1
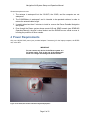
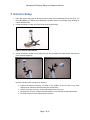
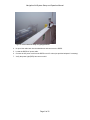
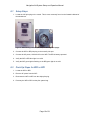
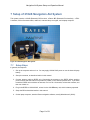
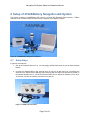
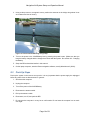
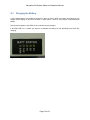
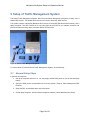
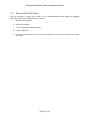
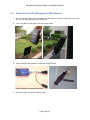
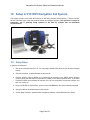
Navigation Aid System Setup and Operation Manual 016-0171-055 Revision G, 5/8/2012 Navigation Aid System Setup and Operation Manual Page 2 of 21 Navigation Aid System Setup and Operation Manual Change History Revision G F Date 5/8/2012 11/23/10 E 06/29/2010 D 03/23/2009 C 01/16/2008 B A 01/26/2007 07/19/2006 Description Updated to Raven Marine Logo and new style Updated to Raven Aerostar logos Added setup instructions for Traffic Management system and for 210LB/Battery system setup. Updated pictures, text, and organization. Updated logo. Replaced contact info with reference to contact info. Updated logo on title page. Added ‘The Dangers of Installing Other Software’ and ‘Scanning the Laptop for Malicious Software’. Added more photographs and expanded descriptions. First release © 2012, Raven Industries, Inc. All rights reserved. Printed in the United States of America. Page 3 of 21 Navigation Aid System Setup and Operation Manual Table of Contents 1 2 3 4 5 6 Introduction ....................................................................................................................... 5 Hardware ........................................................................................................................... 5 General Setup Information ............................................................................................... 5 Power Requirements ........................................................................................................ 6 Antenna Setup................................................................................................................... 7 Setup of WPI or BPI .......................................................................................................... 9 6.1 Setup Steps .................................................................................................................10 6.2 Pack-Up Steps for WPI or BPI......................................................................................10 7 Setup of 210LB Navigation Aid System..........................................................................11 7.1 Setup Steps .................................................................................................................11 7.2 Pack-Up Steps .............................................................................................................12 8 Setup of 210LB/Battery Navigation Aid System ............................................................13 8.1 Setup Steps .................................................................................................................13 8.2 Pack-Up Steps .............................................................................................................14 8.3 Charging the Battery ....................................................................................................15 9 Setup of Traffic Management System ............................................................................16 9.1 General Setup Steps ....................................................................................................16 9.2 General Pack-Up Steps................................................................................................17 9.3 Setup of the Traffic Management GPS Receiver ..........................................................18 10 Setup of 210 WiFi Navigation Aid System ...................................................................19 10.1 Setup Steps ..............................................................................................................19 10.2 Pack-Up Steps ..........................................................................................................20 11 Laptop Software Tips ....................................................................................................21 12 Dangers of Installing Other Software ...........................................................................21 13 Removing Malicious Software ......................................................................................21 14 System Operational Characteristics ............................................................................21 Page 4 of 21 Navigation Aid System Setup and Operation Manual 1 Introduction Raven makes both fixed-installation and portable navigational aid systems. This document describes how to set up your Portable Raven Navigational Aid System, of which can be any of the following: 1) 2) 3) 4) 210LB Navigation Aid System 210LB/Battery Navigation Aid System Traffic Management System 210-WiFi Navigation Aid System (no longer in production) 2 Hardware Depending on system components, the system weighs between 7 and 17 pounds, and is transported in a single soft back pack or hard case containing the DGPS unit, antenna, antenna cable, laptop computer, and power adapters, WPI or BPI. 3 General Setup Information The optimum place to install the computer is on a forward shelf or bridge window so when looking at the RADAR, you can also see the computer display. Locate the antenna to Port or Starboard, depending on the location of the power outlet and, if possible, opposite the side the ship will dock. This helps lessen the chance of people accidentally pulling the antenna cable loose and/or blocking the antenna view while standing on the bridge wing. Take care to tape or place the antenna cable out of harm’s way for the night watch. The doorway should have proper protection for this cable. Stow the DGPS unit away early enough to avoid the last-minute rush prior to leaving the vessel, when the antenna cable might get in the way. Notice the protective sleeve used for antenna cable in the graphic below. Figure 1: Protect Antenna Cable from Damage When boarding and leaving the vessel, DGPS unit back pack should be monitored by the pilot for proper fastening prior to hauling or lowering the back pack. Page 5 of 21 Navigation Aid System Setup and Operation Manual General setup items to note: 1. The antenna is waterproof but the 210-WiFi, the 210LB, and the computer are not waterproof. 2. The 210LB/Battery is waterproof, and is intended to be operated outdoors in order to reduce the antenna cable length. 3. It usually takes less than 5 minutes to install or remove the Raven Portable Navigation Aid System. 4. Even though the Raven system shows remote AIS and SEND vessels (see SEND/AIS Operation Manual), the pilot’s visual lookout and the RADAR are as critical as ever in knowing the positions of other vessels. 4 Power Requirements Only use 100-240 VAC power (use provided adapter if necessary) for the laptop computer, the DGPS unit, or the WPI. IMPORTANT Do not connect any device in the Raven system to a DC power outlet, such as the one in the photograph below. DC voltage will damage the Raven devices. Figure 2: DC Outlet; Do Not Use with Raven System Equipment Page 6 of 21 Navigation Aid System Setup and Operation Manual 5 Antenna Setup 1. Place pilot system bag near the bridge wing door (either port or starboard) and an AC outlet. For the 210LB/Battery, the DGPS unit is designed to operate outside on the bridge wing, allowing for a short antenna cable. 2. Locate the Antenna, Cable, and Reel inside the pilot system bag. Figure 3: Antenna, Cable and Reel 3. Clamp the Antenna outside on the bridge wing as far as possible from obstructions. Point the top of the antenna straight up. Figure 4: Correct (Left) and Incorrect (Right) Antenna Setup Using Clamp Note the following when setting up the antenna: Position the antenna vertically, as shown in the graphic at the left, above. Any other alignment can adversely affect the antenna’s performance. Have a good view of the sky. Avoid metal obstructions of any kind. Be away from sources of electromagnetic radiation, such as radar or radio transmitters. Be firmly clamped to avoid vibrating out of position. Page 7 of 21 Navigation Aid System Setup and Operation Manual Figure 5: Correct Antenna Setup Using Magnet Mount 4. Un-spool the cable back into the wheelhouse and connect to the DGPS. 5. Locate the DGPS AC power cable. 6. Connect the AC power cord from the DGPS to an AC outlet (use provided adapter if necessary). 7. Verify the power light (RED) has come on solid. Page 8 of 21 Navigation Aid System Setup and Operation Manual 6 Setup of WPI or BPI A pilot can use either the Raven WPI or the Raven BPI, depending on the type of power available or convenience. The WPI uses AC power and the BPI uses battery power. The WPI is described in detail in the companion manual, WPI Operation Manual. This section assumes that you have already read the WPI Operation Manual. Figure 6: Raven WPI (Uses AC Power) Figure 7: Raven BPI (Uses Battery Power) Page 9 of 21 Navigation Aid System Setup and Operation Manual 6.1 Setup Steps 1. Locate the AIS pilot plug on the vessel. This is most commonly found on the forward bulkhead of the wheelhouse. Figure 8: AIS Pilot Plug Interface (PPI, Left) and PPI Magnified (Right) 2. Connect the WPI or BPI pilot plug to the vessel’s pilot port. 3. Connect the AC power, 100-240 VAC to the WPI. The BPI is battery-operated. 4. Verify the WPI or BPI blue light is on solid. 5. Verify the WPI green light is flashing or the BPI green light is on solid. 6.2 Pack-Up Steps for WPI or BPI 1. Locate the WPI or BPI. 2. Remove AC power from the WPI. 3. Disconnect the WPI or BPI from the ships pilot plug. 4. Put away the WPI or BPI into the pilot system bag. Page 10 of 21 Navigation Aid System Setup and Operation Manual 7 Setup of 210LB Navigation Aid System This system contains a 210LB (Bluetooth) GPS receiver, a Raven BPI (Bluetooth Pilot Interface), a TBA2 antenna, 50 feet of antenna cable, cable reel, antenna clamp or magnet, and a laptop computer. Figure 9: 210LB Navigation Aid System 7.1 Setup Steps In general, the steps are: 1. Set up the computer and turn it on. You may apply 100-240 VAC power or use the internal laptop battery. 2. Set up the antenna, as described earlier in this manual. 3. Connect antenna cable to DGPS unit. Connecting the antenna to the DGPS before applying power ensures that the DGPS unit provides a position in the shortest possible time. If you have turned the DGPS unit on without an antenna, turn it off for 10 seconds, connect the antenna, and then turn it back on. 4. Plug in the DGPS to 100-240 VAC, unless it is the 210LB/Battery unit, which is battery-operated. 5. Setup the BPI as described earlier in this manual. 6. On the laptop computer, start the Raven navigation software, usually Wheelhouse II (WHII). Page 11 of 21 Navigation Aid System Setup and Operation Manual 7.2 Pack-Up Steps Pack up the system in reverse set up order. It is very important that the power supply be unplugged before any other wires are disconnected. In general: 1. Shut down the computer. 2. Unplug the computer. 3. Unplug the DGPS unit. 4. Disconnect the antenna cable(s). 5. Roll up the cable(s) and dismount the antenna(s). 6. Disconnect, turn off, and pack the BPI. 7. Do not store the computer in a very hot or cold location. Do not leave the computer in a car trunk over night. Page 12 of 21 Navigation Aid System Setup and Operation Manual 8 Setup of 210LB/Battery Navigation Aid System This system contains a 210LB/Battery GPS receiver, a Raven BPI (Bluetooth Pilot Interface), a TBA-2 antenna, 6 feet of antenna cable, antenna clamp or magnet, and a laptop computer. Figure 10: 210LB/Battery Navigation Aid System 8.1 Setup Steps In general, the steps are: 1. Set up the computer and turn it on. You may apply 100-240 VAC power or use the internal laptop battery. 2. Connect the antenna cable to the antenna input. Do not turn on the power yet. Connecting the antenna to the DGPS before applying power ensures that the DGPS unit provides a position in the shortest possible time. If you have turned the DGPS unit on without an antenna, turn it off for 10 seconds, connect the antenna, and then turn it back on. Figure 11: DGPS Unit Connectors Page 13 of 21 Navigation Aid System Setup and Operation Manual 3. Using a clamp mount or a magnetic mount, position the antenna on the bridge wing where it has an unobstructed view of the sky. Figure 12: Correct Antenna Mounting Using Clamp 4. Turn on the power to the 210LB/Battery box by pressing the power button. (Make sure that you keep the battery charged with the charger that comes with the system. See section 8.3 - Charging the Battery. 5. Setup the BPI as described earlier in this manual. 6. On the laptop computer, start the Raven navigation software, usually Wheelhouse II (WHII). 8.2 Pack-Up Steps Pack up the system in the reverse set up order. It is very important that the power supply be unplugged before any other wires are disconnected. In general: 1. Shut down the computer. 2. Unplug the computer. 3. Turn off the power of the 210LB/Battery. 4. Disconnect the antenna cable. 5. Roll up the antenna cable. 6. Disconnect, turn off, and pack the BPI. 7. Do not store the computer in a very hot or cold location. Do not leave the computer in a car trunk over night. Page 14 of 21 Navigation Aid System Setup and Operation Manual 8.3 Charging the Battery A fully charged battery can power the system for about 18 hours. When the battery is plugged into the charger and charging, all the LEDs will flash. It takes about 3 hours to fully charge a fully discharged battery. During normal operation, the LEDs are lit to indicate percent charged. If the ERR LED is lit, it means you need to re-calibrate the battery by fully discharging and then fully charging. Figure 13: Battery Status LEDs Page 15 of 21 Navigation Aid System Setup and Operation Manual 9 Setup of Traffic Management System The Raven Traffic Management System differs from the Raven Navigation Aid System in that it uses a WAAS GPS receiver. This WAAS GPS receiver is a low-end, third-party, GPS receiver. This system contains a third-party Bluetooth GPS receiver, a Raven BPI (Bluetooth Pilot Interface), and a laptop computer. The GPS receiver is for use only when the AIS GPS is not available, and does not provide the same accuracy as the sub-meter Raven GPS receivers. Figure 14: Raven Traffic Management System To use the iBlue 737 with the Raven Traffic Management System, do the following: 9.1 General Setup Steps In general, the steps are: 1. Set up the computer and turn it on. You may apply 100-240 VAC power or use the internal laptop battery. 2. Set up the GPS receiver as described in the next sub-section, 'Setup of Traffic Management GPS Receiver'. 3. Setup the BPI, as described earlier in this document. 4. On the laptop computer, start the Raven navigation software, usually Wheelhouse II (WHII). Page 16 of 21 Navigation Aid System Setup and Operation Manual 9.2 General Pack-Up Steps Pack up the system in reverse set up order. It is very important that the power supply be unplugged before any other wires are disconnected. In general: 1. Shut down the computer. 2. Unplug the computer. 3. Turn off, disconnect, and pack the BPI. 4. Pack the GPS unit. 5. Do not store the computer in a very hot or cold location. Do not leave the computer in a car trunk over night. Page 17 of 21 Navigation Aid System Setup and Operation Manual 9.3 Setup of the Traffic Management GPS Receiver 1. Stick the window cradle to the wheelhouse window that has the best unobstructed view of the sky. You can adjust the angle of the cradle back. 2. Turn on the iBlue 737 and place it into the window cradle. Figure 15: iBlue 737 Unit and Window Cradle 3. Turn on the BPI and connect it to the ship’s AIS PPI port. Figure 16: BPI Unit and AIS PPI Connection 4. Boot up the laptop and start the WHII program. Page 18 of 21 Navigation Aid System Setup and Operation Manual 10 Setup of 210 WiFi Navigation Aid System This system contains a 210-WiFi GPS receiver, a WiFi WPI (Wireless Pilot Interface), a TBA-2 antenna, 50 feet of antenna cable, cable reel, antenna clamp, and a laptop computer. This system is no longer in production, and is gradually being replaced in the field by systems that use Bluetooth communication. Figure 17: 210 WiFi Navigation Aid System 10.1 Setup Steps In general, the steps are: 1. Set up the computer and turn it on. You may apply 100-240 VAC power or use the internal laptop battery. 2. Set up the antenna, as described later in this manual. 3. Connect antenna cable to DGPS unit. Connecting the antenna to the DGPS before applying power ensures that the DGPS unit provides a position in the shortest possible time. If you have turned the DGPS unit on without an antenna, turn it off for 10 seconds, connect the antenna, and then turn it back on. 4. Plug in the DGPS to 100-240 VAC, unless it is the 210LB/Battery unit, which is battery-operated. 5. Set up the WPI as described earlier in this manual. 6. On the laptop computer, start the Raven navigation software, usually Wheelhouse II (WHII). Page 19 of 21 Navigation Aid System Setup and Operation Manual 10.2 Pack-Up Steps Pack up the system in reverse set up order. It is very important that the power supply be unplugged before any other wires are disconnected. In general: 1. Shut down the computer. 2. Unplug the computer. 3. Unplug the DGPS unit. 4. Disconnect the antenna cable(s). 5. Roll up the cable(s) and dismount the antenna(s). 6. Disconnect, unplug, and pack the WPI. 7. Do not store the computer in a very hot or cold location. Do not leave the computer in a car trunk over night. Page 20 of 21 Navigation Aid System Setup and Operation Manual 11 Laptop Software Tips 1. It is possible to render your system inoperable by installing additional software. This is because the new software may modify Windows systems files. Raven recommends that you do not install any additional software on your pilot system laptop. If you do install additional software on your system, be prepared to deal with unexpected problems. 2. Operate only a virus scanner approved by your organization while navigating. 3. Do not visit any web sites other than those authorized for use by your organization. 4. Do not open suspicious email. Especially do not click on attachments to suspicious email. ‘Suspicious email’ means email either from someone you do not know or from someone you do know, but the subject is not what you would expect from that person. 5. Do not change any laptop settings, such as firewall settings for network connections, as these have been applied with security in mind. 12 Dangers of Installing Other Software It is possible to render your system inoperable by installing additional software. Raven recommends that you do not install any additional software on your laptop. If you feel you must install additional software, please check with Raven first. 13 Removing Malicious Software If your system is acting erratically, malicious software may be running on your system. Malicious software can get onto your system from a memory stick, email, accessing a rogue web site, or an unsecure internet connection. The Laptop Admin folder contains a folder called Security Applications. You may be able to use one of these security applications to remove the malicious software. The Laptop Admin folder is on the desktop for most systems. If it is not on the desktop, consult your Raven representative for its location. This folder contains software utilities to remove malicious software, such as spyware and viruses. Contact your Raven representative if you think your laptop has malicious software. He may ask you to execute some of the files in the Security Applications folder. 14 System Operational Characteristics The Raven Portable DGPS System uses DGPS (Differential Global Positioning System) technology to provide ship pilots with a reliable and simple-to-use navigational aid tool. This system uses the U.S. Department of Defense GPS (Global Position System) and the U.S. Coast Guard’s differential radio beacon system to provide sub-meter position accuracy The system is highly configurable. There are scores of software-configurable options, which are preconfigured by Raven to meet the exact needs of a given pilots' association. The system also uses highly accurate surveyed data for the channel center line and channel edges provided by the US Army Corps of Engineers. Aids to navigation are provided by the U.S. Coast Guard. Screens have been designed to provide the exact information the pilots have requested, without any extra clutter. One important feature of the system is that it displays its operational status, including normal operation and alarm conditions. The system may be affected by interference and various conditions that may limit the accuracy of the system. These are reported by the operational status built into the system. Wind, fog, rain, and other types of precipitation usually have no affect on the operation of the system. Page 21 of 21