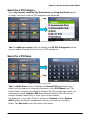
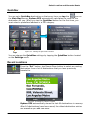
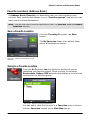
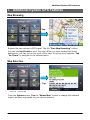
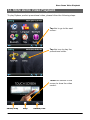
1
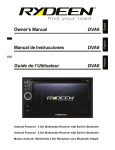
Owner’s Manual MN312S/MN312D Mirror Replacement Navigation System v1.0 Welcome Statement & Warnings [THIS PAGE IS INTENTIONALLY LEFT BLANK] 1 Welcome Statement & Warnings Contents 1. Welcome Statement & Warnings 4 2. What’s in the Box 6 3. Product Overview 7 4. Installation 10 Getting Started (Navigation) 13 5. Configuration Wizard ........................................................................................................................ 13 Main Map .......................................................................................................................................... 14 6. Select Location and Generate Route 16 Go to an Address .............................................................................................................................. 16 Navigate to an Address .................................................................................................................... 20 Points of Interest (POI) ..................................................................................................................... 23 QuickNav .......................................................................................................................................... 26 Recent Locations .............................................................................................................................. 26 Favorite Locations (Address Book) .................................................................................................. 27 7. Additional Rydeen GPS Features 29 Map Browsing ................................................................................................................................... 29 Map Selection ................................................................................................................................... 29 8. Rydeen GPS Configurations 30 Settings Menus ................................................................................................................................. 30 Figure 26 – Enter Settings ................................................................................................................ 30 Automatic Day & Night Adjustments ................................................................................................ 30 Prompts ............................................................................................................................................ 31 Language Settings ............................................................................................................................ 32 Look & Feel Settings ........................................................................................................................ 32 GPS Settings .................................................................................................................................... 33 Units of Measure .............................................................................................................................. 34 Time Settings .................................................................................................................................... 34 Start Demo........................................................................................................................................ 35 About ................................................................................................................................................ 35 Help .................................................................................................................................................. 35 9. Device System Settings 36 Brightness (Backlight) Settings......................................................................................................... 37 Date-Time Settings ........................................................................................................................... 37 Language Settings ............................................................................................................................ 38 System & Touch Screen Calibration ................................................................................................ 38 Software Launch Path Selection ...................................................................................................... 39 10. Music and Volume Settings 40 11. Handsfree Bluetooth Operation 42 12. Temperatures Display Button Function 46 13. Store Demo Video Playback 47 14. Specifications 48 15. Maintaining Your GPS 49 2 Welcome Statement & Warnings 16. Technical Support Contact Info 49 17. One Year Limited Warranty 49 18. To Obtain Warranty Service 50 19. FCC Compliance Statement 51 20. Copyright 51 21. Disclaimer 51 Index 52 3 Welcome Statement & Warnings 1. Welcome Statement & Warnings Congratulations and thank you for purchasing the RYDEEN MN312S/MN312D Mirror Car Navigation Unit. We hope you will enjoy using this exciting product and trust that it will make your driving experience more comfortable and hassle-free. The MN312S/MN312D provides an easy-to-use touch screen user interface, clear, easy-to-understand spoken instructions, and innovative functionality in a stylish housing that replaces the factory mirror. Please read this Owner’s Manual carefully. If you have any further questions about your MN312S/MN312D’s operation, feel free to call RYDEEN, Toll Free at 1-877-777-8811 (within USA only) for product support, or visit our website: www.rydeenmobile.com. PRECAUTIONS & WARNINGS IMPORTANT INFORMATION PLEASE READ CAREFULLY BEFORE USING THIS PRODUCT This product is intended to provide accurate turn-by-turn directions that will help you quickly reach your desired destination. We therefore, recommend that you read and follow all information and instructions in this Owner’s Manual for the best performance and satisfaction of your MN312S/MN312D. Your MN312S/MN312D IS NOT a substitute for personal judgment. The route suggestions should never supersede any local traffic regulation, personal judgment or knowledge of safe driving practices. Before making any maneuvers (for example, a U-turn or a left turn) suggested by the MN312S/MN312D system, please be sure that such a maneuver can be completed legally and safely. Do not follow route suggestions that could put you or your vehicle in a potentially unsafe or illegal circumstance. You should not depend on MN312S/MN312D to locate emergency services (such as police, fire stations, hospitals and clinics). The database may not include all emergency service providers. It is the best to call your local police department and ask for directions in these situations. Set the unit volume at a level that will allow you to hear outside traffic and emergency vehicles. Avoid placing cell phones or wireless transceiver devices near the GPS antenna (located in the rear of the unit) as their signals may weaken or interfere with the GPS satellite signal being received by your MN312S/MN312D, causing it to perform poorly. The MN312S/MN312D should not be programmed while driving. The driver can only program the unit while the vehicle is parked in a safe location. Otherwise, a passenger may program and operate the unit while the vehicle is in motion. SEVERE INJURY RISK -DO NOT mount your MN312S/MN312D on the surface of, or in the deployment field of your vehicle’s driver and passenger 4 Welcome Statement & Warnings airbag units. Position the unit in a location that does not obstruct the driver’s view of the road, instruments or vehicle controls. Position the unit so the screen can be viewed with just a quick glance. Glance at the unit screen or manipulate the in-route touch screen controls ONLY WHEN VEHICLE IS COMPLETELY STOPPED AND IT IS SAFE to do so. Be sure the MN312S/MN312D unit is securely attached to the windshield of your vehicle with the supplied bracket. DO NOT attempt to modify or disassemble the MN312S/MN312D unit. Personal injury or damage could result. If a problem occurs, stop using the system immediately and contact RYDEEN. Changes or modifications to the MN312S/MN312D will void the warranty and its compliance with FCC rules thus making it illegal to use. If you notice any of the following: (unidentified liquid on the unit; smoke rising out of the unit; unusual odor emanating from the unit) – STOP USING THE UNIT IMMEDIATELY. Contact the nearest RYDEEN retailer or call RYDEEN Customer Service for assistance Toll Free @ 1-877-777-8811 (within USA only). DO NOT mount your MN312S/MN312D on any non-automotive form of transportation (motorcycles, bikes, ATV’s, watercraft). WARNINGS Avoid dropping your MN312S/MN312D unit or subjecting it to excessive shock and vibrations as this may cause it to malfunction. DO NOT use any sharp object to operate your unit’s touch-screen display. Excessive force could damage the LCD display. Keep the MN312S/MN312D unit out of reach of small children. Removable parts (microSD memory card) can be a choking hazard. The MN312S/MN312D unit IS NOT WATERPROOF. Avoid exposing it to rain or other forms of excessive moisture. Water damage is not covered under the warranty. WARNINGS • • THE FOLLOWING INSTRUCTIONS ARE INTENDED FOR AUTHORIZED RYDEEN MOBILE INSTALLERS ONLY PROFESSIONAL INSTALLATION BY AUTHORIZED RYDEEN RETAILER REQUIRED TO BE COVERED UNDER WARRANTY 5 What’s in the Box 2. What’s in the Box Your MN312S/MN312D system comes complete with everything you need to get set up and get going. Please take a moment to review the contents of your system. MN312S/MN312D Windshield Mounting Stem is Sold Separately.. (Choose from the following types. Check for updated mount type availability at www.rydeenmobile.com/GPS%20Car%20Navigation/VehicleSpecificMounts.html ) Most Toyota, Nissan, Mazda & Ford Kia & Hyundai Most VW & Audi Most Honda Universal Package 6 Product Overview 3. Product Overview MN312S / MN312D FRONT 8 9 11 1 2 3 4 BACK 5 6 7 10 12 13 14 15 11 7 Product Overview FRONT Description 1 Mirror Reflective Area for Rear Viewing 2 Photo Sensor / Bluetooth Microphone Opening for Photo Sensor for Auto-dimming Function (MN312D only) and Microphone for Bluetooth Function 3 Mute/Volume Button SHORT PRESS – Mutes Sound LONG PRESS – Opens Volume / Music Control Main Screen Bluetooth Button SHORT PRESS – Answer / Hung Up Bluetooth Connected Phone LONG PRESS – Opens Bluetooth Main Menu 4 5 POWER MN312S – Power ON/OFF with LONG PRESS MN312D – Power ON/OFF with LONG PRESS. Turns ON/OFF Auto-dimming Function (RED is OFF) with SHORT PRESS Temperature Button SHORT PRESS – Displays Temperature at Current Screen LONG PRESS – Displays Temperature Main Screen with Calibration (+/-) buttons 7 Guidepoint Button SHORT PRESS – Connects with Guidepoint Call center via Bluetooth connected call phone (dialing preprogrammed toll-free phone number) LONG PRESS – Triggers Guidepoint GPS Tracking System module (sold separately) for Transmitting GPS Location Alert to the Guidepont Call Center in Case of Emergency 8 TOUCHSCREEN 3.5 inch touch screen of the GPS and other mirror functions 9 microSD CARD PORT Supports up to 8GB microSD card for Map Update and Music Play 10 RESET Button (Located at the Bottom of Unit) Use a PEN to press the button, to RE-START the unit (System Re-Boot) 11 Speaker Unit (Back) 2.5W Built-In Speaker 6 8 Product Overview NO. BACK / CABLE Description 11 SPEAKER 2.5W Built-in Speaker 12 BRACKET CHASSIS Attaches to Vehicle Specific Bracket Here 13 Connector A Main Connector 14 Connector B Second Connector for Audio Connection 15 4 Pin Connector Connector for Guidepoint GPS Tracking Box 16 BATTERY (YELLOW) * 12V+ Constant power supply 17 GND (BLACK) * - Chassis Ground 18 ACC (RED) * 12v+ ACC Controlled Power Supply 19 Backup Camera In 20 21 Audio Out Right Ch (RED) Video In for Backup Camera (YELLOW RCA) Connected to Audio Amplifier (Right) Audio Out Left Ch (WHITE) Connected to Audio Amplifier (Left) *Located Inside the Main Power Cable 9 Installation Connector PIN Descriptions: Connector A Pin 1 2* 3 4 Color Red Black Yellow Yellow 5* 6** 7** Blue White Green Description Ignition 12v + (ACC) Ground 12 DC Constant (car battery) Camera In + Guidepoint On-Call Negative Trigger output (-) Temp sensor Send Temp sensor Receive Terminal Bare Bare Bare RCA 4* pin connector Bare Bare Pin 8 9 Color Red White Description Audio Line Out + Right Audio Line Out + Left Terminal RCA Male RCA Male 10 11 12 13 14 Black N/A N/A N/A N/A Audio Line Out Right & Left N/A N/A N/A N/A RCA Male (Ground) N/A N/A N/A N/A Connector B 4. Installation NOTES • To find your nearest professional Rydeen Authorized installer, please call Rydeen Mobile Electronics at 1-877-777-8811, so that we can assist you. • Dropping your MN312S/MN312D unit or subjecting it to excessive shock and vibrations as this may cause it to malfunction and is not covered by warranty. The MN312S/MN312D units ARE NOT WATERPROOF. Avoid exposing it to rain or other forms of excessive moisture. Water damage is not covered under the warranty. • Most vehicles have the mirror mounted directly onto the glass; therefore improper tools or techniques used in the installation could result in a damaged or broken windshield. Rydeen is not responsible for damages to windshield caused by installation processes. 10 Installation 1) Remove the existing mirror and unplug a connector if exist. (Note: All vehicles use different mounting solutions. If necessary, consult your local automotive dealer or installation professional for specific instructions.) 2) Attach the vehicle-specific mounting stem (sold separately) to the back of the mirror using the supplied washers and screws, starting with the holes nearest the top of mirror housing. 3) Mount the MN312S/MN312D using supplied screw. Slide or twist it onto the factory mounting base and carefully tighten the screw until secure. 4) Plug in the cigar lighter power connector to the car power outlet or if necessary the unit can be hardwired for better appearance. 11 Installation Note Please refer to Guidepoint installation manual for the Guidepoint GPS Vehicle Tracking Box installation. Guidepoint GPS Tracking Box is sold separately and service activation is necessary. Contact Guidepoint Systems Inc. for more information (Toll-Free 1-877-477-3463). Note Cables connected to PIN 6 & 7 are for temperature sensor connections. Please contact Rydeen Tech Support (Toll-Free 1-877-777-8811) for more details. Temperature Sensor installation locations (Suggested Installation locations for Optional Temperature Sensor for optimum sensitivity) Sensor location for vehicle’s cabin temperature Sensor location for outside temperature 12 Getting Started (Navigation) 5. Getting Started (Navigation) Configuration Wizard This wizard, which automatically starts at the first time you use RYDEEN GPS, lets you easily configure the system settings by providing a step-by-step setup process. You can also configure these system settings by going to the system options from the Settings menu. Language Settings - Set text and voice language preferences. EULA – Confirm the terms and conditions of using the software. Select “I Agree” and proceed. Time Zone – Select the time zone according to where you live. Select Daylight Saving if applicable. Units of Measure - Set the units of measures of your preference. Warning - When you start RYDEEN GPS, the Warning screen appears. Please take a moment to review the information provided before tapping the Agree button. Select the "Do not display this warning again" checkbox to skip this message in the future. Note: Destinator is a software provider for Rydeen Navigation. Figure 1 –Configuration Wizard 13 Getting Started (Navigation) Main Map You can use the icons displayed on this screen to plan and view your route. 1 6 2 7 8 3 9 4 5 10 Figure 2 - Map Screen Main Map Icons 1, 6 Zoom in or out of the map to view a larger less detailed area or a smaller area in greater detail 2 Tap the compass to change the map view display as follows: 2D map view with the forward direction at the top. 3D map view with the forward direction at the top. 2D N map view with North at the top. 3 Use the Volume bar to adjust or mute the volume. 4 When you have calculated a route, the Directions bar displays information about your next turn. Tap this bar to hear the voice announcement of next maneuver. 5 The GPS bar is a toggle button. Tap this area to display the remaining travel distance and travel time, estimated time of arrival, street name and address number. 14 Getting Started (Navigation) 7 Speed limits are visible only when the Speed Warning prompt is selected. When you are exceeding the speed limit, RYDEEN GPS displays the following icons: 8 These icons display your power source. 9 Tap this icon to set your QuickNav location. When set, you can tap this button to automatically calculate a route to this location. 10 Tap this icon to display the Main Menu. Location Point on Main Map You can drag the map to a specific point and tap the desired location directly on the Main Map screen in both 2D and 3D map view. This feature is useful when you want to navigate to a specific point on the map, rather than by the street address. When you tap on the map, the pop-up menu appears with the following options: Tap Go There - Navigate to the selected point on the map. Save (Add to my Favorites) - Save a point on the map as a favorite destination for future use. Start here - Designate the selected point as the starting point instead of your current location. Figure 3 - Point on the Map Options 15 Select Location and Generate Route 6. Select Location and Generate Route Go to an Address From the Main Menu, tap the Go! button. Then Where Do You Want To Go? Screen appears, allowing you to choose from New Address, POI (Point of Interest), Recent Place or Favorites. Figure 4 - Search by POI Name Tap the Address button to enter address information. Then follow the steps below. Select Select City City First. First. Enter a Tap to City then tap OK. Select or enter a State you enter new want to go. Then tap tap OK. Enter a Street then address OK. a City then tap OK. Enter Enter aa Street Address & tap OK. Enter then Number then tap OK. Enter a Address Number then If going a different tap to OK. State, select Change State to enter a State you want to go. Then tap OK. Figure 5 – Enter Address Screen Select from the following address entry options: City First – City > Street > Address Number Intersections – City> 1st Street > 2nd Street 16 Select Location and Generate Route Tap one of the Enter Address Screen Buttons to display the first address screen. Figure 6 - Selecting a State When entering an address, you can use the keyboard to enter the characters. The characters appear in the Address field. Rydeen GPS automatically searches the Address list for the first occurrence of the characters entered. After you have selected a town or city, Rydeen GPS displays the next address field, such as street and address number. Instead of specifying a street, you have the option of selecting the Town/City Center. If you don't know the address number, you can select the Street Midpoint. Tap the OK button to move through the sequence of address screens. Go to Another Country From the Enter address screen, you can tap Change State to select a State of another country that you can travel to by vehicle. This feature is available only when you have the following maps installed: Map of the country where you are currently located. Map of the country where you want to travel. The map of the major roads for that continent that connect one map to another (for example, the major roads in USA & Canada) For example, if you are in New York and you want to travel to Toronto, select the State of Canada (for this case Ontario) and designate Toronto City Center as your destination. Rydeen GPS automatically displays the map of USA when traveling on local roads in USA, a map of major roads in USA, when traveling on a USA major road. The map of Canada automatically displays when traveling on roads in Canada. 17 Select Location and Generate Route Keyboard Command Keys The following buttons are available to enhance your search process. 1 2 4 3 Select from list Figure 7 - Search and Keyboard Buttons 1 Lets you move back a character that you have entered. 2 Lets you scroll up or down the list of town/city or street names. 3 Lets you extend the address list by hiding the keyboard. 4 Lets you change the keyboard for address number input. Note: Rydeen GPS automatically switches to the address number input keyboard after you enter street numbers and tap OK. To switch back to the alphabetical address input screen, simply tap the ABC key. 18 Select Location and Generate Route Selecting a Destination and Options The following screen appears when a destination address input is complete and ready to navigate. Go - When you tap the Go button, Rydeen GPS calculates the route to your selected destination. When you tap this button, Rydeen GPS returns to the previous screen. Figure 8 –Route Selection Confirmation Screen Options Tap the one of Option button to: To save an Entry - Tap Save to add an address to your list of favorite locations. For more information about favorites, see Favorite Locations on page 28. Set an Address as the Starting Point - Tap the Starting Point button to designate the selected address as the route origin. Preview Route (Demo Route) – Run simulated route to selected address. Tap to see the entire route on the map. 19 Select Location and Generate Route Navigate to an Address Tapping the street name changes the screen to Manage Route From the Manage Your Route menu, tap this button to display a complete turn-by-turn list of directions from your current location to the selected destination. Rydeen GPS continuously updates the Turn-by-Turn screen to display the most current instructions as you navigate the route. Tap Figure 9 - Turn-by-Turn Display Note: The first turn is at the top of the list and the final turn is at the bottom, identified by a checkered flag. The following options are available: Route Tap to display your entire route on the Main Map screen, plus the travel distance and the Estimated Travel Time Remaining (ETR). Turn Tap to display the next turn on the Main Map screen, including the street name, the distance to the turn and the turn direction. Avoid Tap to avoid the selected turn in the Turn-by-Turn list. Rydeen GPS recalculates the route automatically. Note that when you exclude a turn, the recalculated route may take longer. 20 Select Location and Generate Route Road Type When Road Type is select, Rydeen GPS provides the following routing options: Quickest - This option selects the route that takes the least amount of time. Quickest is the default setting. Shortest - This option selects the route that is shorter in distance. Note: The shorter route may not always be the quickest. Figure 10 - Route Type Selections Pedestrian - This option lets you travel as a pedestrian, generating a route up to 6 miles, which is not limited by vehicle constraints, such as one way streets. When creating a pedestrian route, Rydeen GPS avoids freeways/highways or other roads where pedestrians would not travel. Voice prompts are deactivated in this mode. Select OK to confirm your selection. Avoid Roads: Figure 11 - Predefined Road Groups Highways - Roads that allow for high volume, maximum speed traffic movement between and through major metropolitan areas. The default value is to allow. Toll Roads- Let you select to avoid the use of toll roads. The default value includes the use of toll roads. Ferries - The default value is to avoid. Gated Communities - The default value is to allow. Select OK to confirm your selection. 21 Select Location and Generate Route Route Overview When Route Overview is select, Rydeen GPS display your entire route, plus the travel distance and the Estimated Travel Time Remaining (ETR). Figure 12 – Route Overview Create a Detour When Create Detour is selected, Rydeen GPS let you create a detour to avoid a road event, such as an accident. Detour option let you generate a detour routing for the distance specified. For example, if you are traveling on a major highway and you are alerted by the news that there is traffic for the next 3 miles, you can have Rydeen GPS calculate a detour that takes you off the highway and then returns you to the highway after a distance of 3 miles. Figure 13 – Create Detour 22 Select Location and Generate Route Points of Interest (POI) The Points of Interest (POI) list is a collection of millions of interesting or useful places organized by easy-to-find categories. For example, you can use Rydeen GPS to guide you to a shopping center, hotel, restaurant or gas station. Many categories have subcategories to provide for an even greater list of choices. For example, gas station, may have many subcategories each representing a particular brand name. The same is also true for hotels. Restaurants have subcategories that represent different types of food, such as Indian, Italian and French. Search for a Location Near You You can determine the area where you want to search for a specific place, such as a gas station, hotel or restaurant. My Current Location is automatically selected. Tap My Current Location to search near your current location. Tap My Destination to search near your specified destination. If a destination has not been selected and a route generated (by tapping the Go button), this button is disabled. Figure 14 - POI Search Tap Another Location to search for a POI in another location. This button opens the Address Search Mode screen, which is described in Go to an Address on page 17. Tap Along the Route to search POI near your specified route. If a destination has not been selected and a route generated (by tapping the Go button), this button is disabled. 23 Select Location and Generate Route Search for a POI Category When My Current Location, My Destination or Along the Route button is select, the most common POI categories are displayed. Tap Tap Figure 15 - Most Common POI Categories Tap the right top corner button to display the All POI Categories, where you can search through the entire list of POI categories. Search for a POI Name Tap Figure 16 - Search by POI Name Tap the Spell Item button to display the Search POI keyboard screen, where you can search by entering characters in the POI Name field. The Smart Search System automatically displays the POI names that match the characters entered. Rydeen GPS automatically displays the POI entries and the distance each entry is from your current location. For example, if you enter “Denny” and tap the Search button. Rydeen GPS displays all Denny’s Restaurants entries, as shown in the figure below. Tap See List to see the screen view below. 24 Select Location and Generate Route POI Preview Screen After POI search completes, a list of POI result shows as following. Tap Show on Map then you will see POI preview screen that allows you to see your destination options at a glance. POI info includes address and phone number Tap Figure 17 - Showing a POI Preview Tap to view detail info of other locations Show or Hide POI Symbol on Map You can select or clear the ticks next to a POI entry to show or hide the POI symbols on the Main Map screen. Tap Figure 18 - Showing a POI Symbol on the Map 25 Select Location and Generate Route QuickNav You can set a QuickNav destination so that every time you tap the icon on the Main Map screen, Rydeen GPS automatically calculates the route to this destination for you. When you tap the QuickNav button for the first time, you must select a predefined address or a POI category. Tap Figure 19 - Setting the Quick Nav Location You can change the QuickNav settings by tapping the QuickNav button located on the Settings menu. Recent Locations From the “Go!” button, tap Recent Place button to select an existing destination from a list of destinations that you have previously traveled to. Figure 20 -Traveling to a Recent Location Rydeen GPS automatically stores the last 64 destinations in memory. After 64 destinations have been saved, the oldest destination entries are erased as you add new ones. 26 Select Location and Generate Route Favorite Locations (Address Book) An Address Book (Favorite) is a destination that you have stored for easy retrieval. Save favorite destinations to your “favorites groups” and later you can easily travel to these destinations. Note: You can also add a favorite destination from the Address, POI and Recent Locations screens. Save a Favorite Location From the Traveling To screen, tap Save button. The My Favorites folder is the default folder where all favorites are stored. Figure 21 - Adding a Destination to Your Favorites Going to a Favorite Location From the Go To menu, tap this button to display the screen containing your favorite groups. Select a group, for example Restaurants. Rydeen GPS automatically displays a list of stored locations for the selected group. Figure 22 - Going to a Favorite Destination You can add or clear the tick next to a Favorites entry to show or hide the Favorites symbol on the Main Map screen. 27 Select Location and Generate Route Creating a Favorite Group From the “Favorites” screen, Tap “Edit” button to Add Group”, Edit or Delete location. Enter a name and select a group. Figure 23 - Adding a Favorites Group To add favorite destinations to your favorite groups, see "Save a Favorite Location" on page 28. 28 Additional Rydeen GPS Features 7. Additional Rydeen GPS Features Map Browsing Tap Figure 24 - Explore the Map Browse the map without a GPS signal. Tap the “Free Map Browsing” button. You can use tap & hold to scroll the map. When you have located the street destination, you can tap to that point of the map. A pop-up menu appears, Tap “Go There” to navigate to the selected point. You can reestablish a GPS connection by tapping the bottom toggle bar. Map Selection Tap Figure 25 - Select a Map From the Options menu, Tap the “Select Map” button to change the selected map to another map saved on your device memory. 29 Rydeen GPS Configurations 8. Rydeen GPS Configurations Settings Menu Tap the “Settings” button to configure Rydeen GPS system settings to utilize travel playback and demonstration features. Tap Figure 26 – Enter Settings Automatic Day & Night Adjustments Auto Day-Night Adjustment - When this option is selected, Rydeen GPS automatically switches between day and night view according to the GPS time and date information provided. If this option is selected, but you manually switch the day/night view, it will remain in the mode you selected until the next time Rydeen GPS automatically switches the day/night view. Tap Figure 27 – Night View Button 30 Rydeen GPS Configurations Prompts Figure 28 – Prompt Button Tap Tap the “Prompts” button to select the types of notifications that you would like to use or her while driving. Turn ON or OFF by tapping checkbox. Road Prompts Speed Warning Warns you when your car exceeds the speed limit. This prompt is selected as default. Route Recalculation Notifies you when Rydeen GPS recalculates your route. For example, when you miss a turn. This prompt is not active by default. Unreliable GPS Signal Warns that the GPS signal is too low and unreliable for navigation. This prompt is automatically active by default. GPS not found Alerts you if the GPS signal is lost or if the power source has been removed from the GPS receiver. Say Road Names Rydeen GPS tells you the street number and name. 31 Rydeen GPS Configurations Language Settings From the Settings menu, Tap the “Language” button to display the Language Settings screen. You can select from: Figure 29 - Language Settings Display Language - Address and map information, and screen and menu labels Voice Language – Select from English, Spanish or French. Tap Look & Feel Settings From the Settings menu, Tap the “Look & Feel” button to select from a list of preinstalled skins. A skin determines the visual effects such as colors and icons displayed. Prefer QWERTY Keyboard When this option is selected, the Navigation keyboard is displayed as a computer keyboard (QWERTY style) on the screen. Figure 30 – Look & Feel setting Tap 32 Rydeen GPS Configurations GPS Settings From the Settings menu, Tap the “GPS Signal” button to display GPS information and to configure the GPS connection settings. Figure 31 – GPS Setting Tap Rydeen GPS receives data from a built-in GPS receiver or an external GPS receiver, connected to your Navigation device, to pinpoint your location. Your vehicle's location and position are constantly updated unless you are working in the Free Browse Map mode or you tap the GPS Off button. The GPS receiver may take a few minutes to find its initial location. For best results, ensure that the GPS receiver has a clear view of the sky. The GPS Signal screen displays the following information: Longitude Latitude Speed Altitude If you are working in the Free Browse Map mode, Rydeen GPS automatically disconnects from the GPS receiver. Tap the Set button to configure the Connection fields. GPS Troubleshooting Signal too low When you first start Rydeen GPS you may hear the "Signal too low" message. This message means that your navigation device has not yet located a reliable GPS signal. 33 Rydeen GPS Configurations Units of Measure From the Settings menu, Tap “Units of Measure” button to specify the measurement system you would like to use. You can select: Tap Miles, Yards Miles, 10th of a Mile Kilometres, Metres Figure 32 – Units of Measure Time Settings From the Settings menu, Tap “Time Settings” button to display time settings. Figure 33 – Time Settings Tap Figure 34 - Time Zone Settings You can select the “Adjust to Daylight Savings” checkbox to automatically adjust for daylight savings. 34 Rydeen GPS Configurations Start Demo From the Settings menu, Tap “Start Demo” button to display a simulated route. Many of the Rydeen GPS navigation features are disabled when the Demo is running. You can end the Demo by tapping the “Stop Demo” button. About From the Settings menu, Tap “About” button to display version and Copyright information. Help From the Settings menu, Tap “HELP” button to display technical support information. 35 Device System Settings 9. Device System Settings Tap Quit button to go to the Main Menu screen Starts Rydeen Navigation Opens the mirror Settings screen. Figure 27 - The Device Main Menu Tap the button to return to the previous screen Figure 28 - System Settings 36 Device System Settings Brightness (Backlight) Settings Figure 29 - Backlight Settings This screen lets you determine the brightness of the screen. Date-Time Settings Figure 30 - Date-Time Settings This screen lets you select your time zone and set the date and time. 37 Device System Settings Language Settings Figure 31 - Language Settings This screen lets you select the language to be used for system screen displays. System & Touch Screen Calibration From the main menu screen, select the System icon to see the system info as below. Figure 32 - System Information This screen displays information about the device. Calibration optimizes the touch screen LCD for accurate finger or stylus pointing. 38 Device System Settings Software Launch Path Selection Tap here to go to next screen Tap here to enter the Software Launch Path setting screen Tap here to go to software file menu screen then select the executable file of your choice then select X Select this box to start the navigation software automatically after the unit is powered on (default). Tap here to confirm the executable file and return to the main menu screen. 39 Music and Volume Settings 10. Music and Volume Settings Press the MUTE Button (located on the bottom of the mirror) for less than 1 sec. to mute the mirror. To resume with sound, press MUTE button again. Press the MUTEM Button (located on the bottom of the mirror) for more than 3 seconds, the Sound Control Main Screen shows as following. Follow the procedures below to operate your Music Player. Create a folder your Navigation System. on your microSD card. Select Select Insert the microSD card to Select Tap and Song will play Figure 33 – Select Music Player 40 Music and Volume Settings Stop music Play next Song Random Play Play & Pause Repeat music Previous Song Figure 34 – Music Player screen Return to previous screen After selecting a music to play, press the MUTE Button for less than 1 sec, will bring the screen to Navigation View. Press the MUTE Button more than 3 sec. again to go back to Sound Control Main Screen. To select more sound control options, please follow below steps. Select Select “Tap Sound” to able/disable the “click” sound. Select “Outside Speaker” to allow Audio Line Out to turn on (this action turns off the audio from internal speaker of the mirror. Adjust +/- for internal speaker volume adjustment. When “Outside Speaker“is selected, this volume controls the LINEOUT LEVEL. 41 Handsfree Bluetooth Operation Select a proper LINEOUT LEVEL for optimum sound quality from your car speakers using +/- adjustment icons. 11. Handsfree Bluetooth Operation Your MN312S/MN312D is equipped with a Bluetooth-enabled handsfree function to enable you to make and receive cellular phone calls in safety while driving. The process of creating a secure connection between your cellular phone and the mirror unit is called pairing. (Note: your cellular phone MUST have Bluetooth capability and have its Bluetooth function turned on in order to make a connection with the mirror unit. If you are not sure, please consult the manual that came with your phone.) Pairing Your Phone with the Mirror Unit 1. Please make sure that your phone is in “Discoverable Mode”. Then you are ready to begin the pairing process. 2. Press the Bluetooth Button (located on the bottom of a mirror) to enter the Main Bluetooth Control screen on the mirror unit then tap the ‘Settings’ icon. 3. Press the ‘Search Device’ icon on the Bluetooth settings menu. Select Select Tap this LINK icon to connect 42 Handsfree Bluetooth Operation 4. After the ‘Search Device” process completes, you will then see a list of devices those are ready to be connected. Choose the one you would like to connect and tap the ‘LINK’ icon. 5. Occasionally the screen may show ‘Connection Failed’, because the Bluetooth module try to connect to the previously connected device (Auto-Reconnect Feature). Tap the ‘LINK’ icon again and the new device will be connected. 6. Tap “Search Device” to show Bluetooth Device you want to connect. After you confirm your device name, tap the “LINK” icon to connect your phone. 7. Select ‘RYDEEN’ on your phone, and it will ask you to enter the pairing code used by the mirror unit. (The default code is 0000) Once the code is entered, your phone should indicate the pairing process is successful. 8. Depending on the model of your phone, it may offer you the option of connecting to the mirror unit whenever the mirror unit is on and in range (approximately 10 feet, up to 30 feet distance) of your phone. If you do not select this feature, you will need to manually connect your phone to the mirror unit, either by using your phone’s menu to select and connect, or by using the ‘Paired Devices’ selection in the mirror unit’s Bluetooth menu. 9. Note: If your phone does not locate the mirror unit, repeat the pairing procedure, ensuring that you are within acceptable range and completing the process within the 60-second period. If the pairing code is incorrect, check to ensure that the code has not been changed on the mirror (see ‘Properties’ at the Settings menu for changing the ‘Pairing PIN Code.’) Making Calls Using Bluetooth You can initiate calls four ways: 1. Use your handset to initiate a call. Your phone will automatically use the microphone and playback capability of the mirror unit. 2. Use the Key Pad on the mirror unit to initiate a call. Long press the Bluetooth hard key button. From the Bluetooth menu, press the ‘Keypad’ icon. You can then either use the Keypad to directly dial a number. Press the ‘Phone’ icon to start your call. 3. Use the Call Log on the mirror unit to initiate a call. From the Bluetooth menu, press the ‘Dial Pad’ icon, then press the ‘Call Log’ icon to view a list of previously called, received and missed numbers. Select the number you want and press the ‘Phone’ icon to initiate a call. 43 Handsfree Bluetooth Operation 4. Use the Redial feature on the mirror unit to initiate a call. From the Bluetooth menu, press the ‘Keypad’ icon. Simply press the ‘Phone’ icon to immediately redial the last number called. Phonebook button for select phones Call Log button to show call history & memory dial Dial and Redial button Receiving and Ending Calls Answer & Hang-up call can be operated by using the hard key button located on the bottom of the mirror. When you receive a call on a phone that is connected to the mirror unit via Bluetooth, you also will see a pop-up graphic on the mirror unit screen, accompanied by the number of the calling party (if Caller ID is enabled). During a call, you have the following options: Adjust the speaker volume from lowest to highest Mute / Un-mute the call (you can still hear the caller, but he / she cannot hear you) View the call duration (automatic) Access the number keypad to make choices on automated calls (DTMF) Switch the call between your cell phone from the mirror unit (Transfer) 44 Handsfree Bluetooth Operation Go back to Navigation screen and still able to use Bluetooth End the call Viewing or Changing the Pairing Code 1. Press ‘Setting’ from the Bluetooth menu. Then press ‘Properties”. In the ‘PIN Code’ field is the current pairing code. 2. To change it, press the ‘PIN Code’ field then a keypad will show. Enter a new code. 3. Press the ENTER key to complete your change. To Connect to Other Phones To see which phones are paired with your mirror unit, you will see the connected phone’s ‘NAME’ appeared on the top of Bluetooth Main Menu. Press ‘DisConn’ to disconnect from the currently connected phone. Then go through the ‘Pairing’ process from the beginning. Note This Bluetooth device can connect ONLY ONE PHONE at a time to ensure the safety of a driver. 45 Temperatures Display Button Function 12. Temperatures Display Button Function Please follow Page 13 for the installation instructions of temperature sensor. Press the Temperature Display Button (located on the bottom of the mirror) for more than 3 sec. to go to ‘Select Temp Unit’ screen as seen below. If temperature sensor probe is not installed, then the display will show N/A as following. You may select from 2 temperature unit readings (Fahrenheit & Celsius). With the short press of the temperature display button (less than1 sec.) will display the current temperature superimposed on the display screen (Navigation View, Music Control screens etc.) Temp Display Reading 46 Store Demo Video Playback 13. Store Demo Video Playback To play Rydeen product promotional video, please follow the following steps. Tap this to go to the next screen. Tap this icon to play the promotional video. Touch the bottom of the screen to show the video control. Pause/Play Stop Return/Exit 47 Specifications 14. Specifications 48 Maintaining Your GPS 15. Maintaining Your GPS Cleaning the Unit: 1. Use a soft, dry cloth to wipe away dirt. 2. If the dirt cannot be wiped away, dampen the cloth with water to clean the unit. NOTE: Do not wash the unit with running water as this unit is not water proof. 3. Use a dry cloth to wipe away residual moisture when done. NOTE: Do not use solvent, car cleaner or organic cleaners to clean the unit. These substances may damage the GPS unit. Cleaning the LCD Display: 1. Turn off the system while cleaning the display to prevent static electricity. 2. Use a soft, dry cloth to wipe away dirt. 3. The display surface is easily scratched. Do not use hard objects to scrape or come in contact with the display surface. 16. Technical Support Contact Info If you have other questions about the RYDEEN GPS, please contact your retailer or Technical Support: Telephone: 1-877-777-8811 (within USA only) Email: [email protected] Web Address: www.rydeenmobile.com 17. One Year Limited Warranty Rydeen North America Inc. (a manufacturer of “Rydeen" products) warrants this product (MN312S/MN312D) only to the original purchaser as described following: Warranty Period Rydeen warrants this product for a period of one (1) year from the original purchase date. Warranty Coverage This warranty covers all defects in material and workmanship except as specified below. 1. Installation by anyone other than an authorized Rydeen Mobile Retailer voids the warranty. 2. Any products distributed outside of the USA by Rydeen North America Inc. (Rydeen) or which is not purchased in the USA or Canada unless the product is purchased through the USA Military Exchange Service. 49 To Obtain Warranty Service 3. Any product(s) which are purchased from an unauthorized retailer (in store or online). 4. Any products in which the serial number label or the model number label are removed, torn, modified or replicated. 5. Any damage defects or malfunctions resulting from any of following: a) When defect occurs during shipment of product (freight carrier's responsibility). b) Installation or removal of product. c) Accidents, act of nature, misuse, abuse, neglect, unauthorized product modification or failure to follow product owner's manual instructions. d) Any repair or attempt to repair without RYDEEN authorization. e) Any other cause which is not related to product defect. f) Any cosmetic damages due to normal wear and tear. g) Any consumable items (such as fuse or batteries). If any problems develop with your Rydeen products during or after the Limited Warranty Period, or if you have any questions regarding the operation or installation of the product, you should contact your Rydeen retailer. If the problem or your question is not handled to your satisfaction, please contact Rydeen Customer Service Department at 1-877-777-8811 (within the USA only) Monday Friday between 9:00 AM to 4:00 PM Pacific Standard Time or visit www.rydeenmobile.com. 18. To Obtain Warranty Service If warranty service is required for your Rydeen product: 1. Please call Rydeen Customer Service Department at 1-877-777-8811 (within the USA only), Monday–Friday between 9:00 AM to 4:00 PM Pacific Standard time and obtain a Return Authorization Number (“RA”) Number. 2. Please pay for any shipping charge to Rydeen Customer Service Department. Rydeen will pay the return shipping charge, if the repair or service was performed during the warranty period. Rydeen will ship freight collect (recipient is responsible for shipping charge) if Rydeen determine the service was performed outside of warranty period or exclusions described above. Rydeen will not accept warranty service requests from outside of the U.S.A. even if product was purchased in the USA. 3. Please include a copy of your original purchase receipt including Rydeen product model number, purchase date, retailer name/address and a RA Number whenever your product is sent for warranty service. 4. Rydeen will pay for all labor and material expenses for covered product during warranty period. 5. Shipping address for Rydeen Customer Service Department is following: Rydeen North America Inc. (a manufacturer of Rydeen products), 2701 Plaza Del Amo, Unit 705, Torrance, California 90503, USA 50 FCC Compliance Statement 19. FCC Compliance Statement This device complies with Part 15 of the FCC interference limits for Class B digital devices for home or office use. These limits are designed to provide more reasonable protection against harmful interference in a residential installation and are more stringent than “outdoor” requirements. Operation of this device is subject to the following conditions: 1. This device may not cause harmful interference, and 2. This device must accept any interference received, including interference that may cause undesired operation. 20. Copyright 1. Intellectual Property Rights of Software are proprietary to Destinator Technologies or its suppliers and are subject to copyright and other intellectual property laws. Client's only rights with respect to any Destinator Technologies software included with the products shall be provided, under the terms of Destinator Technologies' software license. The title to all Destinator Technologies Software remains with Destinator Technologies. Client agrees that Destinator Technologies retains ownership of all rights, title and interest in all intellectual property, works of authorship, trade secrets and the like in all aspects of the Product(s). Client and its affiliates and subcontractors agree not to reverse engineer any aspect of the Software and/or Products supplied under this agreement and further agree to pay assessed damages should such action take place. 2. Copyright and Copies. The Software (including any copy thereof) is owned by Destinator Technologies or its suppliers and is protected by United States, Canadian, European, Brazilian and Australian copyright and patent laws and international treaty provisions. The Software copy is licensed to you the client, not sold to you, and you (the client) are not an owner of any copy thereof. You may make one copy of the software for backup or archival purposes. You may not otherwise copy the software, except as authorized by applicable law, nor the written materials accompanying the Software. Destinator Technologies hereby reserves all rights not explicitly granted in this license agreement. Software Copyright © 2009, Intrinsyc Destinator Technologies 21. Disclaimer The information in this user manual is for general guidance. Images in the manual may resemble but not exactly match the images that are displayed in the navigation software. Some features described in the manual may not be available or the features described may be limited, depending on the navigation software. 51 Mounting Stem • 6 Music & Volume Setting • 40, 41 Index A Add to My Favourites • 28 Additonal Rydeen GPS Features • 29 Automatic Day & Night Adjustments • 30 B Backlight Settings • 37 Buttons • 8 C Connectors • 9, 10 Contents • 2,3 Configuration Wizard • 13 Copyright • 51 Create a Detour • 22 D Date-Time Settings • 37 Demo • 35 Device System Sttings •36-39 Disclaimer • 52 F Favorite Locations • 27, 28 FCC Compliance Statement • 52 G Go to an Address • 16-20 Go to Another Country • 19 Going to a Favorite Destination • 27 GPS Settings • 33 GPS Troubleshooting • 33 H Handsfree Bluetooth Operation • 42-45 I Installation • 10, 11, 12 Introduction • 4, 5 L Language Settings • 32, 38 Location Point on Main Map • 15 Look & Feel Settings • 32 M Main Map • 14, 15 Main Map Icons • 14 Maintaining GPS • 49 Map Browsing • 29 Map Selection • 29 N Navigate to an Address • 20 Navigation • 13-29 P POI category • 24 POI Name • 24 Points of Interest (POI) • 23-25 Product Overview • 7, 8, 9 Prompts • 31 Q QuickNav • 26 R Recent Locations • 26 Road Prompts • 31 Road Type • 21 Route Overview • 22 Rydeen GPS Configurations • 30 Rydeen Screen Buttons • 19 S Save a Favourite Location • 27 Search for a Location Near You • 23 Search for a POI Category • 24 Search for a POI Name • 24 Select Location and Generate Route • 16 Setting Menus • 30 Show or Hide Symbol on Map • 25 System Information • 36, 38 Software Launch Path Selection • 39 Specifications • 47, 48 Speed limits • 15 Start Demo • 35 System Information • 36, 38 System & Touch Screen Calibration • 38 T Technical Support Contact Info • 49 Temperature Display Button Function • 46 Time Settings • 34 U Units of Measure • 34 W Welcome Statement Warnings • 4, 5 What is in the box • 6 Warranty • 49, 50 Rydeen North America Inc. dba Rydeen Mobile Electronics 2701 Plaza Del Amo, Suite 705, Torrance, California 90503 USA Phone: 1-877-777-8811 Fax: 1-310-943-3778 Copyright © 2012 Rydeen North America Inc. All Rights Reserved. RYDEEN ® is a registered trademark of Rydeen North America Inc. These materials are protected by copyright law and international treaties. Any unauthorized use, reproduction or distribution of these materials, or any portion herein, will result in severe civil and criminal penalties and fines. Violators will be prosecuted to the fullest extent of the law.