1
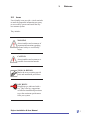
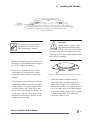
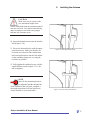
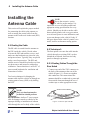
Audiovox® Skybox Installation & User Manual Disclaimers This manual is in draft form and is intended for the purpose of review or to validate the method of installation.The beta tester receiving the Audiovox® Skybox beta antenna agrees to utilize the Draft Manual for the purpose of validating its content only, and agrees to validate and provide feedback to Audiovox®, Inc., in appropriate commercial settings. This manual is subject to revision without notice. nly nit O U t s e T a t e B AUDIOVOX® SHALL NOT BE RESPONSIBLE FOR, AND SHALL BE INDEMNIFIED AND HELD HARMLESS FOR ANY UNAUTHORIZED USE OF THE DRAFT MANUAL. © 2005, Audiovox®, Inc. All rights reserved. DISH Network® is a registered trademark of Echostar Satellite Corporation. Skybox Installation & User Manual Ver 072705 128-7484 Contents Skybox Installation & User Manual.................................................................................................1 Disclaimers....................................................................................................................................... 1 1 Welcome........................................................................................................................................4 1.1 Installation & User Guide.......................................................................................................... 4 1.2 Icons........................................................................................................................................... 5 2 Safety Instructions........................................................................................................................6 3 Introduction to Mobile Satellite TV.............................................................................................8 3.1 Signal Reception........................................................................................................................ 8 3.2 Azimuth and Elevation.............................................................................................................. 8 3.3 Satellite Coverage..................................................................................................................... 8 3.4 Line of Sight (LOS) Interruption ............................................................................................... 9 4 Satellite TV System Overview................................................................................................... 10 Packing Kit Contents - Bill of Materials............................................................................................. 10 4.1 System Components...............................................................................................................12 4.1.1 Antenna.................................................................................................................................12 4.1.2 Indoor Unit (IDU)...................................................................................................................12 4.1.3 Receiver................................................................................................................................12 4.1.4 Remote Control.....................................................................................................................12 5 Installing the Antenna.............................................................................................................. 13 5.1 Shipping Restraint..................................................................................................................13 5.2 Clamp Design........................................................................................................................... 14 5.3 Mounting Procedure................................................................................................................ 14 6 Installing the Antenna Cable.................................................................................................... 18 6.1 Routing the Cable....................................................................................................................18 6.2 Technique 1.............................................................................................................................18 6.2.1 General Procedures for Routing Cables Through the Hatch.............................................18 6.2.2 Routing the Cables through Two Panels.............................................................................19 6.3 Technique 2.............................................................................................................................20 7 Receiver Setup . ....................................................................................................................... 21 7.1 Wiring Configurations............................................................................................................... 21 7.1.1 DISH Network® Wiring Configuration.................................................................................. 21 Skybox Installation & User Manual Contents 7.2 Setting Up the Remote Control...............................................................................................23 7.3 Audio/Video Cable Connections.............................................................................................23 7.3.1 RCA A/V Connection.............................................................................................................23 7.3.2 S-Video Connection..............................................................................................................23 7.3.3 RF Coaxial Connection......................................................................................................... 24 7.4 Power Cable Connection........................................................................................................ 24 7.4.1 Procedure for Connecting Skybox to Switched/Accessory Power..................................... 24 8 Functions of the Skybox............................................................................................................ 26 8.1 Global Positioning System.....................................................................................................26 8.2 Indoor Unit Select and Standby Buttons...............................................................................26 8.3 IDU Light Indicators................................................................................................................26 8.4 IDU Dip Switches....................................................................................................................26 9 DISH Network® Receiver Setup and Activation....................................................................... 27 9.1 Powering Up............................................................................................................................. 27 Appendix A Installing TNC Connector to RG58 Cable............................................................31 Appendix B Troubleshooting.....................................................................................................32 Limited Consumer Warranty.........................................................................................................35 Most television, audio and video programming is protected by U.S. and foreign copyright and other laws. Recording, rebroadcasting and paid or other public display may violate such laws and result in criminal and/or civil penalty. Consumer is responsible for subscribing to a satellite broadcast service and for all subscription costs. Unauthorized decoding of broadcast signals may violate state and federal law and result in both civil and/or criminal penalties. Audiovox® has tried to make this manual user friendly and helpful. It is important that only qualified technicians install and/or service the product. This manual is subject to change without notice. Skybox Installation & User Manual 1 Welcome Skybox 1.1 Installation & User Guide Skybox is the innovative antenna system that provides live satellite TV to a vehicle, while in motion. This manual will provide basic instructions on how to install the Skybox antenna and components in most vehicles and operate it safely. DO NOT VIEW� from� Drivers Seat NOTE Be sure to record serial and part numbers of the receiver, antenna and indoor unit, in the boxes provided on this page before installation. These serial numbers will be needed to activate the receiver after installation. Record your Serial & Part Numbers here: Antenna Serial # Part # WARNING: DO NOT INSTALL AN ACTIVE MONITOR IN RANGE OF THE VEHICLE’S DRIVER TO AVOID DISTRACTION WHILE IN MOTION. This product is intended for entertainment, program selection, and viewing for rear seat passengers in vehicles operated in the United States. Consult local law concerning installation of televisions in motor vehicles. Some states may prohibit TVs in motor vehicles, others restrict placement of monitors. Indoor Unit Serial # Part # Receiver Receiver # Model # Smart Card Smart Card# Skybox Installation & User Manual 1 Welcome 1.2 Icons User-friendly icons provide a visual reminder to mark the important information necessary to successfully operate and install the Skybox antenna system. They include: WARNING Alerts installers and customers of important information regarding personal safety to avoid bodily injury. CAUTION Alerts installers and customers to possible electrocution hazards. TOOLS & REPAIR Marks the areas requiring special tools and installation procedures. KEY HINTS Helpful tips are indicated with a key. They offer key suggestions on efficient installation procedures to get the maximum performance from your system. Skybox Installation & User Manual 2 Safety Instructions Installation and User Safety Instructions Read this manual thoroughly and carefully before attempting to install or operate any Skybox antenna system. Observe Warnings - Be sure to follow all warnings and cautionary instructions in this manual. Follow Instructions Observing these instructions is critical to ensure proper installation. Follow each detail to ensure accurate and safe installation. NOTES, indicated by the box above, will be provided throughout the document to assist in user-friendly installation and operation of Skybox antenna systems. WARNING IT IS IMPERATIVE THAT YOU REMOVE THE SHIPPING RESTRAINT BOLT LOCATED ON THE BOTTOM OF THE ANTENNA BEFORE BEGINNING INSTALLATION. NOTE Be sure to save the container and packing materials for the antenna. If the system needs to be returned for maintenance, under warranty, you will be responsible for proper packaging. VERY IMPORTANT! Before operating the Skybox system, the end consumer shouldfill out the Audiovox® Customer Setup Form attached to this manual and fax to (703) 991-4556. This will save time when you go to activate the system. WARNING No user accessible parts. Repairs to the antenna should be performed only by Audiovox® authorized technicians. CAUTION Verify that the roof rack is in good condition and can support the 55 pound antenna prior to installation. Seek professional assistance to tighten or adjust the mounting brackets, as required for safety and safe operation of vehicle. Skybox Installation & User Manual WARNING Do not open or remove the cover of the receiver, antenna or indoor unit (IDU) to avoid exposure to dangerous voltage. CAUTION The Skybox antenna system is specifically designed for use as it comes shipped – with the housings and unit covers intact. Any attempt to modify or to retrofit this product or its components will void the warranty and may be hazardous. WARNING To avoid fire or electrical shock by the receiver or other components, do not expose them to rain or moisture. The IDU and receiver’s ventilation openings must not be tampered with, covered or obstructed. CAUTION Consumers should not attempt repairs to any components in the system! Only qualified and authorized service personnel should repair damaged or non-operational equipment. Evidence of unauthorized repairs or tampering will void the warranty. Skybox Installation & User Manual 3 Receiving Mobile Satellite TV 3.1 Signal Reception The Skybox antenna can be used to receive satellite television via the direct broadcast service (DBS) satellites, located 22,000 miles in space. This system requires a clear view of these satellites to maximize the signal reception. Other factors, such as satellite coverage area, elevation angle, and weather also contribute to the signal quality (Figure 3-1). Introduction to Mobile Satellite TV 3.2 Azimuth and Elevation The DBS satellites are located in the southern sky. The Skybox is a sophisticated mobile antenna with a satellite recognition and tracking system. The antenna automatically determines and maintains the proper azimuth and elevation angle without user intervention. This enables the system to receive satellite TV while stationary or in motion. 3.3 Satellite Coverage You must be located within the satellite’s coverage area for proper reception. As you begin to travel outside of this coverage area, the signal becomes weaker. In general, signals are received in the lower 48 contiguous states. 3-1 Satellite Elevation Look Angle Skybox Installation & User Manual 3 3.4 Line of Sight (LOS) Interruption The Skybox needs a clear line of sight (LOS), or view to the satellite for uninterrupted reception. Objects such as buildings, mountains, bridges, tunnels, overhead road signs and trees that block this view will cause a loss of signal (Figure 3-2). The signal will, however, be quickly restored once the antenna has a clear LOS again. Introduction to Mobile Satellite TV Heavy rain, snow or ice may also interfere with the signal reception. Stray signals from radio or television broadcast towers may also affect the satellite signal. 3-2 Obstacles Blocking Signal Skybox Installation & User Manual 4 Satellite TV System Overview Packing Kit Contents - Bill of Materials Box No. 1 Description Quantity Skybox 1ox11 Allen Wrench 1 No. 2 Bracket Link - 18mm 4 Bracket Link - 31mm 4 Bracket Bottom 4 Bracket Spacer - 10mm 4 Bracket Spacer - 18mm 4 Hexagon socket countersink head screw M6x25 12 Hexagon socket countersink head screw 12 M6x30 Hexagon socket countersink head screw 4 M6x40 10 Skybox Installation & User Manual 4 Satellite TV System Overview Di re ct TV Di re cT V\ Ec ° ho Di st re ar cT V\ 14 Ec 8° ho Ec st ho ar st ar STANDBY ° SELECT 11 9 NI MI Q1 10 1° 11 0 NI MI Q2 ° 1 91 ° Indoor Unit 61 .5 ° Quantity 82 Description Ec ho st ar Box No. 2 ON/OFF User manual 1 Installation manual Connector, coaxial, TNC plug crimp 1 RF Cable , ODU to IDU 1 IDU End DC power supply cable ODU End 1 Remote extender TX 1 adaptor with batteries Box No. 3 (Option DISH) Description Quantity Satellite receiver Dish 311 1 RF Cable, IDU to RCV RCA A/V Cables DOWN UP POWER 1 1 C RECORD V IEW SELECT VCR PO W ER V O LU M E IN F O LL TH E M E SYS INFO AUX PA C E BRO W SE TV SAT MENU TE TV/DVD MU Skybox Installation & User Manual L 1 E ID CE DISH Remote Control GU AN V� C� R RE CA 11 4 Satellite TV System Overview 4.1 System Components The Skybox satellite TV delivery system requires the following components: 4.1.1 Antenna The Skybox antenna houses the antenna panels and electronics within a weathertight radome (plastic housing). It is mounted to the vehicle’s roof rack and connected with a single coaxial cable to the IDU inside the vehicle. ar st st ho ho st ar Ec Ec V\ STANDBY re ho cT SELECT Ec 8° 14 TV V\ cT Di re 11 0° Di 1 ct Q- re MI Di 1° 10 11 9° ar st 2 91 ° NI ho QMI Ec ° NI ° .5 82 61 The IDU supplies power and commands to the Skybox antenna. This device allows you to manually select the satellite from which you wish to receive a signal. It is co-located with the satellite receiver inside the vehicle. ar 4.1.2 Indoor Unit (IDU) ON/OFF 4.1.3 Receiver The receiver is mounted inside the vehicle near the IDU and decodes satellite signals from the antenna, then sends them to the vehicle’s video system. 4.1.4 Remote Control SAT TV VCR PO W ER TV/DVD MENU AUX PA C E V� C� R V O LU M E MU E ID TE GU The remote control uses a low power RF transmitter to control the receiver from within the vehicle, without pointing directly at the receiver. BRO W SE TH E M E RE CE L SELECT AN CA LL C IN F O SYS INFO 12 NOTE: Actual remote may differ. V IEW RECORD Skybox Installation & User Manual Mounting the Antenna to the Vehicle’s Roof Rack This section offers a general explanation of how to properly install the Skybox antenna to the vehicle’s roof rack. VERY IMPORTANT! Before operating the Skybox system, the end consumer shouldfill out the Audiovox® Customer Setup Form attached to this manual and fax to (703) 991-4556. This will save time when you go to activate the system. NOTE The Skybox antenna mounting hardware provided in your hardware kit will fit almost any design of roof rack. There are however, some vehicles with larger crossbars that may not be compatible with the provided mount. If this is the case, please call (800) 561-9280 to order an upgrade kit. CAUTION The Skybox, when properly installed, increases the vehicle height by 4-9 inches over the existing roof rack or cab. Make sure you are aware of the new height of the vehicle with the antenna and mount above the roof rack. Use caution when driving under overpasses, parking garages and other low clearance areas. Skybox Installation & User Manual 5 Installing the Antenna WARNING Always use two people to move or lift the 55 lb. antenna to avoid strain or injury. CAUTION Do not flip the antenna upside down while removing the shipping restraint bolt. Doing so may result in serious damage to the antenna. WARNING IT IS IMPERATIVE THAT YOU REMOVE THE SHIPPING RESTRAINT BOLT LOCATED ON THE BOTTOM OF THE ANTENNA BEFORE BEGINNING INSTALLATION. 5.1 Shipping Restraint Bolt 1. Place the antenna on a flat surface, such as a table top and remove the shipping restraint bolt located under the antenna (Figure 5-1). Bottom of antenna Figure 5-1 Remove shipping restraint bolt with the provided Allen wrench. 13 Installing the Antenna 5 5.2 Clamp Design The Skybox antenna is designed to clamp onto a vehicle’s permanent roof rack with an adjustable, padded clamping system designed to secure the unit onto the fixed crossbars (Figure 5-2). Installers should confirm good condition of the roof rack and cross bars before installing the antenna. There are two different size bracket spacers provided in the kit: the 1 inch spacer comes installed between the bracket and antenna for ready-to-mount capability. An alternate 1/2 inch spacer is also provided in the kit for lower placement of the antenna onto the crossbars in appropriate conditions (Figure 5-3). Figure 5-3 Bracket spacer between bracket and antenna. 1" 1/2" head screw Figure 5-2 Brackets can accommodate uneven crossbar girth. Make sure you tighten the head screw to secure bracket to the crossbar to compensate for asymmetry. 5.3 Mounting Procedure To mount the antenna: 1. Position the roof rack crossbars 37-1/2 inches apart, measured center-to-center (Figure 5-4). The distance between the antenna and the vehicle’s roof will determine which size bracket spacer to use . Using two people, place the antenna onto the roof rack to measure the distance between the antenna and the roof. 2. Make sure that there is at least 1 inch space between the base of the antenna and the vehicle roof (Figure 5-5). CAUTION Be sure to use only the hardware provided in the hardware kit. Substituting any hardware or juryrigging may result in an improper and unsafe installation. Install all hardware according to this manual. Figure 5-4 Crossbar positioning on roof rack. 14 Skybox Installation & User Manual 5 Installing the Antenna Figure 5-5 A 1-inch gap allows mounting space for antenna between the crossbars and roof rack. NOTE Use a towel or moving cloth to protect the roof of the vehicle while installing the antenna. CAUTION Failing to leave at least a 1 inch space between the Skybox antenna and the vehicle’s roof may result in damage to the roof and to the antenna due to the bouncing or movement of the antenna while the vehicle is in motion. 3. Perform a thorough inspection to make sure the roof rack is not damaged and can support the 55 lb. weight of the antenna. 4. Check to see if sun/moon roof or other vent system will work properly without interfering with the antenna or mounting brackets. 5. If the distance between the base of the antenna and the vehicle’s roof is greater than 1 inch (Figure 5-5), use the supplied Allen wrench to remove the 2 head screws that secure each mounting bracket. Replace the 1 inch spacer with a 1/2 inch spacer. If the antenna-to-roof distance is already 1 inch, continue to the next step. Skybox Installation & User Manual Figure 5-6 Position TNC connector toward rear of vehicle. 6. Orient the antenna so that the antenna’s cable connection is located toward the rear of the vehicle (Figure 5-6). If the distance between the antenna’s base and the vehicle’s roof is less than 1 inch, even with the largest spacer used, attach a large section of rubber or foam to the bottom of the antenna to protect the vehicle’s roof. 15 5 Installing the Antenna 8. Select the proper bracket link size (approximately 1/2 inch, or 1-inch). Determine the link size based on the width of the crossbar (Figure 5-9). There are four combinations of bracket links and head screws that can be used. Choose the combination that will provided the best and most stable fit for your vehicle’s crossbar style. Figure 5-7 Centering the antenna on roof. 7. Measure the distance between the antenna’s mounting bracket to the roof’s edge to make sure the antenna is centered on the roof. Complete this for the front and rear crossbars (Figure 5-7). NOTE Ensure that the mounting brackets are secured to adequate fixed cross bars so that as much of the crossbar’s surface is covered by the top and bottom clamps as possible. Failure to do so may cause antenna to become unstable. Figure 5-9 Top bracket mount with link. 9. Choose proper head screw size, depending on the distance between the top and bottom bracket at the head screw end (Figure 5-8). Figure 5-8 Shipped with 3 different screw sizes. 16 Skybox Installation & User Manual 5 Installing the Antenna CAUTION Make sure you are aware of the new maximum height of the vehicle (unloaded) with the antenna mounted onto the roof rack. Use caution when driving under overpasses, tree limbs, into garages and into low clearance areas. 10. Insert the bottom bracket into the bracket link (Figure 5-10). 11. Secure the bottom bracket with the appropriate head screw. Make sure that the correct head screw-bracket link combination has been applied and as much of the rubber on the mounting clamps are covering the crossbars as possible. Figure 5-10 Inserting bottom bracket. 12. Fully tighten the end head screw with the supplied Allen wrench (Figure 5-11). Do not overtighten. NOTE Once all four mounting brackets are tightened and the antenna has been mounted to the roof rack, complete a thorough inspection of all four brackets to ensure antenna is secure and stable. Skybox Installation & User Manual Figure 5-11 Secure clamp with headscrew. 17 6 Installing the Antenna Cable Installing the Antenna Cable This section will explain the proper method for connecting the cable to the antenna, as well as routing the coaxial cable from the antenna to the Audiovox® indoor unit (IDU) location. NOTE Due to the extensive variety of vehicles on the market, it is impossible to cover all of the possible and appropriate wiring specifications for every vehicle. Should you decide to run the cable between body panels, take every precaution to avoid areas prone to water infiltration, and to prevent damage to the vehicle’s body. If the space between the vehicle’s panels is too small, look for an alternate routing option. 6.1 Routing the Cable The RF cable is routed from the antenna to the IDU inside the vehicle. Decide where to locate the IDU and satellite receiver, and make sure that both units are placed in a dry and protected area. Typically, they are placed under a seat for protection. The IDU and satellite receiver should be placed away from any heat source and in an area with proper ventilation. Ensure that there is at least 2” of space around both units for ventilation and connection of cables. Two basic techniques for bringing the antenna cable into the vehicle are through an existing point of entry (POE) or by drilling the POE. NOTE Only a trained automotive technician should perform this installation. Audiovox® is not responsible for damage caused to vehicles by the improper drilling or installation of antenna cable through the roof or body of the vehicle. 18 6.2 Technique 1 The first option is to route the cable into the vehicle through an existing POE, such as behind the rear hatch, between two body panels or through a grommet. 6.2.1 Routing Cables Through the Rear Hatch 1. Connect one end of the TNC connector to the back of the antenna at the rear of the vehicle (Figure 6-1). Do not overtighten this connection. The connection at the antenna should be weatherized or protected from outside elements through the use of weather tape or other appropriate means. Figure 6-1 Connector input from IDU. Skybox Installation & User Manual 6 2. Run the cable along the roof rack of the vehicle, back to the hatch. With the hatch open, route the cable behind the hatch to inside the vehicle (Figure 6-2 ). NOTE: Prior to the cable entering the vehicle, create a drip loop to prevent water entering the vehicle and causing damage. Installing the Antenna Cable 4. Once the cable has been routed from the antenna to the IDU, the cable must be properly secured to the roof rack crossbars with the supplied tie-wraps. In appropriate situations, you may use self-adhesive cable straps to secure the cable to the vehicle (Figure 6-3). Figure 6-3 Tie wrap cable to roof rack. 6.2.2 Routing Cables Through Two Panels Figure 6-2 Open hatch routing method. 3. Close the hatch gently and carefully inspect the cable to make certain that it is not bent, pinched or damaged. There may be extra coaxial cable left once it has been routed inside of the vehicle to the desired location. You may coil and tie the excess cable and place it near the IDU and receiver. You may also cut the cable to the length needed and install a new TNC connector. Refer to Appendix A for proper installation of TNC connectors. NOTE: Only a trained automotive installer should run cable or remove the vehicle’s headliner. Improperly removing this material may result in tearing, water infiltration and other damage to your vehicle and its contents. Audiovox® is not responsible for damage caused to vehicles due to improper drilling or removal of interior headliners. Skybox Installation & User Manual Another technique for bringing the antenna cable into an existing POE is to route the cable between two body panels of the vehicle (Figure 6-4). The RG58 antenna cable may be small enough for certain vehicles. Take every precaution to protect the vehicle from body damage and water infiltration. If the space between two body panels is too small, look for an alternate routing option. Figure 6-4 Routing cable between two panels. 19 6 Installing the Antenna Cable NOTE Do not fold or kink the cable. Any bends should be gradual and kept to a 4-1/2 inch bend radius to avoid damaging the cable and degrading received satellite signals. 6.3 Technique 2 The second option for routing the cable from the antenna to the IDU, which may be used by trained installers, is to drill a small point of entry (POE) into the vehicle’s roof or body. Only a highly trained and qualified technician should perform this task. Take special care when drilling holes into the vehicle. Appropriate watertight seals should be used. NOTE Audiovox® is not responsible for damage caused to vehicles the improper drilling or installation of the antenna cable through the roof or body of the vehicle or for water damage or other damage resulting from the drilling of a POE. Only a trained automotive technician should perform this installation. 20 Skybox Installation & User Manual 7 Connecting the Skybox IDU and Receiver This section will explain the proper installation and connection of the Skybox indoor unit (IDU) and satellite receiver. NOTE Be sure to record serial numbers of the receiver, antenna and IDU, in the boxes provided on the front page of this manual before installation. These serial numbers will be needed to activate the receiver after installation. NOTE Do NOT remove the cover, obstruct or place anything into the ventilation slots of the IDU or satellite receiver. Damage to the units or injury may occur due to exposed voltage. Do NOT place the IDU or satellite receiver in a location where it may be exposed to any type of moisture. This may result in electrical shock or fire. Skybox Installation & User Manual Receiver Setup 7.1 Wiring Configurations The following describes the basic wiring configurations for DISH Network® equipment. Follow the appropriate diagram for your satellite provider. 7.1.1 Basic DISH Network® Wiring Configuration (Figure 7-2) 1. Connect the RG58 RF cable (coming from the antenna) to the AUDIOVOX ANTENNA IN port on the back of the IDU. 2. Connect one end of the supplied RG6 cable to the SATELLITE RECEIVER port on the back of the IDU. 3. Connect the other end of the RG6 cable to the SATELLITE IN port on the back of the DISH Network receiver. 4. There is an AC receptacle labeled FOR SATELLITE RECEIVER on the back of the IDU. ONLY the satellite receiver should be plugged into this port (Figure 7-1) Figure 7-1 Receptacle for satellite receiver. WARNING Only the satellite receiver may be plugged into this outlet. Plugging other devices into this outlet will damage the unit, may damage the other equipment, may damage the vehicle’s electrical system, and may result in injury or property damage. 21 7 Receiver Setup Figure 7-2 DISH Network Configuration. (Layout May Differ for Some Equipment) 22 Skybox Installation & User Manual 7 7.2 Setting Up the Remote Control The remote control uses an IR signal to command the receiver. The IR signal must be converted to RF by attaching the remote control extender to the front of the remote. The IDU then receives the RF signal, converts it back to IR, and sends it to the receiver using the IR sensor cable. The 7ft IR sensor cable is attached to the IDU and has a small IR eye at the end. The IR eye must be adhered to the top of the satellite receiver (Figure 7-3). This setup will allow the user to change channels with the remote pointed anywhere within the vehicle. POWER Figure 7-3 IR sensor placement. CAUTION The remote control of the satellite receiver should never be used by the driver when the vehicle is in gear or in motion. Receiver Setup NOTE Although wiring configurations differ according to vehicle model, this section describes basic wiring found in many vehicles. If the entertainment system in the vehicle is wired differently, connect the cables as needed to accommodate the vehicle’s configuration. 7.3 Audio/Video Cable Connections There are three ways that the satellite receiver can be connected to the vehicle’s entertainment system: RCA-type, S-Video, and RF coaxial cable. Choose the option that best suits your vehicle’s system. 7.3.1 RCA A/V Connection 1. Connect one end of the RCA connectors to the corresponding Audio Output (left and right) and Video Output jacks of the satellite receiver. 2. Connect the other ends of the RCA cable to the Audio/Video Input jacks of the entertainment system. 7.3.2 S-Video Connection 1. Connect one end of the S-Video cable to the “S-Video” jack on the back of the satellite receiver. 2. Connect the other end of the S-Video cable to the “S-Video” input jack of the vehicle’s entertainment system. NOTE This S-Video connection provides the highest picture quality for your system. Skybox Installation & User Manual 23 7.3.3 RF Coaxial Connection 1. Connect one end of an RG6 RF cable to the RF Output of the satellite receiver. 2. Connect the other end of the RF cable to the RF or VHF/UHF Input of the vehicle’s entertainment system. NOTE RG-6 provides good picture quality, but is the least desirable for connection. For DVD or VCR connection, please refer to your satellite provider’s User Guide. WARNING Only a trained and experienced technician in automotive electrical systems familiar with the type of vehicle should attempt power cable connection. 7.4 Power Cable Connection Once all of the system cables have been connected, the following steps will inform you of power connectivity. 24 7.4.1 Procedure for Connecting Skybox to Switched/Accessory Power WARNING: The following procedure MUST be completed ONLY with a Digital Multi-Meter (DMM). Failure to do so could result in serious injury, damage or death due to airbag deployment. 1. Make sure that the vehicle is turned off. 2. Remove power plug from the receiver. 3. Carefully remove the lower covering of the steering column. Be careful, removal may involve a metal protection plate that may be sharp. 4. Locate the main wiring harness. In most cases it will contain 16g to 14g wires; this will be the ‘main harness.’ Note! Some vehicles (like the Ford Escape) may have a thinner gauged main harness. The majority of vehicles will have the heavier gauge setup. 5. Turn the meter on. Find a suitable ground (Recommend in the kick panel - usually indicated by a bolt going through the metal with wires secured by it, behind the kick panel covering.) and insert the black probe there. Set the dial on the DMM to ‘20v’ on the DC side. Applying the red probe to this point should result in a reading of ’0.00’. This is your ground; connect the black wire from the power plug to this point. Skybox Installation & User Manual WARNING: DO NOT DISTURB ANY WIRES SHEATHED IN COLORED PLASTIC/PVC. THESE COULD BE AIRBAG CIRCUITS AND SHOULD NEVER BE DISTURBED! IF UNSURE, CALL TECH SUPPORT BEFORE CONTINUING. WARNING: Fuse the positive lead to protect the wiring and the vehicle at the source (12V Accessory) 6. With the key in the ‘start’ (do not turn engine over) carefully pierce the thickest wire with the red probe, making sure that you do not go through the wire into the next. Observe the DMM screen. If it reads ’12.00’ turn the key to the ‘run’ position. If it continues to read 12 volts while cranking, turn the key to ‘off’and remove the key. If at this time the screen reads ‘0.00’, then you have located ‘true ignition.’ 7. Remove the fuse from the red wire on the power cord. Connect the red fused wire from the power cord to the wire that you found in the previous step. Making sure that the power switch on the receiver is in the ‘off ’position, re-insert the fuse. 8. You may now re-install the plug into the back of the receiver. WARNING: Do NOT connect the system directly to the vehicle’s battery. Skybox Installation & User Manual 25 Functions of the Skybox Before powering on your Skybox, you should first understand some basic functionalities of this system. 8.1 Global Positioning System (GPS) When the Skybox is powered on, GPS is used to determine your physical location. This information is processed within the antenna and enables the system to acquire the satellite signal faster, usually within one minute. 8.2 Indoor Unit Select and Standby Buttons 8.3 IDU SELECT Light Indicators The SELECT light indicators on the IDU have three different modes of operation. • Flashing orange indicates that the antenna is in process of acquiring the satellite signal. • Steady orange indicates that the satellite was found, but the signal was lost. You will also get this indication while the system initializes during power up. • Green indicates that the antenna is locked onto the satellite and ready for operation. 8.4 IDU Dip Switches There are eight dip-switches on the back of the IDU. These switches should always be in the up position for efficient operation of the antenna system. The switches will be used for future enhanced features of the IDU. The indoor unit (IDU) is equipped with two buttons on the front. The red STANDBY button allows you to shut off the power to the antenna, and places the IDU into standby mode. The yellow SELECT button allows you to manually choose the satellite. For DISH Network, the satellite that the system should lock onto is either 110° or 119°. If the IDU is trying to lock onto a different satellite, simply push the SELECT button until the correct satellite is chosen. 26 Skybox Installation & User Manual 9 Operating the System DISH Network® Receiver Setup and Activation This section will explain the proper method for powering up the Skybox, as well as activation procedures for DISH Network®. NOTE: Before operating the Skybox, you must ensure that the vehicle is parked outside with a clear line of sight to the southern sky. VERY IMPORTANT! Before operating the Skybox system, the end consumer should fill out the Audiovox® Customer Setup Form attached to this manual and fax to (703) 991-4556. This will save time when you go to activate the system. 9.1 Powering Up 1. Turn on the power to the vehicle and verify that the indoor unit and receiver also power on. You may need to physically turn on the IDU from the power switch on the back of the unit. 2. Verify that the On/Off indicator on the IDU is green. Skybox Installation & User Manual 3. If you need to manually turn on the receiver, do so by pressing the power button on the front. 4. Ensure that the green power indicator on the front of the receiver is illuminated 5. Verify that the antenna has power by listening for movement within the radome. This should be a low mechanical hum. WARNING If you hear any grinding or loud noises coming from the antenna, power the antenna off and ensure that you have removed the shipping restraint bolt (Section 5.1). If this does not resolve the problem, please call the Audiovox® tech support number at (800) 225-6074. 6. When you first power the system on, the indoor unit will have a steady orange light adjacent to one of the satellites listed on the front. This light will remain steady while the antenna initializes and begins a self test. The orange light will begin flashing once the antenna begins it’s acquisition of a satellite signal. Verify that 119° is selected for DISH Network. You may need to push the SELECT button on the front of the IDU to manually choose this satellite. 7. While the antenna is searching for the satellite, you will see the Point Dish screen will automatically appear on your TV monitor (Figure 9-1): 27 9 Operating the System thus the vehicle ON. 11. About a minute later you should receive Message 061. (Figure 9-2) Figure 9-1 Point Dish Screen. 8. From the Point Dish menu, use the remote control to select satellite 119°. (Leave the transponder number that appears in the screen as is.) Once the antenna locks onto the satellite, the light indicator on the IDU will change to steady green. This means that your IDU has acquired the satellite signal. Verify that the signal strength is above 60. Please note that the signal strength of a mobile antenna will not be as high as the fixed dish, home installation. Signal strength will be determined by where you are in North America, and the look angle. If the software does not start to download automatically, press “cancel” and then press “yes” in the new window. 9. Push the “Sys Info” button on the remote. You should see on page one, “Section d,” DP311 and Software P310. 10. Put receiver in “Standby” by pressing and holding the power button on the receiver for 3-5 seconds. (This will not work from the remote control, only the receiver power button.). It will look like the receiver is off, but leave the power to the IDU and ODU, 28 Figure 9-2 Vital Information Download Screen 12. Approximately 5-10 minutes later you should receive Message 303. (Figure 9-3) Figure 9-3 Receiver Memory Screen. 13. Approximately 1-2 minutes later the receiver will go back into “Standby.” 14. Press the ‘Sys Info’ button. Check Sys Info: You should see something similar in “Section d” to DP311 and Software ASD1. ASD1 is the mobile software. YOU ARE NOT DONE YET! 15. Cancel out of Sys Info 16. Power the receiver on Skybox Installation & User Manual 9 Operating the System 17. You should receive Message 015. (Figure 9-4). 20. You will receive Message 058. (Figure 9-6) Please note and record these numbers. 1 4 Figure 9-6 Acquiring Satellite Screen. Figure 9-4 DISH Network activation screen. 21. After the Check Switch test has been completed, press the ‘Sys Info’ button again and look for “Section d.” You should see DP311M and Software ASD1. “Section h” should read MPD4X. 18. Within 1-2 minutes, the receiver will show Message 129. (Figure 9-5) Please go to step 19; DO NOT CALL THE TELEPHONE NUMBER ON THE SCREEN. 22. Approximately 1-2 minutes later the receiver will show Message 129. (Figure 9-7) Please go to step 23; DO NOT CALL THE TELEPHONE NUMBER ON THE SCREEN. Figure 9-5 DISH Network activation screen. 19. Run Check Switch from “Installation/ Setup” screen in “Menu” as described above. Choose “Alternate” Figure 9-7 DISH Network activation screen. 23. The installer must call (800) 561-9280 and have the previously filled out Customer Setup sheet available. 24. A Customer Service Representative will confirm the customer’s information and then finalize the activation. Skybox Installation & User Manual 29 25. You will see the following message on your monitor (Figure 9-8) Figure 9-8 Receiver Memory Screen. 26. Once activated, the Program Guide will be downloaded to your receiver. Upon completion, please confirm correct program selection for customer. 30 Skybox Installation & User Manual Appendix A Installing TNC Connector to RG58 Cable Procedures for Installing TNC Connector to RG58 Cable These procedures were written using Jye Bao Co. 8.7” Hex series crimp tool (CT-001) and TNC connectors (TNC3100-0058). 1. Strip the RG58 cable back 16.4mm from the end of the cable. Trim the braid back 8.2mm from the end. Strip the foam insulator back 4.7mm from the end of the cable. 4. Solder the center pin to the cable’s center conductor at the hole on the pin. 5. Fold the braid back from the cable. 6. Slide the Connector onto the cable. 2. Slide the ferrule over the RG58 cable. Connector Ferrule 3. Place the center pin onto the center conductor of the cable. 7. Slide the ferrule up to the connector and crimp. Center Pin Skybox Installation & User Manual 31 Appendix B Troubleshooting Troubleshooting SKYBOX SYSTEM DOES NOT POWER ON: • Verify that the Indoor Unit (IDU) and receiver are powered on. • Check for blown fuses. • Remove and replace the power cord. • Verify vehicle battery has been reconnected properly. SKYBOX IDU DOES NOT LOCK ON SATELLITE: • Ensure that coaxial cable connections are installed properly. • Confirm clear line of sight to the satellite. • Check for green indicator above appropriate satellite on the IDU. • Verify that the appropriate satellite has been selected for your satellite provider. • Verify that the receiver is locked on the satellite from the Setup Menu of the receiver. • Check that the radome of the antenna is free of any obstructions (water, snow, ice, or debris). • Clean radome with soft cloth and water. SKYBOX SYSTEM CONTINUALLY RESETS: • Verify that all connections are installed properly. • Check for proper wiring to the vehicle’s power source. 32 BLACK OR BLUE SCREEN ON TELEVISION : • Verify that the IDU and receiver are powered on. • Ensure that all video connections are installed. • Check for proper television settings. SNOWY TELEVISION PICTURE: • Verify that television settings are correct. • Correct channel configuration (channel 3 / 4, or A/V input). • Make sure video cables are installed properly. INTERMITTENT PICTURE FOR SHORT INTERVALS: • Ensure that all video connections are installed properly. • Confirm clear line of sight to the satellite. • Check for green indicator above appropriate satellite on the IDU. • Verify that the receiver is locked on the satellite from the Setup Menu of the receiver. PICTURE SCRAMBLED, PARTIAL OR FREEZING: • Ensure that coaxial cable connections are installed properly. • Confirm clear line of sight to the satellite. • Check for green indicator above appropriate satellite on the IDU. • Verify that the receiver is locked on the satellite from the Setup Menu of the receiver. • Check that the radome of the antenna is free of any obstructions (water, snow, ice, or debris). Skybox Installation & User Manual Appendix B Troubleshooting SKYBOX SYSTEM DOES NOT WORK IN MOTION: • Ensure that all cable connections are installed properly. • Confirm clear line of sight to the satellite. • Check for green indicator above appropriate satellite on the IDU. • Verify that the receiver is locked on the satellite from the Setup Menu of the receiver. CERTAIN CHANNELS DO NOT WORK OR ONLY PREVIEW CHANNELS ARE VISIBLE: • Verify channel package with satellite TV provider. • Check the availability of local channels in the subscriber’s area. • Ensure proper activation of satellite receiver. REMOTE CONTROL DOES NOT WORK: • Ensure proper placement of IR transmitter. • Install new batteries. Skybox Installation & User Manual 33 Apendix B Troubleshooting Indoor Unit does not lock on satellite X X X System continually resets X X X X X X Black or blue screen on TV X X X X Snowy television picture X X X X Intermittent picture for short intervals X X X X Picture jumbled, partial, or freezing X X X X System does not work in motion X X X X Certain channels do not work Place the IR transmiter according to the manual X Local channels are available in limited area check availability X Correct activation of Receiver X Verify signal strength Check for proper voltage X Ensure clear line of sight to satellite Verify correct cable configuration X Verify TV setup Check for loose cable connections X Clean the radome Check for blown fuse System does not power on Make sure that the receiver is on Skybox Troubleshooting Remote control does not work 34 X Skybox Installation & User Manual 12 MONTH LIMITED WARRANTY Applies to Audiovox Mobile Video Products AUDIOVOX ELECTRONICS CORP. (the Company) warrants to the original retail purchaser of this product that should this product or any part thereof, under normal use and conditions, be proven defective in material or workmanship within 12 months from the date of original purchase, such defect(s) will be repaired or replaced with reconditioned product (at the Company's option) without charge for parts and repair labor. To obtain repair or replacement within the terms of this Warranty, the product is to be delivered with proof of warranty coverage (e.g. dated bill of sale), specification of defect(s), transportation prepaid, to the Company at the address shown below. This Warranty does not extend to the elimination of externally generated static or noise, to correction of antenna problems, to costs incurred for installation, removal or reinstallation of the product, or to damage to tapes, discs, speakers, accessories, or vehicle electrical systems. This Warranty does not apply to any product or part thereof which, in the opinion of the Company, has suffered or been damaged through alteration, improper installation, mishandling, misuse, neglect, accident, or by removal or defacement of the factory serial number/bar code label(s). THE EXTENT OF THE COMPANY'S LIABILITY UNDER THIS WARRANTY IS LIMITED TO THE REPAIR OR REPLACEMENT PROVIDED ABOVE AND, IN NO EVENT, SHALL THE COMPANY'S LIABILITY EXCEED THE PURCHASE PRICE PAID BY PURCHASER FOR THE PRODUCT. This Warranty is in lieu of all other express warranties or liabilities. ANY IMPLIED WARRANTIES, INCLUDING ANY IMPLIED WARRANTY OF MERCHANTABILITY, SHALL BE LIMITED TO THE DURATION OF THIS WRITTEN WARRANTY. ANY ACTION FOR BREACH OF ANY WARRANTY HEREUNDER INCLUDING ANY IMPLIED WARRANTY OF MERCHANTABILITY MUST BE BROUGHT WITHIN A PERIOD OF 24 MONTHS FROM DATE OF ORIGINAL PURCHASE. IN NO CASE SHALL THE COMPANY BE LIABLE FOR ANY CONSEQUENTIAL OR INCIDENTAL DAMAGES FOR BREACH OF THIS OR ANY OTHER WARRANTY, EXPRESS OR IMPLIED, WHATSOEVER. No person or representative is authorized to assume for the Company any liability other than expressed herein in connection with the sale of this product. Some states do not allow limitations on how long an implied warranty lasts or the exclusion or limitation of incidental or consequential damage so the above limitations or exclusions may not apply to you. This Warranty gives you specific legal rights and you may also have other rights which vary from state to state. U.S.A. : AEC 150 MARCUS BLVD., HAUPPAUGE, NEW YORK 11788 1-800-645-4994 CANADA : CALL 1-800-645-4994 FOR LOCATION OF WARRANTY STATION SERVING YOUR AREA 128-5495D Skybox Installation & User Manual 35