1
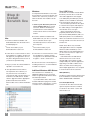
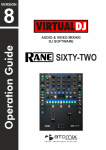
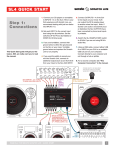
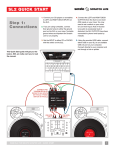
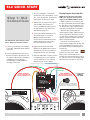
SL3 QUICK START Step 1: SL3 Connections This Quick Start guide will get you the basics. But please read the manual! 1. Connect your CD players or turntables to the LEFT and RIGHT DECK INPUTS on the SL3. 2. Set each DECK INPUT to the correct input level using the dip switches. Set the switches UP for Phono (turntables) or DOWN for Line (CD players). The AUX input is usually DOWN for recording at Line level. Playing Regular Vinyl and CDs 3. If you use turntables, connect their ground wires to the ground posts on the SL3. These ground wires are extremely important for Scratch Live to track. NOTE: the SL3 must be powered by USB or the supplied external power supply for the DECK THRUs to work. While Scratch Live is not running, and the SL3 is powered by the external supply, the deck thrus on the SL3 will always be on, allowing you to play regular CDs and vinyl with your CD players or turntables. When the SL3 is powered by the universal power supply, and then Scratch Live is launched, the deck thrus are still on. This allows a laptop to be connected during a set (when using the deck thrus) with no audio interruption. If the SL3 is not powered by the universal power supply when Scratch Live is launched (USB connected), the deck thrus will be off, but can be turned on in Scratch Live. To turn the thrus off and on in Scratch Live, click on the THRU button next to each Virtual Deck in Scratch Live. This will change the state of the channels to thru mode, sending audio direct from the SL3 inputs to your mixer. 4. (Optional) To record your mix or from your turntables into Scratch Live, connect an additional output (such as an AUX OUT) from your mixer to the AUX INPUTS on the SL3. 5. Connect the DECK OUTPUTS of the SL3 to Line inputs on your mixer. Note: If Scratch Live audio is excessively loud or distorted, the SL3 OUTPUTS have been connected to phono level inputs by mistake. 6. (Optional) Connect the SL3 AUX OUTPUT to an additional Line input or Aux input on your mixer to output the sample player to its own mixer input. 7. Using the USB cable, connect your SL3 to a USB 2.0 port on your computer. Connect it directly to your computer and not through a hub or splitter. USB TO COMPUTER TURNTABLE GROUNDS FROM TURNTABLE OR CD PLAYER OUT TO SL3 LEFT DECK INPUTS FROM TURNTABLE OR CD PLAYER OUT TO SL3 RIGHT DECK INPUTS SL3 SWITCHES: PHONO UP LINE DOWN OPEN H PU S LOCK POWER SUPPLY IS REQUIRED FOR DECK THRUS TO WORK WHEN NOT POWERED BY USB SL3 AUX IN TO MIXER AUX OUT SL3 DECK OUTS TO MIXER PGM INPUTS (LINE) SL3 AUX OUT TO MIXER AUX IN AUX OUT AUX IN PGM 1 PGM 1 4 1 6 2 0 10 MIC LEVEL 2 PGM 2 6 0 10 8 4 6 0 10 2 GAIN 8 GAIN 4 SOURCE L +6 HIGH +12 PAN R L PAN IN OFF +6 MID R OFF +6 HIGH RANE SL3 FOR SERATO SCRATCH LIVE • QUICK START 6 0 10 8 4 6 0 10 4 6 0 10 OFF 8 AUX OUT OUT OUT PGM 1 PGM 2 OFF +6 MID 2 +12 4 10 8 EQ 8 PHONES MIC LOW AUX IN 6 0 2 IN EQ 2 4 2 MAIN MIC HIGH -12 OUTPUT LEVELS 3 OL OFF -12 4 2 SOURCE 8 PGM 2 FlexFX +6 LOW OFF +6 LOW OUT 1 MASTER CUE OUT DRY WET PGM 1 PGM 2 CUE Step 2: Install Scratch live Windows Rane USB Drivers It is important that Windows users install the SL3 drivers as well as the Scratch Live software. The easiest way to do this is to allow the Scratch Live installer to do all the work. The Scratch Live installer includes drivers that allow your Rane SL3 to work with other audio applications that support Core Audio (Mac) and ASIO (PC). Driver updates are also available to download from the product’s page at rane.com. Once installed, you will have the option to select the SL3’s inputs and outputs in the audio settings of other applications when Scratch Live is not open. When using Serato Scratch Live, proprietary Serato drivers are used in place of Rane ASIO (Windows) and Core Audio (Mac) drivers. The included Rane drivers are used when Scratch Live is not running, and will not run the same time as Scratch Live. 1. Connect your SL3 before you insert your installation CD. When you first connect it, Windows will attempt to install the drivers via the hardware wizard. Cancel and close the hardware wizard. Mac 1. Insert the Software Installation CDROM and double-click the Scratch Live Installer.mpkg icon. or Launch the installer you just downloaded from serato.com. 2. Follow the on-screen instructions. Once the installation is complete, Scratch Live will appear in your applications list. You may like to drag the Scratch Live icon to your dock for quick launching. 3. Plug in your SL3. No extra installation is required to use Scratch Live. 4. The optional Rane Device Drivers are required for other software you may have that uses Core Audio to communicate with your Rane device. To install the Core Audio drivers, doubleclick the .pkg file inside the appropriate product folder in the Rane Device Drivers folder on the software installation CD. 2 2. Insert the Software Installation CDROM. Make sure your SL3 is connected first. If a window doesn’t open automatically, browse to the CD drive. Run setup.exe. or Launch the installer you just downloaded from serato.com. 3. Follow the on-screen instructions. Once the installation is complete, Scratch Live appears in the Start Menu under All Programs > Serato > Scratch Live. Because the SL3 was connected prior to installing Scratch Live, no extra hardware installation is required. Additional Windows ASIO Drivers Once Scratch Live is installed, any additional hardware that is connected will be recognized and the drivers will be automatically installed. If you add a Rane device and need to install its ASIO driver, plug it into a USB, and select: Start > All Programs > Serato > Scratch Live > Install ASIO Drivers. NOTE: These drivers only work with audio applications that are compatible with these audio standards (ie. some DAWs might not work with 64-bit drivers, you also can’t use these to output core Windows sounds). Rane ASIO and Core Audio drivers allow the SL3 to act as a 6-in 6-out external USB sound card for use with multiple third-party software applications supporting Core Audio or ASIO. These drivers are multi-client, meaning they allow multiple applications on a computer to share the device at the same time. ASIO (Windows) The driver Control Panel may be launched from the Windows Control Panel. Select Start > Control Panel > Rane SL3. Core Audio (Macintosh) To launch the SL3 driver Control Panel, open the System Preferences window. Locate SL3 in the “Other” section and click the SL3 icon. RANE SL3 FOR SERATO SCRATCH LIVE • QUICK START Step 3: Calibration Calibrating Scratch Live When setting up Scratch Live in a new location, calibrate the software to the background noise picked up by the needles, cables and CD players. 1. Put one Virtual Deck in INT mode, load a track, press the play button, and turn up the mixer volume and sound system as loud as you will be playing your session. 2. With audio playing through your speakers: a. When using a turntable, place the needle on the record with the motors off and switch to the SETUP screen. b. When using CD players, pause the CD and switch to the SETUP screen. 3. Press and hold the Estimate button for each side, letting go when the threshold setting is stable (usually about one second). In situations with lots of background noise, the threshold will need to be higher. 4. Start the turntables, and adjust the L/R balance and P/A balance next to each calibration scope to adjust the shape of the inner ring. Use the scope zoom slider (1x to 16x) to zoom in or out as necessary. Note: If you have trouble getting the rings circular, try cleaning or changing your needles. If the image appears as a line, then one channel of the turntable is not working. See examples of SCOPE READING AND FIXES in the manual. • The three little switches on the SL3 need to match what is plugged in — Switch up for “phono” (turntables), down for “line” (CD decks). 5. Check the percentage (%) in the bottom right of each calibration scope, indicating the percent of readable signal — this number should be 80% to 100% when your system is calibrated properly. • If nothing is moving on the screen, recheck connections and then see Advanced Troubleshooting Techniques in the manual. These are the basics of calibrating. If you run into any problems or questions, we really recommend reading the CALIBRATING SCRATCH LIVE in the manual. If you aren’t seeing good circles, refer to SCOPE READING AND FIXES in the manual. After your setup is calibrated properly you are ready to import music. See Importing and Playing Music in the manual to get started. Troubleshooting If you aren’t getting any sound, disconnect all of the cords and start fresh. For now, let’s keep it simple and get Scratch Live up and running. Leave the AUX connections off for now. • The SL3 outputs connect to a “LINE” or “CD” input on your mixer. Set any phono/line switches on the top or the back of the mixer to the “LINE” position. • If you aren’t hearing audio, you should at the very least see the waveform move on the screen as the control vinyl or CD is playing. The meters next to the Virtual Deck should display sound levels. If not, check that you are using ABS or REL mode above the Virtual Deck. • Play the control vinyl from the beginning (outer part). When using the control CD, play from the beginning of Track 1. • In Setup, set the “Vinyl Start Offset” knobs in the Vinyl Control tab to 0. • If you hear music when in INT mode but not in ABS or REL mode while using control vinyl or CDs, see SCOPE READING AND FIXES in the manual. A problem is seeing a straight or diagonal line in the Scope View, meaning you are either getting an uneven stereo or a mono signal. Scratch Live needs an even stereo signal to function. • Start by taking the needle from the “good” turntable and put it on the “bad” turntable. Does it now play fine? If so, you need a new needle. If not, put the “good” needle back on the “good” turntable. • If we have established good playback from one input of the SL3, plug the turntable giving the problem into the “good” SL3 input. If the turntable still gives you a line or nothing in Scope View, the problem is somewhere in the turntable cartridge, tonearm or its RCA cable. • If you are using CD players, try replacing its RCA cable to the SL3 inputs. RANE SL3 FOR SERATO SCRATCH LIVE • QUICK START 3 Keyboard Shortcuts KEY ctrl - L ctrl - R ctrl - F ctrl - A ctrl - C ctrl - E ctrl - V ctrl - X ctrl - Z shift - ctrl - shift - ctrl - ctrl - P ctrl - N ctrl - O - or + ctrl - or + tab ctrl - del and ctrl - backspace alt - del and alt - backspace ctrl - shift - del and ctrl - shift - backspace ctrl - shift - / esc SP-6 SAMPLE PLAYER Load to sample slot Play sample slot LEFT DECK ctrl - or shift - ctrl - shift - shift - alt - ctrl - , (comma) ctrl - 1, 2, 3, 4, 5 1, 2, 3, 4, 5 F1 F2 F3 F5 Q W E R T Y U I O P [ ctrl - [ alt - Q alt - W alt - 1, 2, 3, 4, 5 ctrl - alt - 1, 2, 3, 4, 5 alt - E alt - R alt - O alt - L alt - space bar ctrl - I Actions Accessed Directly from the Computer Keyboard ACTION Locate the current track. This will highlight the track you most recently loaded. Pressing ctrl - L again will alternate between the tracks recently loaded on both decks. Reveal - the highlighted song is opened in a file browser. Find - moves the cursor to the search box. Select all. Copy text in edit mode. Edit text. Paste text in edit mode. Cut text in edit mode. Undo last track load. Move focus up / down through the library or crates. Note that if you have a song highlighted in the song view, and use shift - ctrl - you will move up or down through the library or crates. When you release the shift or ctrl key, the focus will go back to the song view so that you can move up and down through songs using . Add tracks to the prepare window. Start a new mic recording. Open the track in your default MP3/WAV/OGG/AIF player. Zoom the main waveform display. Zoom the library text size. Alternate focus between crates or songs. Remove track from library., remove track from crate, delete crate (does not delete the file). Remove track from crate and from library. Delete the file from your library and send to the recycle bin. (Note to iTunes users: files in your iTunes library cannot be deleted this way). Toggle the input reverse switch Clear search string if searching, or exit Scratch Live. slot 1 slot 2 slot 3 slot 4 slot 5 slot 6 ctrl - alt - Z ctrl - alt - X ctrl - alt - C ctrl - alt - V ctrl - alt - B ctrl - alt - N Z X C V B N ACTION Load the highlighted song to a deck. Load the track currently on one deck onto the other deck as well (instant doubles). Unload the track from a deck. Place a cue point. Place a cue point in a slot. Jump to cue points slots. (rel and int modes) Switch deck to absolute mode. Switch deck to relative mode. Switch deck to internal mode. Key lock on / off. Play / pause reverse. Play / pause forward. Pitch down. Pitch up. Bend down. (rel and int modes) Bend up. (rel and int modes) Censor. (rel and int modes) (rel and int modes) Go to temporary cue point. Set / adjust loop in-point. Set / adjust loop out-point. Loop on / off. Jump to selected loop. Load previous track. Load next track. Auto loop on / off. Loop roll. Rewind. (rel and int modes) Fast forward. (rel and int modes) Previous loop. Next loop. Activate the tempo tapper. (rel and int modes) Set temporary cue point. RIGHT DECK ctrl - or shift - ctrl - shift - shift - alt - ctrl - . (period) ctrl - 6, 7, 8, 9, 0 6, 7, 8, 9, 0 F6 F7 F8 F10 A S D F G H J K L ; ' ctrl - ' alt - A alt - S alt - 6, 7, 8, 9, 0 ctrl - alt - 6, 7, 8, 9, 0 alt - D alt - F alt - P alt - ; alt - space bar (x2) ctrl - K RANE SL3 FOR SERATO SCRATCH LIVE • QUICK START • PART 21315