1
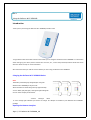
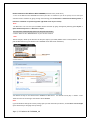
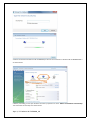
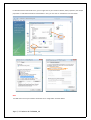
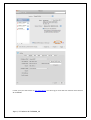
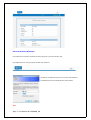
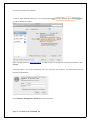
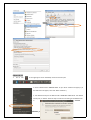
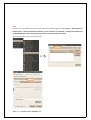
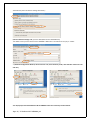
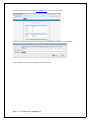
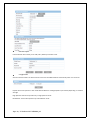
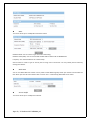
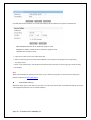
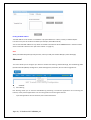
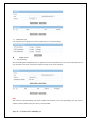
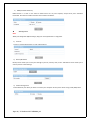
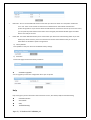
Reliance Wi-Fi SER8189 Router User Guide Portable Table of Contents Part 1: Using the Reliance Wi-Fi SER8189 . . . . . . . . . . . . . . . . . . . . . . . .. . . . . . . . . . . . . . . . .. . . . .. . . . . . . .2 Introduction . . . . . . . . . . . . . . . . . . . . . . . . . . . . . . . . . . . . . .. . . . . . . . . . . . . . . . . . . . . .. . . . . . . . . . ... 2 Charging the Reliance Wi-Fi SER8189 . . . . . . . . . . . . . . . . . . . . . . . . . . . . . . . . . . . . . . . . . . . . . . . . . . . . 2 Opening the Browser Interface (WIN / MAC) . . . . . . . . . . . . . . . . . . . . . . . . . . . . . . . . . . . . . . . . . . . . . . . 3 Device Activation (WIN / MAC) . . . . . . . . . . . . . . . . . . . . . . . . . . . . . . . . . . . . . . . . . . . . . . . . . . . . . . . . . . 7 Opening the Browser Interface & Device Activation for Linux . . . . . . . . . . . . . . . . . . . . . . . . . . . . . . . . 11 The Browser Interface and Settings . . . . . . . . . . . . . . . . . . . . . . . . . . . . . . . . . . . . . . .. . . . . .. . . . . .. . . . 17 Home . . . .. . . . . . . . . . . . . . . . . . . . . . . . . . . . . . . . . . . . . . . . . . . . . . . . . . . . . . . . . . . . . . . . . . . . .. . . . . . .17 CDMA . . . . . . . . . . . . . . . . . . . . . . . . . . . . . . . . . . . . . . . . . . . . . . . . . . . . . . . . . . . . . . . . . . . . . . . . . . . . . . 18 Status. . . . . . . . . . . . . . . . . . . . . . . . . . . . . . . . . . . . . . . . . . . . . . . . . . . . . . . . . . . . . . . . . . . . . . . . . . . . 18 Internet Profile . . . . . . . . . . . . . . . . . . . . . . . . . . . .. . . . . . . . . . . . . . . . . . .. . . . . . . . . . . . . . . . . .. . . . .19 Configuration. . . . . . . . . . . . . . . . . . . . . . . . . . .. . . . . . . . . . . . . . . . . . .. . .. . . . . . . . . . . . . . . . . .. . . . .19 Diagnostics . . . .. . . . . . . . . . . . . . . . . . . . . . . . . . . . . . . . . . . . . . . . . . . . . . . . . . . . . . . . .. . . . . . . . . . .19 Network. . . . . . . . . . . . . . . . . . . . . . . . . . . . . . . . . . . . . . . . . . . . . . . . . . . . . . . . . . . . . . . . . . . . . . . . . .20 Router Address . . . . . . . . . . . . . . . . . . . . . . . . . . . . . . . . . . . . . . . . . . . . . . . . . . . . . . . . . . . . . . . . . . 20 Network Address Server . . . . . . . . . . . . .. . . . . . . . . . . . . . . . . . . . . . . . . . . . . . . . . . . .. . . . . . . . . . .20 Wi-Fi. . . . . . . . . . . . . . . . . . . . . . . . . . . . . . . . . . . . . . . . . . . . . . . . .. . . . . . . . . . . . . . . . . . . . . . . . . . . . . . . 20 Status. . . . . . .. . . . . . . . . . . . . . . . . . . . . . . . . . . . . . . . . . . . . . . . . . . . . . . . . . . . . . . . . . . . . . . . . . . . . 21 Basic . . . . .. . . . .. . . . . . . . . . . . . . . . . . . . . . . . . . . . . . . . . . . . . . . . . . . . . . . . . . . . . . . . .. . . . . . . . . . .21 Multi SSID . . . . .. . . . . . . . . . . . . . . . . . . . . . . . . . . . . . . . . . . . . . . . . . . . . . . . . . . . . . . . .. . . . . . . . . . .21 Secure Profile . .. . . . . . . . . . . . . . . . . . . . . . . . . . . . . . . . . . . . . . . . . . . . . . . . . . . . . . . . .. . . . . . . . . . .22 Trusted MAC Filter. . . . . . . . . . . . . . . . . . . . . . . . . .. . . . . . . . . . . . . . . . . . . . . . . . . . . . . . .. . . . . . . . . 22 Advanced . . . . . . . . . . . . . . . . . . . . . . . . . . . . . . . . . . . . . . . . . . . . . . . . . . . . . . . . . . . . . . . . . . . . . . . . .. .23 Firewall (Port Filtering / VPN Passthrough). . . . .. . . . . . . . . . . . . . . . . . . . . . . . . . . . . . . . . . . . . . . ..23 Traffic Control (Port Forwarding / DMZ). . . . . . . . . . . . . . . . . . . . . . . . . . . . . . . . . . . . . . . . . . . . . . . 24 Management (Account / Backup & Restore / Power Management / Factory Default / Activation ). . . . . . . . . . . . . . . . . . . . . . . . . . . . . . . . . . . . . . . . . . . . . . . . . . . . .. . . . . . . . . . . . . . . . . . 25 Firmware Upgrade . . . . . . . . . . . . . . . . . .. . . . . . . . . . . . . . . . . . . . . . . . . . . . . . . . . . . . . . . . . . . . . . . 26 Help . . . . . . .. . . . . . . . . . . . . . . . . . . . . . . . . . . . . . . . . . . . . . . . . . . . . . . . . . . . . .. . . . . . . . .. . . . .. . .. ..26 Part 2: FAQ. . . . . . . . . . . . . . . . . . . . . . . . . . . . . . . . . . . . . . . . . . . . . . . . . . . . . . . . . . . . . . . . . . . . . . . . . . . .27 Part 3: Glossary. . . . . . . . . . . . . . . . . . . . . . . . . . . . . . . . . . . . . . . . . . . . . . . . . . . . . . . . . . . . . . . . . . . . . . . .30 Page 1 / 33 Reliance Wi-Fi SER8189_UG Part 1 Using the Reliance Wi-Fi SER8189 Introduction Thank you for purchasing the Reliance Wi-Fi SER8189 portable router. This guide describes the browser Interface that allows you to configure the Reliance Wi-Fi SER8189. For information about setting up your device, device maintenance and care, etc., consult the printed Quick Start Guide that comes with this device for Help on initial installation. We recommend that you read this manual before you start using the Reliance Wi-Fi SER8189. Charging the Reliance Wi-Fi SER8189 Device Note. The battery should be fully charged before using the Reliance Wi-Fi SER8189 for the first time. We recommend an initial charge time of approximately 2 hours. When fully charged, a solid green light will appear next to ‘Power’ display on the device. <Green> <Orange> <Red> A red or orange light indicates you need to re-charge. AC- Adapter is Included in your Reliance Wi-Fi SER8189 package Opening the Browser Interface Page 2 / 33 Reliance Wi-Fi SER8189_UG How to Connect to the Reliance Wi-Fi SER8189 (Windows Users / MAC Users) 1. Turn on the Reliance Wi-Fi SER8189 and ensure your Wi-Fi is enabled on your PC or laptop. You can view your available wireless networks by going through the following path Control Panel -> Network and Sharing Center -> Connect to a network OR system tray (lower right hand corner of your screen). Note. For MAC users: You can view your available wireless networks by going through the following path Airport -> Open Network Preferences -> Advanced -> Airport For Linux users: Follow the page from 11 to 16 of this User Guide. 2. Select “Reliance Wi-Fi SER8189 XXXX” as your wireless network. Note. The last 4 digits, ‘XXXX’ of the SSID are the last four digits of your MAC (Media Access Control) address. You can find the MAC address of your Reliance Wi-Fi SER8189 on the label under the battery. . MAC address 3. Click Connect. The default security for the Reliance Wi-Fi SER8189 is WEP 64-bit. The default security key is “12345.” Enter 12345 to continue connecting to the Reliance Wi-Fi SER8189. Note. If you would like to change this security setting after you have activated your device, see the Wi-Fi > Secure Profile of this document for changing security settings. Page 3 / 33 Reliance Wi-Fi SER8189_UG 4. When connected to the Reliance Wi-Fi SER8189 you will see the connection as ‘Reliance Wi-Fi SER8189 XXXX’ – as shown below. 5. Before proceeding, ensure your wireless connection properties are set to ‘Obtain an IP Address Automatically.’ The screenshots for the steps are shown below. Page 4 / 33 Reliance Wi-Fi SER8189_UG For Windows XP and Vista 32-bit users, you can right-click on your wireless network, select properties, then TCP/IP properties. For Windows Vista 64-bit and Windows 7 users, you can click on ‘View Status’ as shown below. Note. For MAC users: Ensure your wireless connection set as ‘Using DHCP” as shown below. Page 5 / 33 Reliance Wi-Fi SER8189_UG 6. Next, open your web browser to http://192.168.5.1. This will bring you to the web user interface of the Reliance Wi-Fi SER8189. Page 6 / 33 Reliance Wi-Fi SER8189_UG Device Activation (Windows) If your device has not been activated at time of purchase, you must activate now. Click Login button on the top right of the web user interface. You will be prompted to enter your username and password. The default Username and Password is admin/admin. Note. Page 7 / 33 Reliance Wi-Fi SER8189_UG See Advanced > Management > Account of this document for changing the default Username and Password. Go to Advanced > Management > Activation for device activation. Click Activate button. Note. During the activation, please do not switch off your device or close the web user interface. If the error message is prompted as shown (Activation Failed), Please contact your service provider. Device Activation (Mac Users Only) 1. Go to Airport Icon at the right upper corner of desktop tap menu and click to open. Airport on Airport off Ensure your Airport mode is turned on to allow your computer Page 8 / 33 Reliance Wi-Fi SER8189_UG to search for available Wi-Fi networks. 2. Choose “Open Network Preferences” on the drop-down menu and select “Reliance Wi-Fi SER8189 XXXX” of your Wi-Fi network and apply it. Open your web browser to http://192.168.5.1. This will bring you to the web user interface of the Reliance Wi-Fi SER8189. Click Login button. You will be prompted to enter your username and password. The default Username and Password is admin/admin. Go to Advanced > Management > Activation for device activation. Page 9 / 33 Reliance Wi-Fi SER8189_UG Click Activate button. Note. During the activation, please do not switch off your device or close the web user interface. If the error message is prompted as shown (Activation Failed) below, please contact your service provider. Page 10 / 33 Reliance Wi-Fi SER8189_UG Opening the Browser Interface and Device Activation for LINUX Below are the Wi-Fi detection guide for 3 different versions of Linux OS - ‘Fedora12’, ‘Ubuntu10.04’ and ‘CentOS5.5’ Fedora12 1. Go to icon at the right upper corner of desktop menu and click to open. 2. Select “Reliance Wi-Fi SER8189 XXXX” of your Wi-Fi network and apply it. (If this SSID does not appear, then click ‘More networks’.) 3. The default security for the Reliance Wi-Fi SER8189 is WEP 64-bit. The default security key is “12345”. Enter the key to continue connecting to the Reliance Wi-Fi SER8189. Note. Please ensure your wireless connection set as “Automatically obtain IP address settings with DHCP” by going through System -> Administration -> Network -> (Network Configuration Window, choose ‘Devices’ tab, double click Wireless) -> (Wireless Device Configuration Window, choose DHCP, Click OK) The screenshots for the steps are shown below. Page 11 / 33 Reliance Wi-Fi SER8189_UG Ubuntu10.04 1. Go to icon at the right upper corner of desktop menu and click to open. 2. Select “Reliance Wi-Fi SER8189 XXXX” of your Wi-Fi network and apply it. (If this SSID does not appear, then click ‘More networks’.) 3. The default security for the Reliance Wi-Fi SER8189 is WEP 64-bit. The default security key is “12345”. Enter the key to continue connecting to the Reliance WiFi Page 12 / 33 Reliance Wi-Fi SER8189_UG SER8189. Note. Please ensure your wireless connection set as “Automatic (DHCP)” by going through System -> Administration -> Network Tools -> (Network Connections Window, choose ‘Wireless’ tab, click Edit) -> (Editing Auto Reliance WiFi SER8189 Window, choose IPv4 Settings tab, choose Automatic (DHCP), Click Apply) The screenshots for the steps are shown below. Page 13 / 33 Reliance Wi-Fi SER8189_UG CentOS5.5 1. Go to Applications -> Accessories -> Terminal. Command ‘iwlist eth1 scan’ Note. ‘Wireless Tool Package’ should be installed in your computer to use the above command. You will see wireless SSIDs and ‘Reliance Wi-Fi SER8189 XXXX’ should be shown as below. 2. Go to System -> Administration -> Network -> (Network Configuration Window, choose ‘Devices’ tab, select wireless profile and double click) (Wireless choose Device ‘General’ Configuration tab, and Window, select Page 14 / 33 Reliance Wi-Fi SER8189_UG ‘Automatically obtain IP address settings with DHCP’) (Choose ‘Wireless settings’ tab, input the SSID (Reliance Wi-Fi SER8189 xxxx) The default security for the Reliance Wi-Fi SER8189 is WEP 64-bit. The default security key is “12345” 3. (Network Configuration Window, choose ‘Devices’ tab, select wireless profile, click ‘Activate’ button and ‘Yes’ and ‘OK’) Your PC/Laptop has detected Reliance Wi-Fi SER8189. Follow the common procedure below. Page 15 / 33 Reliance Wi-Fi SER8189_UG 4. Open your web browser and enter http://192.168.5.1 into the address window. 5. Click Login button on the right top of the browser. The default ID and Password is admin/admin. 6. For Activation, follow page 7 (or page 10) of this User Guide. Page 16 / 33 Reliance Wi-Fi SER8189_UG The Browser Interface and Settings 1. Open your Web browser and enter http://192.168.5.1 into the address window. The browser interface will open. Menu Bar Number of users/devices Your Reliance Wi-Fi SER8189 uses a browser interface to configure the device. The browser interface lets you: View the status of aspects of your network. Page 17 / 33 Reliance Wi-Fi SER8189_UG Battery Level Set up Activation, Internet Profile, WEP or WPA security, MAC filtering, Port Filtering and Port Forwarding Set up a hotspot to allow a maximum of five connections to your device without having to share your network name and network key. Home The Home screen is the first screen you see after logging in to the browser interface. It is the main point of entry for all your work in the browser interface. The menu bar runs horizontally along the top of the browser interface. It shows how many users or Wi-Fi embedded devices are connected. It also displays information about your device’s connection strength and battery level. CDMA The CDMA menu allows you to set your authentication, Internet profile, network option and Internet connection information. Status Click Connect to connect to your network. The Reliance Wi-Fi SER8189 comes pre-configured with the information required to connect to the network. It will not normally require any additional configuration to the basic settings unless you are using the device behind a corporate firewall, and this may require the appropriate proxy server settings to be modified. It displays the following information: Number of bytes received and transmitted Duration of the current connection The device’s IP address and netmask Gateway IP address DNS server IP address Page 18 / 33 Reliance Wi-Fi SER8189_UG Internet Profile Internet Profile menu allows you to add / edit / delete your Profile name. Configuration Auto Connection Enable: The device will be connect to the CDMA network automatically when it is turned on. Hybrid: Device will operate in dual mode with Broadband+ and High Speed 1x periodically depending on network strength High Speed 1x: Device will operate only in High Speed 1x mode Broadband+ : Device will operate only in Broadband+ mode Page 19 / 33 Reliance Wi-Fi SER8189_UG Diagnostics This menu gives you the information of the device. Network The Network menu allows you to set domain name of the wireless browser interface and DHCP (Dynamic Host Configuration Protocol) Router Address The wireless browser interface’s default URL address is http://CDMA_AP.hotspot. The address can be used instead of IP address (192.168.5.1) at your convenience. The URL address also can be changed. Page 20 / 33 Reliance Wi-Fi SER8189_UG Network Address Server This menu allows you to modify Wi-Fi DHCP IP range. Note. DHCP Server: Enabling DHCP server allows the device to automatically assign a local IP address to a new device joining your network (such as wireless printer or an additional laptop). When DHCP server is disabled, you will have to assign static IP address to all devices on your network. Wi-Fi The Wi-Fi menu allows you to view status information for your Wi-Fi network and configure your hotspot. Status This Status menu gives you following status information: Network Name (also known as SSID) Security method in use Users (clients) information currently connected to the device Page 21 / 33 Reliance Wi-Fi SER8189_UG Basic This menu allows you to modify WiFi and Secure Profile. Network Mode: You can choose a type of wireless networking. Network Name (SSID): You can rename SSID. Default SSID is Reliance Wi-Fi SER8189 xxxx. Frequency: It is recommended to set in Auto always. Secure Profile: It shows a type of security that is being used in the device. You may modify Secure Profile by clicking View button. Multi SSID You can use Multi SSID with another secure profile. Enable Mode logically allows your device to be divided into two. When you want to share network with a certain user in a limited way, Multi SSID can be useful. Secure Profile This menu allows you to modify Secure Profile. Page 22 / 33 Reliance Wi-Fi SER8189_UG Click Add, define Secure Profile. You can set Profile Name, Security Method, Encryption and Passphrase. - WPA-PSK/WPA2-PSK: New Wi-Fi certification program mode - WEP(68bit or 128bit): Traditional Wi-Fi certification program mode - TKIP/AES: Data encryption mode 1. Type secure profile name in the Profile Name box. 2. Select a security protocol from the Security Method. (The Encryption box displays the corresponding encryption level.) 3. Enter a new network key in the Passphrase box (Permissible characters are listed in gray just under the box.) 4. Click Apply. Note. When you click Apply, you will need to reconnect to your router by closing your current view and re-opening a browser connection to http://192.168.5.1. Trusted MAC Filtering MAC Filter allows you to limit access to your device to only those devices with a specified MAC address (a unique code assigned to hardware such as network adapters). Page 23 / 33 Reliance Wi-Fi SER8189_UG Finding the MAC Address The MAC Address is also known as a hardware or physical address for a device, usually a network adapter. It consists of six pairs of numbers and letters (for example, 00:21:9B:1C:64:34). You can view the MAC address for any device connected to the Reliance Wi-Fi SER8189 device in the Wi-Fi Clients section of the Wi-Fi Status screen. (See “Wi-Fi Clients” on page 21.) Note. When you enable this feature for the first time, ensure you add your wireless MAC first, then click Apply. Advanced This menu allows you to configure your device to enable Port Filtering, VPN Passthrough, Port Forwarding, DMZ (Demilitarized Zone)Backup Configuration, Power Management, Activation, Wi-Fi Firmware upgrade etc. Firewall 1) Port Filtering Port filtering allows you to conserve bandwidth by preventing non-business applications from accessing the Internet, and to prevent applications such as online games from accessing the Internet. - Input the application value in the Name, Port and Protocol boxes. Page 24 / 33 Reliance Wi-Fi SER8189_UG 2) VPN Passthrough It is required if you are going to connect to a VPN. (Such as a corporate system) Traffic Control 1) Port Forwarding Port Forwarding allows designated users or applications to reach specified servers, such as FTP and DNS servers on your computer. Also, some online games require incoming access to work properly. Note. You cannot use port forwarding with some standard data accounts. To use port forwarding, you may need to request a static IP address from your carrier / service provider.. Page 25 / 33 Reliance Wi-Fi SER8189_UG 2) DMZ (Demilitarized Zone) DMZ function is a host on the internal network that has all ports exposed, except those ports otherwise forwarded. Set mode as Enable and enter the local static IP address. Management Note. When you change the default settings, keep your new information in a safe place. 1) Account Create or change administrator’s name and password. 2) Backup & Restore Backup menu allows you to save your settings to your PC, memory card, CD etc. And Restore menu allows you to restore previous saved settings. 3) Power Management Enable Ethernet port when you want to connect your computer directly to the device using a LAN (RJ45) cable. Page 26 / 33 Reliance Wi-Fi SER8189_UG Radio Off - You can use the Radio Off mode to customize your device to switch to a low power mode when not in use. There are 10 minute increments from 10-60 minutes. Select Never to disable this power saving feature. If you want to switch the WiFi Radio on earlier than the time you set in this menu, you can push the power button of the device one time lightly. A blue WiFi LED will appear that WiFi devices are ready to connect. Power Off - The Power Off mode allows you to choose when your device will automatically power off, to save battery life, due to inactivity. There are 10 minute increments from 10-60 minutes you can select. Select Never to disable this power saving feature. 4) Factory Default Click Update to reset your device to the default factory settings. 5) Activation Please refer page #7-10 for Activation procedure. Firmware Upgrade You can upgrade your device’s configuration file to your computer. Help Help menu gives you the information about customer service, User Guide, FAQ and Troubleshooting. Customer Service User Guide FAQ Troubleshooting Page 27 / 33 Reliance Wi-Fi SER8189_UG Part 2 FAQ Q: What is the Reliance Wi-Fi SER8189’s main purpose unlike other routers? A: The Reliance Wi-Fi SER8189 is a portable WiFi router that fits in the palm of your hand. It will allow you to connect up to 5 devices to access the Internet, such as laptops, digital cameras, portable game consoles or mobile phones. Q: What networks does the Reliance Wi-Fi SER8189 operate on? A: The Reliance Wi-Fi SER8189 operates on 3G wireless networks. Q: What are the air holes on the both side of the Reliance Wi-Fi SER8189? A: The air holes are designed to reduce the heat generated by the device itself while it used. Keep the device away from open flames, dusty conditions, and keep it dry for optimal performance. Q: What kind of security is available with the Reliance Wi-Fi SER8189? A: The Reliance Wi-Fi SER8189 supports advanced WiFi security protocol through standard methods such as WiFi Protected Access (WPA & WPA2) and the previous method of Wired Equivalent Privacy (WEP). More advanced settings are available in the Web based user interface. Q: What if the user forgets their Reliance Wi-Fi SER8189 password? A: The Reliance Wi-Fi SER8189 can be reset by powering on the device, remove the battery cover, and depress the small button near the bottom of the battery using a paper clip or pen and hold for 3 seconds. The Power LED will turn off-and-on twice to indicate reset is successful. The unit will power up with the factory default configuration. Q: What might the owner of the Reliance Wi-Fi SER8189 need to be aware of before sharing with multiple devices? A: With multiple devices or used as a temporary hotspot: If there are several heavy data users on at the same time, you may notice a degradation in performance Users are not allowed to access more than 5 devices to the Reliance Wi-Fi SER8189 in order to keep the devices’ data speed stable enough to be communicated without a problem. Be aware these users are contributing to your data usage. You may want to check your account online to see how much of a difference it is making and how close you are to any usage caps that may apply under your network connection plan. If all are accessing Reliance Wi-Fi SER8189 that is using the battery, the battery will drain faster than the Page 28 / 33 Reliance Wi-Fi SER8189_UG average of 3 hours usage time for one user. Q: Can a user connect the Reliance Wi-Fi SER8189 to their computer with a USB cable? A: When the Reliance Wi-Fi SER8189 is tethered via a USB cable to a computer, the device will not function as a hotspot. In this mode the Reliance Wi-Fi SER8189 can be charged, or re-charged only. Q. What is the LAN port of Reliance Wi-Fi SER8189 can be used for? A: The LAN Port of the Reliance Wi-Fi SER8189 is for users who have a laptop or desktop which does not have WiFi capability. Q: What is the average battery usage time? A: The battery will have on average 3 hours of active use time when connected to a single device and will discharge more rapidly as additional devices are connected (up to 5 WiFi devices are acceptable). There is 7.5 hours of standby time. Q: Why the Reliance Wi-Fi SER8189 turns off while in used and it wouldn’t turn on again? A: The red solid power LED indicates the battery is below 20% and if it’s blinking, it indicates the Reliance Wi-Fi SER8189 will turn off very soon. After the battery has run down, it turns off automatically. So you need to charge the battery using AC-DC adaptor. Please refer to the Quick Start Guide on page 12. Q: How close does the user’s WiFi enabled device need to be from the Reliance Wi-Fi SER8189? A: The device will need to be within 5 meters of the WiFi device to work. So a user can keep the Reliance Wi-Fi SER8189 in their pocket, laptop bag, or sitting on a desk or window ledge across a room (for better coverage). Q: Does the Reliance Wi-Fi SER8189 support voice calls, fax and/or text messaging? A: Voice calls, text messaging and fax are not supported. Q: Can the Reliance Wi-Fi SER8189 be used for memory storage? A: The Reliance Wi-Fi SER8189 does not support onboard or removable memory storage. Q: How long does a user need to charge the battery before they begin using? A: The battery must be fully charged before using the Reliance Wi-Fi SER8189 for the first time. We recommend a minimum of 3 hours charging time before first use. After the initial use and set-up, you may use with the battery alone or with the battery and the AC power. Q: Does the Reliance Wi-Fi SER8189 require software installation? A: The Reliance Wi-Fi SER8189 comes with a browser URL that allows the user to configure the device. Page 29 / 33 Reliance Wi-Fi SER8189_UG You can activate, select a profile, establish security and set more advanced settings without installing any software. Q: What does the user of the Reliance Wi-Fi SER8189 need to begin to do configuration and activation? A: See “Device Activation” of this manual for activation instructions. (page 7 ~10) Q: What if the Reliance Wi-Fi SER8189 can not access the internet even though the unit has been activated? A: Verify your network & signal strength for optimal performance. Q: When will a user of the Reliance Wi-Fi SER8189 need to access the browser interface? A: The Reliance Wi-Fi SER8189 browser interface will only need to be accessed or used when configuring your device for the first time or changing the security settings or establishing more advanced settings. Q: Why does the Reliance Wi-Fi SER8189 gets warm? A: The Reliance Wi-Fi SER8189 has two radios inside: the 3G CDMA radio and the WiFi radio. In fringe areas of low 3G coverage, the transmit power will be at the max and therefore generate more heat. The device has been environmentally tested and approved by the FCC. Page 30 / 33 Reliance Wi-Fi SER8189_UG Part 3 Glossary ● 802.11 (b, g, n) — A set of WLAN communication standards in the 2.4, 3.6 and 5 GHz frequency bands. ● Access Point (AP) — A device that allows wireless communication devices to connect to a wireless network using a standard such as WLAN. ● DHCP — Dynamic Host Configuration Protocol. A network application protocol used to obtain configuration information for an Internet Protocol network. ● DHCP Server — A server that uses DHCP to obtain configuration information for operation in an Internet Protocol network. ● DNS — Domain Name System. A system for converting host names and domain names into IP addresses on the Internet or on local networks that use the TCP/IP protocol. ● ESN — Electronic Serial Number. A unique 32-bit number embedded in a wireless device that identifies the device. ● MEID — Mobile Equipment Identifier. The unique second-generation serial number assigned to the Reliance WiFi SER8189 for cellular network use. ● Firmware — A program that internally controls an electronic device. ● FTP — File Transfer Protocol. A network protocol for exchanging files over a TCP network. ● Gateway — A network point that acts as an entrance to another network that uses a different protocol. ● Host Name — The unique name by which a network-attached device is known on a network. ● Hotspot — A WLAN access point or area for connecting to the Internet. ● HTTP — Hypertext Transfer Protocol. An application-level protocol for accessing the World Wide Web over the Internet. ● IP address — Internet Protocol address. The address of a device attached to an IP network (TCP/IP network). ● LAN — Local Area Network. A type of network that lets a group of computers, all in close proximity (such as inside an office building), communicate with one another. ● MAC Address — A number that uniquely identifies a given network adapter on a LAN. MAC addresses are 12digit hexadecimal numbers. ● MIN — Mobile Identification Number. It refers to the 10-digit unique number that a wireless operator uses to identify the mobile phone. A MIN is a number that uniquely identifies a mobile working under TIA standards for Cellular and PCS technologies ● MSID — Mobile Station ID. A number provisioned by a service provider to a mobile phone that identifies that phone to the network. ● MSL — Master Subsidy Lock. A numeric code for accessing certain phone settings. ● NAI — Network Access Identifier. A standard way of identifying users who request access to a network. ● Network Mask — A number that allows IP networks to be subdivided for security and performance. Page 31 / 33 Reliance Wi-Fi SER8189_UG ● NNTP — Network News Transfer Protocol. An Internet application protocol for reading and posting Usenet (newsgroup) articles. ● POP — Post Office Protocol. An Internet protocol for retrieving email from a remote server over a TCP/IP connection. ● Port — A virtual data connection used by programs to exchange data. ● Port Forwarding — A process that allows remote devices to connect to a specific computer within a private LAN. ● Port Number — A number assigned to a user session and server application in an IP network. ● Protocol — A standard that enables connection, communication, and data transfer between computing endpoints. ● PPTP — Point-to-point Tunneling Protocol. A method for implementing virtual private networks that does not provide confidentiality or encryption. ● PRL — Preferred Roaming List. A list that your wireless phone or device uses to determine which networks to connect with when you are roaming. ● RFB — Remote Frame Buffer. A protocol for remote access to graphical user interfaces. ● Router — A device that connects two networks. ● RTP — Real-time Transport Protocol. A packet format for streaming multimedia over the Internet. ● SMTP — Simple Mail Transfer Protocol. An Internet standard for email transmission across IP networks. ● SSID — Service Set Identifier. The name assigned to a WLAN network. ● TCP — Transmission Control Protocol. A core protocol for transmitting and receiving information over the Internet. ● TCP/IP — Transmission Control Protocol/Internet Protocol. A communications protocol developed under contract from the U.S. Department of Defense to internetwork dissimilar systems. ● Telnet — Telecommunication Network. A network protocol used on the Internet or on local area networks. ● TFTP — Trivial File Transfer Protocol. A file transfer protocol with a subset of FTP functionality. ● UDP — User Datagram Protocol. A simple transport protocol used to transfer information on the Internet. ● VNC — Virtual Network Computing. A graphical desktop sharing system that uses the RFB protocol to remotely control another computer. ● VPN — Virtual Private Network. A secure private network that runs over the public Internet. ● VPN Passthrough — A feature that allows a client to establish a tunnel only with a specific VPN server. ● WAN — Wide Area Network. A public network that extends beyond architectural, geographical, or political boundaries (unlike a LAN, which is usually a private network located within a room, building, or other limited area). ● WEP — Wired Equivalent Privacy. An IEEE standard security protocol for 802.11 networks. Superseded by WPA and WPA2. ● WLAN — Wireless Fidelity. Any system that uses the 802.11 standard developed and released in 1997 by the IEEE (Institute of Electrical and Electronics Engineers). ● WLAN Client — A wireless device that connects to the Internet via WLAN. ● WLAN — WLAN LAN. A typically low-power network that transmits a wireless signal over a span of a few Page 32 / 33 Reliance Wi-Fi SER8189_UG hundred feet and usually only to stationary devices. ● WPA/WPA2 — WLAN Protected Access. A security protocol for wireless 802.11 networks from the WLAN Alliance. ● WWAN — Wireless Wide Area Network. Wireless connectivity to the Internet achieved using cellular tower technology. This service is provided through cellular providers. WWAN connectivity allows a user with a laptop and a WWAN device to surf the Internet, check email, or connect to a virtual private network (VPN) from anywhere within the regional boundaries of the cellular service. Page 33 / 33 Reliance Wi-Fi SER8189_UG