1
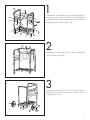
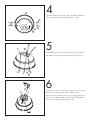
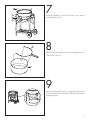
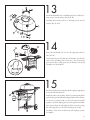
Charcoal Barbecue
with lighting System
S A F E U S E , C A R E A N D A S S E M B LY M A N U A L
FOR YOUR SAFETY
If You Smell Gas
1. Shut off gas to the appliance.
2. Extinguish any open flame.
3. Open lid.
4. If odour continues, immediately call your
gas supplier or your fire department.
FOR YOUR SAFETY
1. Do not store or use gasoline or other flammable
vapours and liquids in the vicinity of this or any
other appliance.
2. An LP cylinder not connected for use shall not be
stored in the vicinity of this or any other appliance.
WA R N I N G
Failure to follow all of the Manufacturer’s instructions
could result in hazardous fires, explosions, property
damage, or serious personal injury or even death.
1
YEAR
LIMITED
WA R R A N T Y
85-1035-0
WA R N I N G
Follow all leak check procedures carefully prior
to operation of barbecue, even if
barbecue was dealer assembled. Do not try to
light this barbecue without reading the
Read and save this manual for future reference.
Lighting Instructions section of this manual.
If pre-assembled, leave this manual
with unit for consumer’s future reference.
For product inquires, parts, and warranty
and troubleshooting support, please call
1-877-707-5463
THIS BARBECUE IS FOR
O U T D O O R U S E O N LY
TABLE
OF
CONTENTS
Warranty . . . . . . . . . . . . . . . ii
WA R R A N T Y
Please call toll-free 1-877-707-5463 for warranty and service. Have
your serial number and sales receipt handy. Do not return unit to
the store.
Danger, . . . . . . . . . . . . . . . . 1
Warnings
Storage . . . . . . . . . . . . . . . . 3
Operating Instructions . . . . 3
Cleaning and . . . . . . . . . . . . 4
Maintenance
Troubleshooting Guide . . . . 5
Parts List and. . . . . . . . . . . . 6
Parts Diagram
Assembly Instructions . . . . . 8
Serial number is required for warranty; please keep proof of purchase with
manual. Please mail in warranty card provided to ensure registration of
your unit.
This MasterChef product carries a one-year limited warranty against
defects in manufacturing workmanship for all upper and lower castings,
shelves, charcoal and cooking grates, lid, regulator and burner. Paint is
covered for one-year.
This Limited Warranty shall be limited to the repair or replacement of
parts that prove defective under normal use and service and which on
examination shall indicate, to Trileaf Distribution’s satisfaction, they are
defective. Trileaf Distribution reserves the right to request the return of
defective parts. Before returning any parts, contact the toll-free hotline
1-877-707-5463.
If Trileaf Distribution confirms the defect and approves the claim, Trileaf
Distribution will elect to replace such parts without charge. The foregoing
warranty does not apply to defects resulting from faulty installation, operation, disassembly, alterations or remodeling, or misuse, misapplication,
neglect, abuse, accident, tornado, hurricane, and earthquake; or lack of
proper maintenance, cleaning and care.
Warranty will not apply if this product is used for commercial or rental
purposes. This warranty shall not extend to anyone other than the original purchaser of this product. Should this product become defective
within the stated warranty period, do not return to store, but call
1-877-707-5463. Have the serial number and sales receipt handy.
Note: Without the serial number, the warranty cannot be honoured.
Purchaser: By accepting delivery of this barbecue, the purchaser hereby
accepts the foregoing and expressly waives any other remedy and damages,
direct, indirect, and consequential.
ii
DANGER
Failure to follow the Dangers, Warnings and Cautions contained in this Owner’s
Manual may result in serious bodily injury or death, or in a fire or an explosion
causing damage to property.
WA R N I N G S
•
Do not store a spare or disconnected propane cylinder under or near
this barbecue.
• Improper assembly may be dangerous. Please follow all the assembly instructions
in this manual.
• Combustible materials should never be within 24” (50 cm) of the top, bottom,
back or sides of the barbecue.
• Do not put a barbecue cover or anything flammable on or in the storage area
under the barbecue.
• Do not use lava rocks in your barbecue.
• Never lean over the barbecue when lighting.
• Barbecue should be cleaned on a regular basis.
• Do not use gasoline, liquid fire starter or alcohol on the charcoal at any time.
Do not use any form of self-lighting charcoal at any time.
• Infants, children and pets should never be left unattended near the barbecue.
• Make sure ash-catcher is in place when using the barbecue.
• Always remove the lid before lighting, either manually or with the igniter.
Lid must remain “OFF” until charcoal is fully ignited.
• Always put charcoal in cylinder provided, or on top of the lower (charcoal)
grate. Do not put charcoal directly in the bottom of the bowl.
• Remove ashes from the ash catcher only after all coals have been fully
extinguished. Never touch grates (either charcoal or cooking), ashes,
or coals to see if they’re hot.
• Do not use water to control flare-ups or extinguish coals, as it may damage
the porcelain finish; slightly close bottom air vents (dampers) and use the lid.
To extinguish coals when finished cooking, close all vents (dampers) after
putting lid on the bowl.
• Barbecue mitts should always be worn while cooking, adjusting air vents
(dampers), adding charcoal, and handling the thermometer or lid.
• Never dump hot coals where they might be stepped on or be a fire hazard.
Never dump ashes or coals before they are fully extinguished. Do not store
barbecue until ashes and coals are fully extinguished.
• After a period of storage and/or non-use, check for gas leaks and burner
obstructions before using. See instructions in this manual for correct procedures.
• Do not operate the barbecue if a gas leak is present.
• Do not use a flame to check for gas leaks.
• Should the burner go out at any time during operation, turn tank valve off.
Remove lid and wait five minutes before attempting to relight, using the
lighting instructions in this manual.
• The conversion, or attempted use of natural gas in this barbecue is dangerous
and will automatically void your warranty.
• Do not attempt to disconnect the gas regulator form the tank or any gas fitting
while the barbecue is in use.
• Use only the LP gas regulator that is recommended for your barbecue.
• A dented or rusty LP tank may be hazardous and should be checked by your
propane supplier. Do not use an LP tank with a damaged valve.
1
Although your LP tank may appear to be empty, it may still contain propane.
The tank should be transported and stored accordingly.
• If you see, smell or hear gas escaping from the LP tank:
1) Move away from the LP tank.
2) Do not attempt to correct the problem yourself.
3) Call fire department.
• Use only the LP tank recommended for your barbecue. Do not connect anything
larger than a 16 oz. cylinder.
• You should exercise care when operating your barbecue. It will be hot during
cooking and/or heating-up, and should never be left unattended.
•
WA R N I N G
This barbecue is for outdoor use only.
Use only in a well-ventilated area. Do not use in a garage,
building, or any other enclosed area.
Minimum clearance to adjacent combustible materials:
• 76 cm (30˝) from furthest protruding edge on side of barbecue.
• 76 cm (30˝) from furthest protruding edge on back of barbecue.
Always keep the area around this barbecue clean and clear of any and
all combustible materials such as gasoline or other inflammable liquids,
paper or oily rags.
• Do not operate this barbecue under any overhanging or
unprotected construction.
• Remember this barbecue is for outdoor use only and is not for use on
any boat or recreational vehicle.
• Use this barbecue outdoors in a well-ventilated area and we recommend
at least 3m (10’) from any dwelling or other buildings.
• The entire barbecue gets hot when in use. Do not leave unattended.
• Keep any electrical supply cord and the fuel supply hose away from
any heated surface.
• Do not use in garages, or any other enclosed area.
• Do not leave your barbecue unattended while in operation.
• Do not obstruct the flow of combustion and ventilation air to the barbecue.
• Do not use while under the influence of drugs or alcohol.
• Do not store any spare L.P. (propane) cylinder, full or empty,
under or near your barbecue.
• Do not allow children or pets to play anywhere near the barbecue.
•
2
STORAGE
When the outdoor cooking season is over and you’re going to store the unit for the
winter, please do the following:
• After removing and cleaning the cooking grill (lightly oil the grill after cleaning)
wrap them in paper and store indoors.
• The barbecue, after being covered, can be stored outdoors.
• Do not store the L.P. cylinder in an enclosed area.
When the barbecue is not in use, the gas must be turned off at the cylinder valve.
The barbecue and cylinder need to be stored outdoors, in a well-ventilated area.
Do not store the barbecue in a garage or near heat. If there is a need for the barbecue to be stored indoors, remove the cylinder. Continue to store the cylinder
outside in a well-ventilated area and make sure the cylinder’s safety cap is firmly
threaded on the valve.
OPERATING
Lighting Procedures
INSTRUCTIONS
Danger
Open lid before lighting. Do not use any flammable liquids such as starting fluid,
gasoline, alcohol or any form of self-lighting charcoal at any time, including when
manually lighting. Failure to do so will cause serious bodily injury or death.
1) Open lid
2) Clear any ashes from the chamber by moving the handle side to side.
3) Open chamber vents.
4) Position filled charcoal tube over burner.
5) Turn gas supply “ON” at propane tank.
Warning: Do not lean over open barbecue while lighting.
6) Push igniter until burner lights.
Caution: Flame may be difficult to see on a bright day.
7) Turn gas supply “OFF” after charcoal has started to burn (approximately 3
to 5 minutes).
8) Remove the tube with the tool for spreading charcoal, put the tube on the
bottom shelf and spread the charcoal evenly on the charcoal grate.
9) You can begin cooking when briquettes have a light coating of grey ash
(approx. 25 to 30 minutes).
3
Insect Alert
The barbecue, as well as any outdoor gas appliance, attracts spiders and insects.
They can nest in the Venturi section of the burner tube causing gas to flow back
out of the air shutter. This could result in a fire in and around the burner tube
under the chamber. It can cause serious damage to your barbecue, rendering it
unsafe to operate.
We strongly recommend that you inspect and clean the burner tube at least once
a year, or if any of the following symptoms appear:
1) Smell of gas in conjunction with the
burner flames appearing very yellow and lazy.
2) Burner makes popping noises.
Danger
Failure to correct these symptoms may result in a fire which can cause serious bodily
injury or death and cause damage to property.
CLEANING
AND MAINTENANCE
After a period of non-use, we recommend you perform the following maintenance
and cleaning procedures at least once a year, especially at the start of a new season.
1) Remove ashes after coals are fully extinguished.
2) Remove the grates and charcoal tube.
3) Clean the porcelain finish with a cleaner that will soften accumulated grease.
4) Wipe out with paper towels. Wash with a mild detergent and water. Rinse well
with clear water and wipe dry.
To Clean Kettle and Lid
While lid is warm, wipe the inside with a paper towel to prevent grease buildup.
For outer surfaces, use a warm soapy water solution and rinse well with water.
To Clean Burner
At a minimum of twice a year, it is important to remove the burner and clean it,
making sure that all dirt and rust is removed. Use a wire to clean out the hole in
the burner. Make sure all holes are clear. If the burner has been damaged or has
rusted, replace it as soon as possible. If the burner is in good shape, reinstall it in
the correct position.
Recommended Cleaning Materials
Mild dishwashing liquid detergent
Hot water
• Nylon cleaning pad
• Wire brush
• Paper clip
• Putty knife/scraper
• Compressed air
•
•
Caution: Do not use cleaners that contain acid, mineral spirits or xylene.
4
TROUBLESHOOTING GUIDE
Problem
Possible Causes
Corrective Action
Burner flame appears
yellowish/orange,
accompanied with
smell of gas
•
Burner flame should be bluish in colour.
Inspect burner for possible obstructions
•
Clean burner.
Burner does not
light, or flame is low
•
Is propane cylinder low, or empty?
•
Throw it away or refill the tank.
•
Does the burner light with a match?
•
If you can light the burner with a match,
then check the ignition system.
•
Is regulator open?
•
Turn regulator to the open position.
Burner flame
pattern is erratic
•
Is the burner clean?
•
Clean burner.
Lid appears
to be peeling
•
The top and insides of the lid are porcelain-coated.
It is not paint. The deposit you see is baked on
grease that has turned into carbon and is flaking off.
This is not a defect.
•
Clean the lid.
Too much
heat/Excessive
flare-ups
•
Excessive fat in meat.
•
Trim meat,decrease fuel supply.
•
Grease drain plugged.
•
Clean cooking chamber and burner.
•
Cooking system not positioned correctly.
•
Position cooking system correctly.
For product inquires, parts, and warranty and troubleshooting support, please call
1-877-707-5463.
5
PARTS LIST
85-1035-0
6
Item No.
Quantity
Description
Part No.
1
1
Lid
C423-0001-9005
2
1
Hook of Lid
C423-0035-9031
3
1
Handle, Lid
C402-0001-0000
4
1
Air Shutter,Lid
C423-0036-9082
5
1
Thermometer
G401-0005-9000
6
1
Bezel, thermometer
G401-0006-0081
7
1
Cooking Chamber
C423-0037-9001
8
3
Ash Tray Stand Brackets
C423-0038-9031
9
1
Fixed Plate 1, Burner
C423-0039-9031
10
2
Chamber Brace
C423-0002-9031
11
1
Burner
C423-0003-9082
12
1
Fixed Plate 2, Burner
C423-0004-9031
13
1
Orifice Clip
C423-0040-9082
14
1
Electrode Set
C423-0005-9000
15
1
Lower Air Shuttle Rivet
C423-0400-9000
16
1
Ash Tray Stand
C423-0007-9082
17
1
Ash Tray
C423-0008-9082
18
1
Handle, Ash Tray
C423-0009-9082
19
2
Side Shelf
C423-0010-9031
20
6
Wooden Surface1,Side Shelf
C423-0011-9035
21
2
Wooden Surface 2, Side Shelf
C423-0012-9035
22
1
Mount 1, Left Shelf
C423-0013-9031
23
1
Mount 2, Left Shelf
C423-0014-9031
24
1
Mount 1, Right Shelf
C423-0016-9031
25
1
Mount 2, Right Shelf
C423-0017-9031
26
1
Cart Side (L)
C423-0018-9031
27
1
Cart Side (R)
C423-0019-9031
28
1
Control Panel
C423-0020-9031
29
1
Tank Stand
C423-0300-9031
30
1
Fastening Belt, Tank
C423-0021-9000
31
1
Front Panel
C423-0022-9031
32
1
Bottom Shelf
C423-0023-9031
33
1
Lid Brace
C423-0024-9082
34
4
Screw Sleeve
G301-0021-9082
35
4
Leg Cap, Cart Side (R)
C423-0033-9000
36
1
Tube
C423-0026-9082
37
1
Handle, Tube
C423-0027-9082
38
1
Tool for spreading charcoal
C423-0028-9082
39
1
Cooking Grate
C423-0029-9081
40
1
Charcoal Grate
C423-0006-9082
41
1
Regulator
C423-0031-9000
42
1
Igniter
G201-0024-9000
43
2
1/4” – 20UNC Screw
G206-0024-0087
44
2
Wheel
G206-0025-9000
45
2
19 mm Washer
G401-0008-9086
3
4
5
6
1
2
39
38
11
40
14
22
7
10
19 21
13
41
37
20
12
36
9
15
30
8
16
18
33
17
43
28
45
44
25
29
23
42
34
31
26
24
32
35
27
7
A S S E M B LY
Tools Needed for Assembly
INSTRUCTIONS
•
#2 Phillips® Screwdriver
• 1/4˝ slotted screwdriver
• No.10 slotted screwdriver
• Adjustable wrench
• Pliers
Before assembling the barbecue, please ensure that you have all the hardware
needed and read these instructions carefully. Assemble the barbecue on a flat,
clean surface.
Note: Do not fully tighten all the nuts during this initial stage.
Supplies Needed: 16 oz. propane cylinder.
If there is a missing part, do not go back to the store. Call the helpline at
1-877-707-5463 to order your part. Have your serial number and receipt handy.
Key A: No.10 – 24UNC Nut – 13 Pcs.
Key B: No.8 – 24UNC Nut – 1Pcs.
Key C: 1/4” – 20UNC Nut – 34Pcs.
Key D: No.8 – 24UNC x 20 Screw – 1 Pcs.
Key E: No.10 – 24UNC x 10 Screw – 10 Pcs.
Key F: No.10 – 24UNC x 13 Screw – 7 Pcs
Key G: 1/4” x 13 Screw – 12Pcs.
Key H: 1/4” x 30 Screw – 4 Pcs.
Key I: 1/4” x 57 Screw – 6 Pcs.
Key J: 1/4” x 35 Screw – 8 Pcs.
Key K: 5 mm Flat Washer – 18 Pcs.
Key L: 19 mm Washer – 2Pcs.
Key M: 7 mm Flat Washer – 38Pcs.
Key N: 7 mm Lock Washer – 32Pcs.
Key O: 5 mm Lock Washer – 3Pcs.
Key P: ST4.2 x 10 Tapping Screw – 1Pcs.
8
1
27
31
C
M
I
N
29
Assemble the bottom shelf (No.32) to the cart sides (No.26, 27)
using screws, nuts & washers (Key H, C, M). Assemble the
front panel (No.31) and the tank stand (No.29) to the cart sides
using screws, nuts & washers (Key I, C, M).
26
H
32
M
C
28
F
2
K
Assemble the control panel (No.28) to the cart sides using
screws & washers (Key F, K).
3
Assemble the wheels to the bottom of the legs as shown.
Attach the wheel (No.44) using screws (No.43), nuts &
washers (Key C, L, M).
43
C
N
M
44
L 45
9
4
7
Assemble the chamber brace (No.10) to both sides of chamber
(No.7) using screws, nuts & washers (Key G, C, M).
10
G
C
N
M
E
8
5
Assemble the ash tray stand brackets (No.8) to the bottom of
the chamber using screws, nuts & washers (Key E, A, K).
K
A
6
A
K
15
Assemble the ash tray stand (No.16) to the ash tray stand
brackets using screw, nuts & washers (Key F, A, K).
16
Insert the lower air shuttle (No.15) to the appropriate slot of
the ash tray stand and assemble to the bottom of the chamber
using screws, nuts & washers (Key E, A, K).
F
K
A
E
10
7
H
M
Attach the chamber to the cart sides using screws, nuts &
washers (Key H, C, M).
N
C
18
8
Insert the ash tray handle (No.18) into the appropriate hole
of the ash tray (No.17).
17
9
Lift the ash tray handle up into the appropriate slot of the
ash tray stand and rotate clockwise. Ash tray handle will fit
securely into place.
11
10
14
P
Carefully push the electrode set (No.14) into the burner
(No.11) and secure in place using tapping screw (Key P).
A
K
Insert the burner into the appropriate hole of the chamber
and secure the burner to the cart side (R) and chamber using
screws, nuts & washers (Key E, A, K).
11
E
11
M N
23
C
22
24 25
Assemble the left shelf (mount 1) (No.22) and the left shelf
(mount 2) (No.23) to the left side shelf (No.19) using screws,
nuts & washers (Key G, C, M, N).
G
19
Assemble the right shelf (mount 1) (No.24) and the right
shelf (mount 2) (No.25) to the right side shelf (No.19) using
screws, nuts & washers (Key G, C, M, N).
C
N
M
J
Assemble the left side shelf assembly by sliding it into position as shown. Repeat procedure with right shelf assembly.
Fasten each shelf assembly into position using screws, nuts
& washers (Key J, C, M, N), two per shelf.
12
Assemble the lid brace (No.33) to the right side shelf assembly
using nuts & washers (Key L, C, M).
Connect tightly the electrode set and insert the igniter (No.42)
into the appropriate hole of the control panel.
42
33
12
13
3
D
Attach the lid handle (No.3) and lid hook (No.2) to lid (No.1)
using screws, nuts & washers (Key D, B, K).
E
4
Assemble the air shutter (No.4) to lid using screws, nuts &
washers (Key E, A, K).
1
K
A
2
K
B
39
38
40
14
Insert the tube handle (No.37) into the appropriate hole of
tube (No.36).
Set the charcoal grate (No.40) into the chamber. Set the tube
and tool for spreading charcoal (No.38) onto the charcoal
grate, and set the cooking grate into the chamber. Set the lid
assembly onto the chamber.
37
36
15
Pass the fastening belt of tank (No.30) through the appropriate
slot in the tank stand (No.29).
41
Attach the tank to the regulator (No.41) by removing the plastic
cap from the top of the tank and screwing tank into the connector.
Set the 16 oz. propane tank onto the tank stand and attach
regulator to burner, aligning slot in end of regulator with dimple in burner. Push in and tightly lock the connection using
the orifice clip (No.13). Close the fastening belt of tank.
Assembly of the charcoal barbecue with lighting system
is complete.
13
DISTRIBUTOR
Trileaf Distribution Trifeuil
Toronto, Canada
M4S 2B8


![[WPE 039] E20101 BBQ Manual E 12/22/04 2:05 AM](http://vs1.manualzilla.com/store/data/007299302_1-29c468208e73d97f1377c17012db49e6-150x150.png)
![[MAS 014] G10601 BBQ Manual F](http://vs1.manualzilla.com/store/data/006311820_1-7d1d18183064467851c215a7ff576cdd-150x150.png)