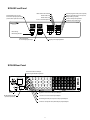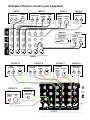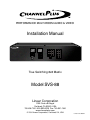
1
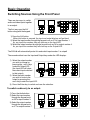
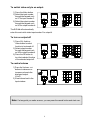
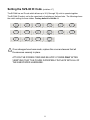
PERFORMANCE MULTI-ROOM AUDIO & VIDEO
Installation Manual
SVS-88
-
+
-
+
-
+
1
2
3
4
5
6
Audio Preset
7
8
9
Video Cancel
0
AV
Off
Func
Enter
True Switching 8x8 Matrix
Model SVS-88
Linear Corporation
2055 Corte del Nogal
Carlsbad, CA 92009, USA
760-438-7000 800-999-5225 Fax: 760-931-1340
www.channelplus.com
© 2004 Linear Corporation, Carlsbad, CA, USA
revision date 02/04A
Thank you for purchasing the SVS-88. The SVS-88 is a crosspoint switching
matrix. It allows 8 audio/video inputs to be switched to 8 unique audio/video outputs with virtually no switching loss. The matrix is controlled via a pushbutton front
panel, easy to use IR, or RS-232 interface. The unit provides broadcast quality
switching of S-Video, analog stereo/audio and coaxial digital audio signals (or
composite video). The SVS-88 provides maximum flexibility for both home and
commercial applications allowing fewer peripheral components to provide
consistently high quality audio/video throughout the installation.
This operation manual is divided into sections based on the complexity of your
application. For most installations, Basic Operation will be sufficient. This
section describes how to use the front panel as well as programming a learning
infrared remote with a few useful IR commands. Advanced Operation will detail
how to access the large array of commands using the RS-232 port and a control
device such as a PC, AMX or Crestron controller. Also, the Advanced Operation
section will detail the use of additional IR commands for more complex routing
functions.
Be careful when unpacking the SVS-88. This electronic unit is susceptible to damage
from dropping or placing heavy objects on top of it. Save the original package and all
enclosed packing material in case the unit needs to be returned. Damage due to shipping
in cartons other than the original package is not covered under the warranty.
Any modifications or improper use of the SVS-88 will void the warranty. Please read
all information and instructions concerning this system before installing.
Please call Linear with questions or concerns about the SVS-88. We are happy to assist
you with any problems you may be experiencing. If you are unsure of any aspect of your
installation, please contact one of our technicians at Linear.
DECLARATION OF CONFORMITY
THIS DEVICE COMPLIES WITH PART 15 OF THE FCC RULES. OPERATION IS
SUBJECT TO THE FOLLOWING TWO CONDITIONS :
(1) THIS DEVICE MAY NOT CAUSE HARMFUL INTERFERENCE.
(2) THIS DEVICE MUST ACCEPT ANY INTERFERENCE RECEIVED, INCLUDING
INTERFERENCE THAT MAY CAUSE UNDESIRED OPERATION.
ANY CHANGE OR MODIFICATION TO THIS DEVICE WITHOUT THE PERMISSION OF
CHANNELPLUS MAY VOID THE USER'S AUTHORITY TO OPERATE THIS
EQUIPMENT .
1
Important Safety Instructions
Read these Instructions.
CAUTION
RISK OF ELECTRICAL SHOCK
DO NOT OPEN
Keep these Instructions.
CAUTION: DO NOT REMOVE COVER. NO
USER SERVICEABLE PARTS INSIDE.
REFER SERVICING TO QUALIFIED
SERVICE PERSONNEL.
Heed all Warnings.
The lightning flash with arrowhead symbol, within an
equilateral triangle, is intended to alert you to the
presence of uninsulated "dangerous voltage" within
the product's enclosure that may be of sufficient
magnitude to constitute a risk of electrical shock to
persons.
Follow all Instructions.
Do not use this Apparatus near Water.
The exclamation point within an equilateral triangle
is intended to alert you to the presence of important
operating and maintenance (servicing) instructions
in the literature accompanying the appliance.
Clean only with a Dry Cloth.
Do not block any Ventilation Openings. Install in accordance with the
manufactures instructions.
Do not install near any heat sources such as radiators, heat registers, stoves or other
apparatus (including amplifiers) that produce heat.
Do not defeat the safety purpose of the grounding type plug. A grounding type
plug has two blades and a third grounding prong. The third prong is provided for
your safety. If the provided plug does not fit into your outlet, consult an electrician for
replacement of the obsolete outlet.
Protect the power cord from being walked on or pinched particularly at plugs,
convenience receptacles and the point where they exit from the apparatus.
Only use attachments/accessories specified by the manufacturer.
Unplug this apparatus during lightning storms or when unused for long periods of time.
Refer all servicing to qualified service personnel. Servicing is required when the
apparatus has been damaged in any way, such as power supply cord or plug is
damaged, liquid has been spilled or objects have fallen into the apparatus, the
apparatus has been exposed to rain or moisture, does not operate normally or has
been dropped.
2
2
WARNING:
There are no user serviceable parts inside. Refer all servicing to
qualified service personnel.
WARNING:
To reduce risk of fire or electric shock, do not expose the SVS-88 to
extreme heat, extreme cold, moisture or water. This apparatus should
not be used near water - for example, near a bathtub, washbowl,
kitchen sink, laundry tub, in a wet basement, or near a swimming pool,
etc. Do not allow foreign objects to get into the enclosure. If the unit
is exposed to moisture, or a foreign object gets into the enclosure,
immediately disconnect the power cord from the wall. Take the unit to
a qualified service person for inspection and the necessary repairs.
The SVS-88 operates off power sources 100 to 240 VAC. It may also be operated at 50/60 Hz
line frequency. The unit is autosensing for power configuration.
The appliance should be situated so that its location or position does not interfere with its proper
ventilation. For example, the appliance should not be situated on a bed, sofa, rug, or similar
surface, that may block the ventilation openings; or placed in a built-in installation, such as a
bookcase or cabinet that may impede the flow of air through the ventilation openings.
Care should be taken so that objects do not fall into and liquids are not spilled into the inside of
the appliance.
The SVS-88 is designed for set top usage only. The SVS-88 must be placed on a fixed, level
surface strong enough to support its weight.
Connect the SVS-88 to the power outlet only with the supplied 3-prong grounded power
supply cord or an exact equivalent. The cable should be connected to a properly grounded
3-conductor wall outlet. Do not modify the supplied cable in any way. Extension cords must
be rated for adequate current. Power cord for countries other than North America not included.
Do not route the power cord where it can be crushed, pinched, bent at severe angles,
exposed to heat, or damaged in any way. If the cord shows any sign of wear or damage,
immediately stop using it and obtain a proper replacement from a qualified service agency or
from the Linear service department.
If the SVS-88 shows signs of improper operation, or if it has been dropped or damaged in
any way, immediately disconnect the power cord from the power outlet. Contact the Linear
technical service department and speak to a qualified service technician to determine if
the unit needs to be returned to Linear for repair. See the back of this manual for futher
information regarding returning SVS-88 units.
3
3
SVS-88 Front Panel
Route both Audio & Video
Enter IR program mode (code required)
Route Audio only
Input Up/Down to be routed
to the currently displayed output
(enter button required to execute)
Execute a predefined preset sequence
(programming required)
Route Video only
Cancel a front panel operation
Complete entry of data input
Turn a selected output off
SVS-88
88
-
+
IR receiving/
IR teaching window
88
-
+
-
+
1
2
3
4
5
6
Audio Preset
7
8
9
Video Cancel
0
Volume Up/Down
of current displayed output
AV
Off
Func
Enter
Display next output Up/Down
SVS-88 Rear Panel
Direct connection for IR Input
when using distribution expansion
8
Serial No.
RS-232
RS-485 Expansion Bus
(for future products)
Right line level stereo audio Inputs/Outputs
Left line level stereo audio Inputs/Outputs
Coaxial digital audio (or composite video) Inputs/Outputs
S-Video or composite video (with adapter) Inputs/Outputs
4
E x a m p le o f h o w
to c o n n e c t y o u r e q u ip m e n t
IN P U T 1
V C R
A U D IO
L
IN P U T 2
D V D
S -V ID E O
O U T
O U T
R
A U D IO
L
O U T
R
IN P U T 3
D IG IT A L
O U T P U T
(C O A X IA L )
S -V ID E O
O U T
S T E R E O
S A T -1
D IG IT A L
O U T P U T
(C O A X IA L )
S -V ID E O
O U T
IN P U T 5
C A M E R A
V ID E O
(U S IN G
S -V ID E O
IN P U T 4
O U T
A D A P T E R )
A U D IO
L
O U T
R
IN P U T 6
C A B L E
D IG IT A L
O U T P U T
(C O A X IA L )
S -V ID E O
O U T
IN P U T S
O U T P U T 5
V C R
A U D IO
L
IN
R
O U T P U T 6
A /V R C V R
S -V ID E O
IN
A U D IO
L
IN
R
D IG IT A L
IN P U T
(C O A X IA L )
O U T P U T 7
S -V ID E O
IN
P L A S M A
D IG IT A L
IN P U T
(C O A X IA L )
O U T P U T 3
M O N IT O R
D V R
D IG IT A L
IN P U T
(C O A X IA L )
O U T P U T 4
S -V ID E O
IN
(U S IN G
V ID E O
S -V ID E O
IN
A D A P T E R )
5
O U T P U T 8
A M P L IF IE R
S -V ID E O
IN
A U D IO
L
IN
R
Zone Outputs
Master Bedroom
Family Room
speakers
TV
plasma
surround sound
Source Inputs
Living Room
speakers
TV
satellite
Kitchen
cable box
speakers
Kid's Room
speakers
security cameras
AMP
Channel Plus
SVS-88
Dining Room
stereo
speakers
DVD
Basement
VCR
surround sound
TiVo
6
plasma
Basic Operation
Switching Sources Using the Front Panel
There are two ways to switch
audio and video inputs together
to an output.
Input
-
Output
+
The first way uses the A/V
button along with the keypad.
2b
1
2
3
3b
4
5
-
+
7
8
-
+
3a
2a
0
Volume
A/V
Func
6
Audio
Preset
9
Video
Cancel
Off
Enter
1
1) Press the A/V button.
When this button is pressed, the input and output displays will go blank.
2) Select the input number through the keypad such as 01 for input number 1.
As you input the numbers they will show up on the Input LED.
3) Select the output number through the keypad such as 04 for output number 4.
As you input the numbers they will show up on the Output LED.
The SVS-88 will automatically enter this and switch input number 1 to output4.
The second method uses the Input and Output keys under the LED displays.
1) Select the output number
you wish to change by
pressing the - and + keys
under the Output LED
Input
Output
(the Input LED will show
1
2
- +
- +
the current input switched
- +
to that output).
Volume
2) Select the input number
you wish to route to the
output by pressing the and + keys under the Input LED.
3) Press the Enter key to switch and save the selection.
1
2
3
A/V
Func
4
5
6
Audio
Preset
7
8
9
Video
Cancel
3
Off
Enter
A/V
Func
Audio
Preset
Video
Cancel
Off
Enter
0
To switch audio only to an output.
1) Press the Audio button.
2) Select the input number
through the keypad such
as 03 for input number 3.
3) Select the output number
through the keypad such
as 07 for output number 7.
Input
-
Output
+
-
+
-
+
Volume
7
3b
1
2b
2
3
4
5
6
7
8
9
3a
0
2a
1
To switch video only to an output.
1) Press the Video button.
2) Select the input number
through the keypad such
as 02 for input number 2.
3) Select the output number
through the keypad such
as 08 for output number 8.
Input
-
Output
+
-
+
-
+
Volume
2b
1
2
3
A/V
Func
4
5
6
Audio
Preset
3b
7
8
9
Video
Cancel
3a
0
Off
Enter
2a
The SVS-88 will automatically
enter this and switch video input number 2 to output 8.
To turn an output off
1) Press A/V, Audio or
Video button to select
function to be turned off.
2) Select output number
through the keypad such
as 08 for output number 8.
3) Press the Off button to
turn that selected function
of the selected output off.
Input
-
Output
+
1
2
3
1a
A/V
Func
4
5
6
1b
Audio
Preset
9
1c
Video
Cancel
3
Off
Enter
-
+
2b
8
-
+
2a
0
1
2
3
A/V
Func
4
5
6
Audio
Preset
7
8
9
Video
Cancel
Off
Enter
Volume
To control volume
1) Press the Volume - or +
buttons to decrease or
increase volume to the
displayed output.
(0=off)
2) View volume level in the
Input window.
view
Input
-
Output
+
1
-
+
-
+
0
Volume
Note: If at any point you make an error, you can press the cancel button and start over.
8
The basic operation of the SVS-88 supports four IR commands (additional IR
commands described in the Advanced Operation section of the manual), Input
UP and Down, as well as Volume Up and Down. These commands are specific
to the output for which they are programmed. For example, you can have one IR
learning remote in the theater (let’s say Output number 3) and a different
learning remote in the bedroom (Output number 7). Each remote will enable you
to scan through the installed inputs as well as adjust the volume independently
from one another.
Programming IR Learning Remote
To program your IR learning remote, you must first select the IR teaching
command from the front panel keypad of the SVS-88. To do this press “FUNC”
(Function), “FC” will appear on the display. Next, input the number “44” and "Enter".
The display will read “tE” (Infrared Teach Mode) and the current output number.
Example:
Press - FUNC 4 4 ENTER
Using the “Output -/+”, select the output you wish to program with an IR
command. Place your Learning Infrared Remote into program mode (refer to
your IR remote for details on how to accomplish this). Place the IR receive LED
approximately 1 to 2 inches from the IR emitter on the front panel. Select one of
the four buttons you wish to program to that output, “Input -/+” or “Volume
-/+". Each time one of these buttons is pressed, the IR command associated
to that button is broadcasted out of the IR teaching window located on the SVS-88
front panel.
This process may be repeated as many times as necessary until all of the
required commands have been learned.
Example:
Theater Remote
-Press - OUTPUT + (until output 03 is displayed)
Place learning remote's IR receiver in front of the IR teaching window and press
"INPUT +" (the command for “Input +" has been broadcast to the learning
IR remote).
Note: If no command is selected within a few minutes, the SVS-88 will automatically
exit the Infrared Teach Mode and return to displaying an Output with its associated
Input.
Once you have completed the process of teaching your IR learning remote the
desired IR commands, you can exit the IR teaching mode on the SVS-88. To do this
press “FUNC” (Function), “FC” will appear on the display. Next, input the number “46”
followed by “Enter”. The display will show the last used input and output.
.
Example:
Press - FUNC 4 6 ENTER
9
Advanced Operation
Accessing Switches for Baud Rate and Unit ID
Should it be required to change the default Baud Rate or SVS-88 ID Code,
ONLY AUTHORIZED SERVICE PERSONNEL should perform changes
to the internal switch settings. When making switch setting changes,
THE POWER SOURCE MUST BE TURNED OFF AND THE POWER
CORD REMOVED PRIOR TO ACCESSING THE SVS-88.
To access the internal switch, remove the hardware (8 screws) from the
top cover and lift off the cover.
Setting the SVS-88 Baud Rate (switches 1-3)
The RS-232 baud rate is set by an internal bank of switches. The switch bank is located in
the vicinity of the RS-232 connector. Factory default is 9600 baud.
The following are the settings required for various baud rates:
O
F
F
O
F
F
4800 Baud
O
F
F
O
F
F
9600 Baud
O
F
F
57600 Baud
O
F
F
19200 Baud
O
F
F
115200 Baud
38400 Baud
O
F
F
230400 Baud
460800 Baud
NOTE:
For rocker-style DIP switches, dark area
indicates depressed half of switch. For slidestyle DIP switches, dark area indicates
switch direction. For example, in the 4800
baud setting at left, slide-style switches would
all be switched toward "off".
The SVS-88 operates at 8 bits, no parity and 1 stop bit.
A null modem cable is required to communicate to the SVS-88. The RS-232 connector on the rear
panel is a male 9-pin D-Sub with the following connections:
Description
Transmit
Receive
Ground
Pin Number
Pin 3
Pin 2
Pin 5
Transmit (Pin 3)
Receive (Pin 2)
Ground (Pin 5)
10
Setting the SVS-88 ID Code
(switches 4-7)
The SVS-88 has an ID code which allows up to 16 (0 through 15) units to operate together.
The SVS-88 ID code is set by the same bank of switches as the baud rate. The following shows
the switch setting for these codes. Factory default is Unit
.
No. 0
O
F
F
Unit No. 0
Unit No. 1
Unit No. 6
Unit No. 7
Unit No. 12
Unit No. 13
O
F
F
Unit No. 3
O
F
F
Unit No. 8
O
F
F
Unit No. 4
O
F
F
O
F
F
Unit No. 9
Unit No. 5
Unit No. 10
Unit No. 11
O
F
F
O
F
F
O
F
F
O
F
F
Unit No. 2
O
F
F
O
F
F
O
F
F
O
F
F
O
F
F
O
F
F
Unit No. 14
Unit No. 15
Once changes have been made, replace the cover and assure that all
8 screws are securely in place.
ATTACH THE POWER CORD AND RE-APPLY POWER ONLY AFTER
VERIFYING THAT THE COVER IS PROPERLY IN PLACE WITH ALL OF
THE ASSOCIATED HARDWARE.
11
RS-232 Commands
Controlling the SVS-88 via the RS-232 port is done using a text based command
set (ASCII). The response from the SVS-88 either as a response or on power-up
is also text based. The commands and their associated responses can be
programmed into any control system (i.e. Crestron, AMX, etc.) If you would like to
setup or change the operational characteristics of the SVS-88 and you are not
using a control system, any terminal program can be used; One is available free of
charge on our web site www.ChannelPlus.com.
On power-up the SVS-88 will output the current operational settings of the unit.
Any time the unit has power removed and reapplied, the current operational
settings will be listed. The following is the default for the SVS-88. If any settings
are changed during operation, they will be reflected in the data.
NOTE: All messages sent to the SVS-88 and received by the SVS-88 end with
a carriage return (ASCII 0D). This will not be reflected in the examples. In
addition, all messages sent to the SVS-88 are case sensitive.
The response from the SVS-88 on power-up:
MXxx-Model No. = SVS-88
MXxx-Serial No. = 0A000004
MXxx-Video=08 to 08
MXxx-Video=07 to 07
MXxx-Video=06 to 06
MXxx-Video=05 to 05
MXxx-Video=04 to 04
MXxx-Video=03 to 03
MXxx-Video=02 to 02
MXxx-Video=01 to 01
MXxx-Audio=08 to 08
MXxx-Audio=07 to 07
MXxx-Audio=06 to 06
MXxx-Audio=05 to 05
MXxx-Audio=04 to 04
MXxx-Audio=03 to 03
MXxx-Audio=02 to 02
MXxx-Audio=01 to 01
MXxx-Volume 08 to 32
MXxx-Volume 07 to 32
MXxx-Volume 06 to 32
MXxx-Volume 05 to 32
MXxx-Volume 04 to 32
MXxx-Volume 03 to 32
MXxx-Volume 02 to 32
MXxx-Volume 01 to 32
MXxx-Sensitivity 08 set to 32
MXxx-Sensitivity 07 set to 32
MXxx-Sensitivity 06 set to 32
MXxx-Sensitivity 05 set to 32
MXxx-Sensitivity 04 set to 32
MXxx-Sensitivity 03 set to 32
MXxx-Sensitivity 02 set to 32
MXxx-Sensitivity 01 set to 32
MXxx-Balance 08 set to 49
12
MXxx-Balance 07 set to 49
MXxx-Balance 06 set to 49
MXxx-Balance 05 set to 49
MXxx-Balance 04 set to 49
MXxx-Balance 03 set to 49
MXxx-Balance 02 set to 49
MXxx-Balance 01 set to 49
MXxx-Hardware revision = 02.00
MXxx-Software revision = 01.00
MXxx-Welcome from Channel Plus
The xx in the response or in the command (i.e. MXxx) is the unit ID number. This is
set via the ID selection switches previously described (default is ID 00.)
When a command is sent to the SVS-88 a response will always return. The
response will only occur upon the completion of the task requested. For example,
if a request is made that all outputs be set with a specific input, the
acknowledgement of that command will not be sent until all of the routes have
been made. If a command is not recognized, the data required is out of range or
the data is invalid, the SVS-88 will respond with a verbose description of the
problem:
MXxx-PARDON!
MXxx-Output number is too high
MXxx-Error found in configuration
etc.
The following is a list of commands available on the SVS-88. Further on in the
manual, each command will be described as well as its corresponding response
from the SVS-88. In addition, an example will be included to better help
understand the command. The examples to follow use the default for the unit ID
number (00).
Audio Commands
MXxxAiioo
MXxxAiio#,o#,o#
MXxxAAii
MXxxAFoo
MXxxAMoo
MXxxAPiibb
MXxxAPAbb
MXxxAUoobb
MXxxAUAbb
MXxxAYoo
MXxxAZoo
MXxxZ50ooww
MXxxZ51
MXxxZ17y
- route an audio input to an output.
- route an audio input to multiple outputs.
- route an audio input to all outputs.
- turn off audio output.
- mute/unmute audio toggle for output.
- adjust audio input sensitivity in 0.5 dB steps.
- adjust all audio inputs sensitivity in 0.5 dB steps.
- adjust audio output volume in 2 dB steps (in Linear)
- adjust all outputs to volume level in 2 dB steps (in Linear)
- adjust output volume up one step.
- adjust output volume down one step.
- set/read a maximum volume level for an output.
- get the maximum output volume levels for all outputs.
- set volume controls as Linear or Logarithmic.
Video Commands
MXxxViioo
MxxxViio#,o#,o#
MXxxVAii
MXxxVFoo
- route a video input to be sent to a particular output.
- route a video input to multiple outputs.
- route a video input to all outputs.
- turn off video output.
13
Digital Commands
MXxxDiioo
MxxxDiio#,o#,o#
MXxxDAii
MXxxDFoo
MXxxZ53y
MXxxZ54y
- route a digital input to be sent to a particular output.
- route a digital input to multiple outputs.
- route a digital input to all outputs.
- turn off digital output.
- attach or detach digital from audio routes.
- attach or detach digital from video routes.
A/V/D Commands
MXxxBiioo
MxxxBiio#,o#,o#
MXxxBAii
MXxxBFoo
- route A/V/D input to be sent to a particular output.
- route A/V/D input to multiple outputs.
- route A/V/D input to all outputs.
- turn off A/V/D output.
Status Commands
MXxxS
MXxxSAoo
MXxxSVoo
MXxxSDoo
MXxxSBoo
MXxxSAPoo
MXxxSAUoo
MXxxSAMoo
- return the settings of the SVS-88.
- return the routing of a single or all audio outputs.
- return the routing of a single or all video outputs.
- return the routing of a single or all digital outputs.
- return the routing of a single or all A/V/D outputs.
- return the audio sensitivity levels for an input or inputs.
- return the audio volume level for an output or outputs.
- return the mute status of an output or outputs.
Preset Commands
MXxxZ26ppssiioo
MXxxZ27ppss
MXxxZ28ppss
MXxxZ29ppssiioo
MXxxZ30ppss
MXxxZ31ppss
MXxxZ32ppssiioo
MXxxZ33ppss
MXxxZ34ppss
MXxxZ35ppssiioo
MXxxZ36ppss
MXxxZ37ppss
MXxxZ38ppssoovv
MXxxZ39ppss
MXxxZ40ppss
MXxxZ44ppssiivv
MXxxZ45ppss
MXxxZ46ppss
MXxxZ47pp
MXxxZ48pp
MXxxZ49pp
MXxxZ55pp
- set audio preset.
- read audio preset.
- clear audio preset.
- set digital preset.
- read digital preset.
- clear digital preset.
Note: Using commands
- set a video preset.
other than those listed can
- read video preset.
inadvertently disable the
- clear video preset.
unit. If this happens you
- set A/D/V preset.
may need to reset the unit
- read A/D/V preset.
- clear A/D/V preset.
to factory defaults.
- set volume preset.
- read volume preset.
- clear volume preset.
- set input sensitivity preset.
- read input sensitivity preset.
- clear input sensitivity preset.
- save current SVS-88 settings as preset.
- show settings of a preset.
- run a preset.
- delete a preset.
Miscellaneous Commands
MXxxZ13y
MXxxZ21
MXxxZ06
MXxxZ56rr
MXxxZ98
MXxxZ99
MXxxR95
- enable or disable front panel.
- either verbose or “OK” acknowledgement messages.
- return the product model number.
- number of IR rounds for programming learning remote.
- soft reset of SVS-88.
- verify presence of SVS-88.
- reset the SVS-88 to factory defaults.
14
Audio Commands
MXxxAiioo - Route an audio input to an output.
xx = unit ID number (00 – 15, default = 00)
ii = input number (00 – 08, 00 = off)
oo = output number (01 – 08)
Example: MX00A0103 - Route audio input 1 to audio output 3.
The response from the SVS-88 will be:
MX00-Audio=01 to 03
MXxxAiio#,o#,o#… - Route an audio input to multiple outputs.
xx = unit ID number (00 – 15, default = 00)
ii = input number (00 – 08, 00 = off)
o# = output number (01 – 08, maximum of 8)
Example: MX00A0103,05,08 - This will send audio input 1 to outputs 3, 5
and 8.
The response from the SVS-88 will be:
MX00-Audio=01 to 03
MX00-Audio=01 to 05
MX00-Audio=01 to 08
MXxxAAii - Route an audio input to all outputs.
xx = unit ID number (00 – 15, default = 00)
ii = input number (00 – 08, 00 = off)
Example: MX00AA03 - Route audio input 3 to all outputs.
The response from the SVS-88 will be:
MX00-Audio=03 to 08
MX00-Audio=03 to 07
MX00-Audio=03 to 06
MX00-Audio=03 to 05
MX00-Audio=03 to 04
MX00-Audio=03 to 03
MX00-Audio=03 to 02
MX00-Audio=03 to 01
MXxxAFoo - Turn off an audio output.
15
xx = unit ID number (00 – 15, default = 00)
oo = output number (01 – 08)
Example: MX00AF01
- Turn off audio on output 1 (this routes input 0 to
output 1)
The response from the SVS-88 will be:
MX00-Audio=00 to 01
MXxxAMoo - Mute/unmute audio toggle for output.
xx = unit ID number (00 – 15, default = 00)
oo = output number (01 – 08)
Example: MX00AM01 - Turn off audio on output 1 (this sets volume level of
input 1 to -64 dB assuming it was not already muted.)
The response from the SVS-88 will be:
MX00-Output 01 is Muted
Example: MX00AM01 - Return output 1 audio to its previous setting (in this
example -0 dB, assuming it was not already
unmuted.)
The response from the SVS-88 will be:
MX00-Volume 01 to 32
MXxxAPiibb - Adjust audio input audio sensitivity in 0.5 dB steps.
xx = unit ID number (00 – 15, default = 00)
ii = input number (00 – 08, 00 = off)
bb = volume level (00 = low volume -16 dB, 32 = pass through 0 dB, 48 = high
volume +8 dB)
Example: MX00AP0331 - This will adjust the input audio sensitivity to -0.5 dB
on output number 03.
The response from the SVS-88 will be:
MX00-Sensitivity 03 set to 31
MXxxAPAbb - Adjust all audio inputs sensitivity in 0.5 dB steps.
xx = unit ID number (00 – 15, default = 00)
bb = volume level (00 = low volume -16 dB, 32 = pass through 0 dB, 48 = high
volume +8 dB)
Example: MX00APA31 - This will adjust the input audio sensitivity to -0.5 dB
on all outputs.
16
The response from the SVS-88 will be:
MX00-Sensitivity 08 set to 31
MX00-Sensitivity 07 set to 31
MX00-Sensitivity 06 set to 31
MX00-Sensitivity 05 set to 31
MX00-Sensitivity 04 set to 31
MX00-Sensitivity 03 set to 31
MX00-Sensitivity 02 set to 31
MX00-Sensitivity 01 set to 31
MXxxAUoobb - Adjust audio output volume in 2 dB steps (in Linear).
xx = unit ID number (00 – 15, default = 00)
oo = output number (01 – 08)
bb = volume level (00 = low volume -64 dB, 32 = pass through 0 dB, 48 = high
volume +32 dB)
Example: MX00AU0331 - This will adjust the output volume to -2 dB on
output number 03.
The response from the SVS-88 will be:
MX00-Volume 03 to 31
MXxxAUAbb - Adjust audio output volume in 2 dB steps (in Linear).
xx = unit ID number (00 – 15, default = 00)
bb = volume level (00 = low volume -64 dB, 32 = pass through 0 dB, 48 = high
volume +32 dB)
Example: MX00AUA31 - This will adjust the output volume to -2 dB on all
outputs.
The response from the SVS-88 will be:
MX00-Volume 08 to 31
MX00-Volume 07 to 31
MX00-Volume 06 to 31
MX00-Volume 05 to 31
MX00-Volume 04 to 31
MX00-Volume 03 to 31
MX00-Volume 02 to 31
MX00-Volume 01 to 31
MXxxAYoo - Adjust output volume up one step.
xx = unit ID number (00 – 15, default = 00)
oo = output number (01 – 08)
Example: MX00AY03 - This will adjust the output volume to 0 dB on output
number 03 (assuming previous setting was -2 dB).
17
The response from the SVS-88 will be:
MX00-Volume 03 to 32
MXxxAZoo - Adjust output volume down one step.
xx = unit ID number (00 – 15, default = 00)
oo = output number (01 – 08)
Example: MX00AZ03 - This will adjust the output volume to -2 dB on output
number 03 (assuming previous setting was 0 dB).
The response from the SVS-88 will be:
MX00-Volume 03 to 31
MXxxZ50ooww - Set/read a maximum volume level for an output. If a volume
command is given for a level above this maximum, the SVS88 will set the volume to the maximum level available.
xx = unit ID number (00 – 15, default = 00)
oo = output number (01 – 08)
ww = volume level (00 = low volume -64 dB, 32 = pass through 0 dB, 48 = high
volume +32 dB)
Example: MX00Z500340 - This will set the maximum output volume to +16 dB
on output number 03.
The response from the SVS-88 will be:
MX00-Max Out Level for 03 = 40
Example: MX00Z5003 - This will read the maximum output volume set on
output number 03.
The response from the SVS-88 will be:
MX00-Max Out Level for 03 = 40
MXxxZ51 - Get the maximum output volume levels for all outputs.
xx = unit ID number (00 – 15, default = 00)
Example: MX00Z51 - This will return the maximum output volume on all
outputs (assuming all outputs have been set to the
maximum available volume level, 00 = low volume -64
dB, 32 = pass through 0 dB, 48 = high volume +32 dB.)
The response from the SVS-88 will be:
MX00-Max Out Level for 08 = 48
18
MX00-Max Out Level for 07 = 48
MX00-Max Out Level for 06 = 48
MX00-Max Out Level for 05 = 48
MX00-Max Out Level for 04 = 48
MX00-Max Out Level for 03 = 48
MX00-Max Out Level for 02 = 48
MX00-Max Out Level for 01 = 48
MXxxZ17y - Set/read volume control as linear or logarithmic. Linear volume
controls give a range of -64 db to +32 db in 2 db steps. Logarithmic
volume controls give a more natural audio taper on the control with
a range of -96 dB to +11 dB.
xx = unit ID number (00 – 15, default = 00)
y = 0 = linear, 1 = logarithmic (default = 0)
The following table shows the actual audio level compared to the matrix volume
level for each of the two formats:
Linear
0
1
2
3
4
5
.
.
.
29
30
31
32
.
.
.
48
Logarithmic
-64 dB
-62 dB
-60 dB
-58 dB
-56 dB
-54 dB
-6 dB
-4 dB
-2 dB
0 dB
+32 dB
0
1
2
3
4
5
.
.
.
29
30
31
32
.
.
.
48
-96 dB
-77 dB
-66 dB
-58 dB
-52 dB
-47 dB
-2.5 dB
-1.5 dB
-0.5 dB
0 dB
+11 dB
Example: MX00Z171 - This will set the volume control as logarithmic.
The response from the SVS-88 will be:
MX00-Volume is Logarithmic
Example: MX00Z17 - This will read the current volume control setting (if set to
0 the response will be Linear, if set to 1 the response will
be Logarithmic).
The response from the SVS-88 will be:
MX00-Volume is Linear
19
Video Commands
MXxxViioo - Route a video input to an output.
xx = unit ID number (00 – 15, default = 00)
ii = input number (00 – 08, 00 = off)
oo = output number (01 – 08)
Example: MX00V0103 - Route video input 1 to video output 3.
The response from the SVS-88 will be:
MX00-Video=01 to 03
MXxxViio#,o#,o#… - Route a video input to multiple outputs.
xx = unit ID number (00 – 15, default = 00)
ii = input number (00 – 08, 00 = off)
o# = output number (01 – 08, maximum of 8)
Example: MX00V0103,05,08 - This will send video input 1 to outputs 3, 5
and 8.
The response from the SVS-88 will be:
MX00-Video=01 to 03
MX00-Video=01 to 05
MX00-Video=01 to 08
MXxxVAii - Route a video input to all outputs.
xx = unit ID number (00 – 15, default = 00)
ii = input number (00 – 08, 00 = off)
Example: MX00VA03 - Route audio input 3 to all outputs.
The response from the SVS-88 will be:
MX00-Video=03 to 08
MX00-Video=03 to 07
MX00-Video=03 to 06
MX00-Video=03 to 05
MX00-Video=03 to 04
MX00-Video=03 to 03
MX00-Video=03 to 02
MX00-Video=03 to 01
MXxxVFoo - Turn off a video output.
xx = unit ID number (00 – 15, default = 00)
20
oo = output number (01 – 08)
Example: MX00VF01 - Turn off video output 1 (this routes input 0 to output 1)
The response from the SVS-88 will be:
MX00-Video=00 to 01
21
Digital Commands
MXxxDiioo - Route a digital input to an output.
xx = unit ID number (00 – 15, default = 00)
ii = input number (00 – 08, 00 = off)
oo = output number (01 – 08)
Example: MX00D0103 - Route digital input 1 to digital output 3.
The response from the SVS-88 will be:
MX00-Digital=01 to 03
MXxxDiio#,o#,o#… - Route a digital input to multiple outputs.
xx = unit ID number (00 – 15, default = 00)
ii = input number (00 – 08, 00 = off)
o# = output number (01 – 08, maximum of 8)
Example: MX00D0103,05,08 - This will send digital input 1 to outputs 3, 5
and 8.
The response from the SVS-88 will be:
MX00-Digital=01 to 03
MX00-Digital=01 to 05
MX00-Digital=01 to 08
MXxxDAii - Route a Digital input to all outputs.
xx = unit ID number (00 – 15, default = 00)
ii = input number (00 – 08, 00 = off)
Example: MX00DA03 - Route digital input 3 to all outputs.
The response from the SVS-88 will be:
MX00-Digital=03 to 08
MX00-Digital=03 to 07
MX00-Digital=03 to 06
MX00-Digital=03 to 05
MX00-Digital=03 to 04
MX00-Digital=03 to 03
MX00-Digital=03 to 02
MX00-Digital=03 to 01
MXxxDFoo - Turn off a digital output.
xx = unit ID number (00 – 15, default = 00)
22
oo = output number (01 – 08)
Example: MX00DF01 - Turn off digital output 1 (this routes input 0 to output 1)
The response from the SVS-88 will be:
MX00-Digital=00 to 01
MXxxZ53y - Attach or detach digital from audio routes.
xx = unit ID number (00 – 15, default = 00)
y = 0 = detach digital from audio routes, 1 = attach digital to audio routes (default =
1)
Example: MX00Z530 - Detach digital from audio routes.
The response from the SVS-88 will be:
MX00-Digital will not switch with audio
Example: MX00Z53 - Return the status of digital attachment to audio routes
(the following example assumes y = 1.)
The response from the SVS-88 will be:
MX00-Digital will switch with audio
MXxxZ54y - Attach or detach digital from video routes.
xx = unit ID number (00 – 15, default = 00)
y = 0 = detach digital from video routes, 1 = attach digital to video routes (default =
0)
Example: MX00Z540 - Detach digital from video routes.
The response from the SVS-88 will be:
MX00-Digital will not switch with video
Example: MX00Z54 - Return the status of digital attachment to audio (the
following example assumes y = 1.)
The response from the SVS-88 will be:
MX00-Digital will switch with video
23
Audio/Video/Digital Commands
MXxxBiioo - Route an A/V/D input to an output.
xx = unit ID number (00 – 15, default = 00)
ii = input number (00 – 08, 00 = off)
oo = output number (01 – 08)
Example: MX00B0103 - Route A/V/D input 1 to A/V/D output 3.
The response from the SVS-88 will be:
MX00-A/V=01 to 03
MXxxBiio#,o#,o#… - Route an A/V/D input to multiple outputs.
xx = unit ID number (00 – 15, default = 00)
ii = input number (00 – 08, 00 = off)
o# = output number (01 – 08, maximum of 8)
Example: MX00B0103,05,08 - This will send an A/V/D input 1 to outputs 3, 5
and 8.
The response from the SVS-88 will be:
MX00-A/V=01 to 03
MX00-A/V=01 to 05
MX00-A/V=01 to 08
MXxxBAii - Route an A/V/D input to all outputs.
xx = unit ID number (00 – 15, default = 00)
ii = input number (00 – 08, 00 = off)
Example: MX00BA03 - Route A/V/D input 3 to all outputs.
The response from the SVS-88 will be:
MX00-A/V=03 to 08
MX00-A/V=03 to 07
MX00-A/V=03 to 06
MX00-A/V=03 to 05
MX00-A/V=03 to 04
MX00-A/V=03 to 03
MX00-A/V=03 to 02
MX00-A/V=03 to 01
MXxxBFoo - Turn off an A/V/D output.
xx = unit ID number (00 – 15, default = 00)
24
oo = output number (01 – 08)
Example: MX00BF01 - Turn off A/V/D output 1 (this routes input 0 to output 1)
The response from the SVS-88 will be:
MX00-A/V=00 to 01
25
Status Commands
MXxxS - Return the settings of the SVS-88. This command requests the SVS-88
to return the output status of the audio and video outputs, as well as the
volume and sensitivity.
xx = unit ID number (00 – 15, default = 00)
Example: MX00S - This will request the current settings of the SVS-88 (digital
routes will be included if not attached to audio or video.)
The response from the SVS-88 will be:
MX00-Video=08 to 08
MX00-Video=07 to 07
MX00-Video=06 to 06
MX00-Video=05 to 05
MX00-Video=04 to 04
MX00-Video=03 to 03
MX00-Video=02 to 02
MX00-Video=01 to 01
MX00-Audio=08 to 08
MX00-Audio=07 to 07
MX00-Audio=06 to 06
MX00-Audio=05 to 05
MX00-Audio=04 to 04
MX00-Audio=03 to 03
MX00-Audio=02 to 02
MX00-Audio=01 to 01
MX00-Volume 08 to 32
MX00-Volume 07 to 32
MX00-Volume 06 to 32
MX00-Volume 05 to 32
MX00-Volume 04 to 32
MX00-Volume 03 to 32
MX00-Volume 02 to 32
MX00-Volume 01 to 32
MX00-Sensitivity 08 set to 32
MX00-Sensitivity 07 set to 32
MX00-Sensitivity 06 set to 32
MX00-Sensitivity 05 set to 32
MX00-Sensitivity 04 set to 32
MX00-Sensitivity 03 set to 32
MX00-Sensitivity 02 set to 32
MX00-Sensitivity 01 set to 32
MX00-Balance 08 set to 49
MX00-Balance 07 set to 49
MX00-Balance 06 set to 49
MX00-Balance 05 set to 49
MX00-Balance 04 set to 49
MX00-Balance 03 set to 49
MX00-Balance 02 set to 49
MX00-Balance 01 set to 49
26
MXxxSAoo - Return the status of a single or all audio outputs.
xx = unit ID number (00 – 15, default = 00)
oo = output number (01 – 08)
Example: MX00SA01 - Return the status of audio output 1.
The response from the SVS-88 will be:
MX00-Audio=01 to 01
Example: MX00SA - Return the status of all audio outputs.
The response from the SVS-88 will be:
MX00-Audio=08 to 08
MX00-Audio=07 to 07
MX00-Audio=06 to 06
MX00-Audio=05 to 05
MX00-Audio=04 to 04
MX00-Audio=03 to 03
MX00-Audio=02 to 02
MX00-Audio=01 to 01
MXxxSVoo - Return the status of a single or all video outputs.
xx = unit ID number (00 – 15, default = 00)
oo = output number (01 – 08)
Example: MX00SV01 - Return the status of video output 1.
The response from the SVS-88 will be:
MX00-Video=01 to 01
Example: MX00SA - Return the status of all video outputs.
The response from the SVS-88 will be:
MX00-Video=08 to 08
MX00-Video=07 to 07
MX00-Video=06 to 06
MX00-Video=05 to 05
MX00-Video=04 to 04
MX00-Video=03 to 03
MX00-Video=02 to 02
MX00-Video=01 to 01
MXxxSDoo - Return the status of a single or all digital outputs.
xx = unit ID number (00 – 15, default = 00)
oo = output number (01 – 08)
27
Example: MX00SD01 - Return the status of digital output 1.
The response from the SVS-88 will be:
MX00-Digital=01 to 01
Example: MX00SD - Return the status of all digital outputs.
The response from the SVS-88 will be:
MX00-Digital=08 to 08
MX00-Digital=07 to 07
MX00-Digital=06 to 06
MX00-Digital=05 to 05
MX00-Digital=04 to 04
MX00-Digital=03 to 03
MX00-Digital=02 to 02
MX00-Digital=01 to 01
MXxxSBoo - Return the status of a single or all A/V/D outputs.
xx = unit ID number (00 – 15, default = 00)
oo = output number (01 – 08)
Example: MX00SB01 - Return the status of A/V output 1 (if digital is not
attached to either audio or video, its status will also be
returned.)
The response from the SVS-88 will be:
MX00-Video=01 to 01
MX00-Audio=01 to 01
Example: MX00SB - Return the status of all A/V outputs.
The response from the SVS-88 will be:
MX00-Video=08 to 08
MX00-Video=07 to 07
MX00-Video=06 to 06
MX00-Video=05 to 05
MX00-Video=04 to 04
MX00-Video=03 to 03
MX00-Video=02 to 02
MX00-Video=01 to 01
MX00-Audio=08 to 08
MX00-Audio=07 to 07
MX00-Audio=06 to 06
MX00-Audio=05 to 05
MX00-Audio=04 to 04
MX00-Audio=03 to 03
MX00-Audio=02 to 02
MX00-Audio=01 to 01
28
MXxxSAPoo - Return the audio sensitivity levels for an input or inputs.
xx = unit ID number (00 – 15, default = 00)
oo = output number (01 – 08)
Example: MX00SAP01 - Return the audio sensitivity level of audio input 1.
The response from the SVS-88 will be:
MX00-Sensitivity 01 set to 32
Example: MX00SAP - Return the audio sensitivity level of all audio inputs.
The response from the SVS-88 will be:
MX00-Sensitivity 08 set to 32
MX00-Sensitivity 07 set to 32
MX00-Sensitivity 06 set to 32
MX00-Sensitivity 05 set to 32
MX00-Sensitivity 04 set to 32
MX00-Sensitivity 03 set to 32
MX00-Sensitivity 02 set to 32
MX00-Sensitivity 01 set to 32
MXxxSAUoo - Return the audio volume level for an output or outputs.
xx = unit ID number (00 – 15, default = 00)
oo = output number (01 – 08)
Example: MX00SAU01 - Return the audio volume level for output 1.
The response from the SVS-88 will be:
MX00-Volume 01 to 32
Example: MX00SAU - Return the status of all audio outputs.
The response from the SVS-88 will be:
MX00-Volume 08 to 32
MX00-Volume 07 to 32
MX00-Volume 06 to 32
MX00-Volume 05 to 32
MX00-Volume 04 to 32
MX00-Volume 03 to 32
MX00-Volume 02 to 32
MX00-Volume 01 to 32
MXxxSAMoo - Return the mute status of an output or outputs.
xx = unit ID number (00 – 15, default = 00)
oo = output number (01 – 08)
29
Example: MX00SAM01 - Return the mute status for output 1 (a route from
input 00 to an output is not considered muted, a
muted output is ONLY set using the MXxxAMoo
command.)
The response from the SVS-88 will be:
MX00-Output 01 is Muted
Example: MX00SAM - Return the mute status of all audio outputs.
The response from the SVS-88 will be:
MX00-Output 08 is not Muted
MX00-Output 07 is not Muted
MX00-Output 06 is not Muted
MX00-Output 05 is not Muted
MX00-Output 04 is not Muted
MX00-Output 03 is not Muted
MX00-Output 02 is not Muted
MX00-Output 01 is Muted
30
Preset Commands
The SVS-88 allows 16 presets, which you can use for doing a routing configuration
with a single command. The following section describes how these presets are
built and stored in the SVS-88. Each preset has a number (01-16) and a subnumber (01-32) for each function type – functions include audio routes, video
routes, digital routes, A/V/D routes, volume settings and sensitivity settings. When
a preset is run, all the routes (function type sub-numbers) are executed by the
matrix. Each A/V/D output can be changed in a single preset.
The following is a sample layout of a preset. The command to set this is to the
right.
Preset No 1:
audio sub-no:1
audio sub-no:2
audio sub-no:3
video sub-no:1
video sub-no:2
video sub-no:3
audio 01 to 01
audio 02 to 05
audio 04 to 01
video 01 to 01
video 02 to 08
video 03 to 07
(MX00Z2601010101)
(MX00Z2601020205)
(MX00Z2601030401)
(MX00Z3201010101)
(MX00Z3201020208)
(MX00Z3201030307)
When preset number 1 is run, the SVS-88 will route the audio and video as shown
above.
Any preset sub-number route can be deleted without affecting the other preset
routes by using the appropriate “clear preset” command.
MXxxZ26ppssiioo - Set audio preset.
xx = unit ID number (00 – 15, default = 00)
pp = preset number (01 – 16)
ss = preset sub-number (01 – 08)
ii = audio input number
oo = audio output number
Example: MX00Z2601010305 - Set audio preset number 01, sub-preset 01,
to route input 03 to output 05.
The response from the SVS-88 will be:
MX00-audio preset 0101 set 03 to 05
MXxxZ27ppss - Read audio preset.
xx = unit ID number (00 – 15, default = 00)
pp = preset number (01 – 16)
ss = preset sub-number (01 – 08)
Example: MX00Z270101 - Read audio preset number 01, sub-preset 01.
31
The response from the SVS-88 will be:
MX00-audio preset 0101 set 03 to 05
MXxxZ28ppss - Clear audio preset.
xx = unit ID number (00 – 15, default = 00)
pp = preset number (01 – 16)
ss = preset sub-number (01 – 08)
Example: MX00Z280101 - Clear audio preset number 01, sub-preset 01.
The response from the SVS-88 will be:
MX00-audio preset 0101 cleared
MXxxZ29ppssiioo - Set digital preset.
xx = unit ID number (00 – 15, default = 00)
pp = preset number (01 – 16)
ss = preset sub-number (01 – 08)
ii = audio input number
oo = audio output number
Example: MX00Z2901010305 - Set digital preset number 01, sub-preset 01,
to route input 03 to output 05.
The response from the SVS-88 will be:
MX00-digital preset 0101 set 03 to 05
MXxxZ30ppss - Read digital preset.
xx = unit ID number (00 – 15, default = 00)
pp = preset number (01 – 16)
ss = preset sub-number (01 – 08)
Example: MX00Z300101 - Read digital preset number 01, sub-preset 01.
The response from the SVS-88 will be:
MX00-digital preset 0101 set 03 to 05
MXxxZ31ppss - Clear digital preset.
xx = unit ID number (00 – 15, default = 00)
pp = preset number (01 – 16)
ss = preset sub-number (01 – 08)
Example: MX00Z310101 - Clear digital preset number 01, sub-preset 01.
32
The response from the SVS-88 will be:
MX00-digital preset 0101 cleared
MXxxZ32ppssiioo - Set video preset.
xx = unit ID number (00 – 15, default = 00)
pp = preset number (01 – 16)
ss = preset sub-number (01 – 08)
ii = audio input number
oo = audio output number
Example: MX00Z3201010305 - Set video preset number 01, sub-preset 01,
to route input 03 to output 05.
The response from the SVS-88 will be:
MX00-video preset 0101 set 03 to 05
MXxxZ33ppss - Read video preset.
xx = unit ID number (00 – 15, default = 00)
pp = preset number (01 – 16)
ss = preset sub-number (01 – 08)
Example: MX00Z330101 - Read video preset number 01, sub-preset 01.
The response from the SVS-88 will be:
MX00-video preset 0101 set 03 to 05
MXxxZ34ppss - Clear video preset.
xx = unit ID number (00 – 15, default = 00)
pp = preset number (01 – 16)
ss = preset sub-number (01 – 08)
Example: MX00Z340101 - Clear video preset number 01, sub-preset 01.
The response from the SVS-88 will be:
MX00-video preset 0101 cleared
MXxxZ35ppssiioo - Set A/D/V preset.
xx = unit ID number (00 – 15, default = 00)
pp = preset number (01 – 16)
ss = preset sub-number (01 – 08)
ii = audio input number
oo = audio output number
33
Example: MX00Z3501010305 - Set A/D/V preset number 01, sub-preset 01,
to route input 03 to output 05.
The response from the SVS-88 will be:
MX00-A/D/V preset 0101 set 03 to 05
MXxxZ36ppss - Read A/D/V preset.
xx = unit ID number (00 – 15, default = 00)
pp = preset number (01 – 16)
ss = preset sub-number (01 – 08)
Example: MX00Z360101 - Read A/D/V preset number 01, sub-preset 01.
The response from the SVS-88 will be:
MX00-A/D/V preset 0101 set 03 to 05
MXxxZ37ppss - Clear A/D/V preset.
xx = unit ID number (00 – 15, default = 00)
pp = preset number (01 – 16)
ss = preset sub-number (01 – 08)
Example: MX00Z370101 - Clear A/D/V preset number 01, sub-preset 01.
The response from the SVS-88 will be:
MX00-A/D/V preset 0101 cleared
MXxxZ38ppssoovv - Set volume preset.
xx = unit ID number (00 – 15, default = 00)
pp = preset number (01 – 16)
ss = preset sub-number (01 – 08)
oo = volume output number
vv = volume setting (00 - 48)
Example: MX00Z3801010332 - Set volume preset number 01, sub-preset
01, to 32 (0 dB) on output 03.
The response from the SVS-88 will be:
MX00-volume preset 0101 set 03 to 32
MXxxZ39ppss - Read volume preset.
xx = unit ID number (00 – 15, default = 00)
pp = preset number (01 – 16)
ss = preset sub-number (01 – 08)
34
Example: MX00Z390101 - Read volume preset number 01, sub-preset 01.
The response from the SVS-88 will be:
MX00-volume preset 0101 set 03 to 32
MXxxZ40ppss - Clear volume preset.
xx = unit ID number (00 – 15, default = 00)
pp = preset number (01 – 16)
ss = preset sub-number (01 – 08)
Example: MX00Z400101 - Clear volume preset number 01, sub-preset 01.
The response from the SVS-88 will be:
MX00-volume preset 0101 cleared
MXxxZ44ppssiivv - Set input sensitivity preset.
xx = unit ID number (00 – 15, default = 00)
pp = preset number (01 – 16)
ss = preset sub-number (01 – 08)
ii = input number
vv = volume sensitivity setting (00 - 48)
Example: MX00Z4401010332 - Set input sensitivity preset number 01, subpreset 01, to 32 (0 dB) on input 03.
The response from the SVS-88 will be:
MX00-sensitivity preset 0101 set 03 to 32
MXxxZ45ppss – Read input sensitivity preset.
xx = unit ID number (00 – 15, default = 00)
pp = preset number (01 – 16)
ss = preset sub-number (01 – 08)
Example: MX00Z450101 - Read input sensitivity preset number 01, subpreset 01.
The response from the SVS-88 will be:
MX00-sensitivity preset 0101 set 03 to 32
MXxxZ46ppss - Clear input sensitivity preset.
xx = unit ID number (00 – 15, default = 00)
pp = preset number (01 – 16)
ss = preset sub-number (01 – 08)
35
Example: MX00Z460101 - Clear input sensitivity preset number 01, subpreset 01.
The response from the SVS-88 will be:
MX00-sensitivity preset 0101 cleared
MXxxZ47pp - Save current SVS-88 settings as preset.
xx = unit ID number (00 – 15, default = 00)
pp = preset number (01-16)
Example: MX00Z4701 - Save current SVS-88 settings as preset 01.
The response from the SVS-88 will be:
MX00-Preset 01 saved
MXxxZ48pp – Show settings of a preset.
xx = unit ID number (00 – 15, default = 00)
pp = preset number (01-16)
Example: MX00Z4801 - Show current SVS-88 settings defined to preset 01 (the
display of a defined preset may be extensive,
including up to 8 preset items of each function type,
i.e. audio, video, digital, etc.)
The response from the SVS-88 will be:
MX00-digital preset 0101 set 02 to 01
MX00-video preset 0101 set 03 to 05
MXxxZ49pp - Run a preset.
xx = unit ID number (00 – 15, default = 00)
pp = preset number (01-16)
Example: MX00Z4901 - Run a defined preset (the execution of a defined
preset may be extensive, including up to 8 preset
items of each function type, i.e. audio, video, digital,
etc.)
The response from the SVS-88 will be:
MX00-Digital=02 to 01
MX00-Video=03 to 05
MXxxZ55pp - Delete a preset.
xx = unit ID number (00 – 15, default = 00)
36
pp = preset number (01-16)
Example: MX00Z5501 - Delete a defined preset (this will delete all sub-numbers
within the preset as well)
The response from the SVS-88 will be:
MX00-Preset 01 cleared
37
Miscellaneous Commands
MXxxZ13y - Enable or disable front panel.
xx = unit ID number (00 – 15, default = 00)
y = 0 = disabled, 1 = enabled (default = 1)
Example: MX00Z130 - Set the front panel to be disabled (once this has been set,
only the output number can be changed using the front
panel.)
The response from the SVS-88 will be:
MX00-Front Panel is Disabled
Example: MX00Z13 - Return the status of the front panel (the following
example assumes y = 1.)
The response from the SVS-88 will be:
MX00-Front Panel is Enabled
MXxxZ21y - Select either verbose or “OK” acknowledgement messages.
xx = unit ID number (00 – 15, default = 00)
y = 0 = verbose, 1 = “MXxx-OK” (default = 0)
Example: MX00Z210 - Set the serial acknowledgements of the SVS-88 as
verbose (full text messages), when set to “OK”, status
messages and data requests will still return a verbose
response.
The response from the SVS-88 will be:
MX00-Response will be full
Example: MX00Z21 - Return the status of the serial acknowledgement type
from the SVS-88.
The response from the SVS-88 will be:
MX00-OK will be the response
MXxxZ06 - Return the product model number.
xx = unit ID number (00 – 15, default = 00)
Example: MX00Z06 - Return the product model number.
The response from the SVS-88 will be:
38
MX00-Model No. =SVS-88
MXxxZ56rr - Number of IR rounds for programming learning remote.
xx = unit ID number (00 – 15, default = 00)
rr = IR transmit rounds (04 – 99, default = 09)
Example: MX00Z5604 - Set the number of rounds to be broadcast from the
SVS-88 when programming a learning remote (some
remotes require a minimum number of rounds when
being taught IR commands.)
The response from the SVS-88 will be:
MX00-IR will repeat 04 times
Example: MX00Z56 - Return the number of rounds to be broadcast from the
SVS-88 when programming a learning remote (the
following assumes the default of 9 rounds.)
The response from the SVS-88 will be:
MX00-IR will repeat 09 times
MXxxZ98 - Soft reset the SVS-88.
xx = unit ID number (00 – 15, default = 00)
Example: MX00Z98 - Execute a soft reset on the SVS-88, the results would be
similar to removing and reapplying power.
The response from the SVS-88 will be:
MX00-Model No. = SVS-88
MX00-Serial No. = 0A000004
MX00-Video=08 to 08
MX00-Video=07 to 07
MX00-Video=06 to 06
MX00-Video=05 to 05
MX00-Video=04 to 04
MX00-Video=03 to 03
MX00-Video=02 to 02
MX00-Video=01 to 01
MX00-Audio=08 to 08
MX00-Audio=07 to 07
MX00-Audio=06 to 06
MX00-Audio=05 to 05
MX00-Audio=04 to 04
MX00-Audio=03 to 03
MX00-Audio=02 to 02
MX00-Audio=01 to 01
MX00-Volume 08 to 32
MX00-Volume 07 to 32
39
MX00-Volume 06 to 32
MX00-Volume 05 to 32
MX00-Volume 04 to 32
MX00-Volume 03 to 32
MX00-Volume 02 to 32
MX00-Volume 01 to 32
MX00-Sensitivity 08 set to 32
MX00-Sensitivity 07 set to 32
MX00-Sensitivity 06 set to 32
MX00-Sensitivity 05 set to 32
MX00-Sensitivity 04 set to 32
MX00-Sensitivity 03 set to 32
MX00-Sensitivity 02 set to 32
MX00-Sensitivity 01 set to 32
MX00-Balance 08 set to 49
MX00-Balance 07 set to 49
MX00-Balance 06 set to 49
MX00-Balance 05 set to 49
MX00-Balance 04 set to 49
MX00-Balance 03 set to 49
MX00-Balance 02 set to 49
MX00-Balance 01 set to 49
MX00-Hardware revision = 02.00
MX00-Software revision = 01.00
MX00-Welcome from Channel Plus
MXxxZ99 - Verify presence of SVS-88.
xx = unit ID number (00 – 15, default = 00)
Example: MX00Z99 - Verify the presence of the SVS-88.
The response from the SVS-88 will be:
MX00-SVS88 OK
MXxxR95 - Reset SVS-88 to factory defaults.
xx = unit ID number (00 – 15, default = 00)
Example: MX00R95 - Reset SVS-88 to factory defaults.
The response from the SVS-88 will be:
MX00-EEPROM has been reset
MX00-Model No. = SVS-88
MX00-Serial No. = 0A000004
MX00-Video=08 to 08
MX00-Video=07 to 07
MX00-Video=06 to 06
MX00-Video=05 to 05
MX00-Video=04 to 04
MX00-Video=03 to 03
MX00-Video=02 to 02
MX00-Video=01 to 01
MX00-Audio=08 to 08
MX00-Audio=07 to 07
40
MX00-Audio=06 to 06
MX00-Audio=05 to 05
MX00-Audio=04 to 04
MX00-Audio=03 to 03
MX00-Audio=02 to 02
MX00-Audio=01 to 01
MX00-Volume 08 to 32
MX00-Volume 07 to 32
MX00-Volume 06 to 32
MX00-Volume 05 to 32
MX00-Volume 04 to 32
MX00-Volume 03 to 32
MX00-Volume 02 to 32
MX00-Volume 01 to 32
MX00-Sensitivity 08 set to 32
MX00-Sensitivity 07 set to 32
MX00-Sensitivity 06 set to 32
MX00-Sensitivity 05 set to 32
MX00-Sensitivity 04 set to 32
MX00-Sensitivity 03 set to 32
MX00-Sensitivity 02 set to 32
MX00-Sensitivity 01 set to 32
MX00-Balance 08 set to 49
MX00-Balance 07 set to 49
MX00-Balance 06 set to 49
MX00-Balance 05 set to 49
MX00-Balance 04 set to 49
MX00-Balance 03 set to 49
MX00-Balance 02 set to 49
MX00-Balance 01 set to 49
MX00-Hardware revision = 02.00
MX00-Software revision = 01.00
MX00-Welcome from Channel Plus
41
Infrared Commands
In addition to the basic IR commands described earlier, specific routes and even
button presses can be taught to an IR learning remote. For example, you can have
your IR learning remote in the theater learn each of the front panel buttons,
enabling full control of the SVS-88 front panel via remote.
Advanced Commands for IR Learning Remote
To program your IR learning remote, you must first select the advanced IR
teaching command from the front panel keypad of the SVS-88. To do this press
“FUNC” (Function), “FC” will appear on the display. Next, input the number “45”
followed by “Enter”. The display will read “tE 00” (Infrared Teach Mode).
Example: FUNC 4 5 ENTER
Place your Learning Infrared Remote into program mode (refer to your IR remote
for details on how to accomplish this). Place the IR receive LED on the remote
approximately 1 to 2 inches from the IR emitter on the front panel. Select one of
the commands from the following list to program into the remote, followed by the
“ENTER” key. As soon as the “ENTER” key is pressed, the selected IR command
is broadcast out the IR teaching window located on the SVS-88 front panel. The
actual transmission from the IR teaching window to the IR learning remote is very
short (9 rounds of data), so be certain the remote is waiting for the code prior to
pressing the “ENTER” key. This process may be repeated as many times as
necessary until all of the required commands have been learned.
Data is entered in sequence for each IR code you wish to program. The data input
will always be represented by three sets of codes. Some commands only require
the command number, and some only require the command number followed by
the output or input number, regardless, the input must always be filled with “00” to
complete the data sequence.
The first set of digits is the IR Command number.
The next set of digits usually identifies the Output or Zone Number (00 = all
outputs, otherwise, 01 to 08 for Zones or Outputs 1 through 8) or the Input or
Source Number (00 to 08, 00 = Off).
The last set of digits typically identifies the Input or Source Number (00 to 08, 00 =
Off). Again, remember to enter “00” as fill if this data is not required.
42
Front Panel Commands
As the individual digits are entered for each command, they will be displayed on
the front panel. As the second set of numbers are input, the command number will
move from one set of displays on the right to the other displays on the left, and
remain there until the “ENTER” button is pressed. The SVS-88 Unit Number will
not be seen while the command data is being entered. Again, the command will be
sent to the learning remote as soon as the “ENTER” key is pressed.
Example:
Teaching Front Panel Button 5
Press - 0 5 for front panel button number 5 (tE - 05 is displayed).
Press - 0 0 for all outputs (05 - 00 is displayed).
Press - 0 0 for required data entry as no input is necessary (05 - 00 is
displayed).
Place the learning remote's IR receiver in front of the IR teaching window and
select the new associated “Front Panel Button 5” button on the IR learning remote.
Press - ENTER (the command for “Front Panel Button 5” has been broadcast
to the learning IR remote).
The following list is the available learnable IR commands on the SVS-88.
yy =
00 = front panel zero button
01 = front panel one button
02 = front panel two button
03 = front panel three button
04 = front panel four button
05 = front panel five button
06 = front panel six button
07 = front panel seven button
08 = front panel eight button
09 = front panel nine button
10 = front panel A/V button
11 = front panel Audio button
12 = front panel Video button
13 = front panel Off button
14 = front panel Function button
15 = front panel Preset button
16 = front panel Enter button
17 = front panel Cancel button
18 = front panel Input button –
19 = front panel Input button +
20 = front panel Output button –
21 = front panel Output button +
22 = front panel Volume button –
23 = front panel Volume button +
43
Output Commands
These commands are output specific and must include the output number.
Example:
Teaching Mute for Output 3
Press - 3 9 for mute/unmute (tE - 39 is displayed).
Press - 0 3 for output number 3, 00 cannot be used as these commands are
zone specific (39 - 00 is displayed).
Press - 0 0 for required data entry as no input is necessary (39 - 00 is
displayed).
Place the learning remote's IR receiver in front of the IR teaching window and
select the new associated “Mute Output 3” button on the IR learning remote.
Press - ENTER (the command for “Mute Output 3” has been broadcast to the
learning IR remote).
24 = output Volume down
25 = output Volume up
39 = output Mute/Unmute (toggle)
A/V Commands
Example:
Teaching Route A/V Input 2 to Output 5
Press - 3 6 for zone A/V input selection (tE - 36 is displayed).
Press - 0 5 for output number 5, 00 cannot be used as these commands are
zone specific (36 - 05 is displayed).
Press - 0 2 for Input number 2 (36 - 02 is displayed).
Place the learning remote's IR receiver in front of the IR teaching window and
select the new associated “Route A/V Input 2 to Output 5” button on the IR learning
remote.
Press - ENTER (the command for “Route A/V Input 2 to Output 5” has been
broadcast to the learning IR remote).
36 = zone A/V input selection
37 = zone audio input selection
38 = zone video input selection
39 = zone digital input selection
44
Preset Commands
Example:
Teaching Preset 3 Select
Press - 4 2 for preset number 3 (tE - 42 is displayed).
Press - 0 0 for required data entry as no input is necessary (42 - 00 is
displayed).
Press - 0 0 for required data entry as no input is necessary (42 - 00 is
displayed).
Place the learning remote's IR receiver in front of the IR teaching window and
select the new associated “Preset 3 Select” button on the IR learning remote.
Keep in mind, prior to executing a preset, you must first save a configuration to that
preset number.
Press - ENTER (the command for “Preset 3 Select” has been broadcast to
the learning IR remote).
40 = Preset 1
41 = Preset 2
42 = Preset 3
43 = Preset 4
44 = Preset 5
45 = Preset 6
46 = Preset 7
47 = Preset 8
48 = Preset 9
49 = Preset 10
50 = Preset 11
51 = Preset 12
52 = Preset 13
53 = Preset 14
54 = Preset 15
55 = Preset 16
Routing All Commands
Example:
Teaching Route Audio Only from Input 7 to all Outputs
Press - 6 2 for audio only routing (tE - 62 is displayed).
Press - 0 7 for input 7, 00 would turn all audio only outputs off (62 - 07 is
displayed).
Press - 0 0 for required data entry as no input is necessary (62 - 00 is
displayed).
Place the learning remote's IR receiver in front of the IR teaching window and
select the new associated “Route Audio Only Input 7 to all Outputs” button on the
IR learning remote.
45
Press - ENTER (the command for “Route Audio Only Input 7 to all Outputs”
has been broadcast to the learning IR remote).
61 = audio & video
62 = audio only
63 = video only
64 = digital only
NOTE: If no command is selected within a few minutes, the SVS-88 will
automatically exit the Infrared Teach Mode and return to displaying an Output with
its associated Input. Once you have completed the process of teaching your IR
learning remote the desired IR commands, you can exit the IR teaching mode on
the SVS-88. To do this press “FUNC” (Function), “FC” will appear on the display.
Next, input the number “46” followed by “Enter”. The display will return to
displaying an Output with its associated Input.
Example:
Press - FUNC 4 6 ENTER
46
Presets
Programming Presets from the Keypad
Presets are useful for setting the system for predefined configurations (i.e. theater
DVD, family room theater, etc.) Presets can both be programmed and executed
from the front panel. The SVS-88 can hold a total of 16 presets. When
programming a preset from the front panel, the SVS-88 takes and saves a
snapshot of the configuration of the unit at that moment. The snapshot includes
audio, digital and video routes as well as the volume for each output. To make
specific modifications to a preset, you must use the appropriate serial commands
previously discussed.
To program a preset, you must first select the preset programming mode from the
front panel keypad of the SVS-88. To do this, press “FUNC” (Function), “FC” will
appear on the display. Next, input the number “47” followed by “Enter”. The display
will read “PE” (Preset Programming Mode).
Example: FUNC 4 7 ENTER
Next, select a preset number (01 – 16) followed by “Enter”. Make sure you take
note of the configuration programmed for each preset. Once “Enter” is pressed,
the current settings for the SVS-88 will be assigned to that preset number.
Example: 01 ENTER
Executing Presets from the Keypad
To execute a preset from the front panel, you must select the preset mode from the
front panel keypad of the SVS-88. To do this press “PRESET”, “PE” will appear on
the display. Next, input the preset number to execute followed by “Enter”. The
display will read “PE” (Preset Selection Mode). In the following example, preset
number 01 will be executed once the input key is pressed.
Example: PRESET 01 ENTER
47
Troubleshooting
Display: Routed an audio input to an output, but the display didn’t show the new
route.
√ – The display on the front panel only reflects the video route, the audio route is
not represented.
Display: The front panel display is off.
√ – Verify power is applied. If power is applied, have a service technician check
fuse at power connector.
Audio: There is no volume for a selected output.
√ – Make sure volume level is not set to 0 from the front panel.
√ – Make sure the route is to the correct output.
√ – Verify audio source as input.
√ – If using RS-232 port, make sure the output was not muted.
Audio: Volume is higher on certain outputs.
√ – Check output volume level from front panel, typical setting is 32 (0 dB).
√ – If using RS-232 port, check input sensitivity settings.
√ – Check cables.
Video: No video on output.
√ – Verify the route is to the correct output.
√ – Verify video source as input.
√ – Check cables.
Digital Audio: Routed an audio input to an output, but the digital didn’t follow the
route.
√ – If using RS-232 port, make sure the digital has not been detached from the
audio, refer to the Digital Commands section of the manual.
√ – Make sure a composite source being used on a digital input is not being routed
to that digital output.
√ – Check cables.
RS-232: SVS-88 is not responding to serial messages, not even with MX00PARDON!
√ – Verify that a carriage return (ASCII 0D) is the last character in the message
sent.
√ – Verify that the SVS-88 baud rate is the same as that in the system controller or
terminal software. In addition to the correct baud rate, the data must be sent with 8
data bits, 1 stop bit and no parity.
√ – All messages are case sensitive, make sure commands are sent in upper case.
Presets: Preset programmed via RS-232 will not execute completely.
√ – Make sure preset sub-numbers are used sequentially, any gap between
numbers will terminate the preset at that point during execution.
48
.
Warranty
Linear Corporation, Inc. warrants this product to be free from defects in materials
and workmanship for a period of one year from the date of purchase or Linear will
repair, or at it's option, replace the defective product. To obtain warranty service,
call Linear for a return product authorization (RPA) number and return the product
prepaid to Linear Corporation, 2055 Corte Del Nogal, Carlsbad, CA 92009,
Attention: Customer Service. Please put the RPA number on the outside of the
carton.
Any implied warranty arising from the sale of the product including implied
warranties of merchantability and fitness for the purpose are limited to the warranty
stated above. Linear shall not be responsible for losses or damages or expenses,
whether direct, consequential or incidental arising from the use of or the inability to
use this product. Some states do not allow limitations on how long the implied
warranty lasts or the exclusion or limitation or incidental or consequential
damages, so the above limitations and exclusions may not apply to you. This
warranty gives you specific legal rights, and you may have other rights, which may
vary from state to state.
Trademarks are the property of their respective companies.
49
Electrical Specification (Minimum)
Input Voltage Range:
100-240 VAC
50/60Hz
Power Consumption:
65W Maximum
Audio/Video Nominal Input/Output Levels:
Audio and Video 1Vpp
Audio/Video Shutdown Levels:
Audio and Video +/- 3Vpp
Mechanical Specification (Minimum)
Dimensions:
W16 ¾” x H3 ½” x D13 ¾”
Weight:
16 lbs. (Unboxed)
18 lbs. (Boxed)
Connector Types (Input, Output, Power ...):
S-Video - Mini-Din
Stereo Audio - RCA
Coaxial Digital Audio - RCA
RS-232 - 9 pin D-Sub
RS-485 Expansion Port - RJ-12 (qty. 2)
Direct IR Input - 3.5mm Jack
Power Cord Connector - EIC-320
(Power Cord for countries other than North America not included)
Miscellaneous
Regulatory Certifications:
UL 6500-2001 (UL Standard for Safety)
CAN/CSA-E60065-00 (Canada Standard for Safety)
CENELEC EN 60065 – 2002 (CE Standard for Safety)
CENELEC EN 55022 (RFI Characteristics)
CENELEC EN 55024 (Immunity Characteristics Limits)
CENELEC EN 61000-3-2 (Electromagnetic Compatibility – Harmonic Current Emissions)
CENELEC EN 61000-3-2 (Electromagnetic Compatibility – Limitation of Voltage Fluctuations)
50
Linear Corporation
2055 Corte del Nogal
Carlsbad, CA 92009, USA
760-438-7000 800-999-5225 Fax: 760-931-1340
www.channelplus.com
© 2004 Linear Corporation, Carlsbad, CA, USA