1
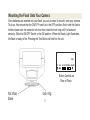
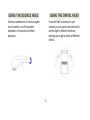
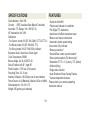
Bounce Swivel Speedlight DSLR Flash
INSTRUCTION MANUAL
VIV-DF-186
Limited One Year Warranty
Vivitar warrants this quality product to be free of defects in material and workmanship for a
period of one year from the date of purchase. During the period, Vivitar will repair or replace the
product at no charge for parts or labor.
TIME PERIOD OF THIS WARRANTY
The time period of this warranty starts from the date of the original purchase and expires on the
first anniversary date of purchase.
WHAT IS NOT COVERED BY THIS WARRANTY
No express or implied warranty is made for any defects in this product which result from
accident, abuse, misuse, failure to operate the product in accordance with relevant instructions,
neglect, immersion in or exposure to chemicals or liquids, extremes of climate, fungus, excessive
wear and tear/cosmetic damage and defects resulting from other extraneous causes such as
unauthorised disassembly, repair or modification.
This warranty shall not extend to any incidental or consequential damages arising from the
purchase, use or inability to use this product even if Vivitar has been advised of such damages.
The laws of some countries and some States thereof do not allow the limitation of incidental or
consequential damages, so the above limitation or exclusion may apply to you.
-1-
WHAT TO DO WHEN SERVICE IS NEEDED
STEP 1. Package the product and relevant accessories carefully, using ample padding materials and a sturdy
mailing container to prevent damage in transit.
STEP 2. Include in package:
a) Evidence of date and place of original purchase (for example, a copy of your sales receipt).
b) Detailed description of your problem.
c) When possible, a sample evidencing the problem.
STEP 3. Return item (insured) to: (in the U.S.):
(in the U.K.)
Vivitar
Sakar UK
Attn: Technical Support
2D Siskin Parkway East
195 Carter Drive
CV3 4PE, UK
Edison NJ 08817
When service is complete, the product will be returned to you shipping prepaid. In the event the product is
deemed to be not faulty or the defect is a result in wear and tear, Vivitar may levy a handling charge for the
return ofthe product. This warranty gives you specific legal rights. You may also have other rights which vary
from country and State to State thereof. For more information visit our website www.vivitar.com
TECHNICAL SUPPORT
For technical support issues please visit our website at www.vivitar.com. You can find manuals, software and FAQ’s
at the website. Can’t find what you are looking for? E-mail us at [email protected] and one of our technical
support team members will answer your questions. For phone support in the US please call 1-800-592-9541, in the
UK call 0800 917 4831. If you would like to call from anywhere else, please visit www.vivitar.com for your local toll
free number.
-2-
Introduction
Congratulations on your purchase of the Vivitar VIV-DF-186 flash unit. This electronic flash
is innovatively designed for both digital cameras, with advanced technology used to control
the correct amount of light output. Please kindly take a few minutes to read this instruction
manual before using.
Compatibility
The VIV-DF-186 flash comes in three different varieties, each compatible with different
cameras. Check to make sure the flash that you have is compatible with your camera.
VIV-DF-186-CAN - Compatible with Canon Digital E-TTL cameras
VIV-DF-186-NIK - Compatible with Nikon Digital I-TTL cameras
VIV-DF-186-SON - Compatible with Sony Alpha Digital ADI cameras
-3-
Important Notes for Flash Photography and Maintenance
1. After each picture, wait for two seconds for the flash to fully recharge before
taking the next shot, even when the ready light is on. This will help to prolong the lifespan
of the flash tube. It will also allow you to attain the full charging capacity of the flash
capacitor for precise flash photography.
2. For best results, keep your flash at least at about six feet away from the subject you are
photographing.
3. In the event that the flash exposure is incorrect (over or under exposed or green auto
check light does not light up),you may take either one or more of the corrective actions: (1)
move closer to the object (2) re-adjust your bounce angle (3) Increase ISO* setting.
4. Bounce should only be used on lighter color ceilings or white walls. Note that when using
this feature, 2-3 f/stop of light will be lost due to the reflection.
*Note: In digital photography, the ISO number notes how sensitive the image sensor is to the
amount of light present. The higher the ISO number, the more sensitive the image sensor is to
light and therefore the possibility to take pictures in low light situations increases.
-4-
Important Notes for Flash Photography and Maintenance (cont.)
6. Always use a fresh set of 4 AA batteries of the same brand and type when old batteries
are depleted. Mixing and matching batteries of different types or brands will greatly
deteriorate the flash’s performance.
7. When the flash is not being used for extended period of time (>2 weeks), remove the
batteries in order to prevent battery leakage. Once the batteries are removed, do not
expose the flash unit and batteries to excessive heat, sunlight or fire.
8. Charge up and test fire the flash unit at least once per month to maintain the optimal
performance of the flash tube and charging capacitor.
-5-
Installing Batteries
In order to power on your flash, you will first need to install batteries. To do so, first ensure
that the ON/OFF switch is in the OFF position. Next, open the battery compartment, and
insert 4 new AA batteries with the correct polarity (+,-) as indicated inside the battery
compartment.
Top View of Your Flash
You can place the included diffuser
over your flash in order to soften
the light emitted.
Slide open the battery
compartment door to
access the battery
compartment.
Battery
Compartment Door
-6-
Mounting the Flash Onto Your Camera
Once batteries are inserted into your flash, you can proceed to mount it onto your camera.
To do so, first ensure that the ON/OFF swtch is in the OFF position. Next, slide the flash’s
hotshoe base onto the camera’s hot shoe then rotate the lock ring until it is fastened
securely. Slide the ON/OFF Switch to the ON position. When the Ready Light illuminates,
the flash is ready to fire. Pressing the Test Button will test fire the unit.
TEST
TTL OK SL OFF OFF/ON READY
Button Controls on
Rear of Flash
hot shoe
base
lock ring
-7-
Auto Check Light
The Green Auto Check Light (OK) located on the back of the flash is used to confirm that
your subject is within the effective TTL range of the flash unit. If your subject is within the
effective TTL flash range after shooting, the green Auto Check Light will illuminate for
approximately 2 seconds.
Power Saving Function
In order to save battery life, your flash will automatically turn off if left idle for more than one
minute.
-8-
PROGRAM TTL (P) / AUTO MODE
This flash unit provides automatic Through-The-Lens (TTL) control of the flash exposure
when used with dedicated digital cameras. When using this mode, the flash unit will
automatically emit the flash output for a balanced illumination of the subject and
background. The inbuilt AF infra-red assistance beam will turn on automatically to assist
the camera to focus in low lighting conditions.
-9-
TTL AV, TV AND M MODES
When this flash unit is used with your camera set to AV, TV or M modes, the flash exposure
will be automatically controlled by the camera based on the combination of shutter speed
and aperture value.
*For TV mode, do not exceed the camera’s maximum flash synchronization speed. In AV
mode, setting at a slow speed will usually result in blurry pictures caused by the shaking of
one’s hand. In such situations, the use of tripod is recommended.
-10-
SECOND/REAR CURTAIN SYNCHRONIZATION
This mode permits you to fire the flash just before your camera’s shutter closes during slow
shutter speed shooting. This will create a trail of lighting that will be appear behind the main
subject when a slow shutter speed is being used.
*For more information on rear curtain synchronization settings, refer to your camera’s
instruction manual.
-11-
RED EYE REDUCTION
When red eye reduction is activated on the DSLR body, the flash unit will activate a series
of preflashes before the main flash to reduce the possibility of red eye occurrence during
shooting.
-12-
USING THE BOUNCE HEAD
USING THE SWIVEL HEAD
Various combinations of bounce angles
can be used to cut off unwanted
shadows or for special soft effect
purposes.
Once the flash is attached to your
camera you can use the swivel head to
aim the light in different directions,
allowing you to get a variety of different
effects.
-13-
SPECIFICATIONS
FEATURES
Guide Number: 30m/ 99ft
Circuitry: IGBT (Insulated Gate Bipolar Transistor)
Automatic TTL Range: 15m / 50ft (F2.0)
AF Illumination: 8m / 26ft
Dedication:
- For Canon (model VIV-DF-186-CAN): E-TTL/E-TTL II
- For Nikon (model VIV-DF-186-NIK): iTTL
- For Sony (model VIV-DF-186-SON): A-Mount
Exposure check: Green Auto Check Light
Color Temperature: 5600K
Bounce Angle: Up 30-45-60-75-90
Swivel Position: left 45° / right 45°
Flash Duration: 1/700 sec. (Full power)
Recycling Time: 0.3-10 sec.
Number of flashes: 100-300 per set of new batteries
Power Source: 4 AA Batteries (Alkaline, NiCd or NiMH)
Dimension(mm): 110 x 65 x 70
Weight: 250 grams (w/o batteries)
• Guide No:30m/99ft
• Flash ready indicator in viewfinder
• Full Digital TTL dedication
• Autofocus Infra-Red Assistance beam
• Bounce and swivel construction
• Automatic shutter speed setting
•Auto check (Ok) indicator
• Red eye reduction*
• Second/Rear curtain synchronization*
• Slow synchronization (For Nikon only)*
• Dedication: ETTL I / II (Canon), iTTL (Nikon)
• A-Mount(Sony)
• Single slave function
• Auto Shutdown Power Saving Feature
* Camera dependent features.
Please check your camera operating
instruction manual.
-14-