1
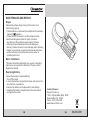
DSM155 Digital LED Light Meter User’s Manual DSM155 CONTENTS CONTENTS TABLE OF CONTENTS............ .... . ...... .......3 Basic Functions........... .................... .........11 LIMITED WARRANTY AND LIMITATION OF LIABILITY... ............... .......3 Out of Box. ........................ .............. ..........3 Accessories. ........................ ........... ..........3 Safety Information. ............... ........... ..........3 Readings Hold........... ...................... .........11 Auto and Manual Range..... ............... .........11 Maximum and Minimum Measurement.........11 Source Selection Mode........... ......... ..........11 Lux/FC Measurement........... ............ .........12 Light Intensity measurement mode.............12 Relative and Peak Measurement. .... ........ ...13 ZERO Calibration........... ................. .........13 Button Sound ON/OFF...............................14 Auto Power Off. .... ................................. ...14 SPECIFICATIONS............ .................. ......14 MAINTENANCE AND REPAIR.. ........... ......15 Repair.......... .................................. .........15 Meter Calibration......................................15 Replacing Battery.... .............................. ...15 Certification. ............... .................... ..........5 INTRODUCTION............ .... . ............... .......5 Overview. ........................ ................ ..........5 Figures and Components. ........... ...... ..........5 Buttons and Components........... ...... ..........5 Display Description........... ............... ..........8 USING THE METER............ ................ .......9 About the Meter . .................. ............ .........9 Concepts of illuminance scales. ... ..... .........10 Conversion of illuminance and light intensity........... ...... . ........... ........10 01 Contact Dawson.. .............................. ......16 02 LIMITED WARRANTY AND LIMITATION OF LIABILITY Safety Information This instrument from Dawson Tools Inc. will be free from defects in workmanship and material for three years from the date of original purchase. This warranty does not cover defects resulting from damage caused by the user such as drops, neglect, misuse, unauthorized alteration, usage outside of specified conditions, contamination, or improper repair/maintenance. To receive service on the instrument if it becomes necessary during the warranty period, contact your nearest Dawson authorized service center at (800) 898-6991 or visit www.DawsonTools.com to obtain a return authorization (within the US only). A return authorization is necessary before returning any instrument to Dawson; no service will be provided without a return authorization. The user is responsible for properly packing the unit and charges such as shipping, freight and insurance charges. The extent of Dawson's liability is limited solely to the repair/replacement of the instrument. The above warranty in its entirety is inclusive and no other warranties, written or oral, are expressed or implied. Warning TO REDUCE THE RISK OF FIRE, ELECTRICAL SHOCK, PRODUCT DAMAGE OR PERSONAL INJURY, PLEASE FOLLOW THE SAFETY INSTRUCTIONS DESCRIBED IN THE USER MANUAL. READ THE USER MANUALS BEFORE USING THE METER. Out of Box Check the meter and accessories thoroughly before using the meter. Contact your local distributor if the meter or any components are damaged or malfunction. Accessories • 9V Battery • Case • User’s Manual x1 x1 x1 03 Warning TO ENSURE SAFE OPERATION AND LIFE OF THE METER, DO NOT PLACE THE METER IN ANY ENVIRONMENT WITH HIGH PRESSURE, HIGH TEMPERATURE, DUST, EXPLOSIVE GAS OR VAPOR. • Avoid shaking, dropping or any kind of impacts when using or transporting the meter. • To avoid electric shock or personal injury, repairs or servicing not covered in this manual should be performed only by qualified personnel. • Avoid direct exposure to sunlight to ensure extended life of the meter. • Use only the batteries indicated in the Technical Spec. • Avoid exposing batteries to humidity. Replace batteries as soon as the low battery indicator appears. • Please keep the original packing for future shipping purposes (ex. Calibration) • After opening the box, check for any damage during delivery. 04 Safety Symbols on the Meter Important safety information, please refer to the user manual Important Safety Information • Repair or maintenance should be implemented by trained personnel. Certification • The meter is compiled to EMC requirements. INTRODUCTION Overview The DSM155 is a high precision portable digital LED light meter. The meter features a bar graph display for easy measurement of illuminance and light intensity. With the ability to switch between standard lighting and various LED light sources, this meter is highly versatile and useful in many different situations. 7. Data hold and Zero calibration button: Data hold: Press to enter/exit data hold mode. Zero calibration: Press for 1 second to perform zero calibration. 8. Relative value and peak value measurement button: Relative value measurement: Press to enter/exit relative value measurement mode. Peak value measurement: Hold for 1 second to enter/exit peak value measurement mode. 9. Manual range button: Press the button to select ranges, Hold for 1 second to return to auto range mode. Figures and Components Buttons and Components 1. Light sensor protection cover 2. Light sensor 3. LCD display screen 4. Power and tone ON/OFF: Power on/off: Press the key to activate the device and hold for 1 second to turn it off. Button tone on/off: When power is on, press the key to turn on/off the button tone. 5. Max/Min Light source button 6. Lux/Foot candles/Light intensity button 05 06 Display Description Front Panel 1. Manual range mode 2. Auto range mode 3. Analog bar graph 4. Light source selection 5. Measurement display 6. Lux units 7. Intensity (CD) units 8. Foot candles (Fc) units 9. Meters/Feet units 10. Data hold mode 11. Low battery symbol 12. Peak measurement mode 13. Minimum measurement mode 14. Maximum measurement mode 15. Relative measurement mode 1 2 1 15 14 13 12 11 3 2 10 9 3 DSM155 9 4 8 5 6 7 07 8 4 7 6 5 LCD display interface 08 USING THE METER Concepts of illuminance scales Warning TO ENSURE SAFE OPERATION AND LIFE OF THE METER, DO NOT PLACE THE METER IN ANY ENVIRONMENT WITH HIGH PRESSURE, HIGH TEMPERATURE, DUST, EXPLOSIVE GAS OR VAPOR. About the Meter • The light sensor of this meter is designed to simulate the sensitive curve of light obtained through human eyes. The spectral coverage is between 320mm and 730mm. For best results, use the meter to measure light within this range. Measurement outside this range ex. infrared range may be inaccurate. • The light sensor is calibrated by common electric incandescent lamps required by CIE under the color temperature of 2854°K; reading may be different for the spectrum of other lamps. • Light source should be facing light sensor directly. • The optical detector should be exposed to the light source for 2 minutes before making measurement. • Influences such as shadows and other factors on the optical detector should be avoided. 09 A Lux is defined as the illuminance on a surface of one square meter when a uniform source of one candela is placed one meter away from the surface. A foot-candle (Fc) indicates the illuminance on a surface of one square foot, when a uniform source of one candela is placed one foot away from the surface. 1 Fc = 10.764 lux 1 lux = 0.09290 Fc Conversion for illuminance and light intensity E=I/r2 I = Exr 2 Where, E --- Illuminance value (Unit: Lux) I --- Light intensity of the light source (Unit: cd) r --- Distance from the luminous surface of light source to the optical detector (Unit: m). During measurement, the minimum distance between the luminous surface of the light source and the light sensor should be greater than 15 times the diameter of the light sensor or light source ( choose the one with the larger diameter). 10 Basic Functions • Press the power button to turn on the meter, the default setting is auto-range Lux measurement. The measured ambient light level is displayed. • Face the light sensor to the light source. Readings Hold • Press “HOLD/ZERO” button to hold the current reading. • Press “HOLD/ZERO” button again to release the hold. Auto and Manual Range • Press “RAN” to switch from auto range to manual range. MANU is displayed on the top left corner of the screen. • Press “RAN” multiple times to choose the desired range. • Hold “RAN” to switch back to auto range (AUTO is displayed) • Hold the “MAX/MIN/LS” button to save the light source setting and return to normal mode. • Light source default values: • L0-Standard lighting: 1.000 • L1-LED daytime light: 0.990 • L2-LED red light: 0.516 • L3-LED amber (yellow) light: 0.815 • L4-LED green light: 1.216 • L5-LED blue light: 1.475 • L6-LED purple light: 1.148 • L7--L9-default standard lighting: 1.000 Lux/FC Measurement • To switch units between Lux and FC, press “LX/FC”. Default unit is Lux. Maximum and Minimum Measurement Light Intensity measurement mode • Press “MAX/MIN/LS” to hold the maximum value on the display. Press “MAX/MIN/LS” again to switch to minimum. Press "MAX/MIN/LS" a third time to return to normal display. • Hold the “Lx/Fc/CD” button and the display will switch to light intensity distance mode where you can adjust the distance from the light source. • Press the “RAN” button to switch between meters and feet. • Press the “MAX/MIN/LS” or “Lx/Fc/CD” button to adjust the distance value. • Hold the “Lx/Fc/CD” button to save the distance and the LCD display will now show the measured light intensity measurement. • Press the “Lx/Fc/CD” button to return to illuminance measurement. • Light intensity is calculated based on the following formula: Light intensity (CD) = illuminance (Lx) x distance squared (m 2) Source Selection Mode • Hold the “MAX/MIN/LS” button for one second and the LS value will flash on the LCD display. The meter is now in source selection mode. • Press “MAX/MIN/LS” or “Lx/Fc/CD” to change the light source (L0-L9); hold "Lx/Fc/CD" to accelerate the change. • Press the “RAN” button and the value of the selected light source begins to flash. Press “MAX/MIN/LS” or “Lx/Fc/CD” to change the value, hold “MAX/MIN/LS” or “Lx/Fc/CD” to accelerate the change. Press “RAN” again to switch back to the previous step. 11 12 Note: 1. Light intensity measurement mode range: distance between 0.01~30.47m or 0.01~99.99ft. 2. If a single light source is used, the light intensity of the source can be set to calculate and display the distance from the light to the sensor. Relative and Peak Measurement Difference between “Peak” and “Max”: Peak measures the instantaneous output of the light source at a higher sampling rate where Max displays the maximum value obtained (at a lower sampling rate). • Press “REL/PEAK” to enter Relative measurement (REL) mode. • When “REL” is pressed, the instantaneous measurement is set as reference level “0” and the value displayed is the difference between the current measurement and the reference level. Change range and units as desired. • To enter PEAK mode, Hold “REL/PEAK” until PEAK shows up on the screen. Change range and units as desired. • Press and hold “REL/PEAK” to return to normal mode. ZERO Calibration • To calibrate the meter, cover the sensor with the sensor cover. • Press and Hold “HOLD/ZERO” button until ADJ is displayed on the screen. • Once ADJ disappears, calibration is done. 13 NOTE: The meter can be calibrated while the sensor is exposed to light. This will serve as a relative measurement. Button Sound ON/OFF • Press the power button to turn off button sound, press again to turn it back on. Auto Power Off The meter will turn off if not in used for more than 10 minutes. SPECIFICATIONS • Analog bar display: 3½ digits, max reading of 1999, w/ Analog Bar Display • Sampling rate: ≥2 times/sec • Measurement range: 20 to 200k Lux 20 to 20k FC 0 to 999k CD • Measurement spectrum: 320~730nm wavelength (λ) • Sensor: silicon photoelectric diode • Power supply: 1 x 9V battery • Battery life: ~200hrs • Operating temperature: 10°F to 122°F (-10 ~+ 50 °C) • Max. Operating Humidity: 80% RH • Storage temperature: 10°F to 122°F (- 10 ~+ 50 °C ) • Max Storage humidity: 80% RH • Outside measurement: 7.5(L) x 3.5(W) x 1.67(H) (190 (L) × 89(W) × 42.5 (H) mm) • Weight: about 7 oz. (200 g) including batteries • Accuracy: ±3% (calibrated with incandescent lamps at 2854K); ±6% other visible light sources. 14 MAINTENANCE AND REPAIR Repair Please follow these steps closely if the meter is not functioning properly: • Check batteries; replace with new batteries if low battery indicator“ ”appears. • Follow the user’s manual to confirm all procedures. • Before sending meter back for repair, include a description of the problems encountered. Remove batteries and pack meter well to avoid damage in delivery; Dawson does not cover damage due to delivery. • Repair or service not covered in this manual should be performed only by the authorized service center or qualified personnel. Meter Calibration The meter should be calibrated once a year. A standard light source is required for calibration. Please contact Dawson for details. Replacing Battery Follow these steps to replace battery: • Turn off the meter. • Loosen the battery compartment screw, and remove the door from the case bottom. • Remove the battery and replace with a new battery. • Reattach the battery compartment to the case bottom and tighten the screw. 15 Contact Dawson Dawson Tools, Inc. 1142 S. Diamond Bar Blvd., #858 Diamond Bar, CA 91765 Phone: (310) 728-6220 www.DawsonTools.com 16 00-05-3729