1
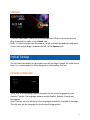
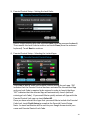
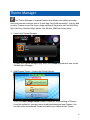
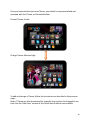
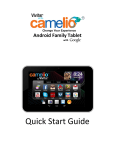
Android Family Tablet with Quick Start Guide Features Google Certified, latest Android Operating System Theme Manager lets you personalize your Tablet with your favorite characters adding as many as you want and changing as often as you want Supports 5 users - each with their own theme and application preferences Separate Parental Controls for each theme High Resolution (1024x600) 7 Inch display Dual Front & Rear Cameras Built In Google Play Store lets you download hundreds of thousands of free apps and apps available for purchase Extra Long Life Battery Getting to Know Your Camelio™ Tablet CAMELIO™ TABLET FRONT BACK 2 UNLOCK To unlock your tablet, touch and hold the Lock icon. When it turns into a circle drag it towards the right, to the Unlock icon. Note: To unlock and activate the camera, touch and hold the Lock icon and when it turns into a circle drag it towards the left, to the Camera icon. Initial Setup The first time you power on your tablet you will be taken through the initial setup. Note: It is recommended to fully charge your tablet before first use. CHOOSE LANGUAGE Touch one of the language options to select the on screen language for your Camelio™ tablet: The language options include English, Spanish, French and Portuguese. Note: You can set your tablet to other languages included in the tablet’s Settings. This will only set the language for the Android Setup menus. 3 SELECT WIFI Touch one of the available WiFi connections listed to select your network. If the Wifi connects automatically, touch Connect. If a password is required by the WiFi connection, you will be prompted to first type in the WiFi password and then touch Connect. Once connected, the WiFi icon will appear on the status bar. Note: If you do not wish to connect to WiFi during the Setup touch Skip. The WiFi connection can be set at any time using the Settings menu. CONNECT TO GOOGLE You must sign into a Google Account to use Gmail, Google Talk and other Google Apps that require an active Google Account. If you don’t have a Google Account you can create one. Touch Yes if you already have a Google Account and continue to the instructions: Sign into Your Google Account Touch No if you do not have a Google Account and continue to the instructions: Create a New Google Account Sign into Your Google Account If you have a Google Account and have touched Yes on the ‘Got Google?’ screen, please follow these instructions: 4 1. Sign In: To sign into your account enter your Email and Password using the onscreen keyboard, and then touch Next or Done to continue. Then touch OK to agree to the Google, Chrome, and Google Play terms and touch Next to continue. 2. Setup Google Play: Touch Set up credit card and enter your details to enable easy purchasing of apps from the Google Play Application Download Store. If you choose not to setup Google Play, touch Not now. 3. Backup and restore: You can backup your tablet’s data, apps and settings to the Google Cloud and also restore your data, apps and settings from the Google Cloud. Touch the appropriate box to check off and select the desired restore and backup options and then touch Next to continue. 5 4. Google & location: Touch the appropriate box to check off and select the desired Google location service options and then touch Next to continue. 5. Date & time: Touch Central Time to select your time zone. Touch Current date to set the date. Touch Current time to set the time. Once the time and date are set, touch Next to continue. 6. Google Services / Setup Complete: Touch Next to agree to Google updates and complete the Initial Setup. Touch Finish to begin using your tablet. 6 Create a New Google Account If you do not have a Google Account and have touched No on the ‘Got Google?’ screen, please follow these instructions: 1. The ‘Make it Google’ screen appears to reconfirm. Touch Get an account to continue. Note: If you would like to create a Google account at another time touch Not now. 2. Enter Name: You will be prompted to enter your first and last name. Touch Done once complete. 3. Choose username: Enter an email then touch Next or Done. Note: The email entered will be will be checked for availability. 4. Create Password/ Recovery information: 7 Type your password for your account (minimum of 8 characters) and retype to confirm your password. Touch Done when complete. Then select a Security question which will be used if you ever lose your password and need to recover it. Type your Answer and then the Recovery Address (different than your new Google email) for recovering your password. When complete touch Next or Done to continue. 5. Join Google+: Touch Join Google+ to enable sharing on the web via Circles, Instant Upload and Messenger. Touch Not Now to continue without enabling Google+. 6. Terms of Service/Authenticate: Touch Next to accept the Google Terms of Service, Privacy Policy and Google Play Terms of Service. Then, to authenticate your account, type the word displayed in the text field. Touch Next or Done to continue. 7. Setup Google Play: 8 Touch Set up credit card and enter your details to enable easy purchasing of apps from the Google Play Application Download Store. If you choose not to setup Google Play, touch Not now. 8. Backup and restore: You can back up your data, apps and your settings with your Google Account. Touch the appropriate box to check off and select the desired restore and backup options and then touch Next to continue. 9. Google & location: Touch the appropriate box to check off and select the desired Google location service options and then touch Next to continue. 10. Google Services / Setup Complete: Touch Next to agree to Google updates. Then touch Finish to complete the new Google Account Setup. 9 LICENSE AGREEMENT Please review the License Agreement. Touch I Agree to complete the Initial Setup and to begin your experience with the ever changing Camelio™ tablet. Home Screen Once you have completed the Initial Setup the Home Screen appears. The orientation of the display screen rotates with the tablet as you turn it. 10 INTERFACE 2 1 3 4 5 6 1. 2. 3. 4. 5. 6. 7. 8. 9. 7 8 9 10 11 Page counter Theme Image Gallery Widget Theme Digital Clock Widget Settings Tabbed Apps Manager Back Home Recent Apps Image Editor 12 10. 11. 12. 13. 14. 15. 16. 17. 13 14 15 16 17 Camera Apps Contacts Parental Control USB Connected Time Wi-Fi Connection Signal Battery Power Level Tabbed Apps Manager The Tabbed Apps Manager allows you to easily organize and create shortcuts to your favorite apps. These apps can be added to the Home screen Tabbed Apps Manager. You can organize and manage your Apps by placing the shortcuts in the selected tab. The Tab Apps Manager includes the following tabs: Apps, Games, Social, Tools. 11 To manage your apps, touch a tab to select it and then touch the Add App icon or touch the App Setting icon (which can also select to remove an App). The list of your Apps appears on the screen. Next, touch an App to choose the one you would like to display in the selected tab. After you have selected the App, it is shown in the tab as seen below: 1. Touch a tab to select it. For example, the App tab above is selected. Touch the Add App icon. 2. Touch the App you would like to add. 3. View the added app on your selected Apps Tab Manager. Parental Control The Parental Control feature can be accessed by touching the Parental Control icon on the Home screen. The Parental Control allows you to specify which apps can be used by your children. Once you add your user information and set your Lock Code, you can then control which apps can be launched without a code and which apps require a lock code to be entered in order to launch. 12 1. Parental Control Setup - Selecting ON/OFF: By default, the Parental Control feature is turned OFF, which means that all apps can be accessed. To activate the Parental Control, touch the ‘Turn Parental Control On’ option to ON. Then touch the Set Up button to continue the Parental Control set up. 2. Parental Control Setup - User Information: You will then be prompted to enter your first name, last name and email. When complete, touch Next. Note: Your existing Google email or the new Google account you defined during the Initial Setup will automatically appear. If you do not have a Google Account, you will be prompted to create a new account. Your lock code details will be sent to the account specified. 13 3. Parental Control Setup – Setting the Lock Code: Enter a 4-digit Parental Lock Code and touch Next (from the onscreen keyboard). Then reenter the Lock Code to confirm and touch Done (from the onscreen keyboard). Touch Next to continue. 4. Parental Control Setup – Selecting the Locked Apps: Touch ON or OFF to select the Parental Control setting for each app. ‘ON’ indicates that the Parental Control has been activated for the selected App and your Lock Code is required to be entered in order to launch that App. ‘OFF’ indicates that the selected App will automatically launch (without entering a Lock Code). If you would like to quickly activate all Apps with the Parental Control Lock you can touch Select All. Once you have selected the Apps that you would like to include the Parental Code Lock, touch Finish Setup to complete the Parental Control Setup. Note: An email notification will be sent to your Google Account with your name and Parental Control Lock Code. 14 Theme Manager The Theme Manager is a special feature that allows your tablet to change into your favorite character with a Theme App Card (sold separately). You can add as many Themes as you like from a large catalog of characters such as Hello Kitty, My Little Pony, Monster High, Barbie, Hot Wheels, WWE and many more. 1. Launch the Theme Manager: To open the Theme Manager App, touch the Theme app shortcut icon on the Tabbed Apps Manager. 2. Add/Change Theme – Access the Online Catalog: Touch the Add/Change Theme button to open the online catalog of Themes. From this online list, you can choose to add and download new Themes. You can also select a purchased Theme and switch your tablet to that Theme. 15 3. Add/Change Theme – Add a New Theme: To activate a new Theme, touch the ADD button by the selected Theme. 4. Add/Change Theme – Activate New Theme: Monster High App Card (sold separately) Enter your first name, last name, email and serial number (included on the Theme App Card - sold separately) and then touch Done (from the onscreen keyboard). Touch the Activate button to download and begin using your new Theme. Note: Download may take several moments. Collect all your favorite characters! 16 5. Add/Change Theme – Purchased Theme: Once the download is complete, the new Theme appears with the Purchased button. This indicates a Theme that you have purchased and a Theme that can be applied to your tablet at any time. 6. Add/Change Theme – Change Theme: The ‘Selected’ button appears on the current theme. Note that the Vivitar Theme is the default Theme and is automatically selected on initial use. Once you have purchased and added new Themes you can select to change the Theme at any time by touching the Purchased button of the Theme you want. The selected Theme will then appear with the highlighted Selected button and your tablet will automatically change into the Theme you have selected. 17 Once you have selected your new Theme, your tablet is now personalized and activated with this Theme, as illustrated below: Current Theme: Vivitar Change Theme: Monster High To add and change a Theme, follow the instructions as described in the previous steps. Note: A Theme can also be selected for a specific User and can be changed at any time. See the ‘Add Users’ section of this Quick Start Guide for more details. 18 Add Users You can add up to 5 different users on your tablet. Each user can have his/her own Theme, profile picture and application preferences. 1. Launch the Theme Manager: To manage the users of your tablet, touch the Theme app shortcut icon on the Tabbed Apps Manager. 2. Access Manage Users: Once the Theme Manager app is open, touch Manage Users. 19 3. Add First User: The first time Manage Users is activated, the ‘Add User’ screen appears. Touch Add User to add a new user. Note that the current theme appears on the right. Enter your name and email then touch Done (from the onscreen keyboard). You can change your profile picture by touching the Profile Image and selecting an existing photo. Touch OK once the information is complete to create the new User. 20 4. Change Theme: The new User’s name now appears highlighted in the Users list. If you would like to change the User’s Theme, touch Change Theme. The ‘Add/Change Theme’ screen appears. Touch one of the purchased Themes. This Theme will then be active for that specific User. Note that each User can have his/her own, custom Theme. Touch OK to complete the personalization of the user and return to the Home screen. 5. Additional Users / Switch Users: Touch Add User and then follow the steps above to include up to 5 new Users. To switch between Users, touch to highlight the User name from the list and then touch Switch to this User. Your tablet automatically changes to the selected User’s Theme and settings. Note: To delete a User, touch a User’s name to select and highlight a User from the list, then touch Delete. 21 6. Additional Users - Selecting a User, Power Off/Standby-Lock Mode: If you have added more than one User on your tablet you will need to identify the User you want after the tablet has been powered off or been in standby/lock mode. Once you power on or unlock your tablet the list of Users appears. Touch a User to activate your customized tablet, as per the selected User’s settings, and to experience the ever changing world of the Camelio™ tablet. If you would like more detailed instructions beyond the Quick Start Guide, please refer to the online User’s Manual and Help. If you require further assistance, please visit www.vivitar.com. For phone support in the US please call 1-800-592-9541, in the UK call 0800 917 4831. If you are calling from anywhere else, please visit www.vivitar.com for your local toll free number. © 2013 Sakar International, Inc. All rights reserved. 195 Carter Drive Edison, NJ 08817 Support: 800-592-9541 Sakar UK 2D Siskin Parkway East CV3 4PE, UK Support: 0800 917 4831 22