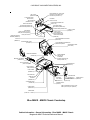
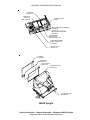
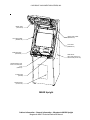
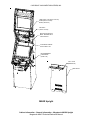
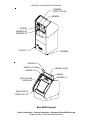
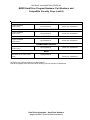
1
90003010 Rev C
Merit Industries, Inc.
2525 State Rd.
Bensalem, PA 19020-8529
(215) 639-4700; (800) 523-2760
http://www.meritind.com
Megatouch MAXX Technical Service Manual Contents
Section 1 - Cabinet Information
General Information- All Cabinet Styles
Dimensions/Shipping Weights
General Information - Countertop
Parts Illustrations
General Information - Upright
Parts Illustrations
MAXX Parts List
Section 2 - Hard Drive Information
Hard Drive Numbers
Program Numbers
Part Numbers
Security Key Numbers
Section 3 - Troubleshooting Information
Touchscreens
Troubleshooting
Touchscreen Calibration
Motherboard Handling Precautions
Motherboard Diagrams
Access/Removal of Major Assemblies
Motherboard
Monitor
Hard drive
Touchscreen
Troubleshooting Guide
CMOS Setup
Mars 2000 Bill Acceptor
DIP Switch Settings
Section 4 - Power Supplies
Power Supplies Used in MAXX Games
GlobTek ST-230WHF
EOS VTL100-4000
Mini-GlobTek AT145-S/GPS145-MATX
Enhance SFX-1211J
Section 5 - Motherboards
Circuit Board Cross Reference Chart
Telco
Mitsubishi
Itox
Unicorn
I/O Board Pinouts (Blue)
Section 6 - Monitors
Monitors Used in MAXX Games
Tatung--type 38
Tatung--type 58
Tatung--type 66
Tatung VS-20475TZ21
Tatung VT19726Z
Wells-Gardner--type 41
Wells-Gardner--type 67
Tatung/Wells--type 40
Kortek flatscreen
Monitor Adjustments
Degaussing
Monitor Adjustment Procedures
Section 7 - Technical Service Bulletins
TN 27
(Missing spacer for hard drive shock mount
in upright games)
TN 28
(Small coins falling into coin return slot inside
countertop coinbox)
TN 29
(Internal power cord in countertop games)
TN 30
(Cleaning games)
TN 31
(Coinbox Adjustment on Megatouch Slim
MAXX Countertop Games)
TN 32
(MAXX 2K CD upgrade)
TN 33
(Adjustment to Slim MAXX coin chute)
TN 36
(Theft deterrent)
CSBULL26
(Potential electrical short circuit on EZ MAXX
games)
FLDBLL 18
(Idle mode)
TN 41
(CD updates)
FLDBLL 19
(Removing and installing the coin box in
MAXX Select/Slim MAXX games)
FLDBLL 20
(Tri-Towers and 11-UP in games with
version 6.02 software)
TN 42
(Baseball in MAXX Owner’s Manuals)
TN 43
(Using a keyboard in upgrading MAXX
games)
TN 44
(Security key return procedure)
FLDBLL 21
(Fan shield on rear door of MAXX Classic
games)
Megatouch MAXX Technical Service Manual Contents (cont’d)
TN 46
(Linking MAXX games)
TN 47
(Double Diamond name change)
TN 48
(Motherboard identification)
TN 49
(Telco motherboards and TournaMAXX
operation)
FLDBLL 22
(Thumbscrew on Elite MAXX games with
integrated bill acceptor)
FLDBLL 23
(Manufacturer defect in security keys)
TN 54
(Replacing touchscreen controllers on EZ
MAXX and MAXX Elite games)
FLDBLL 26
(Software bug affecting high scores)
FLDBLL 27
(Bill acceptor failures in New Jersey games)
FLDBLL 28
(Rebooting and locking up problems--for
games upgraded with XL to MAXX and Infinity
to MAXX kits only)
TN57
(New Jersey games and coin mech and bill
acceptor operation)
TN61
(Memory upgrade included in Ruby upgrade
Kits)
FLDBLL 29
(Canadian FORCE 2003 and Ruby security
keys)
TN58
(Software updates and championship tournaments)
TN76
(FORCE 2004 Point 5/Sapphire 2 update
disc)
TN65 Rev D
(DIP switch settings in FORCE and MAXX
games)
Section 1
Cabinet Information
General Information- All Cabinet Styles
Dimensions/Shipping Weights
General Information - Countertop
Parts Illustrations
General Information - Upright
Parts Illustrations
MAXX Parts List
COPYRIGHT © 2005 MERIT INDUSTRIES, INC.
Cabinet Information Section
General Information
The Megatouch MAXX video games were available in several different cabinet styles:
Megatouch Full MAXX
Dimensions: H - 15-1/4”; W - 20”; D - 18-1/4”
Shipping dimensions: H - 26-1/2"; W - 23"; D - 21-1/4"
Shipping Weight: 95 lbs.
Megatouch Blue MAXX - MAXX Classic
Dimensions: H - 15-1/4”; W - 20”; D - 18-1/4”
Shipping dimensions: H - 26-1/2"; W - 23"; D - 21-1/4"
Shipping weight: 95 lbs.
Megatouch MAXX Select - Slim MAXX
Dimensions: H - 20”; W - 16”; D - 16-1/2”
Shipping dimensions: H - 22”; W - 20”; D - 17-1/2”
Shipping weight: 88 lbs.
Megatouch EZ MAXX - MAXX Elite
Dimensions: H - 16”; W - 17-1/2”; D - 15-1/2”
Shipping dimensions: H - 18-1/2”; W - 21”; D - 20”
Shipping weight: 75 lbs.
MAXX Upright
Dimensions: H - 54-1/4”; W - 24”; D - 26-1/2”
Shipping dimensions: H - 57-3/4"; W - 28"; D - 30"
Shipping weight: 250 lbs.
Blue MAXX Upright
Dimensions: H - 54”; W - 24”; D - 26-1/2”
No shipping dimensions or weight available
*An optional coin Mech/bill acceptor (Mars 2000) combination unit is available for all countertop models.
Cabinet Information - General Information - All Cabinet Styles
Megatouch MAXX Technical Reference Manual
COPYRIGHT © 2005 MERIT INDUSTRIES, INC.
Megatouch Full MAXX
Dimensions: H - 15-1/4”; W - 20”; D - 18-1/4”
Shipping dimensions: H - 26-1/2"; W - 23"; D - 21-1/4"
Shipping weight: 95 lbs.
Motherboard Information
Mitsubishi
Telco
Touchscreen Type
Microtouch
Cabinet Information - General Information - Full MAXX
Megatouch MAXX Technical Reference Manual
COPYRIGHT © 2005 MERIT INDUSTRIES, INC.
MONITOR
BEZEL
HW0092-01
SMILEY BILL
ACCEPTOR
BEZEL
HW0088-02
LID ASSEMBLY
SA0168-XX
TOUCHSCREEN
ASSEMBLY
SA0103-01
REJECT
BUTTON
HW0089-01
SIDE LOCK
HW8733-03
TWIN SPEAKER
ASSEMBLY
SA0173-01
SMILEY
COVER PLATE
HW0093-01
MARS
COVER PLATE
HW0090-01-0A
CHASSIS
MW0181-01
MARS BILL
ACCEPTOR
BEZEL
HW0088-01
Full MAXX
Cabinet Information - General Information - Full MAXX
Megatouch MAXX Technical Reference Manual
COPYRIGHT © 2005 MERIT INDUSTRIES, INC.
C O IN C H U T E
M W 02 00-01
O P T IC A L
C O IN
SENSOR
S A 10042-0 1
C O IN B O X
HARNESS
S A 0176-01
C O IN B O X LID
M W 0168-01
M E T R IM A T E
R E C E P T A C LE
C N 750 7-02
TELCO MOTHERBOARD
ASSEMBLY
SA0163-04
MITSUBISHI MOTHERBOARD
ASSEMBLY
SA0163-05
C O IN B O X LO C K
H W 8731
CENTRONICS
CONNECTOR
SA10043-02
POWER SUPPLY
CONNECTOR SA0157-02
CENTRONICS
RIBBON CABLE
EC2191-06
POWER SUPPLY
EC7528-02
ROCKER SWITCH
SW4024
CIRCUIT BREAKER
EC0340
PC CARD
SLOTS
I/O BOARD
SA10047-01-0B
Full MAXX
Cabinet Information - General Information - Full MAXX
Megatouch MAXX Technical Reference Manual
COPYRIGHT © 2005 MERIT INDUSTRIES, INC.
Megatouch Blue MAXX - MAXX Classic
Dimensions: H - 15-1/4”; W - 20”; D - 18-1/4”
Shipping dimensions: H - 26-1/2"; W - 23"; D - 21-1/4"
Shipping weight: 95 lbs.
Motherboard Information
Mitsubishi
Unicorn
Telco
Touchscreen Type
Microtouch
ELO
Cabinet Information - General Information - Blue MAXX - MAXX Classic
Megatouch MAXX Technical Reference Manual
COPYRIGHT © 2005 MERIT INDUSTRIES, INC.
BOLT LOCK
(MW0023-01)
CTOP DOOR ASSY
(MWOO16-01)
TOP COVER
(MW0013-01-XX)
RIGHT SIDE PANEL
BLUE MAXX (WD0001-03)
CLASSIC MAXX (WD0001-05)
SIDE DECAL
JADE (GL3100-44 (LEFT))
JADE (GL3100-45 (RIGHT))
BLUE (GL3100-04)
MONITOR (EC9377)
SCREEN (SA9824-01)
LOCK (MW0024-01- CAM LOCK)
LOCK W/O CAM (HW8734-01)
COTTER PIN (HW1501-01)
FAN ASSY
(SA5117-04-XX)
FAN POWER CONNECTOR
(SA0117-01)
LEFT SIDE PANEL
BLUE MAXX (WD0001-04)
CLASSIC MAXX (WD0001-06)
PLATE LATCH
LEFT (MW0014-02)
RIGHT (MW0014-01)
REAR DOOR HINGE
(MW5164)
PLASTIC TUBE
(HW9001)
TOUCHSCREEN W/VGA ASSY.
(SA0103-01)
TAPE KIT
(SB0016-01)
GASKET BEZEL ASSY.
(SA5129-01)
MONITOR HARNESS
(SA0225-04)
TOUCHSCREEN CONTROLLER
(EC9840-03) SMT3E
CENTRONICS ASSY.
(EC2198-01)
MAIN HARNESS
(SA0108-03)
I/O BOARD
CLASSIC (SA10051-02)
BLUE (SA10051-01)
BRACKET COUNTER
(MW0012-01)
12VOLT COUNTER
(EC9154-02)
LOCK BRACKET
(MW0015-01)
LOCK (HW8741)
CAM (HW8756)
LAZY SUSAN
(HW8993-02)
ANTI-SKID PAD
(HW8018-01)
CHASSIS
(MW0009-01)
4" SPEAKER ASSY
(SA4084-02)
CLAMP CORD
(MW0038-01)
RKER SWITCH
(SW4024)
SPLY BRKT.
(MW0011-01)
ATX BRACKET
(MW0352-01)
POWER SUPPLY
(EC7531)
RKER SWITCH
(SW4024)
POWER SUPPLY
(EC7528)
U BOLT W/KEPNUT FOR ALL ASSY.
U-BOLT (HW1310) NUT (HW3301)
HARD DRIVE
(PA3021-01 - JADE 2)
Blue MAXX - MAXX Classic Countertop
Cabinet Information - General Information - Blue MAXX - MAXX Classic
Megatouch MAXX Technical Reference Manual
COPYRIGHT © 2005 MERIT INDUSTRIES, INC.
PCB GUIDES
MOTHERBOARD
ASSEMBLY
Blue MAXX - MAXX Classic Countertop
Cabinet Information - General Information - Blue MAXX - MAXX Classic
Megatouch MAXX Technical Reference Manual
COPYRIGHT © 2005 MERIT INDUSTRIES, INC.
$1,$2,$5 500 BILL STACKER
(EC9796-01)
SPRING, EXT, SST
(HW8314-01)
COIN MECH
(HW8159-01)
FRONT FACE
COIN REJECTOR PUSH BUTTON
(HW0003-01)
BILL ACCEPTOR BEZEL
(HW0004-01-0A)
COIN BOX DOOR LOCK
(HW8727)
COIN BOX DOOR
(MW0052-01-0A)
METRIMATE CONNECTOR AND HARNESS
(SA0047-02-0A
COIN BOX STOP BRACKET
(MW0043-01)
Blue MAXX - MAXX Classic Countertop
Cabinet Information - General Information - Blue MAXX - MAXX Classic
Megatouch MAXX Technical Reference Manual
COPYRIGHT © 2005 MERIT INDUSTRIES, INC.
Megatouch MAXX Select - Slim MAXX
Dimensions: H - 20"; W - 16"; D - 16-1/2"
Shipping dimensions: H - 22”; W - 20”; D - 17-1/2”
Shipping weight: 88 lbs.
Motherboard Information
Mitsubishi
Unicorn
Touchscreen Type
Microtouch
Cabinet Information - General Information - Megatouch MAXX Select - Slim MAXX
Megatouch MAXX Technical Reference Manual
COPYRIGHT © 2005 MERIT INDUSTRIES, INC.
SA0213-02
EC9824
MW0183-01
HW0089-01 (SLIM MAXX)
HW0089-02 (MAXX SELECT)
HW8741
HW0088-01-0A (MARS)
HW0088-02-0A (SMILEY)
HW0088-03 (MAXX SELECT)
EC9796
SA0218-01
HW0089-01
(SLIM MAXX)
HW0089-02
(MAXX SELECT)
HW0088-01-0A (MARS)
HW0088-02-0A (SMILEY)
HW0088-03 (MAXX SELECT)
EC9796
SA0172-01
SA10042-01
HW8159-01
MAXX Select - Slim MAXX Countertop
Cabinet Information - General Information - Megatouch MAXX Select - Slim MAXX
Megatouch MAXX Technical Reference Manual
COPYRIGHT © 2005 MERIT INDUSTRIES, INC.
SA0172-01
EC9840-03
SA0211-02
SA0215-02
EC9402-03
MAXX Select - Slim MAXX Countertop
Cabinet Information - General Information - Megatouch MAXX Select - Slim MAXX
Megatouch MAXX Technical Reference Manual
COPYRIGHT © 2005 MERIT INDUSTRIES, INC.
Megatouch EZ MAXX - MAXX Elite
Dimensions: H - 16”; W - 17-1/2”; D - 15-1/2”
Shipping dimensions: H - 18-1/2”; W - 21”; D - 20”
Shipping weight: 75 lbs.
Motherboard Information
Mitsubishi
Unicorn
Touchscreen Type
Microtouch
Cabinet Information - General Information - Megatouch EZ MAXX - MAXX Elite
Megatouch MAXX Technical Reference Manual
COPYRIGHT © 2005 MERIT INDUSTRIES, INC.
TOP COVER PLATE
(MP0002-03) EZ MAXX
(MP0002-06) ELITE MAXX
COIN ENTRY PLATE
(HW8031-01)
LCD DISPLAY
(EC9381-01)
TOUCHSCREEN CONTROLLER
(EC9840-03)
LINE FILTER
(EC9304-01)
COIN DRAWER
(SA0240-03) ELITE MAXX
(SA0240-02) EZ MAXX
CASH BOX LOCK
(HW8733-05) CROSS PRODUCT
LAZY SUSAN (HW8993-02)
ANTI-SKID PAD (HW8018-01)
LINE CORD
(EC2001)
CIRCUIT BREAKER
(EC3040) ELITE MAXX
"U" BOLT (HW1310)
BEZEL ASSY
(MP0009-02) EZ MAXX
(MP0009-04) ELITE
15" LCD DISPLAY
(EC9381-01)
TOUCH SCREEN (EC9850-01)
EZ MAXX DECAL
(GL3102-01)
NO DECAL FOR ELITE
TILT MECH
(SA0236-01) EX MAXX ONLY
EZ MAXX FRONT COVER
(MP0005-03)
ELITE FRONT COVER
(MP0005-06)
(SA0238-01) EZ MAXX
(SA0238-02) ELITE MAXX
EZ MAXX - MAXX Elite Countertop
Cabinet Information - General Information - Megatouch EZ MAXX - MAXX Elite
Megatouch MAXX Technical Reference Manual
COPYRIGHT © 2005 MERIT INDUSTRIES, INC.
HARD DRIVE
(PA3021-01 - JADE 2 EDITION)
MITSUBISHI 2 SLOT RISER BOARD
(EC0028-02)
LEFT END CAP
(MP0001-01) EZ MAXX
(MP0001-07) ELITE MAXX
586 MITSUBISHI MOTHERBOARD
(SA0163-08)
(SA0163-13) (NOVA) WITH PRINTER
RIGHT END CAP
(MP0001-02) EZ MAXX
(MP0001-08) ELITE MAXX
UNICORN MOTHERBOARD
(EC0026-09)
COIN DISTRIBUTION BOARD
(SA10052-XX)
POWER SUPPLY
(EC7529-01) EZ MAXX
(EC7531-01) ELITE MAXX
SPEAKER ASSY.
(SA4084)-CROSS PRODUCT
TILT WHEEL
ONLY ON EX MAXX ASSY
TOP
ENDCAP
LATCH
BOTTOM
ENCAP
LATCH
LATCH DETAIL
EZ MAXX - MAXX Elite Countertop
Cabinet Information - General Information - Megatouch EZ MAXX - MAXX Elite
Megatouch MAXX Technical Reference Manual
COPYRIGHT © 2005 MERIT INDUSTRIES, INC.
SA0237-03
MP0002-06
MW0431-01
SA0298-01
EC9796-04
MW0324-02
HW8031-01
EC9840-03
EC9304-01
SA5117-08
CN4451-01
CN4452-01
SA0240-04
MW0244-03
SW4024
HW1310
HW8733-05
EC3040
HW8401-01
EC2008-01
HW8993-02
HW8018-02
HW8721
MW0323-01
MP0009-04
SA0235-04
EC9381-02
EC9850-01
MW0322-01
MP0001-07, -08
MP0013-01
MAXX Elite with Integrated Coin/Bill Assembly
Cabinet Information - General Information - Megatouch EZ MAXX - MAXX Elite
Megatouch MAXX Technical Reference Manual
COPYRIGHT © 2005 MERIT INDUSTRIES, INC.
SA0163-14
EC0026-09
EC0028-03
PA3021-01
HW8159-01
SA10051-02
MW0425-01
EC7531-02, -03
MW0327-01
SA4084
(2 PLACES)
MAXX Elite with Integrated Coin/Bill Assembly
Cabinet Information - General Information - Megatouch EZ MAXX - MAXX Elite
Megatouch MAXX Technical Reference Manual
COPYRIGHT © 2005 MERIT INDUSTRIES, INC.
MAXX Upright
Dimensions: H - 54 -1/4”; W - 24”; D - 26-1/2”
Shipping dimensions: H - 57-3/4"; W - 28"; D - 30"
Shipping weight: 250 lbs.
Motherboard Information
Mitsubishi
Unicorn
Touchscreen Type
Microtouch
Cabinet Information - General Information - Megatouch MAXX Upright
Megatouch MAXX Technical Reference Manual
COPYRIGHT © 2005 MERIT INDUSTRIES, INC.
I/O BOARD
(SA10052-01)
HARD DRIVE
(PA3021-01)
JADE 2 EDITION
MONITOR SIGNAL
CABLE
586 MITSUBISHI MOTHERBOARD
(SA0163-08)
(SA0163-13) (NOVA) WITH PRINTER
UNICORN MOTHERBOARD
(EC0026-09)
TOUCHSCREEN
CONTROLLER
CABLE CONNECTOR
CONTRONICS RIBBON
CABLE CONNECTOR
(EC2198-01)
POWER SUPPLY
(EC7531-01)
19" BEZEL
(HW9500-01)
19"OVERLAY
(SA9823-01)
FOAM TAPE KIT
(SB0016-01)
19" MONITOR ASSY.
(EC9378-OA)
T/S CONTROLLER
(EC9840-03)
MAXX Upright
Cabinet Information - General Information - Megatouch MAXX Upright
Megatouch MAXX Technical Reference Manual
COPYRIGHT © 2005 MERIT INDUSTRIES, INC.
BEZEL ASSY.
(SA3243-02)
RIGHT SIDE PANEL
(WD0030-01)
LEFT SIDE PANEL
(WD0030-02)
STAY ARM
(MW0095-01)
COIN BOX ASSY.
(SA3248-01)
SIDE DECAL
LEFT SIDE (GL3017-01)
RIGHT SIDE (GL3017-02)
FRONT BEZEL LOCK
LOCK FLAT,STR,#564
1-7/16
(HW8716)
4" SPKR ASSY
(SA4084)
FRONT DECAL
(GL3016-XX)
MAXX Upright
Cabinet Information - General Information - Megatouch MAXX Upright
Megatouch MAXX Technical Reference Manual
COPYRIGHT © 2005 MERIT INDUSTRIES, INC.
LAMP ASSY.-USA (SA0177-04-OA)
EURO-(SA0177-03-OA)
BULB-(LB1130-01)
FAN ASSY
(SA5117-05-XX)
B/A ASSY.(EC9796-01)
BRKT. B/A MW0146-01
LOCK-HW8731
COIN MECH-HW8249
ELEC-HW8317-XX
MOTHERBOARD/
HARD-DRIVE
(SA0217-01)
BOLT LOCK
(MW0023-07)
REAR DOOR
MAXX Upright
Cabinet Information - General Information - Megatouch MAXX Upright
Megatouch MAXX Technical Reference Manual
COPYRIGHT © 2005 MERIT INDUSTRIES, INC.
Blue MAXX Upright
Dimensions: H - 54”; W - 24”; D - 26-1/2”
No shipping dimensions or weight available
Motherboard Information
Mitsubishi
Touchscreen Type
Microtouch
Cabinet Information - General Information - Megatouch Blue MAXX Upright
Megatouch MAXX Technical Reference Manual
COPYRIGHT © 2005 MERIT INDUSTRIES, INC.
HW8989
SA5117-05-0A
SW4024
EC9840
MW5003-01
MW5003-02
EC2001
HW8960
SA3230-01
MW5014-01-0B
HW8951-02-0B
MW5001-01
SA4084
MW5006-01
SA3210-03-0B
EC9378-0A
SA3202-05-0A
WD2013-01-0C
Blue MAXX Upright
Cabinet Information - General Information - Megatouch Blue MAXX Upright
Megatouch MAXX Technical Reference Manual
COPYRIGHT © 2005 MERIT INDUSTRIES, INC.
HARD DRIVE
MOUNTING PLATE
CPU SHELF
Blue MAXX Upright
Cabinet Information - General Information - Megatouch Blue MAXX Upright
Megatouch MAXX Technical Reference Manual
COPYRIGHT © 2005 MERIT INDUSTRIES, INC.
Megatouch MAXX Parts List
Item
Description
CN4451-01
CN4452-02
CN4452-03
CN7501
CN7507-02
CN7508
CN7508-02
EC0003-05
EC0005-01
EC0007-01
EC0012-04
EC0013-01
EC0016-01
EC0016-02
EC0026-01
EC0026-03
EC0027-01
EC0028-01
EC0028-02
EC0074-03
EC2001
EC2002
EC2004
EC2008-01
EC2008-02
EC2008-03
EC2008-04
EC2008-05
EC2008-06
EC2179-01
EC2187-01
EC2187-01-0A
EC2187-02-0A
EC2187-03
EC2187-07-0A
EC2191-01
EC2191-05
EC2191-06
EC2191-08
EC2191-09
EC2193-01
EC2198-01
EC3039
EC3040
EC6056-01
EC7014
EC7528-02
RJ45 CPLR,8POSN,R/A,PNL MTG
RJ-11,SPLTR,M/F,4 CNDCT
RJ-11 CPLR,6POSN,R/A,PNL MTG (FOR MODEM)
METRIMATE PIN, FEMALE 20-24 AWG
METRIMATE RECEPT, 19 PIN
METRIMATE PLUG, 12 PIN
METRIMATE PLUG, 19 PIN
CD-ROM PLAYER, IDE, 4X
RAM SIMM, 4 MEG, 72 PIN
TERMINAL BLOCK, 4 POSITION
UNIV PCMCIA DATA/FAX MDM (MODEM--TOURNAMAXX)
PCA,RISER BD.TELCO
RAM,SIMM, 16 MEG, 72 PIN FP
RAM,SIMM, 16 MEG, 72 PIN EDO
MITSUBISHI MOTHERBOARD W/SIMMS AND CPU
586 W/AUD MITSUBISHI MOTHERBOARD
DIMM,SDRAM,32MB
MITSUBISHI RISER
MITSUBISHI TWO-SLOT RISER BOARD
50' RJ-11 PHONE CABLE
CORD,PWR,USA
CONT EUR PWR CD, DTCH IEC CONN
UK PWR CD W/DTCH IEC CONN
POWER CORD
POWER CORD, 240 VAC
POWER CORD, 230 VAC, UK
POWER CORD, 230 VAC, SWZ
ROWER CORD, 230VAC, ASL
POWER CORD, 2320 VAC, ITA
CENTRONIC IDE-PWR RBN CBL
RIBBON CABLE, 9 COND, 31"L
31", 9 COND RIBN CABLE
RIBBON CABLE, 9 COND, 31" LONG
RIBBON CABLE, SHIELDED, 9 COND, 9 INCH
CABLE, RIBBON, 9COND, 10""L COMM CABL
RIBBON CABLE, 2X20 PIN, IDE, 20"L
RBN. CA. 2X20 PIN, IDE, 24"L
CABLE, RIBBON, 2X20 PIN, IDE, 7""L
CBL, RBN, 2X20 PIN, IDE, 9"L (TO THE MOTHERBOARD)
CBL, RBN, 2X20 PIN, IDE, 12"L (TO THE CENTRONICS BRD)
CBL, RBN, 2X5 PIN, 14"L, COMM DX
CENTRONIC RCPT-IDE-PWR RBN CABLE
CIRCUIT BREAKER 1 AMP PNL MTG
CIRCUIT BREAKER 2AMP PANEL MTG
FL. LAMP ASSY, 15" 230 VAC/50 HZ W/22" CABLE
BALLAST, 230 VAC, 50HZ
POWER SUPPLY, SW, PS/2-PC
Cabinet Information - General Information - Megatouch MAXX Parts List
Megatouch MAXX Technical Reference Manual
COPYRIGHT © 2005 MERIT INDUSTRIES, INC.
Megatouch MAXX Parts List continued
Item
Description
EC7529-01
PWR SPLY, OPEN FR, 100W+12, + 5
EC7531-01
PWR SPLY, 145W =/- 12, +5, +3.3 (Mini Globe or ATX)
EC9154
COUNTER, 12V FROG EYE MOUNTING
EC9154-02
COUNTER, 12V, FROG EYE MOUNTING
EC9304-01
FLTR, LINE, 250VAC@6AMP, IEC
EC9360-XX
VGA CRT, 13" (INDICATE TYPE)
EC9361-XX
VGA 13" MONITOR CHASSIS BD (INDICATE TYPE)
(NOT ALL CHASSIS AND CRT TYPES ARE AVAILABLE / PRICES MAY VARY.)
EC9377
MONITOR, VGA, 13" (W/CHASSIS BOARD & FRAME)
EC9377-07
CRT, 13"VGA, R/A CHAS MTG
EC9378-0A
MONITOR, 19" VGA (OBSOLETE--SELL EC9378-05)
EC9378-05
MONITOR, 19" VGA
DSPL, LCD, 15" XGA (NO DISCOUNT)
EC9381-01
EC9401-01
FAN,CPU 486 MOUNT,12VDC
EC9402-03
FAN 3",12V, 42.5 CFM
EC9410
FAN, TUBAXIAL, 3", 110V
EC9790-01
$1/2/5, 500 STKR, AE2631D5E, MARS
EC9796-01
B / A $1 / 2 / 5 WITH 500 STACKER
EC9796-06
MARS B/A, AE2000, $1/2/5, 7000 STKR
EC9824-02
ELO T/S ASSY 13"
EC9828
WIRE HARN EXTENSION, MARS
EC9840
TOUCHSCREEN CONTROLLER, SMT3
EC9840-02
ELO TOUCHSCREEN CONTROLLER
EC9840-03
TOUCHSCREEN CONTROLLER, SMT3, W/26"L CAB
EC9850-01
OVRLY, TS, 15", W/12" CAB, W/7"ESD
GL2401-20
SAPPHIRE MARQUEE, UPRIGHT, XL
GL2402-02-0A
MAXX MARQUEE, UPRIGHT, XL2
GL2411-03
PLEXI, CLEAR, 19" CABARET SIGN
GL2411-05
PLEXI, CLR, 12.315X8.32, UR, XL2
GL2411-06
PLEXI, CLR, 12.315X8.32X.177, XL2
GL2431-15
SAPPHIRE MARQUEE, XL5
GL3016-02
FT DCL, LWR, BLU & YEL, UR, XL2
GL3017-01
L SIDE DCL, BLU & YEL, UR, XL2
GL3017-02
R SIDE DCL, BLU & YEL, UR, XL2
GL3100-01
DECAL, SIDE PANEL, XL, CTOP
GL3100-03
MAXX DECAL, COUNTER TOP
GL3100-04
DECAL, SIDE PANEL,BLUE MAXX, CTOP
GL3100-05
MAXX DCL, XL3, CTOP
GL3100-40
SAPPHIRE, RIGHT DECAL, CTOP, XL
GL3100-41
SAPPHIRE, LEFT DECAL, CTOP, XL
GL3100-42
SAPPHIRE DECAL, SLIM MAXX
GL3101-01
DECAL, FRONT, XL, CTOP
GL3102-01
ELITE MAXX DECAL
HW0003-01
BUTTON, B / A & CNBX, XL CTOP
HW0004-01-0A
BEZEL, B/A + CNBX, CTOP
HW0020-01
PCB GUIDE, 2.5", SNPN SHLW CHAN
HW0020-02
PCB GUIDE, 3", SNPN SHLW CHAN
Cabinet Information - General Information - Megatouch MAXX Parts List
Megatouch MAXX Technical Reference Manual
COPYRIGHT © 2005 MERIT INDUSTRIES, INC.
Megatouch MAXX Parts List continued
Item
Description
HW0028-01
DISCONTINUED - USE PART # WD0030-01
HW0028-02
DISCONTINUED - USE PART # WD0030-02
HW0031-01-0A
BEZEL TRIM, REAR, UR, XL2
HW0034-01
SPACER RING, LAZY SUSAN
HW0041-01
1"WX.06T MAG TAPE, HD,W/PSA (TAPE FOR SIGN HOLDER)
HW0088-01-0A
BEZEL, MARS, XL2
HW0088-02-0A
BEZEL, SMILEY
HW0088-03
BZL,BLK,MARS,XL3
HW0089-01-0A
BUTTON, REJECT, MARS
HW0089-02
CLASSIC MAXX REJECTOR BUTTON
HW0091-01
AIR FILTER W/GUARD, 3.13 SQ, PLASTIC (ON BACK LID)
HW0092-01
BEZEL, MONITOR
HW0092-01-0A
BEZEL, MONITOR, CTOP, XL2
HW0092-02
BZL,BLK,MON, XL3 (MONITOR BEZEL)
HW0093-01-0A
COVER PLATE, SMILEY, B/A
HW1310
BOLT, "U", 1/4-20X1-1/4"
HW1501-01
COTTER PIN, M2 DIA X 14MM L
HW3301
U BOLT NUT 1/4-20 KEPNUT
HW6366
MOUNTING POST, KNURLED
HW8018-01
ANTI-SKID PAD, 11.5"DIA, RA65 RBR (REPL BY HW8018-02)
HW8018-02
AS PAD,11.5D,W/6.0 C/O (ANTI SKID PAD WITH HOLE)
HW8031-01
GSKT, COIN ENT, CTOP, XL4
HW8031-01
COIN ENTRY PLATE
HW8159-01
$.25 M/CREJ, IMONEX 950
HW8159-04
$1 CAN M/CREJ, IMONEX 950
HW8171-01
PCB GUIDE, 8", SNAP-ON, DEEP CHANNEL
HW8196-01
BACK CHAN ASSY, W / O LKOT COIL
HW8197-01
COIN ACCEPTOR S7
HW8249
FR/PLATE, SINGLE, M, .25, ROLL DOWN
HW8249-04
M/CREJ,SGL,FRPL,ROLL DOWN $1.CAN
HW8279-0A
FRONT PLATE SINGLE W/COIN MECH, ADJUSTABLE
HW8284
FRONT PLATE W/COIN MECH 10, 20, 50, 1 £ UK
HW8285
FRONT PLATE SINGLE, ELEC. W/O COIN MECH
HW8286
ELEC. COIN MECH, 1, 2, & 5 DM (GERMAN)
HW8286-09
ELEC. COIN MECH CAN, .25/$1/$2 330 E/CREJ
HW8286-XX
ELEC. COIN MECH. (INDICATE COUNTRY)
HW8314-01
SPRING, EXT, SST, .24D X3.50L
HW8317-XX
PROGRAMMABLE TD330 E/CREJ (ELEC MECH)
PLEASE INDICATE COUNTRY WHEN PLACING ORDERS. PRICES MAY VARY.
HW8319-XX
ELECTRONIC MECH (INTL U/R MAXX)
PLEASE INDICATE COUNTRY WHEN PLACING ORDERS. PRICES MAY VARY.
HW8358-01
GASKET, NPRN, CLOSED CELL, .187DIA (ON BACK LID)
HW8401-01
FLUSH HANDLE, POCKET PULL
HW8711
ANCHOR PLATE FOR CAM LOCK
HW8713
LOCK, FLAT,STR, 564, 1-7/16 KYRM
HW8713-02
564 LOCK, KYRM, W/O CAM, 1 3/8"L (use HW8716)
HW8716
LOCK,FLAT,STR,#564, 1-7/16" (FRONT BEZEL LOCK)
Cabinet Information - General Information - Megatouch MAXX Parts List
Megatouch MAXX Technical Reference Manual
COPYRIGHT © 2005 MERIT INDUSTRIES, INC.
Megatouch MAXX Parts List continued
Item
Description
HW8721
HW8727
HW8731
HW8733-03
HW8733-05
HW8734-01
HW8741
HW8756
HW8911-01
HW8951-01
HW8951-02-0B
HW8953
HW8960
HW8979
HW8989
HW8993-02
HW9001
HW9461-03
HW9500-01-0A
KUV-107-001
LB1030-01
LB2100
MP0001-01
MP0001-02
MP0001-07
MP0001-08
MP0002-03
MP0002-06
MP0003-02
MP0005-03
MP0005-06
MP0006-02
MP0009-02
MP0009-04
MP0011-01
MW0009-01
MW0009-01-0C
MW0009-02
MW0010-01-0G
MW0011-01
MW0011-01-0B
MW0012-01-0A
MW0012-01-0C
MW0013-01-0C
MW0014-01-0B
MW0014-02-0B
MW0015-01
564 LOCK W/JAM NUT, 7/8" (FOR SERVICE/BACK DOOR)
LOCK, FLAT, STR, DIFF, 1-1/8 (CD DR/COIN BX)
LOCK, FLAT, 90', DIFF, 7/8"" (COIN BOX LOCK)
LOCK, HIGH SECURITY, DIFF, 5/8 (SIDE LOCK)
LK, HSCRTY, KD, 7/8, CAPKY(CASH BX DOOR & SIDE CAR LOCK)
LOCK, W/O CAM, 564, 5/8"L (REAR DOOR)
LOCK, CIRC, BNT, DIFF, 1/2"
CAM, BENT, 1/8" OFFSET
PIN, SPRING, STL, .094 0D X .50L
BEZEL, MONITOR, URTS, 19" CABARET
BEZEL, MONITOR, 19" URTS
BEZEL, 13’ T/S
LEG LEVELER, 2", 3/8-16THD
SLIDE LATCH
FAN GUARD, 2.8""
LAZY SUSAN, 12" DIA, 15 DEG. STOPS
TUBING, PLASTIC
SIGN HOLDER, PETG, 4 X 12, CTOP
BEZEL, MONITOR, UR, XL2
COIN/BILL ACCEPTOR KIT, XL CTOP
BULB, 9", 6 WATT, CW
LAMP, FL, 15W, F15T8CW
L SIDE CVR, GRN, CTOP, XL
R SIDE CVR, GRN, CTOP, XL4
L SIDE CVR,BLU,XL4
R SIDE CVR,BLU,XL4
TOP CVR, 15", SIL, COIN ENT, XL4
TOP CVR, 15", BLU, COIN ENT, XL4
TOP CVR, 4.50", SIL, CTOP, XL4
FR CVR, GRY, COIN RTN, XL4
FR CVR,BLU,CN RTN,XL4
SPCR, SIDECAR, SIL, CTOP, XL4
BEZEL, 15" LCD, SIL, CTOP, XL4
BEZEL, 15" LCD, GRY, XL4
BRG SEAT,DSPL PVT,CTOP,XL4
CHASSIS,CTOP,XL
CHASSIS, CTOP, XL
CHASSIS, CTOP, MAXX
FRAME, DISPLAY, CTOP, XL
POWER SUPPLY BRACKET
BARCKET, PWR SUPPLY, CTOP, XL
PRINTER INTERFACE BRACKET
BRACKET, CONN/COUNTER, CTOP XL
TOP, CTOP, XL
PLATE, (RIGHT) LATCH, CTOP, XL
PLATE, (LEFT) LATCH, CTOP, XL
BRACKET, LOCK, CTOP XL
Cabinet Information - General Information - Megatouch MAXX Parts List
Megatouch MAXX Technical Reference Manual
COPYRIGHT © 2005 MERIT INDUSTRIES, INC.
Megatouch MAXX Parts List continued
Item
Description
MW0016-01-0C
MW0017-01
MW0020-01-0B
MW0021-01
MW0023-01
MW0023-04
MW0023-06
MW0023-07
MW0024-01
MW0028-01
MW0037-01-0A
MW0038-01
MW0039-01-0C
MW0043-01
MW0044-01
MW0051-01
MW0052-01-0A
MW0057-01
MW0061-02
MW0063-01
MW0063-01-0K
MW0095-01
MW0097-01-0A
MW0098-01-0A
MW0100-01
MW0101-01
MW0118-01-0B
MW0119-03
MW0124-01-0B
MW0129-01
MW0138-01-0B
MW0146-01
MW0157-01
MW0158-01
MW0159-02
MW0161-01
MW0163-01
MW0168-01
MW0171-01
MW0171-03
MW0173-01
MW0174-01
MW0175-XX
MW0177-01
MW0179-01
MW0181-01
MW0190-01
DOOR, CTOP, XL
COIN BOX, CTOP, XL
COIN CHUTE ENTRY, LEFT XL CTOP
COIN CHUTE ENTRY, RIGHT XL CTOP
BOLT, LOCK, CTOP, XL
BOLT, LOCK, 7.99"L,UR, XL2
BOLT, LOCK, CTOP, XL3 (CAM FOR HW8734-01)
REAR DOOR BOLT LOCK, 8.69L, UR
CAM, LOCK (REAR DOOR)
PLATE, POWER ENTRY
CAM, LOCK, .75 X 2.0
CORD CLAMP, XL
DOOR, CD-ROM ACCESS, XL, CTOP
COIN BOX STOP BRACKET
DOOR LOCK LATE, UR
LINKAGR, COIN RETURN XL CTOP
DOOR, B / A & COIN W/BOX XL CTOP
COVER, FAN PROTECTOR
COVER, FAN PROTECTOR, UR, XL2
PLATE, MOUNTING, PC POWER, XL
PLATE, MTG, PC/PWR, XL
STAY ARM, UR, XL2
TAMPER PROOF BEZEL BRKT, UR, XL2
STAY ARM HAT BRKT, UR, XL2
COIN BOX CHUTE
SPACER, COIN BOX BRACKET, UPPER
BRKT, SMILEY, UR, XL2
BRKT, M/CREJ, ROLL DN, UR, XL2
HINGE, UR, XL2
CVR PLT, B/A OPNG, UR, XL2
BRACE, 2 POINT LOCK, UR, XL2
BRKT, MARS B/A, UR/, XL2
SWITCH, PANEL,XL3 (FOR COUPLERS)
LOCK BAR, CTOP, XL3
CAM W/DBL D C/O, LOCK, CTOP, XL3
B/A SECURITY BAR,CTOP,XL3
BRACKET, RISER/586 SPRT, CTOP
LID, COIN BOX
CAM, LID, COIN BOX, 5/8, CTOP (CAM FOR COIN BOX LOCK)
CAM, .83, NCH, CNBX LID CTOP XL2
ELECTRONICS BOX, CTO
LID, ELECTRONICS BOX, LOWER, CTOP
LID, CTOP (-01: GREEN; -02: BURGUNDY)
BRACKET, SPRT, TELCO PENTIUM
CAM, LOCK, COIN BOX, CTOP (CAM FOR SIDE LOCK)
CHASSIS, CTOP
LID, ELECTRONICS BOX, CTO
Cabinet Information - General Information - Megatouch MAXX Parts List
Megatouch MAXX Technical Reference Manual
COPYRIGHT © 2005 MERIT INDUSTRIES, INC.
Megatouch MAXX Parts List continued
Item
Description
MW0191-01
MW0192-01
MW0193-01
MW0194-01-0A
MW0200-01
MW0201-01
MW0201-02
MW0203-01
MW0206-01
MW0209-01
MW0209-02
MW0209-03
MW0210-01
MW0210-02
MW0211-01
MW0220-01
MW0221-01
MW0226-01
MW0228-01
MW0237-01
MW0238-02
MW0241-01
MW0242-01
MW0242-02
MW0243-01
MW0244-02
MW0244-03
MW0245-01
MW0246-01
MW0246-02
MW0248-01
MW0253-01
MW0254-01
MW0260-01
MW0260-02
MW0260-03
MW0260-04
MW0268-01
MW0269-01
MW0281-05
MW0283-01
MW0292-01
MW0296-01
MW0297-01
MW0298-01
MW0301-01
MW0321-01
BRACKET, POWER SUPPLY, CTOP
BRACKET, CABLE CLAMP, CTO
BRACKET, COIN BOX, UPPER
BRACKET, COIN BOX STOP
COIN CHUTE, ENTRY, CTOP
BRACKET, LEFT, HARD DRIVE SHOCK MTG, CTOP
BRACKET, RIGHT, HARD DRIVE SHOCK MTG, CTOP
BRACKET, RISER CLAMP, TELCO PENTIUM
MAIN CHASIS, CTOP, XL3
BONNET,GRN,CTOP,XL3 (METAL TOP NO DECAL)
BONNET,BURG,CTOP,XL3 (METAL TOP NO DECAL)
BONNET,BLK,CTOP,XL3 (METAL TOP NO DECAL)
BACK, ACCS, PL, CTOP, XL3
BACK, ACCS, PL, CTOP, XL3 (BACK DOOR)
MTHBD, SHELF, CTOP, XL3
3PT BOP CAM, CTOP, XL3
ANGLE,SCTY REINF, UR, XL5
BRKT, L, I/O/RISER BD, XL
BRKT, R, I/O/RISER BD, XL
CHAS, MAIN, CTOP, XL4
DOOR, REAR, GRY, CTOP, XL4
BRKT,TOP,MAIN,CTOP,XL4
BRKT,SIDE PNL,L,CTOP,XL4
BRKT,SIDE PNL,R,CTOP,XL4
DRAWER, CNBX, CTOP, XL4
DRAWER, FACE, GRY, CTOP, XL4
DRAWER, FACE, BLU, CTOP, XL4
DRAWER CVR, CTOP, XL4
LATCH CLIP,UPR,CTOP,XL4
LATCH CLIP,LWR,CTOP,XL4
BRKT,LWR BEZEL,CTOP,XL4
LOCK BAR, CNBX DOOR, CTOP, XL4
CAM LOCK, CNBX DOOR, CTOP, XL4
LCH,S/PNL,UPR-L,CTOP,XL4
LCH,S/PNL,LWR-L,CTOP,XL4
LCH,S,PNL,UPR-R,CTOP,XL4
LCH,S,PNL,LWR-R,CTOP,XL4
COIN CHUTE, UR, XL5
LOWER COIN CHUTE, UR, XL5
BRKT,PWR ENT,BLU,ATX,XL4
FAN GUARD, CTOP, XL3
CNBXSCTY CLIP,CTOP,XL3
3PT LOCK BAR HLDR, UR, XL5
HANDLE/SWITCH PLT, UR, XL5
BRACE/MARQUEE BRKT, UR, XL5
COINBOX, UR, XL5
PLATE,SIDE LATCH,CTOP,XL4
Cabinet Information - General Information - Megatouch MAXX Parts List
Megatouch MAXX Technical Reference Manual
COPYRIGHT © 2005 MERIT INDUSTRIES, INC.
Megatouch MAXX Parts List continued
Item
MW0322-01
MW0323-01
MW0324-02
MW0327-01
MW0334-01
MW0335-03
MW0336-01
MW0337-01
MW0338-01
MW0339-01
MW0343-01
MW0346-01
MW0351-02
MW0352-01
MW0388-01
MW1670-01
MW1671-01
MW1672-01
MW1674-01-0B
MW1674-02-0B
MW2013-01
MW5001-01
MW5003-01
MW5003-02
MW5006-01
MW5008-01
MW5008-02
MW5014-01-0B
MW5153-01
MW5164-01
PA3021-01
PM0240-02
PM8928-14
PM8928-15
PM8928-47
PM8928-53
SA0013-02
SA0014-01
SA0014-03
SA0047-02
SA0047-02-0A
SA0058-01
SA0063-01
SA0067-01
SA0077-01
SA0096-03
SA0101-01
Description
CAM, 3 PT, REAR DR, CTOP, XL4
LOCK BAR, REAR DR, CTOP, XL4
PLATE,COIN ENT,TLT,CTOP,XL4
CHUTE,COIN RTN,CTOP,XL4
CHAS, S/CAR, 4.5", CTOP, XL4
FR PL, S/CAR, LTGRY, MARS B/A, XL4
DR, REAR, S/CAR, GRY, CTOP, XL4
CAM, S/CAR, CTOP, XL4
LOCK BAR, S/CAR, CTOP, XL4
CUP, COIN RTN, TLT, CTOP, XL4
FLAP, COIN RTN CUP, CTOP, XL4
CHASSIS,MAIN,ATX,CTOP,XL4
DOOR,REAR,BLU,ATX,XL4
BRKT,ATX,ENET,CTOP,XL
BRKT,UNIV,ETR I/O RISER
SPEAKER MTG BKT, 19" CABARET
BRHT, GLASS, UPPER, 19" CABARET
CONTROL PANNEL, 19" CABARET
MONITOR SUPPORT, LEFT, 19" CABARET
MONITOR SUPPORT, RIGHT, 19" CABARET
DUCK BILL CAM, UR, XL5
STAY LID, URTS, 19"
BRACKET, CRT ADJUST, LEFT
BRACKET, CRT ADJUST, RIGHT
COVER, PERFORATED, SPEAKER, 4"
BRACKET, CRT LEFT, 19" URTS
BRACKET, CRT RIGHT, 19" URTS
BEZEL/HINGE ASSY, 19" URTS
DOOR, COIN BOX, CTOP
HINGE, REAR DOOR CTTS
MAXX JADE 2 HARD DRIVE ASSEMBLY V15
OWNER'S MANUAL, XL3
SIGN, MEGATOUCH XL, CTOP XL6000
SIGN, BLUE MAXX
RUBY SIGN
RUBY 2 COUNTERTOP SIGN
WIRE HARN, MARS B/A, MODIFIED XL
HARN, E/M/CREJ, 19" CABARET
WIRE HARN, E OR M/CREJ, 19" CAB, XL
COIN BOX HARNESS ASSY
COIN BOX HARNESS ASSY
HARNESS, POWER SWITCH, URTB/URTS/CAB, XL
HARNESS, POWER, DUAL FANS, URTS
HARNESS, VOLUME POT, URTS/CAB, 260
HARNESS, MAIN, XL
PWR ENTRY W/O COMM, UR, XL2
ASSY, MOTHERBOARD, DE-AMER
Cabinet Information - General Information - Megatouch MAXX Parts List
Megatouch MAXX Technical Reference Manual
COPYRIGHT © 2005 MERIT INDUSTRIES, INC.
Megatouch MAXX Parts List continued
Item
Description
SA0101-02
SA0101-03
SA0102-01
SA0102-02
SA0102-03
SA0103-01
SA0105-01
SA0105-02
SA0105-03
SA0106-01
SA0106-09
SA0106-11
SA0107-01
SA0107-XX
SA0108-01
SA0108-03
SA0111-01-0A
SA0112-01
SA0112-02
SA0112-03
SA0117-01
SA0118-01
SA0118-02
SA0118-03
SA0119-01
SA0139-01
SA0157-02
SA0163-04
SA0163-05
SA0163-07
SA0163-08
SA0163-13
SA0163-14
SA0164-01
SA0165-01
SA0168-XX
SA0169-01
SA0169-02
SA0172-01
SA0173-01
SA0175-01
SA0176-01
SA0177-03-0A
SA0177-04-0A
SA0178-01
SA0181-02
SA0182-01
ASSY, MOTHERBOARD XL, TELCO
ASSY, MOTHERBOARD, TELCO
HARNESS, COIN BOX, MGATCH XL, CTOP
PRINTER INTEREFACE
HARNESS, COIN BOX, MGATCH XL, CTOP
TOUCHSCREEN/VGA DISPLAY ASSEMBLY, 13
COVER ASSY, CTOP, XL
COVER ASSY, CTOP, BLUE MAXX
SIL&BLK CVR, CLASSIC MAXX
POWR ENTRY ASSY, CTOP XL, 120V (OLD)
PWR ENT,ATX,BLU MAXX (NEW)
DOM,W/COMM CPLRS,ATX,PWR ENT
COIN BOX ASSY. COMPLETE W/MECH $0.25 USA
COIN BOX ASSY. COMPLETE W/ELEC MECH
HARNESS, MAIN, CTOP, XL
HARN, MAIN, CTOP, BLUE MAXX
HARNESS, DISPLAY, AC, CTOP
ASSY, MOTHERBOARD & I/O, XL (DE-AMER)
ASSY, MOTHER BOARD & I/O, XL (DE-AMER)
ASSY, MOTHER BOARD & I/O, XL (TELCO)
CABLE, POWER EXTENSION, FAN
CABLE, POWER EXTENSION, CD ROM
CABLE, POWER EXTENSION,MAXX
CBL, PWR EXT, PCA/HDD, XL3
DOOR ASSY, CD-ROM ACCESS, XL, CTOP
ELO TS/VGA DSPLY ASSY 13"
R/A IEC W/LFL, CTOP
586 BOARD AND I/O ASSEMBLY (TELCO) (OBS)
MITSUBISHI 586 BD & I/O, XL2
MITSUBISHI 586 & I/O, BLUE MAXX
M586 W/PCMCIA CTOP
M586,PCMCIA, W/O PTR
UNCRN,PCMCIA,W/O PTR
HARNESS, MAIN, CTOP, XL2
ASSEMBLY, SWITCH/COUNTER, CTOP
ASSEMBLY, LID, CTOP
.25/$1/$2/$5 CNBX, XL2 (FULL MAXX)
.25 & B/A-RDY CNBX, XL2 (FULL MAXX)
CNBX HARN, MARS, XL2
TWIN SPEAKER ASSEMBLY, CTOP
HARNESS, DC FAN, CTOP
HARNESS, COIN BOX, SMILEY, CTOP
F-LMP FXTR, 220V/50HZ, 6 WATT
F-LMP FXTR, 117V/60HZ,6WATTS
HARN, MAIN,UR,XL2
HARN, COIN MECH, UR, XL5
TOUCHSCREEN CTRL BD ASSY, SMT3
Cabinet Information - General Information - Megatouch MAXX Parts List
Megatouch MAXX Technical Reference Manual
COPYRIGHT © 2005 MERIT INDUSTRIES, INC.
Megatouch MAXX Parts List continued
Item
Description
SA0184-01
SA0185-02
SA0201-01
SA0209-01
SA0209-02
SA0210-01
SA0211-01
SA0212-01
SA0213-01
SA0213-02
SA0214-01
SA0215-01
SA0215-02
SA0216-01
SA0216-02
SA0217-01
SA0217-02
SA0217-04
SA0218-01
SA0218-02
SA0218-19
SA0218-20
SA0219-01
SA0225-04
SA0231-01
SA0231-02
SA0232-02
SA0235-01
SA0235-03
SA0236-01
SA0237-01
SA0237-03
SA0238-01
SA0238-02
SA0240-02
SA0240-03
SA0241-01
SA0241-02
SA0241-03
SA0241-04
SA0242-02
SA0242-05
SA0250-02
SA0250-04
SA0255-02
SA0255-03
SA0257-01
HARN, MARS B/A, UR, XL2
HARN, SMLY B/A, UR, XL2
CENTRONICS MTG BRKT ASSY,XL
HARN MAIN, CTOP, XL3
HARN MAIN, CTOP, XL3
HARN/SPEAKER ASSY, CTOP, XL3
PWR ENT W/COMM CPLRS, XL3, CTOP
MINI PWR SPLY ASSY, CTOP, XL3
BEZEL ASSY, CTOP, XL3
BZL ASSY, BLK
CHAS ASSY, CTOP, XL3
DOOR ASSY, CTOP, XL3
DOOR ASSY, CTOP, XL3
BONNET ASSY, BLK, CTOP, XL3
BONNET ASSY, GRN, CTOP, XL4
PCB/HDD SHELF ASSY, XL3
PCB/HDD SHELF ATX PWR, XL4 (UNICORN)
PCB/HDD SHELF ASSY, XL3
.25/1/2/5 B/A CNBX, CTOP, XL3 (SLIM MAXX)
.25 & B/A-RDY CNBX, CTOP, XL3 (SLIM MAXX)
.25/1/2/5 B/A,BLK, XL3 (SELECT MAXX)
COIN BILL ACCEPTOR READY - SELECT
MONITOR ASSY, CTOP, XL3
HARN, AC, ATX, BLUE MAXX
DUAL FAN ASSY, CTOP, XL3
DUAL FAN ASSY, CTOP, XL3
MINI PWR SPLYCHASSIS, CTOP, XL3
DSPL W/BZL, 15", SIL, CTOP, XL4
DSPL W/BZL, 15", GRY, CTOP, XL4
TILT MECH, CTOP, XL4
TOP CVR, SIL, CTOP, XL4
TOP CVR, BLU, CTOP, XL4
BOTTOM FRONT CVR, SIL, CTOP, XL4
BOTTOM FRONT CVR, BLU, CTOP, XL4
CNDWR, GRY, CTOP, XL4
CNDWR, BLU, CTOP, XL4
SIDE CVR, L, CTOP, XL4
SIDE CVR, R, CTOP, XL4
SIDE CVR,BLU, L, CTOP, XL4
SIDE CVR,BLU, R, CTOP, XL4
PWR ENT, GRY, CTOP, XL4
PWR ENT, BLU,MDM CPLRS, XL4
PWR SELF, GRY, CTOP, XL4
PWR SELF, BLU, CTOP, XL4
E/CREJ BRKT ASSY, CTOP, XL4
M/CREJ BRKT ASSY, CTOP, XL4
HARN, MCREJ, CTOP, XL4
Cabinet Information - General Information - Megatouch MAXX Parts List
Megatouch MAXX Technical Reference Manual
COPYRIGHT © 2005 MERIT INDUSTRIES, INC.
Megatouch MAXX Parts List continued
Item
Description
SA0257-03
SA0258-01
SA0258-03
SA0279-01
SA0282-01
SA10023-01-0G
SA10025-01-0A
SA10028-01-0C
SA10042-01
SA10043-02-0A
SA10046-01
SA10047-01-0A
SA10047-01-0B
SA10051-01
SA10051-02
SA10052-01
SA10052-02
SA3014-03
SA3202-05-0A
SA3209-01
SA3210-03-0B
SA3213-10-0A
SA3220-12-0A
SA3230-01
SA3243-02
SA3244-01
SA3246-01
SA3246-02
SA3248-01
SA3266-03-0B
SA3283-02
SA4037-02
SA4084
SA4084-02
SA4084-03
SA5117-04-0A
SA5117-05-0A
SA5117-08
SA5129-01
SA5161-01
SA7297-10
SA7297-13
SA9823-01
SA9824-01
SA9824-02
SB0010-01-0A
SB0016-01
HARN, MCREJ, CTOP,5", XL4
S/CAR W/MARS B/A, SIL/GRY, XL4
S/CAR W/MARS B/A, BLU, XL4
FAN,CTOP,XL4,GLOBETEK
SPARKLE PWR SPLY & Y HARN ASSY
PCA, I/O BOARD, XL VID, CTOP
PCA, CRT-502, DE-AMER, RISER BOARD
PCA, RS-485 COMM, SYSTEM
PCA, OPTICAL COIN SENSOR
PCA, CENTRONICS CONN BOARD, SOCKET
PCA, ESD FILTER BOARD
PCA,I/O BOARD, CTOP (obsolete)
PC IN/OUT BRD, XL2, VID CTOP
I/O BOARD, XL2 VID, PRINTER
I/O BOARD,XL2 VID,W/O PRINTER (NO KEY)
PCA, COIN DISTRIBUTION BD, XL4
PCA, CN DISTR,EXP, XL4
EPROM, 8MEG XL, BOOT (U12- R4)
SHELF ASSY, TS/CRT (VGA)
BRACKET ASSY, METER/TEST SWITCH
TS/CRT (VGA) ASSY, COLOR, 19"
COIN DR, $0.25, $ 1& 5, (VFM 2) , XL
COIN DOOR ASSY, $.25/.25 XL
BEZEL ASSY, 19" URTS
BEZEL ASSY, UR, XL5
MONITOR SHELF ASSY, UR, XL2
DOM SHELF, M586 PC/PWR, UR, XL2
DOM SHELF, M586 PC/PWR, UR, XL2
CNBX ASSY, UR, XL5
CRT ASSY, 19" CABARET, XL, COMPLETE W/ SHELF
ASSY URTS 19" CABARET 230 VAC
12V CNTR W/CONN ASSY
4" SPEAKER ASSY W/2 PIN CONN
SPEAKER ASSY, 4", W/6-PIN CONN
SPEAKER ASSY, 4", W/6-PIN CONN
FNASY,3",12V,2 PIN CONN,W/O GD
FAN ASSY, 3", 12VDC, 2 PIN, W/GUARD
FNASY,3",12V,M&F CONN, W/GUARD
GASKET/BEZEL ASSY
HARNESS, COIN BOX, MECHANICAL, CTOP, XL
SIGN HOLDER, MEGA XL (XL6000 & SIGN ASSY)
SIGN HLDR,MAG
OVRLY,19"TS, W/TERMN
OVRLY, 13" TS, W/TERMN
OVRLY, 13" TS, W/260 ADPTR (FOR GAMES W/CRT260 BRDS)
COM, POWER CABLE
13"/19" TAPE KIT
Cabinet Information - General Information - Megatouch MAXX Parts List
Megatouch MAXX Technical Reference Manual
COPYRIGHT © 2005 MERIT INDUSTRIES, INC.
Megatouch MAXX Parts List continued
Item
SB0359-02
SB6058-01
SC3998-01
SW3005
SW4024
WD0001-01-0B
WD0001-02-0B
WD0001-03-0B
WD0001-04-0B
WD0001-05
WD0001-06
WD0013-01-0B
WD0024-01
WD0030-01
WD0030-02
WD2012-01-0B
WD2013-01-0C
WD2017-01-0B
WD2018-01
WD5060-01
WD5061-01-0B
Description
RUBY2 CD UPGRADE
FL LAMP ASSY, 120VAC/60HZ, 15W
CPU,486 DX266
PB SWITCH, MOMENTARY (SETUP/CALIBRATE)
ROCKER SW, DPST, 250V, PANEL MTG
SIDE PANEL, RIGHT, CTOP XL
SIDE PANEL, LEFT, CTOP XL
SIDE PANEL, RIGHT, BLUE MAXX
SIDE PANEL, LEFT, CTOP BLUE MAXX
SIDE PNL, R, STNLS&BLK
SIDE PNL,L, STNLS&BLK
SHELF, CRT, UR, XL2
CABINET, UR, XL5
SIDE PNL,R,UR,XL5
SIDE PNL,L,UR,XL5
CABINET, 19" URTS, BLK, REAR ACCESS
SHELF, CRT MTG, 19" URTS
CABINET, 19" URTS, BLK, FRONT ACCESS
SHELF, 19" VIDEO, UNIVERSAL
WOOD CABINET, URTS, 19" CABARET
SHELF, MONITOR, 19" CABARET
Cabinet Information - General Information - Megatouch MAXX Parts List
Megatouch MAXX Technical Reference Manual
Section 2
Hard Drive
Information
Hard Drive Numbers
Program Numbers
Part Numbers
Security Key Numbers
COPYRIGHT © 2005 MERIT INDUSTRIES, INC.
MAXX Hard Drive Program Numbers, Part Numbers, and
Compatible Security Keys
JADE 2 EDIT ION
Program # PG3002
V15.00
Part # PA3018-01
Security Key # SA3079-01
JADE EDIT ION
Program # PG3002
(V14.00)
Part # PA3018-01
Security Key # SA3079-01
SAPPH IRE 2 EDIT ION
Program # PG3002
(V13.00, V13.01, V13.02, V13.10)
Part # PA3017-01
Security Key # SA3065-01
SAPPH IRE EDITION
Program # PG3002
(V12.00, V12.01, V12.02, V12.03,
V12.10, V12.11)
Part # PA3016-01
Security Key # SA3065-01
RUBY 2 EDITION
Program # PG3002
(V11.00, V11.01, V11.02, V11.05)
Part # PA3014-01
Security Key # SA3056-01
RUBY EDIT ION
Program # PG3002
(V10.00, V10.02, V10.03, V10.06,
V10.07, V10.08, V10.09, V10.10)
Part # PA3013-01
Security Key # SA3056-01
EMERALD 2 EDIT ION
Program # PG3002
(V9.00, V9.01)
Part # PA3012-01
Security Key # SA3048-01
EMERALD EDITION
Program # PG3002
(V8.00, V8.01, V8.02, V8.03, V8.04,
V8.05, V8.06)
Part # PA3010-02
Security Key # SA3048-01
DIAMOND 2 EDIT ION
Program # PG3002 V7.03
(V7.00, V7.01, V7.02 V7.03)
Part # PA3008-01
Security Key # SA3042-01
CHAMPIONSHIP DIAMOND 2 EDITION
Program # PG3002 V7.03
(V7.00, V7.01, V7.02 V7.03)
Part # PA3008-01
Security Key # SA3043-01
DIAMOND EDITION
Program # PG3002
(V6.01, V6.00, V6.03)
Part # PA3002-06
Security Key # SA3042-01
CHAMPIONSHIP DIAMOND EDIT ION
Program # PG3002
(V6.01, V6.00, V6.03)
Part # PA3002-06
Security Key # SA3043-01
All security key program numbers are USA standard.
Hard drive program versions are the latest versions, previous versions in parentheses.
Hard Drive Information - Hard Drive Numbers
Megatouch MAXX Technical Reference Manual
COPYRIGHT © 2005 MERIT INDUSTRIES, INC.
MAXX Hard Drive Program Numbers, Part Numbers, and
Compatible Security Keys (cont’d)
MAXX 2K PLUS
Program # PG3002
(V5.00, V5.01)
Part # PA3002-05
Security Key # SA3035-01
CHAMPIONSHIP MAXX 2K PLUS
Program # PG3002
(V5.00, V5.01)
Part # PA3002-05
Security Key # SA3036-07
MAXX 2K
Program # PG3002
(V4.00, V4.01)
Part # PA3002-04
Security Key # SA3035-01
CHAMPIONSHIP MAXX 2K
Program # PG3002
(V4.00, V4.01)
Part # PA3002-04
Security Key # SA3036-07
MAXX
Program # PG3002
(R01, R02, V3.01, V3.05, V3.06,
V3.07)
Part # PA3002-03
Security Key # SA3031-01
Security Key # SA3022-01
All security key program numbers are USA standard.
Hard drive program versions are the latest versions, previous versions in parentheses.
Hard Drive Information - Hard Drive Numbers
Megatouch MAXX Technical Reference Manual
Section 3
Troubleshooting
Information
Touchscreens
Troubleshooting
Touchscreen Calibration
Motherboard Handling Precautions
Motherboard Diagrams
Access/Removal of Major Assemblies
Motherboard
Hard drive
Monitor
Touchscreen
Troubleshooting Guide
CMOS Setup
Mars 2000 Bill Acceptor
DIP Switch Settings
COPYRIGHT © 2005 MERIT INDUSTRIES, INC.
Troubleshooting Your Touchscreen
MICROTOUCH:
Features:
•
SMT-3 Controller in white box
•
Green LED on controller lit at half brightness, full brightness when screen is touched
•
Overlay functions on capacitance.
•
Touchscreen cable is on right side of CRT.
Troubleshooting:
•
LED Flashing from 1 to 5 times - detected error or possible defective controller
•
LED not lit - Check +12 vdc. The SMT-3 controller may also be defective.
See Figure 1 for the touchscreen overlay connector schematic.
ELO GRAPHICS:
Features:
•
Controller in a silver box
•
Overlay functions on Sound Acoustic Waves (SAW) - sound waves are reflected
across the screen
•
The green LED is solid when the screen is touched and flashes when the screen is
not touched.
•
Touchscreen cable is on left side of CRT
Troubleshooting:
•
If check for dirt in the ridges around the edge of the screen overlay.
•
If the screen is not responding properly or the LED is solid even when the screen is
not touched:
•
Check the screen for objects that may be attached.
•
Make sure the bezel is dry and not stuck to the screen.
•
Check for dirt in the grooves etched around the outside edge of the screen.
•
The controller may be defective.
CALIBRATION:
1 - Press the Calibrate button.
2 - Touch the dot that appears in the corner for 2 seconds.
3 - Touch the dot that appears in the opposite corner for 2 seconds.
4 - Touch the dot that appears in the center of the screen for 2 seconds.
The cursor should follow your finger wherever you touch the screen.
NOTE: Earlier versions of XL and MAXX software will have a two-point calibration.
CALIBRATION or LOCKUP PROBLEMS:
•
If the calibration is off over the whole area of the screen:
•
Recalibrate the screen.
•
Switch the touchscreen controller with one from another game if possible--a
defective controller can produce this problem.
Troubleshooting Information - Troubleshooting Your Touchscreen
Megatouch MAXX Technical Reference Manual
COPYRIGHT © 2005 MERIT INDUSTRIES, INC.
Troubleshooting Your Touchscreen (cont’d)
•
•
•
•
If these solutions do not correct the problem, replace the touchscreen.
If the calibration is off in one area, check for scratches or nicks on the screen. If you
detect scratches or nicks, replace the touchscreen.
If the screen loses calibration entirely, check the ground pin on the line cord.
If the touchscreen locks up or does not respond to touch:
•
If the graphics are moving on the screen and the green LED is lit, switch the
controller with a working one to see if the controller is the problem. If the
controller is not the problem, there is a communication error between the
motherboard and controller. Do a CMOS configuration and if this doesn’t fix
the problem, the motherboard may need to be replaced.
•
If the graphics are moving on the screen and the green LED is not lit, contact
Merit Technical Support at (800) 445-9353
Microwave ovens and neon lights can and will interfere with the calibration of the
touchscreen and should not be within 6 feet (or 2 meters) of the game.
•
Improper grounding will affect the operation of the touchscreen.
•
If you are experiencing problems with double-touching (e.g. two cards are taken
away after only one touch to the screen), make sure the A/C plug and wall outlets
are properly grounded.
•
The touchscreen cable should not positioned under or on top of the yoke of the
monitor.
•
The touchscreen controller cable should not positioned near the flyback transformer.
NOTE: If the cable was incorrectly installed, the cable will be on the right side of the tube
and the touchscreen response will be out of sync by 180 degrees.
•
FIGURE 1 - MICROTOUCH TOUCHSCREEN OVERLAY CONNECTOR SCHEMATIC
Troubleshooting Information - Troubleshooting Your Touchscreen
Megatouch MAXX Technical Reference Manual
COPYRIGHT © 2005 MERIT INDUSTRIES, INC.
Touchscreen Calibration
NOTE: The machine must be in the idle mode or game select mode to calibrate the touchscreen.
1. Locate and press the CALIBRATE button on the game.
2. With your index finger, touch the center of the first circle that appears on the screen. Once
touched and released, a second circle will appear on the screen.
NOTE: YOU MUST HOLD YOUR FINGER ON THE CIRCLE FOR APPROXIMATELY 2 SECONDS FOR THE CALIBRATION TO BE RECOGNIZED.
3. With your index finger, touch the center of the second circle that appears on the screen.
4. Once the second circle is touched and released, a crosshair will appear on the screen.
To test the calibration of the screen, touch the crosshair with your finger and slowly
drag your finger around the screen. The crosshair should follow your movement. Touch
the EXIT button.
Troubleshooting Information - Touchscreen Calibration
Megatouch MAXX Technical Reference Manual
COPYRIGHT © 2005 MERIT INDUSTRIES, INC.
ATTENTION:
OBSERVE PRECAUTIONS FOR HANDLING ELECTROSTATIC DEVICES
Motherboard Handling Precautions
NOTE: Before handling any boards, observe the following procedures:
•
Remove any static charge from your body before handling the boards.
•
Use a ground strap when handling the boards.
•
When plugging in connectors to the board, make sure the connector is inserted
straight onto the header and that the connector covers all header pins.
•
Do not connect any peripheral device to the board if the power is still connected to
the peripheral or if power is already applied to the board.
•
Prevent electro-static discharge by storing the boards in the anti-static bags in which
they are shipped.
Troubleshooting Information - Motherboard Handling Precautions
Megatouch MAXX Technical Reference Manual
COPYRIGHT © 2005 MERIT INDUSTRIES, INC.
Motherboard Diagrams
POWER SUPPLY
CONNECTOR
(OBSCURED)
KEYBOARD
CONNECTOR
MOUNTING
SCREW
LOCATION
(2 PLACES)
CMOS
BATTERY
TOUCHSCREEN
CONTROLLER
CONNECTOR
RISER
CARD
SOFT DIP
SWITCHES
SECURITY KEY
CONNECTOR
PCMCIA
CARD SLOT
I/O BOARD
PRINTER
CONNECTOR
(OPTIONAL)
MONITOR
SIGNAL
CONNECTOR
SPEAKER
CONNECTORS
FIGURE 1 - ITOX/MITSUBISHI MOTHERBOARD
Troubleshooting Information - Motherboard Diagrams
Megatouch MAXX Technical Reference Manual
COPYRIGHT © 2005 MERIT INDUSTRIES, INC.
Motherboard Diagrams
POWER SUPPLY
CONNECTOR
HARD DRIVE
CONNECTOR
CENTRONICS
CONNECTOR
TOUCHSCREEN
CONTROLLER
CONNECTOR
COMM BOARD
CONNECTOR
SECURITY
KEY
MONITOR
SIGNAL
CONNECTOR
MODEM
CONNECTOR
SPEAKER
CONNECTOR
MAIN POWER
SUPPLY
HARNESS
FIGURE 2 - TELCO MOTHERBOARD
Troubleshooting Information - Motherboard Diagrams
Megatouch MAXX Technical Reference Manual
COPYRIGHT © 2005 MERIT INDUSTRIES, INC.
Motherboard Diagrams
STANDOFF SECURING
SUPPORT BRACKET
TO MOTHERBOARD
DC POWER
HARNESS
IDE 1
IDE 2
STANDOFF
SECURING
SUPPORT
BRACKET TO
AUDIO BOARD
ETHERNET
CONNECTOR
TOUCHSCREEN
CONTROLLER
CONNECTOR
SUPPORT
BRACKETS
AUDIO
BOARD
RISER CARD
DIP
SWITCHES
SECURITY KEY
I/O BOARD
UNCONNECTED
SECTION OF I/O
CONNECTOR
MONITOR
SIGNAL
CONNECTOR
I/O CONNECTOR
PRINTER
CONNECTOR
(OPTIONAL)
FIGURE 3 - UNICORN MOTHERBOARD
Troubleshooting Information - Motherboard Diagrams
Megatouch MAXX Technical Reference Manual
SPEAKER
CONNECTOR
COPYRIGHT © 2005 MERIT INDUSTRIES, INC.
ATTENTION:
OBSERVE PRECAUTIONS FOR HANDLING ELECTROSTATIC DEVICES
Removal/Installation of Major Assemblies Full MAXX
Motherboard Removal
1. Turn off and unplug the game.
2. Unlock and remove the lid.
3. Unscrew the 2 thumbnuts and remove the electronics box access panel at the rear of the
game. You will need to unplug the 2 fan power connectors in order to completely remove the
panel. Also remove the black plate along the bottom of the game. See Figure 1.
4. Use the Motherboard Diagrams section to determine the board type in your game, then disconnect all connections to the board. NOTE: Be sure to read the Motherboard Handling Precautions before handling the board.
5. Remove the 4 nuts on the monitor side of the electronics box and remove the motherboard.
Insert the board into an anti-static bag for storage.
Motherboard Installation
1. Place the new motherboard in the game and secure it with the 4 nuts.
2. Reconnect all connections to the motherboard.
3. Replace the back plate along the bottom of the game, then reconnect the 2 fan power connectors and replace the electronics box access panel. Secure the panel with the 2 thumbnuts.
See Figure 1.
4. Replace and lock the lid.
5. Plug in and turn on the game.
Hard Drive Removal
1. Turn off and unplug the game.
2. Unlock and remove the lid.
3. Unscrew the 2 thumbnuts and remove the electronics box access panel at the rear of the
game. You will need to unplug the 2 fan power connectors in order to completely remove the
panel. Also remove the black plate along the bottom of the game. See Figure 1.
4. Remove the 6 screws (3 per side, see Figure 2) fastening the electronics box to the game
chassis, then slide the box towards you and disconnect all necessary harnesses until you can
completely remove the box and access the hard drive. Remember which harnesses were
disconnected.
5. Loosen the 4 screws (2 on each side) fastening the 2 hard drive mounting brackets to the
electronics box until you’re able to slide the brackets away from the box. See Figure 3.
6. Remove the 4 screws and shoulder washers securing the hard drive to the mounting brackets
and remove the drive. Also remove the 2 screws (1 per side) fastening the cable clamp to the
drive. See Figure 3.
7. Unplug the 4-pin power connector and the ribbon cable from the hard drive. See Figure 3.
Troubleshooting Information - Removal/Installation of Major Assemblies Full MAXX
Megatouch MAXX Technical Reference Manual
COPYRIGHT © 2005 MERIT INDUSTRIES, INC.
ATTENTION:
OBSERVE PRECAUTIONS FOR HANDLING ELECTROSTATIC DEVICES
Removal/Installation of Major Assemblies Full MAXX (cont’d)
Hard Drive Installation
1. Plug the power connector and ribbon cable into the new hard drive.
2. Fasten the cable clamp to the hard drive with the 2 screws (1 per side), then secure the hard
drive to the mounting brackets with the 4 screws and shoulder washers. See Figure 3.
3. Attach the hard drive assembly to the electronics box by tightening the 4 screws that fasten the
hard drive brackets to the box.
4. Place the electronics box in the game and reconnect all harnesses disconnected in step 4
above, then fasten the electronics box with the 6 screws (3 per side, see Figure 2).
5. Replace the back plate along the bottom of the game, then reconnect the 2 fan power connectors and replace the electronics box access panel. Secure the panel with the 2 thumbnuts.
See Figure 1.
6. Replace and lock the lid.
7. Plug in and turn on the game.
Monitor Removal
1. Turn off and unplug the game.
2. Unlock and remove the coin mech from the game.
3. Unlock and remove the lid.
4. Unscrew the 2 thumbnuts and remove the electronics box access panel at the rear of the
game. You will need to unplug the 2 fan power connectors in order to completely remove the
panel. Also remove the black plate along the bottom of the game. See Figure 1.
5. Remove the 6 screws (3 per side, see Figure 2) fastening the electronics box to the game
chassis, then slide the box towards you and disconnect all necessary harnesses until you can
completely remove the box and access the monitor. Remember which harnesses were disconnected.
6. Disconnect the monitor power connection (black and white wires running from the monitor
board to the right angle connector plugged into the power supply).
7. Disconnect the monitor signal cable from the motherboard.
8. Remove the two nuts and washers securing the touchscreen controller to the game and remove the controller from the mounting screws. Then disconnect the touchscreen controller
cable from the back of the controller and disconnect the Molex connector (orange and gray
wires) running from the touchscreen controller cable to the main power harness.
9. Remove the 2 nuts securing the monitor assembly to the cabinet base on the cash box side.
10. Loosen (do not remove) the 2 nuts securing the monitor assembly to the cabinet base on the
side opposite the cash box.
11. Slide the monitor assembly back and lift it off the mounting studs until you’re able to remove it
from the game.
Troubleshooting Information - Removal/Installation of Major Assemblies Full MAXX
Megatouch MAXX Technical Reference Manual
COPYRIGHT © 2005 MERIT INDUSTRIES, INC.
ATTENTION:
OBSERVE PRECAUTIONS FOR HANDLING ELECTROSTATIC DEVICES
Removal/Installation of Major Assemblies Full MAXX (cont’d)
Monitor Installation
1. Place the new monitor assembly on the mounting studs in the game.
2. Tighten the 2 nuts to secure the monitor assembly to the cabinet base on the opposite side of
the cash box.
3. Replace the 2 nuts to secure the monitor assembly to the cabinet base on the cash box side.
4. Route the new touchscreen controller cable under the picture tube and away from the flyback
transformer. Then reconnect the cable in the back of the controller and secure the controller on
the mounting screws in the game with the existing hardware. Also connect the Molex connector (orange and gray wires) to the main power harness.
5. Reconnect the monitor signal cable to the motherboard.
6. Reconnect the monitor power connector.
7. Place the electronics box in the game and reconnect all harnesses disconnected in step 5
above, then fasten the electronics box with the 6 screws (3 per side, see Figure 2).
8. Replace the back plate along the bottom of the game, then reconnect the 2 fan power connectors and replace the electronics box access panel. Secure the panel with the 2 thumbnuts.
See Figure 1.
9. Replace and lock the lid.
10. Replace and lock the coin mech.
11. Plug in and turn on the game.
Touchscreen Removal
1. Turn off and unplug the game.
2. Unlock and remove the coin mech from the game.
3. Unlock and remove the lid.
4. Unscrew the 2 thumbnuts and remove the electronics box access panel at the rear of the
game. You will need to unplug the 2 fan power connectors in order to completely remove the
panel. Also remove the black plate along the bottom of the game. See Figure 1.
5. Remove the 6 screws (3 per side, see Figure 2) fastening the electronics box to the game
chassis, then slide the box towards you and disconnect all necessary harnesses until you can
completely remove the box and access the hard drive. Remember which harnesses were
disconnected.
6. Disconnect the monitor power connection (black and white wires running from the monitor
board to the right angle connector plugged into the power supply).
7. Disconnect the monitor signal cable from the motherboard.
8. Remove the two nuts and washers securing the touchscreen controller to the game and remove the controller from the mounting screws. Then disconnect the touchscreen controller
cable from the back of the controller and disconnect the Molex connector (orange and gray
wires) running from the touchscreen controller cable to the main power harness.
Troubleshooting Information - Removal/Installation of Major Assemblies Full MAXX
Megatouch MAXX Technical Reference Manual
COPYRIGHT © 2005 MERIT INDUSTRIES, INC.
ATTENTION:
OBSERVE PRECAUTIONS FOR HANDLING ELECTROSTATIC DEVICES
Removal/Installation of Major Assemblies Full MAXX (cont’d)
9. Remove the 2 nuts securing the monitor assembly to the cabinet base on the cash box side.
10. Loosen (do not remove) the 2 nuts securing the monitor assembly to the cabinet base on the
side opposite the cash box.
11. Slide the monitor assembly back and lift it off the mounting studs until you’re able to remove it
from the game.
12. Remove the black poly tape from around the edges of the old touchscreen. Remember how
the tape was placed in order to tape the new touchscreen.
13. Use dental floss to carefully cut the foam tape holding the touchscreen to the picture tube until
you are able to completely remove the touchscreen.
14. Remove any remaining adhesive residue with denatured alcohol, then wipe the surface of the
picture tube with the supplied alcohol wipe.
Touchscreen Installation
1. Clean the reverse side of the replacement touchscreen with the supplied alcohol wipe.
2. If there is no tape already on the screen, cut pieces of the supplied 1/2” double-sided foam tape
long enough to cover each edge of the screen without overlapping. After the tape is in place on
the screen, peel off the backing.
3. Replace the new touchscreen over the picture tube (with the cable on the right if you are facing
the game), making sure the screen is properly and evenly aligned over the picture tube. Then
clean the front of the screen with the supplied alcohol wipe.
4. Remembering the manner in which the tape was placed around the touchscreen you removed,
place and cut a length of the supplied black poly tape evenly over an entire edge of the touchscreen and repeat until all 4 edges are covered.
5. Place and cut a longer length of black poly tape around all 4 edges of the screen.
6. Place the monitor assembly on the mounting studs in the game.
7. Tighten the 2 nuts to secure the monitor assembly to the cabinet base on the opposite side of
the cash box.
8. Replace the 2 nuts to secure the monitor assembly to the cabinet base on the cash box side.
9. Route the new touchscreen controller cable under the picture tube and away from the flyback
transformer. Then reconnect the cable in the back of the controller and secure the controller on
the mounting screws in the game with the existing hardware. Also connect the Molex connector (orange and gray wires) to the main power harness.
10. Reconnect the monitor signal cable to the motherboard.
11. Reconnect the monitor power connector.
12. Place the electronics box in the game and reconnect all harnesses disconnected in step 5
above, then fasten the electronics box with the 6 screws (3 per side, see Figure 2).
13. Replace the back plate along the bottom of the game, then reconnect the 2 fan power connectors and replace the electronics box access panel. Secure the panel with the 2 thumbnuts.
See Figure 1.
Troubleshooting Information - Removal/Installation of Major Assemblies Full MAXX
Megatouch MAXX Technical Reference Manual
COPYRIGHT © 2005 MERIT INDUSTRIES, INC.
ATTENTION:
OBSERVE PRECAUTIONS FOR HANDLING ELECTROSTATIC DEVICES
Removal/Installation of Major Assemblies Full MAXX (cont’d)
14. Replace and lock the lid.
15. Replace and lock the coin mech.
16. Plug in and turn on the game.
THUMBNUTS
(BOTH SIDES)
ELECTRONICS
BOX ACCESS
PANEL
BACK PLATE
FIGURE 1 - FULL MAXX - REAR OF GAME WITH LID REMOVED
SCREWS
FASTENING
ELECTRONICS
BOX TO GAME
CHASSIS
(3 PER SIDE)
FIGURE 2 - FULL MAXX - CLOSEUP OF SIDE OF GAME
Troubleshooting Information - Removal/Installation of Major Assemblies Full MAXX
Megatouch MAXX Technical Reference Manual
COPYRIGHT © 2005 MERIT INDUSTRIES, INC.
POWER
CONNECTOR
SCREWS
FASTENING
CABLE CLAMP
TO HARD DRIVE
(2 PLACES)
HARD DRIVE
CABLE CLAMP
HARD DRIVE
MOUNTING
BRACKETS
(EACH SIDE)
HARD DRIVE
RIBBON CABLE
SCREWS
FASTENING HARD
DRIVE MOUNTING
BRACKETS TO
ELECTRONICS
BOX
(2 PER SIDE)
SCREWS AND
SHOULDER
WASHERS
FASTENING
HARD DRIVE
TO MOUNTING
BRACKETS
(4 PLACES)
FIGURE 3 - FULL MAXX HARD DRIVE
Troubleshooting Information - Removal/Installation of Major Assemblies Full MAXX
Megatouch MAXX Technical Reference Manual
COPYRIGHT © 2005 MERIT INDUSTRIES, INC.
ATTENTION:
OBSERVE PRECAUTIONS FOR HANDLING ELECTROSTATIC DEVICES
Removal/Installation of Major Assemblies Blue MAXX/MAXX Classic Countertop
Motherboard Removal
1. Turn off and unplug the game.
2. Unlock and open the lid.
3. Use the Motherboard Diagrams section to determine the board type in your game, then disconnect all connections to the board.
4. Using a 1/4” nut driver, remove the 2 nuts securing the motherboard assembly to the game and
remove the board. Insert the board into an anti-static bag for storage. NOTE: Be sure to read
the Motherboard Handling Precautions before handling the board.
Motherboard Installation
1.
2.
3.
4.
Place the new motherboard in the game and fasten it with the 2 nuts.
Reconnect all connections to the board.
Close and lock the lid.
Plug in and turn on the game.
Monitor Removal
1. Turn off and unplug the game.
2. Unlock and remove the coin box or coin box/bill acceptor assembly.
3. Unlock and remove the lid by first disconnecting the fan power connector, then the clear drainage tubing (from lid end) and ground strap. Also remove the monitor control board attached
with velcro to the inside of the game. Then press up on the spring-loaded levers (located on
each side of the lid), push the levers forward, and lift and remove the lid. Also remove the front
bezel. See Figures 1 and 2.
4. Disconnect the ground wire (with the ring lug) that is attached to the metalwork next to the
touchscreen controller. Then disconnect the cable from the back of the controller and disconnect the Molex connector connecting the orange and gray wires (from the touchscreen controller cable) to the main harness.
5. Disconnect the monitor power connector (black and white wires running from the monitor board
to the right angle connector plugged into the power supply).
6. Disconnect the monitor signal cable from the motherboard.
7. Remove the 4 nuts securing the monitor chassis to the main chassis. Two nuts are located on
each side of the monitor board. See Figure 3 for locations. NOTE: BE CAREFUL TO AVOID
THE FLYBACK TRANSFORMER AND HIGH VOLTAGE WIRE RUNNING TO THE MONITOR.
8. Pick up the monitor assembly and remove it from the cabinet.
Monitor Installation
1. Place the new monitor assembly in the cabinet.
2. Fasten the monitor chassis to the main chassis with the 4 nuts, 2 on each side of the monitor
board. NOTE: BE CAREFUL TO AVOID THE FLYBACK TRANSFORMER AND HIGH VOLTAGE
WIRE RUNNING TO THE MONITOR.
Troubleshooting Information - Removal/Installation of Major Assemblies Blue MAXX/MAXX Classic Countertop
Megatouch MAXX Technical Reference Manual
COPYRIGHT © 2005 MERIT INDUSTRIES, INC.
ATTENTION:
OBSERVE PRECAUTIONS FOR HANDLING ELECTROSTATIC DEVICES
Removal/Installation of Major Assemblies Blue MAXX/MAXX Classic Countertop (cont’d)
3. Connect the monitor signal cable to the motherboard.
4. Reconnect the monitor power connector to the monitor board.
5. Reconnect the touchscreen cable in the back of the controller, then reconnect the Molex
connector to the main harness.
6. After replacing the front bezel, install the hood on the chassis, connecting the fan power
connector, monitor control board, ground strap, and plastic drain tube. Then pull the lid towards
you until the spring-loaded levers lock into place. See Figures 1 and 2.
7. Close and lock the lid.
8. Replace and lock the coin box or coin box/bill acceptor assembly.
9. Plug in and turn on the game.
Hard Drive Removal
1. Turn off and unplug the game.
2. Unlock and open the lid.
3. Remove the screw securing the hard drive mounting plate to the game chassis.
NOTE: If your game was converted with an XL to MAXX Kit, the hard drive mounting plate will
be fastened with 2 hexnuts on either side of the edge of the mounting plate.
4. Remove the 4 screws and shoulder washers fastening the hard drive to the mounting plate and
remove the hard drive. See Figure 4.
5. Disconnect the 4-PIN power connector and hard drive ribbon cable from the hard drive, then
remove the hard drive from the game.
Hard Drive Installation
1. Connect the power connector and ribbon cable to the new hard drive.
2. Fasten the hard drive to the mounting plate with the 4 screws and shoulder washers. See
Figure 4.
3. Replace the hard drive and mounting plate in the game and secure it with the existing hardware.
4. Close and lock the lid.
5. Plug in and turn on the game.
Touchscreen Removal
1. Turn off and unplug the game.
2. Unlock and remove the coin box or coin box/bill acceptor assembly.
3. Unlock and remove the lid by first disconnecting the fan power connector, then the clear drainage tubing (from lid end) and ground strap. Also remove the monitor control board attached
with velcro to the inside of the game. Then press up on the spring-loaded levers (located on
each side of the lid), push the levers forward, and lift and remove the lid. Also remove the front
bezel. See Figures 1 and 2.
Troubleshooting Information - Removal/Installation of Major Assemblies Blue MAXX/MAXX Classic Countertop
Megatouch MAXX Technical Reference Manual
COPYRIGHT © 2005 MERIT INDUSTRIES, INC.
ATTENTION:
OBSERVE PRECAUTIONS FOR HANDLING ELECTROSTATIC DEVICES
Removal/Installation of Major Assemblies Blue MAXX/MAXX Classic Countertop (cont’d)
4. Remove the two nuts and washers securing the touchscreen controller to the game and remove the controller from the mounting screws. Then disconnect the touchscreen controller
cable from the back of the controller and disconnect the Molex connector (orange and gray
wires) running from the touchscreen controller cable to the main power harness.
5. Remove the black poly tape from around the edges of the old touchscreen. Remember how
the tape was placed in order to tape the new touchscreen.
6. Use dental floss to carefully cut the foam tape holding the touchscreen to the picture tube until
you are able to completely remove the touchscreen.
7. Remove any remaining adhesive residue with denatured alcohol, then wipe the surface of the
picture tube with the supplied alcohol wipe.
Touchscreen Installation
1. Clean the reverse side of the replacement touchscreen with the supplied alcohol wipe.
2. If there is no tape already on the screen, cut pieces of the supplied 1/2” double-sided foam tape
long enough to cover each edge of the screen without overlapping. After the tape is in place on
the screen, peel off the backing.
3. Replace the new touchscreen over the picture tube (with the cable on the right if you are facing
the game), making sure the screen is properly and evenly aligned over the picture tube. Then
clean the front of the screen with the supplied alcohol wipe.
4. Remembering the manner in which the tape was placed around the touchscreen you removed,
place and cut a length of the supplied black poly tape evenly over an entire edge of the touchscreen and repeat until all 4 edges are covered.
5. Place and cut a longer length of black poly tape around all 4 edges of the screen.
6. Route the new touchscreen controller cable under the picture tube and away from the flyback
transformer. Then reconnect the cable in the back of the controller and secure the controller on
the mounting screws in the game with the existing hardware. Also connect the Molex connector (orange and gray wires) to the main power harness.
NOTE: Use the supplied roll of 3/8” foam tape (the thicker of the two 3/8” rolls) if you need to
replace the gasket on the inside of the front bezel. Be sure to remove all of the existing foam
tape and adhesive first.
7. After replacing the front bezel, install the lid on the chassis, connecting the fan power connector, monitor control board, ground strap, and plastic drain tube. Then pull the lid towards you
until the spring-loaded levers lock into place. See Figures 1 and 2 for locations.
8. Close and lock the lid.
9. Plug in and turn on the game.
10. When the game is finshed booting, calibrate the touchscreen.
11. Replace and lock the coin box or coin box/bill acceptor assembly.
Troubleshooting Information - Removal/Installation of Major Assemblies Blue MAXX/MAXX Classic Countertop
Megatouch MAXX Technical Reference Manual
COPYRIGHT © 2005 MERIT INDUSTRIES, INC.
FAN POWER
CONNECTOR
CLEAR
DRAINAGE
TUBING
SPRING-LOADED
LEVER
GROUND
STRAP
FIGURE 1 - BLUE MAXX/MAXX CLASSIC - HOOD ASSEMBLY
FRONT
BEZEL
NUTS MOUNTING
MOTHERBOARD
TO GAME
(BEHIND BOARD)
FIGURE 2 - BLUE MAXX/MAXX CLASSIC - MONITOR/MOTHERBOARD ASSEMBLIES
Troubleshooting Information - Removal/Installation of Major Assemblies Blue MAXX/MAXX Classic Countertop
Megatouch MAXX Technical Reference Manual
COPYRIGHT © 2005 MERIT INDUSTRIES, INC.
HIGH VOLTAGE
WIRE
HEATSINK
MONITOR POWER
CONNECTOR
NUTS
(TYP. 4 PLACES)
FIGURE 3 - BLUE MAXX/MAXX CLASSIC - MONITOR REMOVAL
POWER
CONNECTOR
HARD DRIVE
RIBBON
CABLE
SCREWS AND
SHOULDER
WASHERS
FASTENING
HARD DRIVE
TO MOUNTING
PLATE
(4 PLACES)
FIGURE 4 - BLUE MAXX/MAXX CLASSIC - CLOSEUP OF HARD DRIVE
Troubleshooting Information - Removal/Installation of Major Assemblies Blue MAXX/MAXX Classic Countertop
Megatouch MAXX Technical Reference Manual
COPYRIGHT © 2005 MERIT INDUSTRIES, INC.
ATTENTION:
OBSERVE PRECAUTIONS FOR HANDLING ELECTROSTATIC DEVICES
Removal/Installation of Major Assemblies MAXX Select/Slim MAXX Countertop
Motherboard Removal
1. Turn off and unplug the game.
2. Unlock and open the rear door.
3. Lift the spring-loaded pin (see Figure 1) and carefully slide the CPU shelf out from the game
and into its service position.
4. Use the Motherboard Diagrams section to determine the board type in your game, then disconnect all connections to the board.
5. Motherboard Removal:
Mitsubishi:
Remove the 2 screws securing the motherboard assembly to the shelf and the 2 screws
holding the 2 standoffs that are mounted to the shelf. After removing the standoffs, remove the
board and insert it into an anti-static bag for storage. NOTE: Be sure to read the Motherboard
Handling Precautions before handling the board.
Unicorn:
Remove the standoff securing one support bracket to the motherboard and the standoff securing the other support bracket to the audio board. Then disconnect the audio board and remove
the remaining standoff securing the motherboard to the game and remove the board. Insert the
board into an anti-static bag for storage. NOTE: Be sure to read the Motherboard Handling
Precautions before handling the board.
Motherboard Installation
1. Motherboard Installation:
Mitsubishi:
Place the new motherboard in the game, then attach the 2 standoffs to the shelf and attach the
2 screws to the standoffs. Then replace the 2 screws fastening the motherboard to the shelf.
Unicorn:
Place the new motherboard in the game and fasten the board to the game with the standoff.
After connecting the audio board, replace the standoffs fastening the support brackets to the
audio board and the motherboard.
2. Reconnect all connections to the motherboard.
3. Slide the CPU shelf back into the game until the spring-loaded pin clicks in place.
4. Close and lock the rear door.
5. Plug in and turn on the game.
Hard Drive Removal
1. Turn off and unplug the game.
2. Unlock and open the rear door.
3. Lift the spring-loaded pin (see Figure 1) and carefully slide the CPU shelf out from the game
and into its service position.
Troubleshooting Information - Removal/Installation of Major Assemblies MAXX Select - Slim MAXX Countertop
Megatouch MAXX Technical Reference Manual
COPYRIGHT © 2005 MERIT INDUSTRIES, INC.
ATTENTION:
OBSERVE PRECAUTIONS FOR HANDLING ELECTROSTATIC DEVICES
Removal/Installation of Major Assemblies MAXX Select/Slim MAXX Countertop (cont’d)
4. Remove the screw and washer fastening the hard drive mounting plate to the CPU tray and
carefully pull the hard drive assembly away from the game. See Figure 2.
5. Remove the 4 screws and shoulder washers fastening the hard drive to the mounting plate.
See Figure 2.
6. Remove the grommet surrounding the wires on the 4-pin power connector from the cutout in
the hard drive mounting plate in order to allow room to disconnect the connector from the drive.
Then disconnect both the power connector and the hard drive ribbon cable from the hard drive
and remove the drive. See Figure 2.
Hard Drive Installation
1. Connect the power connector and ribbon cable to the new hard drive.
2. Replace the grommet surrounding the wires on the power connector in the cutout in the hard
drive mounting plate, then fasten the drive to the mounting plate with the 4 screws and shoulder
washers. See Figure 2.
3. Place the hard drive assembly in the game and fasten the mounting plate to the CPU tray with
the screw and washer. See Figure 2.
4. Slide the CPU shelf back into the game until the spring-loaded pin clicks in place.
5. Close and lock the rear door.
6. Plug in and turn on the game.
Monitor Removal
1. Turn off and unplug the game.
2. Unlock and remove the coin mech from the game.
3. Unlock and open the rear door.
4. Remove the 2 thumbnuts securing the hood, slide the hood back, and remove it.
5. Lift the spring-loaded pin and carefully slide the CPU shelf out from the game and into its
service position. See Figure 1.
6. Disconnect the monitor power connection (black and white wires running from the monitor
board to the right angle connector plugged into the power supply).
7. Disconnect the monitor signal cable from the motherboard.
8. Remove the two screws fastening the touchscreen controller (see Figure 1) to the game and
remove the controller. Then disconnect the touchscreen controller cable from the back of the
controller and disconnect the Molex connector (orange and gray wires) running from the
touchscreen controller cable to the main power harness.
9. Loosen the thumbnut securing the power supply mounting bracket to the monitor assembly.
10. Remove the 4 screws on top of the front bezel and the 2 screws (one on each side) fastening
the front bezel to the game, then separate the bezel from the monitor.
11. Remove the 3 nuts (one on each side, one on the bottom of the game along the edge opposite
the power switch) securing the monitor assembly to the game and remove the monitor from
the cabinet.
Troubleshooting Information - Removal/Installation of Major Assemblies MAXX Select - Slim MAXX Countertop
Megatouch MAXX Technical Reference Manual
COPYRIGHT © 2005 MERIT INDUSTRIES, INC.
ATTENTION:
OBSERVE PRECAUTIONS FOR HANDLING ELECTROSTATIC DEVICES
Removal/Installation of Major Assemblies MAXX Select/Slim MAXX Countertop (cont’d)
Monitor Installation
1. Place the new monitor in the cabinet and fasten it with the 3 nuts.
2. Replace the front bezel, then replace the 4 screws on top of the bezel and the 2 screws (one on
each side) fastening the bezel to the game.
3. Fasten the power supply mounting bracket to the monitor with the thumbnut.
4. Connect the touchscreen controller cable in the back of the controller, then fasten the controller
to the game with the existing hardware (see Figure 1). Also connect the Molex connector
(orange and gray wires) to the main power harness.
5. Reconnect the monitor signal cable to the motherboard.
6. Reconnect the monitor power connector.
7. Slide the CPU shelf back into the game until the spring-loaded pin clicks in place.
8. Slide the hood back onto the game and secure it with the two thumbnuts.
9. Replace and lock the coin mech.
10. Close and lock the rear door.
11. Plug in and turn on the game.
Touchscreen Removal
1. Turn off and unplug the game.
2. Unlock and remove the coin mech from the game.
3. Unlock and open the rear door.
4. Remove the 2 thumbnuts securing the hood, slide the hood back, and remove it.
5. Remove the two screws fastening the touchscreen controller (see Figure 1) to the game and
remove the controller. Then disconnect the touchscreen controller cable from the back of the
controller and disconnect the Molex connector (orange and gray wires) running from the
touchscreen controller cable to the main power harness.
6. Remove the 4 screws on top of the front bezel and the 2 screws (one on each side) fastening
the bezel to the game, then separate the bezel from the monitor.
7. Remove the black poly tape from around the edges of the old touchscreen. Remember how
the tape was placed in order to tape the new touchscreen.
8. Use dental floss to carefully cut the foam tape holding the touchscreen to the picture tube until
you are able to completely remove the touchscreen.
9. Remove any remaining adhesive residue with denatured alcohol, then wipe the surface of the
picture tube with the supplied alcohol wipe.
Touchscreen Installation
1. Clean the reverse side of the replacement touchscreen with the supplied alcohol wipe.
2. If there is no tape already on the touchscreen, cut pieces of supplied 1/2” foam tape long
enough to cover each edge of the screen without overlapping. After the tape is in place, peel off
the backing.
Troubleshooting Information - Removal/Installation of Major Assemblies MAXX Select - Slim MAXX Countertop
Megatouch MAXX Technical Reference Manual
COPYRIGHT © 2005 MERIT INDUSTRIES, INC.
ATTENTION:
OBSERVE PRECAUTIONS FOR HANDLING ELECTROSTATIC DEVICES
Removal/Installation of Major Assemblies MAXX Select/Slim MAXX Countertop (cont’d)
3. Replace the new touchscreen over the monitor (with the cable on the left if you are facing the
game), making sure the screen is properly and evenly aligned over the picture tube. Then clean
the front of the screen with the supplied alcohol wipe.
4. Remembering the manner in which the tape was placed around the touchscreen you removed,
place and cut a length of supplied black poly tape evenly over an entire edge of the touchscreen
and repeat until all four edges are covered.
5. Replace the front bezel, then replace the 4 screws on top of the bezel and the 2 screws (one on
each side) fastening the bezel to the game.
6. Connect the touchscreen controller cable in the back of the controller, then fasten the controller
to the game with the existing hardware (see Figure 1). Also connect the Molex connector
(orange and gray wires) to the main power harness.
7. Slide the hood back onto the game and secure it with the two thumbnuts.
8. Replace and lock the coin mech.
9. Close and lock the rear door.
10. Plug in and turn on the game.
THUMBNUT
SECURING HOOD
(2 PLACES)
TOUCHSCREEN
CONTROLLER
THUMBNUT
SECURING HOOD
(2 PLACES)
SPRING-LOADED
PIN SECURING
CPU SHELF
MOTHERBOARD
FIGURE 1 - SLIM MAXX/MAXX SELECT - CPU SECTION
Troubleshooting Information - Removal/Installation of Major Assemblies MAXX Select - Slim MAXX Countertop
Megatouch MAXX Technical Reference Manual
COPYRIGHT © 2005 MERIT INDUSTRIES, INC.
GROMMET
HARD DRIVE
RIBBON
CABLE
POWER
CONNECTOR
SCREW AND
WASHER
FASTENING
HARD DRIVE
MOUNTING
PLATE TO
CPU TRAY
SPRINGLOADED
PIN
SCREWS AND
SHOULDER
WASHERS
FASTENING
HARD DRIVE
TO MOUNTING
PLATE
(4 PLACES)
FIGURE 2 - SLIM MAXX/MAXX SELECT - CLOSEUP OF HARD DRIVE
Troubleshooting Information - Removal/Installation of Major Assemblies MAXX Select - Slim MAXX Countertop
Megatouch MAXX Technical Reference Manual
COPYRIGHT © 2005 MERIT INDUSTRIES, INC.
ATTENTION:
OBSERVE PRECAUTIONS FOR HANDLING ELECTROSTATIC DEVICES
Removal/Installation of Major Assemblies EZ MAXX/MAXX Elite Countertop
Motherboard Removal
1. Turn off and unplug the game.
2. Unlock and open the rear door.
3. Use the Motherboard Diagrams section to determine the board type in your game, then disconnect all connections to the board. NOTE: Be sure to read the Motherboard Handling Precautions before handling the board.
4. Remove the 2 screws securing the motherboard assembly to the shelf and the 2 screws
holding the 2 standoffs mounted to the shelf. After removing the standoffs, remove the board
and insert it into an anti-static bag for storage.
Motherboard Installation
1. Place the new motherboard in the game and mount the 2 standoffs to the shelf. Also secure
the motherboard to the shelf with the 2 screws.
2. Reconnect all connections to the motherboard.
3. Close and lock the rear door.
4. Plug in and turn on the game.
Hard Drive Removal
1. Turn off and unplug the game.
2. Unlock and open the rear door.
3. Remove the centronics cable from the clamp fastened to the hard drive (See Figure 1).
4. Remove the screw and washer fastening the hard drive mounting plate to the rear door and
carefully pull the hard drive assembly away from the door. See Figure 1.
5. Remove the 4 screws and shoulder washers fastening the hard drive to the mounting plate.
See Figure 1.
6. Unplug the 4-pin power connector and the ribbon cable from the hard drive and remove the
drive. See Figure 1.
7. Note the orientation of the cable clamp on the hard drive, then carefully remove the clamp from
the surface of the drive by using dental floss to cut the foam tape. Use denatured alcohol to
remove the remaining foam tape from the clamp.
Hard Drive Installation
1. Use double-sided foam tape to attach the cable clamp to the supplied hard drive in the same
manner as the old drive.
2. Plug the power connector and ribbon cable into the supplied hard drive.
3. Place the hard drive in the mounting plate and secure it with the 4 screws and shoulder washers.
4. Replace the hard drive assembly on the rear door of the game and secure it with the screw and
washer.
Troubleshooting Information - Removal/Installation of Major Assemblies EZ MAXX/MAXX Elite Countertop
Megatouch MAXX Technical Reference Manual
COPYRIGHT © 2005 MERIT INDUSTRIES, INC.
ATTENTION:
OBSERVE PRECAUTIONS FOR HANDLING ELECTROSTATIC DEVICES
Removal/Installation of Major Assemblies EZ MAXX/MAXX Elite Countertop (cont’d)
5. Replace the centronics cable in the cable clamp.
6. Close and lock the rear door.
7. Plug in and turn on the game.
Monitor Removal
1. Turn off and unplug the game.
2. Unlock and open the rear door.
3. Disconnect the monitor power connection (black and yellow wires) running to the power
supply.
4. Disconnect the monitor signal connector from the motherboard, then remove the cable from
the clamps.
5. Inside the game, access the latches for each side panel and remove both panels (see Figure
2).
6. Remove the two nuts and washers securing the touchscreen controller to the game and remove the controller from the mounting screws. Then disconnect the cable from the back of the
controller and disconnect the Molex connector connecting the orange and gray wires (from the
touchscreen controller cable) to the main power harness.
7. Remove the 3 screws at the top of each side piece fastening the top cover to the game (see
Figure 3) and remove the top cover.
8. Loosen the 5/16” nuts securing the 2 LCD clips (one on each side piece). See Figure 3.
9. Lift the bezel and monitor assembly from the game.
Monitor Installation
1. Place the new monitor assembly in the game.
2. Secure the 2 LCD clips by tightening the 5/16” nuts (see Figure 3).
3. Fasten the top cover to the game with the 3 screws at the top of each side piece (see Figure 3).
4. Connect the touchscreen controller cable in the back of the controller, then fasten the controller
to the game with the existing hardware. Also connect the Molex connector (orange and gray
wires) to the main power harness.
5. Replace both side panels.
6. Replace the monitor signal cable in the clamps, then connect the cable to the motherboard.
7. Connect the monitor power connector to the power supply.
8. Close and lock the rear door.
9. Plugn in and turn on the game.
Touchscreen Removal
1. Turn off and unplug the game.
2. Unlock and open the rear door.
Troubleshooting Information - Removal/Installation of Major Assemblies EZ MAXX/MAXX Elite Countertop
Megatouch MAXX Technical Reference Manual
COPYRIGHT © 2005 MERIT INDUSTRIES, INC.
ATTENTION:
OBSERVE PRECAUTIONS FOR HANDLING ELECTROSTATIC DEVICES
Removal/Installation of Major Assemblies EZ MAXX/MAXX Elite Countertop (cont’d)
3. Disconnect the monitor power connection (black and yellow wires) running to the power supply.
4. Disconnect the monitor signal cable from the motherboard and remove it from the cable clamps.
5. Inside the game, access the latches for each side panel and remove both panels (see Figure
2).
6. Remove the two nuts and washers securing the touchscreen controller to the game and remove the controller from the mounting screws. Then disconnect the cable from the back of the
controller and disconnect the Molex connector (orange and gray wires) running from the
touchscreen controller cable to the main power harness.
7. Remove the 3 screws at the top of each side piece fastening the top cover to the game (see
Figure 3) and remove the top cover.
8. Loosen the 5/16” nuts securing the 2 LCD clips (one on each side piece). See Figure 3.
9. Lift the bezel and monitor assembly from the game.
10. Remove the 3 screws on top of the front bezel (see Figure 3) and separate the bezel from the
monitor.
11. Use dental floss to carefully cut the foam tape holding the touchscreen to the monitor until you
are able to completely remove the touchscreen.
12. Remove any remaining adhesive residue with denatured alcohol, then clean the monitor glass
with the supplied alcohol wipe.
Touchscreen Installation
1. Clean the reverse side of the replacement touchscreen with the supplied alcohol wipe.
2. Cut pieces of the supplied 1/2” double-sided foam tape long enough to cover each edge of the
screen without overlapping. After the tape is in place on the screen, peel off the backing.
3. Replace the new touchscreen over the monitor (with the cable on the left if you are facing the
game), making sure the screen is properly and evenly aligned over the monitor glass. Then
clean the front of the screen with the supplied alcohol wipe.
4. Reattach the front bezel to the monitor with the 3 screws removed earlier. See Figure 3.
5. Replace the monitor assembly, aligning it with the support brackets inside the game and making sure the LCD clips fit properly into the slots at the top of each side.
6. Tighten the nuts securing the 2 LCD clips. See Figure 3.
7. Replace the top cover.
8. Replace the 3 screws at the top of each side piece. The shorter screw will go in the screw hole
closest to the rear of the game. See Figure 3.
9. Connect the new touchscreen controller cable in the back of the controller and secure the
controller on the mounting screws in the game with the existing hardware. Also connect the
Molex connector (orange and gray wires) to the main power harness.
10. Replace both side panels.
Troubleshooting Information - Removal/Installation of Major Assemblies EZ MAXX/MAXX Elite Countertop
Megatouch MAXX Technical Reference Manual
COPYRIGHT © 2005 MERIT INDUSTRIES, INC.
ATTENTION:
OBSERVE PRECAUTIONS FOR HANDLING ELECTROSTATIC DEVICES
Removal/Installation of Major Assemblies EZ MAXX/MAXX Elite Countertop (cont’d)
11. Reconnect the monitor power connector to the power supply.
12. Route the monitor signal connector through the cable clamps and reconnect it to the
motherboard.
13. Plug in and turn on the game.
14. When the game is finshed booting, calibrate the touchscreen.
15. Close and lock the rear door.
POWER
CONNECTOR
SCREWS AND
SHOULDER
WASHERS
FASTENING
HARD DRIVE
TO MOUNTING
PLATE
(4 PLACES)
SCREW AND
WASHER
FASTENING
HARD DRIVE
MOUNTING
PLATE TO
REAR DOOR
HARD DRIVE
RIBBON
CABLE
CABLE CLAMP
CENTRONICS
RIBBON CABLE
(REMOVED
FROM CLAMP)
FIGURE 1 - EZ MAXX/MAXX ELITE - CLOSEUP OF CPU SECTION
Troubleshooting Information - Removal/Installation of Major Assemblies EZ MAXX/MAXX Elite Countertop
Megatouch MAXX Technical Reference Manual
COPYRIGHT © 2005 MERIT INDUSTRIES, INC.
SIDE PANEL
LATCHES
LATCH DETAIL
FIGURE 2 - EZ MAXX/MAXX ELITE - SIDE PANEL LATCH ACCESS
SCREWS
SECURING
BEZEL
(3 PLACES)
SCREWS
SECURING
TOP COVER
(BOTH SIDES)
NUTS FASTENING
LCD CLIPS
(BOTH SIDES)
FIGURE 3 - EZ MAXX/MAXX ELITE - TOP COVER/LCD CLIP ACCESS
Troubleshooting Information - Removal/Installation of Major Assemblies EZ MAXX/MAXX Elite Countertop
Megatouch MAXX Technical Reference Manual
COPYRIGHT © 2005 MERIT INDUSTRIES, INC.
ATTENTION:
OBSERVE PRECAUTIONS FOR HANDLING ELECTROSTATIC DEVICES
Removal/Installation of Major Assemblies MAXX Upright
Hard Drive Removal
1. Turn off and unplug the game.
2. Unlock and open the front bezel.
3. Slide the CPU shelf out of the game and into its service position.
4. Remove the screw and washer fastening the hard drive mounting plate to the CPU shelf and
carefully pull the hard drive assembly away from the game. See Figure 1.
5. Remove the 4 screws and shoulder washers fastening the hard drive to the mounting plate and
remove the drive. See Figure 1.
6. Remove the grommet surrounding the wires on the 4-pin power connector from the cutout in
the hard drive mounting plate in order to make room to unplug the connector. Then unplug both
the power connector and the ribbon cable from the hard drive. See Figure 1.
Hard Drive Installation
1. Connect the power connector and ribbon cable to the new hard drive.
2. Replace the grommet surrounding the wires on the power connector in the cutout in the hard
drive mounting plate, then fasten the drive to the mounting plate with the 4 screws and shoulder
washers.
3. Place the hard drive assembly in the game and fasten the mounting plate to the CPU tray with
the screw and washer. See Figure 1.
4. Slide the CPU shelf back into the game.
5. Close and lock the front bezel.
6. Plug in and turn on the game.
Motherboard Removal
1. Turn off and unplug the game.
2. Unlock and open the front bezel.
3. Slide the CPU shelf into its service position.
4. Use the Motherboard Diagrams section to determine the board type in your game, then disconnect all connections to the board.
5. Remove the screws securing the motherboard assembly to the game and remove the board.
Insert the board into an anti-static bag for storage. NOTE: Be sure to read the Motherboard
Handling Precautions before handling the board.
Motherboard Installation
1. Place the new motherboard in the game and fasten it with the mounting screws/standoffs.
2. Reconnect all connections to the board.
3. Slide the CPU shelf back in the game.
4. Close and lock the rear door.
5. Plug in and turn on the game.
Troubleshooting Information - Removal/Installation of Major Assemblies MAXX Upright
Megatouch MAXX Technical Reference Manual
COPYRIGHT © 2005 MERIT INDUSTRIES, INC.
ATTENTION:
OBSERVE PRECAUTIONS FOR HANDLING ELECTROSTATIC DEVICES
Removal/Installation of Major Assemblies MAXX Upright
Monitor Removal
1. Turn off and unplug the game.
2. Unlock and open the rear door to gain access to the monitor. See Figure 2.
3. Disconnect all harnesses from the monitor.
4. Remove the two nuts and washers securing the touchscreen controller to the game (see Figure 3) and remove the controller from the mounting screws. Then disconnect the cable from
the back of the controller and disconnect the Molex connector (orange and gray wires) running
from the touchscreen controller cable to the main power harness.
5. Remove both bolts securing the rear of the monitor shelf to the cabinet. See Figure 3.
6. Unlock and open the front bezel.
7. Remove both bolts securing the front of the monitor shelf to the cabinet (located on the underside of the shelf). See Figure 3.
8. Remove the ground strap attached to the monitor.
9. Pull the monitor up and out through the front of the game.
Monitor Installation
1. Place the new monitor in the game.
2. Replace the ground strap on the monitor.
3. Secure the front of the monitor shelf to the cabinet with the 2 bolts. See Figure 3.
4. Close and lock the front bezel.
5. Secure the rear of the monitor shelf to the cabinet with the 2 bolts. See Figure 3.
6. Connect the new touchscreen cable in the back of the controller and secure the controller on
the mounting screws in the game with the existing hardware (see Figure 3). Also connect the
Molex connector (orange and gray wires) to the main power harness.
7. Reconnect all harnesses to the monitor.
8. Close and lock the rear door.
9. Plug in and turn on the game.
Touchscreen Removal
1. Turn off and unplug the game.
2. Unlock and open the front bezel.
3. Remove the black poly tape from around the edges of the old touchscreen, keeping the manner
in which the tape was placed around the screen in mind.
4. Remove the two nuts and washers securing the touchscreen controller to the game (see Figure 3) and remove the controller from the mounting screws. Then disconnect the cable from
the back of the controller and disconnect the Molex connector (orange and gray wires) running
from the touchscreen controller cable to the main power harness.
Troubleshooting Information - Removal/Installation of Major Assemblies MAXX Upright
Megatouch MAXX Technical Reference Manual
COPYRIGHT © 2005 MERIT INDUSTRIES, INC.
ATTENTION:
OBSERVE PRECAUTIONS FOR HANDLING ELECTROSTATIC DEVICES
Removal/Installation of Major Assemblies MAXX Upright
5. Use dental floss to carefully cut the foam tape holding the touchscreen to the picture tube until
you are able to completely remove the touchscreen.
6. Remove any remaining adhesive residue with denatured alcohol, then wipe the surface of the
picture tube with the supplied alcohol wipe.
Touchscreen Installation
1. Clean the reverse side of the replacement touchscreen with the supplied alcohol wipe.
2. Peel the backing from the 8 pieces of double-sided foam tape already adhered to the reverse
side of the touchscreen.
3. Replace the new touchscreen over the picture tube (with the cable on the right if you are facing
the game), making sure the screen is properly and evenly aligned over the picture tube. Then
clean the front of the screen with the supplied alcohol wipe.
4. Connect the new touchscreen cable in the back of the controller and secure the controller on
the mounting screws in the game with the existing hardware (see Figure 3). Also connect the
Molex connector (orange and gray wires) to the main power harness.
5. Remembering the manner in which the tape was placed around the touchscreen you removed,
place and cut a length of the supplied black poly tape evenly over an entire edge of the touchscreen and repeat until all 4 edges are covered.
6. Place and cut a longer length of black poly tape around all 4 edges of the screen.
7. Plug in and turn on the game.
8. When the game is finshed booting, calibrate the touchscreen.
9. Close and lock the front bezel.
SCREWS AND
SHOULDER
WASHERS
FASTENING
HARD DRIVE
TO MOUNTING
PLATE
(4 PLACES)
SCREW AND
WASHER
FASTENING
HARD DRIVE
MOUNTING
PLATE TO
CPU TRAY
GROMMET
POWER
CONNECTOR
HARD DRIVE
RIBBON
CABLE
FIGURE 1 - MAXX UPRIGHT - CLOSEUP OF HARD DRIVE
Troubleshooting Information - Removal/Installation of Major Assemblies MAXX Upright
Megatouch MAXX Technical Reference Manual
COPYRIGHT © 2005 MERIT INDUSTRIES, INC.
FIGURE 2 – MAXX UPRIGHT - MONITOR ACCESS
HEX BOLT
(TYP.4 PLACES)
TOUCHSCREEN
CONTROLLER
FIGURE 3 – MAXX UPRIGHT - MONITOR REMOVAL
Troubleshooting Information - Removal/Installation of Major Assemblies MAXX Upright
Megatouch MAXX Technical Reference Manual
COPYRIGHT © 2005 MERIT INDUSTRIES, INC.
ATTENTION:
OBSERVE PRECAUTIONS FOR HANDLING ELECTROSTATIC DEVICES
Removal/Installation of Major Assemblies Blue MAXX Upright
Motherboard Removal
1. Turn off the game and unplug it from its power source.
2. Open the front door and slide the CPU shelf into its service position. See Figure 1.
3. Use the Mitsubishi motherboard diagram in the Motherboard Diagrams section to determine
connector locations, then disconnect all connections to the board. NOTE: Be sure to read the
Motherboard Handling Precautions before handling the board.
4. Remove the screws securing the motherboard assembly to the game and remove the board.
Insert the board into an anti-static bag for storage.
Motherboard Installation
1. Place the new motherboard in the game and fasten it with the existing hardware.
2. Reconnect all connections to the board.
3. Slide the CPU shelf back into the game, then close the front door.
4. Plug in and turn on the game.
Hard Drive Removal
1. Turn off the game and unplug it from its power source.
2. Open the front door and slide the CPU shelf into its service position. See Figure 1.
3. Remove the screw fastening the adapter carriage plate to the game.
4. Remove the 4 screws and shoulder washers securing the hard drive to the adapter carriage
plate. See Figure 1.
5. Slide the hard drive forward until you’re able to remove the 4-pin power connector and ribbon
cable from the hard drive.
Hard Drive Installation
1. Connect the power connector and ribbon cable to the new hard drive.
2. Secure the hard drive to the adapter carriage plate with the 4 screws and shoulder washers.
See Figure 1.
3. Fasten the adapter carriage plate to the game with the screw removed earlier.
4. Slide the CPU shelf back into the game and close the front door.
5. Plug in and turn on the game.
Monitor Removal
1. Turn off the game and unplug it from its power source.
2. Unlock and open the front bezel and rear door to gain access to the monitor section.
3. Disconnect the touchscreen cable and all harnesses from the monitor.
4. Remove the front and rear bolts (2 per side) securing the monitor shelf to the cabinet. See
Figure 2.
5. Pull the monitor out through the rear door.
Troubleshooting Information - Removal/Installation of Major Assemblies Blue MAXX Upright
Megatouch MAXX Technical Reference Manual
COPYRIGHT © 2005 MERIT INDUSTRIES, INC.
ATTENTION:
OBSERVE PRECAUTIONS FOR HANDLING ELECTROSTATIC DEVICES
Removal/Installation of Major Assemblies Blue MAXX Upright
Monitor Installation
1. Place the new monitor assembly in the game through the rear door.
2. Fasten the monitor shelf with the front and rear bolts (2 per side). See Figure 2.
3. Close and lock the front bezel and rear door.
4. Plug in and turn on the game.
Touchscreen Removal
1. Turn off and unplug the game.
2. Unlock and open the front bezel.
3. Remove the black poly tape from around the edges of the old touchscreen, keeping the manner
in which the tape was placed around the screen in mind. See Figure 2.
4. Remove the two nuts and washers securing the touchscreen controller to the game (see
Figure 2) and remove the controller from the mounting screws. Then disconnect the cable
from the back of the controller and disconnect the Molex connector (orange and gray wires)
running from the touchscreen controller cable to the main power harness.
5. Use dental floss to carefully cut the foam tape holding the touchscreen to the picture tube until
you are able to completely remove the touchscreen.
6. Remove any remaining adhesive residue with denatured alcohol, then wipe the surface of the
picture tube with the supplied alcohol wipe.
Touchscreen Installation
1. Clean the reverse side of the replacement touchscreen with the supplied alcohol wipe.
2. Peel the backing from the 8 pieces of double-sided foam tape already adhered to the reverse
side of the touchscreen.
3. Replace the new touchscreen over the picture tube (with the cable on the right if you are facing
the game), making sure the screen is properly and evenly aligned over the picture tube. Then
clean the front of the screen with the supplied alcohol wipe.
4. Connect the new touchscreen cable in the back of the controller and secure the controller on
the mounting screws in the game with the existing hardware (see Figure 2). Also connect the
Molex connector (orange and gray wires) to the main power harness.
5. Remembering the manner in which the tape was placed around the touchscreen you removed,
place and cut a length of the supplied black poly tape evenly over an entire edge of the
touchscreen and repeat until all 4 edges are covered.
6. Place and cut a longer length of black poly tape around all 4 edges of the screen.
7. Plug in and turn on the game.
8. When the game is finshed booting, calibrate the touchscreen.
9. Close and lock the front bezel.
Troubleshooting Information - Removal/Installation of Major Assemblies Blue MAXX Upright
Megatouch MAXX Technical Reference Manual
COPYRIGHT © 2005 MERIT INDUSTRIES, INC.
SCREWS FASTENING
HARD DRIVE TO MOUNTING
PLATE (4 PLACES)
HARD DRIVE
MOUNTING PLATE
CPU SHELF
FIGURE 1 - HARD DRIVE REMOVAL - BLUE MAXX UPRIGHT
BLACK
POLY
TAPE
TOUCHSCREEN
CONTROLLER
REAR MONITOR
BOLTS LOCATED
AT BACK OF
MONITOR SHELF
FRONT MONITOR
BOLTS LOCATED
UNDER MONITOR
SHELF
FIGURE 1 - MONITOR AND TOUCHSCREEN - BLUE MAXX UPRIGHT
Troubleshooting Information - Removal/Installation of Major Assemblies Blue MAXX Upright
Megatouch MAXX Technical Reference Manual
COPYRIGHT © 2005 MERIT INDUSTRIES, INC.
Merit Industries, Inc.
Troubleshooting Guide for Megatouch MAXX™ Games
Refer to the list below if you are experiencing a problem with your Megatouch MAXX™ Game.
•
•
•
•
•
•
•
•
•
•
•
•
•
•
•
•
•
•
•
•
•
PROBLEM(S)
no power
bill acceptor motor does
not run
no flash on the monitor
screen
no cooling fans
operating
no output from power
supply
no video
no cooling fan operation
screen is blank
A/C power to the
monitor and bill
acceptor
no output from power
supply
no video
cooling fans are working
sound is functioning
A/C power to the
monitor and bill
acceptor
power supply has +5
and +12 volt outputs
no video
constant beeping or a
sequence of beeps
no video
no sound when coins
are deposited
poor picture quality
no sound or distorted
sound
•
•
•
•
•
•
•
•
CORRECTIVE ACTION
Check that the power cord is connected to a “live” outlet.
Check that the power switch is on.
Check that the power cord is connected to the game power supply.
Check that the power supply’s voltage select switch is set to the proper voltage.
Check the harness connections to the on/off switch and circuit breaker.
Check the circuit breaker for an “open”.
Check the A/C harness connection to the power supply.
Check the line cord.
Unicorn motherboards
• Turn the game off and locate J3 along the edge of the motherboard next to the
audio board. There is a jumper shorting pins 20 and 21 together that will set the
motherboard to work with an ATX power supply. Move the jumper to pins 19
and 20 and turn the game on. If the fans in the cabinet start working and the
screen displays “CMOS CHECKSUM ERROR”, turn off the game and connect
a keyboard with a PS/2 connector to the motherboard, then follow the CMOS
configuration procedure for a Unicorn motherboard. After the motherboard is
configured, replace the jumper on pins 20 and 21 of J3. If the fans do not start
working and there is no display, replace the power supply.
Mitsubishi, Itox, and Telco motherboards
• Replace the power supply.
• Check the video cable connections from the motherboard to the monitor or
LCD display.
• Make sure the RAM DIMM is properly seated.
• Check the fuse on the monitor
• If there is sound, the monitor may be defective.
•
The DIMM may not be seated properly or may need to be replaced.
•
•
•
•
Check all connections to the motherboard.
Reseat the DIMM.
Replace the motherboard or send it for repair.
Adjust Brightness, Contrast, Horizontal, and Vertical controls with monitor
controls located in the CPU section of the game.
Mitsubishi and ITOX motherboards with the mini I/O board
• Check the audio cable connections at PL101 of the motherboard and J11 on
the I/O board.
• Check the speaker harness connection at J9 of the I/O board.
• Do a two-button memory clear.
Unicorn motherboard
• Reseat the audio board connected to CN7 on the motherboard. Make sure
there are no exposed header pins on CN7 with the audio board connected.
• Check the connection at J11 of the I/O board.
• Check the speaker harness connection at J9 of the I/O board.
• Do a two-button memory clear.
Telco 586 and Mitsubishi motherboards with I/O Light
• Check the speaker harness connection at J9 of the I/O board.
• Do a two-button memory clear.
Troubleshooting Information - Troubleshooting Guide
Megatouch MAXX Technical Reference Manual
COPYRIGHT © 2005 MERIT INDUSTRIES, INC.
Merit Industries, Inc.
Troubleshooting Guide for Megatouch MAXX™ Games (continued)
Refer to the list below if you are experiencing a problem with your Megatouch MAXX™ Game.
PROBLEM
•
coin jam
•
•
•
meter not advancing
•
game locks up while
being played or in the
attract mode
no movement on the
screen
power has to be cycled
off and on to get the
game to function again
•
•
•
•
•
Check the coin mech and coin chute for coins blocking the pathway.
Make sure the coin harness is connected between the normally open and
common terminals on the coin switch.
• Disconnect the bill acceptor and the coin switch one at a time to narrow down
the problem.
• Check the coin harness for pinched or damaged wires.
• Disconnect the coin harness from J3 of the I/O board. If the coin jam still
appears, the motherboard will have to be sent for repair.
(NOTE: Full MAXX™™, Slim MAXX™ and Select MAXX™ cabinets have an
optical coin switch.)
Globtek Mini GPS145-MATX
Red wire
+5 volt
Yellow wire
+12 volt
Blue wire
-12 volt
Violet wire
+5 volt power good
Black wire
ground
EOS VTL 100-4000
Red wire
+5 volt
Yellow wire
+12 volt
Blue wire
-12 volt
White wire
-5 volt
Violet wire
+5 volt power good
Black wire ground
Enhance SFX 1211J
Red wire
+5 volt
Yellow wire
+12 volt
Blue wire
-12 volt
White wire
+5 volt power good
Violet wire
+5 volt VSB
Black wire
ground
Brown wire
+3.3 volt
•
game resets while being
played or in the attract
screens
Check connection at I/O board.
Check wiring at J3 METER connector on I/O board.
Check the output voltages from the power supply:
Globtek ST230
Red wire
+5 volt
Yellow wire
+12 volt
Blue wire
-12 volt
White wire
-5 volt
Orange wire
+5 volt power good
Black wire
ground
•
•
•
•
•
•
•
CORRECTIVE ACTION
•
Clean the vents and the fans of any dust and dirt that may interfere with airflow.
Clean the CPU cooling fan under the I/O board.
Replace the CPU cooling fan if it is not operating properly.
Clean the contacts between the I/O board, riser board, and motherboard.
Reseat the DIMM on the motherboard.
Clear memory with the following procedure:
• Power off the game.
• Press and hold the “Setup” and “Calibrate” buttons.
• Turn the game on and keep holding the buttons until the screen displays
“TWO BUTTON CLEAR DETECTED RELEASE BUTTONS”. This should
take about 30 seconds.
• Release the buttons. This will clear high scores, clear the books and reset
options, and reset the game menu and coin menu to their factory settings.
Perform a checksum test on the hard drive:
• Power off the game.
• Turn on DS2, position 8.
• Turn on the game. The test will take about 25 minutes.
• A failed test will lock up and display “CHECKSUM ERROR” on the screen.
• A passed test will display “CHECKSUM OK” then continue to the attract
screens mode.
Follow same steps as above.
Troubleshooting Information - Troubleshooting Guide
Megatouch MAXX Technical Reference Manual
COPYRIGHT © 2005 MERIT INDUSTRIES, INC.
Merit Industries, Inc.
Troubleshooting Guide for Megatouch MAXX™ Games (continued)
Refer to the list below if you are experiencing a problem with your Megatouch MAXX™ Game.
•
PROBLEM
game locks up with
“invalid key for version
PG3002 – V XXXX”
•
“invalid key” message
while downloading
software to the hard
drive
•
“OPERATING SYSTEM
NOT FOUND”
(Mitsubishi
motherboard) or “DISK
BOOT FAILURE”
(Unicorn or Telco 586
motherboard)
•
“QUANTUM FIREBALL,
SMART FAILURE
DETECTED, BACK UP
HARD DRIVE”
“ERROR READING
DRIVE C”
•
•
•
•
“CRITICAL ERROR
ABORT RETRY FAIL” –
or “BAD COMMAND OR
FILE NAME” error
“TOUCH CONTROLLER
NOT FOUND” error
game doesn’t recognize
CD-ROM drive
CORRECTIVE ACTION
Check the program number on the security key, it should be compatible with
the program on the hard drive. (Note: See the hard drive and security key
program number list.)
• Check the contacts on the security key socket. Lift up on the contact on the
bottom of the socket, and make sure there is a good connection to the base of
the security key.
• Clean the connections between the I/O, riser, and motherboards. Loose or dirty
contacts can cause an “invalid key”.
• Try another key with the same program number or test the security key in
another game with the same program version.
This message indicates the motherboard did not boot from the CD ROM drive.
• Check that the CD ROM drive is set as master.
• Check the ribbon cable connections between the CD ROM drive and the
motherboard.
• Try another CD ROM drive.
• Make sure the security key is replaced after the download is completed
• Follow same steps as above.
This message indicates the motherboard is not receiving data from the hard drive
and has locked up.
• Check the IDE ribbon cable connections at the power supply and hard drive.
• Check the power to the hard drive. It should have +5 volts, +12 Volts, and
ground.
• Check the CMOS settings on the motherboard.
• Move the hard drive IDE cable to the secondary IDE port on the motherboard
to test the board. If the game does not lock up, there is a motherboard failure
and the board should be sent for repair. The game will work this way, but it
cannot be updated with new software.
• The self-diagnostics on the hard drive has detected an error. The hard drive will
have to be replaced.
•
This message can be caused by the hard drive or in some program versions, a coin
jam while the game is turned on.
• Turn the game off.
• Locate DS 2, position 8 and turn it on.
• Turn on power to the cabinet. This will start the hard drive checksum test,
which should take about 20 minutes to complete.
• When the hard drive passes the test it will display a “CHECKSUM GOOD”
message⎯continue to boot up into the game attract screens. This indicates
a coin jam.
• When the hard drive fails the test, the game will lock up with a
“CHECKSUM ERROR” message, which will stay on the screen until the
power is turned off. In this case, the hard drive will have to be replaced.
• Try reloading the program onto the hard drive with a set of update CD’s
compatible with the security key. If it will not take the download, replace the
hard drive.
•
•
•
•
•
Make sure the touchscreen controller is connected to the touchscreen, the
motherboard, and the power supply.
Perform a CMOS configuration.
Make sure the jumper setting on the back of the CD-ROM drive is set to
MASTER (MA).
Check if the CD-ROM drive is defective by trying another drive.
Perform a CMOS configuration.
Troubleshooting Information - Troubleshooting Guide
Megatouch MAXX Technical Reference Manual
COPYRIGHT © 2005 MERIT INDUSTRIES, INC.
Merit Industries, Inc.
Troubleshooting Guide for Megatouch MAXX™ Games (continued)
Refer to the list below if you are experiencing a problem with your Megatouch MAXX™ Game.
•
PROBLEM
game will not download
CD
•
•
•
•
CORRECTIVE ACTION
Make sure the CD is installed correctly, with the logo facing up.
Check for scratches or a defective disc.
Try a different set of CDs.
If you’re downloading a CD set, make sure each disc is of the same revision.
Troubleshooting Information - Troubleshooting Guide
Megatouch MAXX Technical Reference Manual
COPYRIGHT © 2005 MERIT INDUSTRIES, INC.
CMOS Configuration Procedure for Megatouch MAXX
The CMOS configuration should only be performed if your Megatouch MAXX game experiences problems
booting up.
MITSUBISHI/ITOX MOTHERBOARD CMOS CONFIGURATION:
1.
2.
3.
4.
5.
6.
7.
8.
9.
Make sure the game is turned off.
Plug in your keyboard.
Turn on the power.
Press F2 to enter Phoenix BIOS Setup Utility.
Press F9 to load Setup Default.
At Setup confirmation, press ENTER with YES shaded.
Press F10 to save and exit
Press YES for confirmation.
Unplug the keyboard
TELCO 586 MOTHERBOARD CMOS CONFIGURATION:
1.
2.
3.
4.
5.
6.
7.
8.
9.
10.
11.
12.
13.
14.
Make sure the game is turned off.
Connect your keyboard to J4 on the motherboard assembly.
Turn on the power.
Select LOAD SETUP DEFAULTS.
Press ENTER.
Press Y for YES.
Press ENTER.
Select STANDARD CMOS SETUP.
Press ENTER.
The Settings should be as follows:
Date: Current date
Time: Approximate time
Hard Disks: All TYPE and MODE fields set to AUTO
Drive A: 1.44M, 3.5 in.
Drive B: None
Floppy 3 Mode Support: Disable
Video: EGA/VGA
Halt On: All but keyboard
After all settings have been changed or verified, press ESC.
Press F10.
Press Y for YES.
Press ENTER. Configuration is now complete--the system should reboot.
Unplug the keyboard.
UNICORN MOTHERBOARD CMOS CONFIGURATION:
1.
2.
3.
4.
5.
6.
7.
8.
Make sure the game is turned off.
Connect your keyboard to J4 on the motherboard assembly.
Turn on the power.
Select LOAD SETUP DEFAULTS.
Press ENTER.
Press Y for YES.
Press ENTER.
Select STANDARD CMOS SETUP.
Troubleshooting Information - CMOS Setup
Megatouch MAXX Technical Reference Manual
COPYRIGHT © 2005 MERIT INDUSTRIES, INC.
CMOS Configuration Procedure for Megatouch MAXX (cont’d)
9. Press ENTER.
The Settings should be as follows:
Date: Current date
Time: Approximate time
Hard Disks: All TYPE and MODE fields set to AUTO
Drive A: 1.44M, 3.5 in.
Drive B: None
Video: EGA/VGA
Halt On: All but keyboard
10. After all settings have been changed or verified, press ESC.
11. Press F10.
12. Press Y for YES.
13. Press ENTER. Configuration is now complete--the system should reboot.
14. Unplug the keyboard.
Troubleshooting Information - CMOS Setup
Megatouch MAXX Technical Reference Manual
COPYRIGHT © 2005 MERIT INDUSTRIES, INC.
DIP Switch Settings for the Mars 2000 Bill Acceptor
(The DIP switches are located on the side of the bill acceptor)
SETTING
SWITCHES
1 WAY
2 WAY
4 WAY
DIP 1 ON/DIP 2 OFF
DIP 1 OFF/DIP 2 ON
DIP 1 ON/DIP 2 ON
HIGH ACCEPTANCE
HIGH SECURITY
DIP 3 OFF
DIP 3 ON
*$1
*$2
*$5
DIP 4 ON=ACCEPT/OFF=REJECT
DIP 5 ON=ACCEPT/OFF=REJECT
DIP 6 ON=ACCEPT/OFF=REJECT
1 PULSE PER DOLLAR
*4 PULSES PER DOLLAR
DIP 7 OFF
DIP 7 ON
ALWAYS ENABLE
HARNESS ENABLE
DIP 8 OFF
DIP 8 ON
* Recommended factory settings allow for acceptance of $1, $2, and $5 bills at 4 pulses per dollar.
Troubleshooting Information - Mars 2000 Bill Acceptor DIP Switch Settings
Megatouch MAXX Technical Reference Manual
Section 4
Power Supplies
Power Supplies Used in MAXX Games
GlobTek ST-230WHF
EOS VTL100-4000
Mini-Globtek AT145-S/GPS145-MATX
Enhance SFX-1211J
COPYRIGHT © 2005 MERIT INDUSTRIES, INC.
Power Supplies Used in MAXX Games
Power Supplies - GlobTek
GlobTek ST-230WHF
Used in:
Full MAXX
MAXX Classic and Blue MAXX
MAXX Upright and Blue MAXX Upright
Power Supplies - GlobTek
Megatouch MAXX Technical Reference Manual
COPYRIGHT © 2005 MERIT INDUSTRIES, INC.
Power Supplies - EOS
EOS VTL100-4000
Used in:
MAXX Elite and EZ MAXX
MAXX Select and Slim MAXX
Power Supplies - EOS
Megatouch MAXX Technical Reference Manual
COPYRIGHT © 2005 MERIT INDUSTRIES, INC.
Power Supplies - Mini-GlobTek
Mini-GlobTek AT145-S/GPS145-MATX
Used in:
MAXX Classic and Blue MAXX
MAXX Elite and EZ MAXX
MAXX Select and Slim MAXX
MAXX Upright
Power Supplies - Mini-GlobTek
Megatouch MAXX Technical Reference Manual
COPYRIGHT © 2005 MERIT INDUSTRIES, INC.
Power Supplies - Enhance
Enhance SFX-1211J
Used in:
MAXX Classic and Blue MAXX
MAXX Elite and EZ MAXX
MAXX Select and Slim MAXX
MAXX Upright
Power Supplies - Enhance
Megatouch MAXX Technical Reference Manual
Section 5
Motherboards
Circuit Board Cross Reference Chart
Telco
Mitsubishi
Itox
Unicorn
I/O Board Pinouts
COPYRIGHT © 2005 MERIT INDUSTRIES, INC.
I/O Board Pinouts
Merit # SA10047 Series I/O Boards
J3 I/O Board Connector
Figure 1 - Rear View of Cable Connector
Molex Connector (manufacturer part # 39-01-2160)
PIN
USE
1
2
3
4
5
---------------------
6
7
8
9
10
--------METER GND
SET-UP HIGH
CALIBRATE HIGH
11
12
13
14
15
COIN 1 HIGH
COIN 2 HIGH
COIN 3 HIGH
COIN 4 HIGH
SET-UP/CALIBRATE/COIN GND
16
COIN GND
Motherboards - I/O Board Pinouts
Megatouch MAXX Technical Reference Manual
COPYRIGHT © 2005 MERIT INDUSTRIES, INC.
Merit # SA10047 Series I/O Boards (continued)
J2 I/O Board Connector (optional)
Figure 2 - Rear View of Cable Connector
Molex Connector (manufacturer part # 39-01-2200)
PIN
USE
1
2
COIN 5 HIGH (optional)
COIN 6 HIGH (optional)
Motherboards - I/O Board Pinouts
Megatouch MAXX Technical Reference Manual
COPYRIGHT © 2005 MERIT INDUSTRIES, INC.
Merit # SA10051 Series I/O Boards
J3 I/O Board Connector
Figure 3 - Rear View of Cable Connector
Molex Connector (manufacturer part # 39-01-2200)
PIN
USE
1
2
3
4
5
---------------------
6
7
8
9
10
--------METER GND
SET-UP/CALIBRATE/COIN GND
COIN GND
11
12
13
14
15
SET-UP HIGH
CALIBRATE HIGH
COIN 1 HIGH
COIN 2 HIGH
COIN 3 HIGH
16
17
18
19
20
COIN 4 HIGH
-----------------
Motherboards - I/O Board Pinouts
Megatouch MAXX Technical Reference Manual
Section 6
Monitors
Monitors Used in MAXX Games
Tatung--type 38
Tatung--type 58
Tatung--type 66
Tatung VS-20475TZ21
Tatung VT19726Z
Wells-Gardner--type 41
Wells-Gardner--type 67
Tatung/Wells--type 40
Kortek flatscreen
Monitor Adjustments
Degaussing
Monitor Adjustment Procedures
Monitors Used in MAXX Games
Tatung--Type 38
Used in:
MAXX Select and Slim MAXX
Tatung--Type 58
Used in:
MAXX Upright and Blue MAXX Upright
Tatung--Type 66
Used in:
Blue MAXX and MAXX Classic
Tatung VS-20475TZ21
Used in:
Full MAXX
Tatung VT19726Z
Used in:
MAXX Upright
Wells-Gardner--Type 41
Used in:
MAXX Select and Slim MAXX
Wells-Gardner--Type 67
Used in:
Blue MAXX and MAXX Classic
Tatung/Wells--Type 40
Used in:
MAXX Select and Slim MAXX
Kortek flatscreen
Used in:
EZ MAXX and MAXX Elite
Monitor Information - Monitors Used in MAXX Games
Megatouch MAXX Technical Reference Manual
COPYRIGHT © 2005 MERIT INDUSTRIES, INC.
Degaussing your Monitor
If your monitor is displaying “purity problems,” (a display with purity problems will have parts of an all-white
screen affected by blotches of color) the monitor needs to be degaussed using a “degaussing coil.” A degaussing coil is a circular electromagnet used to cancel out any stray magnetic fields that may build up on a
metal object.
All of our monitors have built-in degaussing coils that are automatically activated on power-up. If your game is
experiencing minor purity problems, try powering down the game for 5 minutes and then reapplying power to
activate the degaussing coil. If the problem is not corrected, you will have to use a manual degaussing coil.
Follow the instructions below for degaussing a monitor.
1. Plug in your degaussing coil.
2. Hold the coil about three feet from the monitor, press the trigger to activate the magnetic field (for circularshaped coils, orient the coil so you see the monitor through the hole in the middle; for wand-shaped coils,
point the wand towards the screen).
3. Move the coil in a circular motion around the face of the monitor and slowly approach the game.
4. Continuing to move the coil in a circular motion, slowly back away from the monitor.
5a. CIRCULAR-SHAPED COILS: When you are about three feet away, quickly turn the coil perpendicular to
the monitor and release the trigger.
5b. WAND-SHAPED COILS: When you are about three feet away, point the wand away from the monitor and
release the trigger.
Monitor Information - Degaussing Procedures
Megatouch MAXX Technical Reference Manual
COPYRIGHT © 2005 MERIT INDUSTRIES, INC.
Monitor Adjustment Procedures
For adjusting the picture on MAXX games, we suggest following the procedures described below. The
vertical/horizontal controls and brightness/contrast controls are located on the monitor control panel that is
Velcroed inside the game. The monitor RGB controls are located on the monitor neck board.
Tatung/Wells Gardner Monitors
For games running software versions prior to Emerald:
1. Under STRATEGY, select the 11-Ball game.
2. Adjust the brightness and contrast controls until there is no shadow on the yellow balls and no pixels of the
incorrect color appear on any of the balls. (Adjusting the brightness and contrast can also correct for a lack
of sharpness.)
3. To adjust the color and screen positioning, use the SETUP button inside the game to bring up the VIDEO
TEST button.
4. Select VIDEO TEST and bring up the grid screens (the third and fourth screens in the VIDEO TEST). Use
the grid screen to ensure that the game is centered, using the vertical/horizontal controls on the monitor
control board to adjust the screen position and ensure that the game screen correctly fills the monitor screen.
5. Use the RGB controls on the monitor neck board with the remaining video test screens to adjust screen
color.
6. Once the necessary adjustments have been made, touch the screen until you bring up the VIDEO TEST
menu again, then exit out of the menu.
For games running Emerald software or a later version:
1. Under STRATEGY, select the 11-Ball game.
2. Adjust the brightness and contrast controls until there is no shadow on the yellow balls and no pixels of the
incorrect color appear on any of the balls. (Adjusting the brightness and contrast can also correct for a lack
of sharpness.)
3. To adjust the color , use the SETUP button inside the game to bring up the VIDEO TEST button.
4. Select VIDEO TEST and bring up the color test screens, then use the RGB controls on the monitor neck
board to adjust screen color.
5. Once the necessary adjustments have been made, touch the screen until you bring up the VIDEO TEST
menu again, then exit out of the menu.
6. To adjust the screen positioning, select NEW GAMES, then Backjammin, then Acey Deucey (Acey Deucey
has the widest playing screen of all the games). Use the vertical/horizontal controls on the monitor control
board to center the screen position and ensure that the game screen correctly fills the monitor screen.
Kortek Flatscreen Monitors
1. Press any button on the monitor control board (located on the reverse side of the LCD screen) to bring up the
menu screen.
2. Use the SW2 and SW3 buttons to arrow through the menu and select BASIC SETTINGS with the SW1
button.
3. Use SW1 to select default or manual settings. Follow the menus on the screen to make manual adjustments.
4. Exit out of each menu once the necessary adjustments have been made.
Monitor Information - Monitor Adjustment Procedures
Megatouch MAXX Technical Reference Manual
Section 7
Technical Service
Bulletins