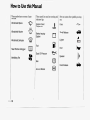
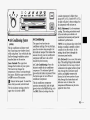
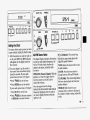
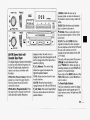
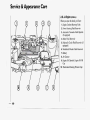
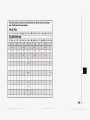
1
1994 CAVALIER O W E R ' S MANUAL
O C h e v r o l e t Cavalier
I
I994 Owner’s Manual
Table of Contents
Part
I
Seats & Restraint Systems.................. 1.,1
Part
2
Features & Controls.............................
Part
3
Comfort Controls& Audio Systems.... 91
Part
4
Your Driving and the Road
Part
5
Part
6
Part
7
8
Part
41
................ 107
Problems on the Road.......................
127
Maintenance Schedule......................
203
Customer Assistance Information.... 221
Includes “Reporting Safety Defects” on page
224
Part
9
Service Station Information.... Last Page
Printed in USA
10234005 B
First Edition
Y
Important Notes About this Manual
Please keepthis manual in your Chevrolet, so it will be there if you ever need it when you’re
on theroad. If you sell the
vehicle, please leavethis manual in it so the new owner can useit.
This manual includesthe latest information at the time it was printed. We reserve the right to make changes inthe product
after that time without further notice.
Vote to Canadian Owners
?orvehicles first sold in Canada, substitutethe name “GeneralMotors of Canada Limited” for Chevrolet Motor
Iivision whenever it appearsin this manual.
?orCanadian OwnersWho Prefer a French Language Manual:
lux proprietaires canadiens:Vous pouvez vous procurer un exemplaire de ce guide en francaischez votre
:oncessionaire ou au DGN Marketing Services Ltd., 1500 Bonhill Road, Mississauga, Ontario L5T 1C7.
’ublished by Chevrolet Motor Division
General Motors Corporation
0 Copyright 1993 General
2
General Motors, GM and the GM emblem, the word
Chevrolet, the Chevrolet emblemand the name
Cavalier are registered trademarks of General Motors
Corporation.
The word Delco is a registered trademark of General
Motors Corporation.
Motors Corporation, Chevrolet Motor Division.
All rights reserved.
The Heritage of Chevrolet
.....................
,
,
Fii
I
II
The dynamic William C. ‘%illy”Durant
shifted gearsfrom making carriages to
making cars, forming half of the team
that gave
birth
to Chevrolet.
The 1957 Chevy started a romance with the
American public-and was poweredby an
I available &el-injected V8.
I
I
I
I
I
I
'60s automotive excitement
included Chevrolet landmarks like
the Corvette Sting Ray, thesporty
Camaro, and powerplants like the
legendary 327 V8.
Your new Chevrolet continuesa tradition of quality and value.
Using Your 7994 Chevrolet
Owner’s Manual
Part 1: Seats & Restraint Systems
This part tells you howto use your seats
and safety belts properly.
Many people readtheir owner’s
manual from beginning to end when
Part 2 Features & Controls
they first receive their new vehicle. This This part explains howto startand
will help youlearn about the
operate your Chevrolet.
features and controls for your vehicle.
Part 3: Comfort Controls& Audio
In this manual, you’ll find that
Systems
pictures and words work together
This part tells you howto adjust the
to explain things quickly.
There are nine parts with thumb-tabbed ventilation and comfort controls and
how to operate your audio system.
pages in this manual. Each part begins
Part 4 Your Driving and the Road
with a brief list of contents, so you can
usually tellat a glanceif that part
Here you’ll find helpfulinformation and
contains the information you want.
tips about the road and how to drive
under different conditions.
You can bend the manual slightly to
reveal the tabs that help you find apart.
Part 5: Problems on the Road
This part tells youwhat to doif you
have a problem while driving,
such as a
flat tire or engine overheating.
Part 6:Service & Appearance Care
Here the manual tells you howto keep
your Chevroletrunning properly and
looking good.
Part 7: Maintenance Schedule
This part tells youwhen to perform
vehicle maintenance and what fluids
and lubricants to use.
i
I
Part 8: Customer Assistance
Information
This part includes important
information about reporting safety
defects and gives you detailsabout the
“Roadside Assistance” program.You
will also findcustomer satisfaction
phone numbers (including customer
satisfaction numbers forthe hearing
and speech impaired)as well as the
mediation/ arbitration procedure. We’ve
also included ordering information for
service publicationsin this part.
Part 9: Index
Here’s an alphabetical listingbf almost
every subjectin this manual. You can
use it to quickly find something you
want to read.
Service Station Information:
This isa quick referenceof service
information. You can find it on thelast
page of this manual.
Safety Warnings and Symbols
You will find a number of safety
cautions in this book. We use a box
with gray backgroundand the word
CAUTION to tell youabout things that
could hurt you if you were to ignore the
warning.
I
How to Use this Manual
In thegray caution area, we tell
you what the hazard is. Then we tell
you what to do to help avoid or reduce
the hazard. Please read these cautions.
If you don’t, you or others could be
hurt.
You will also find a circle
with a slash
through it in this book. This safety
symbol means:
Don’t
Don’t do this
Don’t let this happen
Vehicle Damage Warnings
Also, in this book you will find
these notices:
NOTICE:
These mean there is something
that could damage your vehicle.
In the notice area, we tell youabout
something that can damage your
vehicle. Manytimes, this damage would
not be covered byyour warranty, and it
could be costly. But
the notice will tell
you what to do to help avoidthe
damage.
When you readother manuals, you
might see CAUTION and NOTICE
warnings in different colorsor in
different words.
You’ll also see warning labelson your
vehicle. They use yellow forcautions,
blue for notices and the words
CAUTION or NOTICE.
Vehicle Symbols
These are some of the symbols you will
find on your vehicle.For example, these
symbols are used on an original battery:
Caution Possible lnjuty
Protect Eyes by
Shielding
Caustic BatteryAcid
Could Cause Burns
These symbols are important for you
and your passengers whenever your
vehicle is driven:
These symbols haveto dowith your
lights:
Fasten SafetyBelts
Master Lighting Switch
Turn SignalDirection
Door LocklUnlock
HazardWarningFlashers
A
Power Window
Headlight High Beam
Avoid Sparks or Flames
Parking Lights
Spark or Flame
Could Explode Battery
pf
U
How to Use this Manual
These symbols are on some of your
controls:
These symbols are used on warning and
indicator lights:
Here are some other symbols youmay
see:
Windshield Wipers
Engine Coolant
Temperature
Fuse
Windshield Washer
Trunk Release
Battery Charging
System
Lighter
Windshield Defroster
Fuel
Rear WindowDefogger
p3
Horn
Engine Oil Pressure
Speaker
Ventilating Fan
Brake
Hood Release
Anti-Lock Brakes
Part
I
Seats & Restraint Systems
H e r e YOU’II find information about
the seatsin your Chevrolet and how
. You
to use your safety belts properly
can also learn about some things
you shouldnot do with safetybelts.
Seats and Seat Controls ............................................................................................
Safety Belts................................................................................................................
How to Wear Safety Belts Properly
..........................................................................
Driver Position..........................................................................................................
Safety Belt Use During Pregnancy...........................................................................
Right Front Passenger Position................................................................................
Rear Seat Passengers ................................................................................................
Rear Safety Belt Comfort Guides.............................................................................
Center Passenger Position........................................................................................
Children .....................................................................................................................
Smaller Childrenand Babies ....................................................................................
Child Restraints .........................................................................................................
Larger Children.........................................................................................................
Safety Belt Extender
..................................................................................................
Replacing Safety Belts After
a Crash ........................................................................
12
17
20
21
24
25
25
27
29
30
30
31
38
40
40
Seats & Restraint Systems
Stas and Stat Controls
This section tellsyou about the seatshow to adjust thern-and &a about
reclining seatbacks and head restraints.
Manual Front Seat
ikclining Front Seafbsck
3'0 adjust the seatback, lift the lever or].
tlhe outer side uf the sed mdmove the
Sieathack to where you want it. Release.
tlhe lever to lo& the seatback. Pull up
0n the kmr and the seat will go to an
Upright position.
B;ut don't have a seatback reclinedit
Y'Dur vehicle ismoving.
Move the lever under the front seat to
unlock it. Slidethe seat to where you
want it. Then releasethe lever and try
to move the seat with your body, to
make sure the seat is lockedinto place.
m = m
12
I
1
Head Restraints
Head restraints are fixed on some
vehicles and adjustable on others. Slide
an adjustable head restraint up or down
so that the topof the restraint is closest
to the topof your ears.
This position reduces the chance of a
neck injuryin acrash.
On some models,the head restraints tilt
forward and rearward also.
I:s & F lraint Systems
C
-
-
Manual 4-WayAdjustWe Drker’s
Seat (opnouj
Fmni Seatback LaRches
There are two levers at the front of the
seat. The left lever adjusts the seat
forward arrd back. The right lever
adjusts the angle of the frontof the seat.
To Adjust the Seat%Forward and
Rearward Movement:
Lift the left leverup and adjust the sed
forward or back.Then release the lever
and try to move the seat to be certain
that it is locked inplace.
To Raise or Lower the Frontof the
In 2-door models, the &oatseatback
folds forwardto let people get into the
seat:
Lift the right lever, and lean forward or
backward.
(%DOOR MODELS)
back seat. Your seatbackwill move
back and forth freely, unless YQU come
to a sudden stop. Then it will lock in
place.
There’s onetime the seatback may not
fold without some help fmm you: That’s
if your vehicleis parked going down a
fairly steep hill.
To fold a front seatback forward, push
the seatback towardthe rear as you lift
this latch. Then the seatback will fold
forward. The latch must be down for
the seat to w o k properly.
‘‘.‘.B“
”&q
p
&
.-C
c
&
;
p k .r
Easy-Enfry Seaf
(RS 2-DOOR AND 2-24 MODELS)
The right front seat of your vehicle
makes it easy to get in and out of the
rear seat.
When you push down on therear
latch and tilt the right front seatback
fully forward,the whole seat will slide
forward.
After someone gets into the rear seat
area, move the right front seatback to
its original position.Then move the
seat rearward until it locks.
To getout, again tilt the seatback fully
forward.
Splif Fold-Down Rear Seaf (OPTION)
To Open:
Pull forwardon theseat tab.
To Close:
Push the seatback upitsto
originalposition.
Push the seatback solidlyup against the
back plateto ensure that theinertial
latch hooks.
Folding Rear Seaf (WAGON)
To add more cargo room, your rear
seatback can be easily folded
down. Be
sure to check your seatback latches now
and then by pushing the seatback back
and forth. If they do not latch properly,
have them checked by your dealer.
Remember to keep safety belts clear
of seat
hinges and latches
so they are not damaged
when you raise and lower the seatback.
Seats & Restraint Systems
To Lower the Split Folding Rear Seat: 2. Push down on the filler panel and the
seatback so they lock into a level
1. There is a release leveron the side of
position.
each seat. Pull the release lever
forward and pull the seatback
forward and down.
1
... 16
To Raise theSplit Folding Rear Seat:
1. Push downon the edge of the
seatback and pull up the filler panel.
2. Lift the seatback until it loclts in
place. Push back and forth on the
Seatback to be sure it is locked in
place.
Safety Belts: They’re For
Everyone
n
This part of the manual tells you howto
use safety belts properly.It also tells
you some things you should not do with
safety belts.
This figure lightsup as a reminder to
buckle up. (See Safety Belt Warning
Light in the Index.)
In many states and Canadian provinces,
the law says to wear safety belts. Here’s
why: They work.
You never know if you’ll bein a crash.
If you do have a crash, you don’t know
if it will bea bad one.
A few crashes are mild, and some
crashes can be so serious that even
buckled up a person wouldn’t survive.
But most crashes are in between. In
many of them, people who buckleup
can survive and sometimes walk away.
Without belts they could have been
badly hurt or killed.
After more than 25 years of safety belts
in vehicles, the facts are clear. In most
crashes buckling up does matter ... a lot!
Seats & Restraint Systems
Why Safety Belts Work
When you ride inor on anything, you
go as fast as it goes.
1. For example, if the bike is going 10
mph (16 km/h). so is the child.
4. Put someone on it.
'
8
.
18
2. When the bike hits the block, it
stops. But thechild keeps going!
3. Take the simplest vehicle. Suppose
it's just a seat on wheels.
5. Get itup to speed. Then stop the
6. The person keeps goinguntil stopped
vehicle. The rider doesn't stop.
by something.
In a real vehicle, itcould be the windshield
...
HereAre Questions Many
People Ask About Safety
Belts - the Answers
...
7. or the instrument panel
:
8. or the safety belts!
systems only- so they workwith
With safety belts,. you
slow down as the
& ~ ‘m&t&sQp,
v6Kicle d & ~ i ; ~ & ! h&.
safety belts,not instead of them.
Every air bag system ever offered for
You stop over more distance, and your
sale has required the use of safety
strongest bones take theforces. That’s
belts.
Evenif you’re in a vehicle that
why safety belts makesuch good sense.
has air bags, you still haveto buckle
up to get the most protection. That’s
true notonly in frontal collisions, but
especially in side and other
collisions.
and
Q: If I’m a good driver, andI never
drive f a r from home,why should I
Q: Won’t I be trapped in the vehicle
wear
safety belts?
after an accident if I’m wearinga
safety belt?
A You may be an excellent driver,but if
you’re in anaccident - even one
A: You could be -whether you’re
that isn’t your fault-you and your
wearing a safety belt ornot. But you
passengers can behurt. Being a good
can easily unbucklea safety belt,
driver doesn’t protectyou from
even if you’re upside down. And
things
beyond yourcontrol, such as
your chanceof being conscious
4
bad
drivers.
Most accidents occur
during and after an accident, so you
within 25 miles (40 km)of home.
can unbuckle and get out, is much
”
And the greatest number of serious
greater if you are belted.
injuries and deaths occur at speeds
Q: Why don’t theyjust putin air bags
of less than 40 mph (65 lun/h).
so people won’t haveto wear safety
Safety beltsare for everyone.
belts?
A: Air bags are in some vehicles today
and will bein more of them in the
future. But theyare supplemental
I-I
~~
Seats & Restraint Systc
First, you’ll want to know which
restraint systems your vehicle
has.
We’ll start with the driver position.
Vehicles First SoldIn Canada
Safety Belt Warninglight
When the key is turned to Run or Start,
a chimewill come on for about eight
seconds to remind peopleto fasten their
safety belts, unless the driver’s safety
belt is already buckled.
The safety belt
light will also comeon and stay on for
20 seconds, then itwill flashfor an
additional 55 seconds. If the driver’s
belt is already buckled,neither the
chime nor thelight will comeon.
8
8
8
20
How To Wear SafetyBelts
Properly
Adults
This section is only for peopleof adult
size.
Be aware that there are special things to
know about safety belts and children.
And there are different rules for smaller
children and babies. If a child will be
riding in your Chevrolet, seethe section
after this one,called Children. Follow
those rules for everyone’sprotection.
Was your Chevroletfirst sold, when
new, in Canada? (If it was, a sticker on
the driver’s door will say “conformsto
...”
all applicable Canada motor vehicle
etc.) If so, then therest of Part 1 does
not apply to your vehicle.
To learn how to use your safetybelts,
please read the Owner’s Manual Safety
Belt Supplement.It comes with every
new Chevroletfirst sold in Canada.
Driver Position
This section describes the driver’s
restraint system.
Automatic Lap-Shoulder Belt
This safety beltis called “automatic”
because you don’t have to buckle up
when you getinto your vehicle.
And you don’t have to unbuckle when
you get out.
Just get into your vehicle. Then close
and lock the door. Adjust the seat (to
see how, see Seats in the Index) so you
can situp straight.
21
...
-
Seats & Restraint Systems
I
The safety belt locltsif there’s a sudden
stop or a crash.
It’s possiblethat anautomatic belt
could keep you from fully opening a
door. That can happenif the door was
slammed shut very hard. Just close the
door allthe way, then slowly open it. If
that doesn’t fix it, then your Chevrolet
needs service.
We hope you’ll always keep your
The lap belt should be wornas low on
automatic belt buckled. However,you
:he hips as possible. In a crash, this
lpplies forceto thestrong pelvic bones. may need to unbuckle it inan
emergency.
2nd you’d be less likely
to slide under
:he lap belt.If you slid under it, thebelt
would apply forceat your abdomen.
rhis could cause serious or even fatal
njuries. The shoulder belt should go
Iver the shoulder and acrossthe chest.
rhese parts of the body are best ableto
.ake belt restraining forces.
22
To unbuckle the automatic belt, just
push the button on the buckle.
'1
To reattach the automaticbelt:
1. Close and lock the door.
2. Adjust the seat (to see how, see Seats
in theIndex) so you can sit up
straight.
3. Pick up the latch plate and pull the
belt across you. Don't let it get
twisted.
1. Push the latch plate into thebuckle
until it cliclts. Pullup on the latch
plate to make sure it is secure.
QI: What's wrong with this?
A,:The shoulder belt is too loose. It
won't give nearly as much protectior
this way.
Q: What's wrong with this?
A: The belt is buclded inthe wrong
place.
I
i
23
I .
Q: What’s wrong with this?
A: The shoulder belt is worn under the
ani. It should be worn over the
shoulder at all times:
...
24
.
..
,...
Q: What’s wrong with this?
A: The beltis twisted acrossthe body.
Safety Belt Use During
Prepncy
Safety belts work for everyone,
including pregnant women. Like all
occupants, they are more likelyto be
seriously injured if they don’twear
safety belts.
A pregnant woman should wear lapa
shoulder belt, and the lap portion
should be worn as low as possible
throughout the pregnancy.
The best wayto protect the fetus is to
protect the mother. When a safety belt
is worn properly, it’s more’likelythat
the fetus won’t be hurt ina crash. For
pregnant women,as for anyone,the key
to making safety belts effective
is
wearing them properly.
I I
Seats & Restraint Systems
Pear Seat Outside Passenger
Dositions
Lap-Shoulder Belt
The positions nextto thewindows have
ap-shoulder belts. Here's howto wear
me properly.
1. Pick up the latch plate and pull the
belt across you. Don't let it get
twisted.
2.Push the latch plate into the buckle
until it clicks.
If the belt stops beforeit reaches the
buckle, tiltthe latch plate and keep
pulling until you can buckle it.
Pull up on the latch plate to make sure
it is secure.
If the belt is not long enough,see Safety
Belt Extender at theend of this section.
Make sure the release button on the
buckle is positionedso you would be
able to unbuckle the safety belt quickly
if you ever had to.
To make the lap part tight, pull down
on the buckle end of the belt as you pull
up on the shoulder part.
The lap part of the belt should be worn To unlatch the belt, just push the
low and snugon thehips, just touching button on the buckle.
the thighs. In a crash, this applies force
to thestrong pelvic bones. And you’dbe Rear Safety Belt Comfort Guides
less likelyto slide under the lap belt. If
for Children and Small Adults
you slid under it, thebelt would apply
force at your abdomen. This could cause Your vehicle may be equipped with rear
serious or even fatal injuries. The shouldershoulder belt comfort guides. This
belt should go over the shoulder and
feature will provide added comfortfor
across the chest. These parts of the bod3 children who have outgrown child
are best able to take belt restraining forces.
restraints and for small adults. The
The safety beltlocla if there’s a sudden
comfort guides pullthe shoulder belts
stop or a crash.
away from the neck and head. (This
feature is not availableon vehicles with
a convertibletop.)
Seats & Restraint Systems
There is one guide for each outside
passenger positionin the rear seat. You
will find them tucked in betweenthe
seatback and the interior body, about
half-way downthe edge of the seatback.
Here is how youshould install the
comfort guideon the shoulder belts:
1. Pull the elastic cordout from
between the edge of the seatback and
the interior body to remove the guide
from its storage clip.
. I
28
2. Slide the guide under and past the
belt. The elastic cord must beunder
the belt. Then, place the guide over
the belt, and insert the two edges of
the belt into the slots of the guide.
3. Be sure that thebelt is not twisted
and it lies flat. The elastic cord must
be under the belt and the guide on
top.
r
4. Buckle the belt around thechild, and
make sure that both the
lap belt and
the shoulder belt are secured
properly. Makesure that theshoulder
belt crosses the shoulder. See Safety
Belts, Rear Seat Passengers in the
i Index.
To remove and store thecomfort
guides, just perform these steps in
reverse order. Squeeze the belt edges
together so that you can take them out
from the guides. Pull the guide upward
to expose its storage clip, and then slide
the guide onto theclip. Rotate the guide
and clip inward and in between the
seatback and the interior body, leaving
only the loop of elastic cord exposed.
ICenter
Passenger Position
Lap Belt
If your vehiclehas a rear bench seat,
someone can sit in thecenter position.
When you sit in a center seating
position, you have alap safety belt,
which has no retractor.
To make the belt longer, tilt the latch
plate and pull it along the belt.
Seats & Restraint Systems
Smaller Childrenand Babies
To make the belt shorter, pull its free
end as shown until the belt issnug.
Buckle, positionand release it thesame
way as the lap part of a lap-shoulder
belt. If the belt isn’t long enough, see
Safety Belt Extender at the end of this
section.
Make sure the release button on the
buckle is positioned so you would be
able to unbuckle the safety belt quickly
if you ever hadto.
IChildren
Everyone in a vehicle needs protection!
That includes infantsand all children
smaller than adult size. In fact, the law
in every state in the United States and
in every Canadian province says
children up to some agemust be
restrained whilein a vehicle.
IChild Restraints
Be sure to follow the instructions for
the restraint. You may find these
instructions on the restraint itself or in
a booklet, or both.These restraints use
the belt systemin your vehicle,but the
child also has to be secured within the
restraint to help reduce the chance of
personal injury. The instructions that
come with the infant or child restraint
will show you howto do that.
Accident statistics show that children
are safer if they are restrained in the
rear rather than thefront seat. We at
General Motors therefore recommend
that you put your child restraint in the
rear seat unless the child is aninfant
and you’re the only adult in the vehicle.
In that case, you mightwant to secure
the restraint in the front seat where you
can keep an eye on the baby.
Wherever you installit, be sure to
secure the child restraint properly.
Keep in mind that anunsecured child
restraint can move around in a collision
or sudden stop and injure people in the
vehicle. Be sure toproperly secure any
child restraint in your vehicle- even
when no child is in it.
31
Seats & Restraint Systems
Top Strap
If your child restraint has a top strap, it
should be anchored.
If you need to have an anchor installed,
you can ask your Chevrolet dealer
to
put it in for you.If you want to install
an anchor yourself, your dealer can tell
you how to doit.
For cars first sold in Canada, child
restraints with a top strapmust be
anchored according to Canadian Law.
Your dealercan obtain the hardware kit
and install it for you, or you may install
it yourself using the instructions
provided in the kit.
Use the tether hardwarekit available from
the dealer. The hardwareand installation
instructions were specifically designed
for this vehicle.
Securing a Child Restraint ina
Rear Outside Position
You’ll be usingthe lap-shoulder belt.
See the earlier sectionabout the top
strap if the child restraint has one.
1. Put the restraint on the seat. Follow
the instructions for the child
restraint.
2. Secure the child in the child restraint
as theinstructions say.
3. Pick up the latch plate, and run the
lap and shoulder portions of the
vehicle’s safety beltthrough or
around the restraint. The child
restraint instructions will show you
how. Tiltthe latch plate to adjust the
belt if needed. If the shoulder belt
goes infront of the child’s face or
neck, put it behind the child restraint.
4.Buckle the belt. Makesure therelease
button is positioned so you would be
able to unbuckle the safety belt
quickly if you ever hadto.
I
I
1
5. To tighten the belt, pull up on the
shoulderbeltwhileyou push down
on the child restraint.
6. Push and pull the child restraint in
Securing a Child Restraint the
in
different directionsto be sure it is
Center Rear Seat Position
secure.
When you securea child restraint in a
To remove the child restraint, just
center seating position, you’llbe using
unbuckle the vehicle’s safety beltand
the lap belt.
let it go back allthe way. The safety belt
See the earlier sectionabout the top
will move freely againand be ready to
strap
if the child restraint has one.
work foran adult or larger child
passenger.
Seats & Restraint Systems
1, Make the belt as long as possible by
tilting the latch plate and pulling it
along the belt.
2. Put the restraint on theseat. Follow
the instructions for the child
restraint.
3. Secure the child in the child restraint
as the instructions say.
34
different dtlrectionsto be sure it is
secure. If the child restraint isn’t
secure, turn thelatch plate over and
buckle it again. Then seeif it is
secure. If it isn’t, securethe restraint
in a different place inthe vehicle and
contact the child restraint maker for
their advice about how to attach the
child restraint properly.
4. Run the vehicle’s safety belt through
To remove the child restraint, just
or around the restraint. The child
unbuckle the vehicle’s safety belt.It will
restraint instructionswil show you how. be readyto work for anadult or larger
5. Buckle the belt. Make sure the
child passenger.
release button is positioned so you
would be ableto unbuckle the safety
belt quickly if you ever hadto.
6. To tighten the belt, pull its free end
while you push down onthe child
restraint.
Securing a Child Restraint inthe
Right Front Seat
To use a child restraint here, you will
need a special infant/childseat
attaching belt and thehardware that
goes with it. See the earlier section
about the top strap if the child restraint
has one.
Your dealer can get this and install the
hardware for you. It's free. The special
belt is GM Part Number 12340286. Your
dealer can find the correct hardware
in the
accessory sectionof the GM Parts Catalog
Seats & Restraint Systems
I
Once the special hardware is installed, 2. Snap one hook of the infant/child
seat attaching belt near the floor at
please follow the instructions with it
door side of the seat.
the
and these steps:
1. Unbuckle the automatic lap-shoulder
belt by pushing the button on the
buckle. It will stay on thedoor, ready
to be rebuckledfor use by adults or
older children.
3. Put the belt's special latch plate into
the vehicle's safety belt buckle.
P
4. You can makethe belt longer by
tilting the buckle and pulling it along
the belt.
5. Put the restrainton the seat.Follow
the instructionsfor the child
restraint.
6. Secure the child in the child restraint
as the instructionssay.
7. Run the belt through or around the
child restraint. The child restraint
instructions will show you how.
8. Put thehook on the free endthrough
the slot in the latch plate.
9. To make it tight, pull the belt while
you push downon the child restraint.
If the belt won't staytight, switch it
end forend.
IO. Push and pull the child restraint in
different directionsto be sure it is
secure.
To remove the infant/child seat
restraint:
1. Push the buttonon the safety belt
buckle and remove the special latch
plate. Leave the latch plate on the
special belt.
2. Push the spring on the hook near the
door and remove the special belt.
Put the belt awayin a safe place in your
vehicle, so it won’t flyaround in a crash
and injure someone.
Remember to reattach the automatic
belt again, oncethe child restraint is
removed. Be sure it isn’t twisted.
Larger Children
Children who have outgrown child
restraints should wearthe vehicle’s
safety belts.
If you have the choice, a child shouldsi1
next to a window so the child can wear
a lap-shodder belt and get the
additional restraint a shoulder beltcan
provide.
Accident statistics show that children
are safer if they are restrained in the
rem seat. But theyneed to use the
safety belts properly.
Children who aren’t buckled up can
be thrown out in a crash.
children who aren’t buckledup can
strike other people who are.
I
Q: What if ,ab .child
. .: ..:is w
earing ais
lapshouldetbelt, tjdi the
s&
.$,
I
-,
’
small that the shoulder beltis very
close to the child’s face or neck?
A: Move the child toward the center of
the vehicle, but be sure that the
shoulder belt still is
on thechild’s
shoulder, so that in a crash the
child’s upper bodywould have the
restraint thatbelts provide. If the
child is so small that the shoulder
belt is still very closeto the child’s
face or neck,you might want to
place the child in thecenter seat
position, the one that has only a lap
belt. See Rear Safety Belt Comfort
Guides in the Index.
Wherever the child sits, thelap portion
of the belt should beworn low and snug
on the hips, just touching the child’s
thighs. This applies belt forceto the
child’s pelvic bones in a crash.
Seats & Restraint Systems
4 Safety
BeltEaeder
If the vehicle’s safety belt will fasten
around you, you should useit. The
automatic lap-shoulder belt has plenty
of extra length builtin, so it will fasten
around almost all people.
But if a safety belt isn’t long
enough to
an
fasten, your dealer will order you
extender. It’s free. When you go to
in
order it, take the heaviest coat you will
wear, so the extender will be long
enough for you.The extender will be
just for you,and just for the seat in your
vehicle that you choose. Don’t let
someone else useit, and use it only for
the seat it is madeto fit. To wear it, just
attach it to the regular safety belt.
Checking Your Restraint
Systems
Now and then, make sure all your belts,
buckles, latch plates,retractors,
anchorages and reminder systemsare
working properly.Look for any loose
parts or damage. If you see anything
that might keep arestraint system from
doing its job, have it repaired.
Replacing Safety Belts
AjFer
a Crash
If you’ve had acrash, do you need new
belts?
After a very minor collision, nothing
may be necessary.But if the belts were
stretched, as they would beif worn
during a more severe
crash, then you
need new belts.
If belts are cut or damaged, replace
them. Collision damagealso may mean
you will need to have safety beltor seat
parts repaired or replaced. New parts
and repairs may be necessary evenif the
belt wasn’t being used
at thetime of the
collision.
S
Q: What’s wrong with this?
A: The belt is torn.
Torn or frayed belts may not protect
you in a crash. They can rip
apart under
impact forces. If a belt istorn orfrayed,
get a newone right away.
........;\?
Keys............................................................................................................................
42
Locks .......................................................................................................................... 43
Glove
..................................................................................................................
47
H e r e you can learn about the
. . Box
.......................................................................................................................
50
Ignition
many standard and' optional
Starting Your Engine................................................................................................. 51
features on your Chevrolet. and
52
Engine
Coolant Heater..............................................................................................
information on starting. shifiing and
53
Automatic Transaxle.................................................................................................
braking; Also explained are the
.................................................................
56
Manual
Transaxle
...................................
i
instrument panel and the:warning
systems that tell youif everything is Parking Brake.......................................................... 1.................................................. 58
................. 58
Shfiing intoPark ....................................................................................
working properly-and what to do
62
Windows ..... ..............................................................................................................
if you have a problem
.
Turn Signal/Multifunction Lever.............................................................................. 63
Headlights .............................................
.I. ................................................. .:............-65
Interior Lights............................................................................................................ 67
Windshield Wipers..................................................................................................... 68
Windshield Washer................................................................................. .l ................. 69
Cruise Control........................................................................................................... 70
Mirrors ....................................................................................................................... 72
Ashtrays and Lighter................................................................................................. 75
Sunroof ...................................................................................................................... 75
Instrument Panel....................................................................................................... 80
..................................................................... 84
Warning Lights, Gages and Indicators
Features & Controls
?heignition keysare for the ignition
IdY.
:he door keys are for the doors and all
Ither locks.
Vhen a new Chevroletis delivered, the
lealer removes the plugs from the keys,
nd gives them to the first owner.
Iach plug has a code on it thattells
our dealer or a qualified locksmith
.owto maleextra keys. Keepthe plugs
I a safe place.If you lose your keys,
ou'll be able to have newones made
asily using these plugs.
NOTICE:
Your Chevrolet hasa number of new
features that can help preventtheft.
But you can have a lot of trouble
getting into your vehicleif you ever
lock your keys inside.
You may even
have to damage your vehicleto get
in. So be sure you haveextra keys.
~
rhere areseveral waysto lock and
d o c k your vehicle.
From the Outside:
Use your door ley.
From the Inside:
To lock the door, pullthe sliding lockin$
lever back.
To unlock the door, push the sliding
locking lever forward.
Automatic Door Locks
Power Door Locks
You can lock or unlock all
doors of your
vehicle fromthe driver or passenger
door lockswitch.
On 4-door models,the switch on each
rear door works onlythat door’s lock.It
won’t lock (or unlock) all of the
doors-that’s a safety feature.
w w w
44
Just close yourdoors and turn on the
ignition. If you have an automatic
transaxle, all of the doors will lock
when you move your shift lever
out of P
(Park) or N (Neutral). If you have a
manual transaxle, all of the doors will
lock when the vehicle goesabout 8 mph
(13 l d h ) . If someone needsto get out
while the vehicle isrunning, have that
person use the manual or power lock.
When the door is closed again,it will
lock automatically whenyou move your
shift leverout of P (Park) or N
(Neutral). If you have a manual
transaxle, the doors will lock whenthe
vehicle reaches about 8 mph (13 M h ) .
All doors will automatically unlock
when the key isturned to the OFF
position.
If you don’t want the doors to
automatically unlock whenthe key is
turned to the OFF position, you can
remove the Automatic Door Unlock
fuse. Forfuse location, see the Index
under Fuse Usage.
Leaving Your Vehicle
If you are leaving the vehicle, open your
door and set the locks from inside. Then
get out and close the door.
Features & Controls
Remote Trunk Release (OPTION)
Pull upwardon the remote release
handle, located on thefloor near the left
side of the driver’s seat, to release the
trunk lid.
Lockout Feature:
The remote trunk release is equipped
with a lockout feature to help prevent
unauthorized entry into the trunkwhen
the vehicle is unattended. The switch is
located on the inside of the trunklid,
mounted to the trunklid latch.
To turn thelockout on, slide the switch
all the way to the right until it clicks.
When the lockout is on, themechanical
remote trunk release will not release the
trunk lid. However,the trunklid can
still be openedwith the key.
To turn thelockout off, slide the switch
all the way to the left.
Liftgate Lock (WAGON)
To unlock the liftgate fromthe outside,
insert the door l e y and turn it
clockwise. Then lift up the bottom of
the liftgate.
Be sure thereare no overhead
obstructions before you open the
liftgate. You could slamthe liftgate into
something and break the glass.
Remote Liltgate Release(WAGON)
Glove Box
Press the yellow liftgate releasebutton
located in the glove box to release the
liftgate.
The automatic transaxle must be in P
(Park) or N (Neutral) for the liftgate
lock releaseto work. With amanual
transaxle, the parking brakemust be set.
To open, pinch the handle.
neft
Vehicle theft is big business, especially
in some cities.Although your Chevrolet
has anumber of theft deterrent features,
we know that nothing we put on it can
make it impossible to steal. However,
there are ways you can help.
Illuminated EntryExit System
When you liftthe handle of either front
door, the lights inside your vehicle will
go on. (On thewagon, the rear
compartment light willnot go on when
the doors are opened.) These lights will
go off after about 40 seconds, orwhen
the ignition isturned on.
For two minutes after you remove the
key fromthe ignition, the lights inside
Trunk Lock
your vehicle will stayon for about 15
To unlockthe trunkfrom the outside,
seconds to provide an illuminated exit.
insert the door keyand turn it.
The illuminated entry/exit system is
deactivated when the dome light lever is
moved to theOFF position.
I
45---
Features & Controls
Key in the rgnition
Parking at Night
Parking Lots
If you walk away
from your vehiclewith
the keys inside, it’s an easy target for
joy riders or professional thieves- so
don’t do it.
When youpark your Chevroletand
open the driver’s door, you’ll hear a
chime reminding youto remove your
ley from the ignition and take it with
you. Always do this. Your steering
wheel will be locked,and so will your
ignition. If you havean automatic
transaxle, taking your key out also locks
your transaxle. And rememberto lock
the doors.
Park in a lightedspot, close all windows
and lock your vehicle. Remember
to keep
your valuablesout of sight. Put them in
a storage area, or take them with you.
If you park in a lotwhere someone will
be watching your vehicle, it’s best
to
lock it up and take your keys. Butwhat
if you have to leave your ignition key?
What if you have to leave something
valuable in your vehicle?
Put your valuables in a storage area,
like yourtrunk or glove box.
Lock allthe doors except the driver’s.
Then take thedoor key with you.
48
New Khicle ‘Break-in"
NOTICE:
Convenience Net (OPTION)
Trunk Cargo Anchors(OPTION)
Your vehicle may havea convenience
net. You’ll see itjust inside the back
wall of the trunk. Putsmall loads, like
grocery bags,behind the net. It can help
keep them from falling overduring
sharp turnsor quickstarts and stops.
Unclip a corner of the convenience net
to fit larger objectsbehind the net, then
reclip it to secure them in place.
The net isn’t for larger, heavier loads.
Store them in the trunk as
far forward
as you can.
You can unhook the net so that itwill
lie flat whenyou’re not using it.
If your vehiclehas fold-down rear seats,
you’ll findtwo or four anchors on the
back wall of your trunk. You can use
these anchors to tie down lighter loads.
They preventthings from shifting during
sudden stops, turnsand maneuvers.
These anchors are not for heavierloads.
Store thoseitems as far forward inthe
trunk as possible.
Your modern Chevroletdoesn’t
need an elaborate “break-in.” But it
will perform better in the long run
if you followthese guidelines:
Don’t drive at any one speed fast or slow -for the fist 500
miles (804 km) . Don’t make fullthrottle starts.
Avoid making hardstops for the
first 200 miles (322 km)or so.
During this time your newbrake
linings aren’t yetbroken in. Hard
stops with new linings can mean
premature wear and earlier
replacement. Follow this
“brealring-in” guideline every
time you get newbrake linings.
Features & Controls
RUN
A warning chime w
ill sound if you open
the driver’s door whenthe ignition is off
and the key isin the ignition.
Run: An “on” position to which the
switch returns .after youstart your
engine and release’the syitch.The
switch staysin the Run position when
the engine is running. But even when
the engine isnot running, you can use
Run to operate your electrical power
accessories, andto display some histrument panel WarningJights.
With the ignition keyin theignition
switch, youcan turn the switch to five
Stark Starts theengine. Whenthe
positions:
engine starts, release the key. The
ignition
switchwill return toRun for
Accessory: An “on” position in which
normal
driving.
you c m operate your electrical power
accessories. Press in the ignition switch Note that even if the engine is not
as you turn thetop of it toward you.
running, the positions Accessory and
Lock The only positiopin which you can Run are “qd’positions’thatallow you
remove the key. This locks your steering to operate your electrical accessories,
such as .the radio.
wheel, ignition and transaxle.
Off: ,Unlocksthe steering wheel, ignition
and transaxle, but does not send electrical
power to any accessories. Use
this position
if your vehicle must be pushed
or towed,
but never try to push-start your vehicle.
.Ignition Switch
50
I
.
NOTICE:
If your key seemsstuck in Lock and
you can’tturn it,be sure it is allthe
way in. If it is, thenturn thesteering
wheel le&’andright while youiurh
the key hard. But turn thekey only
with your hand. Using a tool to
force it could breakthe key orthe
ignition switch.If none of this works,
then your vehicle needs service.
Starting YourEngine
Key Release Button
(MANUAL TRANSAXLE)
Follow the proper steps to start the
engine.
Automatic Transaxle:
Move your shift leverto P (Park) orN
(Neutral). Your enginewon’t start in
any other position - that’s a safety
feature. To restart when you’re already
moving, use N (Neutral) only.
NOTICE:
The ignitionkey cannot be removed
Don’t try to shift to P (Park) if your
from the ignition unlessthe key release
Chevrolet is moving.If you do, you
button is used.
could damagethe transaxle. Shift
To Remove the Key:
to P (Park) only when your vehicle
Turn the key to theOff position. Press
is stopped.
the key release button while turning the
key from Off to Lock.Keeping your
Manual Transaxle:
finger on the button,pull the key
Hold the clutch pedal to thefloor, then
straight out.
shift your gear selectorto N (Neutral)
while starting theengine. Your vehicle
won’t start if the clutch pedal is not all
the way down-that’s a safety feature.
To start your engine:
1. Without pushingthe accelerator
pedal, turn your ignitionkey to Start.
When the engine starts, let go ofthe
key. The idle speed will go down
as
your engine getswarm.
NOTICE:
Holding yourkey in Start for longer
than 15 seconds at a time will cause
your battery to be drained much
sooner. And the excessive heat can
damage yourstarter motor.
2. If your engine still won’tstart (or
starts but then stops),
it could be
flooded with too much gasoline. Try
pushing your accelerator pedalall the
way to thefloor and holding itthere
as you hold the key in Start for about
three seconds. If the vehicle starts
briefly but then stopsagain, do the
same thing, but thistime keepthe
pedal down for five orsix seconds.
This clearsthe extra gasoline from
the engine.
n
Features & Controls
NOTICE:
Your engineis designed to work
with the electronics in your vehicle.
If you add electricalparts or
accessories, you could change the
way the fuel injection system
operates. Before adding electrical
equipment, check with your dealer.
If you don’t, your engine might not
perform properly.If you ever haveto
I
have your vehicle towed, see
the part
(OPTION)
of this manual that tells how to do
it without damaging your vehicle. See In very cold weather, 0°F (-18°C) or
Towing Your Vehicle in theIndex.
colder, the engine coolant heater can
help. You’ll get easier starting and
better fuel economyduring engine
warm-up. Usually, the coolant heater
should be plugged in a minimumof four
hours prior to starting your vehicle.
To use the coolant heater:
NOTICE:
1. Turn off the engine.
If you drivetoo quickly through
2. Open the hood and unwrap the
deep puddles orstanding water,
electrical cord.
water can come in through your
engine’s air intake and badly damage 3.Plug it into a normal, grounded
your engine.If you can’t avoid deep
110-volt outlet.
puddles or standing water, drive
through them very slowly.
Engine Coolant Heater
(Engine Block Heater)
Driving Through Deep
Standing Water
NOTICE:
After you’ve usedthe coolant
heater, be sure to store the cord as
it was beforeto keep it away from
moving engineparts. If you don’t, it
could be damaged.
How long shouldyou keep the coolant
heater plugged in? The answer depends
on theweather, the kind of oil you
have, and some other things. Instead of
trying to list everything here, we ask
that you contact a Chevrolet dealer in
the areawhere you’ll be parking your
vehicle. The dealer can give youthe best
advice forthat particular area.
.Automatic Transaxle
Your automatic transaxle has a shift
lever locatedon theconsole between
the seats.
There are several different positions for
your shift lever.In this manual, these
are referred to by the commonly used
symbols in the right column below:
Park
P
. Reverse
R
Neutral
N
Drive
D
Second
2
First
1
Park
P (Park): This locks yourfront wheels.
It’s the best position to use when you
start your engine because your vehicle
can’t move easily.
.
Features & Controls
Ensure the shift lever is fully in P
(Park) range before starting the engine.
Your Chevrolethas a brake-transaxle
shift interlock. You have to fully apply
your regular brakesbefore you can shift
from P (Park) when the ignition ley is
in the Run position. If you cannot shift
out of P (Park), ease pressure on the
shift lever-push the shift lever allthe
way into P (Park) and also release the
shift leverbutton asyou maintain brake
application. Then move the shift lever
into thegear youwish. See the Index
under Shifting Out of P (Park).
Reverse
R (Reverse): Use this gear to back up.
NOTICE:
Shifting to R (Reverse)while your
vehicle is moving forward could
damage yourtransaxle. Shift to R
only after your vehiclehas stopped.
To rock your vehicle back
and forth to
get out of snow, ice or sand without
damaging yourtransaxle, see the Index
under I f You’reStuck: In Sand, Mud,
Ice or Snow.
54
Forward Gears
Neutral
N (Neutral):In thisposition, your
engine doesn’tconnect with the wheel:
To restart when you’re already moving,
use N (Neutral) only. Also, use N wher
your vehicle is being towed.
NOTICE:
Damage to your transaxle caused
by shifting out of P (Park) or N
(Neutral) with the engine racing
isn’t covered by your warranty.
D (Drive): This positionis for normal
driving.
2 (Second Gear):This positiongives
you more powerbut lower fuel economy
You canuse 2 on hills. It can help contro
your speed as you go down steep
mountain roads, but thenyou would
also want to use your brakesoff and on
I
..
NOTICE:
Don’t drive in 2 (Second Gear) for
more than 5 miles (8 km), or at
speeds over 55 mph (88 km/h), or
you can damage your transaxle.
Use D as much as possible.
Don’t shift into 2 unless you are
going slowerthan 65 mph (105 km/h),
or you can damage your engine.
I
L
55===
Features & Controls
1 (First Gear): This position gives you
even more power(but lower fuel
economy) than 2. You can use it on
very steep hills, or in deep snow or
mud. If the selector lever isput in 1, the
transaxle won’t shift into first gearuntil
the vehicle is going slowly
enough.
1
3
5
2
4
R
NOTICE:
If your front wheels can’t rotate,
don’t try to drive. This might
happen if you were stuck in very
deep sand or mud or wereup
against a solid object. You could
damage yourtransaxle.
Also, if you stop when going uphill,
don’t hold your vehiclethere with
only the accelerator pedal. This
could overheat and damagethe
transaxle. Use your brakes or shift
into P (Park) to hold your vehicle
in positionon a hill.
3.1L V6 Engine:
Maximum engine speedis limited to
protect driveline components from
improper operation.
Manual Transale
There are seven different positions:
N Neutral
1
First Gear
2
Second
Gear
3
Third
Gear
4
Fourth
Gear
5
Fifth
Gear
R Reverse
This is your shiftpattern. Here’s how to
operate your transaxle:
1 (First Gear):Press the clutch pedal
and shift into 1. Then, slowly let up on
the clutch pedalas you press the
accelerator pedal.
You can shift into 1 when you’re going
less than 20 mph (32 km/h) . If you’ve
come to a complete stop and it’s hard to
shift into 1, put the shift leverin N
(Neutral) and let up on the clutch.
Press the clutch pedal backdown. Then
shift into 1.
2 (Second Gear):Press the clutch pedal
as you let up on the accelerator pedal
and shift into 2. Then, slowly let up on
the clutch pedal as you press the
accelerator pedal.
3 , 4 and 5 (Third, Fourth and Fifth
Gears): Shift into 3 , 4 and 5 the same
way you do for 2. Slowly letup on the
clutch pedal as you press the
accelerator pedal.
To Stop: Let up on the accelerator
pedal and press the brake pedal. Just
before the vehicle stops, press the
clutch pedal and the brake pedal, and
shift to N (Neutral).
N (Neutral): Use this position when
you start oridle your engine.
R (Reverse): To back up, press down
the clutch pedal and shift into R
(Reverse).Let up on the clutch pedal
slowly whilepressing the accelerator
pedal.
SHIFT
Shift Light(MANUAL TRANSAXLE)
If you have a manual transaxle, you
have a SHIFT light. This lightwill show
you when to shift to thenext higher
gear for best fuel economy.
When this light comes on, you can shift
to the next higher gearif weather, road
and traffic conditions let you.
For the best fuel economy,accelerate
NOTICE:
Shift to R (Reverse) only after your slowly and shift whenthe light comeson
vehicle is stopped. Shifting to R
While you accelerate,it is normal for the
(Reverse) while your vehicle is
light to go on andoff if you quickly change
moving could damage your transaxle. the position of the accelerator. Ignore
the SHIFT light when you downshift.
Also, use R (Reverse), along with the
parking brake, for parking your vehicle. Shift Speeds (MANUAL TRANSAXLE)
This chart shows when to shift to the
next higher gear for best fuel economy.
Acceleration Shift Speeds:
1stto 2nd
17 mph (27 k w h )
2nd to 3rd
30 mph (48 km/h)
3rd to 4th
39 mph (63 ltm/h)
4th to 5th45
mph (72 ltm/h)
If your speeddrops below 20 mph
(32 l d h ) , or if the engine isnot
running smoothly, you should
downshift to the next lower gear.You
may have to downshift two or more
gears to keep the engine running
smoothly or for good performance.
NOTICE:
If you skip morethan one gear when
you downshift, orif you racethe engine
when you downshift, you can
damage the clutch or transaxle.
Features & Controls
Shijling Into C(P JJ (Park)
(AUTOMATIC TRANSAXLE
MODELS ONLY)
J
Parking Brake
The parking brake lever is located
between the bucket seats.
To Set the Parking Brake:
Hold the brake pedal down and pull up
on theparking brake lever.
If the ignition is on, the brake system
warning light will come on.
To Release the Parking Brake:
Hold the brake pedal down. Pullthe
parking brake lever up until you can
press the release button. Hold the
release button in as you move the brake
lever allthe way down.
NOTICE:
Driving with the parking brake on
can cause your rear brakes to
overheat. You may have to replace
them, and you could also damage
other parts of your vehicle.
1. Hold the brake pedal downwith your
right foot and set the parking brake.
Leaving Yqur. Vebjcle
W@h:,.the
., . :.
. .
.
Engine Runriing
.-‘j!
,.
position likethis: Hold in the button
on thelever, and push the lever all
the way toward the frontof your
vehicle.
3. Move the ignition keyto Lock.
4. Remove the key and take itwith you.
If you can walk away from your
vehicle with the ignition key in your
hand, your vehicle isin P (Park).
,
Torque Lock(AUTOMATICRWVSAXLE)
If you are parking on a hill and you
(AUTOllrlATIC TRANSAXLEMODELS ONLY) don’t shift yourtransaxle into P (Park)
properly, the weight of the vehicle may
put toomuch forceon theparking pawl
in the transaxle. You may findit
difficult to pull the shift leverout of P
(Park). This is called “torque lock.” To
prevent torque lock, set the parking
brake and then shift into P (Park)
properly before you leavethe driver’s
seat. To find out how, seeShifting Into
P (Park) in the Index.
When you are ready to drive, move the
shift leverout of P (Park) BEFORE you
release the parking brake.
If “torque lock” doesoccur, you may
need to have another vehicle push yours
If you have to leave your vehicle with a little uphillto take some of the
the engine running, be sure your vehicle pressure fromthe transaxle, so you can
is in P (Park) and your parking brakeis pull the shift leverout of P (Park).
firmly set before you leave it. After
you’ve movedthe shift lever into theP
(Park) position, hold the regular brake
pedal down. Then, see if you can move
the shift lever away from
P (Park)
without first pushing the button.
If you can, itmeans that theshift lever
wasn’t fully locked into P (Park).
’
2. Move the shift lever into theP (Park)
,
’
Features & Controls
Shifting Out of P (Park)
(AUTOMATIC TRANSAXLE)
Your Cheyrolet hasa brake-transaxle
shift interlock.You have to fully apply
your regular brakesbefore you can shift
from P (Park) when the ignition is in
the Run position. Seethe Index under
Automatic Transaxb. If you cannot
shift out of P (Park), ease pressure on
the shift lever-push the shift lever all
the way into P (Park) and also release
the shift lever button onfloor shift
console modelsas you maintain brake
application. Then move the shift lever
into thegear you wish. (Pressthe shift
lever button before moving the shift
lever on floorshift console models.)
If you ever holdthe brake pedal down but
still can’t shiftout of P (Park), try this:
1. Turn the key to OFF.
2. Apply and hold the brake untilthe
end of Step 4.
3. Shift to N (Neutral).
4. Start thevehicle andthen shift to the
drive gear youwant.
5. Have the vehicle fixed as soon as you
Can.
Parking Your Vehicle
(MANUAL TRANSAXLE)
Before you getout of your vehicle,put
your manual transaxle in R (Reverse)
and firmly applythe parking brake.
.
Parking Over Things That
Burn
Engine Exhaust
Running YourEngine while
You’re Parked
(AUTOMATIC TRANSAXLE)
It’s better not to park with the engine
running. But if you ever haveto, here
are some things to know.
Follow the proper steps to be sure your
vehicle won’t move. SeeShifting Into P
(Park) in the Index.
Features & Controls
i
Le
I
h?
Windows
Power Windows (OPTION)
Power Window Lock-Out Switch
On a vehiclewith manual windows, use
the window crank to open and close
each window.
With powerwindows, switches on the
center console control each of the
windows when the ignition is on. In
addition, in 4-door models, each rear
passenger door has a control switch for
its own window.
The driver’s windowswitch has an
Auto Down feature. The driver’s
window can be opened a small amount
by pushing the switch markedAUTO to
the first detent. When the switch is fully
pressed, the window will go down all
the way.
To stop thewindow whileit is lowering,
press the switch forward, then release.
To raise the window, pressand hold the
switch forward.
(OPTION)
Dn 4-door models,this switch disables
the rear passenger power windows.
Push the switch forwardto lock the
windows. Push the switch backto
unlock the windows.
Horn
Tilt Steering Wheel (OPTION)
You can sound the hornby pressing the
A tilt steering wheel allows youto
adjust thesteering wheel beforeyou
drive. You canalso raise it to the
highest levelto give your legs more
room when you exit and enter the
vehicle.
To tilt the wheel, holdthe steering
wheel and pull the lever. Movethe
steering wheel to a comfortable level,
then release the lever to lock the wheel
in place.
horn pad on your steering wheel.
Turn Signul/MuiJicnction
Lever
The lever onthe left sideof the steering
column includes your:
Turn Signal and Lane Change
Indicator
Headlight High-LowBeam Changer
Parking Lights
Cruise Control (Option)
Flash-to-Pass Feature (except in
Canada)
Features & Controls
Operation of Lights
LLJ’
n
Although your vehicle’s lighting system
(headlights,parking lights, foglamps,
side marker lightsand taillights) meets
all applicable federal lighting
requirements, certain states and
provinces may applytheir own lighting
regulations that may require special
attention before you operate these lights,
For example, some jurisdictions may
Turn Signal and Lane Change
require that you operate your lower
Indicator
beam lightswith fog lamps at all times,
The turn signal has two upward (for
or that headlights beturned on
whenever you must use your windshield Right) and two downward (for Left)
positions. These positions allow youto
wipers. In addition, most jurisdictions
signal aturn or a lane change.
prohibit driving solelywith parking
To signal aturn, move the lever allthe
lights, especiallyat dawn or dusk. It is
recommended that you checkwith your way up or down. Whenthe turn is
finished, the lever willreturn
own state or provincial highway
automatically.
authority for applicable lighting
regulations.
A greenarrow on the instrument panel
will flash in the direction of the turnor
lane change.
I)
To signal alane change, just raise or
lower the lever until the green arrow
starts to flash. Holdit there until you
complete yourlane change. The lever
will return by itself when you releaseit.
As you signal aturn or a lane change, if
the arrows don’t flash but just stay on, a
signal bulb may be burned out and
other drivers won’tsee your turn signal.
If a bulbis burned out, have yourdealer
replace it to help avoidan accident. If
the green arrows don’t goon at all
when you signal a turn, check the fuse
(see the Index under Fuses G Circuit
Breakers) and for burned-out bulbs.
I
1c
m
Headlights
I'urn the band marked
turn on:
Parking Lights
Side Marker Lights
Taillights
License Plate Lights
I'urn the band marked
turn off the lights.
.
-:a-to PC to
-:a-to OFF to
Turn the band marked
turn on:
Headlights
Parking Lights
Side Marker Lights
Taillights
License Plate Lights
Turn theband marked
turn off the lights.
-a-go
to
to
Dayfime Running Lights ( D M )
Indicator Light (CANADA ONLY)
[f your vehicle wasfirst sold, when new,
in Canada, you will havethis light on
the instrument panel. It goes on
whenever the Daytime Running Lights
we on.
-n-
to OFF to
Dayfime Running Lights
(CANADA ONLY)
The Canadian federal government has
decided that Daytime Running Lights
(DRL) are a useful feature, in that DRL
can make your vehicle more visible
to
pedestrians and other drivers during
daylight hours. DRL are required on
new vehicles soldin Canada.
Features & Controls
The high beam headlights will come
on
at reduced brightness in daylight when:
The ignition ison
The headlight switchis off, and
The parkingbrake is released.
When youturn on your headlights, the
DRL will switch off and the exterior
lights will comeon. When youturn off
the headlights, the exterior lights will go
out and the high beamswill change to
the reduced brightness of DRL again.
The DRL indicator light on the
instrument panel will goon whenever
the DRL are on. This light means that
only the DRL are on. When youturn on
your exterior lights, this light will go
out. Of course, you may still turn on the
headlights any timeyou need to.
To idle your vehiclewith the DRL off,
set theparking brake.The DRL will
stay off until you releasethe parking
brake.
Flash-to-Pass (EXCEPT CANADA)
Headlight High-Low Beam
Changer
J
To change the headlights from low
beam to high or high to low, pullthe
turn signal lever allthe way toward you.
Then release it. When the high beams
are on, a blue lighton the instrument
panel alsowill be on.
Flash-to-Passlets you use your high
beam headlights to signal a driverin
front of you that you want to pass.
To use it, pull the turn signal lever
toward you, then release.
If Your Headlights Are Off
Your high beam headlights will
turn on.
They’ll stay on as long as you hold the
lever there. Release the lever to turn
them off.
If Your Headlights Are On:
Flash-to-Pass doesnot operate when
your headlights are on. Use the lever to
change between highand low beams.
\
-
E
Instrument Panel Intensity
Control
1Dome Light
To turn on thedome light, movethe
You can brighten or dim the instrument 1lever allthe way up.
panel lights by moving the control lever 1[n theDOOR position the illuminated
up or down.
:ntry/exit system is activated. To turn
3ff all interior lights, move the lever to
OFF.
ro Replace the Bulb:
Grasp the center front andcenter rear
1portion of the housing and squeeze
jFirmly but gently. The housing should
1pop off.
1[f this doesn’t work, you may need to
1use a small, flat-head screwdriverunder
1the side of the housing to help pry it off.
I
Reading Light(OPTION)
This light comeson when you open
either front door or move the dome
light leverto DOME. You can turn on
either reading light by pressing the
depression in either light’s lens.
To Replace theBulb
Use a small, flat-head screwdriverunder
the side of the housing to help pry it off.
Features & Controls
. .. .. .. . .:. . .
. . .
.. ...._
.
. . . .. . . . .. ... ... .
.
.
a
1
. . ..
a
'
..
.,
. . .
.
1
_ .
. .
. .. . .
Rear Compartment Light(WAGON)
Mindshield Wipers
To turn on therear compartment light,
press the buttonlocated on the light.
To Replace the Bulb
Grasp the center front and center rear
portion of the housing and squeeze
firmly but gently. The housing should
pop off.
If this doesn't work, you may needto
use a small, flat-head screwdriverunder
the side of the housing to help pry it off.
fou control the windshield wipersby
noving the stalk with the wiper symbol
In it up or down.
For a Single Wiper Cycle:
?ush the stalk down to MIST until the
vipers start, thenlet go. The wipers will
;top after one cycle. For more cycles,
lold the stalk down on MIST longer.
For Steady Wiper Cycles:
vlove the stalk up to either I (Low) or
[I (High), depending on thewiper
;peed you want.
To Turn Wipers Off:
vlove the stalk to OFF.
Remember that damaged wiper blades
may prevent you from seeing well
enough to drive safely. To avoid
damage, be sure to clear iceand snow
from the wiper blades before using
them. If they're frozen to the
windshield, carefully loosenor thaw
them. If your blades do become
damaged, get new blades
or blade
inserts.
Heavy snow or ice can overload your
wipers. A circuit breaker will stop them
until the motor cools. Clear awaysnow
or ice to prevent an overload.
c
II\
Intermittent Windshield Wipers
1Windshield Washer
(OPTION)
t
If your vehiclehas intermittent
windshield wipers, you can set the
wiper speed fora long or short delay
between wipes.This can be very useful
in light rain or snow.
Move the stalk to DEL, then rotate the
band marked DELAY to choose the
delay youwant. Rotate the band up for
shorter delay times between wiper
cycles. Rotate the band down for longelr
delay times between wiper cycles.
For a single wiper cycle,push the stalk
to MIST, then let go.
1
Standard Wipers:
To spray washer fluid on the
windshield, pullthe stalk with the wipe]
symbol on it toward you one time.
When you release the stalk the washers
will stop, but thewipers will keep going
1in low until you move the wiper control
1to OFF.
Intermittent Windshield Wipers:
If you have intermittent windshield
wipers, after each wash cycle ends the
wipers willresume the delay speed you
were using before.If you had no speed
selected, the wipers will stop.
I
1
4
1
1
Driving without washer fluidcan be
dangerous. A bad mud splash can block
your vision.You could hit another
vehicle or go off the road. Check your
washer fluid level often.
Features & Controls
NOTICE:
When using concentrated washer
fluid, followthe manufacturer’s
instructions for adding water.
Don’t mix water with ready-touse washer fluid. Water can cause
the solution to freeze and damage
your washer fluidtank and other
parts of the washer system. Also,
water doesn’t clean as well as
washer fluid.
*Fill yourwasher fluid tank only %
full when it’s very cold.This
allows for expansion, which could
damage the tankif it is
completely full.
*Don’t use radiator antifreeze in
your windshieldwasher. It can
damage yourwasher system and
paint.
co&ol
&&?
(OPTION)
With cruise control, you can maintain a
speed of about 25 mph (40 km/h) or
more without keeping yourfoot on the
accelerator. This can really helpon long
trips. Cruise control does not work at
speeds below about 25 mph (40 km/h).
When you apply yourbrakes, or the
clutch pedal,the cruise control shuts off.
To Set Cruise Control
1. Move the cruise control switch
to ON.
2. Get up to the speed you want.
To Increase speed While Using
Cruise Control
3.Push in the SET button at the end of
the lever and release it.
4. Take your footoff the accelerator
pedal.
There are two ways to go to a higher
speed. Here’sthe first:
1. Use the accelerator pedalto get to
the higher speed.
2. Push the button at the end of the
lever, then release the button and the
I
I
accelerator pedal. You’ll now cruise
at the higher speed.
To Resume a Set Speed
Suppose you set your cruise controlat a Here’s the second way to go to a higher
speed:
desired speedand then you apply the
brake or clutch pedal. This, ofcourse,
Move the cruise switch fromON to
shuts off the cruise control. But you
R/A. Hold it there until you get up to
don’t need to reset it. Once you’re going the speed you want, and then release
about 25 mph (40 k w h ) or more, you
the switch.
can movethe cruise control switch from To increase your speed in very small
ON to R/A (which stands for Resume/
amounts, move the switch to R/A for
Accelerate) for about half a second.
less than half a secondand then
You’ll go right backup toyour chosen
release it. Each timeyou do this, your
vehicle will goabout 1mph (1.6km/h)
speed and stay there.
faster.
If you hold the switch at R/A longer
than half a second,the vehicle will keep
going faster until you release the switch
or apply the brake or clutch pedal. You
could bestartled and even lose control.
So unless you want to go faster, don’t
hold the switch at R/A.
Features & Controls
To Reduce Speed While Using
Cruise Control
There are two waysto reduce your
speed while using cruise control:
Push in the buttonat the end of the
lever until youreach the lower speed
you want, thenrelease it.
To slow downin very small amounts,
push the button for lessthan half a
second. Each time youdo this, you’ll
go 1mph (1.6 km/h) slower.
Passing Another Vehicle While
Using Cruise Control
Use the accelerator pedalto increase
your speed. When you
take your footoff
the pedal, your vehicle will slow down
to the cruise control speed you set
earlier.
Using Cruise Controlon Hills
How well your cruise control
will work
on hills depends upon your speed, load,
and the steepness of the hills. When
going up steep hills, you may have to
step on the accelerator pedalto
maintain your speed. When going
downhill, you may haveto brake or
shift to a lower gearto keep your speed
down. Of course, applyingthe brake or
clutch pedaltakes you out of cruise
control. Many drivers findthis to be too,
much trouble and don’t use cruise
control on steep hills.
To Get Out of Cruise Control
There are several waysto turnoff the
cruise control:
Step lightly on the brake pedal, or
push the clutch pedal, if you have a
manual transaxle; OR
Move the cruise switch to OFF.
To Erase Cruise Speed Memory
When youturn off the cruise control or
the ignition, your cruise control set
speed memory is erased.
Inside Manual DaylNight
Rearview Mirror
To reduce glare from lights behind you,
move the lever toward youto thenight
position.
#-
I
Convex Outside Mirror
Remote Control Mirror
Your right side mirroris convex.
A convex mirror’s surface is curved
so
you can see more fromthe driver’s seat
The driver sideoutside mirror should be
adjusted with the control lever onthe
door so that you just seethe side of
your vehiclewhen you ‘aresitting in a
comfortable driving position.
Adjust this mirror by hand so that you
just see the side of your vehiclewhen
you are sitting in a comfortable driving
position.
Features & Controls
.
.
..-
I
SUR visors
Cup Holder
To block out glare, you can swing down
the visors.
To use the cup holder, slide it out from
the dash. Use the right side for larger
containers.
Ashtrays and lighter
Rear Ashtray
To cleanthe rear console-mounted
To open the center console ashtray, lift
ashtray, open it, push down on the
the lid.
snuffer and pull it out.
To clean the ashtray, pull up on the
LIFT tab along the left edge.
NOTICE:
To use the lighter, just push it in all the
way and let go. When it’s ready, it will Don’t put papers and other things
that burn into your ashtrays. If you
pop back out by itself.
do, cigarettes or other smoking
materials could setthem on fire,
NOTICE:
causing damage.
Don’t hold a cigarette lighterin
with your hand while itis heating.
If you do, it won’t be ableto back
away fromthe heating element
when it’s ready. That can male it
overheat, damagingthe lighter and
the heating element.
~wzroof(OPTION)
rhe sunroof includes a glass panel
that
)pens for ventilationand is completely
removable, and an air deflectorthat
mures a smooth flow of air.
Features & Controls
ro Open the Sunroof:
EW,down on the latchrelease handle
and then push it forward and up until
tlhe glass panel locksinto place.
76
ro Remove the Sunroof Glass Panel:.
With the.sunroaf open, press up on
the glass .releasetab; located inside
the latch release handle.
,I Li€t the pane1 up-ahd aut. The air
deflector w
ill automatically pap up.
.
Store the glass panel inthe special
storage bag in the trunk.
4. If you havethe optional fold-down
rear seat, you can secure the storage
bag containingthe glass panelto the
trunk anchors using the straps
provided.
77"'
Features & Controls
To Install the Sunroof Glass Panel:
1. Center the glass panel uprighton the
weatherstrip. Then line up the hinges
on the panel with the slots in the roof
opening.
2. Push forward on the rear edge of the
glass while loweringthe panel. Do
not force a hinge if it binds in a slot.
Reposition the glass panel and start
again.
3.Push the glass releasetab and engage
the latch with the striker. Close the
panel.
NOTICE:
Roof Luggage Carrier
(WAGON, OPTION)
If you havethe optional luggage carrier,
you can load things on top of your
vehicle.
The luggage carrier has slats attached to
the roof, side rails, and tiedowns.
Loading cargothat weighs more
than 125 pounds (57 kg) on the
luggage carrier may damage your
vehicle. When you carry large
things, never let them hang over the
rear or the sides of your vehicle.
Load your cargoso that it rests on
the slats and does not scratch or
damage the vehicle. Put thecargo
against the side rails and fasten it
securely to the luggage carrier.
Don’t exceed the maximum vehicle
capacity when loading your Chevrolet.
For moreinformation on vehicle
capacity and loading, see the Index
under Loading Your Vehicle.
To prevent damage or loss of cargo as
you’re driving, check now
and then to
make sure the luggage carrier and cargo
are still securelyfastened.
~~
Features & Controls
80
The Instrument PanelYour Information System
Your instrument panel is designed to let
you know at a glance howyour vehicle
is running. You’ll know how fast you’re
going, how much fuel you’re using,
and
many other things you’ll need to drive
safely and economically.
The main components of your
instrument panel are:
1. Side Vent
2. Instrument Panel Intensity Control
3.Turn Signal/Multifunction Lever
4. Hazard Warning Flashers Switch
5. Instrument Cluster
6. Ignition Switch
7. Windshield Wipermasher Controls
8. Interior Light Control
9. Audio System
10. Center Vents
11. Cup Holder
12. Side Vent
13. Glove Box
14. Climate Controls and Rear Window
Defogger
15. Parking Brake Lever
16. Ashtray/Lighter
17. Gearshift Lever
18. Horn
19. Tilt Steering Wheel Lever (Option)
20. Fuse Panel
21. Hood Release Lever
Features & Controls
2.2L L4 CLUSTER
CAVALIER
CHECK
Instrument Panel Clusters
Your Chevrolet is equipped with one of
these instrument panel clusters, which
include indicator warning lights and
gages that areexplained on the
following pages.Be sure to read about
those thatapply to theinstrument panel
cluster for your vehicle.
E
,$
' F,'
&
TEMP
Speedometer and Odometer
Your speedometer lets you
see your
speed in both miles perhour (mph) and
kilometers perhour (ltm/h). Your
odometer shows how far your vehicle
has been driven,in either miles (used in
the U.S.) or kilometers (used in
Canada).
1
Tamper Resistant Odometer
Your Chevrolethas a tamper resistant
odometer. If you see silver lines
between the numbers, you'll knowthat
someone has probably triedto turn it
back, so the numbers may not be true.
You may wonder what happens if your
vehicle needs a newodometer installed.
I 3.1L V6 CLUSTER
E
If the new one can be set to the mileage
total of the old odometer, then it must
be. But if it can’t, then it’s set at zero
and a label must be put on the driver’s
door to show the old mileage reading
when the new odometer was installed.
Trip Odometer (3.I L v6 ENGINE)
Tachometer(3.1L v6 ENGINE)
The trip odometer can tell you how far The tachometer displays the engine
speed in revolutions perminute (rpm).
your vehicle has been driven since
you
last set the tripodometer to zero.
NOTICE:
To set the tripodometer to zero, press
Do
not operate the engine with the
the knob to theright of it.
tachometer in thered area, or
engine damage may occur.
Features & Controls
4
fi
260
WarningLights, Gages and
Indicators
This section describes the warning
lights and gages that may beon your
vehicle. Thepictures will help you
locate them.
Warning lightsand gages can signal that
something is wrong before it becomes
serious enough to cause an expensive
repair or replacement. Paying attention
to your warning lights and gages could
also saveyou or others from injury.
Warning lights goon when there may
be or is a problemwith one of your
vehicle’s functions. As you will seein
the details on the next few pages,some
warning lights comeon briefly when
you turn theignition key just to let you
lmow they’re working.If you are
0
’&
8
familiar with this section, you should
\
not be alarmed whenthis happens.
Gages can indicate when there may be
E
or is a problemwith one of your
93
vehicle’s functions. Often gages and
warning lights worktogether to let you
know when there’s a problemwith your
FUEL ONLY
vehicle.
When one of the warning lights comes
on and stays on when you are driving,
Fuel Gage
or when one of the gages showsthere
When the ignition is on, your fuel gage
may be a problem, check
the section
that tells youwhat to doabout it. Please tells youabout how much fuel you have
left. Whenthe indicator nearsE (Empty),
follow the manual’s advice. Waiting
to
you still have a little fuel left,
but you
do repairs can be costly- and even
should
get
more
soon.
dangerous. So please getto know your
warning lights and gages. They’re a big Here are four things that some owners
ask about. None of these show a
help.
problem with your fuel gage:
At the gas station, the gas pump shuts
off before the gage reads I: (Full).
It takes a little more or less fuelto fill
up than thegage indicated. For
example, the gage may have indicated
the tank was half full, but itactually
took a little more or less than half the
tank’s capacity to fill the tank.
The gage movesa little when you turn
a corner or speed up.
The gage doesn’t go backto E when
you turn off the ignition.
For your fueltank capacity, see Service
Station Informationon the last page of
this manual.
I80
1
-
110-
hgine Coolant Temperature
Gage
With the ignition in theRun position,
this gage shows the engine coolant
temperature.
If the gage pointer moves into thered
area, your engine is too hot! It means
that your engine coolant has
overheated. If you have been operating
your vehicleunder normal driving
conditions, you should pull off the road,
stop your vehicle and turn off the
engine as soon as possible.
HOT COOLANT CAN BURN YOU
BADLY!
In Problems on the Road, this manual
shows what to do. See the Index under
Engine Overheating.
Low Coolant Warning Light
(3.1L V6 ENGINE)
If this light comes on and stays on, your
system is lowon coolant and the engine
may overheat. See the Index under
Coolant and have your vehicle serviced
as soon as you can.
Features & Controls
I CHECK
m
closer to the floor. It may take longer to
stop. If the light is still on, have the
vehicle towed for service.(See Towing
Your Vehicle in the Index.)
II
L
Charging SystemLight
9rake Sysfem Warning Light
The charging system light will come
on
briefly when you turn on theignition
and the engine is not running, as a
check to show you it is working. Then it
should go out. If it stays on, or comes
Ion while youare driving, you may have
a problemwith the electrical charging
system. It could indicate that you have
a loosegenerator drive belt, or another
electrical problem. Haveit checked
right away. Driving whilethis light is on
could drain your battery.
If you must drive ashort distance with
the light on, be certain to turnoff all
your accessories,such as theradio and
air conditioner.
tour Chevrolet’s hydraulicbrake
;ystem is divided into two parts. If one
)art isn’t working,the otherpart can
;till workand stop you. For good
)raking,though, you need both parts
vorlting well.
[f the warning light comeson, there
zould be a brake problem. Have your
brake system inspected right away.
rhis light should come on as you start
the vehicle. If it doesn’t come on then,
have it fixed so it will be readyto warn
you if there’s a problem.
[f the light comeson while youare
jriving, pulloff the road and stop
zarefully. You may notice that thepedal
.s harder to push. Or, thepedal may go
I
... 86
The brake system warning light will also
come on when you set your parking
brake, and it will stay on if your parking
brake doesn’t release fully.If it stays on
after your parkingbrake is fully
released, it means you havea brake
problem.
If the regular brake system warning
light is alsoon, you don’t have anti-lock
brakes and there’s a problemwith your
regular brakes. See Brake System
Warning Light earlier inthis part. If
the anti-lock brake system warning light
ever flashes, your anti-lock brake
system is still workingbut needs service
as soon as possible.
Anti-Lock Brake System Warning
Light
With anti-lock, this light will comeon
when you start your engine and it will
stay on for three seconds. That’s
normal. If the light doesn’t come on,
have it fixed so it will be readyto warn
you if there is a problem.
If the light stays on, turn theignition
off. Or, if the light comeson and stays
on when you’re driving, stop assoon as
possible and turn the ignition off. Then
start theengine again to reset the
system. If the light still stays on, or
comes on again while you’re driving,
your Chevroletneeds service. If the
regular brake system warning light isn’t
on, you still have brakes, but you don’t
have anti-lock brakes.
I
SHIFT
\
Shift Light(MANUAL TRANSAXLE)
This light comeson when you need to
shift to the next higher gear. Seethe
Index under Manual Transaxle.
~~
Features & Controls
NOTICE:
I
CHECK
- 1
Malfunction lndicatorLamp
(Check Engine Light)
A computer monitors operation of your
fuel, ignition and emission control systems.
This light should come on when the ignition
is on, but the engine is not running, as a
check to show you it is working.If it does
not come on at all,have itfixed right away.
If it stays on, or it comes on while you
are driving, the computer is indicating
that you have a problem. You should
take your vehiclein for service soon.
... 88
If you keep driving your vehicle
with this light on, after a whilethe
emission controls won’t work as
well, your fuel economy won’t be
as
good and your engine may not run
as smoothly. This could lead to costly
repairs not coveredby your warranty.
Liftgate Ajar Light(WAGON)
This light will comeon if the liftgate is
not fully closed. Have your vehicle
serviced if this light comeson and stays
on after the liftgate is closed.
r
c
NOLANT
CHECK
OAGES
D)(8,
I
If you make a hard stop, the light may
come on fora moment. This is normal.
’
J
\
Check GagesLight
Oil Warning Light (2.2~~4 ENGINE)
This light will come on briefly
when yo1
are starting theengine. If the light
comes on and stays on while youare
driving, check your various gages
to see
if they are in the warning zones.
This lightwill also comeon when the
fuel level is low,1to 3 gallons (3.8 to
liters)
If you havea low engine oil pressure
Iroblem, this light will stayon after yob
start your engine, or come
on when you
ue driving. Thisindicates that your
mgine isnot receiving enough oil.The
mgine could be low on
oil, or couldhaw
some other oil problem. Haveit fixed
immediately.
The oil light couldalso come on in two
other situations:
When the ignition is on but the engin
is not running, the light will come on
as a test toshow you it is working,
but thelight will goout when you
turn theignition to Start. If it doesn’l
come on with the ignition on, you
may have a problem with the fuse or
bulb. Haveit fixed right away.
NOTICE:
Damage to your engine from
neglected oil problems can be costly
and is not covered by your
warranty.
Features & Controls
\
\
e
oil PfeSSUI'e Gage (3.7L V6 ENGINE)
The oil pressure gage shows the engine
oil presure in psi (pounds per square
inch) when the engine is running.
Canadian vehicles indicate pressure in
1tPa. Oilpressure may varywith engine
speed, outside temperature, and oil
viscosity, but readings abovethe red
warning zone indicate the normal
operating range.
A reading in thered zone may be
caused by a dangerously low oil level
or
other problem causing low oilpressure.
Have your vehicle serviced immediately.
NOTICE:
Damage to your engine from
neglected oil problemscan be costly
and is not covered by your
warranty.
Part
3
Comfort Controls & Audio Systems
I n this part you'llfind out how to
operate the comfort control
systems and audio systems
offered with your Chevrolet. Be
sure to read about the particular
system supplied with your vehicle.
Climate Control System............................................................................................
92
Air Conditioning System.......................................................................................... 93
Rear Window Defogger
.............................................................................................
95
Setting the Clock ....................................................................................................... 97
AM/FM Stereo Radio................................................................................................ 97
AM/FM Stereo Radio with Cassette Tape Player....................................................
99
AM/FM Stereo Radio with Compact Disc Player..
................................................ 101
Understanding Radio Reception............................................................................. 104
Care of Your Cassette
Tape Player ......................................................................... 104
Care of Your Compact Discs.................................................................................. 105
Fixed MastAntenna ................................................................................................ 105
Comfort Controls& Audio Systems
IClimate
Control System
Nith this system, youcan control the
rentilation and heating in your vehicle.
four vehicle also has theflow-through
Jentilation system describedlater in this
rection.
Lever Controls: The upper lever
:hanges the functions of your system.
rhe lower lever changesthe temperature
If the air coming through the system.
Slide the upper control lever to OFF to
:urn off the system.
3f: Sets the fan speed. To select the
:orce of air you want, turn theknob.
VENT: Use when outside temperatures
are mild and little heating or coolingis
needed. Air flow is through the
instrument panel outlets. Set the lower
lever to the temperature desired.
B/L (Bi-Level):Use on cool, but sunny
days. Thissetting brings in the outside
air, but directs it in two ways. Cool air
is directed to the upper portion of your
body through the instrument panel
outlets, and slightly warmerair is
directed through the heater ducts and
defroster vents. At times, this
temperature difference may be more
apparent than others.
HTR (Heater): This setting brings
heated air through the heater ducts, and
some through the windshield defroster
vents. If you havethe optional engine
coolant heater and use it during cold
weather, 0°F (-18°C) or lower, your
heating system will more quickly
provide heat because the engine coolant
is already warmed. See
the Index under
Engine Coolant Heater.
BLEND: This setting divides the air
flow equally betweenthe heater duets
and the windshield defroster vents.
DEF (Defrost):This setting directs
most air through the windshield
defroster vents, and some through the
heater ducts.
Defogging Windows
To defog the windows, slidethe lower
lever to HOT, set the upper lever to
DEF and turn thefan control to HI.
Air Conditioning System
(OPTION)
The air conditioner and heater work
best if you keep your windows closed
while usingthem. Your vehiclealso has
the flow-throughventilation system
described later in this section.
Lever Controls:The upper lever
changes the functions of your system.
The lower lever changesthe
temperature of the air coming through
the system. Slidethe upper control lever
to OFF to turn off the system.
3f: Selects the fan speed. To select the
force of air you want, turn theh o b .
The fan is always running unless the
upper lever is moved to OFF.
Air Conditioning
The upper lever has threeair
conditioner settings. On very hot days,
open the windows long enough to let
hot inside air escape. This reduces the
amount of work your air conditioner's
compressor will haveto do,which
should help fuel economy.
A/C (Air Conditioning): Press this
button to enable the air conditioner
compressor. The indicator light will
glow when the button ispressed. Press
the buttonagain to turnoff the air
conditioner compressor.
The air conditioner compressor
operates automatically (and thelight
glows) when in the MAX setting, or in
the DEF (Defrost) setting when the
outside temperature is higherthan
about 40°F (4.5"C). Below 40°F (4.5"C),
the light will glowin thesesettings, but
the compressor will not turn on.
MAX (Maximum): Use for maximum
cooling. This setting recirculates much
of the air inside your vehicleso it
maximizes fuel economyand your air
conditioner's performance.
VENT: Use on pleasant days when little
heating or cooling isneeded, to direct
outside air into thevehicle. In this
setting, the air flow is through the
instrument panel outlets.
B/L (Bi-Level): Use on cool, but sunny
days. This setting brings in the outside
air, butdirects it in two ways. Coolair
is directed to theupper portion of your
body through the instrument panel
outlets, and slightly warmer air is
directed to the lower portion of your
body through the heater ducts and
defroster vents. At times, this
temperature difference may be more
apparent thanothers.
Comfort Controls & Audio Systems
HTR (Heater): Use this setting to
direct most of the air flow through the
heater ducts, and some through the
windshield defroster vents.
If you have the optional engine coolant
heater and use it during cold weather,
0°F (-18°C) or lower, your heating
system will more quickly provideheat
because the engine coolant is already
warmed. Seethe Index under Engine
Coolant Heater.
BLEND: This setting divides the air
flow equally betweenthe heater ducts
and the windshield defroster vents.
DEF (Defrost):This setting directs
most air through the windshield
defroster vents, and some through the
heater ducts.
... 94
Defogging Windows with theAir
Conditioning System
Slide the lower lever to HOT.
To defog the windshield, set the upper
lever to DEF and turn thefan control
to HI.
To defog the side windows,set the
upper lever to B/L, the fan control to
HI, and press the A/C button. Aim the
side vents toward the side windows. For
increased air flow to the side vents,
close the center vents.
Do not attacha temporary vehicle
license across the defogger gridon the
rear window.
NOTICE:
Rear Window Defogger (owlonr)
The rear window defogger uses a
warming gridto remove fog fromthe
rear window. Press thebutton
and
ill glow. The defogger
an indicator lightw
will turn off automatically after about
10 minutes of use. If you turn it on again,
the defogger willoperate for about five
minutes only. You can also turn the
defogger off by pressing the button
again, or by turning off the ignition.
Don’t use a razor blade or
something else sharp on the inside
of the rear window. If you do, you
could cut ordamage the warming
grid, and the repairs wouldn’t be
covered by your warranty.
W
U
Flow-Through Ventilation System
Your Chevrolet’s flow-through
ventilation systemlets outside air into
the vehiclewhen it ismoving. Outside
air willalso enter thevehicle when the
heater or the air conditioning fan is
running.
95 ‘
I .
.
Comfort Controls & Audio Systems
Audio Systems
Ventilation Tips
Keep the hood and front air inlet free
of ice, snow, or anyother obstruction
(such as leaves). The heater and
defroster will work farbetter,
reducing the chance of fogging the
inside of your windows.
In cold weather,turn the blower fan
to HI for afew moments before
driving off. This helps clearthe intake
ducts of snow and moisture, and
reduces the chance of fogging the
inside of your windows.
Keep the air path under the front
seats clear of objects. This helps airto
circulate throughout your vehicle.
The following pages describethe audio
systems available for your Chevrolet,
and how to get the best performance
from them. Please readabout the
system in your vehicle.
Hearing damage from loud noise is
almost undetectable until it istoo late.
Your hearing canadapt to higher
volumes of sound. Sound that seems
normal can be loudand harmful to your
hearing. Take precautionsby adjusting
the volume controlon your radio to a
safe sound level before your hearing
adapts to it. To help avoid hearing loss
or damage:
Adjust the volume controlto the
lowest setting.
Increase volume slowly until you hear
comfortably and clearly.
NOTICE:
Before you add any sound
equipment to your vehicle- like a
tape player, CB radio, mobile
telephone or two-way radio - be
sure you can add whatyou want. If
you can, it’s very important to do it
properly. Added sound equipment
may interfere withthe operation of
your vehicle’s engine, DelcoB radio
or other systems, and even damage
them. And, your vehicle’s systems
may interfere withthe operation of
sound equipment that has been
added improperly. So, before
adding sound equipment, check
with your dealerand be sure to
check Federal rules covering mobile
radio and telephone units.
1
If-
7
1
pwR-VOL
TREBLE
TUNE
BASS
-
c
VSEEKA
II I'LSCANA
1
2
3
4
s
E
T
I
No matter which audio system you have
in your vehicle, setting the clock is easy.
1. With the ignition on and the radio on
or off, press SET. The SET indicator
will appear on thedigital screen for
five seconds.
2. You must begin to set the clock to
the correct hour and minute during
those five seconds. If your audio
system doesnot have a CD player:
Press VSEEK to set the hour.
Press SEEKA to set theminute.
If your audio system has a CD player:
Press SCAN to set the hour.
Press VSEEK to decrease minutes
or SEEKA to increase minutes.
.
AMIFM Stereo Radio
R
The digital displayindicates information
on time or radio station frequency, the
AM or FM radio band, whether the
station is in stereo, and other radio
functions.
PWR-VOL (Power-Volume):With the
ignition on, rotate theupper knob to
turn thesystem on and off, and to
control the volume.
Press the upper knob to change
between the clock and the radio station
frequency displayedwhen the radio is
on, and todisplay the time when the
ignition is off.
behind the upper knob adjusts the
right/left speaker balance.
TUNE: Rotate the lower knob to tune
in radio stations.
AM/FM: Press the lower knob to
change betweenAM and FM bands.
F R (Fade): The control ring behind
the lower knob adjusts the fronthear
speaker balance.
TREBLE: Slide this lever up to
increase treble, ordown to decrease it.
If a station is weak or noisy, reduce
the
treble.
L (Balance): The control ring
Comfort Controls& Audio Systems
BASS: Slide this lever up to increase
bass, or down to decrease it.
SEEK A: Press to seek and stop on
the next station higher or lower on the
radio band.
SCAN: Press both SEEK buttons
together to listen for a few seconds
to
the next station on the AM or FM band;
the scan willcontinue every few
seconds to the next station on the AM
or FM band.
The radio will scan upward if you press
SEEKA first and downward if you
press V SEEK first. Whenthe radio is
scanning stations, the word SCAN will
appear on the digital display.
Press eitherof the SEEK buttons or the
PWR-VOL knob to cancel SCAN and
select a station.
To Preset Radio Stations:
The four pushbuttons under the digital
display can be usedto preset up to 14
radio stations (seven AM and seven FM
stations).
1. Tune in the desired station.
2. Press SET. The word SET will
appear on the digital screen for five
seconds.
3.While SET is displayed, pressone of
the four pushbuttons. Whenever you
press this button again, the preset
station will betuned in.
4. Repeat steps 1-3 for eachof the four
AM and four FM stations.
Up to three additional stations on each
band may be presetby “pairing”
pushbuttons:
1. Tune in the desired station.
2. Press SET, and within five seconds
press any two adjacent pushbuttons
at the same time. Whenever you press
these buttons again, the preset
station will betuned in.
-
PWR-VOL
TREBLE
AM/FM Stereo Radio with
Cassette Tape Player
The digital displayindicates information
on time or radiostation frequency, the
AM or FM radio band, whether the
station is in stereo, and other radio
functions.
PWR-VOL (Power-Volume):With the
ignition on, rotate theupper lmob to
turn thesystem on and off, and to
control the volume.
PROG-RCL (Program-Recall): Press
the upper knob to change betweenthe
clock and radio station frequency
TREBLE: Slide this lever up to
increase treble, or downto decrease it.
If a station is weakor noisy, reduce the
treble.
BASS: Slide this lever up to increase
bass, or down to decrease it.
VSEEKA: Press to seek and stop on
the next station higher or lower onthe
radio band.
SCAN: Press both SEEK buttons
together to listen for a few seconds to
the next station on theAM or FM band;
the scan will continue every few
seconds to the next station on the AM
displayed when the radio is on, to
display the time when the ignition is off, or FM band.
The radio will scan upward if you press
and to change sidesof the tape when a
SEEKA first and downward if you
cassette is playing.
press VSEEK first. When the radio is
R L (Balance):The control ring
scanning stations, theword SCAN will
behind the upper knob adjusts the
appear on the digital display.
right/left speaker balance.
Press either of the SEEK buttons or the
TUNE Rotate the lower knob to tune
PWR-VOL knob to cancel SCAN and
in radio stations.
select a station.
AM/FM: Press the lower knob to
To Preset Radio Stations:
change betweenthe AM and FM bands. The fourpushbuttons under the digital
F R (Fade): The control ring behind
display can be used to preset up to 14
the lower knob adjusts the fronthear
radio stations (seven AM and seven FM
speaker balance.
stations).
Comfort Controls & Audio Systems
1. Tune in the desired station.
2. Press SET. The word SET will
AUTO DNR: This unit is equipped
with an automatic Dynamic Noise
appear on the digital display for five Reduction systemthat reduces
background hiss onAM or FM radio
seconds.
broadcasts, as well as on cassette tapes.
3.While SET is displayed, pressone of
the four pushbuttons. Whenever you Cassette Tape Player
press thisbutton again, the preset
With the power on, insert a tape into
station will be tuned in.
the cassette door. Do not use tapes that
4. Repeat steps 1-3 for eachof the four
are longer than 45 minutes on each side.
AM and four FM stations.
When the left arrowis lit, selections
Up to three additional stations on each
listed on the topside of the cassette are
band may be preset by “pairing”
playing. Whenthe right indicator arrow
pushbuttons:
is lit, selections listedon the bottom
side of the cassette are playing. To
1. Tune in the desired station.
change sidesof the tape, press the
2. Press SET, and within five seconds
upper control knob (PROG) while the
press any two adjacentpushbuttons
cassette is playing.The tape player
at the same time. Wheneveryou press automatically begins playing
the other
these buttons again, the preset
side when it reaches the end of the tape.
station will be tuned in.
Fast Forward Press the button with
the arrow pointing inthe same direction
that the tape is playing. To stop fast
forward, pressthe STOP-EJECT
button.
Reverse: Press the button with the
arrow pointingin the opposite direction
that thetape is playing. Tostop reverse,
press the STOP-EJECTbutton.
STOP-EJECT:To stop playing atape,
fully pressthis button (the cassette will
be partially ejected,and the radio will
begin playing).
Comfort Concr
5
& Audio Systems
4. Repeat steps 1-3 for each of five AM
and five FM stations.
Compact Disc Player
Many of the controls for the radio also
have functions for the compact disc
player, as explained here.
Don’t use mini-discs that are called
singles. Theywon’t eject. Use only fullsize compact discs.
1. Turn the PWR-VOL knob to turnon
the power.
2. Insert a disc part-wayinto theslot,
with the label side up. The player will
pull it in. Within a fewseconds, the
disc should play.
If the disc comes backout and/or Err
appears on the display:
The disc may be upside down.
The disc may be dirty, scratched or
wet.
There may be too much moisture in
the air (wait about one hour and try
again).
The player may betoo hot, or the road
may be too rough forthe disc to play.
As soon as things get backto normal,
the disc should play.
102
While a disc is playing,the CD indicator
is displayed on the digital screen, as is
the clock.
RCL (Recall): Press this button once
to see which track is playing. Press
again whilethe track number is still
displayed to see how long your selection
has been playing. Thetrack number
also will be displayed whenthe volume,
bass, or treble is changedor a newtrack
starts toplay.
COMP (Compression):Pressing this
button makes softand loud passages
more equal in volume.Press again to
resume normal play.
RDM (Random): Press to play tracks
in random, rather than sequential,
order. This feature remains activeuntil
the RDM button is pressed again.
REV (Reverse): Press and holdto rapidly
reverse the disc. Releaseto resume playing.
FWD (Fast Forward): Press and hold
to rapidly advancethe disc. Release to
resume playing.
SCAN: Press this button to sample ten
seconds of each track. Press againto
stop scanning.
PREV (Previous): Press to play a track
again. If you keep pressingthe PREV
button, thedisc will keep backing up to
previous tracks.
NEXT: Press to advance to thenext
track. If you keep pressingthe NEXT
button, thedisc will keep advancingto
other tracks.
When Finished with the Compact
Disc Player:
If you turn off the radio, or turn off the
ignition, the disc will stay in the player
2. Turn the ignition on.
3. Rotate the PWR-VOL knob to turn
the radio off.
4. Press station preset buttons 1 and 4
at thesame time and hold until "- - -"
shows on thedisplay. You now have
only 15 seconds between each of the
following steps.
5. Press SET and 000 will appear on
the display.
6. Press SCAN until the first digit of
your code appears.
7. Press SEEK until the second and
third digits of your codeappear.
CD Player Anti-Theft Feature
Delco LOC II@is a security feature that 8. Press the TUNE knob (000 will
appear on thedisplay).
can be usedor ignored. If you ignore it,
the radio will play normally. If you use 9. Press SCAN until the fourth digit of
your code appears.
it, your radiocannot be turned on if it is
stolen. These instructions will tell you
IO. Press SEEK until the fifth and sixth
how to enter a secret codeinto the radio.
digits of your code appear.
If battery power is lost for any reason,
the 11. Press the TUNE knob (rEP will
secret codemust be entered again before
appear for five seconds,then 000 ) .
your audio system can be turned on.
12.Repeat steps 6 through 10. Then
To Set the Anti-Theft System:
press the TUNE knob again. SEC
1. Write down any six-digitnumber and
keep it in a safe place. This is your
secret code.
and start again when you turn on the
ignition or thePWR-VOL button. The
disc will begin playing
at thepoint
where it had been stopped.
ST-PL (Stop-Play): Press to stop the
disc player; the radio will play. Press
again to play the disc (the player will
start playing the disc where it had
stopped earlier).
EJCT (Eject):Press to eject the disc; the
radio will play. The disc willstart at
track 1 when you reinsert it.EJCTworks
even whenthe radio or theignition isoff.
will appear, indicating that Delco
LOC I P is set, and your radio is
secure. If "- - -" appears, the steps
were not successful and you must
repeat the entire procedure.
To Disable the Anti-Theft System:
Enter your secret code by following
these steps (you will have only15
seconds between each step).
1, Turn the ignition on and the radio
off, then press station preset buttons
1 and 4. SEC will appear, showing
the radio is secure.
2. Press SET and 000 will appear on
the display.
3.Press SCAN until the first digit of
your secret codeappears.
4.Press SEEK until the second and
third digits of your codeappear.
5. Press the TUNE knob (000 will
appear on thedisplay).
6. Press SCAN until the fourth digit of
your codeappears.
7. Press SEEK until the fifth and sixth
digits of your codeappear.
I03
Comfort Controls& Audio Systems
8. Press the TUNE knob. If the display
Understanding Radio Reception
shows "- - -,"the radio is unsecured FM Stereo
and will play again.If the display
FM Stereo will giveyou the best sound,
shows SEC, the steps were not
but
FM signals will reach only about 10
successful andthe numbers didnot
to 40 miles (16 to 65 l a ) . Tall buildings
match the secret code.
or hills can interfere with
FM signals,
If you lose or forget your code, see yourcausing the sound to come and go.
dealer.
AM
If you lose battery power,
when the
AM stations is
battery is reconnected the radio will not The range for most
greater
than
for
FM,
especially at night.
ill appear. Follow
turn onand IX)C w
steps 1-8for disabling your system,and The longer range, however,can cause
the time will appearif you are successful. stations to interfere with each other,
AM can also pickup noise from things
If SEC appears, the numbers did not
like storms and power lines.To lower
match andYOUKunit is still locked.
this noise, try reducing the treble level.
Care of Your Cassette Tape
Player
A tape player that is not cleaned
regularly is subject to reduced sound
quality, ruining the cassette, or
damaging the mechanism. Tape
cassettes that arenot properly stored in
their plastic cases away from
contaminants, direct sunlight,and
extreme heat may not operate properly
and couldcauseprematurefailure of
the tape player.
Your tape player shouldbe cleaned
monthly or with every15 hours of use,
as regular maintenance. If you notice a
reduction in sound quality,try a good
cassette to see if the tape or the tape
player is at fault. If the second cassette
results in no improvement in sound
I'
l l
.,"
quality, try cleaning the tapeplayer.
Proper tape player cleaningshould be
done with a wiping action nonabrasive
cleaner cassette. To properly clean your
tape player, you should follow the
directions on the cleaning cassette.
Cassettes are subject to wear and the
sound quality may degrade over time.
Always verifythat thecassette tape is in
good condition before obtaining service
on your tape player.
c.
Fixed Mast Antenna
Care of Your Compact Discs
Handle discs carefully. Store them in
their original cases or other protective
cases and away fromdirect sunlight and
dust. If the surface of a disc is soiled,
dampen a clean, soft cloth in a mild,
neutral detergent solution and clean it,
wiping fromthe center to theedge.
Be sure never to touch the signal
surface when handling discs. Pickup
discs by grasping the outeredges or the
edge of the hole and the outeredge.
The fixed mast antenna canwithstand
most car washes without being
damaged. If the mast should ever
become slightlybent, you can straighten
it out by hand. If the mast is badly bent,
as itmight beby vandals, you should
replace it.
Check everyonce in a whileto be sure
the mast is still tightened to the fender.
Notes
Part
4
Your Driving and the Road
H e r e you’ll find information
about driving on different kinds
of
roads and in varying weather
conditions. We’ve alsoincluded
many other usefultips on driving.
..
....................................................................................................
Defensive
Drlvmg
108
Drunken Driving ..................................................................................................... 108
Control of a Vehicle
Braking ................................................................................................................. 110
Anti-Lock Brakes................................................................................................. 111
Steering
. Tips
. ......................................................................................................... 113
Steermg m Emergencies.......................................................................................
114
115
Passing ..................................................................................................................
Driving at Night ...................................................................................................... 117
Driving in theRain ..................................................................................................
118
City Driving............................................................................................................. 119
Freeway Driving...................................................................................................... 120
Before Leavingon a LongTrip ............................................................................... 121
Hill and Mountain
Roads........................................................................................ 122
..
Winter Drnmg .........................................................................................................
123
Recreational Towing ................................................................................................ 125
Towing aTrailer ......................................................................................................
126
107
.
.
.
.
.
.
.
.
.
~
Your Driving and the Road
Defensive Driving
Just how much alcoholis too much if a
IDrunken Driving
person plans to drive? Ideally,no one
The best adviceanyone can give about
Death and injury associatedwith
should drink alcohol and then drive.
driving is: Drive defensively.
drinking and driving is a national
But if one does, then what’s “too
Please start with a veryimportant safety tragedy. It’s the number one contributor much”? It can be a lot less than many
to the highway death toll, claiming
device in your Chevrolet: Bucldeup.
might think. Although it depends on
thousands
of victims every year.
(See Safety Belts in theIndex.)
each person and situation, here is some
Alcohol takes away three things that
general information on the problem.
Defensive driving reallymeans “be
anyone needs to drive a vehicle:
ready for anything.” On city streets,
The Blood AlcoholContent (BAC) of
Judgment
rural roads, or freeways, it means
someone who is drinking depends upon
“always expectthe unexpected.”
Muscular Coordination
four things:
Assume that pedestrians or other
Vision
How much alcohol isin thedrink.
drivers are going to be careless and
Police records show that almost half of
The drinker’s body weight.
make mistakes. Anticipate what they
all motor vehicle-related deaths involve
The amount of food that is consumed
might do.Be ready for their mistaltes.
alcohol - a driver, a passenger or
before and during drinking.
Rear-end collisionsare about themost
someone else, such as a pedestrian, had
The length of time it has taken the
preventable of accidents. Yet they are
been drinking.In most cases,these
drinker
to consume the alcohol.
common. Allowenough following
deaths are theresult of someone who
distance. It’s the best defensive driving was drinking and driving. About 20,000
maneuver, in bothcity and rural
motor vehicle-related deaths occur each
driving. You never knowwhen the
year becauseof alcohol, and thousands
vehicle in front of you is going to brake
of people are injured.
or turn suddenly.
Drinking That WIN Resuit in a
BAC of -05% in the Time Shown
3 HOURS
2
HOURS
1 HOUR
According to theAmerican Medical
Association, a 180-pound (82 kg)
person who drinks three 12-ounce
(355 ml) bottles of beer in an hour will
end up with a BAC of about 0.06
percent. The person would reach the
same BAC by drinking three 4-ounce
(120 ml) glassesof wine or three mixed
drinks if each had 1H ounces (45 ml) of
a liquor like whiskey, ginor vodka.
It’s the amount of alcohol that counts.
For example,if the same person drank
three double martinis (3 ounces or 90
ml of liquor each) within an hour, the
person’s BAC would be close to 0.12
percent. A person who consumes food
just before or during drinking will have
a slightly lowerBAC level.
100
120
140
160
180
200
220 240
BOQYWEIGHT IN POUNDS
rhe law in most U.S. states sets the
legal limitat a BAC of 0.10 percent. In
Canada the limit is 0.08 percent, and in
some other countries it’s lower than
that. The BAC will be over0.10 percent
after three to six drinks (in one hour).
Of course, as we’ve seen, it depends on
how much alcohol isin the drinks, and
how quicklythe person drinks them.
But it’s veryimportant to keep in mind
that theability to drive is affected well
below a BAC of 0.10 percent. Research
shows that thedriving skillsof many
people are impaired at a BAC
approaching 0.05 percent, and that the
effects are worse at night. All drivers are
impaired at BAC levels above0.05
percent. Statistics show that thechance
of being inan accident increases sharply
for drivers who have aBAC of 0.05
percent or above. A driverwith a BAC
level of 0.06 percent (three beers in one
hour for a 180-pound or 82 kg person)
has doubled his or her chance of having
an accident. At a BAC level of0.10
percent, the chance of that driver
having an accident is six times greater;
at a level of 0.15 percent, the chances
are twenty-five times greater! And, the
body takes about anhour to rid itself of
the alcohol in one drink. No amount of
coffee or number of cold showers will
speed that up.
“I’ll becareful” isn’t the right answer.
What if there’s an emergency, a needto
take sudden action, as when a child
darts into thestreet? A person with a
higher BAC might not be able to react
quickly enough to avoid the collision.
There’s something else about drinking
and driving that many people don’t
know. Medical research shows that
alcohol in a person’s system can make
crash injuries worse. That’s especially
Your Driving and the Road
true for brain, spinal cordand heart
injuries. That means that if anyone who
has been drinking-driver or
passenger is in a crash, the chance of
being killedor permanently disabledis
higher than if that person hadnot been
drinking. And we’ve already seen
that
the chance of a crash itself is higher for
drinking drivers.
-
Bruking
Braking action involvesperception
time and reaction time.
First, you have to decide to push on the
brake pedal. That’sperception
Then you haveto bring up your foot
and do it. That’s reaction the.
Average reaction timeis about 3/4 of a I
second. But that’sonly an average. It
of a
might be less with one driver
and as
You have three systems that make your long as two or three seconds or more
vehicle go where you wantit to go. They with another. Age, physical condition,
alertness, coordination, and eyesight all
are the brakes, the steering and the
play
a part. So do alcohol, drugs and
accelerator. All three systems haveto do
frustration.
But evenin 3/4 of a second,
their work at theplaces wherethe tires
a vehicle movingat 60 mph (100 km/h)
meet the road.
travels
66 feet (20 m). That could be a
Sometimes, as when you’re driving on
lot of distance in an emergency, so
snow or ice, it’s easyta ask moreof
keeping
enough space between your
those control systems than thetires and
vehicle and others is important.
road can provide. That means
you can
lose control af your vehicle.
the.
Condrol
Khkk
And, of course, actual stopping
distances vary greatlywith the surface
of the road (whether it’s pavement or
gravel); the condition of the road (wet,
dry, icy); tire tread; and thecondition of
your brakes.
Avoid needless heavy braking. Some
people drive in spurts -heavy
acceleration followedby heavy braking
- rather thankeeping pacewith traffic.
This is a mistake. Your brakes may not
have timeto cool between hardstops.
i
l
l wear out much faster if
Your brakesw
you do a lot of heavy braking. If you
keep pace with the traffic and allow
realistic followingdistances, you will
eliminate a lot of unnecessary braking.
That means better braking and longer
brake life.
If your engine everstops while you’re
driving, brake normallybut don’t pump
your brakes. If you do, the pedal may
get harder to push down. If your engine
stops, you will still have some power
brake assist. But you will useit when
you brake. Once the power assist is
used up, it may take longer to stopand
the brake pedal will be harderto push.
L
--
20
10
9nti-Lock Brakes (ABS)
Your Chevrolet has an advanced
dectronic braking systemthat will help
prevent skidding.
rhis light on the instrument panel will
30 on when you start your vehicle.
When you start your vehicle, or when
you begin to drive away, you may hear a
momentary motoror clicking noise.
Your Driving and the Road
L-
And you may evennotice that your
brake pedal moves a little while this is
going on. This isthe ABS system
testing itself. If there’s a problem with
the anti-lock brake system, the anti-lock
brake system warning light will stayon
or flash.
See Anti-lock Brake System Warning
Light in the Index.
Here’s how anti-lock works. Let’s say
the road is wet. You’re driving safely.
Suddenly an animal jumps out in front
of you.
You slam on the brakes. Here’s what
happens with ABS.
A computer senses that wheels are
slowing down.If one of the wheels is
about to stop rolling, the computer wil1
separately workthe brakes at each fro]nt
wheel and at therear wheels.
The anti-lock systemcan change the
brake pressure fasterthan any driver
could.*Thecomputer is programmedto
make the most of availabletire and road
conditions.
You can steer around the obstacle while
braking hard.
As you brake, your computer keeps
receiving updates on wheel speed and
controls braking pressure accordingly.
Remember: Anti-lockdoesn’t change
the time you need to get your foot up
to
the brake pedal. If you get too close to
the vehicle in front of you, you won’t
have timeto apply your brakesif that
vehicle suddenly slows or
stops. Always
leave enough room up ahead to stop,
even though you have anti-lockbrakes.
To Use Anti-Lock
Don’t pump the brakes. Just hold the
brake pedal down andlet anti-lock
work for you.You may feel the system
working, or you may notice some noise,
but this is normal.
Braking in Emergencies
Use your anti-lock braking system when
you need to. With anti-lock, you can
steer and brake at the same time. In
many emergencies,steering can help
you more than even the very best
braking.
Power Steering
If you lose powersteering assist
because the engine stops or the system
is not functioning, you can steer but it
will take much more effort.
Steering Tips
accelerate. Both control systems steering and acceleration - have to do
Driving on Curves
their work where the tires meet the
It’s important to take curves at a
road. Adding the sudden acceleration
reasonable speed.
can demand too much of those places.
You can lose control.
A lot of the “driver lost control”
accidents mentioned on the news
What should you do if this ever
happen on curves. Here’s why:
happens? Ease up on the accelerator
pedal,
steer the vehicle the way you
Experienced driver orbeginner, each of
us is subject to thesame laws of physics want it to go, and slow down.
when driving on curves. The traction of
Speed limit signsnear curves warn that
the tires against the road surface makes you should adjust your speed. Of
it possible forthe vehicle to change its
course, the posted speeds are based on
path when you turn the front wheels. If
good weather and road conditions.
there’s no traction, inertia will keep the Under less favorableconditions you’ll
vehicle going in thesame direction. If
want to go slower.
you’ve evertried to steer a vehicle on
If you need to reduce your speedas you
wet ice, you’ll understand this.
approach a curve, do itbefore you enter
The traction you can get in a curve
the curve, while yourfront wheels are
depends on the condition of your tires
straight ahead.
and the road surface, the angle at which
Try to adjust your speed so you can
the curve is banked, and your speed.
While you’re in a curve, speed is the one “drive” through the curve. Maintain a
reasonable, steady speed. Wait to
factor you can control.
accelerate until you are out of the curve,
Suppose you’re steering through a
and thenaccelerate gently into the
sharp curve. Then you suddenly
straightaway.
Your Driving and the Road
P
.
.
Steering in Emergencies
There are times when steering can De
more effectivethan braking. For
example, you come over a hill
and find
a truck stopped in your lane, or a car
suddenly pullsout fromnowhere, or a
child darts outfrom betweenparked
cars and stops right in front of you. You
can avoid these problems by braking if you can stop in time. But sometimes
you can't; there isn't room. That's the
time for evasive action - steering
around theproblem.
Your Chevroletcan perform very wellin
emergencies likethese. First apply your
brakes. It is better to remove as much
speed as you can from a possible
collision. Then steer around the
problem, to the left or right depending
on thespace available.
An emergency likethis requires close
attention and a quick decision.If you
are holding the steering wheel at the
recommended 9 and 3 o'clock positions,
you can turnit a full 180 degrees very
quickly without removing either hand.
But you haveto act fast,steer quickly,
and just as quickly straighten the wheel
once you have avoidedthe object.
The fact that such emergency situations
are always possibleis a goodreason to
practice defensive drivingat all times
and wear safetybelts properly.
IOff-Ruad Recovery
You may find sometimethat your right
lvheels have dropped off the edge of a
soad onto theshoulder while you're
hiving.
:f the level of the shoulder is only
;lightly belowthe pavement, recovery
;hould be fairly easy. Easeoff the
iccelerator and then, if there is nothing
n the way, steer so that your vehicle
itraddles the edge of the pavement. You
:an turn thesteering wheel up to 1/4
urn until the right front tire contacts
he pavement edge.Then turn your
;teeringwheel to go straight down the
toadway.
Passing
The driver of a vehicle about to pass
another ona two-lane highwaywaits for
just theright moment, accelerates,
moves around thevehicle ahead, then
goes backinto theright lane again. A
simple maneuver?
Not necessarily! Passing another vehicle
on a two-lane highway isa potentially
dangerous move, sincethe passing
vehicle occupiesthe same lane as
oncoming traffic for several
seconds. A
miscalculation, an error in judgment, or
a brief surrender to frustration oranger
can suddenlyput the passing driver face
to face withthe worst of all traffic
accidents - the head-on collision.
So here are some tips for passing:
“Drive ahead.” Look down the road,
to thesides, and to crossroads for
situations that might affect your
passing patterns. If you have any
doubt whatsoever about making a
successful pass, wait fora better time.
Watch for trafficsigns, pavement
markings, and lines.If you can seea
sign up ahead that might indicate a
turn or an intersection, delay your
pass. A broken center line usually
indicates it’sall right to pass (providing
the road ahead isclear). Never cross a
solid lineon your sideof the lane or a
double solidline, even if the road
seems emptyof approaching traffic.
Do not get too close to thevehicle
you want topass while you’re
awaiting an opportunity. For one
thing, following too closely reduces
your area of vision, especiallyif you’re
following a larger vehicle. Also, you
won’t haveadequate space if the
vehicle ahead suddenly slowsor stops.
Keep back a reasonable distance.
When it looks likea chance to pass is
coming up,start to accelerate but stay
in the right lane and don’t gettoo
close. Time your move
so you will be
increasing speedas thetime comes to
move into theother lane. If the way is
clear to pass, you will have a “running
start” thatmore than makes up for
the distance you would loseby
dropping back. Andif something
happens to cause you to cancel your
pass, you need only slow down and
drop back again and wait foranother
opportunity.
If other cars are lined up to pass a
slow vehicle, wait yourturn. But take
care that someone isn’t tryingto pass
you as you pull out topass the slow
vehicle. Remember to glance over
your shoulderand check the blind
spot.
Check your mirrors, glance over your
shoulder, and start your left lane
change signal before movingout of
the right lane to pass. When youare
far enough aheadof the passed
vehicle to see its frontin your inside
mirror, activate your right lane change
signal and move backinto theright
lane. (Remember that your right
outside mirror is convex. The vehicle
you just passed may seemto be farther
away from youthan it really is.)
Try not to pass more than onevehicle
at a time on two-lane roads.
Reconsider before passingthe next
vehicle.
Don’t overtake a slowly moving
vehicle too rapidly. Eventhough the
brake lightsare not flashing, it may be
slowing down orstarting to turn.
Your Driving and the Road
If you’re being passed, make it easy
for thefollowing driverto get aheadof
you. Perhaps you can easea little to
the right.
Skidding
In a skid, a driver can lose controlof
the vehicle. Defensive drivers avoid
most skidsby taking reasonable care
suited to existing conditions, and by not
“overdriving” those conditions. But
skids are always possible.
Let’s reviewwhat driving experts say
The three types of skids correspondto
about what happens whenthe three
your Chevrolet’s three control systems.
control systems (brakes, steering and
In the braking skid your wheelsaren’t
acceleration) don’t have enough friction rolling. In the steering or cornering
where the tires meet the road to do
skid, too much speed or steeringin a
what the driver has asked.
curve causestires to slip and lose
In any emergency, don’t give
up. Keep
cornering force. And in
the acceleration
trying to steer and constantly seekan
skid too much throttle causes the
escape route or area of less danger.
driving wheels to spin.
A cornering skidand an acceleration
skid are best handled by easing your
foot offthe accelerator pedal.
If your vehicle starts toslide, ease your
foot off the accelerator pedal and
quickly steer the way you want the
vehicle to go. If you start steering
quickly enough, your vehicle may
straighten out. Always be ready fora
second skidif it occurs.
Loss of Control
Of course, traction is reduced when
water, snow, ice, gravel,or other
material is on the road. For safety,
you’ll want to slow down andadjust
your drivingto these conditions. It is
important to slow down on slippery
surfaces because stopping distance will
be longer and vehicle control more
limited.
While driving on a surface with reduced
traction, try your bestto avoid sudden
steering, acceleration, or braking
(including engine braking
by shifting to
a lower gear). Any sudden changes
could cause the tires to slide. You may
not realize the surface is slippery until
your vehicle is skidding. Learn
to
recognize warning clues-such as
enough water, ice or packed snow on
the road to make a “mirrored surface”
- and slow down when you have any
doubt.
Remember: Any anti-lock braking
system (ABS) helps avoid onlythe
braking slid.
your eyes to readjust to thedark. When
you are faced with severe glare(as from
a driverwho doesn’t lower the high
beams, or a vehiclewith misaimed
headlights), slow down a little. Avoid
staring directly into theapproaching
lights.
Keep your windshieldand all the glass
Night Vision
on your vehicle clean-inside and out.
No one can see as well at night as in the Glare at night is made much worse by
dirt on the glass. Eventhe inside of the
daytime. But as we get olderthese
glass
can build up a filmcaused by dust.
differences increase. A 50-year-old
Dirty glass makes lights
dazzle and
driver mayrequire at least twice as
flash
more
than
clean
glass
would,
much light to see the same thing at
malting the pupils of your eyescontract
night as a 20-year-old.
repeatedly.
What you do in the daytime can also
affect your night vision. Forexample, if Remember that your headlights lightup
far less of a roadway whenyou are in a
you spend the day in brightsunshine
turn or curve. Keepyour eyes moving;
you are wise to wear sunglasses.Your
that way, it’s easier to pick out dimly
eyes will have lesstrouble adjusting to
lighted objects. Just asyour headlights
night. But if you’re driving,don’t wear
sunglasses at night. They maycut down should be checked regularlyfor proper
aim, so should your eyes be examined
on glare fromheadlights, but they also
regularly. Some drivers suffer from
make a lot of things invisible.
night blindness - the inability to see in
You can be temporarily blindedby
approaching lights. It can take a second dim light-and aren’t even aware of it.
or two, or even severalseconds, for
Slow down, especially on higher
speed roads. Your headlights can light
up only so much road ahead.
In remote areas, watch for animals.
If you’re tired, pull off the road in a
safe placeand rest.
Driving at Night
Night driving ismore dangerous than
day driving.One reason is that some
drivers are likely to be impaired - by
alcohol or drugs, with night vision
problems, or by fatigue.
Here are some tips on night driving.
Drive defensively.
Don’t drink and drive.
Adjust your inside rearview mirror to
reduce the glare fromheadlights
behind you.
Since youcan’t see as well, you may
need to slow downand keep more
space between you and other vehicles.
7
Your Driving and the Road
Driving in the Rain
Rain and wet roads can mean driving
trouble. On a wet road you can’tstop,
accelerate or turn as well because your
tire-to-road traction isn’t as good as on
dry roads. And, if your tires don’t have
much tread left, you’ll get even less
traction. It’s always wiseto go slower
and be cautious if rain starts tofall
while you are driving. The surfacemay
get wet suddenly when your reflexes
are
tuned fordriving on dry pavement.
The heavier the rain, the harder it is to
see. Even if your windshield wiper
blades are in good shape, a heavy rain
can make it harder to see road signsand
traffic signals, pavement markings,the
edge of the road, and even people
walking.
It’s wise to keep your wiping equipment
in good shape and keep your windshield
washer tank filled. Replace your
windshield wiperinserts when they
show signs of streaking or missingareas
on the windshield, or when strips of
rubber start toseparate from the
inserts.
Driving too fast through large water
puddles or even goingthrough some car
washes can cause problems, too. The
water may affect yourbrakes. Try to
avoid puddles. Butif you can’t, try to
slow down before youhit them.
Your Driving and the Road
Treat a green lightas a warning
signal. A traffic lightis there because
the corner is busyenough to need it.
When a light turns green, and just
before you start to move, checkboth
ways for vehicles that have not
cleared the intersection or may be
running the red light.
Freeway Driving
~
Mile for mile, freeways(also called
thruways, parkways, expressways,
turnpikes, or superhighways)are the
safest of all roads. But they havetheir
own special rules.
The most important advice on freeway
driving is: Keepup with traffic and keep
to theright. Driveat thesame speed
most of the other drivers are driving.
Too-fast or too-slow driving breaks
a
smooth trafficflow. Treat the left lane
on a freeway as a passing lane.
At the entrance there is usually a ramp
that leads to thefreeway. If you have a
clear view ofthe freeway as you &ive
along the entrance ramp, you should
begin to check traffic.Try to determine
where you expect to blend with the
I20
. I r n
flow. Tryto merge into thegap at close
to theprevailing speed. Switchon your
turn signal, check yourmirrors and
glance over yourshoulder as often as
necessary. Tryto blend smoothlywith
the traffic flow.
Once you are on the freeway, adjust
your speedto theposted limit orto the
prevailing rate if it’s slower. Stayin the
right lane unless you want to pass.
Before changinglanes, check your
mirrors. Then use your turn signal.
Just before you leave the lane, glance
quickly over yourshoulder to make sure
there isn’t another vehicle in your
“blind” spot.
Once you are moving on the freeway,
make certain you allow a reasonable
following distance. Expect to move
slightly slowerat night.
When youwant to leave the freeway,
move to theproper lane well in
advance. If you miss your exitdo not,
under any circumstances, stop and back
up. Drive on to the next exit.
The exit ramp can be curved, sometimes
quite sharply.
The exit speed is usuallyposted.
Reduce your speed according to your
speedometer, not to your senseof motion.
After driving forany distance at higher
speeds, you maytend to think you are
going slowerthan you actuallyare.
Before Leaving ona Long
Trip
Make sure you’re ready. Try to be well
rested. If you must start when you’re
not fresh - such as after a day’s work
- don’t plan to make too many miles
that first part of the journey. Wear
comfortable clothing and shoes you can
easily drive in.
Is your vehicle readyfor a longtrip? If
you keep it serviced and maintained, it’s
ready to go. If it needs service, have it
done before starting out.Of course,
you’ll findexperienced and able service
experts in Chevrolet dealerships all
across North America. They’ll be ready
and willing to help if you need it.
Here are some things you can check
before atrip:
Windshield Washer Fluid Is the
reservoir full?Are all windowsclean
inside and outside?
Wiper Blades:Are they in good
shape?
Fuel, Engine Oil, Other Fluids:Have
you checked all levels?
Lights: Are they all working? Arethe
lenses clean?
Tires: They are vitally important to a
safe, trouble-free trip. Is the tread
good enough for long-distance
driving? Arethe tires all inflated to
the recommended pressure?
Weather Forecasts:What’s the
weather outlook along yourroute?
Should you delay yourtrip a short
time to avoid a majorstorm system?
Maps: Do you have up-to-date maps?
Highway Hypnosis
Is there actually such a condition as
“highway hypnosis”? Or is it justplain
falling asleep at thewheel? Call it
highway hypnosis, lackof awareness, or
whatever.
There is something about aneasy
stretch of road with the same scenery,
along with the hum of the tires on the
road, the droneof the engine, and the
rush of the wind against the vehicle that
can make you sleepy.Don’t let it
happen to you! If it does, your vehicle
can leave the road in less than a
second, and you could crash and be
injured.
What can you do about highway
hypnosis? First, be aware that it can
happen.
Then here aresome tips:
Make sure your vehicle is well
ventilated, with a comfortably cool
interior.
Keep your eyes moving.Scan the road
ahead and to the.sides. Check your
rearview mirrors and your
instruments frequently.
If you get sleepy, pulloff the road into
a rest, service, or parking area and
take a nap, get some exercise,or both.
For safety, treat drowsiness on the
highway as anemergency.
a
Your Driving and the Road
Hill and Mountain Roads
Driving on steep hills or mountains is
different from drivingin flat or rolling
terrain.
If you drive regularlyin steep country,
or if you’re planningto visit there, here
are some tips that canmake your trips
safer and more enjoyable.
Keep your vehicle in goodshape.
Check all fluid levelsand also the
brakes, tires, cooling system and
transaxle. These parts can work hard
on mountain roads.
Know how to go down hills.The most
important thing to know is this: let
your enginedo some of the slowing
down. Shift to a lower gearwhen you
go down asteep or long hill.
Know howto go uphill. You may
want to shift down to a lower gear.
The lower gearshelp cool your engine
and transaxle, and you can climb the
hill better.
Stay in your own lane when driving
on two-lane roadsin hills or mountains.
Don’t swing wideor cut across the
center of the road. Drive at speeds
that let you stay in your ownlane.
As you go over the topof a hill, be
alert. There could be somethingin
your lane, like a stalled car oran
accident.
You may see highway signson
mountains that warn of special
problems. Examplesare long grades,
passing or no-passing zones, a falling
rocks area, or winding roads.Be alert
to these and take appropriate action.
4 Winter Driving
Here are some tips for winter driving:
Have your Chevroletin good shape
for winter. Be sure your engine
coolant mix iscorrect.
You may want to putwinter
emergency suppliesin your trunk.
Include an ice scraper, a smallbrush or
broom, a supply of windshield washer
fluid, a rag, somewinter outer clothing,
a small shovel, a flashlight, a red
cloth,
and a coupleof reflective warning
triangles. And, if you will be driving
under severe conditions, include a small
bag of sand, a pieceof old carpet or a
couple of burlap bags to help provide
traction. Be sure you properly secure
these items in your vehicle.
Driving on Snowor Ice
Most of the time, those places wnere
your tires meet the road probably have
good traction.
However, if there is snow or ice
between your tires and the road, you
can have a very slippery
situation.
You’ll have a lot less
traction or “grip”
and will needto be very careful.
What’s the worst time forthis? “Wet
ice.” Very cold snow or ice can be slick
and hard to drive on. But wet ice can be
even more trouble because may
it offer
the least traction of all. Youcan get
“wet ice”when it’s about freezing
(32°F; OOC) and freezing rain beginsto
fall. Tryto avoid drivingon wet ice until
salt and sand crews can get there.
Your Driving and the Road
Whatever the condition - smooth ice,
packed, blowing or loose snow-drive
with caution. Accelerate gently. Try
not
to break the fragile traction. If you
accelerate too fast, the drive wheels will
spin and polishthe surface under the
tires even more.
Your anti-lock brakes improve your
ability to make a hardstop ona slippery
road. Even though you have the antilock braking system, you’ll want
to begin
stopping soonerthan you would on dry
pavement. SeeAnti-lock in the Index.
Allow greater following distanceon
any slippery road.
Watch for slipperyspots. The road
might be fine until youhit a spot
that’s covered with ice. On an
otherwise clearroad, ice patches may
appear in shaded areas wherethe sun
can’t reach: around clumpsof trees,
behind buildings, or under bridges.
Sometimes the surface of a curve or
an overpass may remain icy whenthe
surrounding roads are clear. If you see
a patch of ice aheadof you, brake
before you are on it. Try not to brake
while you’re actuallyon the ice, and
avoid sudden steering maneuvers.
I . .
I24
I f You’re Caught in a Blizzard
If you are stopped by heavy snow, you
could be in a serioussituation. You
should probably stay with your vehicle
unless you know for surethat you are
near help and you can hike throughthe
snow. Here are some thingsto do to
summon help and keep yourself and
your passengers safe:Turn on your
hazard flashers. Tiea red cloth to your
vehicle to alert police that you’ve been
stopped by the snow. Put on extra
clothing or wrap a blanket
around you.
If you have no blankets or extra clothing,
make body insulators from newspapers,
burlap bags, rags, floor mats
- anything
you can wrap around yourselfor tuck
under your clothingto keep warm.
You can run the engine to keep warm,
but be careful.
Run your engine only
as long as you
must. This saves fuel. When
you run the
engine, malteit go a little faster than
just idle. That is, push the accelerator
slightly. This uses less fuel for
the heat
that you get and it keeps the battery
charged. You will need a well-charged
battery to restart the vehicle, and
possibly for signaling later on with your
headlights. Letthe heater run for
awhile.
Then, shut theengine off and close the
window almost allthe way to preserve
the heat. Start the engine againand
repeat this only when you feel really
uncomfortable from the cold. But do it
as little as possible. Preservethe fuel as
long asyou can. To help keepwarm,
you can get out of the vehicle and do
some fairly vigorous exercises everyhalf
hour or so until help comes.
Towing Your Vehicle from the Front
~~
Recreational Towing
If your vehiclehas a manual transaxle,
you can tow your vehicle behind
another vehicle for useat your
destination. Be sure to use proper
towing equipment designed for
recreational towing. Followthe
instructions for the towing equipment.
Tow your vehiclewith all four wheels
on the ground. Follow these steps:
1. Set the parking brake.
2. Turn the ignition keyto OFF to
unlock the steering wheel.OFF will
also preventthe automatic door locks
from locking.
3. Shift yourmanual transaxle to N
(Neutral).
4. Release the parking brake.
NOTICE:
Make sure that thetowing speed
does not exceed55 mph (90 l m ) ,
or your vehicle could be badly
damaged.
Your Driving andthe Road
n
0
Towing Your Vehicle from the Rear
I NOTICE:
Do not tow your vehicle fromthe
rear. Your vehiclecould be badly
damaged and the repairs would not
be coveredby your warranty.
TowingA Trailer
Your Chevrolet isneither designed nor
intended to tow a trailer.
Part
5
Problems on the Road
H e r e you’ll find what to do
about someproblems that can
occur on the road .
Hazard Warning Flashers.......................................................................................
Jump Starting ..........................................................................................................
Towing Your Vehicle..............................................................................................
Engine Overheating.................................................................................................
If a Tire Goes Flat...................................................................................................
Changing a Flat Tire................................................................................................
Compact Spare Tire ................................................................................................
If You’re Stuck: In Sand, Mud, Ice or Snow.........................................................
128
128
132
136
145
146
151
152
Problems on the Road
Jump Starting
If your battery hasrun down, you may
want to use another vehicle and some
jumper cables to start your Chevrolet.
But please followthe steps below to do
it safely.
Move the switch to the right to male
your front and rear turn signal lights
Your hazard warning flashers let
you
flash on andoff.
warn others. They also let police know
you have a problem. Yourfront and rear Your hazard warning flashers work no
matter what position yourkey is in, and
turn signal lights will flash on
and off.
even if the key isn’t in.
To turn off the flashers, move the
switch to the left.
When the hazard warning flashersare
on, your turn signals won’t work.
Hazard Warning Flashers
Other Warning Devices
If you carry reflective triangles, you
can
set one up at the side of the road about
300 feet (100 m) behind your vehicle.
NOTICE:
2. Get the vehicles. close enoughso the
jumper cables can reach, Ijut be suke
the vehicles aren’t touching each
Ignoring these steps could result in
other. If they are, it could cause a
costly damageto your vehiclethat
ground
connectionyou don’t want.
wouldn’t be coveredby your
You
wouldn’t
be ableto startyour
warranty. Trying to startyour
Chevrolet, and the bad grounding
Chevrolet by pushing or pullingit
could
damagethe electrical systems.
could damage your vehicle, even if
You could be injuredif the vehicles roll.
you have a manual transaxle. And if
Set the parking brakefirmly on each
you have an automatic transaxle, it
vehicle. Put anautomatic transaxle in
won’t start thatway.
P (Park) or a manual transaxle in
N (Neutral).
To Jump Start Your Chevrolet:
3.Turn off the ignition on both
vehicles. Turn off all lightsthat aren’t
1. Check the othervehicle. It must have
needed, and radios. Thiswill avoid
a 12-volt battery with a negative
sparks and help saveboth batteries.
ground system.
And it could save your radio!
NOTICE:
If the othersystem isn’t a 12-volt
system witha negative ground,
both vehicles can be damaged.
NOTICE:
If you leave your radio on, it could
be badly damaged.The repairs
wouldn’t be covered byyour warranty.
4. Open the hoods and locate the
batteries.
Find the positive (+) and negative (-)
terminals on each battery.
Problems on the Road
5. Check that thejumper cables don’t
have looseor missing insulation. If
they do, you could get ashock. The
vehicles could be damaged,too.
Before you connect the cables, here
are some basicthings you should
know. Positive (+) will go to positive
(+) and negative (-) will go to
negative (-) or a metal enginepart.
Don’t connect (+) to (-) or you’ll get
a short that would damagethe
battery and maybe other parts, too.
6. Connect the red positive (+) cable to
the positive (+) terminal of the
vehicle with the dead battery. Use a
remote positive (+) terminal if the
vehicle has one.
~~
7. Don’t let the otherend touch metal.
9. Attach the cable at least 18 inches
Connect it to thepositive (+)
terminal of the good battery. Usea
remote positive (+) terminal if the
vehicle has one.
8. Now connect the black negative (-)
cable to the good battery’s negative(-)
terminal. Don’t let the otherend
touch anything until the next step.
The other end of the negative cable
doesn’t go to thedead battery. It goer
to a heavy unpainted metal part on
the engine of the vehicle withthe
dead battery.
(45 cm) away fromthe dead battery,
but not near engineparts that move.
The electrical connection is just as
good there, but thechance of sparks
getting backto thebattery is much
less.
IO. Now start thevehicle with the good
battery and run the engine fora
while.
11. Try to start thevehicle with the
dead battery. If it won’t start after a
few tries, it probably needs service.
12. Remove the cables in reverse order
to prevent electricalshorting. Take
care that they don’t touch each
other orany other metal.
Problems
on the Road
A
B
ITowing Your Vehicle
Try to have aGM dealer or a
xofessional towing servicetow your
Zhevrolet. The usual towing equipment
S:
:A)Sling-type towtruck
:B)Wheel-lift tow truck
C) Car carrier
f your vehicle has been changedor
nodified sinceit was factory-newby
ldding aftermarket items like fog lamps,
iero skirting, or special tires and
uheels, these instructions and
llustrations may not be correct.
Before youdo anything, turn on the
lazard warning flashers.
. I
I32
When you call, tellthe towing service:
That your vehiclecannot be towed
from the front with sling-type
equipment.
That, if you have the 2-24, your
vehicle cannot be towed fromthe
front or rear with sling-type
equipment.
That your vehiclehas front-wheel
drive.
The make, model,and year of your
vehicle.
Whether you can still move the shift
lever.
If there was an accident, what was
damaged.
When the towing servicearrives, let the
tow operator know that this manual
contains detailed towinginstructions
and illustrations. The operator may
want to see them.
When your vehicleis being towed, have
the ignition key off. The steering wheel
should be clampedin a straight-ahead
position, with a clamping device
designed for towing service.Do not use
the vehicle’s steering column lock for
this. The transaxle should be in N
(Neutral) and the parking brake
released.
Don’t have your vehicle towedon the
front wheels, unless you must. If the
vehicle must be towed
on the front wheels,
don’t go more than 35 mph (56 k d h )
or farther than 50 miles (80 lun) or your
transaxle will be damaged.If these
limits must be exceeded,then thefront
wheels haveto be supported on a dolly.
Towing from the Front-Vehicle
Hookup
Before hookingup to a tow truck, be
sure to read all the information in
Towing Your Vehicle earlier in this
section.
1. Attach T-hook chains into theslots
in the bottom of the floor pan, just
behind the front wheels, on both
sides.
Problems on the Road
NOTICE:
NOTICE:
Do not tow with sling-type
equipment or fascia damage
will
occur. Use wheel-lift or car carrier
equipment. Additional ramping
may be required for car carrier
equipment. Use safety chains and
wheel straps.
Towing a vehicle over rough
surfaces could damagea vehicle.
Damage can occur from vehicle
to
ground or vehicleto wheel-lift
equipment. To help avoid damage,
install a towing dolly and raise
vehicle until adequate clearance is
obtained betweenthe ground
2. Attach a separate safety chainaround
and/or wheel-lift equipment.
the outboard end of each lower
Do not attach winch cables or J-hooks control arm.
to suspension components when
using car carrier equipment. Always
use T-hooks insertedin the T-hook
slots.
Towing from the Rear- Vehicle
Hook-up
Before hooking up to a tow truck, be
sure to read all the information in
Towing Your Vehicle earlier in this
section. Also be sure to use the proper
hook-up for your particular vehicle.
All Models:
1. Attach T-hook chains on bothsides
in the slotted holes in thebottom of
the frame rail just ahead of the rear
wheels.
2. Position lower slingcrossbar directly
I-
-24Model:
under the rear bumper.
I
NOTICE:
I
Do not tow with sling-type
equipment or rear bumper valance
will be damaged.Use wheel-lift or
car carrier equipment. Additional
ramping may berequired for car
carrier equipment. Use safety
chains and wheel straps.
~~
ote: The ignition must be in the Off
Isition to keep automatic door locks
3m locking during tow.
135
1 1
-
r
Problems on the Road
All Models:
NOTICE:
Towing a vehicle over
rough
surfaces could damage a vehicle.
Damage can occur from vehicleto
ground or vehicle to wheel-lift
equipment. To help avoid damage,
install a towing dolly
and raise
vehicle until adequate clearance is
obtained betweenthe ground
and/or wheel-lift equipment.
Do not attach winch cables
or J-hooks
to suspension components when
using car carrier equipment. Always
use T-hooksinserted in theT-hook
slots.
I
I
3.Attach a separate safety chain to each
side of the axle inboardof the spring.
Engine Overheating
You will find acoolant temperature
gage on your Chevrolet’sinstrument
panel.
If Steam Is Coming From Your
Engine
I
NOTICE:
If your engine catches fire because
you keep driving with no coolant,
your vehiclecan be badly damaged.
The costly repairs would not be
covered by your warranty.
I f No Steam Is Coming From your
Engine
If you get the overheat warning but see
or hear no steam, the problem may not
be too serious. Sometimes the engine
can get alittle too hot when you:
Climb a long hillon a hot day.
Stop after high speed driving.
Idle for long periodsin traffic.
If you get the overheat warning with no
sign of steam, try this for a minute or so:
1. If you have an air conditioner, turn it
Off.
2.Turn on your heater to full hot at the
highest fan speed and open the
windows as necessary.
3.Try to keep your engine under load
(in a drive gearwhere the engine
runs slower).
(2.2L L4 ENGINE)
If you no longer havethe overheat
When you decideit’s safe to lift the
warning, you can drive. Just to be safe, hood, here’s what you’ll see:
drive slowerfor about tenminutes. If
(A) Coolant recovery tank
the warning doesn’t come backon, you
(B) Radiator pressure cap
can drive normally.
(C)Electric engine fan
If the warning continues, pull over,
stop, andpark your vehicle right away.
If there’s still no sign of steam, you can
idle the engine for two or three minutes
while you’re parked, to see if the
warning stops. But then, if you still
have the warning, TURN OFF THE
ENGINE ANDGET EVERYONE OUT
OF THE VEHICLE until it cools down.
You may decide not to lift the hood but
to get service help right away.
If the coolant insidethe coolant recovery
tank is boiling, don’t do anything else
until it cools down.
h d i r t g system
I37
Problems on the Road
NOTICE:
Engine damage fromrunning your
engine without coolant isn’t
covered by your warranty.
The coolant level should be at or above
FULL COLD. If it isn’t, you may have
a leak inthe radiator hoses, heater
hoses, radiator, water pump or
somewhere elsein the cooling system.
If there seems to be no leak, check to
see if the electric enginefan is running.
If the engine is overheating, the fan
should be running. If it isn’t, your
vehicle needs service.
coohg Sy&n
(3.1L V6 ENGINE)
When you decide it’s safe
to lift the
hood, here’s what you’ll see:
(A) Coolant surgetank with pressure cap
(B) Electric engine fan
If the coolant insidethe coolant surge
tank is boiling, don’tdo anything else
until it cools down.
’
I . .
138
I
’
.
I
. _ I
NOTICE:
Engine damagefrom running your
engine without coolant isn’t
covered by your warranty.
The coolant level should beat or above
FULL COLD.If it isn’t, youmay have
a leak in theradiator hoses, heater
hoses, radiator, water pump or
somewhere elsein thecooling system.
If there seems to be no leak, checkto
running.
see if the electric engine fan is
If the engine is overheating,the fan
should berunning. If it isn’t, your
vehicle needs service.
Howlo Add Coolant to the Coolant
Recovery Tank-2.2L f.4 Engine
If you haven’t founda problem yet,but
the coolant level isn’t at or abovethe
FULL COLDmark, add a 50/50
mixture of clean water (preferably
distilled) and a proper antifreezeat the
coolant recovery tank. (See Coolant in
the Index for more informationabout
the proper coolant mix.)
Problems on the Road
I InNOTICE:
I
coldweather, water can freeze
and crack the engine, radiator,
heater core and other parts. Use the
recommended coolant.
When the coolant inthe coolant
recovery tank is at or above the FULL
COLD mark, start your vehicle.
If the overheat warningcontinues,
there's one more thing you can try. You
can add the proper coolantmix directly
to the radiator but be sure the cooling
system is cool beforeyou do it.
I
I
2.2L ]
How to Add Coolant to the 2.21
14 Engne at the Radiator
1. You can remove the radiator pressure
cap when the cooling system,
including the radiator pressure cap
and upper radiator hose, is no longer
hot. Turn thepressure cap slowly to
the left until it first stops. (Don’t
press down while turning the
pressure cap.) If you hear a hiss, wait
for that tostop. A hiss means there is
still some pressure left.
n
I
2.2L
2. Then keep turning the pressure cap,
but now push down as you turn it.
Remove the pressure cap.
3.Fill the radiator with the proper mix,
up to thebase of the filler neck.
Problems on the Road
I
II-
4. Then fill the coolant recovery tank to
FULL COLD.
m . 4
142
m
5. Put the cap back on the coolant
recovery tank, but leave the radiator
pressure cap off.
6. Start theengine and let it run until
you can feel the upper radiator hose
getting hot. Watch out for the engine
fan.
7. By this time the coolant level inside
the radiator filler neck may be lower.
If the level is lower,add more of the
proper mix through the filler neck
until the level reachesthe base of the
filler neck.
II
R
8. Then replace the pressure cap. At anj
time duringthis procedure if coolant
begins to flow out of the filler neck,
reinstall the pressure cap. Be sure the
arrows on pressure cap line up like
this.
How to Add Coolant to the 3.7L V6
€ngine at the Coolant SurgeTank
If you haven't found a problem yet,but
the coolant levelisn't at orabove the
FULL COLD mark, add a 50/50 mixture
of clean water (preferably distilled)and
a proper antifreezeat thecoolant surge
tank, but be sure the cooling system,
including the coolant surgetank pressure
cap, is cool before youdo it. (SeeCooZuni
in the Index for more information about
the proper coolant mix.)
NOTICE:
In cold weather, water can freeze
and crack the engine, radiator,
heater core and other parts. So use
the recommended coolant.
Problems on the Road
1. You can remove the coolant surge
tank pressure cap when the cooling
system, includingthe coolant surge
tank pressure cap and upper radiator
hose, is no longer hot. Turn the
pressure cap slowly to theleft until it
first stops. (Don't press down while
turning the pressure cap.) If you hear
a hiss, wait for
that to stop. A hiss
means there is still somepressure left.
2. Then keep turning the cap, but now
push down as you turn it. Remove
the pressure cap.
3. Fill the coolant surge tank with the
proper mix, up to the FULL COLD
mark.
4. With the coolant surge tank pressure
5. By this time, the coolant level inside
cap off, start theengine and let it run
until you can feel the upper radiator
hose getting hot. Watch out for the
engine fan.
the coolant surge tank may be lower.
If the level is lower,add more of the
proper mix to thecoolant surge tank
until the level reaches the FULL
COLD mark.
6. Then replace the pressure cap. Be
sure thearrows on the pressure cap
line up like this.
Ifa Tire Goes Flat
It’s unusual for a tire to “blow out”
while you’re driving, especiallyif you
maintain your tires properly. If air goes
out of a tire, it’s much more likelyto
leak out slowly. But if you should ever
have a blowout^" here are afew tips
about what to expect and what to do:
Problems on the Road
If a front tire fails, the flat tire will
create a drag that pulls the vehicle
toward that side. Take your foot off the
accelerator pedal and grip the steering
wheel firmly. Steer to maintain lane
position, then gently brake to a stop
well out of the traffic lane.
A rear blowout, particularlyon a curve,
acts much like a skidand may require
the same correction you’d usein a skid.
In anyrear blowout, remove yourfoot
from the accelerator pedal. Get the
vehicle under control by steering the
way you want the vehicle to go. It may
be very bumpyand noisy, but you can
still steer. Gently brake to a stop, well
off the road if possible.
If a tire goes flat, the next section shows
how to use your jackingequipment to
change a flattire safely.
Changing a Flat Tire
If a tire goes flat, avoid further tire and
wheel damageby driving slowlyto a
level place.Turn on your hazard
warning flashers.
The following steps will tell youhow to
use the jack and change atire.
The equipment you’ll need is in the
trunk or rear area.
.
1. If you have carpeting, pull it back
from the floor of the trunkor rear
area.
2. Turn thecenter retainer nut on the
compact spare tire housing
counterclockwiseto remove it, then
lift the tire cover. You will find the
jacking instructions label on the
underside of the tire cover.
.
3. If your vehicle is equippedwith a
spare tire housing lid hook, pull the
front of the lid up and hook it to the
rear upper edge of the trunk.
4. Remove the wing boltsecuring the
compact spare tire, spacer and wheel
wrench by turning it
counterclockwise. Then lift off the
spacer and remove the spare tire.
5. Your vehicle mayuse a foam tray, or
a bracket and wing bolt, for storing
the jack and the tools. Remove the
bolt securing the jack by turning it
counterclockwise.Then remove the
jack. Or, remove the jack and the
wheel wrench from the foam tray.
I
Problems on the Road
5. Remove the band around thejack.
Turn the jack handle cloclnvise to
raise the jack head a few inches.
For 2-24Models:
On 2-24 models, a cover plate must be
removed to access the wheel nuts.
Remove the cover plate usingthe flat
end of a wheel wrench.
7. Using the wheel wrench, remove the
plastic cap nuts and loosen all the
wheel nuts. Don’t remove the wheel
nuts yet.
~~
~
~~
9. Position the jack under the vehicle.
8. Near each wheel wellis a notch in
Raise the jack headuntil it fits firmly
into thenotch in the vehicle's frame
nearest the flat tire. Do not raise the
vehicle yet. Put thecompact spare
tire near you.
the frame which the jack headfits in
(A).The front notch is 9" (23 cm)
back from the rear wheel well.The
rear notch is 8" (20 cm) forward from
the rearwheel well.If your vehicle
has flared side moldings, both front
and rear notches are 18" (46 cm)
from the wheel wells.
NOTICE:
Raising your vehiclewith the jack
improperly positioned will damage
the vehicle or may allow the vehicle
to fall off the jack. Be sure tofit the
jack lift headinto theproper
location before raisingyour vehicle.
10. Raise the vehicle by rotating the
jack handle cloclnvise. Raisethe
vehicle far enough off the ground so
there isenough room forthe spare
tire to fit.
11. Remove all of the wheel nuts and,if
you have a wheel cover,
use your
fingers to carefully pry the wheel
cover fromthe wheel. Then take off
the flat tire.
NOTICE:
Do not jack or lift the vehicle using
the oil pan. Pans could crack and
begin to leak fluid.
I
149
I
Problems on the Road
F
J
14. Lower the vehicle by rotating the
jack handle counterclockwise.
Lower the jack completely.
13. Replace the wheel nuts with the
rounded end of the nutstoward the
wheel. Tighten each nut
by hand until
the wheel is held against the hub.
12. Remove anyrust or dirt from the
wheel bolts, mounting surfaces and
spare wheel. Placethe spare on the
mounting surface.
the wheel cover and plastic capnuts in
the trunk orrear area untilyou have the
flat tire repaired or replaced.
Compact Spare Tire
Although the compact spare was fully
inflated when your vehicle was new,
it
can
lose
air
after
a
time.
Check
the
I I C E :
inflation pressure regularly.It should be
Wheel covers won’tfit on your compact 60 psi (420 1cPa). After installingthe
spare. If you try to put a wheel cover compact spare on your vehicle, you
on your compact spare, you could
should stop as soon as possibleand
damage the cover or the spare.
make sure your spare tire is correctly
to
inflated. The compact spare is made
16. Store the flat tire in the compact
perform well at posted speed limitsfor
spare tire compartment,and secure
distances up to 3,000 miles (5 000 lcm),
with the wing bolt and extension.
so you can finish yourtrip and have
Store the jack and wheel wrench in your full-sizetire repaired or replaced
their compartment, also.
where you want. Of course, it‘s bestto
tire as
The compact spare is for temporary use replace your spare with a full-size
only. Replacethe compact spare tire with soon as you can. Your spare willlast
longer and be in goodshape in case you
a full-sizetire as soon as you can. See
Compact Spare Tire next in this section. need it again.
I
15. Tighten the wheel nuts firmly in a
criss-cross sequence, as shown.
NOTICE:
Don’t try to put a wheel coveron your
compact spare tire. It won’t fit. Store
Don’t take your compact spare
through an automatic car wash
with guide rails.The compact spare
can get caught on the rails. That
can damage the tire and wheel, and
maybe other parts of your vehicle.
151
Problems on the Road
Rocking your vehicle to get it out:
First, turn your steering wheel left
and
right. That will clear the area around
your front wheels. Then shift backand
forth between R (Reverse) and a
fonGard gear (or with a manual
transaxle, between First or Second gear
and Reverse), spinning the wheels as
little as possible. Releasethe accelerator
pedal while youshift, and press lightly
on the accelerator pedal when the
transaxle is in gear. If that doesn’t get
you out after a few tries, you may need
to be towedout. If you do need to be
towed out, see Towing Your Vehicle in
the Index.
Don’t use yourcompact spare on some
other vehicle.
And don’t mix your compact spare or
wheel with other wheels or tires. They
won’t fit. Keep yourspare and its wheel
together.
NOTICE:
Tire chains won’t fit your compact
spare. Using them will damageyour
vehicle and destroy the chains too.
Don’t use tire chains on your
compact spare.
I f You’re Stuck: In Sand,
Mud, Ice or Snow
What youdon’t want to do when your
vehicle is stuck is to spin your wheels.
The method known as “rocking” can
help you get out when you’re stuck, but
you must use caution.
NOTICE:
Spinning your wheelscan destroy
parts of your vehicleas well as the
tires. If you spin the wheels too fast
while shifting yourtransaxle back
and forth, you can destroy your
transaxle.
Part
6
Service and Appearance Care
Service .....................................................................................................................
Fuel ..........................................................................................................................
Hood Release...........................................................................................................
Engine Oil ................................................................................................................
Air Cleaner..............................................................................................................
Automatic Transaxle Fluid.....................................................................................
H e r e you will find information
Manual Transaxle Fluid..........................................................................................
about the care
of your Chevrolet.
This part begins with service and Engine Coolant........................................................................................................
...............................................................................................
fuel information. and then it shows Power Steering Fluid
........................................................................................
how to check important fluid and Windshield Washer Fluid
Brakes
......................................................................................................................
lubricant levels. There is also
technical information about your Battery .....................................................................................................................
Bulb Replacement....................................................................................................
vehicle. anda section devotedto
Windshield
Wiper Blade Replacement
...................................................................
.
its appearance care
Loading Your Vehicle
.............................................................................................
Tires .........................................................................................................................
Appearance Care .....................................................................................................
Vehicle Identification Number (VIN)....................................................................
Add-on Electrical Equipment ................................................................................
Fuses 8I Circuit Breakers........................................................................................
Capacities 81Specifications ....................................................................................
Fluids 81Lubricants ................................................................................................
Replacement Bulbs..................................................................................................
Engine Specifications..............................................................................................
Normal Maintenance Replacement Parts ...............................................................
154
154
158
162
165
167
169
170
i73
173
174
176
176
179
180
181
187
194
195
195
198
199
200
202
f!B
Service & Appearance Care
You should keepa record with all parts
receipts and list the mileage and the
date of any service work you perform.
See Maintenance Record in the Index.
Service
Your Chevrolet dealer knows your
vehicle bestand wants you to be happy
with it. We hope you’ll goto your dealer
for all your serviceneeds. You’ll get
genuine GM parts and GM-trained and
supported service people.
We hope you’ll want to keep your GM
vehicle all GM.Genuine GM parts have
one of these marks.
Doing Your Own Service Work
If you want to do some of your own
service work, you’ll want to get the
proper Chevrolet ServiceManual. It
tells you much moreabout how to
service your Chevrolet
than this manual
can. To orderthe proper servicemanual,
see Service Publicationsin the Index.
. I I .
I54
Fuel
Use regular unleaded gasolinerated at
87 octane or higher. It should meet
specifications ASTM D4814 in the U.S.
and CGSB 3.5-92 in Canada. These
fuels should have the proper additives,
so you should not have to add anything
to thefuel.
In the U.S. and Canada, it’s easyto be
sure you get the right kind of gasoline
(unleaded). You’ll see “UNLEADED”
right on the pump. And only unleaded
nozzles will fitinto your vehicle’s filler
neck.
NOTICE:
Be sure the posted octane is at least 87.
If you try to do your own service
work without knowing enough about If the octane is lessthan 87, you may
get a heavy knocking noise when you
it, your vehicle could be damaged.
drive. If it’s bad enough, it can damage
your engine.
If you’re using fuelrated at 87 octane or
higher and you stillhear heavy
knocking, your engine needs service.
But don’t worry if you hear a little
pinging noisewhen you’re accelerating
or driving up a hill. That’s normal, and
you don’t haveto buy a higher octane
fuel to get rid of pinging. It’s theheavy,
constant knock that means you have a
problem.
What about gasoline with blending
materials that contain oxygen
(oxygenates),such asMTBE or
alcohol?
MTBE is “methyl tertiary-butylether.”
Fuel that is no more than 15% MTBE is
fine for your vehicle.
Ethanol is ethyl or grain alcohol.
Properly-blended fuelthat is no more
than 10%ethanol is fine for your
vehicle.
Methanol is methyl or wood alcohol.
Fuel that is morethan 5%
methanol is bad for your vehicle.
Don’t use it. Itcan corrode metal
parts in your fuel systemand also
damage plasticand rubber parts.
That damage wouldn’t be covered
under your warranty. And even
at
5% or less, there must be
“cosolvents” and corrosion
preventers in this fuel to help avoid
these problems.
Gasolines for Cleaner Air
Your use of gasoline with deposit
control additives will help prevent
deposits from formingin your engine
and fuel system.That helps keep your
engine in tuneand your emission
control system working properly.It’s
good for your vehicle,
and you’ll be
doing yourpart for cleanerair.
Many gasolinesare now blended with
oxygenates. General Motors
recommends that you use gasolines
with these blending materials, suchas
MTBE and ethanol. By doing so, you
can help cleanthe air,especially in
those parts of the country that have
high carbon monoxide levels.
In addition, some gasoline suppliersare
now producing reformulated gasolines.
These gasolines are specially designed
to reduce vehicle emissions. General
Motors recommendsthat you use
reformulated gasoline.By doing so, you
can help clean the air, especiallyin
those parts of the country that have
high ozone levels.
You should ask your service
station
operators if their gasolines contain
deposit control additives and oxygenates,
and if they have been reformulated
to
reduce vehicle emissions.
.
.
Service & Appearance Care
Fuels in Foreign Countries
If you plan on driving inanother
country outside the U.S. or Canada,
unleaded fuel may behard to find. Do
not use leaded gasoline.If you use even
one tankful, your emission controls
won’t workwell or at all. With
continuous use, spark plugscan get
fouled, the exhaust system can corrode,
and your engine oil can deteriorate
quickly. Your vehicle’s oxygen sensor
will be damaged. Allof that means
costly repairs that wouldn’t be covered
by your warranty.
To check on fuel availability, ask an
auto club, or contact a major oil
company that does business in the
country where you’ll be driving.
You can also write usat thefollowing
address for advice.Just tell us where
you’re going and give your Vehicle
Identification Number (VIN).
General Motors Overseas Distribution
Corporation
North American Export Sales (NAES)
1908 Colonel Sam Drive
Oshawa, Ontario L1H 8P7
Filling Your Tank
“el Capacity: 15.2 U.S. Gallons
77.5 L). Use unleaded fuel only.
The cap is behind a hinged dooron the
sight side of your vehicle.
To take off the cap,turn it slowly to the
eft (counterclockwise).
Be careful not. tospill gasohe: Clean
gasoline frompainted surfaces as soon
as possible. See Cleaning the Outside
of Your Chevrolet in theIndex.
When youput thecap back on, turn it
to theright until you hear at least three
clicks.
NOTICE:
I
While refueling,hang the cap inside the
fuel door.
If you need a newcap, be sure to
get the right type. Your dealercan
get one for you.If you get the
wrong type, it may not fit or have
proper venting, and your fueltank
and emissions system might be
damaged.
Checking ntings Under the
Hood
The following sections tell you howto
check fluids, lubricants and important
parts underhood.
Service & Appearance Care
t
Hood Release
To open the hood, first pullthe hood
release handle insidethe vehicle.
Lift the hood, release the hood prop
Then go to the front of the vehicle and
push the secondary hood release handle from its retainer and put the hood prop
into the slot in the hood. Use the prop
to the right.
rod sleeve when handlingthe prop rod.
Before closing the hood, be sure all the
filler capsare on properly. Then lift the
hood to relieve pressure onthe hood
prop. Remove the hood prop fromthe
slot in the hood andreturn theprop to
its retainer. Then just let the hood down
and close it firmly.
Service & Appearance Care
2.21 L4 Engine
CODE^)
When you openthe hood, you’ll see:
1. Engine CoolantRecovery Tank
2. Power Steering Fluid Reservoir
3. Automatic Transaxle Fluid Dipstick
(if equipped)
4.Brake Fluid Reservoir
5. Hydraulic Clutch Fluid Reservoir(if
equipped)
6. Windshield Washer Fluid Reservoir
7. Battery
8. Air Cleaner
9. Engine Oil Dipstick, Engine Oil Fill
Cap
IO. Thermostat Housing Pressure Cap
3.7L V6 Engine (CODE TI
When you open the hood, you’ll see:
1. Coolant SurgeTank
2. Power Steering Fluid Reservoir
3.Automatic Transaxle Fluid Dipstick
(if equipped)
4. Brake Fluid Reservoir
5. Hydraulic Clutch Fluid Reservoir (if
equipped)
6. Battery
7. Windshield Washer Fluid Reservoir
8. Air Cleaner
9. Engine Oil Fill Cap
IO. Engine Oil Dipstick
Service & Appearance Care
Engine Oil
When to Add Oi/
If the oil warning lighton the
instrument panel comeson, it means
you need to check your engine oil level
right away. For more information, see
Engine Oil Warning Lightin the Index.
You should check your engine oil level
regularly; this is an added reminder.
It’s agood idea to check your engine oil
2.2L L4: Checking Engine Oil
every time you get fuel. In orderto get
an accurate reading,the oil must be
warm and the vehicle must be on level
ground.
Turn off the engine and give the oil a
few minutes to drain back into the oil
pan. If you don’t, theoil dipstick might
not show the actual level.
To Check Engine Oil
Pull out the dipstick and cleanit with a
paper towel or cloth, then push it back
in all the way. Remove it again, keeping
the tip lower, and checkthe level.
3.1L V6: Checking Engine Oil
If the oil is at or below the ADD line,
then you’ll needto add some oil. But
you must use the right kind. This
section explains what kindof oil to use.
For crankcase capacity, seeCapacities
and Specifications in the Index.
NOTICE:
Don’t addtoo much oil. If your
engine has so much oilthat the oil
level gets above the cross-hatched
area that shows the proper
operating range, your engine could
be damaged.
Just fill it enough to put the level
somewhere in the proper operating
range. Push the dipstick allthe way
back in when you’re through.
RECOMMENDED SAE VlSCOSlTy GRADE ENGINE OILS
FOR BEST FUEL ECONOMYAND COLD STARTING,
SELECT THE LOWEST SAE VISCOSITY GRADEOIL
FORTHEEXPECTEDTEMPERATURERANGE.
HOT
YNE,
2.2L L4: Adding Engine Oil
3.1 L V6: Addlng Engine Oil
”F
’C
What Kind of Oil to Use
tlOO
t38
Beginning midyear 1993, oils of the
?roper quality for your vehicle
will be
.dentifiedwith this new “starburst”
iymbol. The “starburst” symbol
ndicates that theoil has been certified
~y the American Petroleum Institute
(API), and is preferred for use in your
gasoline engine.
fou should look for this on the front of
:he oilcontainer, and use only oilsthat
iisplay this new symbol.
fou should also use the proper viscosit)
ail for your vehicle, as shown in the
following chart:
As shown in the chart,SAE 5W-30 is
best for your vehicle. However, you
can
+80
t27
+60
t16
+40
t4
4-20
-1
0
LOOK FOR
ONE OF THESE
LABELS
1
-18
SAE 5W-30
PREFERRED
COLD
WEATHER
IF NEITHER SAE 5W-30 NOR SAE 10W-30
GRADE OILS AREAVAILABLE,SAE
30
GRADE MAY BE USED AT TEMPERATURES
ABOVE 40 DEGREES F (4 DEGREES c).
DO NOT USE SAE 1OW-40, SAE 2OW-50 OR
ANY OTHER GRADE OIL NOT RECOMMENDED.
Service & Appearance Care
use SAE 1OW-30 if it’s going to be 0°F
(-18°C) or above. These numbers on an
oil container show its viscosity, or
thickness. Donot use other viscosity oils,
such as SAE 1OW-40 or SAE 20W-50.
If you cannot find oilswith the new
“starburst” symbol on the front of the
container, you should look for and use
oils containing the following three things:
SH or SG
“SH” or “SG” must be on the oil
NOTICE:
container, either by itself or combined
’ If you use oils that do not have
with other quality designations, such
as “SWCD,” “SH,SG,CD,” “SG/CD,” etc. either the “starburst”symbol or an
These letters show American Petroleum API SH or SG designation, you can
cause engine damagenot covered
Institute (API) levels of quality.
by your warranty.
SAE 5W-30
Energy Conserving I1
GM Goodwrench@oil (in Canada, GM
Oils with these words on the
Engine Oil) meets allthe requirements
container will help you save fuel.
for your vehicle.
These three things are usually included
in a doughnut shaped logo (symbol)on
most containers. If you cannot find oils €ngine Oil Additives
with the “starburst”symbol, you should Don’t add anything to your oil. Your
look for oilswith the doughnut shaped
Chevrolet dealer is readyto advise if
symbol, containing the threethings
you think something should be added.
noted above.
I .
I64
When to Change Engine Oi/
See if any one of these is true for you:
Most tripsare less than 4 miles (6 km).
It’s below freezingoutside and most
trips are less than 10 miles (16 km).
The engine is at low speed mostof the
time (as in door-to-door delivery, or in
stop-and-go traffic).
Most trips are through dusty places.
If any one of these is true for your
vehicle, then you need to change your
oil and filter every 3,000 miles(5 000
km) or 3 months -whichever comes
first.
If none of them is true, change the oil
every 7,500 miles (12 500 km) or 12
months -whichever comesfirst.
Change the filter at thefirst oil change
and at every other oil change afterthat.
Engine Coolant Heater
(Engine Block Heater)
An engine coolantheater can be a big
help if you haveto park outside in very
cold weather, 0°F (-18°C) or colder. If
your vehicle hasthis option, see Engine
Coolant Heater in theIndex.
What to Do with Used Oil
Did you know that used engine oil
contains certain elements that may be
unhealthy for your skin and could even
cause cancer? Don’tlet used oil stay on
skin
your skin for very long. Clean your
and nails with soap and water, or a
good hand cleaner. Washor properly
throw away clothingor rags containing
used engine oil. (See the manufacturer’s
warnings about the use and disposal of
oil products.)
Used oil can be a real threat.,t.othe
environment. If you change yourown
oil, be sure to drain all free-flowing oil
from the filter before disposal. Don’t
ever dispose of oil by putting it in the
trash, pouring it on the ground, into
sewers, orinto streams or bodies of
water. Instead, recycle it by taking it to
a place that collects used oil.If you
have a problem properly disposing of
your used oil,ask your dealer, a service
station or a local recycling center for
help.
Air Cleaner
Refer to theMaintenance Scheduleto
determine when to replace the air filter.
See Scheduled Maintenance Services in
the Index.
NOTICE:
If the air cleaner isoff, a backfire
can causea damaging engine fire.
And, dirt can easily get into your
engine, whichwill damage it.
Always havethe air cleanerin place
when you’re driving.
I
Service & Appearance Care
2.2L L4: Air Filter Replacement
To check or replace the filter, remove
the two wingnuts and lift the cover.
Be sure to reinstall the air cleaner filter
and replace the cover tightly.
3.1 L V6 (Except2-24):Air Filter
Replacement
3.1 L V6 (2-24):Air Filter Replacement
To check or replacethe filter, remove
the three wing nuts and lift the cover.
Be sure to reinstali the air cleaner filter
and replace the cover tightly.
three clips and removethe cover.
Be sure to reinstall the air cleaner filter
and replacethe cover tightly.
To check or replacethe filter, unclipthe
IAutomatic Transaxle Fluid
1 When to Check and Change
A goodtime to check your automatic
transaxle fluid levelis when the engine
oil is changed. Refer to the Maintenance
Schedule to determine when to change
your fluid. See Scheduled Maintenance
Services in theIndex.
How to Check
Because this operation can be a little
difficult, you maychoose to have this
done at your Chevrolet dealership
Service Department.
If you do it yourself, be sure to follow
all the instructions here, or you could
get a falsereading on the dipstick.
~.
,
,'
NOTICE:
Too much or too little fluid can
damage your transaxle.Too much can
mean that some of the fluid could
come out and fall on hot engine parts
or exhaust system, starting a fire.
Be sure to get an accurate reading if
you check your transaxle fluid.
Wait at least 30 minutes before
checking the transaxle fluid levelif you
have been driving:
When outside temperatures are above
90°F (32°C).
At high speedfor quite a while.
In heavy traffic- especially in hot
weather.
To get the right reading, the fluid
should be at normal operating
temperature, which is 180°Fto 200°F
(82°C to 93°C).
Get the vehicle warmedup by driving
about 15 miles (24 lun) when outside
temperatures are above 50°F (10.C). If
it's colder than 50°F (lOOC), you may
have to drive longer.
To check the fluid level
Park your vehicle on a level place.
With the parking brake applied, place
the shift lever in P (Park).
With yourfoot on the brake pedal,
move the shift leverthrough each gear
range, pausing for about three
seconds in each range. Then, position
the shift leverin P (Park).
Let the engine run atidle forthree to
five minutes.
Then, without shuttingoff the engine,
follow these steps:
1. Pull out thedipstick and wipe it with
a clean rag orpaper towel.
2.Push it back in all the way, wait three
seconds and then pull it back out
again.
3. Check both sides of the dipstick, and
read the lower level. The fluid level
must be in thecross-hatched area.
4.If the fluid level isin theacceptable
range, push the dipstick back in all
the way.
Service & Appearance Care
How to Add fluid
2.2L L4: Checking Automatic
Transaxle Fluid
3.1L V6: Checking Automatic
Transaxle Fluid
. 168
Refer to the Maintenance Scheduleto
determine what kind of transaxle fluid
to use. See Recommended Fluids and
Lubricants in the Index.
If the fluid level is low, add only enough
of the proper fluidto bring the level into
the cross-hatched area on the dipstick.
1. Pull out thedipstick.
2. Using a long-neck funnel,add
enough fluid at thedipstick hole to
bring it to the proper level.
It doesn’ttake much fluid, generally less
than a pint (0.5L). Don’t overfill. We
recommend you use only fluid labeled
DEXRONo-111 or DEXRONB-HE,
because fluids withthat label are made
especially for your automatic transaxle.
Damage caused by fluid other than
DEXRONO-I11 or DEXRONB-IIE is not
covered by your new vehicle warranty.
After adding fluid, recheckthe fluid
level as described under How to
Check.
When the correct fluid levelis
obtained, push the dipstick back in all
the way.
2.2L L4: Adding Automatic Transaxle
Fluid
3.1L V6: Adding Automatic Transaxle
Fluid
4. If the fluid levelis where it should be,
Manual TransaxleFluid
push the dipstick back in all the way
and flip the handle down. If the fluid
level is low, addmore fluid as
described in the next steps.
When to Check
A goodtime to have it checked iswhen
the engine oil is changed. However, the
fluid in your manual transaxle doesn't
require changing.
How to Check
Because this operation can be alittle
difficult, you maychoose to have this
done at a Chevroletdealership Service
Department.
If you do it yourself, besure to follow
all the instructions here, or you could
get a falsereading on thedipstick.
NOTICE:
Too much or too little fluid can
damage yourtransaxle. Too much
can mean that some of the fluid
could comeout and fall on hot'
engine parts or exhaust system,
starting a fire.Be sure to get an
accurate reading if you check your
transaxle fluid.
How to Add Fluid
Check the fluid level onlywhen your
engine isoff, the vehicle is parkedon a
level placeand the transaxle is cool
enough for you to rest your fingerson
the transaxle case.
Then, follow these steps:
1. The manual transaxle dipstick is
located belowthe brake master cylinder
near the rear of the transaxle case.
Flip the handle up and then pull out
the dipstick and clean it with a ragor
paper towel.
2. Push it back in allthe way and
remove it.
3.Check both sides of the dipstick and
read the lower level.The fluid level
must be betweenthe ADD and FULL
marks. (Note: Fluid may appear at
the bottom of the dipstick even when
the fluid level is severalpints low.)
Here's how to add fluid. Referto the
Maintenance Schedule to determine
what kind of fluid to use. See
Recommended Fluids and Lubricants
in the Index.
1. Remove the dipstick.
2. Add fluidat thedipstick hole. Add
only enough fluid to bring the fluid
level up to the FULL mark on the
dipstick.
3.Push the dipstick back in all the way;
then flip the handle down to lock the
dipstick in place.
~~
~
Service & Appearance Care
fluid. SeeOwner Checks andServices
and Recommended Fluids and
Lubricants in the Index.
How to Check
You do not need to check the fluid level
unless you suspect a clutch problem. To
check the fluid level,take the cap off. If
the fluid reaches the step inside the
reservoir, the fluid level iscorrect.
What to Use
Use a mixture of one-half clean water
(preferably distilled) and one-half
antifreeze that meets “GM Specification
1825-M,” which won’t damage aluminum
parts. You can also use a recycled
coolant conforming to GM Specification
1825-M witha complete coolant flush
and refill. If you use this mixture, you
don’t needto add anything else.
IHydraulic Clutch
The hydraulic clutchin your vehicleis
self-adjusting. The clutch master
IEngine Coolunt
cylinder reservoir is filled with hydraulicThe following explains your cooling
clutch fluid.
system and howto add coolant whenit
It isn’t a good idea to “topoff” your
is low.If you have a problem with
clutch fluid. Adding fluid won’t correct engine overheating, seeEngine
a leak.
Overheating in the Index.
A fluid loss inthis system could
The proper coolant for your Chevrolet will:
indicate a problem. Havethe system
Give freezing protection down
to -34°F
inspected and repaired.
(-37°C).
Give boiling protectionup to 262°F
When to Check and What to Use
(128°C).
Refer to theMaintenance Scheduleto
determine how oftenyou should check
the fluid level in your clutch master
cylinder reservoir and for
the proper
Protect against rust and corrosion.
Help keep the proper engine
temperature.
Let the warning lights workas they
should.
170
NOTICE:
If you use an improper coolant mix,
your engine could overheat
and be
badly damaged.The repair cost
wouldn't be coveredby your
warranty. Too muchwater in the
mix can freeze and crackthe
engine, radiator, heater core and
other parts.
Adding Coolant-2.2L 14 Engine
To Check Coolant
When your engineis cold, the coolant
level should beat FULL COLD, or a
little higher. When your engine
is warm,
the level should beat FULL COLD or
higher.
To Add Coolant
If you need morecoolant, add the
proper mix at the coolant recovery
tank.
~
~~
~~
~
Service & Appearance Care
Radiator Pressure Cap
NOTICE:
Adding Coolant-3. IL V6 Engine
To Check Coolant
When your engine is cold,the coolant
level should beat FULL COLD, or a
little higher.
To Add Coolant
If you need more coolant, addthe
proper mix at the surge tank.
D
lI
D
I72
Your radiator cap is a15 psi (105
kPa) pressure-type cap and must be
tightly installedto prevent coolant
loss and possible engine damage
from overheating. Besure the arrows
on the cap line up with
the overflow
tube on theradiator filler neck.
When you replace your radiator
pressure cap, aGM cap is recommended.
Thermostat
Engine coolant temperatureis
controlled by a thermostat inthe engine
coolant system. The thermostat stops
the flow of coolant through the radiator
until the coolant reaches a preset
temperature.
When you replace your thermostat,an
AC@thermostat is recommended.
What to Add
Refer to theMaintenance Schedule to
determine what kind of fluid to use. See
Recommended Fluids and Lubricants
in the Index.
NOTICE:
IPower Steering Fluid
How To Check Power Steering
Fluid
Unscrew the cap and wipe the dipstick
with a clean rag. Replacethe cap and
completely tightenit. Then remove the
cap againand look at thefluid levelon
the dipstick.
When the engine compartment is hot,
the level should benear the H mark.
When the engine compartment is
cool, the level should benear the C
mark.
When adding power steering fluid
or maltinga complete fluid change,
always usethe proper fluid. Failure
to use the proper fluidcan cause
leaks and damage hosesand seals.
IWindshield
WasherFluid
ro AM
Open the cap labeled WASHER
FLUID ONLY. Add washer fluid until
the bottle is full.
Service & Appearance Care
fluid. Adding brake fluid won’t correct a
leak. If you add fluid when your linings
are worn, then you’ll havetoo much
fluid when you get new brake linings.
You should add (or remove) brake
fluid, as necessary, only when workis
done on thebrake hydraulic system.
NOTICE:
When using concentrated washer
fluid, followthe manufacturer’s
instructions for adding water.
Don’t mix water with ready-touse washer fluid. Water
can cause
the solution to freeze and damage
your washer fluidtank and other
parts of the washer system. Also,
water doesn’t cleanas well as
washer fluid.
Fill your washer fluidtank only %
full when it’s very cold. This
allows for expansion, which could
damage the tankif it is
completely full.
Don’t use radiator antifreeze in
your windshield washer.It can
damage your washer system and
paint.
IBrakes
Brake Master Cylinder
Your brake master cylinder is here.It is
filled with DOT-3 brake fluid.
There are only two reasons whythe
brake fluid level in your master cylinder
might go down. The first isthat the
brake fluid goes downto an acceptable
level during normal brake lining wear.
When new liningsare put in, the fluid
level goes back up.The other reason is
that fluid is leakingout of the brake
system. If it is, you should have your
brake system fixed, sincea leak means
that sooner or later your brakes won’t
work well, or won’t workat all. So, it
isn’t agood idea to “topoff” your brake
When your brake fluid falls
to a low
level, your brake warning light will
come on. See Brake System Warning
Light in the Index.
What to Add
When you do need brake fluid, use only
DOT-3 brake fluid- such as Delco
Supreme 11@(GM Part No.1052535).
I
Use new brake fluid from a sealed
container only, and always cleanthe
brake fluid reservoircap before
removing it.
NOTICE:
DOT-5 silicone brake fluid can
damage your vehicle. Don’t
use it.
Don’t letsomeone put in the
wrong kindof fluid. For example,
just a few drops of mineral-based
oil, such as engine oil, in your
brake system can damage brake
system parts so badly that they’ll
have to be replaced.
Brake fluid can damagepaint, so
be carefulnot to spill brake fluid
on your vehicle.If you do, wash it
immediately. SeeAppearance
Cave in the Index.
OF
I I
Brake Wear
Your Chevrolethas front disc brakes
and rear drum brakes.
Disc brake pads have built-in
wear
indicators that make a high-pitched
warning sound when the b&[email protected], Your rear drum brakes don’t have wear
indicators, but if you ever hear a rear
worn and new‘pads are needed: .The
the rear brake
sound may comeand go or be heard all brake rubbing noise, have
the time your vehicle is moving (except linings inspected.Also, the rear brake
drums should be removedand
when you are pushing on thebrake
inspected each timethe tires are
pedal firmly).
removed forrotation or changing. When
you have the front brakes replaced,
have the rear brakes inspected,too.
Brake linings should always be replaced
as complete axlesets.
~
‘
Brake Pedal Travel
NOTICE:
Continuing to drive with worn-out
brake pads could resultin costly
brake repair.
Some driving conditionsor climates
may cause a brake squealwhen the
brakes are first applied or lightly
applied. This doesnot mean something
is wrong with yourbrakes.
See your dealerif the brake pedal does
not return to normal height, orif there
is a rapid increasein pedal travel. This
could be a sign
of brake trouble.
Brake Adjustment
Every time you make a moderate brake
stop, your disc brakesadjust for wear.If
you rarely make a moderate or heavier
stop, then your brakes mightnot adjust
correctly. If you drivein thatway, then
-very carefully- make a few
moderate brake stops about every 1,000
miles (1600 lun), so your brakeswil
adjust properly.
Service & Appearance Care
If your brake pedal goesdown farther
than normal, yourrear drum brakes
may need adjustment. Adjust them by
backing up and firmly applyingthe
brakes a few times.
Replacing Brake System Pa&
The braking systemon a modern
vehicle is complex.Its many parts hawe
to be of top quality and work well
together if the vehicle is to have really
Contact your dealerto learn howto
good braking. Vehicles we design and Every new Chevrolethas a Delco
prepare your vehicle for longer storage
test have top-qualityGM brake parts in Freedom* battery. You never haveto
periods.
them, as your Chevrolet does when
it is add water to one of these. When it’s
time fora new battery, we recommend a
new. When you replaceparts of your
Delco Freedom* battery. Get one that
braking system-for example, when
has
the catalog number shownon the
your brake linings wear downand you
original
battery’s label.
have to have newones put in - be sure
you get newgenuine GM replacement
parts. If you don’t,your brakesmay no
Vehicle Storage
longer work properly. For example,if
If you’re not going to drive your vehicle
someone puts in brake linings th,atare
for
25 days ormore, take off the black,
wrong for your vehicle,
the balance
negative
(-) cable from the battery. This
between yourfront and rear brakes can
will help keep yourbattery from
change, for the worse. The braking
running
down.
performance you’ve come
to expect can
change in manyother ways if someone
puts in the wrong replacementbrake
parts.
Battery
Halogen Bulbs
Headlight Bulb Replacement
2. Pull out thebulb assembly.
3. Disconnect the bulb base fromthe
For the type of bulb, see the Index
socket by lifting the plastic locking
under Replacement Bulbs.
tab.
1. Turn the lock ring clockwiseuntil the
4. Snap a new bulb into the socltet.
flanges alignwith the slots in the
housing. Then pull the ring back from 5. Replace the bulb assemblyby
the housing.
reversing steps 1-3.
Taillight Bulb Replacement
For the type of bulb, see the Index
under Replacement Bulbs.
4-Door Models:
1, If your vehicle has a convenience net
at theback of the trunk,remove it
and pull the carpet away from the
rear of the trunk.Next remove the
four wingnuts.
177
1
_
_
~
Service & Appearance Care
2-Door Models:
1. Pull the carpet back from the corner
and remove the plastic wing nuts. If
you have the optional convenience
net, first unhook the netfrom the
retainer and remove the retainer
knob.
Both 4-DOOr and 2-Door Models:
2. From outside the vehicle, gently pull
back on the taillight housing.
3.Press the bulb housing release lever
and turn thehousing 1/6 turn
countercloclnvise to remove it.
4. To removethe bulb, push in and turn
it countercloclnvise.
5. Push in the new bulband turn it
cloclnvise.
6. Reverse all steps to reassemble the
taillight housing.
Wagon:
1. Open the liftgate.
2. Remove the two Torxs screws.
3. Pull back gentlyon thetaillight
i.To remove the bulb, push the bulb in,
housing.
4. Press the bulb housing tab, rotate the
housing counterclockwise% turn and
remove it.
and rotate it counterclockwise.
5. Push in the new bulband turn it
cloclnvise.
7. Reverse allsteps to reassemble the
taillight housing.
Windshield Wiper Blade
Replacement
Replacement blades come in different
types and are removed in different
ways. Here’s howto remove the type
with a release clip:
1. Pull the windshield wiperarm away
from the windshield.
2. Lift the rele-ase clip with a
screwdriver and pull the blade
assembly off the wiper arm.
3.Push the new wiper blade securely
on
the wiper arm.
Service & Appearance Care
The other label isthe Certification label,
found on the rear edge of the driver's
door. It tellsyou the gross weight
capacity of your vehicle, calledthe
GVWR (Gross Vehicle Weight Rating).
The GVWR includes the weight of the
vehicle, all occupants, fuel and cargo.
Never exceed the GVWR for your
vehicle, or the Gross Axle Weight
Rating (GAWR) for either the front or
rear
axle.
I
Two labels on your vehicle show how And, if you do have a heavy load, you
nuch weight it may properly carry. The should spread itout. Don't carry more
than 132 lbs. (60 kg) in yourtrunk, or
rire-Loading Information label found
If you put things inside your vehicle
88 lbs. (40 kg) in your wagon's rear
In the rear edge of the driver's door
like suitcases, tools, packages, or
area.
.ells youthe proper size, speed rating
anything else- they will goas fast as
md recommended inflation pressures
the vehicle goes.If you have to stop or
or the tires on your vehicle. It also
turn quicltly, or if there is a crash,
:ives you important information about
they'll keep going.
.he number of people that can bein
four vehicle andthe total weight that
rou can carry. This weightis called the
Jehicle Capacity Weightand includes
.heweight of all occupants, cargo, and
111 nonfactory-installed options.
Loading Your Vehicle
Tires
We don’t make tires. Your new vehicle
comes with high qualitytires made by a
leading tire manufacturer. These tires
are warranted by the tire manufacturers
and their warranties are delivered with
every new Chevrolet.If your spare tire
is a different brand than your roadtires,
you will have a tire warranty folder from
each of these manufacturers.
Service & Appearance Care
Inflation-Tire Pressure
The Tire-Loading Information label
which ison the rear edge of the driver’s
door shows the correct inflation
pressures for your tires, when they’re
cold. Cold means your vehiclehas been
sitting for at least three hours or driven
no more than a mile.
NOTICE:
Don’t let anyone tell youthat
underinflation or overinflation is all
right. It’s not. If your tires don’t
have enough air (underinflation)
you can get:
Too much flexing
Too much heat
Tire overloading
Bad wear
Bad handling
Bad fuel economy.
If your tires have too much air
(overinflation),you can get:
Unusual wear
Bad handling
Rough ride
Needless damage from road hazards.
When to Check
Check yourtires once a month or more.
Don't forget your compactspare tire. It
should be at 60 psi (420 1tPa).
How to Check
Use a good quality pocket-type gageto
check tire pressure. Simply lookingat
the tires will not tell youthe pressure,
especially if you have radialtires which may look properly inflated even
if
they're underinflated.
If your tires have valve caps, besure to
put them back on. They help prevent
leaks by keeping out dirt and moisture.
x
\
Tire lnspectionand Rotation
To make yourtires last longer, have
them inspected and rotated at the
mileages recommendedin the
Maintenance Schedule. SeeScheduled
Maintenance Services in the Index.
Use this rotation pattern.
After the tires have been rotated, adjust
the frontand rear inflation pressure as
shown on theTire-Loading Information
label. Makecertain that all wheelnuts
are properly tightened. SeeWheel Nut
Torque in theIndex.
Service & Appearance Care
Buying New Tires
To find out what kind and sizeof tires
you need, look at the Tire-Loading
Information label.
The tires installedon your vehicle when
it was new had a Tire Performance
Criteria Specification (TPC Spec)
TREAD WEAR INDICATORS
number on each tire’s sidewall. When
you get newtires, get ones withthat
same TPC Spec number.That way, your
When It’s Time for New Tires
vehicle
will continue to have tiresthat
3ne way to tell when it’s time for new
are designed to give proper endurance,
;ires isto check the treadwear
handling,
speed rating, traction, ride
ndicators, which willappear when your
and
other
things during normal service
;ires have only%Z inch (1.6mm) or less
on your vehicle.If your tires havean allIf tread remaining.
season tread design, the TPC number
llou need a newtire if:
will be followed bya “MS” (for mud
m You can see the indicators at three or
and snow).
more placesaround the tire.
If you ever replace your tires with
those
m You can see cord or fabric showing
not having a TPC Spec number, make
through the tire’s rubber.
sure they are the same size, load range,
The tread or sidewall is cracked, cut
speed rating and construction type
or snagged deep enoughto show cord (bias, bias-belted or radial)as your
or fabric.
original tires.
The tire has a bump, bulge or split.
The tire has a puncture,cut, orother
damage that can’t be repaired well
because of the size or locationof the
damaEe.
B
B
Uniform Tire Qualify Grading
The following information relates to the
system developedby the United States
National Highway Traffic Safety
Administration which grades tires by
treadwear, traction and temperature
performance. (This applies only to
vehicles soldin the United States.)
Treadwear
The treadwear grade is a comparative
rating based on the wear rate of the tire
when tested under controlled
conditions on a specifiedgovernment
test course. For example, a tire graded
150 would wear one anda half (1Yz)
times as well on the government course
as a tire graded 100. The relative
performance of tires depends upon the
actual conditions of their use, however,
and may depart significantly fromthe
norm due to variations in driving habits,
service practices and differences in road
characteristics and climate.
Traction-A, B, C
The traction grades, from highestto
lowest are: A, B, and C. They represent
the tire’s abilityto stop on wet
pavement as measured under controlled
conditions on specified governmenttest
surfaces of asphalt and concrete. A tire
marked C may have poor traction
performance.
Warning: The traction grade assigned to
this tire is based on braking (straightahead) traction tests and does not
include cornering (turning) traction.
Temperature-A, B, C
The temperature grades are A (the
highest), B, and C, representing the
tire’s resistance to the generation of
heat andits ability to dissipate heat
when tested under controlled
conditions on a specified indoor
laboratory test wheel. Sustained high
temperature can cause the material of
the tire to degenerate and reduce tire
life, and excessive temperature can lead
to sudden tire failure. The grade C
corresponds to a level of performance
which all passengercar tires must meet
under theFederal Motor Vehicle Safety
Standard No. 109. Grades B and A
represent higher levelsof performance
on the laboratory test wheel than the
minimum required by law.
Warning: The temperature grade for
this tire is established for a tire that is
properly inflatedand not overloaded.
Excessive speed, underinflation, or
excessive loading, either separately or in
combination, can cause heat buildup
and possible tire failure.
These grades are molded on the
sidewalls of passenger car tires.
While the tires available as standard or
optional equipment on General Motors
vehicles may varywith respect to these
grades, all such tires meet General
Motors performance standards and
have beenapproved for use on General
Motors vehicles. All passenger type (P
Metric) tires must conform to Federal
safety requirements in addition to these
grades.
1
Service & Appearance Care
Wheel Alignment andTire Balance Wheel Replacement
The wheels on your vehiclewere
Replace any wheel that is bent, cracked
aligned and balanced carefullyat the
or badly rusted. If wheel nuts keep
factory to give you the longest tire life
coming loose,the wheel, wheelbolts,
and best overall performance.
and wheel nuts should be replaced.If
the
wheel leaks air, replace it (except
In most cases, you will not need to have
some aluminum wheels, which can
your wheels aligned again. However,
if
sometimes be repaired). See your
you notice unusual tire wear or your
vehicle pullingone way or the other, the Chevrolet dealerif any of these
conditions exist.
alignment may need to be reset. If you
Your dealerwill know the kind of wheel
notice your vehicle vibratingwhen
you need.
driving on a smooth road, your wheels
may need to be rebalanced.
Each new wheel should havethe same
load carrying capacity,diameter, width,
offset, and be mounted the same way as
the one it replaces.
If you need to replace any of your
wheels, wheelbolts, or wheel nuts,
replace them only with new GM
original equipment parts. This way, you
will be sure to have the right wheel,
wheel bolts, and wheel nuts for your
Chevrolet model.
I The
NOTICE:
wrong wheelcan also cause
problems with bearing life,brake
cooling, speedometer/odometer
calibration, headlight aim, bumper
height, vehicle ground clearance,
and tire or tire chain clearance to
the body and chassis.
I Used Replacement Wheels
Tire Chains
.
. .
NOTICE:
If your Chevrolet has P195/70R14,
P195/65R15 or P205/60R15 size
tires, don’t use tire chains; they can
damage your vehicle.If you have
other tires, use tire chains only
where legaland only when you
must. Use only S A E Class “S” type
chains that are the proper size for
your tires. Install them on the front
tires and tighten them as tightly as
possible with the ends securely
fastened. Drive slowly and follow
the chain manufacturer’s
instructions. If you can hearthe
chains contacting your vehicle, stop
and retighten them. If the contact
continues, slow down until it stops.
Driving too fast with chains on will
damage your vehicle.
Uppearance Care
Remember, cleaningproducts can be
hazardous. Some are toxic. Others can
burst into flame if you strike a match or
get them on a hot part of the vehicle.
Some are dangerous if you breathe their
fumes in a closed space. When you use
anything froma container to clean your
Chevrolet, besure to follow the
manufacturer’s warnings and
instructions. And alwaysopen your
doors or windowswhen you’re cleaning
the inside.
I87
Service & Appearance Care
Never use these to clean your vehicle:
Gasoline
Benzene
Naphtha
Carbon Tetrachloride
Acetone
Paint Thinner
Turpentine
Lacquer Thinner
Nail Polish Remover
They can all behazardous - some
more than others - and they can all
damage your vehicle,too.
NOTICE:
Don’t use anyof these unless this
manual says you can. In many uses,
these will damage your vehicle:
Alcohol
Laundry Soap
Bleach
Reducing Agents
Cleaning the Inside of Your
Chevrolet
Use a vacuumcleaner often to get rid of
dust and loose dirt. Wipe vinyl or
leather with a clean, damp cloth.
Your Chevrolet dealerhas two GM
cleaners, a solvent-typespot lifter and a
foam-type powdered cleaner. They
will
clean normalspots and stains very well.
Do not use them on vinyl or leather.
Here are some cleaningtips:
Always read the instructions on the
cleaner label.
Clean up stains as soon as you can before they set.
Use a clean clothor sponge, and
change to a cleanarea often. A soft
brush may be usedif stains are
stubborn.
Use solvent-type cleaners in a wellventilated area only. If you use them,
don’t saturate thestained area.
If a ring forms afterspot cleaning,
clean the entire area immediately or it
will set.
Using Foam-TypeCleaner on
Fabric
Vacuum and brush the area to remove
any loose dirt.
Always clean a whole trim panel
or
section. Mask surrounding trim along
stitch or welt lines.
Mix Multi-Purpose Powdered Cleaner
following the directions on the
container label.
Use suds only and apply with a clean
sponge.
Don’t saturate thematerial.
Don’t rub it roughly.
As soon as you’ve cleanedthe section,
use a spongeto remove the suds.
Rinse the section with a clean, wet
sponge.
Wipe off what’s left with a slightly
damp paper towel or cloth.
Then dry it immediately with a blow
dryer or a heat lamp.
,
Fabric hotection
Non-Greasy Stains
NOTICE:
Such as catsup,coffee (black), egg,
Your Chevrolet has upholsterythat has
Be careful with a hair dryer or heat
fruit juice, milk, softdrinks, wine,
fruit,
been treated with Scotchgard’” Fabric
lamp. You could scorchthe fabric.
Protector, a 3M product. ScotchgardTM vomit, urine and blood.
protects fabrics by repelling oil and
Carefully scrape off excess stain, then
water,
which
are
the
carriers
of
most
Wipe with a clean cloth.
sponge the soiled area with cool
stains. Even withthis protection, you
water.
still needto clean your upholstery often
If a stain remains, followthe foamUsing Solvent-Type Cleaneron
to keep it looking new.
type
instructions described earlier.
Fabric
Further information on cleaningis
If an odor lingers after cleaning vomit
First, see if you have to use solvent-type available by calling 1-800-433-3296 (in
or
urine, treat the area with a
.
cleaner at all. Somespots and stains
Minnesota, 1-800-642-6167).
waterhaking soda solution: 1
will clean off better with just water and
teaspoon (5 ml) of baking soda to 1
mild soap.
cup (250 ml) of lukewarm water.
Special Cleaning Problems
If you need to use a solvent:
If needed, clean lightlywith solventGreasy or Oily Stains
Gently scrape excess soil fromthe
type cleaner.
trim materialwith a clean, dull knife Such as grease, oil,butter, margarine,
shoe polish, coffeewith cream, chewing Combination Stains
or scraper. Use verylittle cleaner,
gum,
cosmetic creams, vegetable oils, Such as candy, ice cream, mayonnaise,
light pressureand clean cloths
wax crayon, tar andasphalt.
(preferably cheesecloth). Cleaning
chili sauce and unknown stains.
should start at the outside of the
Carefully scrape off excess stain.
Carefully scrapeoff excess stain, then
stain, “feathering” toward the center.
Follow the solvent-type instructions
clean
with cool water and allow to
Keep changingto a clean sectionof
described earlier.
drythe cloth.
Shoe polish,wax crayon, tar and
If a stain remains, cleanit with
When you clean a stain from fabric,
asphalt will stain if left ona vehicle
solvent-type
cleaner.
immediately drythe area with an air
seat fabric. They should be removed
hose, hair dryer, or heat lamp to help
as soon as possible. Be careful,
prevent a cleaning ring. (See the
because the cleaner will dissolve them
previous NOTICE.)
and may cause them to spread.
189
I
Service & Appearance Care
Cleaning Vinyl
Use warm water and a clean cloth.
Rub with a clean, damp cloth to
remove dirt. You may haveto do it
more than once.
Things liketar, asphalt and shoe
polish will stain if you don’t get them
off quickly. Use a clean cloth and a
solvent-type vinylcleaner.
Cleaning theTop of the
Instrument Panel
Use only mildsoap and water to clean
the topsurfaces of the instrument
panel. Sprayscontaining silicones or
waxes may cause annoying reflections
in thewindshield and even makeit
difficult to see through the windshield
under certain conditions.
1 Ckaning the
Cupholder
If beverages get spilledon your
cupholder, it may become difficultto
operate. The slider mechanismcan
become cloggedwith pop, coffee, etc.
To clean and return thecupholder to
190
normal operation, simply spraya waterbased cleaner (such as Glass Plus@or
Windex@)on thetracks of the slider
mechanism, andthen slide the
cupholder in and out until normal
operation is regained. Holda paper
towel under the cupholder to catch any
excess cleaner which could
drip on your
carpet or seats.
Care of Safety Belts
Keep belts cleanand dry.
Glass
Glass should be cleaned often. GM
Glass Cleaner (GM Part No. 1050427)
or a liquid household glass cleanerwill
remove normal tobacco smokeand dust
films.
Don’t use abrasive cleanerson glass,
because they may cause scratches.
Avoid placing decalson the inside rear
window, since they may haveto be
scraped off later. If abrasive cleanersare
used on the inside of the rear window,
an electric defogger element may be
damaged. Any temporary license should
not be attached across the defogger grid.
ICleaning
the Outsideof the
Windshield and Wiper
Blades
If the windshield is not clear after using
the windshield washer, or if the wiper
blade chatters when running, wax or
other material may be on the blade or
windshield.
Clean the outside of the windshield
with GM Windshield Cleaner, Bon-Ami
Powder@ (GMPart No. 1050011).The
windshield is cleanif beads do not form
when you rinse it with water.
Clean the blade by wiping vigorously
with a cloth soakedin full strength
windshield washer solvent. Then rinse
the blade with water.
Wiper blades should be checked
on a
regular basisand replaced when worn.
soaps. Don’t usecleaning 8 @o&-that
contain acid or abrasives.
cleaning
agents should be flushed promptly
and
not allowed to dry on the surface, or
they couldstain. Dry the finish with a
soft, clean chamois or a100% cotton
towel to avoid surfacescratches and
water spotting.
High pressure carwashes may cause
water to enter your vehicle.
3
1
Finish Care
NOTICE:
Machine compounding or
aggressive polishingon a
basecoat/clearcoat. paint finish
may
dull the finish or leave swirl marks.
Rxtured-Surjace Bumper
Covers WLAND RS MODELS)
Cleaning with a brush, a soft terry cloth
or
a commercial carwash is
Occasional waxing or mild polishing
of
recommended for normaldirt. Never
your Chevroletmay be necessaryto
use a wirebrush or abrasives.
remove residue fromthe paint finish.
You can get GM approved cleaning
Avoid applyingwax or polishto the
The paint finishon your vehicle
products
from
your
dealer.
textured-surface bumper covers. To
provides beauty,depth of color, gloss
remove wax,a commercially available
Your Chevrolet has a ‘Lbasecoat/clearcoat”
retention and durability.
paint finish. The clearcoat gives more wax solvent shouldbe used. Tarand Oil
depth and gloss to thecolored basecoat. Remover (GM Part No.1050172) is also
Washing YourVehicle
Always use waxes and polishes that are recommended. It’s also recommended
The best wayto preserve your vehicle’s non-abrasive and made for a
for cleaning difficultsoils like road tar
finish is to keep it clean by washing it
and oil. Also recommended are solventbasecoat/clearcoat paint finish.
often with lukewarm or coldwater.
type fabric cleaners suchas GM Part
No. 1050214.
Don’t wash your vehiclein the direct
rays of the sun. Don’t use strong soaps
or chemical detergents.Use liquid hand,
dish or carwashing (mild detergent)
Cleuning tbe Outside of Your
Chevrolet
191
...
Service & Appearance Care
To clean white bumper covers, firstuse
Tar and Oil Remover. If the dark areas
are still visible,whiten with White
Sidewall Tire Cleaner,such as GM Part
No. 1050174.
Finish Careof T d r e d
SurJace Bumper Covers
To touch up any smallspots after
regular washing,use a solvent-type
fabric cleanersuch as GM Part No.
1050214 and a clean, dry cloth.
To help maintain bumper covers, after
washing use a cleaner/protectant like
GM/Armor All" Part No. 1052919.
IAluminum wheels (IfSo
Equipped)
Your aluminum wheels have a
protective coating similarto the painted
surface of your vehicle.Don't use
strong soaps, chemicals, chrome polish,
abrasive cleaners or abrasive cleaning
brushes on them because you could
damage this coating. After rinsing
thoroughly, a waxmay be applied.
NOTICE:
If you havealuminum wheels, don't
use an automatic vehicle washthat
has hard silicon carbide cleaning
brushes. These brushes can take off
the protective coating.
IWeatherstrips
Silicone greaseon weatherstrips will
make them last longer, sealbetter, and
not stick or squeak. Apply silicone
grease with a cleancloth at least every
six months. During very cold,damp
weather more frequent application may
be required. (See Recommended Fluids
G. Lubricants in the Index.)
Sheet Metal Damage
If your vehicleis damaged and requires
sheet metal repair or replacement, make
sure the body repairshop applies anticorrosion material to theparts repaired
or replaced to restore corrosion
protection.
IForeign Material
Calcium chlorideand other salts, ice
melting agents, road oil and tar, tree
Your Chevrolet dealerhas a GM White
sap, bird droppings, chemicals from
Sidewall Tire Cleaner. Youcan use a
industrial chimneys, and other foreign
stiff brush with the cleaner.
When applyinga tire dressing always take matter can damage your vehicle's finish
care to wipe off any overspray or splash if they remainon painted surfaces.Use
from painted surfaces. Petroleum- based cleaners that are marked safe for painted
surfaces to remove foreignmatter.
products may damagethe paint finish.
Tires
Finish Damage
Any stone chips, fractures or deep
scratches in the finish should be
repaired right away. Bare metal will
corrode quickly and may developinto a
major repair expense.
Minor chipsand scratches can be
repaired with touch-up materials
available from your dealer other
or
service outlets. Larger areas of finish
damage can be correctedin your
dealer's bodyand paint shop.
Underbody Mahtenanm
.
:
Chemical PaintSpotting
Some weatherand atmospheric
Chemicals used for ice
and snow
removal and dust control can collect on conditions can create a chemical fallout.
Airborne pollutants can fallupon and
the underbody. If these are not
attack painted surfaceson your vehicle.
removed, accelerated corrosion(rust)
This damage cantake two forms:
can occur on theunderbody parts such
blotchy, ringlet-shaped discolorations,
as fuel lines, frame,floor pan, and
exhaust system even though they have and small irregulardark spots etched
into thepaint surface.
corrosion protection.
Although no defect in the paint job
At least every spring, flush
these
causes this, Chevrolet will repair,at no
materials fromthe underbody with
plain water. Clean anyareas where mud charge to theowner, the surfaces of
new vehicles damagedby this fallout
and other debris can collect. Dirt
condition within 12 months or 12,000
packed in closed areas of the frame
should be loosened before being flushed. miles (20 000 km)of purchase,
whichever comesfirst.
Your dealer oran underbody vehicle
washing systemcan do this for you.
Service & Appearance Care
Engine ldenfificafion
The eighth character in your VIN is the
engine code. This code will help you
identify your engine, specifications,and
replacement parts.
SASE
Ikhicle Identification
Number
This isthe legal identifier for your
Chevrolet. It appears on a plate inthe
front corner of the instrument panel, on
the driver's side. You can see it if you
look through the windshield from
outside your vehicle.The VIN also
appears on the Vehicle Certification and
Service Parts labels and the certificates
of title and registration.
C O A T - C L E A ~ COAT W4--1382
09382 2 0 K
.I
Service Parts Identification
Label
You'll find this label on your spare tire
cover or on the inside of your trunk lid.
It's very helpfulif you ever needto
order parts. On this label is:
your VIN,
the model designation,
paint information, and
a list of all production options and
special equipment.
Be sure thatthis label is not removed
from the vehicle.
NOTICE:
Don’t add anything electricalto
your Chevrolet unless you check
with your dealer first. Some electrical
equipment can damage your vehicle
and thedamage wouldn’t be
covered by your warranty. Some
The fuse panelis located under the
add-on electrical equipment can
lower
left sideof the instrument panel.
keep other components from
working as they should.
To identify and check fuses, refer to the
Fuse Usage chart.
Fuses & Circuit Breakers
Look at thesilver-colored band inside
the fuse.If the band is brokenor
melted, replace the fuse. Be sure you
replace a bad fuse witha new one of the
identical size and rating.
The wiring circuits in your vehicleare
protected fromshort circuits by a
combination of fuses, circuitbreakers,
and fusible thermal links in the wiring
itself. This greatly reduces
the chance of
damage caused by electrical problems.
I95
Service & Appearance Care
Fuse
INST LPS
ECM
DR UNLK
CIG LTR
RDO 2
GAUGES
Rating
(AMP.)
5
10
10
15
10
10
PIUTURN
HTR-A/C
15
25
WIPER
F/P
RDO 1
CTSY
25
10
WDO
CRUISE
TURN-B/U
S/LP
FTP
ACC
HDLP
30
1Vse Usage
196
10
15
10
15
20
20
30
20
Circuitry
Instrument Panel Lamps
Electronic Control Module, FuelInjectors
Automatic Door Unlock (Removeto Disable)
Cigarette Lighter, GloveBox Light
Radio Power
Gages, Audio Warning System, Cluster Telltales, TCC,
Rear Defogger Relay, BrakeTransaxle Shift Interlock,
Multiport Fuel Injection
Park and Turn Lamps
Heater and A/C Power, Daytime Running Lights
(Canada),Anti-Lock Brakes
Windshield Wipers
Fuel Pump
Radio Memory, Digital Clock
Interior Lights, Horn, Power Locks, Audible Warning
System, Remote Liftgate Release, Check Oil Light
Power Window (Circuit Breaker)
Cruise Control
Turn Signal, Back-Up Lamps
Stop Lamps, Hazard Flashers
Flash-To-Pass
Power Locks, Rear Window Defogger (Circuit
Breaker)
Headlamp (Circuit Breaker)
Headlight Wiring
Windshield Wipers
The headlight wiring is protectedby a
circuit breakerin the fuseblock. An
electrical overloadwill cause the lights
to go on andoff, orin some cases to
remain off. If this happens, have your
headlight system checked right away.
To access the headlight circuit breaker,
squeeze the plastic clip togetherand
remove.
The windshield wiper motor is
protected by a circuit breakerand a
fuse. If the motor overheats due to
heavy snow, etc., thewiper will stop
until the motor cools. If the overload is
caused by some electrical problem, have
it fixed.
Power Windows and Other Power
Options
Circuit breakersin thefuse panel
protect the power windowsand other
power accessories. Whenthe current
load istoo heavy, the circuit breaker
opens and closes, protectingthe circuit
until the problem is fixed.
Service & Appearance Care
Capacities & Specifications
Engine Crankcase.......................................................................................... 4.0 quarts
3.80 L
When changing filter, up to0.5 quart (0.5 liter) more oil may be needed.
Automatic Transaxle ....................................................................................
Pan Removal and Replacement................................................................... 4.0 quarts
3.80 L
After Complete Overhaul........................................................................... 6.9 quarts
6.60 L
When draining or replacing torque converter, morefluid may be needed.
Manual Transaxle .........................................................................................
Complete Drainand Refill ........................................................................... 2.0 quarts
1.90 L
Cooling System .............................................................................................
2.2L L4 ......................................................................................................... 11.7 quarts
11.1L
3.1L V6 ......................................................................................................... 14.2 quarts
13.5 L
Refrigerant (R-12),Air Conditioning ........................................................ 2.25 pounds
1.02 kg
Not all air conditioning refrigerants are the same.If the air conditioning
system in your vehicle needs refrigerant,
be sure the proper refrigerant
is used. I f you’re not sure, ask your Chevrolet dealer.
For additional
information,see your “Warranty and Owner Assistance
Information” booklet.
Fuel Tank ..................................................................................................... .15.2 gallons
57.5 L
Power Steering
Pump Only ................................................................................................... 1.00 pint
0.50 L
Complete System......................................................................................... 2.25 pints
1.25 L
Tire Pressures, Sizes .................................................................................... See Tire-Loading Information labelon driver’s door.
Wheel Nut Torque ....................................................................................... 100 pound-feet 140 Nom
NOTE: All capacities are approximate. When adding, be
sure to fill to theappropriate level,as recommended in this manual.
,
Fluids & Lubricants
ITEM
APPLICATION
GM PART NUMBER
SIZE
Antifreeze Coolant...................................... .Year-Round Antifreeze for
(3.8 L)
1 gal.
Coolant Mixtures ........................................
1052753
(Ethylene Glycol Base)
14 oz.
1052497
Chassis Lubricant (Grease Gun Insert) ..... General Chassis Lube, etc. ...........................
(397 8)
(0.5 L)
16 oz.
Delco Supreme 1l@
Brake Fluid ................ Brake Systemand Clutch Master Cylinder... 1052535
Automatic Transmission Fluid.................... Automatic Transaxle
(1.0 L)
32 oz.
12346143
DEXRON@-I11....................................................................................................................
32 oz.
(1.0 L)
12345881
DEXRONa-IIE ..................................................................................................................
(1.0 L)
32 oz.
12345349
Synchromesh Transmission Fluid .............. Manual Transaxle .........................................
16 oz.
(0.5 L)
GM Hydraulic Fluid .................................... Clutch Master Cylinder.................................
12345347
Engine Oil .................................................... Engine Lubrication ....................................... See the Index under Engine Oil.
your
dealer
for
advice
............................. 1052367
16 oz.
(0.5 L)
GM Engine Oil Supplement (E.O.S.) ........ See
Hood, Trunk and Door Hinges
Engine Oil ....................................................
Windshield Washer Solvent........................ Windshield Washer Fluid
Steering
System
................................. 1050017
32 oz.
(1.O L)
Power Steering Fluid................................... Power
1052884
16 oz.
(0.5 L)
DielectricSiliconeGrease
........................... Weatherstrips ................................................ 12345579
1oz. (0.028 kg)
Spray-A-Squeak Silicone Lubricant........... General Purpose SiliconeLubricant,
Weatherstrips ................................................ 1052276 (aerosol) 4.5 oz (127 g)
1052277
12 02. (0.35 L)
I
Replacement Bulbs
OUTSIDE LIGHTS
BULB
Back-up Lights ..........................................................................
Front Parkinflurn Signal Lights ............................................
Center High Mount Stoplight
Inside (Carpet Covered) .........................................................
Inside (Pedestal Mount) ........................................................
Outside ....................................................................................
Halogen Headlights
HigWLow Beam .....................................................................
Front Side Marker Lights .........................................................
Rear Side Marker Lights ...........................................................
StopiTaiVTurn Signal Lights (Coupe) .....................................
Stopflurn Signal Lights (Sedan) .............................................
Taillights (Sedan) ......................................................................
Trunk Light ...............................................................................
Wagon: Rear Side Marker Lights .............................................
.
200
1156
2357NA
1141
1156
577
9004
194
24
2057
2057
194
912
194
INSIDE LIGHTS
BULB
Dome Light
Wagon Rear Compartment and Base ..................................... 562
Dome/Reading Light
Front ....................................................................................... 168
Rear .........................................................................................
194
Heater & A/C Control ..............................................................
74
High-Beam Indicator ................................................................ 194
Indicator Lights
194
Brake. Oil. Turn Signals .........................................................
Charge. Malfunction Indicator. Fasten Safety Belts. Temp.. 168
Tailgate Ajar ..............................................................................
37
PRNDL ......................................................................................
74
Glove Box .................................................................................. 194
561
Wagon: Rear Compartment Light ............................................
Service & Appearance Care
Engine Specifications
VIN Engine Code .....................................................................
Type ..........................................................................................
Displacement ...........................................................................
Compression Ratio ........,.................... ... ........... ........................
Firing Order .............................................................................
Thermostat Temperature .........................................................
2.2L L4
4
14
2.2 Liters
8.85:1
1-3-4-2
195°F (91°C)
Normal Maintenance ReplacementParts
Air Cleaner Element
2.2L L4 ..................................................................................... AC Type A-1172C
3.1L V6 ................................................................................... AC Type A-1098C
2-24 ..................................................................................... AC Type A-925C
Engine Oil Filter
2.2L L4 ....................................................................................
AC Type PF-47
3.1L V6 ....................... ,..................... .... ....
.............................. AC Type PF-47
PCV Valve
AC Type CV-9OOC
2.2L L4 ....................................................................................
3.1L V6 ...................................................................................
AC Type CV-892C
Spark Plugs
2.2L L4 .................................................................................... AC Type 041-908
Gap: 1.52 mm (0.060 inch)
3.1L V6 ................................................................................... AC Type R44LTSM
Gap: 1.14 mm (0.045 inch)
I . .
1
202
3.1L V6
T
V6
3.1 Liters
8.80:1
1-2-3-4-5-6
195°F (91OC)
Part
7
Maintenance Schedule
T h i s part covers the maintenance Section
Introduction
. Your
required for your Chevrolet
A Word About Maintenance ...........................................................................
vehicle needs these services
to
Your Vehicleand theEnvironment.................................................................
retain itssafety. dependability and
How This Part is Organized ............................................................................
.
emission control performance
A. Scheduled Maintenance Services
Using Your Maintenance Schedule
.................................................................
Selecting the Right Schedule...........................................................................
Schedule I .........................................................................................................
Schedule I1 .......................................................................................................
Explanation of Scheduled Maintenance Services...........................................
B. Owner Checks& Services
At Each Fuel Fill..............................................................................................
At Least Once a Month ...................................................................................
Have you purchased the
At Least Twice a Year
.......................................................................................
GM Protection Plan?
At LeastOnce a Year.......................................................................................
The Plan supplements your new
C.Periodic Maintenance Inspections..............................................................
vehicle warranties
.
D.Recommended Fluids& Lubricants ...........................................................
See your Chevrolet dealer for
details.
E.Maintenance Record.....................................................................................
204
204
204
205
205
206
208
210
212
213
213
214
216
217
219
203
I .
1
Maintenance Schedule
Your Vehicle andthe Environment
Proper vehiclemaintenance not only
helps to keep your vehiclein good
A Word About Maintenance
working
condition, but also helps the
We at General Motors want to help you
environment. All recommended
keep your vehiclein good working
condition. But we don’t know exactly maintenance procedures are important.
how you’ll driveit. You may drive very Improper vehicle maintenance or the
short distances only a fewtimes a week. removal of important components can
significantly affectthe quality of the air
Or you may drive longdistances all the
we breathe. Improper fluid levelsor
time in very hot, dusty weather. You
even the wrong tire inflation can
may use your vehiclein malting
increase the level of emissions from
deliveries. Or you may driveit to work,
your
vehicle.To help protect our
to do errands or in many other ways.
environment, and to help keep your
Because of all the different ways people vehicle in good condition, please
use their GM vehicles, maintenance
maintain your vehicle properly.
needs vary. You may even need more
frequent checks and replacements than
How This Part is Organized
you will findin theschedules in this
part. So please read this part and note
The remainder of this part is divided
how you drive.If you have any
into five sections:
questions on how to keep your vehicle “Section A: Scheduled Maintenance
in good condition, see your Chevrolet
Services” showswhat to have done and
dealer, the place manyGM owners
how often. Some of these services can
choose to have their maintenance work be complex,so unless youare technically
done. Your dealercan be relied upon to qualified and have the necessary
use proper parts and practices.
equipment, you should let your dealer’s
service department or another qualified
service center do these jobs.
B
B
204
If you are skilled enoughto do some
work on your vehicle, you will probably
want to get the service information GM
publishes. You will find alist of
publications and how to get them in
this manual. See Service Publications
in the Index.
“Section B: Owner Checksand
Services” tells youwhat should be
checked whenever youstop for fuel. It
also explains what you can easily do to
help keep your vehiclein good
condition.
“Section C: Periodic Maintenance
Inspections” explains important
inspections that your Chevroletdealer’s
service department or another qualified
service center should perform.
“Section D: Recommended Fluidsand
Lubricants” lists some products GM
recommends to help keep your vehicle
properly maintained. These products, or
their equivalents, should be used
whether you do thework yourself or
have it done.
“Section E: Maintenance Record”
provides a placefor you to record the
maintenance performed on your vehicle.
Whenever any maintenance is
performed, be sureto write it down in
this section. This will help you
determine when your next maintenance
should be done. In addition, it is a good
idea to keep your maintenance receipts.
They maybe needed to qualify your
vehicle for warranty repairs.
Section A: Scheduled
Maintenance Services
Selecting theRight Schedule
First you’llneed to decide whichof the
two schedules is right for your vehicle.
Here’s how to decide whichschedule to
follow:
Using Your Maintenance
Schedule I
Schedule
Is any one of these true for your
This section tells you the maintenance
vehicle?
services youshould have done and
when you should schedule them. Your
Most trips areless than 4 miles
Chevrolet dealer knows your vehicle
(6 l a ) .
best and wants you to be happy with it.
Most trips areless than 10 miles
If you go to your dealer for your service
(16 km) when outside temperatures
needs, you’ll lmowthat GM-trained and
are below freezing.
supported service people will perform
The engine is atlow speedmost of the
the work using genuine GM parts.
time (as indoor-to-door delivery, or in
These schedules are for vehicles that:
stop-and-go traffic).
carry passengers and cargo within
You operate your vehiclein dusty
recommended limits. You will find
areas.
these limits on your vehicle’sTireIf any one (or more) of these is truefor
Loading Information label. See
your driving, followSchedule I.
Loading Your Vehicle in theIndex.
Schedule I1
are driven on reasonable road
surfaces within legal driving limits.
Follow Schedule I1 only if none of the
above conditions is true.
use the recommended unleaded fuel.
See Fuel in the Index.
Maintenance Schedule
Schedule I
Follow ScheduleI if your vehicle is
MAINLY driven underone or more of
the following conditions:
When most trips are less than 4 miles
(6 km).
When most trips are less than 10
TO BE SERVICED
ITEM
See Explanation of Scheduled Maintenance
miles (16 ltm) and outside
Nom Services following SchedulesI and 11.
temperatures remain below freezing.
When most trips include extended
idling and/or frequent low-speed
I 2 ILubrication
Chassis
I
operation, as in stop-and-go traffic.
When operating industy areas.
I 4 I EngineAccessoryDrive Belt(s) Inspection* I
Schedule I should also be followedif
the vehicle is used for delivery service,
police, taxi or other commercial
applications.
* = An Emission Control Service.
t = The US.Environmental Protection Agency
or the California Air Resources Board
has
determined that thefailure to perform this
maintenance item will not nullify the
emission warranty or limit recall liability
prior tothe completion of vehicle useful life.
General Motors, however, urges
that all
recommended maintenance servicesbe
performed at the indicated intervals and the
maintenance be recorded in “SectionE:
Maintenance Record.”
WHEN TO PERFORM
Miles (kilometers)or Months
(whicheveroccurs first).
Every other oil change.
I
Every 30,000 Miles (50 000 km)or 24 Months. I
The services shownon this chart up to60,000 miles (100 000 km)should be performed
after 60,000 miles at the same intervals.
MILES (000)
3 1 6 1 9 112115118121 124127130133136139142145148151 154157160
KILOMETERS (000)
. I 1 . 11 . 1
I
I
1.1 1.1
I
I
I
I
I
1 . 11 . 1
I
I
.
I
I
1.1
I
I
I
I
1.1
'
I
I
1.1
I
I
.
I I I I I I I I I I I I I I I I I I I
C
207
Maintenance Schedule
Schedule /I
Follow ScheduleI1 ONLY if noneof
the driving conditions specified in
Schedule I apply.
WHEN TO PERFORM
TEM
TO BE SERVICED
Explanation of Scheduled Maintenance
No' SeeServices
following SchedulesI and 11.
Miles (kilometers)or Months
(zuhichever occursfirst).
2
I Chassis Lubrication
I Everv 7.500 Miles (12 500 lun) or 12 Months.
12
I
I
* = An Emission Control Service.
t = The U S . Environmental Protection Agency
or the CaliforniaAir Resources Boardhas
determined that the failure to perform this
maintenance item will not nullify the
emission warranty or limit recall liability
prior to the completion of vehicle useful life.
General Motors, however, urges that all
recommended maintenance services be
performed at the indicated intervals and the
maintenance be recorded in "Section E:
Maintenance Record."
Fuel Tank, Cap & Lines1nspection"t
Every 30,000 Miles (50 000 km).
r
I
The servicesshown on this chart up to 60,000 miles (1 00 000 km) should be performed
after 60,000 miles at the same intervals.
MILES (000)
5 17.5
I
10
I 15 I 20 (22.51 25 I 30 I 35137.5140
KILOMETERS (000)
8 112.5116
I 25 I 32137.51
40
I 50 I 56
162.5164
I
45
I 50 152.51 55 I 60
I 75183.5187.5(92
I 100
.
Maintenance Schedule
Explanation of Scheduled
Maintenance Services
Following are explanations of the
services listed in ScheduleI and
Schedule 11.
The proper fluids and lubricants to use
are listed in Section D. Make sure
whoever servicesyour vehicle uses
these. All parts should be replacedand
all necessaryrepairs done before you or
anyone else drivesthe vehicle.
ITEM
NO.
SERVICE
4. Engine Accessory DriveBelt(s)
Inspection * - Inspect the belt (s)
for cracks, fraying, wear and proper
tension. Replace as needed. (Belts
Always use SH or SG Energy
can have many small cracks in
Conserving I1 oils of proper viscosity.
individual ribswithout affecting
The “SH” or “SG” designation may
performance.)
be shown alone or in combination
with others, such as “SH/CD,” “SH, 5. Cooling System Service*- Drain,
SG, CD,” “SG/CD,” etc. To
flush and refill the system with new
determine the preferred viscosity for
or approved recycledcoolant
your vehicle’s engine (e.g., SAE 5Wconforming to GM Specification
30 or SAE 10W-30),see Engine Oil
1825M. Keep coolant at the proper
in the Index.
mixture as specified. SeeCoolant in
the Index. This provides proper
2. Chassis Lubrication- Lubricate
freeze and boil protection, corrosion
the suspension and steering linkage.
inhibitor level and maintains proper
Lubricate the transaxle shift linkage.
engine operating temperature.
3. Tire and Wheel Rotation and
Inspect hoses and replace if they are
Inspection - For proper wear and
cracked, swollen or deteriorated.
maximum tire life, rotate your tires
Tighten
screw-type hose clamps.
following the instructions in this
Clean
the
outside of the radiator and
manual. See Tires, Inspection G
air conditioning condenser. Wash the
Rotation in the Index. Check the
pressure
cap and neck.
tires for uneven wearor damage. If
To help ensure proper operation, we
you see irregular orpremature wear,
check the wheel alignment. Check for recommend a pressure testof both the
cooling system andthe pressure cap.
damaged wheels also.
1. Engine Oil and Filter Change*
-
8. Spark Plug Replacement (P.2L
6, Transaxle Service- For manual
Code 4 engine only)* - Replace
transaxles, fluid doesn’t require
spark plugswith the proper type.
changing. SeePeriodic Maintenance
See Replacement Parts in the
Inspections in the Index. For
Index.
automatic transaxles, changeboth
the fluid and filter every15,000 miles 9. Spark Plug WireInspection*t (25 000 km)if the vehicle is mainly
Inspect forburns, cracks or other
driven under one or moreof these
damage. Checkthe boot fit at the
conditions:
coils and at the spark plugs. Replace
wires as needed.
In heavy city trafficwhere the outside
temperature regularly reaches 90°F
I O . Exhaust Gas Recirculation (EGR)
(32°C) or higher.
System Inspection (2.2L Code4
engine only)*? - Conduct the
In hilly or mountainous terrain.
EGR
system serviceas described in
Uses such as found in taxi, police car
the service manual. To purchase a
or delivery service.
service manual, seeService
If you do not use your vehicleunder
Publications in the Index.
any of these conditions, change both
1 1. Air Cleaner Filter Replacement*‘
the fluid and filter every100,000 miles
- Replace every30,000 miles
(166 000 lun).
(50 000 km)or more oftenunder
7. Spark Plug Replacement (Except
dusty conditions. Ask your dealer
2.2L Code 4 engine)*- Replace
for the proper replacement intervals
spark plugs with the proper type. See
for your driving conditions.
Replacement Parts in the Index.
12. Fuel Tank,Cap and Lines
Inspection’#t- Inspect fueltank,
cap and lines (including fuel rails
and injection assembly) for damage
or leaks. Inspect fuel cap gasket for
an even filler neck imprint or any
damage. Replaceparts as needed.
Periodic replacement of the fuel
filter isnot required.
NOTE: To determine your engine’s
displacement and code, seeEngine
Identification in the Index.
* = An EmissionControl Service.
t = The U.S. Environmental Protection Agency
or the CaliforniaAir Resources Board has
determined that the failure to perform this
maintenance itemwill not nullify the
emission warrantyor limit recall liability
prior to the completion of vehicle useful life.
General Motors,however, urges that all
recommended maintenance services be
performed at the indicated intervals and the
maintenance be recorded in “SectionE:
Maintenance Record.”
Maintenance Schedule
Section B: Owner Checks and Services
h t e d below are owner checks and services which should be performed
at the intervals specified to help ensure the safety,
lependability and emission control performance
of your vehicle.
3e sure any necessary repairsare completed at once. Whenever any fluidsor lubricants are added to your vehicle, makesure
hey are the proper ones, as shown in Section D.
\t Each h e /
(It is important for you or a service station attendant to perform these underhood checks ateach fuel fill.)
CHECK
OR SERVICE
Engine Oil Level
Engine
Windshield Washer
Fluid
Level
necessary.
See
I
I
I
1
WHAT TO DO
Check the engine oil level and addthe proper oil if necessary. SeeEngine Oil in the Index for
further details.
Check the engine coolant leveland add the proper coolant mix if necessary. See Coolant in the
Index
details.
further
for
Check the windshield washer fluid level in
the windshield washer tank and add the proper fluidif
WindshieldWasher Fluid in the Index for further details.
CHECK
OR SERVICE
WHAT TO DO
TireInflation
Check tire inflation. Make sure they are inflated to the pressures specified on theTire-Loading
Information label located onthe rear edge of the driver’s door. See Tires in the Index for
further details.
Cassette Deck
Clean cassette deck. Cleaning should be done every15 hours of tape play. SeeAudio Systems in
the Index for further details.
At Least Twice a Year
CHECK
WHAT TO DO
OR SERVICE
Hydraulic Clutch Check
the fluid level in the clutch reservoir. See Hydraulic CZutch Huid in the Index. A fluid loss
System Inspection
in this system could indicate a problem. Have the system inspected and repaired at once.
213
I .
Maintenance Schedule
At Leasf Once a Year
-
CHECK
OR SERVICE
Key Lock Cylinders
Body Lubrication
-
Starter Switch
Bralte-Transaxle
Shift Interlock BTSI (Automatic
Transaxle)
z
A
WHAT TO DO
Lubricate the key lock cylinders withthe lubricant specified in Section D.
Lubricate all bodydoor hinges, rear compartment or tailgate. Also lubricate all hinges
and latches,
including those for thehood, glove boxdoor, console door and any folding seat hardware. Section
D tells vou what to use.
CAUTION: When you are doingthis check, the vehicle could move suddenly.
If it does, you
or others could be injured. Follow the steps below.
1. Before you start, be sure you have enough room around the vehicle.
2. Firmly applyboth the parking brake (see Parking Brake in the Index if necessary) and the
regular brake.
NOTE: Do not use the accelerator pedal,and be ready to turnoff the engine immediatelyif it starts.
3.On automatic transaxle vehicles, try
to start the engine in each gear. Thestarter should work only
in P (Park) or N (Neutral).If the starter worlts in any other position, your vehicle needs service.
On manual transaxle vehicles, put the shift lever inN (Neutral), push the clutch down halfway
and try to start theengine. Thestarter should workonly when the clutch is pushed down the
all
way to the floor. If the starterworlts when the clutch isn’t pushed allthe way down, your
vehicle needs service.
CAUTION: When you are doing this check, the vehicle could move suddenly.
If it does, you
or others could be injured. Follow the steps below.
1. Before you start, be sure you have enough room around the vehicle. It should be parked on a
level surface.
2. Firmly applythe parking brake (see Parking Brake in the Index if necessary),
NOTE: Be ready to apply the regular brake immediately if the vehicle beginsto move.
3.With the engine off,turn thekey to the RUN position, but don’t start theengine. Without
applying the regular brake, try to move the shift lever out of P (Park) with normal effort.If the
shift lever movesout of P (Park),your vehicle’s BTSI needs service.
I
CHECK
OR SERVICE
WHAT TO DO
~~
Steering Column
Lock
Parking Brake
and Automatic
Transaxle P (Park)
Mechanism Check
~~
~
While parked, and with the parking brake set, try to turn the key to LOCK in each shift lever
position.
With an automatic transaxle, the key should turn toLOCK only when the shift lever is in P
(Park).
With a manual transaxle, the key should turn to LOCK only when the shift lever is inR
(Reverse).
On vehicles with a key release button, try to turn the key to LOCK without pressing the button.
The key should turn toLOCK only with the key button depressed. On all vehicles,the key
should come out only in LOCK.
Turn the steering wheel to theleft and to theright. It should only lockwhen turned to the right.
CAUTION: When you are doing thischeck, your vehicle could beginto move. You or others
could be injured and property could be damaged. Make sure there
is room in frontof your
once should the vehicle
vehicle in caseit begins to roll. Be readyto apply the regular brake at
begin to move.
Park on a fairly steep hill, with the vehicle facing downhill. Keeping yourfoot on the regular
brake, set the parking brake.
To check the parking brake: Withthe engine running and transaxle in N (Neutral),slowly
remove footpressure from the regular brake pedal. Do this until the vehicle is heldby the
parking brake only.
To check the P (Park) mechanism’sholding ability: Shiftto P (Park). Then release allbrakes.
At least every spring, use plain water to flush any corrosivematerials from the underbody. Take
care to clean thoroughly anyareas where mud and other debris can collect.
Maintenance Schedule
Section C: Periodic Maintenance Inspections
Listed below are inspections and services which should
be performed at least twice
a year (for instance, eachspring and fall). You should let
JourGM dealer’s service department or other qualified service center
do these jobs. Make sure any necessary repairs are completed at once.
INSPECTION
OR SERVICE
WHAT SHOULD BE DONE
~
Restraint Systems
Steering, Suspension
and Front-WheelDrive Axle Bootand
Seal InsDection
Exhaust System
Inspection
Throttle Linkage
Inspection
Manual Transaxle
Brake System
Inspection
.
2
1
6
~~~~~~
11
Now and then, make sure all your belts, bucltles, latch plates,retractors, anchorages and
reminder systems are worlting properly. Look for any loose
parts or damage. If you see anything
that might keep arestraint system from doing its job, have it repaired.
Inspect the front and rear suspension and steering system for damaged, loose or missing
parts,
signs of wear, or lackof lubrication. Inspect the power steering lines and hoses for proper hookup, binding, leaks, cracks, chafing,etc. Clean and then inspect the drive axle boot seals for
damage, tears or leakage. Replace sealsif necessary.
Inspect the complete exhaust system. Inspectthe body near the exhaust system. Look for broken,
damaged, missing or out-of-positionparts as well as open seams, holes, loose connections, or
other conditions which could cause a heat build-upthe
in floor pan or could let exhaust fumes
into thevehicle. SeeEngine Exhaust in the Index.
.Inspect the throttle linkage for interferenceor binding, and for damaged or missing
parts.
Replace parts as needed.
Check the transaxle fluid level; addif needed. See Manual Transaxle in the Index. A fluid loss
may indicate a problem. Checkthe system and repair if needed.
Inspect the complete system. Inspect brake lines and hoses for proper hook-up, binding, leaks,
cracks, chafing, etc. Inspect disc brake pads for wear and rotors for surface condition. Also inspect
drum brake linings for wear
and cracks. Inspect other brake parts, including drums, wheel
cylinders, calipers, parking brake, etc. Check parking brake adjustment.
You may need to have
your brakes inspected more often
if your driving habits or conditions result in frequent braking.
NOTE: A low brake fluid level can indicate worn disc brake pads which may need
to be serviced.
Also, if the brake system warning light stayson or comes on, something may be wrong with the
brake system. SeeBrake System Warning Lightin the Index. If your anti-lock brake system
warning light stayson, comes on or flashes, somethingmay be wrong with the anti-lock brake
system. SeeAnti-Lock Brake System Warning Light in the Index.
Maintenance Schedule
Section D: Recommended Fluids and Lubricants
VOTE: Fluids and lubricants identified below by name, part number or specificationmay be obtained from your GM dealer.
~~
~
FLUID/LUBRICANT
USAGE
~~~~
Engine Oil
API serviceSH or SG Energy ConservingI1 oils of the proper viscosity. The“SH” or “SG” designation
may be shown alone or in combination with others, such
as “SH/CD,” “SH,SG,CD,”“SG/CD,” etc.
To determine the preferred viscosity for your vehicle’s
engine, see Engine Oil in the Index.
Engine Coolant
50/50 mixture of water (preferably distilled) and good quality ethylene glycolbase antifreeze
(GM Part No. 1052753 or equivalent) conforming to GM Specification 1825M or approved
recycled coolant conforming to GM Specification 1825M.
Hydraulic Brake
System
Hydraulic Clutch
System
Delco Supreme 110 Brake Fluid (GM Part No. 1052535 or equivalent DOT-3 brake fluid).
~
Hydraulic Clutch Fluid (GM Part No. 12345347 or equivalent).
Power Steering
System
GM Hydraulic Power Steering Fluid (GM Part No. 1052884 or equivalent).
~
~~~
Manual Transaxle
Synchromesh Transmission Fluid (GM Part No. 12345349 or equivalent).
Automatic Transaxle
DEXRONo-I11 or DEXRONs-IIE Automatic Transmission Fluid.
Key Lock Cylinders
Manual Transaxle
Shift Linkage
Lubricate with Multi-Purpose Lubricant (GM Part No. 12345120) or synthetic SAE 5W-30 engine
oil.
Chassis lubricant (GM Part No, 1052497 orequivalent) or lubricant meeting requirements of
NLGI Grade 2, Category LB or GC-LB.
Maintenance Schedule
USAGE
FLUlD/LUBRICANT
Automatic Transaxle
Shift Linkage
Engine oil.
Clutch Linkage Pivot
Points
Engine oil.
Chassis Lubrication
Chassis lubricant (GM Part No. 1052497 or equivalent) or lubricant meeting requirements of
NLGI Grade 2, Category LB or GC-LB.
Windshield Washer
GM Optikleen@Washer Solvent (GMPart No. 1051515) or equivalent.
Solvent
Hood Latch Assembly
a. Pivots and Spring
a. Engine oil.
Anchor
b. Release Pawl
b. Chassis lubricant (GM Part No. 1052497 or equivalent) or lubricant meeting requirements of
NLGI Grade 2, Category LB or GC-LB.
Hood and Door Hinges,
Fuel Door Hinge, Rear
Compartment Lid
Hinges, Wagon Tailgate Engine oilor Lubriplate Lubricant (GM Part No. 1050109).
Hinge, Rear Folding
seat
Weatherstrips
Dielectric SiliconeGrease (GM Part No. 12345579or equivalent).
jee RepZacement Parts in the Index for recommended replacementfilters, valves and spark plugs.
Section E: Maintenance Record
After the scheduled services are performed, recordthe date,odometer reading and who performedthe service in thecolumns
indicated. When completingthe Maintenance Performed column, insert the numbers from the Schedule I or Schedule I1
maintenance charts which correspond to themaintenance performed. Also,you should retain all maintenance receipts. Your
owner information portfolio is a convenient place to store them.
DATE
ODOMETER
READING
SERVICED BY
MAINTENANCE PERFORMED
Maintenance Schedule
DATE
220
ODOMETER
READING
SERVICED BY
MA/WENA/UC€PERFORMED
Part
8
Customer Assistance Information
H e r e you will find out how to
contact Chevrolet if you need
assistance. This partalso tells you
how to obtain service publications
and howto report any safety
Customer Satisfaction Procedure ...........................................................................
222
Customer Assistance for Hearing or Speech Impaired .........................................223
BBB Auto Line-Alternative Dispute Resolution Program....................................223
224
Reporting Safety Defects........................................................................................
Chevrolet RoadsideAssistance Program................................................................ 225
Service Publications................................................................................................ 227
Customer Assistance Information
Customer Sati#action
Procedure
Your satisfaction and goodwill are
important to your dealer and Chevrolet.
Normally, any concern withthe sales
transaction or the operation of your
vehicle will be resolved by
yo11:r-dealer’s
Sales or Service Departments
Sometimes, however, despitethe best
intentions of all concerned,
misunderstandings can occur If your
concern has not been resolve(to your
satisfaction, the following steps should
be taken:
STEP ONE - Discuss your concern
with a memberof dealership
management. Normally, concerns can
be quicltly resolved at that level. If the
matter has already been reviewed with
the Sales, Service, or Parts Manager,
contact the owner of the dealership or
the General Manager.
STEP TWO- If after contacting a
member of dealership management, it
appears your concerncannot be
resolved by the dealership without
further help, contactthe Chevrolet
Customer Assistance Centerby calling
1-800-222-1020. In Canada, contact
GM of Canada Customer Assistance
Center in Oshawaby calling
1-800-263-3777 (English) or
1-800-263-7854 (French).
In Mexico, call (525) 254-3777. In
Puerto Rico or U.S. Virgin Islands, call
1-809-763-1315. In allother overseas
locations, contact GM North American
Export Sales in Canadaby calling
1-905-644-4112.
For prompt assistance, please havethe
following information availableto give
the Customer Assistance
Representative:
Your name, address, home and
business telephone numbers
Vehicle Identification Number (This
is available from the vehicle
registration or title, or the plate at the
left top of the instrument panel and
visible through the windshield.)
Dealership name and location
Vehicle delivery date and present
mileage
Nature of concern
We encourage you to call the toll free
number listed previously in orderto
give your inquiry promptattention.
However, if you wish to write
Chevrolet, write to:
Chevrolet Motor Division
Chevrolet Customer Assistance Center
P. 0. Box 7047
Troy, MI 48007-7047
Refer to your Warranty and Owner
Assistance Information booklet for
addresses of Canadian and GM
Overseas offices.
When contacting Chevrolet, please
remember that your concern w
l
ilikely
be resolved in thedealership, using the
dealership's facilities, equipment and
personnel. That is why we suggest you
follow Step Onefirst if you have a
concern.
Customer Assistance
for the
Hearing or Speech Impaired
(TW
To assist owners who have hearing
difficulties, Chevrolethas installed
special TDD (Telecommunication
Devices forthe Deaf) equipment at its
Customer Assistance Center. Any
hearing or speech impaired customer
who has access to a TDDor a
conventional teletypewriter (TTY) can
communicate with Chevrolet by dialing:
1-800-TDD-CHEV. (TDDusers in
Canada can dial 1-800-263-3830.)
program is available freeof charge to
customers who currently own or lease a
GM vehicle.
If you are not satisfied after following
the Customer Satisfaction Procedure,
Both Chevrolet and your Chevrolet
you may contact the BBB using the tolldealer are committed to making sure
free telephone number, or write them at
you are completely satisfiedwith your
the following address:
new vehicle.If a situation arises where
BBB AUTO LINE
you feel yourconcern has notbeen
Council of Better Business Bureaus
adequately addressed, our experience
4200 Wilson Boulevard
has shown that theCustomer
Satisfaction Procedure described earlier Suite 800
Arlington, VA 22203
in this section is very successful.
Telephone: 1-800-955-5100
There may be instances where an
To file a claim, you will
be asked to
impartial third-party can assist in
provide
your
name
and
address,
your
arriving at a solution to a disagreement
vehicle identification number (VIN),
regarding vehiclerepairs or
and a statement of the natureof your
interpretation of the New Vehicle
Limited Warranty. To assist in resolving complaint. Eligibility is limited by
vehicle ageand mileage, and other
these disagreements Chevrolet
factors.
voluntarily participates in BBB AUTO
We prefer you utilizethe Customer
LINE.
Satisfaction Procedure before youresort
BBB AUTOLINE is an out-of-court
to AUTO LINE,but you may contact
program administered by the Better
the BBB at any time. The BBB will
Business Bureau systemto settle
attempt to resolve the complaint serving
disputes between customers and
as an intermediary between you and
automobile manufacturers. This
Chevrolet. If this mediation is
GM Participation in'BZ9.B
AUTO LINE- Al'ternutive
Resolution Program*
Customer Assistance Information
unsuccessful, an informal hearingwill
be scheduled where eligiblecustomers
may present their case to an impartial
third-party arbitrator.
The arbitrator will make a decision
which you may accept or reject. If you
accept the decision, GM will be bound
by that decision. The entire dispute
resolution procedure should ordinarily
take about forty days fromthe time you
file a claimuntil a decisionis made.
Some state laws mayrequire you to use
this program before filing a claim
with a
state-run arbitration program or inthe
courts. For further information, contact
the BBB at 1-800-955-5100 orthe
Chevrolet Customer AssistanceCenter
at 1-800-222-1020.
REPORTING SAFETY
DEFECTS TO THE UNITED
STATES GOVEI"ENT
If you believethat your vehiclehas a
defect which couldcause a crash or
could cause injury or death, you should
immediately informthe National
Highway Traffic SafetyAdministration
(NHTSA), in addition to notifying
General Motors.
If NHTSA receives similarcomplaints,
it may open an investigation, and if it
finds that a safety defectexists in a
group of vehicles, it may order a recall
and remedy campaign. However,
NHTSA cannot become involved in
individual problems between you, your
dealer, orGeneral Motors.
"This program maynot be available in all states, To contact NHTSA, youmay either call
depending on state law.Canadian owners refer the Auto Safety Hotline toll-free at
to your Warranty and Owner Assistance
1-800-424-9393(or 366-0123 in the
informationbooklet. General Motors reserves
Washington,
D.C. area) or write to:
the right to change eligibility limitations and/or
to discontinue its participation
in this program.
NHTSA
U.S. Department of Transportation
Washington, D.C. 20590
You can also obtain other information
about motor vehicle safety fromthe
Hotline.
REPORTlRTG SAFETY
DEFECTS TO THE
CMDWG0W-M
If you live in Canada, and you believe
that your vehiclehas a safety defect,
you should immediately notify
Transport Canada, in addition to
notifying General Motors of Canada
Limited. You may write to:
Transport Canada
Box 8880
Ottawa, Ontario K1G 3J2
24-Hour Roadside Assistance
Number
4 REPORTING SAFETY
DEFECTS TO GENERAL
MOTORS:
In addition to notlfying NHTSA (or
Transport Canada) in a situation like
this, we certainly hope~ 0 ~ notify
~ 1 1us.
Please call us at 1-800-222-1020, or
write:
Chevrolet Motor Division
Chevrolet Customer Assistance Center
P. 0.Box 7047
Troy, MI 48007-7047
In Canada, please callus at
1-800-263-3777 (English) or
1-800-263-7854 (French). Or,write:
General Motors of Canada Limited
Customer Assistance Center
1908 Colonel Sam Drive
Oshawa, Ontario L1H 8P7
IChevrolet
Roadside
Assistance Program
I‘o enhance Chevrolet’s strong
commitment to customer satisfaction,
Chevrolet is excited to announce the
establishment of the Chevrolet/Geo
Roadside Assistance Center.As the
owner of a 1994 Chevrolet/Geo, your
membership in Roadside Assistance is
free.
Roadside Assistance is available 24
hours a day,365 days a year,by calling
1-800-CHEV USA (1-800-243-8872).
This toll-free number will provide you
over-the-phone roadside assistance with
minor mechanical problems.If your
problem cannot be resolved overthe
phone, our advisors have accessto a
nationwide network of dealerrecommended service providers. The
following servicesare available:
Towing
Locltsmith
Tire repair
Glass replacement
Rental car or taxi
Additional services as necessary
Courtesy Transportation
Customer Assistance Information
Chevrolet/Geo offers Courtesy
Transportation for customers needing
warranty service. Courtesy
Transportation will be offeredin
conjunction withthe coverage provided
by the Bumper-to-Bumper New Vehicle
Limited Warrantyto retail purchasersof
1994 Chevrolet/Geo passenger carand
light duty trucks.
Courtesy Transportation includes:
One way shuttle ride for any warranty
repair.
Up to $30 maximum daily vehicle
rental allowance for any overnight
warranty repairup to 5 days.
Up to $30 maximum daily cab,bus, or
other transportation allowance in lieu
of rental for any overnight warranty
repair up to 5 days.
Up to $10 daily fuel allowance for
rides providedby another person (i.e.,
friend, neighbor, etc.) in lieu of rental
for any overnight warranty repair
up
to 5 days.
Note: All CourtesyTransportation
arrangements will be administeredby
your Chevroiet/Geo dealership service
management. Claim amounts should
reflect all actual costs.
Chevrolet/Geo Courtesy
Transportation is not part of the
Bumper-to-BumperNew Vehicle
Limited Warranty. Chevrolet/Geo
reserves the right to make any
changes or discontinue Courtesy
Transportation at any timewithout
notification.
For additional program details contact
your Chevrolet/Geo dealer.In
Canada, please consult yourGM
dealer for information on Courtesy
Transportation.
The Roadside Assistance Center uses
companies that will provide you with
quality and priority sevice. When
roadside services are required, our
advisorswillexplainanypayment
obligations that may be incurred for
utilizing outside services.
For prompt assistancewhen calling,
please havethe following availableto
give to the advisor:
Vehicle Identification Number
License plate number
Vehicle color
Vehicle iocation
Telephone number whereyou can be
reached
Vehicle mileage?
Description of problem
Please referto the Roadside Assistance
brochure inside your owner information
portfolio for full program details.
Cambia# Roadside Assistance
Vehicles purchasedin Canada havean
extensive Roadside Assistance program
accessible from anywherein Canada or
the U.S.A. Please referto the separate
brochure providedby the dealer or call
1-800-268-6800for emergency services.
Service Publications
Information on how to obtain Product
Service Publications and Indexes as
described below is applicable only
in thc
fifty U.S.states (and the District of
Columbia) and only forcars and light
trucks with GVWR less than 10,000
pounds ( 4 536 kg).
In Canada, information pertaining to
Product Service Bulletinsand Indexes
can be obtained by writing to:
General Motors of Canada Limited
Service Publications Department
1908 Colonel Sam Dr.
Oshawa, Ontario L1H 8P7
Chevrolet regularly sends its dealers
useful servicebulletins about Chevrolet
products. Chevrolet monitors product
performance in the field. We then
prepare bulletins for servicing our
products better. Now, you can get these
bulletins too.
I
Bulletins covervarious subjects. Some
pertain to theproper use and care of
your vehicle. Some describe costly
repairs. Others describe inexpensive
repairs which, if done on time with the
latest parts, may avoid future costly
repairs. Some bulletins tell a technician
how to repair a newor unexpected
condition. Others describe aquicker
way to fix your vehicle. They
can help a
technician service your vehiclebetter.
Most bulletins apply to conditions
affecting a smallnumber of cars or
trucks. Your Chevroletdealer or a
qualified technician may haveto
determine if a specificbulletin applies
to your vehicle.
What You’ll Find inthe Index:
A list of all PSP’s publishedby
Chevrolet in a model year(1990 or
later). PSP’s covering all modelsof
Chevrolet vehiclesare listed inthe
same index.
Ordering information so you can buy
the specific PSP’s you may
want.
Price information for the PSP’s you
may want to buy.
How You Can Get an Index:
Indexes are published periodically.
Most of the PSP’s which could
potentially applyto the most recent
Chevrolet modelswill be listedin the
most recent publication for that model
Individual PSP’s
year. This means you may want to wait
until the end of the model year before
If you don’t want to buy all the PSP’s
issued by Chevrolet for all models
in the ordering an index, if you are interested
in buying PSP’s pertaining to a current
model year, youcan buy individual
PSP’s, such as thosewhich may pertain model year caror truck.
to a particular model. To do this, you
Some PSP’spertaining to a particular
will first need to see our index of PSP’s. model year vehicle may be published
in
It provides a varietyof information.
later years, and these would be listedin
Here’s what you’ll find in theindex and the later year’s index. When you order
how you can get one:
an index for a model year
that is not
Customer Assistance Information
over yet, we’ll send you the most
recently published issue. Check the
ordering form for indexes for earlier
model years.
Cut out theordering form, fillit out,
and mail it in. We will then see to it that
an index is mailed to you. There is no
charge for indexes for the 1990-1994
model years.
228
Toll-Free Telephone Number
Chevrolet Senrr’ce Publications
If you want an additional ordering form
for an index or a subscription, just call
toll-free and we’ll be happyto send you
one. Automated recording equipment
will take your name and mailing
address. The number to call is
1-800-551-4123.
A VERY IMPORTANT REMINDER:
These PSP’s are meant for technicians.
They are not meant for the“do-ityourselfer.” Technicians have the
equipment, tools, safety instructions,
and know-how to do a job quicklyand
safely.
You can get these by using the order
form. Chevrolet Division service
manuals are intended for use by
professional, qualifiedtechnicians.
Attempting repairs or service without
the appropriate training, tools and
equipment could cause injury to you or
others and damage to your vehiclethat
may cause it not to operate properly.
1994 CHEVROLET SERVICE PUBLICATIONS ORDERING INFORMATION
The folloWng publications covering the operation and servicing
of p u r vehicle canbe purchased by filling out the Service Publications Order Form
in thisbook and mailing it with your
check, money order or credit card information toHelm, Incorporated (address listed below).
CURRENT PUBLICATIONSFOR 1994 CHEVROLET CAVALIER
SERVICE MANUALS
PRODUCT SERVICE PUBLICATIONS
Product Service Publications
(PSP’s), are bulletins, letters and articlesService Manuals have the diagnosis, repair and overhaul information
publishedfor trained dealer service personnel.
See Service Publica- on engines, transmission, axle, suspension, brakes, electrical, steertions listed previouslyin this section.
ing, body, etc.
A cumulative indexis published quarterlyduring the current model
Price
Number
Form
year. The indexes
list allPSP’s published by Chevroletin the model year. Model
1994
Chevrolet
Cavalier
. . . . . . . . . . . . . ST-366-94
TBA”
PSP Index
NOTE: Please specify specialbody or engine typeson order form.
Form
Year
Price
Write informationin the Form Number column. For example: Turbo,
1994 PSPI-94.. . . . . . . . . . . . . . . . . . . . . . . . . . . . . .
Free
Convertible.
Free
1993 PSPI-93.. . . . . . . . . . . . . . . . . . . . . . . . . . . . . .
‘Price tobe announced ata laterdate. Call
1-800-782-4356fotfurtherinformation.
............................
Free
1990-92
PSPI-90-92
NOTE Form Numbers for individual Product Service Publications may
OWNER’S INFORMATION
be foundin the PSP Index.Prices are M.00for the firstPSP and $2.00
Owner publications are written directly for owners and intended
to profor each additionalPSP on the same order.
vide basic operational information about the vehicle.
PSP Bound Bulletin Book (Complete Year Bulletins)
1994 Chevrolet Cavalier Owner’s Manual
PriceNumberForm
Description
Year
1991 All PSP’S . . . . . . . . . . . . . . . . . . . .40.00 PSP-91-4
In Portfolio:Includes Fbrtfolio, Owner’sManualand Warranty Booklet.
PSP-90-4
40.00
1990 All PSP’S . . . . . . . . . . . . . . . . . . . .
1994
Chevrolet
Cavalier
In-Portfolio
. . . . . .lo233995
$15.00
NOTE: For 1992Model Year and Later, Product Service Publications Without Portfolio:Includes Owner’s Manual.
(PSP’s) can only be purchased individually.
1994
Chevrolet
Cavalier
Without
Portfolio
.lo234005
$10.00
For subscription informationcall Helm, Incorporated.
MODEL
ORDER
FORMS
Address
CURRENT 81PAST
Service
Publications
model
Chevrolet
past
current
available
and
are
for
vehicles. To request anmodel
Detroit,
please
form,
order
specify
and
year
name of vehicle.
all inquiries to:
HELM,
INCORPORATED
PO.
07130
Box
MI 48207
For information and inquiries call: 1-800-782-4356
CHEVROLET SERVICE PUBLICATIONS ORDER FORM
MAIL TO:
NOTE: Please complete form below (Print or Type) and
Post Office Box 07130, Detroit, Michigan 48207
ORDER TOLL FREE
1-800-782-4356
(Monday-Friday 8:OO A.M.-6:00 P.M. EST)
PUBLICATION FORM NUMBER*
VEHICLE MODEL
DESCRIPTION
ITEM
NAME
YEAR
ST-366-94
Service Manual
Chevrolet Cavalier
1994
10233995
Owner's Manual In-Portfolio
Chevrolet Cavalier
1994
Owner's Manual Without-Portfolio
Chevrolet Cavalier
!:E$*
QTY.
~~~~
~
10234005
1994
I
I
0
(CUSTOMER
MasterCard
Discover
VISA
Card
(AITENTION)
0
(STREET
ADDRESS-NO
P.O.
(STATE)
BOX NUMBERS)
(APT.
(CITY)
AREA
DAYTIME TELEPHONE NO. CODE
* :Prices
TBA* *
$15.00
$10.00
I
NOTE: Dealers and Companies please provide dealer or company name, and
Check orMoney
also the name
of the personto whose attention the shipment should be sent.
Order payable to
U.S.A.please write to the above address for quotation. Helm, Inc. (USA
For purchases outside
funds only - do not
send cash.)
NAME)
TOTAL PRICE
~
NO.)
(ZIP CODE)
(
are subject to change without notice and without incurring obligation.
Orders for Individual Product Service Publications cannot be filled without the
appropriate bulletin numbers. These numbers may befound in the
p s p Index, your
$4.00; each additionalPSP costs $2.00.
first Product Service Publication costs
"'Price to be announced at a later dale. Ca
l 1-800-782-4356 for further information.
0
Account
Number:
Expiration
Date mo/yr:
I
-
TOTAL MATERIAL
Handling Charge
Canadian Postage
GRAND TOTAL
r l
I
I
I
$3.50
I
I
II
1
Check
here
if your
billing
address is different from your
shipping address shown.
n
(CUSTOMER SIGNATURE)
NOTETOCANADIAN CUSTOMERSAll listed prices arequoted
in US. funds. Canadian residents are
to makechecks
payable in U.S. funds. T O cover Canadian postage, add
$11.50 plus theU.S. Handling Charge. Requests
(Or ITlanUalS
printed in French shouldbe directed to Canadian General Motors dealerships.
Please allow adequatetime for postal service.
Orders cannot be returned without prior authorization.
A restocking fee may apply.
.I
Index
Care of Audio Systems.................. 104
Radio Reception.Understanding.. 104
Setting the Clock ............................. 97
Automatic Door Loclts ......................
44
Automatic Lap-Shoulder Belt
(see Safety Belts)
Automatic Transaxle..........................
53
Adding Fluid................... 168.198.199
Brake-Transaxle
Shift Interlock.......................... .54.60
Checking Fluid.............................. 167
Shifting ............................................53
Starting Your Engine......................51
A B S (Anti-LockBrakes) ............... 111
Adding
Brake Fluid.............................
174.199
Electrical Equipment........... 52.96.195
Engine Coolant................139.143.170
Engine Oil........................
162,198,199
Hydraulic Clutch Fluid .......... 170,199
Power Steering Fluid ...... 173,198,199
Sound Equipment ........................... 96
Transaxle Fluid
Automatic ..................... 168,198,199
Manual .......................... 169,198,199
Windshield Washer Fluid
.............. 173
Air Cleaner Filter...................... 165,202 Battery............................................. 176
Air Conditioner .................................. 93
Jump Starting ................................128
Alcohol. Driving Underthe
Battery Warning........................ 130.176
Influence of .................................... 108 Battery Warning Light.......................86
Alcohol in Gasoline .........................155 Blizzard. Caught In a .......................
124
........... 192 Block Heater. Engine.................. 52. 165
Aluminum Wheels, Cleaning
Antenna ............................................ 105 Blowout. Tire ................................... 145
Antifreeze .....................137,170,198,199 Brake
Anti-Lock Brake System.................. 111
Adjustment .................................... 175
Warning Light.................................. 87
Fluid ........................................ 174.199
Appearance Care.............................. 187
Master Cylinder ............................. 174
Ashtrays & Lighter ............................ 75
Parking.............................................58
Audio Systems ...................................96
Pedal Travel.................................... 175
AM/FM Stereo Radio...................... 97
Rear ................................................175
AM/FM Stereo Radio with Cassette
Warning Light..................................86
Player ............................................ 99
Wear Indicators-Front Brakes .... 175
AM/FM Stereo Radio with Compact
Brake System Warning Light
............. 86
Disc Player.................................. 101 Brake-Transaxle ShiftInterlock ... 54.60
Brakes. Anti-Lock............................ 111
Bralcing ............................................. 110
Bralcing in Emergencies ................... 113
Braking Technique........................... 110
Break-In. New Vehicle....................... 49
Buckling Up (see Safety Belts)
Bulb Replacement
Headlight ................................177,200
Taillight................................... 177,200
Capacities and Specifications........ 198
Carbon Monoxide in
Exhaust ........................... 45,47,61,124
Cassette Tape Player (seeAudio
Systems)
Center Console Ashtray..................... 75
Center Passenger Position ................. 29
Chains, Tire ...............................152,187
Changing a Flat Tire ........................ 146
....... 86
Charging System Warning Light
“Check Engine” Light........................ 88
“Check Gages” Light......................... 89
Checking
Brake Fluid ....................................174
Engine Coolant.......................
137,170
Engine Oil Level............................ 162
Hydraulic Clutch........................... 170
Power Steering Fluid..................... 173
Safety Belt Systems......................... 40
Transaxle Fluid
Automatic .................................... 167
Manual ................................ ........ 169
233
,.
Checking Things Underthe Hood .. 157
Ventilation ....................................... 95
Chemical Paint Spotting.................. 193 Clock. Setting the ............................... 97
Child Restraints.................................. 31 Clutch, Hydraulic
Children and Safety Belts.............30.38
170,199
Adding Fluid...........................
Checking Fluid.............................. 170
Cigarette Lighter................................ 75
Circuit Breakers& Fuses ................ 195 Comfort Controls
City Driving.,.................................... 119
.................93
Air Conditioning System
Cleaner. Air............................... 165.202 Compact Disc Player (see
Audio Systems)
Cleaning
Compact Spare Tire ......................... 151
Aluminum Wheels......................... 192 Control of a Vehicle ......................... 110
Antenna ......................................... 105 Convenience Net................................ 49
Bumpers.........................................
191 Convex Outside Mirror......................
73
Cassette Player .............................. 104 Coolant .............................................
170
Compact Discs...............................
105
Checking & Adding ........137,140,143,
Cupholder ...................................... 190
170,198,217
Fabric ............................................. 188
Low Coolant Warning Light........... 85
Glass ..............................................
190
Proper Mixture to Use .... 139,143,170
Inside of Your Chevrolet............... 188
Safety WarningsAbout .........138, 139,
Instrument Panel ...........................
190
140,143,144,159,171,172
Outside of Your Chevrolet............ 191
Temperature Gage........................... 85
Safety Belts.................................... 190 Cruise Control....................................
70
Scotchgard TM Fabric Protection ... 189 Cup Holder ......................................... 74
189 Curves, Drivingon ........................... 113
Special Problems...........................
Textured-Surface Bumper Covers 191 Customer Assistance Information... 22 1
Underbody Maintenance............... 193
Vinyl............................................... 190 Daytime Running Lights................. 65
Warnings ........... 188,189,190,191,192 Dead Battery: Whatto Do ............... 128
Waxing ...........................................
191 Defects, Safety (see Safety Defects)
Weatherstrips................................. 192 Defensive Driving............................ 108
White Sidewall Tires..................... 192 Defogger, Rear Window
..................... 95
Windshield and Wiper Blades
....... 190 Defogging Your Windows.......92,94,95
Climate Control System
..................... 92 Defrosting................................. 92,94,95
234
Dome Light ........................................ 67
Door Locks.........................................
43
Downshifting ......................... 55.57. 122
Driver
Position................................... 21
.
.
Drnmg ..............................................107
At Night .........................................117
City................................................. 119
Controlling aSlid .........................
116
Defensively ....................................
108
Drunken ......................................... 108
Freeway.......................................... 120
Hill and Mountain ......................... 122
In a ForeignCountry.....................
156
In the Rain ..................................... 118
Long Distance ...............................121
Loss of Control.............................. 116
On Curves...................................... 113
Passing ........................................... 115
Through Deep Standing Water....... 52
Winter Driving...............................
123
Drunken Driving .............................. 108
asy-Entry Seat ............................... 15
EElectrical
Equipment, Adding
...52,96, 195
Emergencies, Braking...................... 113
Emergencies on the Road ................ 127
Emergencies, Steering in.................114
Emergency Starting.......................... 128
Emergency Towing..........................
132
Engine BlockHeater ................... 52,165
Engine CoolantHeater ...............52,165
Engine Coolant (see Coolant)
Gage .................................................
84
Engine CoolantTemperature Warning
In
Foreign
Countries
.....................
156
F a b r i c Cleaning
Gage (see Coolant)
154
Requirements.................................
(see Appearance Care)
Engine Exhaust
Dangerous Gas in .......... 45.47.61. 124 Fan Warnings....... 129.130.137.138.159 Fuse Usage ....................................... 196
Filling the Fuel Tank................. 156.198 Fuses & Circuit Breakers................ 195
Parking withthe Engine
Running .................................... 59.61 Filter. Oil................................... 164,202
Engine Identification ....................... 194 Finish Care ....................................... 191 G a g e s
Coolant Temperature ...................... 85
Engine Oil ........................................ 162 Finish Damage................................. 193
Fuel .................................................. 84
164 Flashers, Hazard Warning ............... 128
Additives........................................
Flash-To-Pass
Oil Pressure ..................................... 90
.....................................
66
89
Check Oil Light...............................
Tachometer...................................... 83
Checking &Adding ........ 162.198.199 Flat Tire............................................ 145
Gasoline
...........................................
154
..................................
51
Flooded
Engine
Crankcase Capacity....................... 198
Gasoline Tank, Filling Your..... 156,198
Disposing of Used Oil ................... 165 Fluid
Brake
.......................................
174,
199
Gas Station Information .................. 240
164
Energy Conserving........................
Capacities ......................................
198 Gear Positions
164.202
Filter .......................................
....................
170.
199
Hydraulic
Clutch
(see Shifting the Transaxle)
Pressure Gage .................................. 90
Power Steering................ 173,198,199 Gearshift Lever
Starburst ........................................ 163
(see Shifting the Transaxle)
Transaxle
Warning Light.................................. 89
167,198,199 Glove Box........................................... 47
Automatic.....................
164
When to Change ............................
169,198,199 Graphic Equalizer (seeAudio Systems)
..........................
Manual
136
Engine Overheating.........................
Windshield Washer................ 177,199
Engine Specifications....................... 202
199 Halogen Bulbs ........................
176, 200
& Lubricants .........................
Fluids
Engine. Starting ................................. 51
Folding
Rear
Seats
.............................
15
Hazard
Warning
Flashers
................
128
Automatic Transaxle ....................... 51
Manual Transaxle ............................ 51 Foreign Material............................... 192 Head Restraints.................................. 13
Ethanol in Gasoline .........................
155 Freeway Driving............................... 120 Headlight & Taillight, Removingand
Replacing ................................ 177,200
French LanguageManual .................... 2
Expectant Mothers. Use of Safety
Fuel
...................................................
154
.......................................... 65
Headlights
Belts ................................................. 24
Alcohol in Fuel.............................. 155
Flash-To-Pass .................................. 66
Expressway Driving......................... 120
156,
198
..................................
High-Low Beam Changer............... 66
Capacity
Extender. Safety Belt......................... 40
Replacement Bulb.................. 177,200
Exhaust Warnings..........45,47,61,124
Exterior Appearance
156,
198
Filling
Your
Tank
Wiring
...................
............................................ 197
(see Appearance Care)
........................
155
Heater (see Comfort Controls)
Fuels with Alcohol
235
1
..
Heater. Engine Block.................. 52.165
High Beams........................................
66 Jack. Tire ........................................ 146
Highway Hypnosis........................... 121 Jump Starting ...................................
128
Hill and Mountain Roads ................ 122
Hood Release ...................................
158 K e y Release Button .......................... 51
Warning. Overheated Engine........ 159 Keys ....................................................42
Horn ................................................... 63
64
Hot Engine. Safety Warnings.. 138. 139. L a n e Change Indicator ....................
140.143.144.159.171. 172 Lap-Shoulder Safety Belt
................... 21
How to Use Manual ............................. 6
Front ........................................... 20,25
Rear .................................................. 26
Hydraulic Clutch....................... 170.199
Hydroplaning ...................................119
Use by Children .......................... 30'38
14
Latches, Seatback ..............................
Identification Number. Vehicle...... 194 Liftgate
Ajar Light.........................................88
........................ 59.61
Idling Your Engine
Lock ................................................. 46
If You're Stuck: In Sand. Mud. Ice or
Lock Release.................................... 47
Snow .............................................. 152
Ignition
Safety Warning................................ 47
Key ................................................... 48 Lighter ................................................ 75
Key Release Button .........................
51 Lights
Positions ..........................................
50
Daytime Running Lights
................. 65
Illuminated Entry System.................. 45
Dome/Map ...................................... 67
Indicator Lights (see Warning Lights)
Flash-To-Pass .................................. 66
Headlights........................................
Infant Restraint (see Child Restraints)
65
Instrument Panel Intensity Control
Inflation. Tires..................................
182
.. 67
Inside Rearview Mirror...................... 72
Rear Compartment.......................... 68
Instrument Panel ............................... 81
Removing & Replacing Bulbs.. 177, 200
Replacement Bulbs........................ 200
Instrument Panel Clusters.............82.83
Taillights ................................. 177,200
Instrument Panel Intensity
Control ..........................................
67
Turn Signal ...................................... 64
Warning Lights................................ 84
Instrument PanelWarningLights ..... 84
ittent Windshield
Wipers ........ 69 Loading Your Vehicle
................. 79,180
.'95iP
Locks .................................................. 43
Long Distance Driving..................... 121
128
Low Battery ......................................
Low Oil Pressure Warning ................ 89
Luggage Carrier ..................................
79
Maintenance Record ..................... 219
Maintenance Schedule..................... 203
Malfunction Indicator Lamp
(Check Engine Light)...................... 88
Manual Front Seat ............................. 12
Manual Sunroof................................. 75
Manual Transaxle
Adding Fluid................... 169,198,199
Checking Fluid.............................. 169
Shifting ............................................ 56
Starting Your Engine......................
51
Master Cylinder. Brake....................174
Methanol in Gasoline ...................... 155
Mileage Indicator
(see Odometer G Speedometer)
Mirrors
Convex Outside ............................... 73
Inside Manual Day/Night ............... 72
Manual Adjust................................. 72
Manual Remote Control.................. 73
Mountain Driving ............................
122
N e w Vehicle Break-In
Requirements................................... 49
Night Driving...................................
117
Octane Requirements
(see Fuel Requirements)
Odometer & Speedometer ................. 82
Oil. Engine .......................................
162
Pressure Gage.................................. 90
Quality ........................................... 163
Starburst ........................................ 163
Thickness ....................................... 163
Used Oil .........................................
165
When to Add .................................
162
When to Change ............................ 164
Oil Warning Light..............................
89
Operation of Lights ............................ 64
Outside Rearview Mirrors................. 73
Overheated Engine .......................... 136
Overheated Engine Coolant Warning
Gage .................................................
85
Owner Checks& Services ............... 212
Owner’s Manual. Howto Use ............. 6
Polishing and Waxing
(see Appearance Care)
Power Door Locks .................i.........;. 44
Power Steering Fluid......... 173,198,199
Power Windows.................................
62
Power Window Lock-out Switch...... 62
Pregnancy, Use of Safety Belts
During .............................................. 24
Problems on theRoad ......................
127
Publications (seeService Publications)
Radiator Overheating
(see Overheated Engine)
Radiator Pressure Cap .....................
172
Radio (seeAudio Systems)
Reading Light..................................... 67
Rear Safety Belt Comfort Guides......27
Rear Seat, Split Fold-Down............... 15
Rearview Mirrors............................... 72
Rear Window Defogger
...................... 95
Reclining Seatbacks...........................
12
paint Spotting. Chemical................ 193 Recommended Fluids &
Park. ShiftingInto ........................ 51.58
Lubricants ....................................... 217
Recreational Towing........................ 125
Parking
Over ThingsThat Burn ................... 60 Replacement Bulbs.......................... 200
Torque Lock .................................... 59 Replacement Fuses.......................... 196
With the Engine Running..... 54.59. 61 Replacement Parts ........................... 202
Parking Brake..................................... 58 Replacement, Windshield Wiper..... 179
Passenger Belts (see Safety Belts)
Replacing Safety Belts.......................
40
Passing ........................................ 72. 115 Replacing Tires................................. 184
Replacing Wheels............................. 186
Periodic Maintenance
Inspections ..................................... 2 16 Reporting Safety Defects................. 224
Restraints. Child................................. 31
Roads. Hill and Mountain............... 122
................. 54.152
Rocking Your Vehicle
Roof Luggage Carrier ......................... 79
Rotation. Tire................................... 183
SAdults
afety Belts.......................................
..............................................
17
20
Automatic Lap-Shoulder Belt......... 21
Care ................................................ 190
Center Passenger Position.............. 29
Checking .......................................... 40
Children ...................................... 30, 38
Child Restraints............................... 31
Child Restraints-How to Install
Them ............................................. 32
Child Restraints, Where to Put .. 31,35
Cleaning ......................................... 190
27
Comfort Guides, Rear.....................
Driver Position................................ 21
Extender........................................... 40
How to Wear ...................................
20
Passenger Belts................................ 25
Pregnancy, Use During................... 24
Questions &
Answers ....................
19,23,24,39,40
Rear Safety Belts............................. 26
Rear Seat Passengers ...................... 25
Replacement .................................... 40
Right Front, Adult Passenger.......... 25
Smaller Children and Babies .......... 30
Top Strap ......................................... 32
237
Index
a mI
Torn ................................................. 40
Twisted ............................................ 24
Vehicles First Sold in Canada.........20
Warning Light............................. 17.20
Why You Should Wear Safety
Belts ...............................................
18
Safety Defects. Reporting
................224
Scheduled Maintenance Services.... 205
Seat Belts (see Safety Belts)
Seat Controls
Easy-Entry ....................................... 15
Head Restraints ............................... 13
Manual 4-Way Adjustable............... 14
Manual Front Seat .......................... 12
Manual Reclining Seatbaclc............12
Seat. Split Fold-Down Rear............ 15
Seats. Split Folding. Rear Wagon... 15
Seatbaclc Latches............................. 14
Service Parts Identification Label ... 194
Service Publications......................... 227
Service Station Information ............ 240
Setting the Clock................................ 97
Setting the Trip Odometer ................ 83
Shift Light..................................... 57.87
Shifting Into P (Park) ........................ 58
Shifting Out of P (Park) ....................
60
Shifting the Transaxle
Automatic Transaxle ....................... 53
Manual Transaxle............................ 56
Signaling Turns .................................. 64
Skidding ........................................... 116
Snow or Ice. DrivingOn ................. 123
238
.
Snowstorm. If You’re Caught in a.. 124
Sound Equipment. Adding................ 96
Sound Systems (see Audio Systems)
Spare Tire. Compact........................ 151
Specifications and Capacities .......... 198
Speed Control (see Cruise Control)
Speedometer & Odometer................. 82
Trip Odometer................................. 83
Stains. Removing .....?.......................
189
Starting Your Engine......................... 5 1
Automatic Transaxle.......................53
Manual Transaxle............................ 56
Starting Your Vehicleif the Battery is
Dead (seeJump Starting )
Steering
In Emergencies ..............................
114
Off-Road Recovery........................
1 14
Tips ................................................ 113
Steering Wheel, Tilt........................... 63
Stereo Sound Systems
(see Audio Systems)
Storing Your Vehicle....................... 176
Stuck, If You Are ............................. 152
Sunroof ............................................... 75
Sun Visors .......................................... 74
T
achometer ...................................... 83
Taillight Bulb Replacement...... 177,200
Tape Player (seeAudio Systems)
Technical Facts & Specifications
Bulbs ..............................................
200
Electrical Equipment.
Add-on ............................. 52.96. 195
Fluid Capacities& Types ....... 198.199
Fuses & Circuit Breakers..............195
Service Parts Identification Label..194
Vehicle Identification Number
(VIN) .......................................... 194
Temperature Gage ............................. 85
Theft ...................................................47
Thermostat .......................................
172
Tilt Steering Wheel ............................ 63
Time. Setting the ................................ 97
Tires ..................................................181
Buying New................................... 184
Chains.....................................
152.187
Flat. Changing............................... 146
Inflation ......................................... 182
Inspection & Rotation .................. 183
Loading .......................................... 182
Pressure .........................................
182
Quality Grading............................. 185
Spare. Compact ............................. 151
Tread Wear Indicators .................. 184
Wheel Alignmentand Tire
Balance .......................................
186
Wheel Replacement....................... 186
When to Replace Wheels............... 186
Winter Drivingand Tires ....... 123.187
Top Strap............................................ 32
Torque Lock .......................................59
Towing a Trailer............................... 126
Towing Your Vehicle
................ 125.132
.
Liftgate Ajar..................................... 88
85
Low Coolant ....................................
Vehicle
Damage
Warnings
..................
8
hnsaxle. Automatic
....................................................
89
Oil
Vehicle Identification Number
(see Automatic Transaxle)
194
Safety
Belt
..................................
17.
20
.............................................
(VIN)
rransaxle. Manual
Upshift
Indicator
........................
57.
87
Vehicle Loading .......................... 79. 180
(see Manual Transaxle)
176 Washer. Windshield.................... 69.173
Vehicle Storage ................................
rransmission. Automatic
Vehicles First Soldin Canada ........... 20 Weight
(see Automatic Transaxle)
Ventilation
.......................... 92.93.95. 96 Gross Axle Rating (GAWR) ......... 180
Transmission. Manual
Gross Vehicle Rating (GVWR)..... 180
VIN ................................................... 194
(see Manual Transaxle)
83 Visor Vanity Mirror........................... 74 q e e l Alignment and Tire Balance..186
Trip Odometer ...................................
Wheel Covers. Howto Remove....... 149
Trunk .............................................
45. 46
Wheel Nuts .......................................
149
Trunk Cargo Anchors........................ 49 Wagon
151.198
Trunk Convenience Net.................... 49
Folding.Rear Seats .......................... 15 Wheel Nut Torque ....................
Wheel
Replacement
.........................
186
47 Ajar
Trunk/Liftgate Release. Lockout.. 46.Light
........................... 88
Liftgate
Turn Signal Indicator.........................
64
Liftgate Lock ...................................
46 Windows
62. 197
Power ........................................
Turn SignaVMultifunction Lever...... 63
Liftgate ReleaseButton ................... 47
Standard .......................................... 62
Cruise Control.................................
70
Rear Compartment Light ................ 68
Windshield
Washer..................... 69. 173
Headlight High/LowBeam ............. 66
Roof Luggage Carrier ...................... 79
68. 197
Turn & Lane ChangeIndicator ......64
Taillight Bulb Replacement... 177. 200 Windshield Wipers......................
190
Cleaning .........................................
Warning Flashers.Hazard ............... 128
Unleaded Gasoline .........................
154 Warning Lights................................... 84 Windshield Wiper Blade
Replacement .................................. 179
Upholstery Care ...............................
188
Anti-Lock Brake System
................. 87
Winter
Driving ................................. 123
Upshift Indicator Light ................. 57.87
Battery ............................................. 86
Driving
On Snow or Ice ................ 123
Urban Driving .................................. 119
Brake ................................................ 86
If Your Vehicle isStuck in Deep
Charging System .............................
86
Snow .................................... 124.152
Check Coolant................................. 85
If
You’re Caughtin a Blizzard ...... 124
Check Engine................................... 88
Check Gages....................................
89 Wrecker Towing............................... 132
Check Oil......................................... 89
.
-
. Trailer Towing..................................
-a n r
ILO
T7
Service Station Information
Windshield Washer Fluid
See Page 173
Battery
The Delco Freedom03battery needs
no water. See Page 176
Transaxle Fluid
Automatic: See Page 167
Manual: See Page 169
Hood Release
See Page 158
Cooling System
Check and add coolant at the
coolant recovery or coolant surge tank.
The fluid should be at or slightly above
the FULL COLD mark.
See Page 170
Engine Oil
See Page 162
Cold Tire Pressure
See Tire-LoadingInformation
label on the driver’s door.
See Page 182
Spare Tire Pressure
Compact Spare:60 psi (420 1tPa)
See Page 151
Fuel
Capacity: 15.2 U.S. Gal. (57.5 L)
Use unleaded gas only,
87 octane or higher.
See Page 154
WE SUPPORT
VOLUNTARY TECHNICIAN
CERTIFICATION THROUGH
National Institute for
AUTOMOTIVE
SERVICE
EXCELLENCE
..
I994 Owner’s Manual Supplement
This information replaces the air conditioning refrigerant specifications on page 198 of the 1994 Chevrolet
Cavalier Owner’s Manual.
If your Cavalier has air conditioning,the system could be filled with R-12or R-134a refrigerant. These refrigerants
are not interchangeable. If service is required, please referto therefrigerant charge label underthe hood for
refrigerant charge typeand quantity.