1
RightFax
8/15/2003
: Colovos
Operator's
1:18
PAGE
2/11
Righ%Fax
l
Manual
18 Gauge
- 21/8
" Length
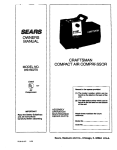
BRAD NAILER
Model No.
351.181720
CAUTION:
• Safety
• Operation
• Maintenance
• Parts List
Read and follow
all Safety Rules and Operating
Instructions before First Use
of this Product, Keep this
manual with tool.
Sears,
Roebuck
and Co., Hoffman
www.seors.comlcreftsman
20317.01 Draft (04/24/03}
•
Estates,
IL 60179
U.S.A.
Espafiol
R±ghtF&×
8/15/2003
1:18
PAGE
The tool must have a male, free-flow hose coupling so that
all air pressure is renmvad from the tool when the coupling
joint is disconnected. Failure to use proper coupling could
cause ac_dente) dlscharge,possibly causing injury.
•
Only use air hose that is rated for a maximum working
pressure of 15G ps( or 150% oftbe maximum system pressure, whichever is greater.
7
•
Do not use a hose swivel connector with _is tool.
8-9
•
Do not putt trigger or depress contact trip white connecting
to the air supply, as the tool may cycle, possibly causing
injury
•
When loading tool: Do not puFI trigger or depress contact
trip; DO not point the tool at yourself or others; Do not
place hand or any part of body in the fastener discharge
area of the tool as accidental actuation may occur and
cause thjur_:
*
Disconnect
2
Safety Rules ......................................
2
Operation ......................................
Maintenance ....................................
3-5
5-6
...................................
Parts IIlustratton and List ..........................
Espa_ol ......................................
FULL
10-15
ONE YEARWARRANTY
If Dis product falls due to a defect In mateidal or workmanship
wi_ln one year from _ date of pumheae, Sears will at Its
option repair or replace It free of charge. Contact your nearest
Sears Service Center {1-800-4-MY-HOME) to arrange for product repair, or return this product to place of purchase for
replacement.
•
Use Sears recommended fasteners only.
•
Do not load the teal until you are ready to use It.
•
Always assume that the tool contains fasteners. Keep _e
tool pointed away from yourself and others at all times.
Never engage Lnhorseplay. Never pull the thgger unless
the contact frfp is In contact wtth the workplace. Keep othere at a safe distance from the tool while the tool Is In
operation.
•
Always remove finger from trigger when not driving fasteners. Never carry the tool with finger on or under the trigger
as accidental actue_lon may oo_ur and cause Injury.
•
Always keep hands and body away from the fastener discharge area when air supply is connected to the tool. Grip
too/firmly to maintain control whl_e allowing tco9 to recolJ
away from work surface as fastener Is driven.If contact trip
Is allowed to recontact work surface before trigger Is
released, an unwanted fastener may be driven.
•
Check operation of the c_ltact thp frequently. Never use
the tool if the contact thp, trigger or eprlnge have become
Inoperable, mtsslng or damaged. Do not altar or remove
contact tap, trigger or springs. Never use a tool that is leaking air, has missing or damaged parts, or requires repair
•
Do not drive fasteners on top of other fasteners or with the
tool at too steep an angle. The fasteners can dcechet and
cause Injury DO not drive fasteners close to the edge of
the workplace. The workpteos is likely to split, allowing the
fastener to tty free and cause injury DO not attempt to
drive fasteners into hard or brittle materials such as concrete, steal or tile.
•
Do not overreach. Always piece yourself in a firmly balanced position when using or handling the tool. Do not
attach the hose or tool to your body.
•
Do not operate tnol w_thout fasteners or damage to too)
may result.
Do not use oxygen, carbon dioxide, high-pressure compressed gas or bottled gases as the power source for this
tool. The tool will explode and serious personal injury
could result.
•
Do not use tool without safety wamthg label If labe) is
missing, damaged or unreadable, conteot SEARS to
obtain a new label.
•
Only qualified repair personnel must perform tool service.
Never connect the tool to air pressure which could potanttatly exceed 200 psi. Use only clean, dry, regulated air
within rated range as marked on tool.
•
When servicing a too/. use only JdantJcalrepair parts,
•
Store toni out of reach of children and other untrained
This warranty aepllas only while tlds product is used In the
United States,
This warranty gives you specific legal dghts, and you may also
have other rights which vary from state to state.
Sears, Roobuck and Co., Dept. 817WA, Hoffman Estates,
IL 60179
Read and follow all safety rules and operating instructions
in this manual and on warning label of tool before using
this tool. Keep this manual with the tool.
Keep work area cJean and properly lighted.
•
Keep children, bystanders end visitors at a safe distance
from work area while operating this tool.
•
Air tool operators and all others In work area should
always wear safety goggles complying with United States
ANSI Z87.1 to prevent eye Injury from fasteners and flying
debris when loading, operating and unloading this tool.
Everyday eyeglasses have only impact resistant lenses.
These are NOT safety glasses. ANSI Z87.1 safety glasses
have permanently attached rigid, hard plastic side shields
and will have "ZBT.I" printed or stamped on them.
•
•
tool from air supply betore loading or unload-
ing, performing tool maintenance, clearing a jammed t'astenet, fea_ng work area, moving tool to another location or
handing the tool to another person.
If this product Is used for commercial or rental purposes, this
warranty will apply for 90 days from the date of purchase.
•
RightFax
•
Warranty .........................................
Troubleshooting
3/11
Always wear ear protection. The work area may include
exposure to excessk-_e noise levels which wilt require necessary ear protection. Some enwronmeots will require
head protecBon; use head protection conforming to ANSI
Z89.1.
DO not alter or modify this tool in any we:( Do not use this
tool for any application other than for which it was
designed,
O _ears,
Roebuck and Co.
persons.
2
KightFax
811512003
1:18
PAGE
4111
RightFax
• Air operated tools require cJesn, dry, lubricated compressed air to ensure top performance, low maintenance
and long life.
DESCRIPTION
Dirt and abrasive materials present in all air lines will damage tool O-rings, valves and cylinders.
The Craftsman 18 Gauge Brad Nailer drives brads from %" to
2%" long. Oiltass design eliminates daily oiling and oil stains
on workpiece. Die cast magnesium body with textured rubber
grip minimizes operator fatigue. I_rga capaoi_ side leading
magazine with posilNe, quick action latch makes loading easy.
Nailer features rear exhaust, single and rapid-fire operation,
adjustable depth of drive control, rubber nose tip and storage
case. Salty feature disabtes toot unless contact tdp is pressed
against workptece. Tapered nosepiece provides operator with
greater visibility for precme fastener placement Rigid nosepiece reduces jamming. The 18 Gauge Brad Nailer is excellent
for molding, furniture making, and picture fremlng.
Moisture will reduce tool performance
removed from cornprassecl air.
SPECIFICATIONS
Capacity
..............................
% to 2_"
Operating pressure ........................
Air inlet....................................
60-100 PSI
Y," N.P.T.
Length ........................................
9_ =
Width .........................................
2_t_,_
Weight .....................................
2.7 Ibs.
NAILS
18341 {Box of 5000)
.........
18 gauge brad nails, %" long
19171 {Box of 1000)
.........
18 gauge brad nails, %" long
18342 (Box of 5000) ..........
18 gauge brad nails, 1" long
19172 (Box of 1000) ..........
Keep air filter clean. A dirty filter will reduce the air pressure
to the tool causing a reduction in power and efficiency.
•
The air supply system must ha able to provide air pressure
of 60 to 100 pounds per square Inch st tool
•
All hoses and pipes
and free of moisture
rated for s maximum
of maximum system
.....
19173 (Box of 1000)
.....
18 gauge bred nails, 1%" long
18360 [Boo( of 5000)
.....
.18 gauge bred nails, 1%" long
19174 (Box of 1000)
.....
• 18 gauge bred nails, 1½" long
18361 (Box of 5000)
.....
In the air supply system must be clean
end foreign pertisies. Hoses must be
woddng pressure of 150 PSI or 150%
pressure, whichever is greater,
•
Do n_ mou_
•
The air pressure should be properly regulated,
swivel contractor in air supply line.
•
Oifferent workptece mate_ls
and different fastener lengths
will require different operating pressure.
•
Be sure a= conneoitons in air supply system are sealed to
prevent air toss.
•
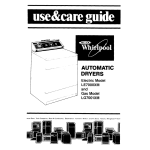
Never connect a female quick-disconnect coupling to the
tool side of air line connection. A male, free-tim coupling
should be connected to the tool side of air freeconnection
(see Figure 1).
WARNING:
The female coupling provides a seal preventing
loss of compressed air from compressor tank when disconnet.fad from msie coupling, if connected to tool s{de of air
supply, the farnate ooupling could seal a compressed air
charge in the tool which could discharge if the tool trigger is
actuated.
18 gauge brad nails, 1" long
18343 (Box of 5000)
.18 gauge brad nails, 1%" long
• 18 gauge brad nails, 1%" long
18362 (Box of 5000) .....
...
18 gauge brad nails, 2" long
19176 (Box of 1000) .....
...
18 gauge brad nails, 2" long
SUPPLY
•
9Vz"
Height ........................................
AIR
A filter-ragulator-lubricator system is required and should be
located as dose to tool as possible. A distance of tess than
15 feet is recommended. Lubricator is not required for
oittess tools.
18 gauge (.040" x .040 ")
Nail lengths ................................
BRAD
•
100 brad nails
Nail size ......................
and life if not
LINE
Rater to Figure 1.
DANGER:
Do not use oxygen, carbon dioxide, high-pressure
compressed gas or hotttad gases as the power source for this
tool. The tool will explode and serious personal injury coutd
resutt.
The air tool operates on compressed sir at pressures from
60 to 100 PSI.
Never connect the tool to air pressure which could potentially exceed 200 PSI. Use only clean, dry, regulated air
within rated range as marked on tool.
Air Delivery Required:
(30 shots per minute),
Figure I -Air
Supply
Line
LOADING
0.94 SCFM @ 90 PSI
Refer to Figures 2, 3 & 4 (page 4).
WARNING:
Disconnect tool from air supply. Oo not load tool
until you are ready to use it. Do not ppll trigger or depress
contact tripwhile loading tool. Always load with nose of tool
pointing away from you and others. Always wear ssfaly goggles that comply with United States ANSI Z87.1.
WARNING;
Keep hands and _
away from discharge area
of tool when connecting air supply. Always disconnect tool
from air supply when servicing or adjusting tool and when tool
Is not in use.
NOTE: For best results, use Sears fasteners only.
3
RightFax
•
8/15/2003
1:18
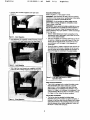
Depress latch and slide magazine cover open (see
Figure 2).
PAGE
5/11
NAILING
OPERATION
RightFax
Refer to Figures 5, 6, 7 & 8 (pages 4 and 5).
WARNING:
Read and fonow all safety rules and operating
instructions in this manual and on warning label of too_ before
using this tool. Keep this manual with the tool.
WARNING:
Do not use this tool wift_Jt safety warning
isbel. If label is ndssw,g, damaged or unreadable, contact
Seam to obtain a new label.
WARNING:
Never operate tool unless contact trip is in contact with wod_pisce. Do not operate toot without fasteners or
damage to tool may result. Never fire fasteners into the air
because fasteners may injure operator or others and damage
to tool may result.
•
Pertorm "Safety Mechanism Check" as described in the
Maintenance sec_on (see page 6) prior to first use of tool
and on a daily basis thereafter.
•
The tool is equipped with a rotating switch that can be set
to rapid-fire orstogle-fire mode (see Figure 5). When the
switch is set to single-fire mode, the tool will not drive a
second fastener until the trigger is fully released and
pulled again.
•
When the switch is rotated to rapid-fire
drive fasteners continuously. A fastener
time the contact top is pressed against
long as the _='kJgeris maintained in the
F;o.I.O.o.a0=..
•
Insert fasteners into magazine. Position fasteners at bottom
of magazine with head towards top of tool (see Figure 3).
mode. the tool can
will be fired each
the workpmce, as
pulisd position.
Figure 3 - Load Magazine
•
Slide magazine cover forward over magazine until latch
snaps Into place, locking magazine cover (see Figure 4),
Figure 5 - Push and rotate swltoh to select
Operation Mode
SINGLE-FIRE
•
RAPID-FIRE
•
Figure 4 - Close Magazine
4
OPERA1]ON;
The air tool is equipped with a contact trip safety mechanism that disables too# unless _sct
lrip is pushed
against work. To drive a fastener hold body firmly and
press contact tnp on workpisce where fastener is to be
applied. Pull trigger to ddve fastener into workplace. To fire
a second fastener lilt the tool from the workpisce, release
the trigger and then repeat the above sequence.
OPERATION:
The toal can also be operatad by holding bigger
depressed and pushing contact trip against workplace. A
fastener will be driven each time the cordact trip is pushed
against the workplece. This opera_ng procedure provides
rapid-fire fastener ddving. Never operate tool unless contact b'ip is in contact with workpisce.
RightFax
8/15/2003
I:18
PAGE
LOAD
WARNING:
All air power fastening tools recoil when operated. This recoil is CaUSed by rapid driving of the fe.stanen Tool
may bounce from recoil causing a second unwanted fastener
to be driven. Reduce tacd bounce by holding too( firmly in
hand and pressing tool gently against workplace. Let the tool
do the work. This will allow recoil of tool to bounce tool away
from workpisce preventing the ddving of second fastener,
CONTACT
TRIP
6/ii
RightFax
INDICATOR
The tool is equipped with a load indicator, The load indicator
(colored red) will be visible through the magazine cover window when there are oo fasteners in the magazine.
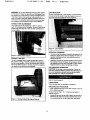
ADJUSTMENT
The contact hip may be adjusted up or down to vary the
depth of the tastener in the workpiece. To adjust, rotate depth
contr_ knob _see Figure 6) to raise or I_er contract t_p to
desired setting.
Figure 8 - Load Indicator
Knob
OPERATING
Use only enough air pressure to perform the operation. Air
pressure in excess of that which is required will make the
operation Lneffident ar_l may cause premature wear or
damage to the toot.
•
Determine minimum air pressure required by driving some
test fasteners into the wodkoiece. Set air pressure so that
test fasteners are ddvan down flush with the work surface.
ura 6 - Setting Dept_ Control
CONTACT
TRIP
PAD
The tool is equipped with a contact trip pad (see Figure 7)
that prevents marring of finished surfaces by the contact trip
during normal operation. Pad can be removed and stored on
the storage sleeve located on the and cover of the magazine,
Hex wrench is also stored on the magazine.
PRESSURE
•
Fasteners driven too deep may damage workpieca.
COLD
WEATHER
CAUTION:
OPERATION
Do not store In cold environment. Frost or ice
could form Inside tool affecting operation and damaging tool.
Use a cold temperature lubricant, such 8s ethylene glycol,
when operating tool In freezing temperatures.
Refer to Figure 9 (page 8).
LUBRICATION
This isan oilisss tool.No lubricationis necessary.
MAGAZINE
•
AND
PISTON-RAM
Keep magazine and nose of tool dean and free of any dirt,
lint or abrasive particles.
Tho tip of the ram (Fig. 9, No, 11) can become
rounded over time,
-
Flgura 7 - Storteg
Contact Tdp Pad and Wrench
5
dented or
Square off the tip of the ram with a clean, fine hand file to
=tend the itfa of the ram and tool. Fastener firir_ v(dl be
more consistent if the ram tip is kept clean and square.
RightFax
SAFETY
811512003
MECHANISM
I:18
PAGE
CHECK
Inspect contact trip safety mechanism daily for proper operation Do not operate tool if mechanism is not operating
properly
With the red push-button switch in the rapid-fire mode, perform the fo_towing procedures to test safety mechanism:
•
Leave trigger untouched while pushing contact trip Into
workpiece Tool must not fire.
•
Pull trigger while contact trip Is dear of wolf and pointed
away from operator and o'_ers. Tool must not fire.
•
Depress and hold trigger, push contact trip against work
where _stener is needed. The tool should drive only one
lastener each time the contact trip is pushed against
workpiece
If co.tact t_lp mechanism
does not operate properly,
repair tool Immediately through Sear/Servloa
Center.
Replace any damaged or missing parts. Usa the parts list to
order parts.
REBUILD
KITS
Rebuild kits ere available as spare ports, (see page 9}. Tools
should be rebuilt ff tool falls to operate properly after e_fanded
use. See troubleshooting to determlse required replacement
parts
Disconnect tool from air supply before attempting
or adjustment.
repair
NOTE: When replacing O-rings or cylinder, lubricate with
grease before assembly
6
7111
RightFax
KightF_x
811512003
SYMPTOM
Trigger cap leaks air
Cap leaks air
Nose leaks air
Tool will not operate
Tool operates slowly
or loses power
I
Tool skips fasteners or
nconsistsnt operation
POSSIBLE
1 :18
PAGE
CAUSE(S)
8111
CORRECTIVE
RightFax
ACTION
1. O-ring damaged
1. Check and replace damaged O-ring (Fig. 9, No. 55)
2. Valve stern, seal or O-rings damaged
2. Check and replace damaged stern, se_l or O-rings
(Fig. 9, Nos. 55, 56, 57 and 60)
1. Cap bolts toose
2. Damaged gasket
1. Tighten bolts (Fig 9, No. 1)
2. Check and replace damaged gasket (Fig. 9, No. 3)
1. Damaged cylinder O-ring
1. Check and replace damaged
2.
Damaged bumper
2. Check and replace damaged bumper {Fig. 9, No. 14)
3.
Ram guide damaged
3. Check and replace guide (Fig. 9, No. 15)
1. Insufficient
air supply
O-ring (Fig. 9, No. 12)
1. Check air supply
2. Damaged or worn heed valve O-dng
or seal
3. Damaged head valve spring
2.
Replace damaged or worn O-ring or seal
(Fig, 9, Nos. 5 and 9)
3. Replace damaged spring (Fig. B, No. 6)
4. Head valve binding in cap
4.
Clean and grease cap and head valve
(Fig, 9, Nos. 2 and 9)
1. Damaged head valve spring
1. Check and replace damaged swing (Fig 9, No 6)
Z
Damaged or worn O_ngs
2. Check and replace damaged or worn O-dr_ja
3.
Damaged trigger assembly
3. Check and replace
4.
Build-up on ram
4.
trigger assembly
Clean piston/ram assembly (Fig. 9, No. 11)
5. Cylinder not sealed on bumper
propedy
5. Disassemble cylinder and assemble properly
6.
Insufficient air supply
6. Check air supply
7.
Head valve poorly lubricated
7. Disassemble heed valve (Fig. 9, No. 9),
dean, grease, and assemble properly
1. Worn or damaged bumper
2. Build-upon ram or nose
1. Check and replaCe bumper
(Fig, 9, No. 14)
2. Clean and grease piston/ram assembly (Fig. 9, No. 111
and inside of nose cover (Fig. 9, No. 21)
3. Insufficient air supply
4. Damaged or warn piston O-ring
3. Check air supply
4. Check and ragl_ca O-ring (Fig. 9, No. 10)
5. Damaged
5. Chedx and replica springs (Fig. 9, No, 34]
magazine springs
6, Magazine-nose
bolts loose
7. Fasteners too short
8. Damaged fasteners
9. Inconect fastener size
6. PJlgn nose wffh magazine and tighten bolts
(Fig. 9, No. 24)
7. Use Sears recommended fasteners only
8. Discard damaged fasteners
9. Use Sears recommended fasteners only
10. Cap leaks
10. Tighten cap bolts [Fig. 9, No. 1). Check and replace
damaged gasket [Fig. 9, NO. 3)
11. Damaged trigger valve seal and
O-rings
11. Check and replace damaged seal and O-rings
(Fig. 9, Nos. 55, 57 and 60)
12. Bent or damaged ram
12. Check and replace damaged piston/ram
(Fig. 9, No. 11)
13. Dirty magazine
13. Clean magazine and lubricate with a
dry, film lubricant.
14. Check and replace magaslne (Fig, 9, No. 37)
14. Damaged orwom
magaslne
assembly
8/t5/2003
_:18
pAGE
9/11
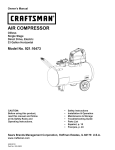
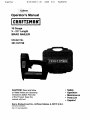
Model
351.181720
RightFax
gigh_FaX
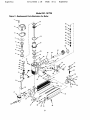
Figure9.ReplaoementPa_slllu_ra_°nF°rNailer
50
48
36
33
24
t
27
30
25
31
32
RightFax
8/15/2003
1:18
PAGE
I0/II
RightFax
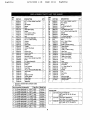
KEY
NO.
PARTNO.
DIESCRIPTION
38
060O6.0O
4-02 x 8ram Socket Head Bolt
3
39
2029g.00
Push Button
1
40
17437.CO
Spring
1
1
41
2024E0O
3 x 23ram Spdng Pin
2
Seal
1
42
20300.00
"n'lgger
1
04210.00
Head Valve Spdng
1
43
20301.0O
2
2
KEY
NO.
PART NO.
DESCRIPTION
QTY.
1
06395.0O
4-0.7 x 22ram Socket Head Bolt
2
20272.0O
Cap
3
20273.00
Gap Gasket
4
20274.00
Spacer
5
20275.00
6
7
QTY.
7
06436.00
Spacer
1
44
0607E0O
2.5 x 24ram Spring Pin
4-0.7 x 12ram Sccl<etHead Bolt
8
9
04303.00
04302.00
33,5 x 2.0mm O-Ring
Head Valve Piston
1
1
45
20302.00
Washer
5
46
20303.00
Rear Support
1
10
20277.00
Seal
1
11
20278.00
Piston Ram Asceml_J
1
47
48
20276.00
0608E0O
3 x 33ram Spdng Pin
' 4.0.7mm Fiber Nut
l
1
12
06909.00
44.17 x 1.78mm G-Ring
1
49
1
20279.00
Cylinder
1
5O
NIA
04327.00
i Body
13
14
15
20280.00
20281.00
Bumper
Ram Guide
1
1
51
16
20282.00
Throttle
1
17
18
20283.00
20284,00
Contact Trip Guide
Pad
19
20285.00
20
21
20304.0O
9.8 x 1.9mm O-Ring
Air Manifold
1
1
52
2030_0O
2g.82 x 2.62 mm G-Ring
1
53
2030E0O
Trigger Spring
1
1
4
54
203_7.0O
Trigger Cap
1
55
2030&0O
Contact Trip
1
56
20309.00
10.82 x 1.78mm O.Ring
Val_ Stem
1
1
20286.00
20287.00
Contact Trip Pad
Nose Cover
1
1
57
06449.00
2.5x 1.4ram O-Ring
2
58
04325.00
TriggerValve Spring
1
22
04345.00
Shoulder Screw
2
59
20310.00
Trigger Valve Head
1
23
24
06079.00
20288.00
4-0.7 x l_-nm Socket Head Bolt
Nose
1
1
60
20311.00
61
2031Z0O
7.5 x 1.5ram O-Ring
Latch
1
1
25
26
27
20895.00
20289.00
20290.00
2 x 12ram Spring Pin
Left Plate
Pusher
4
1
1
62
2031:t00
Lever
1
63
20314.00
64
2031_0O
Latch Spring
End Cover
1
1
28
20291.00
Load indicator
1
65
0559:_0O
3 x 18mm Spdng Pin
1
29
30
20364,00
06088.00
Feed Ring
4-0.7 x 10ram Socket Head Bolt
1
1
66
2050;_00
Trip Lever
1
67
20547.00
31
32
20292.00
20293.00
Right Plate
Nut
1
1
68
20503.00
E-Ring
Nut
1
1
69
20548.0O
Nut Guide
1
33
2029400
Magazine Cover
1
70
2054_00
Knob
1
34
35
20295.00
20296.00
Pusher Spdng
Wear Plate
1
1
2031E00
Warning Label
1
20317.01
Operator's Manual
1
36
20297.00
Lever Lock
1
9-18335
Storage Case
1
37
20298.00
Magazine
1
A
Standard hardware item available locally
Not Shown
Recommended
Qty.IBox
Model No
18 Gauge Brad Nails, sH' Long
5000
9-18341
18 Gauge Brad Nails, %" Long
1000
9-19171
_,
18 Gauge Brad Nails, 1" Long
5000
9-18342
_,
18 Gauge Brad Nails, 1" Long
1000
9-19172
18 Gauge Brad Nails, 1_,_
" Long
5000
9-18343
18 Gauge Brad Nails, lY." Long
1000
9-19173
18 Gauge Brad Nails, l'h" Long
5000
9-18360
18 Gauge SradNalls,
1000
9-19174
_.
_-
Accessories
1'/="Long
18 Gauge Brad Nails, 1¾" Long
5000
9-18361
A
18 Gauge Brad Nails, 2" Long
5000
9-18362
A
18 Gauge Brad Nails. 2" Long
1000
9-19176
Rebuttd Kits
5--
1 20320.00
Ng. 9, Nos. 3.4, 5 and B
Piston-Ram Assarn_y RebuitdKit
F{g.9, Nos. 10, 11.12 and 14
--1
RightFax
8/15/2003
1:18
_:
PAGE
11/11
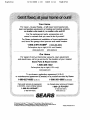
RightFax
Your Home
For repair-in
your home-of all major brand appliances,
lawn and garden equipment, or heating and cooling systems,
no matter who made it, no matter who sold it!
For the replacement
parts, accessories and
owner's manuals that you need to do-it-yourself.
For Sears professional installation of home appliances
and items like garage door openers and water heaters.
1-800-4-MY-HOME
_
(1-800-469-4663)
Ca(( anyf,(ma, day or n{ght (U.S.A. and Canada)
iii!iiii_i_iii
Our Home
:_:"............
For repair of carry-in items like vacuums, lawn equipment,
and electronics, call or go on-line for the location of your nearest
':"_
iiiii_!_!_!_i
Sears
Parts & Repair
Center.
_:ii_,_
1 800 488 1222
...........
........
_..._
_
.........
Call anytime, day or night (U ,SJ_. only)
:_:,_
.:
www.sears.com
,_:,:::
iiii!_i_[[[i
•.
::?:::::
::>_:>:
...............
__,_:_:_
To purchase a protection agreement (U .S .A .)
...............or maintenance
agreement
(Canada)
on a product
serviced
_:::
_,..,.:;
..........
by Sears:
::::::::
............
::_::
1 800 827 6655 (u s A )
;::::::::
m
m
m
Para pedir servicio de reparacibn
a domicilio
y para ordenar piezas:
1"888
iiiiiiiiiiiiiii_
SU HOG_
(1-888-784-6427)
_
1 800 361 6665 (Canada)
==
l=
Au Canada
m
::::::
........
pour service en franqais:
1-800-LE-FOYER
..........
_.........
_
..........
(1-800-533-6937)
WWW.SeaPS.Ca
_iiii:iiii:i!i!i!i!,
.:::::::
ii iii;iii i!i !ii!!!iiiii!i ii i!iiii iii ii!!i!i!i!i!
® RegisteredTrademark/ ru TrademarkI eu _ar_ce Mark_f Seam, RoebUckandCo.
® Mama ReglsftadeI _ Mama de F_bdca/ m Marc_de S_rv!dode Sears, Roebuckand Co,
_c t_ue
de commerce/ uoM_rquedepes_e de Sea_, Roebuckmd Co.
@ Sears, RoebuckandCo.