1
ODe tor,s M:anu
4;0 Amo
13 inch.Guttin_aiPath/.0_=_e_
m
Batch#_
Model NO.
358.799230
WARNING:
Read _d followall Safety Rulesand Operating
In._tmctionsbeforefirst Useof thisproduct.
Foranswers
tOyour
quest!onsabout
this Sun
product:
Call
7am-7 pro,
Mon-Sat
10 am-7 pro,
[]
1=800=235=5878
(Hours Ilstedare Central Time)
Sears, Roebuck and Co., Hoffman Estates, IL 60179 USA
530087383
02/25/98
•
FULL ONE YEAR WARRANTY ON:!O_t_rSMAN
LINE-TRIMMER"
ELE_IC
WEEDWACKER_=
If th_iS
C ra_man.._c-Weedwacl<_r__ _ne Tdmmer fails to perform propedy
due to a defect in material or workmanship within (1) one=yearfrom:_e data Of
purchase, Sears will repair or replace it, free of charge.
This warranty does not cover the nylon line•
WARRANTY SERVICE IS AVAILABLE BY RETURNING THE CRAFrSMAN ELECTRIC WEEDWACKER ® LINE TRIMMER TO THE NEAREST SEARS STORE IN
THE UNITED STATES.
This warranty gives you specific legal rights, and you may also have other rights
which vary from state to state.
Sears, Roebuck and Co. De_)t, D/B17WA Hoffman _Lstates. RL'60'B_
WARFJlN_: When Using elest.9 gardenlng appliances, basic safety i_racautions must aiw_be
follew_:to
reduce the risk of fire; e|ectri'cshock,
and serious injury.Readand follow all
instructions.
._
WARN]]NG: Td_mar !!nS::thmws oI_
je_ vio!e_ly._Youland lpthers!_
be
bhnded/in'jured.Wear:_f_y gl_es, ,
boots and leg p_!ectl0r_;!:l<eepbody
parts clear of r0tstin_ ine:
_atetY
!ni°rmett°n
ontheunit
This power un# can be dangerous/
Operator is responsble for follo_ng
unit and manual instructionsand warnings. Read entire O_mt0r's Manual
before using unltl.Be tiib:mughly familIar with the co_ro!s _d._b p_i;id:_
of the unlL Restrict _edse _.
0f _i_ Uhit
to persons who read, _b_d,:_d
follow unit and man_ai _in_
and :_
instructions.Never'al_o_ _ild_n _Oi :
operate this unit.
DA_G_R: N_er Us_ bli_l_r:fl_iling
devices. Unitisdeslgn_ forhneMmme_
use only. use of anyo_er accessOnes
or attachments will:inei;easethe _sk Ot
injury.
@@@
_eep_chil.d_n; _nd_:_and
a_
f
If ............................................
s_t_ons:_)ccur-_ichiare:not
dust mask:if ope ration is _liJsty.A!
ways wear hear _,long pants, long
sleeves, bo0ts_and gloves, Do not
go barefoot orwear sandals.
• Secure-hair ab0ve shoulder length.
Secure or _move Ibose clothing and
!ewalry or cl0_ing with loosely hangmg ties, st_s_ ta_els;ietc. They
can be caught iri m_v!ng parts.
o Balngfully €o_ie_ed_Is0 h_!ps pro.
tect you frOmdebd_._d pieces of
toxic plants thrownlby!splnningline.
. Stay Alert. Dd not 0p=erateunit when
you are tired, ill, U_ei, 0_"under the
influe_ Of alcohol, drugs_or
medi n:Wa h:wh=
youaredo-
rag; use _mmon sense.
o Avoid unlhtenti0nal st_ng of the
unit. Never _
Umt with your finger
on the switch. Be Surethe switch is
in off positionwhen connecting extension cord.
ELECTRICAL SAFETY
= Use a voltage supply as shown on
unit.......
• Avoid dangerous environment. Don't
use appliances in damp or wet locations. Don't use in rain.
o Avoid dangerous situations. Do not
use in the presence of flammable liquids or gases to avoid creating a fire
or explosion and/or causing damage
to unit.
°To reduce therisk of electricalshock,
thisappliance a polarized
plu.g .
(one bisde is wider than the omer) aria
w_llreqwre the use of a polarizedextensioncord. The app_
pug will fit
intoa polarized extansioncord only
one way. If thelplug does not fit fully
intothe extensionc0rd, reverse the
plug;If the plug stilldoes not fit, obtain
a correctpolarized extensioncoid. A
polarizedextensionCordwill require
the use of a polarized wall outlet.This
plugwillfit intothe polarized wall outlet
only one way. If plug dobs not fit fully
intothe wall outlet,reverse the plug. ff
the plugs'dll:_ not fit, contact a
qualified electricianto installthe proper
wall outlet.Do not change the equipment plug, extensionprd receptacle,
or extensioncord plug,n any way.
. To reduce risk of electrical shock,
use extension cords specifically
marked as suitable for outdoor appliances having electrical rating not
less than the rating of unit. Cord
must be marked with suffix "W-A = (in
Canada '=W").Make sure your extension cord is in good condition. Inspect extensioncord before use and
replace if damaged. An undersized
extension cord will cause a drop in
line voltage resultingin lossof power
and 0_/er'neattng,If in doubt, use the
next hea_'ier gauge. The lower the
gauge number,the heavier the cord.
(See "Selecting an extension cord")
° Do not abuse cord. Never carry the
unit by the extension cord or yank
extension cord to disconnect unit.
= Use €0rd mtalr)er to prevent disconnection of extension cord from unit.
See "Attach the extension cord to
your trimmer" under the sectiontitled
=OPERATION =.
° Do not use the unit if the switch does
not turn the unit on and off properly.
Repairs to theswitch must be made
by your Sears Service Center.
• Keep theextension cord clear of operator and obstacles at all times. Do
not expose cords to heat, oil, water,
or sharp e_lgcs, .
° To avoid th.o_ssibility of electric
shock, avoid body contact with any
grounded conductor, such as metal
fences or pipes,
o Ground Fault Circuit Interrupter
(GFCI) protectionshould be provided
on circuitor outletto be used. Receptanlas are available having builtin GFCI protection and may be used
for this measure of safety.
UNIT SAFETY
= Inspect unit before use. Replace
damaged parts, Make sure all handles, guards, shields, and fasteners
are in place and securely fastened.
Parts that are damaged must be repaired or replaced by a Sears Service Center. These includehead
parts that are cracked or chipped,
guards, shields, or any other part
that is damaged.
o Do not repair unit yourself.
o Use only .065_ (1.65 mm) diameter
recommended tdmmer line (see
"Service and Adjustments").Never
use wire, rope, stdng etc.
!.
° Use specified _immer spool. Make
sure spool is properlyinstalled and
all parts are s_curely fastened.
o Use only re'_ommended:_Dlaooment
parts and accessories.
TRAHSPORT_NG
STORAG_
A{'_D
oStop
the
O e the
CLr?TINGSAP'EP!,
. Inspect _a
tO_e bUt_Rem_
or>,
wire, string, aft.) whlch:_
thrown or become entangled m cutting head.
o Do notoven_ch orstandon unstabte support. Keep firm _ot_ng:_d
belanca.
.
.
o Keep the cutting h_ad belov_waLFt
level. Do not raise handl_s above
your waist. Cuffing he@dpan_€ome
dangerouslycloset.Oy.our
.body.
o Keep away from sp_nninglmb; .
, Use unit p.mpedy. Use'0nly for trimruing, edging, sc.a_ping;and mitring,
Do not loroe unit. It Will do the job
better end with le_ dsk Oflnjury at
the rate for which itwas designed.
• stomuni_ Ihck)i0_i{__ihigh_dry PlaCe
o_ ot theroachOf;eh_dren:Store i
_OUBL_ INSLOL_T_O_
C(_M_
_I_O_':
unRieD0ublB]_uleted to help,
protect
_galrt_eI_:'sho_ Double
ir_iJlati6n co_
"6i_oon_sts_:oftwo
separate =layered _f_Lin_,la,
tion Instead of gro_n_ng,
Tools built __1ii._ i_ulauon system
are not.intendedto begmunded. No
grounding means is p_ded on th=s
unit, norshould a me_n_Sof grounding
be added tothis Un'¢
Safety precautions must be observed
o Use onlyin d_yll_htortn'g0od artificiallight.
I_IA_NT_HANCE _AF_=_
, Maintain
unitaccordingito
_'_mmendedprocedures_
Keep c.utb.'ng
I!neat properlen_.!F011__cttons for changingtrt_mprBn_i
, Haveall serviceand inaintenance
notexplainedin thi_manuelpep
formedby a Se_ _e_¢a canter to
avoidcreat_ng_..a
braid.
o D_soonnect
unR_m:thSl:_Owe_-sup
plybeIore
pertoim_ n1_ntenance,
orwhenchangingIiimmer line:./.
o Never douseor squirtthe Unitwith
wateror anyotherli_uld.C!ean unit
and labelswitha dariipspohge.
Keephandlesd_y,de_m;and_e "
fromell and grease,
• Keepthb airvents.c!eanandfree
fromdabds:to:avoid:_,e.d_atlpg'the
motor.Clean aftere_chu_;
4
Cm:|TON € NTE S
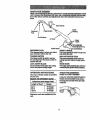
ATTACHING::THE:SHieLD
Check carton:contentsagainst the tol- :
WARNiNG.;-The shield must be proplowing lisL
erly installed.The Shield provides parModel 799230
tlal protectionfro m Be dsk of thrown
= Trimmer
objectsto the operator and others.
o Shield
Your unit is equipped with a line I=miter
o Extra Spool
blade. •whichcuts excess line to the
Examine parts for damage. Do not use
proper lengthwhile running.The.line
damaged parts.
,miter blade(on unders=deof sh=ald)is
NOTE= If you need assistance or find
Sharp and cancut you.
parts missing or damaged, call
o Alignthe installation arrow on the
1-800-235-5878.
shield with the arrow on the motor
ASSEMBLY
housing.
WARNING: If received assembled,
•Inssrt the shield onto the motor
review all a_embly steps to ensure
housing.
your unit is properlyassembled and all
, Twist the shield untilit snaps securefastenersare secure,
ly into place. Make sure the shield is
o Extend the tube until it snaps into
facing the back of the unitas illusplace.
trated on the front cover of this
manual.
CAUTioN,'
/
Sharp blade.
_installation
arrows
ADJUSTIHG THE HANDLE
o Loosen wing nut or knob on handle.
• Rotate the handle on the tube to an
upnght position, place in a comfortable positionand retighten wing nut.
shield in
directionof
armwtoassemble
R
R_
THiSOP=-RATOR!S
_U_
_SAF_
RUL_B_
O_EP,ATING YOUR '
aon oxthe vanousconw=sana acljustrnents.;Save
thl_:::mari_ial
fO__.efer:'
__'
'IVl ....
ReceSSed
TriggerSw_
:_Ho_ng
L
Plug
Cord Retainer.
Air Vents
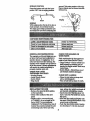
RSCESS_=DPLUG
The recess?dplugIswhere youattach
yourextens=on
coid to the unit.
TRUGGERSWITCH
The triggerswitchisu._d to turnon
the unit.Squeeze the tria_erswitch.to
operatethe unit.
LiNE LWMFi_RBLADE
The lineIlrnlterbladetrimsthe cutting
lineto thepropercuttiliglength
OP_RAT_HG _STRUCT_ONS.
Use only a voltage suPPly as_specified
on your unit.
SELECT AN _T_NSION
CORE)
a. ena=on
con auge
Length of Cord
25 Ft.
50 R.
100 Ft,
ATTACHTHE EXTENSIONCORD TO YOUR TRB/I_ER
Loopyouraxtensior!cord:thmu_gh
the
and aro:undi_fi0ol_':lnsure
the plug_n-dcord:_m firmlv:_-dfullv
en_a_ed_:,
rhandle
.Gauge
18 GaUg_
16 Gauge
, 16 Gauge
Extensioncordsare a.val!abief6rthis
unit.
6
CORRECTOPERATING
POSITION
the line to make contact. Do not force
trimmer Irne intowork area.
Sc,alplng
Trimmln_l
Edging
Stand es:sh0wnand Checkfor the following:
o Operator wcaring eye protection and
heavy clothing:
• Bo_ hands holdinghandiss.
o Un=tbelow Waist le;,iel.
° Use the leftside f0_itrimmingso debris is thrown away fr0m the operator.Without operator bending over,
keep the line near and parallel to•
ground (perpendi_larlwhen edg=ng)
and not crowded into matadal being
cut.
WARNING: Alwayswear eye protection. Never lean overthe trimmer head•
Rocks or debris can dcechet or be
thrown intoeyes and face and cause
blindness or other serious injury.
ADVANCING THE CUTTING UNE
Advance line by tapping bottom of cutting head lightlyon the ground while
unit is runningat _fullSpeed. The line
Iimiterblade attached to the shield wJil
cut the line to the proper length,i:
SCALPING
The scalpingteshn!que removes unwant_vegetation.
Hold the bottom of
the't_er
he_d about 3 in. (8 cm)
_r0V_i_e :gmt_di'_d at an angle. Allow the tip of the line to strike the
ground _ound trees, posts, monuments, etc. This technique increases
line wear.
Mowing
MOWING
Your trimmer is ideal for mowing in
places conventional lawn mowers cannot reach. In the mowing position,
keep the line parallel to the ground.
Avoid pressing the head into the
ground as this can scalp the ground
and damage the tool•
Sweep!ng,.,
. ._ . .--
Trimming
3in.
TRIMMING
Hold thebottom of the trimmer head
about 3 in. (8 cm) above the ground
and at an angle. Allow only the tip of
SWEEPING
The fanningactionof the rotatingline
can be usedfor a quickand easy
cleanup. Keep the lineparallelto and
abovethe sudesesbeingsweptand
movethe toolfromsideto side.
"/
E_Gg_G POSSTION
ground. Take extra caution while edging as objectsCanbe thrown from the
trimmer line.
Press the button and twist the lower
portion 180 ° into an edging position.
Button
EDGING
While edging allow the tip Ofthe line to
make contact. Do nef force the line.
The edge guard helps protect the unit
and keeps the unit from contacting the
Before each use
Before eechuse
WHEN TO PERFORM
.......
' _
GENERAL RECOMM_DATIONS
Thewarrantyonthis unitd_;nct cover items that have be_ subjected to
operator abuse or neghgen.ca,To receive full value from the'warranty, the
operator must maintain unit as Instructed In this manual. Various adjustments
will need to be made periodicallyto
properlymaintain your unit.
CHECK FOR LOOS_
.....
FASTENERS AND PARTS
• Housing Screws
• Assist Handle Sc_
• Debris Shield
• Edge Guide
RSPL C .G
S LiNS
• Remove the_li_::fi_lypulling
• Clean
u
ce of.h band
:
Aftareach
Us.e
i
_.1
CH_CK
FOR_AMAG_D
Or
wor_ PAR__
Refer replacement of damaged/worn
Paris t0 Your Se_ Service Centar,_
• Trigger Switch- EnsUre switch functions properly by pressing and releasing the trigger switch. Make sure
motor stops,
, Debris Shleld- Discontinue use of
unit if debds sPiieldis dmaged.
CLaNuNrr&I_SL=LS
= C!ean th_unit _!dg e. damp cloth
_th a mdd:_:let_rgen_.
o WIDe off Uhit with a €le_*drv cloth.
rope, stri_ e_._:-_,_'Chcanbreak off
and become _;i_an_gp_i_sinissile.
olnSert one*end bfthe_iabout
112
inch (1 i_) Int_ _i
h_oleinside
spool.
.
= Replace with a pre-wound spoo!
(# 71-85837), or cut a length of 30
feet of .065" (1,6ram) diam.,eter_.
Craftsman® Pro Trimmer hne._Useof
heavier lines could overloed the unit
and damage unit. Never use wire.
: the spool_
"
.
Wind the II-r_e.even!yaq_
_idbghtlyonto
the spool. Win_l_ip_i_i_on
of the
arrow
found
onff_:s_l, "
= Push the hne =nt_the _otch, _leaving
3 to 5 inches (7_:12 cm) Unwound,
8
• Insert the line into the exit hole in the
hub as shown in the illustration.
° Alignthe notchwith the line exit hole.
• Push the spool intothe hub until it
snaps into place.
o Pull the line extending outside the
hub to release it from the notch.
Une exithole
spoo,
USER REPLACEABLE SERVICE PARTS
REPLACEMENT PART
PART NUMBER
Spool with .065" Pro Trimmer Line
Assist Handle
71-85837
530-402657
530-401989
530-016152
530-402672
530-402663
530-015815
Bolt Carda,qe, 1/4-20 ____.___
Wing Nut
Shield Assy.
Edge Guide
Screw, 10-16 X 1/2 HI-LO SEMS
Prepareunitforstomg_at°eraof Sea.
sonor If It willnotbe usedfor3O days
ormore.
WARNBt_G:
oStop the unitand disconnectthe
powersourcewhennotin use.
o Carrythe unitwithmotor stopped.
= Store the unitso the linelimiterblade
canno_€_u._ injury.
Store unIt and extension cord indoors in a hl_gh,dnjplaca out of the
reach of children. Store unit unplugged;
° Store unit with el! guards in place.
Position unitso that any sharp object
cannot accidentally cause injury.
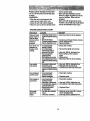
TROUBLESHOOTgNG CHART
,
TROUBLE
Trimmer head
stops under a
load or does
not turn when
switch is
pressed.
Line does not
advance or
breaks while
cuffing.
Une welds
onto spool.
une releases
continuously.
Une us.ageis
excessive.
Une pulls
back into
head.
,l,
,
,,
CAUSS
........
REMEDY
o
Allow tip of llneto do the cuffing.
o Crowding trimmer line
against matenal being
cut.
• Electrir,al faiture.
o Contact your Sears Service Center.
o Thrown circuit breaker ° Check Breaker Box.
° Debris stopping head = Remove debris.
i
o Line improperly
muted in head.
o Line improperly
wound onto spool.
Incorrect line size
o NOtenough line
outside head.
o Dirt buildup on cover.
o Crowdingtrimmer line
against material
being
cut.
!o Una size is incorrect.
Io Incorrect spool.
o Une Is being crowded
against material being
cut.
° Lineimproperly
muted in head:.
• Spool damaged.
° Line i.mpropedy
muted in head.
° Une size is incorrect.
= Crowdingline against
mstedaibeing cut.
o Spool teeth.worn
or damage a.
Too little line outside
head.
Line size incorrect.
= Check line routing.
° Rewind line tightly and evenly.
=_Use only J]65 irt. diameter line.
Pull 4 Inches of line outside
head,
o Clean cover.
o Allow tip of line to do the cutting.
* Use only .065 in. diameter line.
o Replace .withcorrect spool.
o Cut with tip of line fully extended.
o Check line routing.
I= Replace spool.
• Check line muting.
o Use only .065 In. diameter line.
= Cut with tip ofline fully extended.
Replace Spool
o Remove cover and pull 4 inches
of line outside head.
o Use only .065 in. diameter line.
10