1
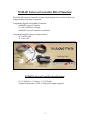
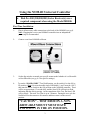
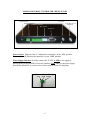
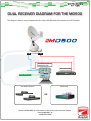
NOMAD UNIVERSAL CONTROLLER
USER INSTRUCTIONS MANUAL
The NOMAD Universal Controller gives all new meaning to the word simplicity with its
easy one step process this revolutionary product will bring satellite TV technology to new
heights.
Table of Contents:
NOMAD Bill of Materials (Packaged Components).……………..
2
NOMAD Specifications….………………………………………..
2
Using the NOMAD Universal Controller
First Time Installation……………………………….. 3, 4
Test Dish Functions…………………………………. 3, 4
Explanation Display Options
Front Panel……………………………………………
4
Button Operations (Find Satellite/Stowing the Dish)...
4
Dish Services and Their Assigned Satellites………… 4, 5
Front Panel LEDS…………………………………….
5
Explanation NOMAD Hardware
Rear Panel…………………………………………….
5
Control Cable Wiring Diagram………………………
7
Dip Switch Guide (Dish Services)…………………...
8
Dip Switch Guide (Switch Options/Configurations)…
9
(Show Mode Switch)…………….
9
Trouble Shooting and Error Codes……………………………..…
10
Technical Support Info…………………………….……………….. 12
Products Used with the NOMAD………………………………….. 12
Important Notes for Dish Network...……………………………..… 13
Rain Fade Effect on Domes………………………………………… 14
Dual Receiver Diagram for Dish Network MD500…………………. 15
1
NOMAD Universal Controller Bill of Materials:
The NOMAD Universal Controller Systems (when shipped with a mount of choice) are
shipped with the following components:
Components shipped with NOMAD Controller:
- NOMAD Universal Controller
- 12 VDC 4 AMP Power Supply
- NOMAD Universal Controller User Manual
Components shipped with your mount of choice:
- 30’ Control Cable
- 30’ Coax Cable
NOMAD Universal Controller Specifications:
-
10 7/8” Wide by 9 ¾” Deep by 1 1/16” Height
Voltage Requirements: 12VDC 4 AMP power supply (supplied)
2
Using the NOMAD Universal Controller
● Dish Pro 500 (300,500,800) Series Receiver(s) are a
required component when using the Model MD500.
First Time Installation:
1-
Plug in all necessary cable connections to the back of the NOMAD (see pg 6).
Note: Plugging the receiver and NOMAD controller into an independent
power strip is recommended.
2-
Connect coax from NOMAD to Mount.
(Labeled “To Nomad)
3-
Set the dip switches to match your specific mount model whether it is a Skewable
or Non-Skewable (see pg. 8-9 for specific settings.)
4-
To run the “MANDATORY” Test Dish function, set dip switch #1 to the ON or
UP position, (Note: For non-skewable single LNB dishes, 1 and 3 must be “ON”)
then turn the Power Switch to the ON position on the NOMAD controller. There
will be an approximate 15 second delay and the Stow LED will begin to flash,
indicating that the dish is moving. At the completion of the Test, the Stow LED
will go steady. The total Test Time is up to 3 minutes. During the test cycle the
Nomad will run the mount to all extremes and then return it to the stowed
position.
“CAUTION” – TEST DISH ON A NONSKEWABLE MOUNT MUST HAVE
SWITCH # 3 IN THE ON POSITION.
3
The purpose of the “MANDATORY” test dish:
A- Automatically determines if the non-skewable mount is a Dome or
Open Face dish. (See pg 8, 9 for “specific” dish switch settings)
B- Checks to ensure proper working order of all (Elevation, Azimuth,
Skew) motor functions.
5-
Upon successful completion of the Test Dish function, turn “OFF” the Power
Switch and set the dip switches to identify your specific mount (skewable or nonskewable) and satellite service settings such as, Dish Network, Dish 500 (2 LNB),
DirecTV, Direct HDTV (3 LNB), Bell ExpressVu (2 LNB) or Star Choice. (See
pg. 8, 9 Dish Services: Options & Configurations.)
6- After properly setting the dip switches for your application, turn “ON” the Power
Switch on the rear panel of the NOMAD Universal Controller. Start up will take
approximately 5 seconds. Note: When the Power Switch is turned “ON” the
PWR (power), LNB and STOW LEDS will be lit.
NOMAD UNIVERSAL CONTROLLER “FRONT” PANEL
BUTTONS:
FIND: (Find Satellite)
Pressing the Find button will begin the dish “search” to locate and lock
onto the “main” satellite.
For non-skewable single LNB dishes pressing the Find button, while on
satellite enables you to switch between multiple satellites. For example:
(Pressing the find button while locked onto
• Dish Network will toggle between satellites 119 and 110.
• DirecTV will toggle between satellites 101, 110 and 119.
• Bell ExpressVu will toggle between satellites 91 and 82.
• Star Choice will toggle between satellites 107 and 111.*
*Coming soon
4
Dish Services and their Assigned Satellites
1.
2.
3.
4.
Dish Network – Can use satellite(s) 119 & 110
DirecTV – Can use satellite(s) 101, 110 & 119
Bell ExpressVu – Can use satellite(s) 91 & 82
Star Choice – Can use satellite(s) 107 & 111
REPEAK – Skewable Mounts ONLY - Pressing the Find button, when
“on satellite” and the signal strength shows weakness, will re-peak the
dish for a higher signal quality when using the twin LNB skewable dish
model(s) MD500 or triple LNB MDHDTV ONLY. (Note: Single LNB
non-skewable dishes “re-peak” during satellite transition.)
STOW: (Stowing the Dish)
Pressing this button returns the dish to its stowed or travel position.
LED’S:
LNB: When lit, this LED indicates the coax cable from the receiver has been
correctly connected to the NOMAD Universal Controller, and the receiver has
power. (Note: The LNB LED is illuminated once the coax cable of the receiver
has been connected, but does NOT indicate the Controller has power).
LOCK: When lit, this LED indicates the “strongest” or “highest” signal strength
of the satellite has been achieved.
PWR: When lit, this LED indicates the NOMAD Universal Controller power has
been turned on.
PEAK: When lit, this LED indicates the dish has found a signal and is adjusting
for the “strongest” or “highest” signal strength of the satellite.
FIND: When the “Find” button has been pressed, the Find LED will blink until a
satellite has been identified and can establish a connection. Once the satellite has
been identified, the Find LED will remain solid. (The Stow LED also blinks
indicating motor movement.) If the Nomad is locked on the satellite, pressing the
“Find” button again will activate a re-peak routine which will verify the dish
alignment to the satellite for optimum signal level for skewable dishes (MD500
and MHDTV). Pressing the Find button on non-skewable dishes (Dome and
Executive) allows you to switch between satellites.
STOW: When the “Stow” button has been pressed, the Stow LED will blink
indicating motor movement as the dish is being stowed. Once the dish has been
stowed, the Stow LED will remain solid.
5
NOMAD UNIVERSAL CONTROLLER “REAR” PANEL
On/Off Switch
Power Connector
Control Connector
Dip Switch
From Dish
To Satellite Receiver
Satellite IN
Serial Port
Power Switch: Depressed, the “1” indicates the controller is in the “ON” position.
Depressed, the “0” indicates the controller is in the “OFF” position.
Power Supply Interface: Is used to connect the 12 VDC 4 AMP power supply to
provide power to the NOMAD Universal Controller. (Note: Only use the power supply
provided by MotoSAT or a power source known to have at least a 4 Amp min.)
P1
P2
P3
+12V -GND Unused
6
Control Cable Interface: Connects the mount by way of a 9 pin conductor cable to the
NOMAD Universal Controller. The cable is color coordinated for exact connection
configuration. (See Figure Below)
Wiring to 9 Pin Control Connector
Black-Brown-Red-Orange-Yellow-Green-Blue-White-Purple
(Purple is only used on Skewable Mounts, and not required on Non-Skewable Mounts)
Serial Port: Used to provide software upgrades.
From Dish: Coax connection from the dish to the NOMAD Universal Controller.
To Satellite “IN” on Receiver: Coax connection used to connect the NOMAD Universal
Controller to the satellite/LNB connection on the satellite receiver.
Dip Switches: Will provide precise configuration of the NOMAD Universal Controller
to specific satellite TV configurations.
“Caution” - Power must be turned off before changing Dip Switch settings!
Dip Switches
7
Dish Services: Options & Configuration
8
Dipswitch Operation: Options & Configuration
9
TROUBLESHOOTING
“CAUTION” – The dish needs to be STOWED and the Power Switch has
to be in the OFF position before switching any of the dip switches.
LED ERROR CODES
- Probable Cause and/or Resolution:
NOMAD
Universal Controller
Error Code Matrix
LED Lights Flashing
Power
X
X
X
X
X
X
X
X
X
Peak
Lock
Find
X
X
X
X
X
X
X
X
X
X
X
X
Cause of Error
Stow
X
Invalid Dip Switch. Skewable vs Non-Skewable mount
Invalid Network ID
Motor time out. No counts with Azimuth motor.
Limit error - Elevation movement
Limit error - Skew movement
No DVB power but DVB connected
Main satellite not found but secondary satellite found / ALSO NO SATELLITES
FOUND
Signal lost, or no LNB power
Over temperature on NOMAD (NOMAD too hot. Cool it down)
10
X
X
X
X
X
X
X
X
X
X
X
X
X
X
X
X
X
X
X
X
X
X
X
X
X
X
X
X
X
X
X
X
Coax cables reversed on NOMAD
Satellite signal too strong
Could not find main satellite after skewing dish
Invalid Dip Switch, Improper identification of Dome or Skewable mount
Motor Time Out. No counts on Elevation motor.
Motor Time Out. No counts on Skew motor.
Limit Error - Azimuth movement
No Receiver (or LNB) power
Only main satellite found
Signal lost but LNB power present
Azimuth, Elevation or Skew motor active (This is not an error but a Motor is active)
Dish did not raise minimum height
DVB Board has failed
Not enough satellite signal
Lost Code - Call Customer Service for Upload Module (SOLID LED, NOT
FLASHING)
NOTE: Before calling Technical Support
please perform a “Test Dish” and press
“Find” one more time before calling.
Technical Support
-
MotoSAT Customer/Technical Service – (1-800-247-7486) - Available MonFri 9:00 a.m. to 5:00 p.m. Mountain Standard Time.
● Please have your MotoSAT Model # and Satellite Receiver Brand
prior to calling Customer/Technical Support.
11
12
Special Notes
Stowing the dish when all else fails.
If you are able to go onto the roof 1. Unplug the “Green” 9 pin connector from the back of the NOMAD.
2. Go to the roof where you can apply a slight amount of force to move
the dish into an acceptable position for traveling.
3. Call Tech Support when you get to a location that you can perform
trouble shooting.
If you are unable to go onto the roof –
The dish can be manipulated by applying 12 volt DC power to specific
wires in the control cable located in the back of the NOMAD. The 12 Volts going
to your NOMAD controller (3 pin “green” connector) can be used as this source.
1. ELEVATION - Orange and Red wires (reversing polarity will
change direction.)
2. AZIMUTH
- Black and Brown (reversing polarity will change
direction.)
If a chain or motor/gearbox assembly is broken, the dish will have to be
stowed by hand.
Dish Network receivers
NON-SKEWABLE Dome or Open Faced mounts.
If your satellite receiver is a Dish 500 or Dish Pro and you remove it from
your home to your RV, you will need to perform a “Check Switch” while
the non-skewable dish is in the STOWED POSITION. Your screen
upon completion of the “Check Switch” should have 8 X’s in the check
boxes meaning that the “Check Switch” failed. This procedure must be
accomplished before you “FIND” satellite. Failure to do so will
result in improper operation of the receiver.
13
RAIN FAID ON DOME SYSTEMS
Read all about it………….
Subject:
Rain fade on Domed (Covered) Systems
What is rain fade? Rain fade is signal degradation due to the interference of rain
droplets. Rain can affect performance as well as heavy water content thunder clouds.
Satellite frequencies have a great deal to do with degradation. C band satellite
frequencies have the best resistance to rain fade, KU band satellite frequencies have the
next best performance, and KA band frequencies are the most susceptible to rain fade.
Rain fade is also known as rain attenuation.
There are quiet a few examples of rain fade or degradation.
1. There is heavy rain (large droplets); it can block the uplink channels for
reception.
2. There is heavy rain that can block the receive signal to the satellite.
3. There is also moisture build-up on the dome or cover.
Unfortunately, all these examples are caused by acts of nature, that with a domed system
you will always experience all of the symptoms in varying degrees. There are things you
can do to reduce degradation.
1. If you live in Seattle, move to Arizona.
2. Get a big fan, point it towards the sky and blow the clouds away.
3. KEEP YOUR DOME CLEAN- Soap and water are the most efficient
methods. Some harsh or abrasive cleaners can be harmful to the outside of
the dome as well as signal interference. NOTE: Some types of cleaners as
well can eventually collect dirt. Be sure to select one that will work for
you.
4. After rain, wipe the water droplets off the Dome.
5. A bigger dish size and superior surface accuracy reduces rain fade
problems.
All domes on the market are susceptible to rain fade. MotoSAT’s Dome (aka Mini
Dome) as well as the T2 AutoMotion are the two domed satellite television systems that
have the lowest rain degradation on the market. Because of size and surface accuracy of
our dish, MotoSAT can offer the best performance in rain fade situations.
Your Staff at MotoSAT
14
WHITE::PAPER
4.11.05
DUAL RECEIVER DIAGRAM FOR THE MD500
This diagram shows a setup of equipment for using a MD500 with dual receivers or a PVR receiver.
110°
From Dish
119°
Dish Network Dish Pro
DP34 Multiswitch
Sat 1
Nomad Controller
Sat 2
To VHF Antenna In
Two DishPro Receviers
DishPro PVR
OR
Please call MotoSAT for information on this or any other technical subject
contact MotoSAT at:
1-800-247-7486