1
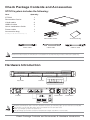
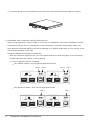
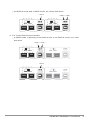
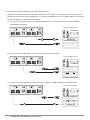
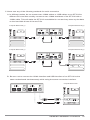
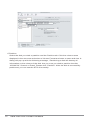
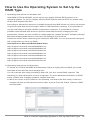
ST7610-4S-WBC
User Manual
Version:2.0 (April, 2009)
Index
Check Package Contents and Accessories...................................................
2
Hardware Introduction...................................................................................
2
Precautions prior to Installation......................................................................
3
Hardware Installation Procedure...................................................................
4
Hard Disk Drive Format Procedure...............................................................
11
How to Use the Operating System to Set Up the RAID Type .......................
16
Product Description.......................................................................................
20
Frequently Asked Questions.........................................................................
21
1
Index
Check Package Contents and Accessories
ST7610 system includes the following:
Item
Quantity
ST7610
1
Removable Carrier
4
1394b cable
2
USB2.0 cable
2
Quick Installation Guide
1
Power cable
1
Accessories bag
1
ST7610
(including 24 x 6#-32 screws and Key x 2)
Removable Carrier
Accessories bag
1394b cable
USB2.0 cable
Power cable
Please check above parts are included prior to installation.The accessories bag contains screws and a plastic key.
Hardware Introduction
Tray handle
Lock hole
4
JBOD
2
3
Raid 0
1394b
JBOD
USB 2.0
1
2
3
4
FAIL Power
1
Raid 0
1394b
USB 2.0
4cm Fan
4
JBOD
3
Power Socket
Power Switch
Raid 0
1394b
USB 2.0
Status Indications of LEDs:
ACCESS LED will light up blue if the HD is installed. ACCESS LED will always light up red if the HD is not installed.
HDD Access LED will flash Blue when data is accessed from the hard disk drive.
Power LED will light up blue if the power is on.
Fail LED will light up red when the internal temperature is higher than 60°C or the fan fails.
Check Package Contents and Accessories & Hardware Introduction
2
Precautions prior to Installation
1. Before installation, please refer to the Check Package Contents and Accessories and
ensure necessary parts are fully provided. Contact the original distributor in case of any
missing or damaged item.
2. Please use the power cord that comes with the package to connect the power supply. Do
not disassemble or modify the device without authorization. Be sure to use 100-240V,
60Hz, power supply. Any unauthorized disassembly or modification may cause damage to
the electronic parts and deprive you of the benefit under the warranty. RAIDON is not
liable and responsible for any damage due to unauthorized disassembly or modification, if
such unauthorized disassembly or modification results in data damage or loss, or causes
the operating system unable to start.
3. Please carefully go through the Quick Installation Guide and back up your data on the hard
disk drive before installation or use the newly purchased hard disk drive to avoid data loss
in case of inadvertent operation. RAIDON is not reliable and responsible for any data
damage due to inadvertent operation, if such inadvertent operation results in data damage
or loss, or causes the operating system unable to start.
4. Hardware Requirements
A. To enhance compatibility and transmission efficiency, please connect to motherboards
or external cards supporting USB 2.0 or higher.
B. To enhance compatibility and transmission efficiency, please connect to motherboards
or external cards supporting 1394b or higher.
5. OS Software Requirements
The product is ideal for any operating system compatible with the USB or 1394b interface
3
Precautions prior to Installation
Hardware Installation Procedure
1. After verifying that the package is complete, proceed to unpack the package.
2. Hardware Installation.
A. Insert the supplied plastic key into the lock hole on the removable tray and carefully
remove the tray.
B. Remove the holder from the removable tray with a screwdriver (be careful not to
damage the nuts)
C. Mount the hard disk drive and fasten the screws.
Hardware Installation Procedure
4
D.Carefully push the removable tray into the slot and push the handle back into place.
3. Use Mode and Connection Wiring Descriptions
Users must determine which mode to use prior to installation. Once the installation mode
is selected, please do not change the mode arbitrarily if possible. Especially when you
have already selected RAID 0 mode but change it to JBOD mode later or vice versa, it will
cause data damage in the HD.
A. Switch Adjustment Mode Illustrations:
With the machine powered off, you can adjust Switch by selecting any of the following
modes from the rear panel of the machine .
a. For 4 Hard Disk Drives Installed
Two JBOD modes, as 4 physical hard disk drives
HDD 4
HDD 3
4
JBOD
3
Raid 0
1394b
HDD 2
2
JBOD
USB 2.0
HDD 1
1
Raid 0
1394b
USB 2.0
Two RAID 0 modes, as 2 virtual hard disk drives
HDD 2
4
JBOD
5
2
3
Raid 0
1394b
HDD 1
JBOD
USB 2.0
Hardware Installation Procedure
1
Raid 0
1394b
USB 2.0
An RAID 0 mode and a JBOD mode, as 3 hard disk drives
HDD 3
3
4
JBOD
Raid 0
1394b
HDD 2
2
JBOD
USB 2.0
HDD 1
1
Raid 0
1394b
USB 2.0
b. For 2 Hard Disk Drives Installed
A JBOD mode, supporting 2 hard disk drives; or an RAID 0 mode, as 1 hard
disk drive
HDD 2
HDD 1
4
JBOD
1394b
2
3
Raid 0
JBOD
USB 2.0
1
Raid 0
1394b
USB 2.0
HDD 3
4
JBOD
1394b
2
3
Raid 0
JBOD
USB 2.0
1
Raid 0
1394b
USB 2.0
Hardware Installation Procedure
6
4. Connection Wiring Descriptions and Illustrations:
When the mode for Switch has been selected, you can then install the ST7610 with the
following connection wiring methods. It is recommended you use 1394b cables to connect
to the computer for better performance.
A. Connect two 1394b cables to the interfaces of the computer (most recommended
installation method).
Computer Back Panel
4
JBOD
1394b
2
3
Raid 0
JBOD
USB 2.0
1
Raid 0
1394b
USB 2.0
B. Connect two USB cables to the interfaces of the computer.
Computer Back Panel
4
JBOD
1394b
2
3
Raid 0
JBOD
USB 2.0
1
Raid 0
1394b
USB 2.0
USB Port
C. Connect to the interfaces of the computer with a 1394b cable and a USB cable.
Computer Back Panel
4
JBOD
Raid 0
1394b
2
3
JBOD
USB 2.0
1
Raid 0
1394b
USB 2.0
USB Port
7
Hardware Installation Procedure
D. Connect a 1394b cable to the interface of the computer and connect another 1394b
cable serially to the rear panel of the ST7610. (The method is recommended if there is
only a 1394b interface of your motherboard.)
Computer Back Panel
Raid 0
1394b
1
2
3
4
JBOD
JBOD
USB 2.0
Raid 0
1394b
USB 2.0
E. Connect a 1394b cable only to the interface of the computer.
Computer Back Panel
Raid 0
1394b
1
2
3
4
JBOD
JBOD
USB 2.0
Raid 0
1394b
USB 2.0
F. Connect a USB cable only to the interface of the computer.
Computer Back Panel
4
JBOD
1394b
2
3
Raid 0
JBOD
USB 2.0
1
Raid 0
1394b
USB 2.0
USB Port
Hardware Installation Procedure
8
G. Two ST7610 units serially connected each other
ST-7610-4S-WBC (1)
Computer Back Panel
4
JBOD
Raid 0
1394b
2
3
JBOD
USB 2.0
1
Raid 0
1394b
USB 2.0
ST-7610-4S-WBC (2)
4
JBOD
1394b
2
3
Raid 0
JBOD
USB 2.0
1
Raid 0
1394b
USB 2.0
ST-7610-4S-WBC (3)
4
JBOD
1394b
2
3
Raid 0
JBOD
USB 2.0
1
Raid 0
1394b
USB 2.0
Up to 4 Units
After selecting a desired installation method as stated above, first power of the ST7610, wait until the ST7610
operates normally, and then turn on your PC.
9
Hardware Installation Procedure
5. Never use any of the following methods for serial connection
A. In different modes, do not connect two 1394b cables or USB cables on an ST7610 to
different PCs and then serially connect to two 1394b interfaces of the ST7610 with a
1394b cable. This will make the ST7610 unavailable for use and may mess up the data
on the hard disk drives of the two PCs.
Computer Back Panel (2)
Computer Back Panel (1)
4
JBOD
1394b
2
3
Raid 0
JBOD
USB 2.0
1
Raid 0
1394b
USB 2.0
Computer Back Panel (1)
Computer Back Panel (2)
4
JBOD
1394b
2
3
Raid 0
JBOD
USB 2.0
1
Raid 0
1394b
USB 2.0
USB Port
B. Be sure not to connect the 1394b interface and USB interface of an ST7610 to the
same motherboard simultaneously while using the same connection interface.
Computer Back Panel
4
JBOD
Raid 0
1394b
2
3
JBOD
USB 2.0
1
Raid 0
1394b
USB 2.0
USB Port
Hardware Installation Procedure
10
Hard Disk Drive Format Procedure
1. In the four individual Hard Disk Drives modes, the installed devices can be detected by the
Device Manager of the operating system.
A. Windows Operating System – 1394b Interface Connection – JBOD Mode
2. Customers can format the hard disk drive by using the Disk Management tool of the
operating system and then using the ST7610 normally.
A.Operating Instructions for Windows OS
11
Hard Disk Drive Format Procedure
Hard Disk Drive Format Procedure
12
B. Operating Instructions for Macintosh
After the hardware installation for the ST7610 is completed, you can restart the system
and connect the device to Macintosh.
Hard Disk Drive Format (same as in the Windows format function)
a. Move the cursor to the Toolbar on the Desktop, and select the Disk Utility. A disk tool
window will pop up with several function tabs, such as First Aid, Erase, Partition,
RAID and Reinstall.
b. Select the Erase tab. If the disk device is ready, the disk information will be displayed
on the left window.
c. To erase all data and volumes on a disk, please select the icon for the disk drive and
a Volume Format and enter a name and then click “Erase”. A dialog will pop up with
the following message, “Erasing a disk will destroy all information on the volume of
the disk. Are you sure you wish to erase the disk ‘XXX’? Cancel or Erase” If you wish
to erase, please click “Erase”. After the disk is formatted, you can use the ST7610
normally. Please refer to the figure for instructions.
13
Hard Disk Drive Format Procedure
Hard Disk Drive Format Procedure
14
C.Partition
Select the disk you wish to partition and the Partition tab. Click the volume name
displayed in the structure and select a Volume Format and enter a name and size. A
dialog will pop up with the following message, “Partitioning a disk will destroy all
information on the volume of the disk. Are you sure you wish to partition the disk
‘XXXXXXX’? Cancel or Erase” Please click “Partition”. After the disk is successfully
partitioned, you can use the ST7610 normally.
15
Hard Disk Drive Format Procedure
How to Use the Operating System to Set Up the
RAID Type
1. Operating Instructions for Windows OS
GearTANK ST7610-4S-WBC can be set up as a highly efficient RAID system in an
operating system. To set up a highly efficient RAID system with the ST7610, please refer
to Microsoft related web sites.
According to Microsoft’s reference, portable external hard disk drives can not be converted
to dynamic hard disk drives through 1394b or USB interfaces. Namely, it is impossible to
use the OS utility to provide a RAID configuration. However, it is possible to convert
portable external hard disk drives to dynamic hard disk drives by changing the OS
parameters. Unless you are an MIS or related engineer, please DO NOT arbitrarily change
Microsoft related parameters to avoid any OS damage or boot failure.
Please be careful when connecting the computer with USB. It is not recommend using the
OS configuration to set up an RAID.
Information for Microsoft Related Web Sites
http://support.microsoft.com/kb/299598/en-us
http://support.microsoft.com/kb/299598/zh-tw
http://support.microsoft.com/kb/303184/zh-tw
http://support.microsoft.com/kb/302969/en-us
http://support.microsoft.com/kb/302969/zh-tw
http://support.microsoft.com/kb/302969/en-us
http://support.microsoft.com/kb/303237/zh-tw
2. Operating Instructions for Macintosh
To set up an ST7610-4S-WBC with Macintosh OS as a highly efficient RAID, you need
hard disk drives with the same storage size.
You can use the disk utility provided by Mac OS 10.4.6 to create RAID systems. The
following is a brief description on how to operate. For more detailed information on RAID
setup, please refer to Apple computer related web sites.
A. Move the cursor to the Toolbar on the Desktop, and select the Disk Utility. A disk tool
window will pop up with several function tabs, such as First Aid, Erase, Partition, RAID
and Reinstall.
How to Use the Operating System to Set Up the RAID Type
16
B. Select the RAID tab. If the disk device is ready, the disk information will be displayed on
the left window. Please select the Volume Format and the RAID Type you wish to
create. Please decide the RAID Type that you create by the amount of external hard
drive disks.
17
How to Use the Operating System to Set Up the RAID Type
C. Drag disks or volumes to the list box to create the hard disk drives according to the
definition of RAID.
D. Select “Create” to create RAID systems according to the information in the window, as
shown in the figure.
How to Use the Operating System to Set Up the RAID Type
18
E. When the format is completed, you will have a highly efficient RAID system featured
with ST7610-4S-WBC. You can then access the data through the RAID system, as
shown in the figure.
19
How to Use the Operating System to Set Up the RAID Type
Product Description
Product Characteristics
1. Two 1394b and USB inputs for different flexible applications.
a. By connecting two inputs to different computers, the same storage system can be
shared.
b. Connecting two inputs to two individual interfaces of the same computer system for
better transmitting performance.
c. By connecting an input to a computer system, and serially connecting a 1394b cable to
another 1394b interface, users may have a computer for extended storage usage.
2. The product supports RAID 0 and JBOD. When using JBOD, the system will recognize 4
individual hard disk drives. When using RAID 0, the ST7610 will merge two hard disk
drives of the same input into a larger HD; therefore the system will recognize two large
hard disk drives.
3. The product features 4 HD transmission LEDs and HD damage warning LEDs and a
malfunction warning LED for system HD malfunction and overheat detection.
Related Products:
We provide the interfaces for the ST7610 series related products, including ST7610-4S-S2.
1. The ST7610-4S-S2 provides 4 highly efficient SATA 3.0GHz interfaces as a faster, safer
and more reliable system for users
2. For more details on related products, please go to http://www.RAIDON.com.tw.
1. Most of the GearRAID series are the RAID series. Customers may set up different RAID levels without adding any
other peripherals. Please refer to the GearRAID series such as SR5620, SR5650, or SR6600 on the
RAIDON web site.
2. Most of the GearTANK series are the external case series. Customers may use a GearTANK series product as an
external case or a RAID system with an optional RAID CARD. Please refer to the GearTANK series such as
ST5650, ST6600 on the RAIDON web site.
Product Description
20
Frequently Asked Questions
Q: Does it need additional drivers to run GearTANK ST7610 in different operating systems?
A: No. Users do not need any additional driver to run GearTANK ST7610 in different
operating systems. As long as the OS supports the USB or 1394b interface, RAIDON
systems are compatible with a variety of operating systems, e.g. Window XP, Linux, and
Macintosh, etc..
Q: Is GearTANK ST7610 compatible with any hard disk drive?
A: The product has no problem with hard disk drive compatibility. RAIDON provides the
SATA II interface, which is a cost-efficient system with high performance. Please feel free
to contact us for any hard disk drive compatibility problem.
Q: What can I do if I turn on my PC, but the system BIOS cannot detect the hard disk drive?
A: 1. Typically the system BIOS fails to detect the hard disk drive because of improper
connection. To solve this problem, you can try the following procedure: (1) Power off the
system. (2) Turn off the PC. (3) Make sure the cables are connected properly. (4)
Restart GearTANK ST7610. (5) Repeat Step (1) to Step (4) for three times. Please
wait at least 5 minutes between each attempt. If the system BIOS still fails to detect the
hard disk drive, make sure the installation and connection procedures are compliant
with regulations described in the manual.
2. If the hard disk drive cannot still be detected, please contact us via phone or contact
our technical support directly through the RMA system.
Q: Why can’t I use the storage device in the operating system, even the system BIOS has
detected the hard disk drive?
A: 1. Please refer to the Hardware Installation Procedure & Hard Disk Drive Format
Procedure in the Quick Installation Guide and make sure the storage devices have
been installed successfully.
2. New hard disk drives can only be displayed in the system after disk partition and format.
Q: What should I do when the Fail LED indicator lights on?
A: Determine if the fan fails, the system is over heated, or the HD is malfunctioned, as soon
as the Fail LED indicator lights on.
1. In case of malfunctioned fan, please check if the fan is jammed with dust. Should any of
the situations occur, please shut down the system and clean the fan up or remove the
wires that trap the fan. Then restart the system again. If the problem still occurs or for
any reason that you are unable to fix the problem on your own, please send it back for
maintenance.
2. In case that the internal temperature has raised over 60°C, please shut down the
system, let it cool down and then restart it. If the problem still occurs, please send it
back for maintenance
21
Frequently Asked Questions
Q: How to identify the OS supports the USB interface.
A: 1. Supported by Macintosh operating systems
All Macintosh computers (iMac and Blue and White G3 Macintosh or higher) support
USB. An older Macintosh model can be installed with USB devices from other brands.
2. Supported by Windows operating systems
Only Windows 98 and Windows XP/2000/2003 support USB. If you are using Windows
95, it’s necessary to upgrade to Windows 98 or Windows XP/2000/2003.
NOTE: Not all of the PCs can be upgraded to Windows 98 or Windows XP/2000/2003.
The ST7610-4S-WBC is applicable to any other operating system that supports the USB
interface and allows USB to work normally.
Q: USB is not available for use under the following circumstances:
A: If the OS configuration is incorrect
If the OS does not support USB
If USB is turned off in BIOS
If the computer’s BIOS does not support USB
Q: How to check if the Macintosh USB ports are activated.
A: Please select “Apply System Profiler” from the Apple Menu. In “Apply System Profiler”,
select the “Hardware and USB” tab.
Q: Why can’t my USB interface support USB 2.0?
A: The ST7610 features the USB 2.0 interface. Please check if your OS has installed
Windows XP Service Pack 1, or check with the vendor of your motherboard that if the
USB interface has the latest USB 2.0 driver stack. Besides that the ST7610 features the
compatible USB 2.0 interface, the OS and the USB interface of the motherboard must
support USB 2.0.
Q: If my OS or motherboard does not support USB 2.0, will it affect the overall performance?
A: If your OS or motherboard does not support USB 2.0, you can still indirectly access the
ST7610 with the USB interface. However, this will result in poorer overall performance
than using USB 2.0. It is recommend that you update the OS to Windows XP Service
Pack 1 or higher and purchase a motherboard that supports the USB 2.0 interface to
optimize the USB 2.0 performance.
Frequently Asked Questions
22
Q: How to check if the USB ports of your PC are activated.
A: USB is included in Windows 98 and XP/2000/2003; however, some computer
manufacturers may not set up the computer’s USB.
If “New Hardware Wizard” does not show on the screen after you connect the device to
the USB port of the computer, please proceed with the following procedures:
Select “Start” from Windows XP desktop and then select “Control Panel”.
Double click on the “System” icon and then tap “Hardware”.
Click on the “Device Manager” tab.
Click on the “+ (plus)” sign in front of “Universal Serial Bus controllers”.
Click on the “+ (plus)” sign in front of “USB controllers”.
If you identify the USB Universal Host Controllers and USB Root Hubs, it means USB may
be already activated. If there are several USB hubs serially connected, please try to
connect to a different USB hub or to a USB device. Meanwhile, please make sure that the
cable is connected properly. (A USB hub is a hardware device that allows you to connect
to multiple USB cables.)
If you do not identify any of these devices on the screen, please refer to the computer
documents or contact the manufacturer for further detailed information on how to activate
and configure USB.
23
Frequently Asked Questions


![Datasheet-SE1x00-ch [轉換].ai](http://vs1.manualzilla.com/store/data/005880953_1-483fad80bdf3a3090579fc760497bacf-150x150.png)