1
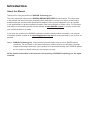
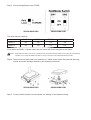
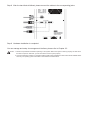
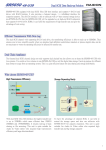
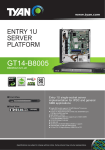
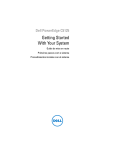
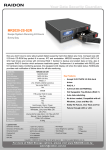
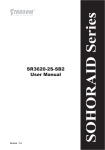
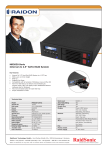
SR5620-WBS1/SB2
SR5650-WBS1/SB2
User Manual
Version : 1.00 (February, 2008)
Introduction
About this Manual
Thank you for using the product of RAIDON Technology Inc.
This user manual will introduce the RAIDON SR56XX-WBS1/SB2 series products. The information
in the manual has been thoroughly checked before publication, but may not conform to the product
actually delivered. Actual product specifications depend on the product shipped to you. Any update
in the specifications or product-related information shall not be subject to further notice. For the latest
information on the product, please visit the website at www.RAIDON.com.tw or directly consult with
your contact window of our sales.
If you have any questions on RAIDON products or need the latest product information, user manual
or firmware, please contact us at [email protected] and we will get back to you as soon as
possible.
Notice : RAIDON Technology Inc. only provides technical support and service to RAIDON direct
customers. For end users or non-direct customers, please contact your distributor for better
support and prompt responses. If your product is not purchased directly from RAIDON, please
do not contact us directly since you may not get any reply.
All the product information in this manual is the property of RAIDON Technology Inc. All rights
reserved.
SR56XX-WBS1/SB2 Quick Installation Guide
1. Package Contents
After you open the outer package, make sure that the following items are contained in the package:
•SR56XX-WBS1/SB2 product body
•AC Power Cord
•RS-232 Port Cable
•SATA Cable
•USB2.0 Cable
•1394b Cable (WBS1 Only)
•CD
•User Manual
•Accessory Kit
2. Hardware Installation
Please follow the procedure below to complete the hardware installation of SR56XX-WBS1/SB2:
Step 1 Open the outer package and take out the product body. (Make sure the related accessories and
the product body are not damaged or missing. If you have any questions, contact the distributor
or sales)
Step 2 Place the product on a flat and stable surface. Make sure that the ventilation fan is not
obstructed and appropriate ventilation space is provided around the product. (Do not place the
product nearby water area or any environment that may cause damage to the product)
Step 3 Set up the application level of RAID.
SR5620-WBS1/SB2
SR5650-WBS1/SB2
The setup has two switches.
RAID 0
RAID 0+1
RAID 5
RAID 5+Spare
Switch 1
On
On
Off
Off
Switch 2
On
Off
Off
On
If you select the RAID 5 + Space mode, then the fourth HD will be assigned as the Space.
Notice : Please determine which mode to use in advance. Once the mode is decided, please do not change the mode arbitrarily
if possible. If you change the RAID mode after it is set up, it will cause entire internal data damage in HDs.
Step 4 Take out the tray and install your hard disk in it. Make sure to fasten the hard disk securing
screws to prevent damages caused by unnecessary movement.
SR5620-WBS1/SB2
SR5650-WBS1/SB2
Step 5 Connect with the Power cord and power on. Waiting for the System booting.
Step 6 After the system boot and confirmed your RAID level setting, insert the tray back and fix it
firmly in the proper place.
SR5620-WBS1/SB2
SR5650-WBS1/SB2
Step 7 The system will initialize automatically. Please press “ENT” to start the initiation process.
Initializing
Note :
1.The initiation process is completed when it shows “RAID INIT 100%” .
2.Following is the formula for calculating the initiation time: The speed of initiation is 7GB/min.
Step 8 After the hard disks initialized, please connect the cables to the corresponding jacks.
Step 9 Hardware installation is completed.
You can manage and setup via management interface, please refer to Chapter 2.3.
Notice : 1. Please set up the RAID mode before powering on the system. Wait for the system to start up properly, and then insert
the HDs in sequence. Otherwise, you will not be able to use the system properly.
2. Once the hardware is installed, it is imperative that the RAID system initializes the HDs. Please reboot SR56XX Series
and then your operating system will be able to auto-detect the installed device.
Contents
Chapter 1
1.1
1.2
1.3
Chapter 2
2.1
2.1.1
2.1.2
2.2
2.3
2.4
Chapter 3
3.1
3.2
3.3
Appendix A
......................................................................
What is RAID? ..................................................................................
RAID Functions .................................................................................
RAID Levels and Comparisons .............................................................
Installation ..................................................................................
Notice Before Installation ....................................................................
Product Characteristics .......................................................................
Package Contents .............................................................................
Hardware Introduction ........................................................................
Hardware Installation ..........................................................................
Formatting the HD .............................................................................
System Monitoring Software ...................................................
Software Installation ...........................................................................
Login ...............................................................................................
Setup ..............................................................................................
Frequently Asked Questions ...................................................
RAID Introduction
8
8
8
8
10
10
10
10
11
12
14
16
16
20
21
22
Chapter 1 RAID Introduction
E
N
G
L
I
S
H
1.1
What is RAID?
It is inevitable that a single hard disk, either with SCSI or IDE interface, will suffer the compatibility
problem between the motor rotational speed and the transfer interface. As a result, an Ultra160 SCSI
or ATA100 IDE hard disk can only achieve the transfer rate of up to 30MB/Sec at the bandwidth of
100MHz. In addition, the life span of a hard disk is limited. Once a hard disk is damaged, it is likely
to lead to the system crash and data loss. Abovementioned are two severe problems in network
system architecture. These factors have encouraged the generation of RAID (Redundant Arrays of
Inexpensive / Independent Disks), a technology that combines multiple inexpensive and independent
hard disks into an array of hard disks so as to increase data transfer performance and storage efficiency.
RAID implements the mechanisms such as Striping or Mirroring plus Parity Checking, to combine two
or more physical hard disks into one virtual/logical disk array that allows On-line, quick access, huge
capacity and fault tolerance. If one of the hard disks in the array is damaged, the system continues to
operate using the remaining working hard disks, resulting in no system crash or data loss.
In summary, RAID technology increases the performance and data security in network system
architecture.
1.2
RAID Functions
•Expanding storage capacity
•Increasing data transfer speed
•Saving cost
•Inherent Fault Tolerance
•Hot Swap
•Auto-Rebuild
•Hot Spare
•On-line Capacity Expansion
1.3
RAID Levels and Comparisons
RAID 0 : Striping (fast, has no fault tolerance; requires at least two hard disks)
The arraying method of RAID 0 hard disks is to use part of array storage capacity to store messages. If
one of the hard disks in the array fails, such messages will be able to restore the user’s data. According
to different types of arrays, the virtual hard disk has the advantages of fault tolerance, cost, efficiency or
the combination of the said factors.
In the RAID 0 array, the data of the hard disks in the entire array is separated or disassembled. For a
server concerned, the array is considered as a large hard disk of which the capacity is approximately
equal to the sum of all physical disks’ capacity. Because multiple read/write can be operated
simultaneously, the import/export efficiency of the array is much better than that of a single physical disk.
The RAID 0 array does not backup data, so it is not regarded as a real RAID application. If one of the
8
RAID Introduction
hard disks is damaged, the entire array will fail, and all data in the array will be lost. Therefore, the fault
tolerance of RAID 0 is lower than that of any hard disk in the array. However, RAID 0 is still the term
widely used to describe these arrays. It is because that its basic idea is similar to real RAID application.
RAID 0+1 : Striping with Mirroring (requires as least four hard disks)
RAID (0+1) is developed by integrating the functions of RAID 0 and RAID 1. In RAID (0+1) system, two
hard disks are regarded as a set, and each set of hard disks should be compliant with the specifications
of RAID 1 to ensure data security. In addition, RAID 0 rules should be observed among different sets
of hard disks in order to increase the read/write speed of the hard disks. Although RAID (0+1) has both
features of read/write speed increase and fault tolerance at the same time, the necessary cost relatively
increases due to the availability of only half of the hard disks’ space.
RAID 5 : Striping (block) and parity drive (Dispersed) (requires as least three hard disks)
The RAID 5 array contains redundant messages by the type of parity data, in which all data of the user
is accessed through successive block calculation. The parity messages are scattered in various hard
disks in the array and occupy a space approximately equivalent to a hard disk’s capacity. The general
data and the parity messages are scattered together. If one of the hard disks in the array fails, the data
of such hard disk can be rebuilt based on the parity data and the user’s data of the rest hard disks.
The whole array will malfunction in case that two of the hard disks fail at the same time. The read/write
efficiency of the RAID 5 array is optimum in comparison with the RAID 0 array. Because the write
operation involves the calculation and write of the parity data and the write of new user’s data, the write
efficiency of the RAID 5 array may be lower than that of the RAID 0 array.
RAID 5+Spare :
RAID 5+Spare has similar specifications as RAID 5, except an additional hard disk reserved for backup.
Also, the failed hard disk can be replaced automatically on-line immediately.
The following is a comparison of 4 RAID levels.
RAID Level
Basic Operation
Method
Hard Disk Available
Capacity
Data Reliability
Data Transfer Speed
Minimum Number
of Hard Disks
0
Striping data across
each drive
Total capacity of all the
hard disks
Low
Highest
2
0+1
Mirroring data to
another drive and
stripping across the
drive
Half of total capacity of
all the hard disks
Very High
High
4
5
Stores parity
information on all the
hard disks
Total capacity of all the
hard disks minus one
disk capacity
High
Very High
3
5+Spare
Stores parity
information on all the
hard disks & spare
disk.
Total capacity of all the
hard disks minus two
disks capacity
Very High
High
4
For more information of RAID, refer to our website at www.RAIDON.com.tw
RAID Introduction 9
E
N
G
L
I
S
H
Chapter 2
E
N
G
L
I
S
H
Installation
2.1 Notice Before Installation
2.1.1 Product Characteristics
SR56XX-WBS1/SB2 has a built-in controller that supports RAID 5. The controller allows the
system to maintain proper operation without compromising the overall operational performance
even when one hard disk (HD) is damaged. This will ensure both data security and system
performance.
Features
• The Multi-transfer Interface: Provides the SATA, USB2.0, and 1394b (WBS1) transfer
interfaces for you to select for combination according to your needs.
• Four SATA Interfaces: With up to four SATA high-capacity HDs, it can support up to 2.2TB.
• The Built-in RAID Control Module: This module supports RAID 0, 5, 10, and 5+spare; it
does not burden the system’s performance.
• The LCM Control Mode: Through the LCD panel on the product body, you will be able to
complete the system setup and use it with ease.
• Online Data Auto-rebuild: When HD is damaged, the system will auto-rebuild the data to the
newly-replaced HD; no command is necessary.
• Supports hot-swap: Allowing you to replace the HD online; there is no need to shut down
the system.
• GUI Management Interface (Web-based): You can connect the GUI management interface
through RS-232 and monitor/manage related systems with ease.
• The System-detecting Function: Auto-detect HD, fan, and system temperature. Once an
abnormality is detected, warning will be sent actively.
2.1.2 Package Contents
After you open the outer package, make sure that the following items are contained in the
package:
•
•
•
•
•
•
•
•
•
SR56XX-WBS1/SB2 product body
AC Power Cord
RS-232 Port Cable
SATA Cable
USB2.0 Cable
1394b Cable (WBS1 Only)
CD
User Manual
Accessory Kit
For missing accessory and damaged product body, please contact your dealer or sales.
10
Installation
2.2 Hardware Introduction
Front View
LCD Panel
Panel Switch
Keylock
Fail LED
Power LED
Tray
SR5620-WBS1/SB2
SR5650-WBS1/SB2
Status Indications of LEDs :
Product
SR5620-WBS1/SB2
SR5650-WBS1/SB2
LED Status
1. When the power is turned ON, the SR5620
power LED indicator will light on green.
2. The HDD Access LED indicator will light on
yellow when the data is accessed.
3. The Access LED indicator on the HD tray blinks
yellow when the data is accessed from the hard
disk drive.
4. If either the RAID fails or the controller is
overheated, the buzzer will alarm.
1. When the power is turned ON, the SR5650
power LED indicator will light on green.
2. The Fail LED indicator will light on red in case
that the system is overheated.
3. The Access LED indicator on the HD tray blinks
blue when the data is accessed from the hard
disk drive.
4. If either the RAID fails or the controller is
overheated, the buzzer will alarm.
Instruction
Rear View
1.Fan
2.RAID Controllers
3.RS232 Port
4.SATA Port
5.USB2.0 Port
6.1394b Port
7.Power cord Port
8.Power Switch
SR5620-WBS1/SB2
SR5650-WBS1/SB2
Installation 11
E
N
G
L
I
S
H
2.3 Hardware Installation
E
N
G
L
I
S
H
Please follow the procedure below to complete the hardware installation of SR56xx-WBS1/SB2 :
Step 1 Open the outer package and take out the product body. (Make sure the related
accessories and the product body are not damaged or missing. If you have any
questions, contact the distributor or sales)
Step 2 Place the product on a flat and stable surface. Make sure that the ventilation fan is not
obstructed and appropriate ventilation space is provided around the product. (Do not place the
product nearby water area or any environment that may cause damage to the product)
Step 3 Set up the application level of RAID.
SR5620-WBS1/SB2
SR5650-WBS1/SB2
The setup has two switches.
RAID 0
RAID 0+1
RAID 5
RAID 5+Spare
Switch 1
On
On
Off
Off
Switch 2
On
Off
Off
On
If you select the RAID 5 + Space mode, then the fourth HD will be assigned as the Space.
Notice ; Please determine which mode to use in advance. Once the mode is decided, please do not change the mode arbitrarily
if possible. If you change the RAID mode after it is set up, it will cause entire internal data damage in HDs.
12
Installation
Step 4 Take out the tray and install your hard disk in it. Make sure to fasten the hard disk securing
screws to prevent damages caused by unnecessary movement.
E
N
G
L
I
S
H
SR5620-WBS1/SB2
SR5650-WBS1/SB2
Step 5 Connect with the Power cord and power on. Waiting for the System booting.
Step 6 After the system boot and confirmed your RAID level setting, insert the tray back and
fix it firmly in the proper place. The system will initialize automatically.
Step 7 After the hard disks initialized, please connect the cables to the corresponding jacks.
Step 8 Hardware installation is completed.
Notice ; 1. Please set up the RAID mode before powering on the system. Wait for the system to start up properly, and then insert
the HDs in sequence. Otherwise, you will not be able to use the system properly.
2. Once the hardware is installed, it is imperative that the RAID system initializes the HDs. And then your operating system
will be able to auto-detect the installed device.
Installation 13
2.4 Formatting the HD
E
N
G
L
I
S
H
After the hardware has been properly installed, you need to initialize and format the HDs, and
then you will be able to use them properly. Take the Microsoft Windows operating system for
example.
Once the hardware is installed properly, the SR56xx-WBS1/SB2 will automatically initialize
your HDs for you. Therefore, your system will be able to auto-detect the initialized HD devices.
See the figure as follows.
Figure 2.4.1
Next, you can use the operating system’s HD-formatting tool to format HDs. Once this
procedure is completed, you can use the SR56xx-WBS1/SB2 device properly. Please refer to
figure 2.4.2, figure 2.4.3 and figure 2.4.4.
Note :
After initializing, it will show disk name (ex: F Disk) and Format type (ex: NTFS). If any one of them
is not showed which means the format process is not completed, the disk may not run smoothly.
\
Figure 2.4.2
14
Installation
E
N
G
L
I
S
H
Figure 2.4.3
Figure 2.4.4
Figure 2.4.5
Installation 15
Chapter 3 System Monitoring Software
E
N
G
L
I
S
H
SR56XX-WBS1/SB2 provides the software supported by Web-based GUI to monitor the
system. Users can monitor the RAID system through the SATA interface and RS232. This
software is also capable of notification function by sending out e-mails to warn users regarding
RAID problems.
Major Features :
• Graphic user interface
• Supporting the monitoring platform for multiple operating systems
• Supporting the monitoring function for multiple interfaces
• The remote monitoring function
• The Web-based environment
• The notification for showing up events
Functions Descriptions :
• RAID controller tab: Allowing users to monitor and select certain RAID system
• Controller information: Listing RAID name, serial number, and current RAID level
• Disk Stats: Monitoring each HD’s current status
• Disk information: Tabling each disk’s name and capacity
• Re-build/Initialize progress: Promptly detecting the process of disk rebuilding and initialization
3.1 Software Installation
Please follow the following procedures to complete the software installation.
Notice Before Installation :
1. Please install the Java software first, and then execute the RAIDGuide installation program
2. Please execute checkup and test at the following website to verify that the operating
system has the Java software installed. http://www.java.com/en/download/installed.jsp
3. Please visit the following web site to download the Java software. After the software is
installed, you need to restart the computer http://www.java.com/en/
Step 1 Select to execute installation, and the following window will pop up. Select “Next”, and
the screen of copyright declaration will be displayed.
Figure 3.1.1
16
System Monitoring Software
E
N
G
L
I
S
H
Figure 3.1.2
Step 2 After you select “Next”, a window will be displayed requiring you to fill in username
and company name. When finished, select “Next”. Then, the software installation path
will be displayed as well as the system’s default path. You can change the installation
path by yourself.
Figure 3.1.3
System Monitoring Software 17
E
N
G
L
I
S
H
Figure 3.1.4
Step 3 Then, the system will ask you about the path name displayed in Programs. You can
either change it to your favorable name or use the default name.
Figure 3.1.5
18
System Monitoring Software
Step 4 Once the path name is filled in, please select “Next”. The system will pop up a
confirmation window. If the information is correct, then please select “Next”. The
system will start to install the software.
E
N
G
L
I
S
H
Figure 3.1.6
Step 5 Installation completed. Select “Finish”, and then you can begin to use the monitoring
software.
Figure 3.1.7
System Monitoring Software 19
3.2 Login
E
N
G
L
I
S
H
Step 1 Select the “Server” shortcut icon on the desktop to start the Server Detect action.
Figure 3.2.1
Step 2 When Detect is completed, please open “Monitor Window” to monitor the current
system status.
Figure 3.2.2
20
System Monitoring Software
3.3 Setup
To facilitate management, the system provides message notification service by sending e-mail.
Please follow the following descriptions for setup.
Select the related icon at the lower right corner of the window and right-click the mouse at the
same time, and then the selection window will pop up.
Figure 3.3.1
Descriptions : •
•
•
•
•
•
•
Run at Windows Startup : Starting as the Windows starts
Enable Warring Message : Closing the window of error-message
Config Setup : E-mail message setting
Schedule Setting: Schedule Setting
History Log : History Log
Open Monitor Window: Opening the monitoring window
Exit : Exit
To set up the e-mail, please select “Config Setup”, and the related window will pop up.
Figure 3.3.2
Once the related settings are entered, you can select “Save” to complete the setup.
System Monitoring Software 21
E
N
G
L
I
S
H
Appendix A Frequently Asked Questions
E
N
G
L
I
S
H
Q : Does it require additional drivers in different operating systems?
A : No. Users do not need any additional driver in different operating systems. RAIDON built-in
systems support a variety of operating systems including Windows XP, Linux, and Macintosh, etc.
Q : Is SR56XX-WBS1/SB2 compatible with any hard disk drive?
A : The product has no problem with any hard disk regarding compatibility. RAIDON provides the
SATA II interface, which is a cost-efficient system with high performance. Please feel free to contact
us for any hard disk compatibility problem.
Q : Why can’t I use the storage device in the operating system, even the system BIOS has detected the
hard disk drive?
A : 1. The newly-installed HD needs to be initialized by the RAID system, and then it will be detected
as the installed device by operating system’s device manager.
2. Please refer to the procedures for hardware installation and HD format in the manual to make
sure that the storage devices have been installed successfully.
3. New hard disk drives can only be displayed in the system after disk partition and format.
Q : What should I do when the Fail LED indicator lights on?
A : Determine if the fan is malfunctioned or the system is over heated, when the Fail LED indicator
lights on.
1. In case of malfunctioned fan, please check if the fan is jammed with dust or trapped by the back
panel wires. Should any of the situations occur, please shut down the system and clean the fan
up or remove the wires that trap the fan. Then restart the system again. If the problem still
occurs or for any reason that you are unable to fix the problem on your own, please send it back
for maintenance.
2. In case that the internal temperature has raised over 60°C, please shut down the system, let it
cool down and then restart it. If the problem still occurs, please send it back for maintenance.
Q : What should I do if I want to change the RAID mode after the installation is completed?
A : To change the set RAID mode, please backup the data originally in the hard disks because
changing the RAID mode will result in damage of such data. To change the RAID mode, please
refer to the following procedures:
1. Backup the data stored in the hard disks.
2. Remove the hard disks in order with the system powered on. After the hard disks been removed,
please power off the system.
3. Reset the RAID mode. Please refer to Section 2.3 of the user manual for more details.
22
Appendix