1
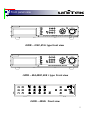
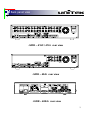
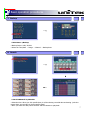
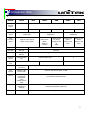
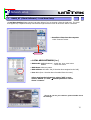
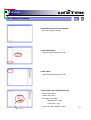
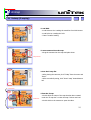
Quick Guide Manual
DVR-4xxx
1
Front panel view
LOCK
FRZ
SEARCH
PTZ
ZOOM
MISC/SH
UP
REC
R.PLAY
LEFT
MULTI
MENU
FF
REW
STOP
RIGHT
OK
SEQ
PLAY
PAUSE
DOWN
POWER
REC
1
2
3
4
5
6
7
8
9
10/0
11
12
13
14
15
16
<UDR – 416C,416> type front view
LOCK
FRZ
SEARCH
PTZ
ZOOM
MISC/SH
UP
REC
R.PLAY
REW
STOP
LEFT
MULTI
MENU
FF
RIGHT
OK
SEQ
PLAY
PAUSE
DOWN
POWER
REC
1
2
3
4
5
6
7
8
9
0
<UDR – 404,408C,408 > type Front view
OK
MULTI
SEQ
<UDR – 4004> Front view
2
Back panel view
CAUTION
RISK OF ELECTRIC SHOCK
DO NOT OPEN
<UDR – 416C / 416> rear view
CAUTION
RISK OF ELECTRIC SHOCK
DO NOT OPEN
<UDR – 404> rear view
<UDR – 4004> rear view
3
Basic operation procedures
1. Power On/Off
• Power ON - Using either the keypad or the remote control, press the “POWER” button. (Note: In case
of power outage or rare instance of system failure, the DVR will reboot automatically)
The Power LED light will turn from red to green when it has turned on properly.
• Power OFF – To shutdown the system, you must type in the password. The default password for
shutdown is “111111”.
2. Date & time setting
¾ Main Menu → System Setup → Time/Date
• Set the date and time for the DVR.
4
Basic operation procedures
3. Password setting procedure
¾ Main Menu → System Setup → System
Password → User Account
• Select either Admin or Users and change the
settings.
• Change your password for the DVR. The password
must be a 6-digit combined number consisting of
numbers 1 ~ 8.
4. Record setup
¾ Main Menu → Record Setup
• Resolution for NTSC is “360 x 240”, “720 x 240”, “720 x 480”. PAL is “360 x 288”, “720 x 288”, “720 x
576” selectable and selected resolution will be applicable to all channels simultaneously.
• User select channel’s recording frame rate and none (no recording), 1, 2, 3, 4, 5, 6, 7, 8, 9,
10, 15, 20, 30(25) fps will be available. The total for all the cannels is max 120 fps(100fps).
But, with 720 x 240 (NTSC), 720x288 (PAL) resolution, user should not set to exceed
60(NTSC), 50(PAL) frame per second with accumulated total channel recording.
• Record mode: Manual, Continuous, Motion, Sensor, Motion + Sensor, Schedule.
5
Basic operation procedures
5. Record Schedule Setup
• Select
“Schedule”
¾ Main Menu → Record Setup → Record mode
• Move the cursor to the desired position of time by
pressing up/down key and set the
recording mode at the desired position of time by
pressing the OK button according to the color indicator.
After the setup, store the set schedule
and exit to the top menu by pressing the Menu button.
6. Motion Detection Setting
¾ Main Menu → Event Setup → Motion Detection Setting → Detection Zone
6
• Select the motion area to activate motion detection. (Activate channel by channel)
Basic operation procedures
7. Backup
¾ Main Menu → Backup
• Backup Device: USB / CD-RW
• Select the Time/Date → Range → Channel → Backup Start
8. Search
¾ Search → Search by Calendar
• Calendar View: When you click specific date, it will be showing recorded data as drawing. (red color
means there are recording on those specific dates)
• After you select the date, select the time and the cameras to play back.
7
Basic operation procedures
8. Search (continuous)
¾ Search → Search by Event
• Search an event by selecting the start time, range and the channel.
¾ Search → Still Image Search
• Search option to view by saved images.
9. Miscellaneous Menu
¾ MISC/SH
• Net: Displays the current network IP and the user connected to
the network.
• OSD: Turns on/off the OSD (On Screen Display). It substitutes
the OSD button on the remote control.
• Audio Mute: Turns on/off the audio. It substitutes button on the
remote control.
• HDD: Displays the HDD information. It substitutes the HDD
button on the remote control.
• LOG: Display the System Log. It substitutes the LOG button on
the remote control.
8
Specifications
Model
UDR-404,4004
UDR-408/ 408C
Image system
NTSC, PAL selectable
Multi-tasking
Quadplex
Video Channel
Spot
4CH Composite, 4CH Loop
through (404 only), BNC
Single channel for 404
(Spot function is only for 404)
UDR-416 / 416C
8CH Composite,
8CH Loop through,
BNC
16CH Composite, 16CH
Loop through, BNC
Single channel 408C
Multi channel 408
Single channel -416C
Multi channel -416
Video output
1CH Composite BNC, 1CH Spot(Single/Multi), 1CH VGA
(Spot function is not available for 4004.)
Video Compression
MPEG-4
Recording resolution
720x480, 720x240,360x240(NTSC) /720x576,720x288,360x288(PAL)
Recording Quality
4 Levels(Normal, Enhanced, Fine, Super Fine)
Max.Display Speed
120fps(NTSC)
100fps(PAL)
240fps (NTSC)
200fps (PAL)
480fps (NTSC)
400fps (PAL)
Max.Recording
Speed
120fps at Full D1
(NTSC)
100fps at Full D1
(PAL)
240fps at Half D1(NTSC)
240fps at CIF (NTSC)408C
200fps at Half D1 (PAL)
200fps at CIF(PAL)-408C
480fps at CIF (NTSC)
240fps at CIF (NTSC)416C
400fps at CIF (PAL)
200fps at CIF(PAL)-416C
Time Laps Recording
interval(fps)
1,2,3,4,5,6,8,10,15,30 (NTSC,10 Steps)
1,2,3,4,5,7,9,13,20,25 (PAL,10 Steps)
Recording mode
Schedule, Event(Sensor, Motion Detection), Manual, Continuous,
Continuous+Event
Playback search
Calendar, Event (Sensor, Motion Detection)
Playback speed
x1,x2,x4,x8,x16,x32,x64,x128, Field by Field(Forward, Backward)
Sensor input
4 (NO/NC Selectable)
Alarm output (Relay)
,Aux output
Audio In/Out
8 (NO/NC Selectable)
16 (NO/NC Selectable)
1relay (NO/NC), 4TTL
4ch
4ch(4ch option)
4ch(12ch option)
Network
10/100Base-T (Static, DHCP, PPPoE, E-mail ), DDNS server available
Slow motion
x1/4, x1/2(Forward Only)
9
Specifications
Model
UDR-404,4004
Motion detection
Hard Disk
UDR-408/ 408C
UDR-416 / 416C
22x15(NTSC) /22x18 (PAL), 8Level Sensitivity
Max. 2EA(1EA for 4004)
Max.2EA
USB(Ver2.0), CD-RW/DVD-RW, Network
(Only USB(Ver2.0) & Network is available for 4004)
Backup
Keyboard control
O (Except Matrix Key)
O (Except Matrix
Key)
O
Daisy chain Out
X
O
O
Watermarking
Still Image Backup
PTZ Control
RS-485
Serial Port
RS-232-Console, Reserved (No RS-232 for 4004)
System Log
Video Loss, Power On/Off, REC warning, REC fail, HDD Full, HDD Fail, Menu
Called, Reset HDD Format, Reset SW Upgrade, Email Fail
Language
Korean, English, Japanese, French, Spanish, German, Polish, Italian,
Russian, Slovakian, Czech, Turkish
S/W upgrade
Network, USB Memory stick, CD-RW
(Only Network & USB Memory stick is available for 4004)
Password Function
Power OFF, MENU, Record OFF, Key Lock
Power source
Free Voltage (100 –
240VAC, 50Hz/60Hz)
using adaptor(12VDC,
42W)
Free Voltage (100 –240VAC, 50Hz/60Hz, 70W)
Dimension
280(W) x 320(D) x
44m(H)
433(W) x 385(D) x88(H)
Operating
temperature
Weight
5℃ ~ 40℃
3kg(net)
7kg(net) / 8kg(gross)
10
Comparison table
Model
4004
Loop
through
Output
X
Spot
X
404
408C
408
416C
416
Single channel
Multi channel
O
Single channel
Max Display
Speed
120fps (NTSC)
100fps (PAL)
Max
Recording
Speed
120fps at Full D1(NTSC)
100fps at Full D1(PAL)
Single channel
Multi channel
240fps(NTSC)
200fps(PAL)
480fps(NTSC)
400fps(PAL)
240fps at Half
D1 (NTSC)
200fps at Half
D1
(PAL)
240fps at CIF
(NTSC)
200fps at
CIF(PAL)
Jog/Shuttle
X
O
Hard Disk
Max.1EA
Max.2EA
Back up
USB(Ver2.0),
Network
USB(Ver2.0), CD-RW/DVD-RW (option), Network
Keyboard
control
O (Except Matrix
Key)
Daisy chain
Out
O (Except Matrix Key)
X
O
O
O
Serial port
RS-232
(TTL level)
O
S/W
upgrade
Network, USB
memory stick
Network, USB Memory Stick, CD-RW
Power
Source
Free Voltage
(100-240VAC,
50Hz/60Hz)
using
adapter(12VDC,
42W)
Free Voltage
(100-240VAC, 50Hz/60Hz,70W)
Dimension
280mm(W) x
320mm(D) x
44mm(H)
433mm(W) x385mm(D) x88mm(H)
3kg(net)
7kg(net)
Weight
480fps at CIF
(NTSC)
400fps at CIF
(PAL)
240fps at CIF
(NTSC)
200fps at CIF
(PAL)
11
Network setup
1.
Network Connection Setup
DVR
¾ Check List
• Please check if your cable/DSL modem has router function built in.
• If so, you cannot use another router. Switch is needed instead.
¾ Check back of the modem for the ports
• If there is only single port back of the modem, then less likely the modem has
router function built in.
• If unsure, please contact your ISP and confirm.
• Connect it directly to the router.
¾ Check back of the modem for the ports
• If there are multiple ports back of the modem, then the modem is
equipped with router function.
• Another router cannot be used, in this case you would need a
switch.
12
Network setup
2.
Command Prompt
¾ Check List
• Use the computer that is directly connected to the router
where DVR is connected
¾ Start Æ All Programs Æ Accessories Æ Command Prompt
¾ Inside the Command Prompt Æ type “ipconfig”
¾ IP address is your computer IP address.
¾ Remember “Subnet Mask”, “Default Gateway”.
13
Network setup
3.
How to access the router (i.e. Linksys)
¾ Check List
• Use the computer that is directly connected to the router
where DVR is connected
¾ Open an Internet Explorer.
¾ Erase everything off of the address bar.
¾ Type in the Default Gateway on to the address bar.
¾ Type http://xxx.xxx.xxx.xxx (xxx: Default Gateway IP #).
¾ After entering the address, press enter.
¾ User name/password is require to log in.
¾ http://portforward.com ; Lists routers by model numbers
with port forwarding instruction by model along with
default user/password.
¾ If they are changed, please contact the manufacturer of
the router.
14
Network setup
4.
Port forwarding (i.e. Linksys)
¾ Check List
• Use the computer that is directly connected to
the router where DVR is connected
¾ Press “setup” on the top of the page.
¾ Under the basic setup, there is a list “DHCP
start IP 192.168.1.xxx”. And then there is
“Number of address xx”.
¾ This is indicating that any devices connecting
directly on to the router will be automatically
assigned an IP between the range.
¾ Pick an IP Address for the DVR that is outside
of this range.
¾ From the top menu, click on “Applications &
Gaming”.
¾ Goto “Port Forwarding”.
¾ Example Setting:
- Application: Unitek DVR (Any name is fine)
- Start: 8000
- End: 8000
- Protocol: TCP
- IP Address: 192.168.1.[200]
- Enabled: check
¾ “Save Settings”
¾ The DVR S/W can be upgraded remotely if
additional port 20, 21 are opened.
¾http://portforward.com ; Lists routers by model numbers with port forwarding instruction by router
along with default user/password.
15
Network setup
5.
Disabling Firewall inside the router (i.e. Linksys)
¾ Check List
• Use the computer that is directly connected to
the router where DVR is connected
¾ Press “security” on the top of the page.
¾ The firewall inside the router must be
disabled in order to view it from the remote
locations.
¾ Under the security option please change the
settings.
¾ If there is an option “Enable”, “Disable” then
select “Disable”.
¾ For other Linksys models, there might just be 4
boxes only. If so, uncheck “Block Anonymous
Internet Requests” box and save the setting.
¾ Save the setting after selection.
¾http://portforward.com ; Lists routers by model numbers with port forwarding instruction by router
along with default user/password.
16
Network setup
6.
Network Setup (DVR)
¾ Press “Menu” Æ Select “Network Setup”.
¾ Select “Network Type Setup”.
¾ Example Setting:
- Network Type: Static
- DDNS Link: On
- Port: 8000
- IP Address: 192.168.1.200
- Subnet Mask: 255.255.255.0
- Gateway: 192.168.1.1
- DNS IP: 0.0.0.0 (Do not change)
¾ Press “Menu” until you get small box to confirm to reboot.
¾ Press “Ok” and let it reboot.
• DDNS Link: In order to view remotely must be “On”.
• Port: Port # that has been forwarded from the router.
• IP Address: Enter the IP address you have assigned.
• Subnet Mask: Given from command prompt “ipconfig”.
• Gateway: IP used to access your router.
• DNS IP: do not change.
17
Network setup
7.
RAMS_RT (Client Software) - Local Area Setup
• Local Area Setting: Please use the instruction below if you are viewing it from the local area. The Local
area applies any computers directly connected through the same router as where the DVR is connected.
¾ Install the Client into the computer.
• Click “Connect” button.
Click for DVR List
» LOCAL AREA NETWORK (i.e.)
• DVR Model: MPEG4(Realtime) - Unitek 4xx, 4xxx, 4xxC series.
MPEG4
- Unimo 3xx series.
• DVR Name: Select any name.
• DVR Address: 192.168.1.200 (IP that has been assigned to the DVR)
• Port: 8000 (Port # that has been forwarded from the router)
¾ After entering the information, select “Add” to save.
¾ Select “Admin” or “User” Æ default password: 111111
¾ Press “Connect”
¾ If you do not see your cameras, please double check
the settings.
18
Network setup
8.
RAMS_RT (Client Software) - Remote Area Setup
• Remote Area Setting: Please use the instruction below if you are viewing it from the remote area. The
Remote area applies any computers not directly connected through the same router or same network as where
the DVR is connected.
¾ Install the Client into the computer.
• Click “Connect” button.
MAC Address
Click for DVR List
» REMOTE AREA NETWORK (i.e.)
• Menu Æ System Information
•DVR Model: MPEG4(Realtime) - Unitek 4xx, 4xxx, 4xxC series.
MPEG4
- Unimo 3xx series.
• DVR Name: Select any name.
• DVR Address: aabb16.udrdns.net (must use last 3 pairs of the MAC address)
• Port: 8000 (Port # that has been forwarded from the router)
¾ After entering the information, select “Add” to save.
¾ Select “Admin” or “User” Æ default password: 111111
¾ Press “Connect”
¾ If you do not see your cameras, please double check
the settings.
19
Network setup
9.
Internet Explorer - Local Area Setup
• Local Area Setting: Please use the instruction below if you are viewing it from the local area. The Local
area applies any computers directly connected through the same router as where the DVR is connected.
¾ Open an Internet Explorer.
¾ Erase everything off of the address bar.
¾ Type in the IP Address assigned to the DVR.
¾ Type http://xxx.xxx.xxx.xxx:xx (xx: Port#).
¾ After entering the address, press enter.
¾ Disable any pop up blocker you may have.
¾ Select “Admin” or “User”.
¾ Default password is 111111.
¾ Press “OK”.
“Install Activate X“
¾ When logged in for the first time, it is require to
install the “Activate X”.
¾ Once “popup” is disabled, message will appear to
install “Activate X”
¾ If you do not see your cameras, please double
check the settings.
20
Network setup
10. Internet Explorer – Remote Area Setup
• Remote Area Setting: Please use the instruction below if you are viewing it from the remote area. The
Remote area applies any computers not directly connected through the same router or same network as where
the DVR is connected.
MAC Address
¾ Open an Internet Explorer.
• Menu Æ System Information
¾ Erase everything off of the address bar.
¾ Type in the DVR address. (Last 3 pairs of the MAC) see
example below.
¾ Type http://xxxxxx.udrdns.net:xx (xx: Port#).
¾ After entering the address, press enter.
¾ Disable any pop up blocker you may have.
¾ Select “Admin” or “User”.
¾ Default password is 111111.
¾ Press “OK”.
“Install Activate X“
¾ When logged in for the first time, it is require to
install the “Activate X”.
¾ Once “popup” is disabled, message will appear to
install “Activate X”
¾ If you do not see your cameras, please double
check the settings.
21
Network setup
11. Multi-Viewer_RT
¾ Install the Client into the computer.
• Run the program “Multi-Viewer_RT”.
• Click “Connect” on top left.
¾ Group Add.
• If they have default group added in, select them and
delete them off.
• Click “Group Add”.
• Create group name and password.
• Press “OK”.
“Group Add“
¾ DVR Add.
• DVR Name: Select any name.
• DVR Address: IP address (Local); Mac address (Remote).
• Port: Port #.
• DVR Model: Select appropriate model.
• Select the camera channels to be viewed.
• Select Admin/User#.
• Input appropriate password.
• Click “DVR Add”.
• Click “Save”.
¾ Press “Connect”.
• If you cannot view the videos, please check your settings.
22
Unimap
12. Unimap (E-maping)
¾ Install the Client into the computer.
• Run the program “Unimap”.
¾ Click “Edit E-map”.
• Input the password and click “OK”.
¾ Click “New”.
• Input the password and click “OK”.
¾ This is where you would load a map.
• Insert “Main name”.
• Insert “Sub name”.
• Formats for the maps:
• Bitmap Files (*.bmp)
• Jpeg Files (*.jpg)
• Press “OK” after loading the map.
“Load Map“
23
Unimap
13. Unimap (E-maping)
¾ Load DVR.
• Load Mviewer List: Loading the saved list from Multi-viewer.
• Load DVR List: Loading the DVR.
• “Save” list after loading.
¾ Locate cameras into the map.
• Drag the cameras into the map and place them.
“Drag and Place“
¾ Save the E-map list.
• After placing the cameras, click “E-Map” from the menu and
“Save”.
• After successfully saving, click “View E-map” located bottom
left.
“Double Click”
¾ View the E-map.
“Double Click“
“Camera“
• Double Click the name of the map that has been created
under the “E-map List” to view the map if it does not load.
• Double click on the cameras to open the video.
24
Mobile Viewer
14. PDA
¾ Check List
• Set up fps value of JPEG data on DVR.
• Set up DVR network so that PDA device can access to WLAN/LAN.
• You can check if JPEG data is coming up from DVR by selecting “Stream Type” as JPEG on RAMS setup menu.
• Once you finish DVR setup, please download pertinent “Mobile Viewer” software program onto your Mobile Device. Currently Unitek
DVR supports the following platform.
»
»
»
»
Windows
Windows
Windows
Windows
Mobile
Mobile
Mobile
Mobile
5.0
5.0
5.0
5.0
Pocket PC (ARMV4I)
Smart Phone (ARMV4I)
Professional (ARMV4I)
Standard (ARMV4I)
¾ Connecting DVR.
• Select “Connect” on Menu.
¾ By using Add button, please input DVR address to
be connected.
• Once you input User & Password, it’s automatically
saved on PDA device for next easy connection.
• If you don’t input them now, you will need to input
them when connecting to the DVR.
¾Mobile Viewer receives JPEG data (not MPEG4 data) from DVR and displays on a real-time basis.
25
Mobile Viewer
15. PDA
¾ Connecting DVR.
• Input the password and connect.
¾ Changing Channel.
• Channels being displayed are the channels connected
at the time.
• Select the channels you would like to view from the list.
¾ Controlling PTZ.
• Select PTZ Control from the menu.
• To close PTZ menu, select “Close PTZ” from the
menu.
¾Mobile Viewer receives JPEG data (not MPEG4 data) from DVR and displays on a real-time basis.
26
Smart Backup
16. Smart Backup
¾ Install the Client into the computer.
• Smart Backup utility allows users to backup the data's
into the PC.
• Run the program “Smart Backup”.
• Add: To add new schedules.
• Delete: To delete schedules.
• Modify: To modify schedules.
• Log: To view the executed schedules.
• Setting: Program setting.
• Hide: To minimize the program into the tray.
¾ Schedule.
• Name: Select the name.
• Time: Select the time when to execute the backup.
• Daily/Weekly/Monthly/Once: Select from the list.
¾ DVR.
• Address: Input the DVR address. (IP or DNS)
• Port: Input the port that was opened for the DVR.
• ID: Select Admin/User#.
• PW: Input the password.
• Channel 1~16: Select which channels to backup.
• Audio: Select to backup audio.
• I Frame Only: Will backup I Frame only, which will also
speed the backup speed due to less file size. May not be
smooth picture.
** Video compression consists of I-frame, P-frame and Bframe. I-frame: in effect a fully specified picture, like a
conventional static image file. P-frame/B-frame: holds only the
changes in the image from the previous frame.
27
Smart Backup
17. Smart Backup
¾ Data Begin.
• Begin Day: Select how many days ago data you would
want from the scheduled date. (i.e. if the current date is
05/12/09 and the begin day “7” is selected, it will backup
data from 05/05/09)
• Begin Time: Select the time you would like to backup
from the date you have selected above.
¾ Data Length
• Select the length you would like to backup.
¾ Setting.
• Start with Windows: The program will automatically
start when window starts.
• Start in try icon mode: When the program executes, it
will minimize into the tray.
• Save: Select the location where backup to be saved.
28