1
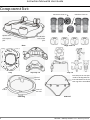
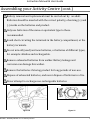
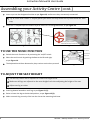
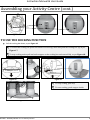
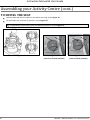
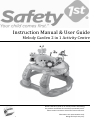
Instruction Manual & User Guide
Melody Garden 2 in 1 Activity Centre
Please read this manual in its entirety before assembling
the product and follow all instructions contained herein.
Please retain instruction manual for future reference.
An IGC Dorel brand
Illustrations are representative only.
Design and style may vary.
2
Instruction Manual & User Guide
BEFORE ASSEMBLING THIS WALKER,
PLEASE READ AND UNDERSTAND THE INSTRUCTIONS AND ENSURE THAT THEY ARE FOLLOWED AT ALL
TIMES. INCORRECT ASSEMBLY COULD MAKE THE WALKER UNSAFE.
RETAIN THESE INSTRUCTIONS IN A SAFE PLACE FOR FUTURE REFERENCE.
WARNINGS
WARNING NEVER leave child unattended and always
-
keep child in view while using walker.
WARNING- STAIR HAZARD: avoid serious injury or death.
Block stairs and steps securely before using walker.
Use only on flat surfaces free of objects that could cause the unit to
tip over. Never use near stairs, thresholds, hills, roadways or pools.
To avoid burns, keep the child away from hot liquids, stoves,
radiators, space heaters, fireplaces, barbeques and similar hazards.
Prepare rooms to prevent collisions with glass, windows and
furniture.
Do not carry or adjust the walker while a child is in it.
Do not lift the walker by the tray, toy tray or toys.
To reduce the chance of the child slipping out of the seat, check that
both feet are touching the floor.
This walker is intended for one child only.
Do not suspend strings, such as hood strings or pacifier cords, on the
walker or attach strings to toys. String can wrap around a child’s neck
and cause choking.
The walker & toys must be assembled by an adult.
Check that the walker is fully erected and that the frame has locked
in place before placing a child in the walker.
Discontinue use of the walker when the child can stand unaided or
walk unassisted.
#11390 – Melody Garden 2 in 1 Activity Centre
Instruction Manual & User Guide
WARNINGS (cont)
Regularly inspect the walker for any part that is loose, broken,
torn or missing. Attend to the problem as soon as it is noticed.
Do not use until baby can sit up by their self.
To avoid danger of suffocation, keep any plastic bags away from
babies and children. Plastic bags can block nose and mouth and
prevent breathing. Bags are not toys. Please dispose of waste
packaging thoughtfully.
Only use the walker if your child can support their body weight
with their legs, weight between 6kgs and
12kgs, and is less than 80cms high.
Do not use the walker if it is damaged or broken.
Clean the friction strips regularly with a damp cloth to maintain
stopping performance.
This product is not intended for commercial use.
#11390 – Melody Garden 2 in 1 Activity Centre
3
Instruction Manual & User Guide
Component list:
4
Square pin close up
Square slots
to fit square
pins
Round holes
to fit round
pins
Base
Eound pin close up
Legs x 4
Large nuts x 4
Back
Front
Tray
Toy trays x 2
Toys x 5
Elevated part of seat pad
needs to be aligned with
most elevated area of the
seat ring when assembled
Back of
the seat
Front of
the seat
Indent
Seat Ring
Seat Pad
#11390 – Melody Garden 2 in 1 Activity Centre
holes
Instruction Manual & User Guide
Assembling your Activity Centre
ASSEMBLING THE ACTIVITY CENTRE
Press each leg button and insert the leg firmly into the mounting hole at the
Mounting
holes
base as per Figure 1.
Legs with square pins enter the square holes at the base, as per
Figure 2.
Legs with round pins enter the round holes at the base, as per
Figure 1
Figure 3.
Square
shaped hole
Round
shaped
hole
Click
Click
Base
Figure 2
Figure 3
Connect the legs to the upper tray, as per Figure 4 so that the screws on the upper tray stick through the holes
on the top of the legs.
Put the assembly on its side, as per Figure 5 and connect the four large plastic nuts on the protruding threads by
tightening them clockwise, as per Figure 6 and Figure 7.
Figure 4
#11390 – Melody Garden 2 in 1 Activity Centre
Figure 5
Figure 6
Figure 7
5
Instruction Manual & User Guide
Assembling your Activity Centre (cont.)
Inserting the tabs on the seat pad into slots located around the seat ring, as per Figure 8.
Slide tabs through holes and insert the seat to the upper tray, as per Figure 9.
Elevated side of seat pad fabric must match with
elevated side of seat ring
Underside of seating
Seat
Make sure the four tabs found on the ‘white’ seat
ring are secured under the tray
Back
Elevated side
of seat ring
Front
Figure 8
Figure 9
TO ATTACH THE TOYS
6
The toy tray requires two AA batteries (not included).
Use a Philips head screwdriver to unfasten battery cover, insert batteries and replace cover as per Figure 10.
Insert and snap the toy trays into upper tray at designated cavities as per Figure 11.
To release the toy tray lay the activity centre upside down and press the yellow tabs underneath the
toy tray firmly.
#11390 – Melody Garden 2 in 1 Activity Centre
Instruction Manual & User Guide
Assembling your Activity Centre (cont.)
Battery removal and replacement must be carried out by an adult.
Batteries should be inserted with the correct polarity, observing (+) and
(-) marks on the batteries and product.
Only use batteries of the same or equivalent type to those
recommended.
Avoid short-circuiting the terminals in the battery compartment, or the
battery terminals.
Do not mix old (used) and new batteries, or batteries of different types,
for example: alkaline and rechargeable.
Remove exhausted batteries from walker. Battery leakage and
corrosion can damage this walker.
Remove the batteries if storing product for long periods of non-use.
Dispose of exhausted batteries, and never dispose of batteries in a fire.
Never attempt to recharge non-rechargeable batteries.
Figure 10
#11390 – Melody Garden 2 in 1 Activity Centre
Figure 11
7
Instruction Manual & User Guide
Assembling your Activity Centre (cont.)
Insert toys into the designated cavities as per Figure 12, and be sure they are securely connected.
Toy B comes with a small ‘C’ shaped plastic part which securely holds the toy underneath the main
tray.
Place the ‘C’ shaped clip at the end of Toy B to secure it in its designated hole, as per Figure 13.
‘C’ shaped plastic clip slides
underneath the tray to secure toy B
Figure 12
Figure 13
TO USE THE MUSIC FUNCTION
Bee button
On/off switch
Switch the music function on by activating the ‘on/off’ switch.
Keyboards
Select the multi-music by pushing the Bee to the left and right,
Drum button
as per Figure 14.
The keyboards and drum button also plays various music when pressed.
Figure 14
TO ADJUST THE SEAT HEIGHT
8
The activity centre can be adjusted to 3 different height levels.
Make sure all legs are adjusted to the same height level when adjusting the height of the seat.
Adjust one leg at a time.
Press leg button located on each leg, as per Figure 15 (1).
Raise or lower the leg to the desired position, as per Figure 15 (2).
Make sure each leg securely clicks into the slot at the mounting hole base.
#11390 – Melody Garden 2 in 1 Activity Centre
Instruction Manual & User Guide
Assembling your Activity Centre (cont.)
Figure 15
TO USE THE ROCKING FUNCTION
Pull the rocking bar down, as per Figure 16.
To retract the rocking bar press the buttons on each leg’s base and push the rocking bar up, as per
Figure 17.
To stop rocking action pull out both stoppers at the rocking bar and extend fully, as per Figure 18.
Press button
Rocking bar
Push bar up
Figure 16
Figure 17
To stop rocking, pull stop.
To start rocking, push stopper inside.
Stoppers
Figure 18
#11390 – Melody Garden 2 in 1 Activity Centre
9
Instruction Manual & User Guide
Assembling your Activity Centre (cont.)
TO SWIVEL THE SEAT
10
Line the red knob with the indent in the white seat ring, as per Figure 19.
Lift and rotate the red knob in position, as per Figure 20.
To unlock the swivel seat, rotate red knob in position, as per Figure 21.
Red knob
Seat
Red knob
Seat
Indent in seat ring
Indent in seat ring
Figure 19
Figure 20
(seat in un-locked position)
Figure 21
(seat in locked position)
#11390 – Melody Garden 2 in 1 Activity Centre
Instruction Manual & User Guide
Notes
Please tape or staple your receipt
here for safekeeping and future reference.
#11390 – Melody Garden 2 in 1 Activity Centre
11
Instruction Manual & User Guide
Product care and maintenance
Always store the unit in a clean and dry place.
Do not use abrasives or detergents on the unit’s surfaces.
Scuff marks can be removed with mild soap and warm water. Dry with a soft towel.
Regularly check all bolts to ensure they are tight.
Damaged components should be replaced as required.
Replacement parts are available from the IGC Dorel Customer Service Department.
Clean the friction strips regularly with a damp cloth to maintain stopping performance.
Customer service
Please contact our Customer Service Department if you experience a problem with this product or require assistance:
AUSTRALIAN
CUSTOMERS
NEW ZEALAND
CUSTOMERS
Email
[email protected]
[email protected]
Web
www.igcdorel.com.au
www.igcdorel.com.au
Phone 1
(03) 8311 5300
(09) 276 1040
Address
655-685 Somerville Road
7 A Hotunui Drive,
Sunshine West, Vic, 3020
Mt Wellington Auckland, 1060.
Phone 2
1300 809 526 (local call cost)
0800 628 000 (Toll Free)
Hours
8:30 am – 4:30 pm, Monday to Friday
9:00 am – 4:00 pm, Monday to Friday
Postal
IGC Dorel Pty Ltd
P.O. Box 1260
Sunshine West, Victoria, 3020
Australia
IGC Dorel New Zealand
P.O. Box 82377 Highland Park
Mt Wellington
New Zealand
Guarantee
This product carries a twelve month guarantee to rectify manufacturing defects. It does not cover problems arising from
accidental damage or product misuse. Specifications are subject to change without notice.
Copy or reproduction without permission is prohibited.
© 2010 IGC Dorel Pty Ltd. All Rights Reserved. www.igcdorel.com.au
12
#11390 – Melody Garden 2 in 1 Activity Centre