1
Regist:e__you__p_oduct and get st_ppo_t at
www_ p _ilipSoc o lira/weIco lirae
52PFL7704D
47PFL7704D
42PFL7704D
32PFL7704D
52PFL6704D
47PFL6704D
42PFL6704D
32PFL6704D
EN User manual
For further
assistance, call the customer
support
service
in your country
"
To obtain
Customer
"
To obtain assistance in Canada, contact Philips Customer
"
1 800 661 6162 (French spealdn£)
"
Enter bdow
Model:
Serial:
assistance in the US.A,, Puerto Rico, or the US.Virgin
Care Center at 1 866 771 4018
islands, contact
Care Center
Philips
at:
1 866 771 4018 (English speaking)
the model
and serial nurnbers
Ioca±ed on the back and right side oftheTV
cabinet,
9
Contents
Connect
devices
Connection
Select your connection
1
Notice
4
2
Important
Product information
5
5
5
5
Screen
care
Environmental
3
care
Side controls and indicators
6
6
Remote control
6
Get
started
Switch on and set up theTV
8
8
8
8
9
9
12
Use your TV
1I
Switch yourTV on/off or to standby
Switch channels
1I
Adjust volume
1I
Watch
Watch
channels from a set-top box
connected devices
12
Watch
a DVD
12
Position the Tg
Insert the remote
control
batteries
Connect the antenna or cane
Connect the power cord
Manage cables
Use more
13
Create and use lists of favorite channels
15
Set the dod<
15
10 Troubleshooting
33
11 Notes
34
for the use of USB devices
Use child control and rating locks
16
19
View photos, play music, and watch videos on a USB device
Watch videos on a USB device
22
Use yourTV
in HD mode
22
Use yourTV
as a PC monitor
23
23
Install
13 Warranty
36
14 Index
37
25
25
25
25
25
26
26
26
24
channels
Select your menu language
Set your location to home
install channels
Optimize the signal quality from your antenna
Uninstall and reinstall channels
Return your settings to default values
Show emergency alerts (EAS)
your TV software
Check your current software version
software
35
20
Use Philips EasyLink
Use the demo mode
for the software
information
15
View closed captions (subtitles)
Upgrade
3O
13
of yourTV
Change picture and sound settings
Use Auto Mode
Prepare
29
Connect your devices
12
13
Update
29
quality
1I
Use the quid< access menu
Automatically
28
Label your connections
12 Product
Your TV
28
overview
upgrade
27
27
27
27
EN
1
Registering your model with PHlUPS makes you eligible for all of the valuable benefits listed below, so don't miss out.
Complete and return your Product Registration Card at once, or register online
to ensure:
at www.philips.comlwelcome
Know these
PHILIPS
safetysymbols
Congratulations on your purchase,
and welcome to the "family!"
CAUTION:
TO REDUCE
REHOVE
INSIDE,
Dear
PHILIPS
product
owner:
Thank you for your confidence
in PHILIPS.You've selected one of
the best-built, best-backed products available today.We'll do everything in our power to keep you happy with your purchase for many
years to come.
As a member of the PHILIPS "family," you're entitled to protection
by one of the most comprehensive warranties and outstanding
service networks in the industry.What's
more, your purchase guarantees you'll receive all the information and special offers for which
you qualify, plus easy access to accessories from our convenient
home shopping network.
Host importantly, you can count on our uncompromising
ment to your total satisfaction.
All of this is our way of saying welcome
in a PHILIPS product.
- and thanks
commit-
for investing
COVER
THE RISK OF ELECTRIC
(OR BACK). NO
REFER SERVICING
SHOCK,
USER-SERVICEABLE
TO QUALIFIED
DO NOT
PARTS
SERVICE PERSONNEL.
This
"boltmaterial
of lightning"
sulated
within indicates
your unit uninmay
cause an electrical shock. For the safety of
everyone in your household, please do not
remove product covering.
The "exclamation point" calls attention to features for which you should
read the enclosed literature closely to prevent operating and maintenance problems.
WARNING:
To reduce the risk of fire or
electric shock, this apparatus should not be
exposed to rain or moisture and objects
filled with liquids, such as vases, should not
be placed on this apparatus.
CAUTION:
To prevent electric shod<,
match wide blade of plug to wide slot, fully
insert.
ATTENTION:
Pour 6viter les choc 61ec-
triques, introduire la lame la plus large de la
fiche dans la borne correspondante
de la
prise et pousser jusqu'au fond.
P.S. To get the most from your PHILIPS purchase, be
sure to complete and return your Product Registration
Card
at once,
or register
online
ww_.philips.com/welcome
at:
For Customer
Enter below
EN
Use
and serial numbers
on the back and right side of the TV cabinet.
this information
for future reference.
Model No.
Serial No.
2
the model
located
Retain
iMPORTANT
SAFETY iNSTRUCTiONS
Read before operating equipment
#ii:ili_i!!!!!!!!!!!!!!
:::ii_!!!!!!!!!!!!!!!!
I. Read these
instructions.
2. Keep these
instructions.
C.
D.
3. Heed all warnings.
4. Follow all instructions.
5. Do not use this apparatus
openings.
Install in accordance
force to the front, or top, of the cabinet
overturn the product.
9. Do not defeat the safety purpose of the polarized or grounding-type
plug.
A polarized plug has two blades with one wider than the other. A
grounding type plug has two blades and third grounding prong. The wide
10. Protect the power
plugs, convenience
for your safety. When the provided
consult an electrician for replacement
cord from being walked on or pinched particularly at
receptacles,
and the point where they exit from the
apparatus.
11. Only use attachments/accessories
12.
specified
by the manufacturer.
Use only with a cart, stand, tripod, bracket, or table specified by
the manufacturer,
or sold with the apparatus. When a cart is
used, use caution when moving the cart/apparatus
combination
to avoid injury from tO-over.
13. Unplug this apparatus
during lightning storms
periods of time.
or when
unused
and/or personal
18. Wall or Ceiling
GROUNDING
CODE (NEC)
- The appliance
should be mounted
to a
by the manufacturer.
should be located away from
20. Outdoor
Antenna
Grounding
- If an outside antenna is connected
the receiver, be sure the antenna system is grounded
so as to provide
some protection
against voltage surges and built up static charges.
Section 810 of the National Electric Code, ANSI/NFPA No. 70-1984,
provides
information
with respect
to proper
grounding
the grounding electrode.
See Figure below.
21. Objects
and Liquid Entry - Care should be taken
not fall and liquids are not spilled into the enclosure
to
of the mats and
supporting structure
grounding of the lead-in wire to an antennadischarge unit, size of grounding connectors,
location of antennadischarge unit, connection to grounding electrodes
and requirements
for
so that obiects do
through openings.
liquids, such as vases should not be placed on this apparatus.
22. Battery
Usage CAUTION
- To prevent battery leakage that may
result in bodily injury, property damage, or damage to the unit:
• Install all batteries
unit.
by
correctly,
• Do not mix batteries
A. The power supply cord or the plug has been damaged; or
B. Objects have fallen, or liquid has been spilled into the appliance;
pull
which could ultimately
a) Warning: To reduce the risk of fire or electric shock, this apparatus
should not be exposed to rain or moisture and objects filled with
15. This product may contain lead or mercury. Disposal of these materials
may be regulated due to environmental
considerations.
For disposal or
recycling information,
please contact your local authorities
or the
should be serviced
injury.
Mounting
wall or ceiling only as recommended
19. Power Lines - An outdoor antenna
power lines.
into apparatus, the apparatus
has been exposed to rain or moisture,
does not operate normally, or has been dropped.
Electronic Industries Alhance:www.eiae.org.
16. Damage
Requiring Service
- The appliance
qualified service personnel when:
of its
• Also,do not endanger yourself, or children, by placing electronic
equipment/toys
on the top of the cabinet. Such items could
unsuspectingly
fall from the top of the set and cause product damage
for long
14. Refer all servicing to qualified service personnel. Servicing is required
when the apparatus has been damaged in any way, such as power-supply
cord or plug is damaged, liquid has been spilled or objects have fallen
EXAMPLE OF ANTENNA
NATIONAL
ELECTRICAL
or exhibits a
international
global safety standards for tilt and stability properties
cabinets design.
• Do not compromise
these design standards by applying excessive
with
8. Do not install near any heat sources such as radiators, heat registers,
stoves, or other apparatus (including amplifiers) that produce heat.
blade or third prong are provided
plug does not fit into your outlet,
of the obsolete outlet.
has been exposed to rain; or
does not appear to operate normally
marked change in performance;
or
E. The appliance has been dropped, or the enclosure damaged.
17. Tilt/Stability
- All televisions must comply with recommended
near water.
6. Clean only with a dry cloth.
7. Do not block any of the ventilation
the manufacturers
instructions.
The appliance
The appliance
• Remove
batteries
with + and - alignment
(old and new or carbon
as marked
on the
and alkaline, etc.)
when the unit is not used for a long time.
or
AS PER
GROUND CLAMP
ANTENNA LEAD IN WIRE
ANTENNA DISCHARGE UNIT
(NE C SECTION
810-20)
GROUNDING CONDUCTORS
(NEC SECTION 81 0-21)
GROUND CLAMPS
ELECTRICSERVICEEQUIPMENT
POWER SERVICEGROUNDING
ELECTRODE SYSTEM
(NEC ART 2S0, PARTFI)
Note
to the
CATV
the NEC that provides
grounding
system
system
installer."
guidelines
this reminder
for proper
grounding
is provided
to call the CATV system
and, in particular,
specifies
installer's
that the cable ground
attention
to Article
shall be connected
820-40
of
to the
of the building, as close to the point of cable entry as practical.
EN
3
1
Cables
Notice
Connections
to this device must be made with shielded cables with
metallic RFI/EMI connector
hoods to maintain compliance with FCC
Rules and Regulations.
2009 © Koninldijke Philips Electronics N.V.AII rights reserved.
Specifications are subject to change without
the property
notice.Trademarks
are
of Koninldijke Philips Electronics N.V. or their respective
owners. Philips reserves the right to change products at any time
without
Canadian notice
This Class B digital apparatus meets all requirements
Interference-Causing
of the Canadian
Equipment Regulations.
being obliged to adjust earlier supplies accordingly.
The material in this manual is believed adequate for the intended use of
Copyright
the system. If the product, or its individual modules or procedures,
are
All other registered and unregistered trademarks
used for purposes other than those specified herein, confirmation
of
their respective owners.
are the property
of
their validity and suitability must be obtained. Philips warrants that the
material itself does not infringe any United States patents. No further
warranty
is expressed or implied.
Philips cannot be held responsible neither for any errors in the content
of this document
document.
nor for any problems as a result of the content
Errors reported
in this
to Philips will be adapted and published on
the Philips support website as soon as possible.
Pixel characteristics
This LCD product
has a high number of color pixeis.AIthough
it has
DOLBY
effective pixels of 99.999% or more, black dots or bright points of light
(red, green or blue) may appear constantly on the screen.This is a
structural property of the display (within common
and is not a malfunction.
DIGITAL J
industry standards)
Manufactured
double-D
Warranty
No components
under license from Dolby Laboratories."Dolby"
symbol are trademarks
and the
of Dolby Laboratories.
are user serviceable. Do not open or remove covers
to the inside of the product. Repairs may only be done by Philips
Service Centers and official repair shops. Failure to do so shall void any
warranty, stated or implied.
Any operation expressly prohibited
in this manual, any adjustments, or
assembly procedures not recommended
or authorized
in this manual
shall void the warranty.
Federal Communications
This equipment
Commission
Notice
has been tested and found to comply with the limits
VESA, FDll and theVESA Mounting Compliant
theVideo Electronics Standards Association.
logo are trademarks
of
for a Class B digital device, pursuant to part 15 of the FCC Rules.These
limits are designed to provide
interference
reasonable protection
in a residential installation.This equipment
against harmful
generates, uses,
and can radiate radio frequency energy and, if not installed and used
in accordance with the instructions, may cause harmful interference
to radio communications.
interference
However, there is no guarantee that
will not occur in a particular
does cause harmful interference
can be determined
installation. If this equipment
to radio or television reception, which
by turning the equipment
encouraged to try to correct the interference
following
off and on, the user is
by one or more of the
® Kensin_on
World
and Micro Saver are registered US trademarks
corporation
of ACCO
with issued registrations and pending applications
other countries throughout
measures:
•
Reorient
•
Increase the separation
•
Connect the equipment into an outlet on a circuit different
that to which the receiver is connected.
•
Consult the dealer or an experienced
technician
or relocate the receiving antenna.
between
the equipment
and the receiven
from
radio or television
DivX®
is a registered trademark
of DivX, Inc., and is used under license.
for help.
Portions of this software are copyright © The FreeType Project (www.
freetype.org).
Modifications
The FCC requires the user to be notified that any changes or
modifications
made to this device that are not expressly approved by
Philips Consumer
the equipment.
4
EN
in
the world.
Electronics may void the user's authority
to operate
2
Environmental
Important
care
ij3iiiiiiii
iliili{;i:i:i_122222211@
:::ii_!!!!!!!!!!!!!!!!
Registering your model with Phifips makes you eligible for all of the
valuable benefits listed below, so don't miss out.
Complete
_###################
and return your Product Registration Card at once, or
register online at www.philips.com/welcome
•
Proof of Purchase
to ensure:
Returning the enclosed card guarantees that your date of
purchase is on file, so no additional
you to obtain warranty
•
paperwork
is required
from
service.
The packaging of this product
Product Safety Notification
By registering
your product
from the manufacturer
you receive notification
- directly
- in the rare case of a product
recall or
is intended to be recycled. Contact your
local authorities for information
End of life directives
about how to recycle the packaging,
safety defect.
•
Additional
Benefits of Product
Ownership
Registering your product guarantees that you receive all of the privileges
to which you're entitled, including special money-saving
For further
For further
offers.
assistance
assistance, call the customer
support
X
service in your
country.
•
To obtain assistance in the U.S.A., Puerto
Islands, contact
40I 8
•
Philips Customer
Rico, or the U.S. Virgin
Care Center at 1-866-771Like all LCD products, this set contains a lamp with mercury; please
To obtain assistance in Canada, contact
Center at:
•
1-800-661-6162
(French speaking)
•
1-866-771-4018
(English speaking)
Philfps Customer
Care
dispose of according to all local, state and federal laws.
Philfps pays a lot of attention to produce environment-friendly
in green focal areas.Your newTV
products
contains materials which can be
recycled and reused. At the end of its life, specialized companies can
dismantle the discarded TV to concentrate the reusable materials and to
minimize the amount of materials to be disposed of. Please ensure you
Product
dispose of your oldTV according to local regulations.
information
Disposal of used batteries
ThisTY
consumes minimal energy in standby mode to minimize
environmental
impact.The active power consumption
type plate at the back oftheTV.The
The batteries supplied do not contain the heavy metals mercury and
is given on the
model and serial number of your
TV can be found on the bad< and right side oftheTV
as well as on the
cadmium. Nevertheless,
in many areas, batteries may not be disposed
of with your household waste. Please ensure you dispose of batteries
according to local regulations.
packaging,
Screen
•
care
Avoid stationary
images as much as possible. Stationary
are images that remain on-screen for extended
Examples include: on-screen
If you must use stationary
periods
images
of time.
menus, black bars and time displays.
images, reduce screen contrast
and
brightness to avoid screen damage.
•
Unplug the TV before cleaning.
•
Clean the TV screen and frame with a soft, damp cloth. Never
use substances such as alcohol, chemicals or household cleaners
on the TV screen.
•
Risk of damage to the TV screen! Never touch, push, rub or
•
To avoid deformations
strike the screen with any object.
and color fading, wipe off water drops as
soon as possible.
EN
5
3 Your TV
Congratulations
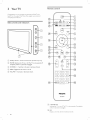
Remote
on your purchase, and welcome
control
to Philips!To fully
@
@
benefit from the support that Philips offers, register your product at
www, philips,com/wefcome,
Side controls
ACTIVE
Q-
and indicators
®
VOLUME
@
AUTO
SOU_
OPTIONS
Q_
®
BACK
(_
POWER:
indicator
Switches
completely
CHANNEL
(_)
MENU:
VOLUME
/ remote
unless
sensor
(location
may vary)
the TV on or off. The TV is not powered
it is physically
+/-: Switches
Toggles
control
the main
+/-: Increases
to the
menu
off
unplugged.
next or previous
..J
®
®
5
Standby
NFO
EXF
@
(_)
l
_ @
channel.
0-
--@
@
©
--@
®
on or off.
or decreases
volume.
PHILlPS
TELEVISION
(_)
(5 (Standby-On)
Switches the TV on or off. The TV is not powered
unless it is physically unplugged,
(_)
FAV
Displays a list of all channels marked as favorite,
6
EN
off completely
(_)
TV
(_
Switches back to the antenna source from EasyLink mode.
@
Color
ACTIVE
CONTROL
The TV continuously
measures and corrects
incoming signals to
iliili{;i:i:i_122222211@
provide the best picture quality.
buttons
:::ii_!!!!!!!!!!!!!!!!
Selects tasks or options.
(_
(_
SOURCE
Selects connected
_###################
devices.
OPTIONS
Activates the quick access menu (see 'Use the quick access menu'
on page 13).
(_) OK
Activates
(_
AT_
a selection
(Navigation
Navigates through
(_)
or accesses the menu.
buttons)
the menus.
INFO
Displays information about the TV channel or accessory device.
The quality and accuracy of the information depends on the
broadcaster. You might see a difference in broadcast
broadcast is from a different time zone.
(_
_
(Fast Forward)
Searches forward
(_
on your EasyLink device.
O (Record)
Starts or stops video recording
(_
time if the
on your EasyLink device.
MUTE
Nutes or restores audio output.
(_
CH+/Switches to the next or previous channel.
(_
FORMAT
Selects a picture format.
(_
Number
buttons
Select a channel, page or setting.
1_
. (Dot)
Press the dot (.) for digital channels.
(_
PREV CH
Returns to the previously
(_
VOL +/Increases
or
decreases
viewed channel.
volume,
[]
Stops playback on your EasyLink device.
(@
"
Searches backward
on your EasyLink device.
Starts, pauses or resumes playback on your EasyLink device.
MENU/EXIT
Turns the menu on or off.
(_
BACK
Returns to a previous screen.
1_
AUTO
MODE
Cycles through
the preset picture and sound settings (see 'Use
Auto Node' on page 15).
(_)
DEMO
Toggles the demo menu on or off.
(_
SLEEP
Sets a delay after which the TV switches to standby.
EN
7
4
Get
started
This section supplements
information
Start.
Insert
information
the remote
control
batteries
in the Quick Start. For
about how to mount and install yourT_, refer to the Quick
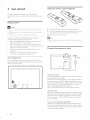
Position
the TV
Warning
"
Do not
made,
insert
"
Large screen
screen TV.
•
Before
the
power
plug into the
TVs are hea£y. Two
you move the
wall socket
people
TV, disconnect
the
before
are required
all the connections
to carry
cables to prevent
In addition to reading and understanding
and handle
1
Slide the battery
2
Insert the 2_supplied batteries
cover off the back of the remote
control.
are
a large
breakage.
of the batteries
3
(AAA).
Be sure the + and - ends
line up with the markings inside the case.
Slide the cover back into position.
the safety instructions,
consider the following before positioning yourTV;
"
•
Ensure that you always have easy access to the power cord or
•
plug to disconnect the TV from the power.
If the TV is mounted on a swivel base, ensure that no strain is
Remove
time,
the
batteries
if not
using the
remote
control
for
an extended
period
of
placed on the power cord when the TV is swiveled. Strain on the
power cord can loosen connections.
•
Connect
the
antenna
or cable
The ideal viewing distance for watching TV is three times its
screen
SiZe.
•
Position the TV where light does not fall on the screen,
•
Connect
Use a Kensington
There
oo
your devices before you position the TV.
lock
is a Kensington security slot on the back of the TV. Prevent
theft by looping a Kensington loci< between
object, such as a heavy table.
f
o
Cable
the slot and a permanent
t
o
Connect
to an antenna
Any DTV programs that are broadcast
in your area can be received for
free through an antenna connection.
Contact your local content
provider or your local electronics retailer if
you are unsure about what HDTV programs are available in your area.
Broadcasters are transitioning
a given broadcaster
from analog to digital TV.This means that
can have channels available either in analog or in
digital, or both analog and digital at the same time.
The TV produces
Connect
stereo sound only if a stereo signal is broadcast.
to a cable
When yourTV
is connected to the cable socket, you might receive free
digital and high definition
programs (depending on your cable provider).
The channel number for digital and high definition
channels includes a
dot "." For example, 11.1,46.30, 108.20I. Contact your cable provider
formore information.
Connect
There
to a Direct
Broadcast
Satellite
are two main DBS systems: DirecTV
(DBS)
and DishNetwork,These
systems requirea separate, proprietary
set-top box to decode signals
and send them to the TV.The set-top box contains a digital TV tuner for
receiving off-air digital broadcasts.
8
EN
Contact your local DBS provider for more information
connections and theTV channels.
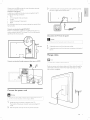
3
about the
Connect the power cord plug to the power outlet.
Ensure that
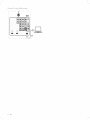
the cord is tightly secured at both ends.
iiiiiiiiiii_i!!!!!!!!!!!!!!!!!!!!@
Connect to a set-top box
:::ii_!!!!!!!!!!!!!!!!
A cable box or satellite set-top box can be connected to theTV
through the following
•
ANT
connections:
•
A/V (Composite
S-Video
Video
•
•
YPbPr (Component
HDNI
For information
_###################
and Audio)
Video
o
--
o
o
Input)
about how to connect a set-top box, see the Quick
Start provided.
Connect
a set-top
box through
RF IN/OUT
IftheTV is connected to a cable box or satellite set-top box via a
coaxial connection, set theTV to channel 3 or 4, or to the channel
specified by the service provider.
Disconnect the TV from the power
O
O Sll
H
Caution
"
Cable
Pull the
power- cord
by the
plug; do not pull on the
power- cord,
1
Unplug the power cord from the power outlet.
2
Unplug the power cord from the power connector
the TV.
at the back of
Manage cables
L
Connect
a set-top
box through
component
video
input or HDMI
" A cable
holder
is available
in selected
models
only.
Route your power cord, antenna cable and all other cables through the
cable holder at the back oftheTV.The
holder helps keep your cables
tidy and easily manageable.
F
_<_.,
................
Connect
the
power
cord
Warning
•
Verify
that
your
the TV, Do not
mains voltage
insert
corresponds
the power
cord
Locate the power connector
if the
with
voltage
printed
at the
back of
is different,
at the back of the TV.
The location of the power connector
model.
2
the
voltage
varies according to TV
Insert the power cord fully into the TV power connector.
EN
9
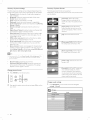
Switch on and set up the TV
TheTV turns on automatically
power connector.The
after the power cord is inserted into the
following screen appears;
@ Next
Press the GREEN button
Follow
the
yourTV
"
on-screen
setup,
on your remote
instructions
Insta%tion
control to proceed.
to select
takes
approximately
If you connect your- TV to a cable
install channeB,
box or- satellite
your
language
and complete
10 minutes,
set top
box, you do not need to
Finish the setup by selecting your location:
•
If you choose [Retail
store] your settings are erased each time
you turn off the TV, Use this mode for retail store displays only.
•
10
If you choose [Home]
you are guided through
a choice of picture
display options.
Press the left or right cursor buttons
your preferred
screen.
EN
to select
5
Use yourTV
x:ii_!!!!!!!!!!!!!!!!
This section helps you perform
basicTV operations,
_###################
Switch your TV on/off or to standby
•
Press CHANNEL
•
For digital channels, press a number
+I - on the side of the TV.
•
"." and then the corresponding sub channel number (1 to 999).
Ex. 108.30.
Press CH +/- or enter a number on the remote control.
•
Press PREV CH to return to the previously
(I to 999) followed
by a dot
viewed channel.
Adjust volume
To switch on
•
Press (5 POWER
at the side of the TV,
Press d) on the remote
control,
To switch to standby
Press O on the remote
control,
To switch off
•
Press d) POWER
at the side of the TV,
Switch channels
q,
To increase or decrease volume
Press VOL +/- on the remote
the side of the TV.
To mute or unmute
control or press VOLUME
sound
•
Press MUTE on the remote
•
Press MUTE again to restore the sound.
To adjust headphone
•
+/- on
control to mute the sound.
volume
Press VOL +/- on the remote
the side of the TV. When
control or press VOLUME
headphones
the loud speakers are automatically
+/- on
are plugged into the TV,
muted.
EN
11
Watch
To watch
channels
t
channels
from
a set-top
from a set-top
Switch on the set-top
box
box
box.
L_ The picture from your set-top box might appear automatically
ON your
_-
Use the remote
If the picture
AUTO
DEMO
t
screeN,
does
control
of your set-top box to select channels.
not appear
@
OPTIONS
Press SOURCE
repeatedly
to select the set-top
box and wait a
few seconds for the picture to appear,
2
Use the remote
Watch
control
connected
To watch connected
t
of your set-top box to select channels,
devices
devices
Switch on the connected
device.
L_ The picture from your connected
automatically
_-
Use the remote
If the picture
control
of the device to select channels.
not appear
SOURCE
@
AUTO
DEMO
t
does
device might appear
on the TV.
OPTIONS
II _
Press SOURCE
repeatedly
to select the connected
device and
wait a few seconds for the picture to appear,
2
Use the remote
Watch
control
of the device to select channels.
a DVD
To watch a DVD
1
Insert a DVD disc into your piayen
2
Press PLAY _ on the remote
control of the DVD player.
L_ The DVD mi£ht automatically
If the picture
AUTO
DEMO
t
does
@
Press SOURCE
play on theT_.
not appear
OPTIONS
repeatedly
to select the DVD player and wait a
few seconds for the picture to appear.
2
Use the remote
12
EN
control
of the DVD player to play the disk.
6
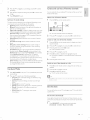
3
Use more of yourTV
Press _ and 1_to selectthe
ij3iiiiiiii
menu.
[Picture]
::ii_!!!!!!!!!!!!!!!!!
TV menu
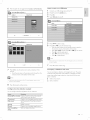
Use the quick access menu
The quick access menu gives direct access to some often-needed
items.
"
When
digital
dispEayed
t
channeEs are instafled
in the quick
and broadcast,
Picture
TV Settings
the rdevant
iiiiiiiiiiiiiiiiiiiiiiiiiiiii
....
menu
digitaE options
are
access menu.
Press OPTIONS
on the remote
control.
_Available in selected models
AUTO
OPT_NS
4
Press A or T to select one of the picture settings, and press l_ to
enter the setting.
5
Press A or T to adjust the setting, and press 4 or OK to confirm
the change.
2
Press A or _r and then OK to access one of the following
•
Audio
menus:
6
Press MENU/EXITto
exit.
language, for digital channels only, where multiple
audio languages are broadcast.
•
Closed captions (see 'View closed captions (subtitles)'
page 19).
•
Picture format
•
Equalizer (see 'Summary
•
Clock (see 'Set the clock' on page 15).
on
Change
picture
picture
t
Press MENU/EXIT
and sound
@--
settings
t
on the remote
setting
assistant
your picture settings.
control.
EXIT
[NFO
T
can
settings or change settings manually.
21
Change picture
the
of sound settings' on page q5).
Change picture and sound settings to suit your preferences.You
apply pre-defined
by using
The settings wizard helps you to configure
(see 'Summary of picture formats' on page 14).
EXIT
Change
settings
Press
_ to enterthe
[Settings
assistant]
menu.
settings
PressblENU/EXIT on the remote control.
Installation
TV settings
Settings assistant
EXIT
2
Press _ to enterthe
TV menu
TV settings .....
[TV settings]
menu.
TV settings
3
Press _ to highlight [Start
now], and press OK to start the
[Settings assistant].
L_
4
YOUare guided through a choice of picture display options.
Press the color buttons,
4, I_, and OK to make your selections
and store your setup.
EN
13
Summary
of picture
The following
format
•
settings
Summary
picture settings can be configured.
Depending
on the
of the picture source, some picture settings are not available.
[Contrast]:
Adjusts the intensity of bright areas, keeping dark
of picture
The following
formats
picture formats can be selected.
Depending on the format
are not available.
of the picture source, some picture formats
areas unchanged.
•
[Brightness]:
•
[Color]:
Adjusts the intensity and details of dark areas.
•
[Tint]:
•
[Sharpness]:
•
[Color
temperature]:
[Warm]
or [Cool],
•
[Automatic]:
Adjusts color saturation.
Adjusts the color balance in an image.
[Dynamic
Adjusts the level of sharpness in image details.
To set the color temperature
contrast]:
Automatically
visible.
to [Normal],
enhances contrast
[Super zoom]:
in an
[Digital
Natural
Motion]:
In selected models only. Reduces field
and line flicker to display movement
•
[Noise
Reduction]:
Automatically
distortion.
smoothly,
filters out and reduces
image
[4:3]: Shows the classic 4:3 format.
noise. Improves picture quality for weal< video signals. You can
switch DNR on or off.
•
[MPEG artifact
reduction]:
(Not for HD and PC
mode.) Removes the black bars on the
side of 4:3 broadcasts. There is minimal
image,
•
(Not for PC mode.)
Enlarges the picture automatically to
best fit the screen. The subtitles remain
Smooths out transitions
on digital
pictures. You can switch this feature on or off,
•
[Color
enhancement]:
Makes colors more vivid and improves
[Movie
the resolution of details in bright colors. You can switch this
feature on or off.
•
[Active
Control]:
Corrects
light sensor]
Control]
to
in the room, You can
one of these settings: [Off],
or [On without
[On with
[Movie
light sensor],
expand 16:9]: (Not for H D and
PC mode.) Scales 4:3 format
•
Save power
with
TV will adjust
power
Eco TV, Switch
the brightness
to 14:9.
incoming signals for the best picture
possible, according to lighting conditions
switch [Active
expand 14:9]: (Not for HD and
PC mode.) Scales 4:3 format
[Active
according
Control]
to the
to [On with
ambient
room
light sensor],
lighting,
to 16:9.
The
reducing
consumption.
[Picture
format]:
[Horizontal
Changes the picture format.
Shiff]/[Vertical
Shift]: Adjusts
vertical position of the picture,
the horizontal
[Wide
screen]:
format
to 16:9.
Stretches
the
classic
4:3
and
The availability of this settings
depends on certain signals or sources.
[Unscaled]:
Change picture format
maximum
t
Press FORMAT
on the remote
For HD and PC mode only,
and in selected models only. Allows
control.
sharpness. Some distortion
may be present due to the broadcaster's
systems. Set your PC resolution
screen mode for best results.
Change
_-
Press A or T to select a picture format
your choice.
and press OK to confirm
t
sound
settings
Press MENU/EXIT
settings]
on the remote
control
> [Sound].
TV menu
TV Settings
14
EN
to wide
Sound
and select [TV
2. Press
AorTtohighlight
asound
setting
andpress
_ toselect
thesetting.
3 Press
_ orTtoadjust
thesetting,
andpress
OKtoconfirm
the
change,
4 Press
MENU/EXITto
exit,
Create
and
use lists of favorite
iiii;iiiii:i:i_i22222211{
You can create lists of your preferred TV channels so that you can find
of sound
The following
t
settings
sound settings can be configured,
Depending
:::ii_!!!!!!!!!!!!!
those channels easily.
Select a list of favorite
Summary
channels
channels
Press the FAV key on the remote
control.
on the
sound source, some sound settings are not available,
•
[Equalizer]:
•
[Balance]: Adjusts the balance of the right and left speakers to
Adjusts
individual sound frequencies.
ACTIVE
best suit your listening position.
•
•
DEMO
[Digital
audio language]: Available
for digital channels only, when
multiple
languages are broadcast.
Lists available audio languages.
[Alternate
L_
audio]: Available for analog channels only, when a
main and second audio program
(SAP) is broadcast.
Select the
2
Your lists of favorite channels are displayed.
Press A or v to highlight a list, and press OK to select the list.
main or second audio program.
•
[Mono]/[Stereo]:
broadcast.
•
[Incredible
sound,
•
Selects between
volume
Selects available modes for surround
leveling]):
[TV Speakers]: Set on or off, or output
compliant
device. [Master
[Preferences]
When
are disabled and TV sound outputs
•
3
the remote
control
Press the green key to enter
L_
in the
4
Press A or v to highlight a channel.
5
Press OK to select or deselect the highlighted channel.
L_ The channel is added to or removed from the list of favorite
to the speakers of the
device. Adjust the volume
of the EasyLink-compliant
channels.
using
6
device.
[Delta volume]: Levels out volume differences between channels
or connected devices. Switch to the connected device before
you change the delta volume.
t
Mode
Press AUTO
Press OK on the remote
selected.
2
3
MODE to set your TV to a predefined
Press the green button to exit.
Switch to one of the channels
t
Use Auto
Edit mode.
A list of channels is shown.
menu available.
EasyLink] is selected, the TV speakers
EasyLink-compliant
control to display your lists of
Press A or v to highlight a list, and press OK to select the list.
sound to an EasyLink-
EasyLink] must be activated
compatible
channels
Press the FAV key on the remote
favorite channels.
2
or when switching
menu to make the [TV Speakers]
[Speakers
or edit a list of favorite
Reduces sudden changes in
volume, for example, during commecials
channels. Set on or off.
•
if stereo is
Create
Surround]:
[AVL] ([Auto
mono or stereo
picture and
on a list
control to display the last list that you
Press A or T to highlight a channel.
Press OK to select the channel.
L_
TheTV switches to that channel.
sound setting.
2
Press A or T to select one of the following
•
[Personal]:
The customized
the [Picture]
settings:
settings you defined
by using
"
menu.
•
[Sports]:
action.
•
[Standard]:
•
[Movie]:
Brilliant picture settings for a cinematic experience.
•
[Game]:
Optimized
Press CH+/to select channels
that are not in a list,
in a list or press the
numeric
keys to select
channels
Vivid picture settings and clear sound for high
For normal TV viewing.
for PCs, games consoles and
Set the
clock
playstatfons.
•
[Power
Saver]: Eco TV settings for lower power
consumption.
You can set the time on yourTV
and program yourTV to switch off at
a specific time.
Set the
time
automatically
Some digital channels transmit
set the time automatically
from.
t
Press blENU/EXlT
[Installation]
the time. For these channels, you can
and choose which
on the remote
> [Clock]
channel to read the time
control and select
> [Auto clock
mode].
EN
15
2
Select
[Automatic]
and press 4 to confirm
Set the
your choice,
sleeptimer
Sleeptimer switches the TV to standby after a pre-defined
TV menu IInstallation
Clock
during the countdown.
Auto clock mode
Press SLEEP repeatedly
example,
"
To turn
to select a value from 0 to 180 minutes. For
if you select 90, the TV switches to standby in 90 minutes.
the sEeeptimer
off, select
Use child control
3
4
5
6
(Optional)
Press T and I_ to enter the menu for [Auto
•
Press _ or T to highlight a channel.
•
Press 4 to confirm
clock channel],
You can prevent your children from watching certain programs or
certain channels by locking theTV controls and by using ratings.
Set or change your PIN
Press T and I_ to enter the menu for [Time zone].
•
Press A or T to highlight the time zone.
•
Press 4 to confirm
t
your choice.
2
Press _' and _, to enter the menu for [Daylight
•
Press A or T to highlight [Automatic]
•
Press 4 to confirm
Press F1ENU/EXlTto
saving].
or [Off].
t
exit.
[installation]
2
on the remote
control
and press _1to confirm
and select [Features]
buttons
of the remote
If you have a PIN, enter your current
•
If you do not have a PIN or if you have forgotten
enter 07I 1.
•
You are asked to enter your new 4-digit
Enteryour
PIN.
your PIN,
PIN again.
PIN again to confirm.
that your PIN has been
changed.
and select
4
> [Clock] > [Auto clock mode].
Select [Manual],
control
•
L_ A message appears to confirm
manually
Press MENU/EXIT
on the remote
Enter a 4-digit PIN on the number
control.
your choice.
3
time
Press P1ENU/EXlT
> [Change PIN].
Set daylight saving.
•
Set the
and rating locks
your choice.
Select the time zone.
•
(Optional)
0 minutes,
Select the channel from which the TV reads the time.
•
(Optional)
period of time.
You can always switch off your TV earlier or reset the sleeptimer
Press blENU/EXIT
to exit.
your choice.
Loci< the TV
TV menu I Installation
This section describes
Clock
specified time, screen is blanked out and the audio is muted.
Auto clock mode
t
Auto clock mode
how to loci< all channels on the TV. At the
Ensure that the clock is set with the current
time (see 'Set the
clock' on page 15).
2
Press MENU/EXIT
> [Child
on the remote
control
and select [Features]
lock] > [Lock after].
3
Enter your PIN.
4
Press _ to select [Timer].
Features I Child lock
Lock after
Timer
Timer
3
Press T to select [Time]
and then press _ to set the time.
Use the format
afternoon.
Select [AM]/[PM]
HH:MM.
4
Press OK to confirm
5
Press T and I_ to enter the menu for [Day].
6
Press A or T to select the day.
7
Press OK to confirm
8
Press MENU/EXlTto
for morning
or
your choice.
your choice.
exit.
5
Press T to select [On] and activate the [Lock after]
Select [Off]
16
EN
to deactivate
the feature.
feature.
6 Press
_toconfirm
yourchoice,
7 Press
_ toselect
[Time]
andpress
I_tosetthetime,
Usetheformat
HH:MM,
andselect
[AM]/[PM]
formorning
or
afternoon.
8
9
t 0
Press OK to confirm
A box with / indicates that some content
deselected.
i{i3iiiiii
ratings are
For example, for rating TV-14, you can deselect
one or more of the following
content
ratings: [(D) Dialog],
:::ii_!!!!!!!!!!!!!!!!
[(L) Language], [(S) Sex], or [(V) Violence],
the time.
?###################
Child Lock
Press MENU/EXIT
Turn
the
TV
to exit.
TV ratings lock
off and on again.
TV-14
Lock a channel
This section describes how to loci( specified channels. The channels
can be selected but the screen is blanked out and the audio is muted.
t
Ensure that the clock is set with the current time (see 'Set the
clock' on page 15).
_-
Press MENU/EXIT
> [Child
3
on the remote
lock] > [Channel
control and select [Features]
lock],
Enter your PIN.
When you select [Att], all items in the ratingslist are locked.
Features
When you select [None],
Child Lock
programs with no rating and
programs with a rating of None are locked.
When you loci( a rating, all ratings in the younger age
Channel lock
categories are automatically
4
Press MENU/EXIT
locked.
to exit.
Summary of TV ratings
4
5
6
Age rating
Content rating
All
None
None
None
TV-Y: Appropriate
for children of all ages with
themes and elements suitable for children
None
aged 2-6.
Press A or T and then press OK to lock one or more channels
or external sources.
TV-Y7: Programs designed for children age 7
[(FV) Fantasy
and older.
Violence]
Each channel has a box-graphic
it is locked:
TV-G:
in front of it to indicate whether
•
A box with X indicates that the channel is locked
•
An empty box indicates that the channel is not locked
Press MENU/EXIT
to individual programs
The program content
the program
to exit.
[(D) Dialog]
some parents may find unsuitable
[(L) Language]
for younger
may need parental
[(S) Sex]
guidance. The program may contain moderate
based on their age rating and content
rating.
advisory data are sent by the broadcaster
or by
provider.
a set-top
box or cable box connected
violence,
sexual dialog and/or
some strong language.
TV-14: Programs contain elements
that may
[(L) Language]
of age. These programs
[(S) Sex]
include one or more
cable box must be connected
RF or AV connectors,
sexual situations, suggestive dialog and strong
control and select [Features]
language.
Press MENU/EXIT
on the remote
TV-MA:
> [Child lock] > [TV ratings lock],
_-
intense violence,
under the age ofi7.
3
Press A or T and then press OK to lock or unlock one or more
ratings.
intense
Programs are designed to be viewed
by adults and may be unsuitable
Enter your PIN.
[(D) Dialog]
not be suitable for children under 14 years
of the following:
t
[(V) Violence]
situations and
by HDiVil, you cannot use the TV ratings loci(. Your set-top box or
through
None
no
TV-PG: Programs contain elements that
children and which
with a V-chip that allows you to control access
If you receive channels through
contain little or no violence,
strong language and little or no sexual dialog
or situations.
Use the TV ratings loci<
Your TV is equipped
Programs suitable for all ages. These
programs
for children
These programs
contain graphical violence,
may
[(V) Violence]
[(L) Language]
[(S) Sex]
[(V) Violence]
explicit sexual
activity and/or crude or indecent
language.
Each rating has a box-graphic in front of it to indicate whether
programs carrying that rating are locked;
•
A box with X indicates that all items in the content
list are locked.
•
An empty box indicates that no items in the content
list are locked.
ratings
ratings
EN
17
Use the movie
ratings
2
lock
You can control viewing of movies based on their Motion
Association
t
of America
Press MENU/EXIT
> [Child
_-
(NPAA)
your choice.
the region rating
table and you cannot use the region rating lock.
rating.
on the remote
Press A or _' to select [On], and press _ to confirm
If you select Off, you choose not to download
Picture
control
and select [Features]
3
Press _ to return to the TV menu and select [Features]
> [Child
lock] > [Region ratings lock].
lock].
Select one of the menus for movie ratings loci<.
Features
•
In the USA, select [Movie
•
In Canada, select [Canada English ratings lock] or [Canada
ratings lock],
Region ratings lock
French ratings lock],
3
Enter your PIN.
L_ The following screen shows the ratings in [Movie
ratings lock],
Features
Child Lock
Movie ratings lock
4
Enteryour
5
Press A or T and then press OK to lock or unlock one or more
PIN.
ratings.
Each rating has a box-graphic
is locked:
4
Press A or T and then press OK to lock or unlock one or more
6
in front of it to indicate whether
•
A box with X indicates that the rating locked.
•
An empty box indicates that the rating is not locked.
Press MENU/EXITto
it
exit.
ratings.
Each rating has a box-graphic
programs
in front of it to indicate whether
Summary
carrying that rating are locked;
of US movie
ratings
•
A box with X indicates that all items in the rating are locked.
Rating
Description
•
An empty box indicates that no items in the rating are not
locked.
All
All items in the ratings fist are locked.
NR
Not rated.
G
Movies with a mild content,
PG
Movies for which parental guidance is
When you lock a movie rating, all items for ages below that
movie rating are automatically
Press MENU/EXIT
locked.
to exit.
recommended.
suitable for all ages.
They may contain a few racy or
violent scenes or maybe some bad language.
Use the region
You
can control
region
ratings.
regional
t
ratings
Press
ratings
loci<
access to digital
Before
you
PG -I3
programs
download
based
a ratings
recommended
on downloaded
table,
ensure
that
R
on the
Restricted.
remote
control
children
> [Preferences]
and select
> [Downloaded
rating
table],
NC-17
for
under the age of 17. Parental guidance or
permission
[Installation]
if under age I3.
The movies usually contain offensive
sex or bad language and may be unsuitable
are broadcast.
MENU/EXIT
Movies for which parental guidance may be
needed.
Even with parental permission,
forbidden
under
age 17. More offensive sex, violence or bad
Installation
Preferences
language.
Downloaded rating table
X
Movies which generally focus on sex, violence and/
or bad language. Also known as pornography.
18
EN
Summary
of Canadian
movie
Closed
ratings
captioning
Rating
Description
Closed captioning
All
All items in the ratings list are locked,
with hearing disabilities to access television
C
Programming
suitable for children under the age of
8 years. No profanity or sexual content
allowed. Minimal comedic violence.
C8+
Suitable for children
of any level
ages 8 and over. Low intensity
violence and fantasy horror
allowed.
Movies with a mild content,
suitable for all ages.
O
PQ
captioning
t
Press MENU/EXIT
2
Press MENU/EXIT
to exit.
Select caption
18+
of sexual activity
Programming
intended
for viewers
over. May contain strong violence,
within
ages 18 and
language, and
t
2
sexual activity.
Summary
your choice.
profanity,
of a story.
of Canadian
French
movie
ratings
Rating
Description
AIr items in the ratings list are locked,
O
Appropriate
for all ages with little or no violence
and little to no sexual content.
"
Appropriate
Select a caption service for analog channels;
•
Press MENU/EXIT
on the remote control
Appropriate
violence,
•
•
Press A or T to select one of the listed caption
Not
all caption
captions
or only when theTV
•
If you connect
set top
The captions
•
Not
do not
or component
the TV. You can select
all TV programs
Refer to your
press 4 to confirm
Press MENU/EXiT
use correct
and product
area TV program
shows. The captioned
marks such as CC'.
transmission
of a
spelling
commercials
video
closed
input,
caption
with
you cannot
through
the
and grammar.
include
closed
listings for the TV channels
programs
caption
services, and
your choice,
to exit
Service
Description
CC-1, CC-2,
Dialog and descriptions
CC-3, and CC-4
captioned TV program show on screen. Usually
CCq is the most used. CC 2 can be used for
for the action on the
languages if they are transmitted.
board information for Closed Captions programs,
news, weather information, or stock market
CS-q, CS-2, CS3, CS-4, CS-5
Service 1 is designated as the Primary Caption
Service. This service contains verbatim, or near-
and CS-6
verbatim
are usually noted
caption
and times
in the
informa±ion,
of closed
TVlistings
with
captions for the primary
spoken in the accompanying
language being
program
audio.
Service 2 is designated as the Secondary
Language
Service. This service contains captions in a
secondary
always
the
reports.
box only,
"
caption
service
box via tqDMI
through
during
Press A or T to select one of the listed caption
is
This television
provides a display of television
closed captioning
that conforms
the EIA 608 standard
and in accordance
with Sections 15,119 of the FCCrules,
caption
channel
Press T and I_ to enter the menu for [Digital
T-4
•
closed
are used by aTV
T-l, T-2, T-3 and Often used for channel guide, schedules, bulletin
CC-,T-, and CS- text.The
caption text can be displayed permanently
muted,
select
services, and
your choice.
program,
alternate
(subtitles)
The caption service displays transmitted
set top
service],
Summary of caption services
by adults and contains extreme
violence and graphic sexual content/pornography.
your
> [Caption
Select a caption service for digital channels;
•
4
for children I6 and up, with strong
Only to be viewed
closed
services
Settings]
service],
by an
violence, strong language, and strong sexual
content.
View
caption
•
language, and some sexual situations.
Appropriate
18 ans+
3
for children 13 and up, with moderate
Persons under 13 should be accompanied
adult.
16 ans+
> [Caption
and select
[Features]
Press I_.
for children 8 and up which may
contain little violence, some foul language and/or
little to no sexual content.
13 ans+
or [On during mute], and
Turn captions on.
closed
8 ans+
control and select [Features]
services
press _ to confirm
All
as text
> [Closed captions],
press 4 to confirm
3
and depictions
on the remote
Press A or T to select [On], [Off]
Programming intended for children ages 14 and
over. May contain intense scenes of violence, strong
the context
of programming
:::ii_!!!!!!!!!!!!!!!!
Closed
over the video.
> [Caption settings]
They may contain a few racy or
iiiiiiiiii:i:i_i2222221}ill
that allows persons
programming.
Display captions
violent scenes or maybe some bad language.
14+
displays the audio portion
superimposed
Movies for which parental guidance is
recommended.
is an assistive technology
language which are translations
captions in the Primary Caption
service subchannels are not pre-assigned.
the discretion
of the
Service. The other
It is up to
of the individual caption provider
utilize the remaining
to
service channels.
EN
19
Select how digital
captions
Connect
are displayed
You can choose the size, font, colon background
characteristics
t
Press MENU/EXIT
> [Caption
2
and other
of the caption text.
on the remote
> [Digital
settings]
control
caption
a USB storage
1
Turn on the TV.
2
Connect
and select [Features]
device
the USB device to the USB port on the side of your TV.
L_ The main menu appears automatically.
options],
Press _ or T to highlight an option for digital captions, and press
!_ to select the option.
3
TV menu
Press A or T to highlight a setting for the option, and press 4 to
confirm
4
USB
your choice.
Press MENU/EXITto
exit.
Difficulties viewing closed captions on DTV programming
If you have difficulties
including HDTV,
viewing closed captions on DTV programming,
received from your subscription
television
providen
you should;
•
consult any consumer
information
captions for DTV programming
television
•
and manuals/guides
provided
on closed
by your subscription
provider;
ensure that the captioning
applicable,
is turned
function
on your set-top box, if
on; and,
ensure that the captioning
function
on your DTV is turned
on.
Disconnect
If you are still unable to view closed captions on DTV programming,
you should contact your subscription
assistance.
television
provider
"
videos
YourTV is fitted with a USB port that enables you to view photos, listen
to music, and view videos stored on a USB device.
Further information
is provided on USB devices (see 'Notes for the use
of USB devices' on page 34).
Supported
formats
Not-supported
JPEG
formats
File name exceeding
FAT/DOS-formatted
devices
memory
AVI
NP3
Npeg4, DivX311,
DivX4, DivX5, Xvid
NP4
NPEG1 L3, HE-AAC
H.264
PS (,mpg)
MPEG1 L1/L2, AC3,
LPCN
MPEG1, MPEG2
Philips cannot
be held responsible
Philips accept
any liability
USB device
Demand
device
•
registration
code'
DivX
content
system
20
VOD
that restricts
DivX
VOD
Error"
will
EN
device
content.
and submit
content
if your USB device
for damage
is not supplied
Certified
(VOD)
always exit the
on screen
USt} device,
Wait five seconds then remove the USB device,
to exit the on-screen menu,
View your pictures on a USB device
t
Connect
2
Press _ to enterthe
your USB storage device to the TV.
3
Press OK.
[Picture]
[USB] menu.
is highlighted.
USB
Picture
Video codec
This DivX@
the
Picture
WNV
The
the USB device
you remove
Press MENU/EXIT
a dot character
WNA
•
before
I28 characters
File names containing
Audio codec
•
damaging
seconds
L_
ASF (.wmv)
"
To avoid
1
video formats
Supported
Container
device
2
Progressive JPEG files
lvip3
storage
Caution
for
View photos, play music, and watch
on a USB device
a USB
with
must
the
is not
of stored
supported,
÷
nor- will
the
DivX
registration
in order
VOD
to play DivX
registration
process
(see 'Display
code
the
Video
on
for your
DivX@
on page 22).
is protected
playback
not
be displayed
by a DivX
DRN
(Digital
to registered
DivX
Certified
authorized
Thumbnails
.....
data.
the TV.
be registered
Generate
it during
or-loss
for your
and your- content
will
device,
Rights Management)
devices,
the message
not play.
If you try to play
"Authorization
4
Press _ to enterthe
5
Press AT4_
[Picture]
folder.
to select a picture.
L_ The pictures appear in a list or as thumbnails.
menu
and wait
five
6
Press the green key to toggle between
[List] and [Thumbnails].
Devicelabell I Picture [ Folder 1
Folder 1
IMAGE1.JPG
IMAGE1JPG
Listen to music on a USB device
1
Connect
your USB storage device to the TV.
2
Press I_ to enter the [USB] menu.
3
Press OK.
4
Select [Music] and press 1_
x:ii_!!!!!!!!!!!!!!!!
_//////////////////////////////////////
Devicelabel 1_Music
Music
Track1.MP3
Track1.MP3
Thumbnails
Devicelabell_Folder
_,
1
Folder 1
5
6
IMAGE1JPG
"
Press AT411_ to select a song.
Press OK or _"Ii to play the selected song.
•
Press the color buttons on the remote control to perform
the functions shown at the bottom of the screen.
•
•
Press OK orl_||to
pause, press OK or I_1| again to resume.
Press I_ to fast-forward
search.
•
Press _1_ to fast-backward
•
Press II to stop playback.
If the function
to make
7
7
Press OK to view the picture orto
start a slideshow
pictures.
•
Press the color keys on the remote control to perform
functions shown at the bottom of the screen.
"
If the
button
8
function
bar at the
bottom
of the TV screen
disappears,
a slideshow
disappers,
press any color
button
song.
with
a slideshow
music
with background
continues to be played even if the slideshow
stops when another
album is reached.
press any color
of the TV screen
Press _ to select another
You can accompany
the
bottom
it reappear.
Accompany
of the
bar at the
search.
music. The audio
is stopped.
The audio
song is played, or when the end of the music
1
Select a music album.
2
Start a slideshow.
to make it reappear.
Press 4 and select another
picture.
Configure how the slideshow is played
You can configure
the following
Feature
[Details]/[More
features of your siideshow.
Description
details]
Displays the picture name, date, size and
next picture in the slide show.
[Transitions]
Displays a list of available transition
[Slide time]
Sets the amount
shown.
styles.
[Rotate]
Rotates a picture.
[Zoom]
Displays a list of available magnifications.
[Start show]/[Stop
Starts or stops a slide show.
of time that a picture
is
show]
EN
21
Display the DivX@ registration
code
t
Press MENU/EXIT
on the remote
2
Select [Installation]
> [DivX®VOD].
L_ The DivXVideo
On Demand registration
Use yourTV
in HD mode
control.
Not all models can be configured
code is displayed.
information
ofyourTV.You
mode. For
might also have to configure the display format
of your HD device. For information
the documentation of the device.
Installation
(HD)
When you connect an HD device to yourTV, configure the display
format
TV menu
in high definition
about your set, see the specification.
about configuring your device, see
DivX® VOD
Supported video formats
The following
video formats
are supported
Resolution
Refresh rate
640 x 480p
"
Take note
device
of your
before
registration
code, You will
you buy or rent
DivX
need this when
you register
in HD mode.
60Hz
720 (I440)
x 4801
60Hz
720 (I440)
x 5761
50Hz
720 x 480p
60Hz
720 x 576p
50Hz
1280 x 720p
50Hz, 60Hz
1920 x 1080
50Hz, 60Hz
1920 x 1080p
24Hz, 25Hz, 30Hz, 50Hz, 60Hz
your
movies,
•
Your TV is HDMi
format
on your
compliant,
connected
If you do not
get a good
picture,
change the video
devices.
Watch videos on a USB device
Configure yourTV
t
Connect
your USB storage device to the TV.
2.
Press _ to enterthe
3
Press OK.
4
Select [Video]
t
Connect
[USB] menu.
in HD mode
the H D device to your TV (see 'Connect
your devices'
on page 30).
_-
and press I_.
Press MENU/EXIT
> [Mode
on the remote
control
and select [Features]
Selection].
TV menu
Devicelabell [ Video
Video
Features
Videol.MPG
Mode Selection
Videol.MPG
5
6
"
Press AT411_ to select a video.
3
Select [HDTV]
Press OK or I_ || to play the selected video.
4
If necessary, adjustthe
TV picture settings.
•
Press the color buttons on the remote control to perform
the functions shown at the botton of the screen.
5
Press MENU/EXITto
exit.
•
•
Press OK or I_1!| to pause, press OK or I_|l again to resume.
Press _" to fast-forward
search.
•
Press ,_
•
Press I to stop playback.
If the
button
function
to f_ast-backward search.
bar at the
bottom
of the TV screen
to make it reappear.
7
Press 4 to select another
22
EN
video.
disappears,
press any color
Selection]
and press 4 to confirm
•
[Mode
•
1280x720p@60
appears
•
1920×1080p@24/25/30/J0/60
for
the following
Hz
t-lz
input
your choice.
signals:
Use yourTV
as a PC monitor
Use Philips EasyLink
iiiiiiiiii:ii_!!!!!!!!!!!!!!!!!!!!
Use an HDNI-DVI
yourT_.
H
cable or an HDNI-DVI
adaptor to connect a PC to
For sound, add an audio cable with a stereo mini jack,
Caution
Before
you connect
your- PC, set the
Supported
screen
The following
screen resolutions
PC monitor
refresh
Your TV supports Philips EasyLink,which usesthe HDNI CEC
(Consumer Electronics Control) protocok EasyLink-compliant devices
that are connected through HDNI connectors can be controlled by a
single remote control.
rate to 601 Iz,
•
Philips does
"
The
100%
are supported
with
all HDNI
CEC devices.
in PC mode:
Refresh rate
640 x 480
60Hz
800 x 600
60Hz
1024 x 768
60Hz
1280 x 768
60Hz
1280 x 1024
60Hz
1360 x 768
60Hz
1920 x 1080
60Hz
If necessary, adjust the picture
with the cursor buttons.
EasyLink
compliant
One-touch
When
2
Press PIENU/EXJT
on the remote
as the source.
play
you connect your TV to devices that support
TV automatically
content.
When
switches to the correct
one-touch
play,
control.
control,
your
channel to show the DVD
standby
you connect your TV to devices that support
use your TV remote
your TV.
on and selected
For example, when you press Play on your DVD remote
in PC mode
Connect the PCto
must be switched
you can control your TV and the devices with one remote
position to the center of the screen
1
device
EasyLink features
One-touch
Configure yourTV
standby, you can
control to put your TV and all connected
HDNI
devices in standby mode.
control and select [Features]
Selection].
System audio control
When
you connect your TV to HDNI
TV can switch automatically
•
•
•
•
interoperability
resolutions
Resolution
> [Mode
not guarantee
[Mode Selection] appears for the following input signals only:
710x480p@60 _lz
1280x720p@60tlz
1920x1080p@24/25/30/50/60
Hz
To use one-touch
connected
Mode Selection
device.
device to your TV.
control
RC key forwarding
Features
devices, your
audio, you must map the audio input from the
You can use the remote
the volume.
Remote
TV menu
CEC compliant
to play audio from the connected
control from the connected
device to adjust
(RC) key forwarding
allows you to control EasyLink-compliant
using your TV remote
devices
control.
Mode Selection
3
4
"
5
Select [PC] and press OK to confirm
your choice.
If necessary, adjust the picture settings.
Set the
picture
format
Press MENU/EXIT
to [Unscaled]
for
wide
screen
PC resolutions.
to exit.
EN
23
:::ii_!!!!!!!!!!!!!!!!
_###################
EasyLink buttons
You can control
buttons
EasyLink-compliant
on the remote
control
devices with the following
When
of your TV.
Button
EasyLink function
_||
Starts, pauses or resumes playback on your
(Play/Pause)
EasyLink device.
•
[] (Stop)
Stops playback on your EasyLink device.
@ (Record)
Starts or stops video
device.
(Fast
Searches
enabled, this feature
content
Audio
recording
automatically
from an EasyLink-compiiant
is played through
[Master
turns off TV speakers when
home theater
system is played.
the speakers of the home theater
EasyLink]
must
menu
available,
Speakers]
be activated
in the
[Preferences]
menu
system.
to make the
[TV
on your EasyLink
backward,
Backward)
I_
to EasyLink mode
SetTV speakers
1
Press MENU/EXIT.
_-
Press the Navigation
buttons
to select [TV settings]
> [Sound].
L_ The [Sound] menu appears.
(Fast
Forward)
Searches
forward.
0-9 (Numeric
When
EasyLink
buttons)
chapter
is enabled,
AT41_
Navigates through
OK
compliant device.
Activates a selection
3
a title,
Select [TV Speakers].
L_ The [TV Speakers] menu appears.
the menus of the EasyLink-
4
Select [Speakers
EasyLink].
L_ TV speakers are set to EasyLink mode.
or accesses the menu of
the EasyLink-compiiant
OPTIONS
setects
or track.
5
Press MENU/EXITto
exit.
device.
Displays the menus of the EasyLink-compliant
device. Note that when MENU/EXIT
is pressed,
the TV menu is displayed.
(b(Standby-On)
When
Use the
demo
mode
EasyLink is enabled, switches the TV and
all EasyLink devices to standby. Note that you
must press and hold d3 (Standby-On)
3 seconds for this to occur.
for at beast
You can use demonstrations to better understand the features of your
TV. Some demos are not available on certain models.When a demo is
available, it is displayed in the menu list.
t
Press MENU
on the remote
control and select [Features]
>
[Demo].
"
Press the
TV button
to switch
back to the
antenna
source fl-om
EasyLink
mode,
TV menu
Features
Demo
Enable or disable EasyLink
"
Do not enable
EasyLink
if you do not
intend
to use it,
t
Press MENU/EXIT
on the remote
control.
2
Select [Installation]
> [Preferences]
3
Press A or T to select [On] or [Off].
> [Master EasyLink].
*In selected models only
Enable or disable remote control key forwarding
t
Press MENU/EXIT.
2
Select [Features]
3
Press OK.
4
Press A or T to highlight an HDMI
5
Press OK to enable RC key forwarding
> [RC Key Forwarding].
connector.
for the selected HDMI
CONNeCtOR
"
When
between
24
EN
RC key forvvardhqg
the
HDNI
is enabled
connector
for an HDINI
and the
connection
connector,
label when
the _)
icon appears
you press SOURCE,
_-
Press A or v to highlight a demo, and press OK to start the
demo.
3
Follow the on-screen
instructions
4
Press MENU/EXITto
exit.
to enjoy the demo.
7
Install channels
Installation
Channels
The first time you setup yourTV, you are prompted
to select a menu
::ii_!!!!!!!!!!!!!!!!!
Autoprogram
Autoprogram
iiiiiiiiiiiiiiiiiiiiiiiiiiiii
....
language and to install TV and digital radio channels (if available).This
chapter provides instructions
Select your
t
menu language
Press MENU/EXIT
[Installation]
on how to reinstall and fine tune channels.
on the remote
control and select
> [Language].
TV menu
2
Installation
Language
Press OK to start the installation.
•
If you run [Autoprogram]
enteryour
•
3
on locked channels, you must to
PIN code.
If you have forgotten
your PIN, reset it.
Select [Cable] or [Antenna]
and press OK.
TV installation
_-
Select a language and press OK to confirm
3
Press 41to return to the [Installation]
Set your
location
your choice.
menu.
to home
You can set the location ofyourTV
to home or retail store. Choose
home so that you can change the predefined settings for picture and
sound.
t
Press MENU/EXIT
[installation]
on the remote
> [Preferences]
control and select
•
> [Location].
2
Select [Home]
3
Press 4 to return to the [Installation]
and press OK to confirm
When
[Antenna]
is selected, the TV detects antenna signals.
It searches for NTSC and ATSC channels available in your
your choice.
area.
menu.
•
When
[Cable] is selected, the TV detects signals supplied
by cable. It searches for NTSC, ATSC, and QAN
modulated
channels available in your area.
Automatically
install
•
channels
t
Press MENU/EXIT
[Installation]
on the remote
this message appears [Channel
search
completed.].
Before you install channels, ensure that you are registered with your
cableTV provider and that your equipment
When complete,
is correctly
4
Follow the on-screen instructions
to complete
the installation.
connected.
control and select
> [Channels] > [Autoprogram]
> [Start now].
Optimize
antenna
the signal quality from your
You can optimize your signal quality by tuning in ATSC channels with
weal< signals, and adjusting the antenna.
t
Press MENU/EXIT
[Installation]
on the remote
control and select
> [Channels] > [Installation mode] mode.
2
Select [Antenna]
3
Press A and I_ to enter
4
Highlight a channel from the list of TV channels and press the
green color button
L_
and press 4 to confirm
[Weak
your choice.
channel installation].
on the remote
control.
The signal strength for the channel is displayed.
EN
15
5
Adjust your antenna to maximize the signal strength,
6
Press MENU/EXITto
Show emergency
alerts
(EAS)
exit,
The SCTEI8 standard defines an emergency alert signaling method for
use by cableTV
Uninstall
and reinstall
systems. EAS can be broadcast to digital devices such as
digital set-top boxes, digitalTVs, and digitalVCRs.
channels
The EAS scheme allows a cable operator to disseminate information
When you uninstall a channel, you remove it from the list of stored
channels. Uninstalled
channels are not reinstalled during an installation
update.
t
Press MENU/EXIT
[Installation]
on the remote
> [Channels]
control
> [Uninstalt
and select
channels],
related to state and local emergencies and warnings.
EAS contain the following
information:
•
•
Emergency alert text
Start time and date
•
End time and date
•
Priority
EAS with priority
maximum
or high are always displayed on yourTV.
However, you can configure yourTV
Installation
medium
Channels
Uninstall channels
not to show EAS messages with
or low priority.
EAS is not possible with a multimedia
browser
or with analog video
SOUrCeS,
You can always remove the message from the screen.The message
display overlaps menus and other messages on the screen.
t
Press MENU/EXIT
[Installation]
on the remote
> [Preferences]
control
and select
> [Show emergency
alerts],
Installation
Preferences
2
3
Press I_ to enter the list of stored channels.
Press A or T to select the channel you want to uninstall, and
press the green key on the remote
4
Show emergency alerts
The channel is removed
control.
from the channel list. Press the green
key again to reinstall the channel.
5
Press MENU/EXIT
Return
your
to exit.
settings
to
default
values
2
When you return picture and sound settings to their default values the
Highlight
[Always]:
•
[Skip low priority]:
channel installation settings are not affected.
t
Press MENU/EXIT
[Installation]
on the remote
control
and select
•
Reset AV settings
Press I_ to highlight [Start now], and press OK to resetthe
picture and sound settings.
3
Press MENU/EXIT
16
EN
to exit.
[Skip medium/low
priority
3
4
TV menu
2
Displays all emergency
alert messages
Shows all messages except
low priority
messages
> [Reset AV settings].
Installation
an option:
•
priority]:
messages only
Press _t to confirm
your choice,
Press MENU/EXIT
to exit.
Shows maximum
and high
8
Download
Update your TV software
t
Philips continuously
recommend
available.
tries to improve its products and we strongly
that you update theTV
_-
software when updates are
TV (e,g, 42PFL5603D/27)
Check
your
from
website. Use the type number of your
software
on the remote control and select [Installation]
[Current
info].
software
of the current software
>
Copy the autorun.upg
t
?###################
file to the root directory
of the USB
software
upgrade (see 'Prepare for the software
upgrade' on page 27).
Connect
TV.
your USB device to the USB port on the side of your
TheTV scans the USB device for the updated software and
automatically
3
Installation
4
5
enters upgrade mode.
Read the on-screen instructions
continue with the installation.
When the software
device,
upgrade
and confirm
is complete,
that you want to
remove the USB
Turn the TV off and on again.
L_
for the software
related to your TV and download
the Zl P-file.
Prepare the software
L_
TV menu
:::ii_!!!!!!!!!!!!!!!!
device.
2
is
and go to www.phifips.com/
upgrade file to your PC.
Decompress
displayed.
Prepare
and software
4
Upgrade
version
Press MENU/EXIT
L_ The version and a description
Find information
3
to find information,
current
i{i3iiiiii
On your PC, open a web browser
welcome.
the latest software
New software can be obtained from your dealer or downloaded
the www, phifips.com/welcome
the software
TheTV starts up with the new software.
upgrade
You require the following equipment:
A PC with web browsing capability.
•
•
An archive utility that supports
Windows
A USB memory
•
" Only
FAT/DOS
•
software
New
(e.g. WinZip
for
stick.
formatted
portable
can be obtained
www.philips.com/welcome
•
the ZIP-format
or Stufflt for Mac OS).
Use only software
memory
fi_om your
is supported.
dealer
or can be downloaded
fi_om the
website.
upgrades
that can be found
on the Philips
web site,
Warning
•
Do not
remove
•
If there
is a power
the USB device
drop
during
the TV, The TV continues
•
If you try to upgrade
confirmation
message
during
the
software
the upgrade,
the upgrade
to a software
is displayed,
do not
as soon
version
lower
Downgrade
upgrade.
remove
as the
the USB device
power
than the
to older
comes
currerlt
software
from
back.
version,
a
only in case of real
necessity.
•
If an error
occurs
during
the
upgrade,
retry
the procedure
or- contact
your
dealer
EN
27
9
Connect devices
(_
AV3S-VIDEO
with Audio
(back): S-Video
L/R connectors
(bad<) input connector
for camcorder,
to be used
game console, etc.
When you use the S-Video (bad<) for video signals, do not use
Composite
video (back) for video signals.
This section describes how to connect various devices with different
connectors
and supplements
examples provided
HDbll
in the Quick Start.
1/2/3: Digital audio and video input from high-definition
digital devices such as Blu-ray players.
H
Caution
Side connectors
"
•
Disconnect
Different
the mains cord
types
depending
before
of connectors
on availability
Connection
connecting
devices.
may be used to connect
and your
a device
to your
TV,
needs.
overview
2
Back connecl:ors
75_
"iF
_VANTENNA
1
SJVIDEO
3
HDMI 4
4
--: ®£
5
V
HDMI
V
HDMI
@ Stereo audio output to headphones or earphones.
@ Composite video: Video input for analog devices such
2
camcorder,
®
S-Video
(side) to be used with Audio
camcorder,
as DVD,
game console, etc. To be used with audio input.
game console, etc. When
L/R connectors
for
you use the S-Video (side)
for video signals, do not use the Composite
video (side) input for
video signals.
®
(_)
AUDIO
OUT
L/R : Analog audio outputto
home theaters
and
other audio systems.
Signal input from
an antenna, cable or satellite.
(_
AV1 and AV2: Video input from
analog devices such as DVD,
receiver, game console, etc. This connector
is used with audio
input.
(_
AV3 Composite
video (back): Video
such as DVD, camcorder,
input for analog devices
game console, etc. To be used with
audio input.
(_
For use by service personnel
(_)
Digital audio output
to home theaters
systems. For connection
(_
Audio
28
EN
only.
input for HDMI3.
and other digital audio
to home theatre
systems.
4 (side): Digital audio and video input from high-definition
digital devices such as Blu-ray players.
®
@
HDbll
Data input from USB storage devices.
Select
your
connection
Composite - Basic quality
quality
iiiiiiiiii:i:i_i22222211{l
x:ii_!!!!!!!!!!!!!!!!
HDMI - Highest quality
_//////////////////////////////////////
Composite video/audio cable (yellow/red/white)
For analog connections. Composite cables usually combine a yellow
video cable with a red/white audio L/R cable. Match the cable colors
Supports high-definition
signals and gives highest picture and sound
quality. Video and audio signals are combined
use HDMI for full high-definition
•
To connect
separate
to a PC without
an HDHI
in one cable, You must
video and to enable Phifips EasyLink.
connector;
when you connect to the TV.
use a DVI HDHI
adaptor
and a
audio cable.
Label your connections
When you connect devices, you can label the connections
t
Press MENU/EXIT
[Installation]
•
Philips
HDMI
is a form
supports
of Digital
I-tighbandwidth
Rights Management
Digital
Contents
that protects
Protection
high definition
(HDCP).
HDCP
content
in DVD
Installation
control and select
Source labels
(Y Pb Pr) - High quality
Component video cable (red/green/blue) and audio L/R cable (red/white)
Supports high-definition
HDMI.
on the remote
> [Source labels],
TV menu
or- Blu ray Discs,
Component
to help you
to identify where devices are connected.
Component
signals but gives lower picture quality than
cables combine
a red/green/blue
Press i_ to enter the list of available connections.
3
Press A or T to highlight a connection
4
Press I_ to enter the list of devices for the connection,
in the list.
and press
A or T to highlight a device.
video cable
with a red/white audio L/R cable. Match the cable colors when you
connect to the TV.
S-Video - Good
2
5
Press 4 to confirm
6
Press MENU/EXlTto
your choice.
exit.
quality
S Video cable and audio L/R cable (red/white)
For analog connections.
L/R cable.
Use an S-Video cable together
with an audio
EN
29
Connect
Connect a set-top box, DVD player/recorder
console via HDMI
your devices
and game
This section describes how to connect a selection of devices with
different connectors, Different types of connectors
75_
_r"
can be used to
connect a device to yourTV, The following sections describe examples
only, other configurations
are possible.
When you connect composite or component
colors to the connectors on theTV,
Connect a DVD player/recorder
connectors
cables, match the cable
llo ;®®1 II
via composite
r® ® :;::01_
................9
Connect a DVD player/recorder via HDMI-DVI
DIGITAL AUDIO OUT connectors
OUT
"li _
and
w Am_NN_
TV
RF IN
Do not place your recorder too close to the screen because some
recorders
can be susceptible to sisnals,
AUDIO
IN
__
o_/odo R_OUT'_r"
iii!iiii!i
i_{i_
TV
=_
Connect
"11" BFIII
a set-top
box via a composite
connector
L÷ B÷VlDEO
If your recorder
has an S-VHS video jack: For improved
quality, connect an S-Video cable with the S-Video
picture
input. Connect
the audio cables to the audio L and R input jacks of AV3/side AV.
•
When
you use an S Video
AV video
connector,
do not
connect
any device
to the
2L
AV3/side
jack,
If you use mono equipment,
the left loudspeaker
reproduces
but the right speaker does not. Use a mono to stereo adapter
supplied) for sound reproduction
via all internal
sound
(not
IV
loudspeakers.
If your device has an S-VHS video jack, improve the picture quality as
follows:
•
30
EN
Connect
an S-Video cable to the S-Video input of AV3/side AV
•
Connect the audio cables to the audio L and R input jacks of
AV3/side AV,
When
you use the S-Video connector,
the video jack ofAV3
orthe
Only the left loudspeaker
do not connect any device to
Connect
i,+:iiii_
a PC with an S-Video connector
at the back
:::ii_!!!!!!!!!!!!!
side AV.
reproduces
sound for mono equipment
Use a mono to stereo adapter (not supplied)
via all internal
Connect a PC
for sound reproduction
?//////////////////////////////////////
TV
loudspeakers,
Connect a DVD player/recorder via component
output connectors (YPbPr) and analog audio
video
Selected TV models can display 108@, 1080p, 720p and 480p DTV
signals when connected
to a DTV set-top box. Set the output
of the
cable box to either 1080i, 1080p, 720p or 480p, A DTV signal must
be available in your area,
o
_r
WAmENmA
Connect
a PC with an S-Video connector
at the side
i: AV1 / AV2:
AUDIO L + R
7S_
ii_
i _i!}
:{_iiiii_!
ii{_
i:/_
i_
iii:,iM;;
¸/:/;:,i !!!! !!!
TV
YPbPr
TV _l
+7
AUDIO
S VIDEO
Connect
a digital
home
theater
amplifier
ilililil
Connect
a PC with a DVI connector
75_
7rWANTENNA
R
®
L®
®
P_
TV
_11 ..../
ou+| +AUDIO
OUT
II Es+
viDEo
Y@
m
v HDM]1
v
HDMI
2
[®1_®
® +®1
®1_
AUDIO
IN
_®® :::::o1_
_J
D,,_, _j
M
d
/
AUDIO
DiGiTAL
_ AUDIO
\
• l=
ol
TV
For legal reasons, the digital audio signal can be muted for copyprotected
through
PCM audio qualities on accessory devices connected
HDMI,
EN
31
Connect
a PC with
an HDHI
connector
HDMI
32
EN
10 Troubleshooting
Problem
Possible cause and solution
No power or
The TV is not connected to the power.
Press (5 atthe side of the TV or on the remote
indicator
light.
No sound
Volume level is setto zero - increase the volume
on the TV
Sound is muted - press MUTE on the remote control,
loudspeaker.
Headphones
described
control,
Ensure that the power cord is connected
the TV power connector
outlet,
tightly to
Connect the TV to a different
HDCP authentication faik
Audio
power socket outlet.
Ensure that your HDMI cable is certified.
Press SOURCE on the remote control to switch to
connection.
another
source and then switch back to the HDMI
Reset the accessory device and the TV.
Turn on the TV.
HDMI
Standard definition
high definition
component
the PC.
Connect a DVI-HDN
on the TV.
Connect
the HDMI
cable
or
No picture or sound - ensure you have selected
the correct channel.
control,
Batteries are installed incorrectly,
respond to the
remote control.
powen
Ensure the indicator
compliant and are connected to your TV via an
HDMI cable. Not all brands of devices such as DVD
an electronic
buttons,
are inserted
control.
correctly
outlet, wait 60 seconds and reconnect
cord.
stretched
the best picture format.
on the remote
the power
control to select
or has black
copy of this manual:
1
Point your browser
_-
Choose your country
3
Enter the model number
and
Remove the power cord from the power socket
Broadcast video format.
to www.philips.com/support.
4
Clickthe
description
5
Under Product support,
Contact
green, or the
mostly red and
Ensure all the connections
the color code,
picture misses
red when
Push the component cables all the way into the
YPbPr sockets on the TV.
connected
an
dick User manuals.
us
If the problem
connection,
in the "Find your
you can browse the catalogue.
or model.
or top.
Insecure/incorrect
or a keyword
field. Alternatively,
www, philips.com/su pport.
is
of location.
product"
For some accessory devices, the picture format
bars on the side must be set in the accessory device.
The picture
copy
or low battery
light on the TV blinks when
The picture
is distorted,
devices are EasyLink
IN
do not need to be replaced.
Press FORMAT
your TV and
connected
To obtain an electronic
Ensure that the batteries
again.
Confirm that the connected
and select
Ensure that you are using the TV remote
out,
connection, perform the auto-installation
Cannot control
Download
TV does not
source input.
devices with one players use the same system as Philips EasyLink.
remote control.
Other brands might not work with Philips EasyLink.
3 port
3 source.
control
cables.
If the TV is connected directly to the wall via a coaxial
or an audio
an audio cable to the DVI AUDIO
you press the remote
or HDMI
set the TV to the correct
cable to the HDNI
port on the TV.
Press SOURCE on the remote
channels are not as clear as
channels - connect the devices via
connection,
channel.
An incorrect HDMI port is connected
cable is not connected.
some accessory
Incomplete channel installation
If the TV receives channels via an AV connection,
powered on, unplug either end of the HDMI
and then reinsert the cable.
from
For HDNI connections,
quality with
a coaxial
While the TV and the accessory device are
No sound is
your devices (see 'Connect
output setting for the accessory device is
Bad picture
Turn on the accessory device.
detected
_###################
devices have an HDMI audio output setting that
must be turned on for HDNI to HDNI connections,
No picture
sound.
source,
in Connect
incorrect,
the power
with HDNI
Selectthe
x:ii_!!!!!!!!!!!!!!!!
cable, ensure that you have not crossed the red
audio cable with the red video cable.
Remove the power cord from the power socket
Error message
on the screen
- ensure that
your devices' on page 30). If you use a component
and to the power socket
outlet, wait 60 seconds and reconnect
cord.
are connected
headphones are not plugged into the TV.
Audio cable is not connected - for AV connection,
ensure that the Audio L/R cable is connected as
If you cannot resolve your problem, refer to the FAQ for this TV at
remains unresolved, contact the Customer
Support
Center in your country.
are made according to
Warning
•
to
Do not
attempt
damage
to your- TV or void your
to repair
the
TV yourselfi
This may cause severe
injury,
irreparable
warranty,
accessory
device via
component
cables.
"
Please have available
numbers
are available
your
TV model
and serial
number
on the back and side of your
before
contacti%
TV, as well
as on the
us, These
packaging,
EN
33
11 Notes for the use of USB
devices
Digital Content
•
supported.
formatted
(initialized)
Errors in this formatting
If such problems
it (pictures,
portable
memory
is
appear try to re-format
the card. Be
the card will also delete all the content
on
music .... ).
The following
file types are supported:
Only linearjPEG
picture formats
JPEG and JPEG2000 encodings
,jpg, ,jpeg, ,rap3, ,alb, ,m3u
are supported.
The length of a filename
•
length specified by the FAT16/32 file systems.
Max. levels of nested directories is I9.
•
Never use the supported
or directory
name is limited to the
file type extensions
.rap3, .alb, .m3u and .pls) as extensions
directories
will be treated
Progressive
are not supported.
•
•
as corrupted
The MP3 decoder does not support
(.jpg, .jpeg,
for directories
as these
files.
MPEG1 Layer 1 or Layer 2
playback.
•
Mr3 Pro files can be played with normal
•
The access and response time of the content
differ depending
•
Mr3 quality,
on a device can
on the type or brand of the device,
The access and response time of the content
on a device will
increase the more
device.
files are on the
unsupported
or corrupted
Digital Camera Issues
•
If a USB connection
isn't working,
between
your digital camera and the TV
you can try the solutions
below to resolve your
problem.
•
Make sure your digital camera is switched
configuration
(see the manual of
information).
Some digital cameras allow you to switch off the USB interface.
Make sure that the USB interface is switched on before
connecting
•
on and verify if the
of your digital camera is correct
your digital camera for more
•
to the TV.
If you have a digital camera with only internal memory
removable
memory)
a USB memory
you can try to copy the content
device (e.g. Philips KEY product)
(no
manually to
using a personal
computer.
•
Some digital cameras allow you to switch between
Transfer Protocol)
•
PTP (Picture
or "PC Link" and USB Mass Storage or "PC
Drive".
Make sure that you select USB Mass Storage or "PC
Drive"
on your digital camera.
If your camera supports
different
interface
settings be sure to try
them one by one or contact the reseller of your camera to find
out the correct
USB Memory
•
setting.
Device Issues
Devices connected
to the USB port of your TV must be "Mass
Storage Class" compliant.
player, portable
compliant
TV.
•
If your device (digital camera. Mr3
hard disk .... ) is not "Mass Storage Class"
it will not be detected
The following
by the content
browser
of the
subsets of the Mass Storage Class specification
are
supported:
•
The implementation
of the TV is based on the "Universal
Bus Mass Storage Class Specification
Overview"
Serial
(vl.2, june 23,
2003) including all documents referenced by the document. The
document can be found on the USB standardization
website
(www.usb.org).
34
EN
Full support of SubClass Code -- 06h; SCSI transparent
command set.
of SubClass Code = OSh; SFF-8070i spec.
•
For large USB memory
external
proper
devices, when you are in the Content
it may take a long time before you can access your files.
using a USB portable
power consumption
and .pls.
•
Full support
When
Transport
-- SOb),
•
•
can result in unreadable
of the USB Mass Storage Class Bulk-Only
•
Browser,
aware that formatting
•
Full support
(blnterfaceProtocol
Issues
Only FAT (DOS)
content.
•
hard disk, and due to the high
of the hard disk, it is advised to use the
power supply of the portable
working
under all conditions
hard disk to guarantee
12 Product
information
:::ii_!!!!!!!!!!!!!!!!
_###################
•
Product
Mformation
is subject
to change without
prior
notice.
Picture enhancement
Type:
1080p 120Hz
Brightness:
500 cd/m2_
Aspect
I6:9
Ratio:
Viewing
Angles;
178 (V) by 178 (H)
Built-in digital tuner:
Dynamic Dimming
Ambient
Sound
ATSC/QAN
BL:
Yes
Light Sensor:
Yes
enhancement
iViono/Stereo:
Power output
iViono, Stereo, Incredible surround
(RNS Watts):
Equalizer:
20 W
5 band
Ease of use
Video
modes:
Automatic,
4:3, Novie
Expand 14:9,
Novie Expand 16:9, Super Zoom, Wide
Screen, Unscaled
PC input:
via HDNI
Photo Slideshow:
Yes (JPEG files only)
NP3 Playback:
Yes (NP3 files only)
Video
Yes (NPEG, WNV,
Playback:
AVI, NP4)
Connections
Component video input
with Audio L/R:
2, supporting
I080i, I080p
Composite video input with
audio L/R and S-Video:
2
HDNI:
4
verl.3a
HDNI
4801/p, 5761/p, 720p,
@24Hz-BOHz
supporting
video: 48@/
p, 576i/p, 720p, 108@, 1080p @24Hz60Hz
PC-input:
up to WUXGA
Digital audio out:
Yes, supporting
Headphone:
I (on the side of TV)
AC-3 and PCM
USB:
I (on the side of TV)
Power
Auto
multi-voltage:
110V-240V-/50-60
Hz
EN
35
13
Warranty
WARRANTY
COVERAGE:
This warranty
below.
obligation
is limited to the terms as set forth
or (e) product, accessories or consumables sold "AS IS" without
warranty of any kind by including refurbished product sold "AS
WHO ISCOVERED:
This product warranty is issued to the original purchaser or the
person receiving the product as a gift against defects in materials
and workmanship as basedon the date of original purchase
("Warranty Period") from an Authorized Dealer. The original
sales receipt showing the product name and the purchase date
from an authorized retailer is considered such proof.
WHAT
or a part that has been modified without written company permission, or (d) if any serial number has been removed or defaced,
IS" by some retailers.
This Limited Warranty
does not cover:
•
•
Shipping charges to return defective product.
Labor charges for installation or setup of the product, adjust-
•
ment of customer controls on the product, and installation or
repair of antenna/signal source systems outside of the product.
Product repair and/or part replacement because of improper
IS COVERED:
This warranty covers new products if a defect in material or
workmanship occurs and a valid claim is received within the
installation or maintenance, connections to improper voltage
supply, power line surge, lightning damage, retained images or
screen markings resulting from viewing fixed stationary con-
Warranty
Period. At its option, the company will either (I)
repair the product at no charge, using new or refurbished
tent for extended periods, product cosmetic appearance items
due to normal wear and tear, unauthorized repair or other
replacement parts, or (2) exchange the product with a product
that is new or which has been manufactured from new, or serviceable used parts and is at least functionally equivalent or most
comparable to the original product in current inventory, or (3)
refund the original purchase price of the product.
Replacement products or parts provided under this warranty are
covered against defects in materials and workmanship from the
date of the replacement or repair for ninety (90) days or for the
remaining portion of the original product's warranty, whichever
provides longer coverage for you. When a product or part is
exchanged, any replacement item becomes your property and the
replaced item becomes company property. When a refund is
given, your product becomes company property.
Note: Any product sold and identified as refurbished
renewed carries a ninety (90) day limited warranty.
or
Replacement product can only be sent if all warranty
requirements are met. Failure to follow all requirements
can result in delay.
•
cause not within the control of the company.
Damage or claims for products not being available for use, or
for lost data or lost software.
•
Damage from mishandled
returning product.
•
A product that requires modification or adaptation to enable
it to operate in any country other than the country for which
it was designed, manufactured, approved and/or authorized, or
•
shipments or transit accidents when
repair of products damaged by these modifications.
A product used for commercial or institutional purposes
•
(including but not limited to rental purposes).
Product lost in shipment and no signature verification
can be provided.
•
Failure to operate
per Owner's
receipt
Manual.
TO OBTAIN ASSISTANCE...
Contact the Customer Care Center at:
1-866-771-4018
aged with the bundled product.
REPAIROR REPLACEMENTAS PROVIDED UNDER THIS
WARRANTY ISTHE EXCLUSIVE REMEDY FOR THE CONSUMER,WITH THE ISSUING COMPANY NOT LIABLE FOR
ANY INCIDENTAL OR CONSEQUENTIAL DAMAGES FOR
BREACH OF ANY EXPRESSOR IMPLIED WARRANTY ON
THIS PRODUCT. EXCEPT TO THE EXTENT PROHIBITED BY
APPLICABLE LAW, ANY IMPLIED WARRANTY OF MERCHANTABILITY OR FITNESSFOR A PARTICULAR PURPOSE
ON THIS PRODUCT IS LIMITED IN DURATION TO THE
DURATION OF THIS WARRANTY.
WHAT
IS NOT
COVERED
- EXCLUSIONS
AND
LIMI-
TATIONS:
This Limited Warranty
applies only to new company manufac-
tured products that can be identified by the trademark, trade
name, or logo affixed to it. This Limited Warranty does not apply
to any hardware product or any software, even if packaged or
sold with the product, as manufacturers, suppliers, or publishers
may provide a separate warranty for their own products pack-
The company is not liable for any damage to or loss of any pro-
Some states do not allow the exclusions or limitation
grams, data, or other information stored on any media contained
within the product, or other additional product or part not cov-
tal or consequential damages, or allow limitations on how long an
implied warranty lasts, so the above limitations or exclusions may
of inciden-
ered by this warranty. Recovery or reinstallation of programs,
data or other information is not covered under this Limited
not apply to you.
Warranty.
This warranty
does not apply (a) to damage caused by accident,
abuse, misuse, neglect, misapplication, or non-supplied product,
(b) to damage caused by service performed by anyone other than
company approved Authorized
Service Location, (c) to a product
Thiswarrantygives you specificlegal rights, Youmay haveother rights whichvary from state/provinceto state/province.
0908
36
EN
14
Index
P
A
Parental control
child loci<
16
;ii_!!!!!!!!!!!!!!!!!!
PC
23
iiiiiiii!_mmmmmmu!!!!ili
iii({;i:i:i_122222211@
Picture format
14
14
8
Picture settings
Power
14
C
R
Cables
component
29
Ratings
Remote control
composite
HDNI
29
insert batteries
29
overview
quality
S-Video
29
YPbPr
29
Active Control
Antenna
17, 18
8
6
10
Retail store mode
29
Channels
favorite
9
list
15
S
Settings assistant
Side controls
13
17
16
Child loci<
lock channels
PIN code
16
ratings loci<
Clock
17
Sleep timer
Slideshow
15
Software
Closed captions
19
Sound settings
Component
29
Standby
Subtitles
cable
Composite cable
Connections
29
6
2I
27
14, 15
6,1I
19
S-Video
29
8
antenna
29
quality
D
24
20
Semo
DivX
T
Technical specifcations
Timer
35
Troubleshooting
TV
33
15
as PC monitor
connections
E
23
8, 28, 3I, 32
controls
23
EasyLink
Eco TV
Environmental
14, 15
care
5
F
Favorite list
22
menu
13
position
8
ratings
remote
17
screen
15
6
in High Definition
control
6,8
5
care
software
27
switch channels
H
switch on
HDMI
cable
Home mode
29
10, 25
troubleshooting
11
10,1I
33
U
L
USB
Location
20, 34
10, 25
V
M
Video
Menu
Volume
child loci<
quick access menu
NPEG artifact reduction
16
adjust
13
automatic
delta
14
22
11
15
leveling
15
11
mute
Nusic
USB
2I
with slideshow
21
Y
29
YPbPr
N
Noise reduction
14
EN
37
Pl I[I P5
© 2009 Koninklijke
Phitips Electronics
All rights reserved.
Document order number:
N.V.
3139 125 40861