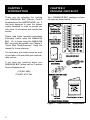
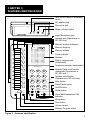
1
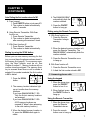
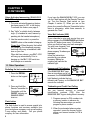
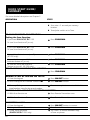
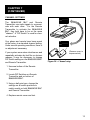
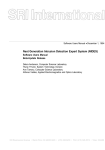
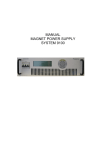
RC
DIALOGUE RC
REMOTE CONTROL
SPEAKERPHONE
Model RC-100 and RC-200
Operating Instructions
520001
© AMERIPHONE 1/03 RC M0168
2
∆
IMPORTANT SAFETY INSTRUCTIONS
When using your telephone equipment, always follow
basic safety precautions to reduce the risk of fire, electric shock, and injury to persons, including the following:
1. Read and understand all Instructions. Observe all
warnings and other markings on the product.
2. During thunderstorms, avoid using telephones
except cordless models. There may be a slight
chance of electric shock from lightning.
3. Do not use a telephone near a gas leak. If you
suspect a gas leak, report it immediately, but use
a telephone away from the area where gas is
leaking.
4. Do not use this product near water, or when you
are wet. For example, do not use it in a wet basement or shower, or next to a swimming pool, bathtub, kitchen sink or laundry tub. Do not use
liquids or aerosol sprays for cleaning. If the
product comes in contact with any liquids, unplug
any line or power cord immediately. Do not plug
the product back in until it has dried thoroughly.
5. Install this product in a protected location where
no one can trip over any line or power cord.
Protect cords from damage or abrasion.
6. If this product does not operate normally, read “In
Case of Difficulty” on page 12. If you cannot
resolve the problem, or if the product is damaged,
refer to the Ameriphone Warranty. Do not open
this product except as may be directed in this
owner’s manual. Opening this product or
reassembling it incorrectly may expose you to
hazardous voltages or other risks. Opening this
product automatically voids the warranty.
7. If this product uses batteries as power back-up
during power outages, replace batteries only as
described in this owner’s manual. Do not burn or
puncture used batteries — they contain caustic
chemicals.
8. Unplug this product from the wall outlet and refer
servicing to qualified service personnel under the
following conditions:
A. When the power supply cord or plug is
damaged or frayed.
B. If liquid has been spilled on the product.
C. If the product has been exposed to rain or
water.
D. If the product does not operate normally by
following the operating instructions. Adjust
only those controls that are covered by the
operating instructions because improper
adjustment of other controls may result in
further damage.
E. If the product has been dropped or appears
damaged.
F. If the product exhibits a distinct change in
performance.
9. If this product has a polarized plug with one wide
prong, it may not fit in non-polarized outlets. Do not
defeat the purpose of these plugs. If they do not
fit in your outlet, the outlet should be replaced by an
electrician.
ADDITIONAL SAFETY NOTES FOR CANADIAN USERS
NOTICE: The Canadian Department of
Communications label identifies certified equipment.
This certification means that the equipment meets
certain telecommunications network protective, operational and safety requirements. The department does
not guarantee the equipment will operate to the user's
satisfaction.
Before installing the equipment, users should ensure
that it is permissible to be connected to the facilities
of the local telecommunications company. The
equipment must also be installed using an acceptable
method of connection. The customer should be aware
that compliance with the above conditions may not
prevent degradation of service in some situations.
Repairs to certified equipment should be made by an
authorized Canadian maintenance facility designated
by the supplier. Any repairs or alteration made by the
user to this equipment, or equipment malfunctions,
may give the telecommunications company cause to
request the user to disconnect the equipment.
Users should ensure for their own protection that the
electrical ground connections of the power utility,
telephone lines and internal metallic water pipe
system, if present, are connected together. This
precaution may be particularly important in rural
areas.
CAUTION: Users should not attempt to make such
connections themselves, but should contact the
appropriate electric inspection authority, or electrician, as soon as possible.
NOTICE: The LOAD NUMBER (LN) assigned to
each terminal device denotes the percentage of the
total load to be connected to a telephone loop which
is used by the device, to prevent overloading. The
termination on a loop may consist of any combination
of devices subject only to the requirement that the
sum of the load numbers of all devices does not
exceed 100.
SAVE THESE INSTRUCTIONS
TABLE OF CONTENTS
CHAPTER 1. INTRODUCTION ..............................................................................................2
CHAPTER 2. PACKAGE CHECKLIST ..................................................................................2
CHAPTER 3. FEATURES IDENTIFICATION ..........................................................................3
CHAPTER 4. INSTALLATION ................................................................................................4
A. Batteries ....................................................................................................4
B. Connections ..............................................................................................4
C. Setting Up Your RC ..................................................................................4
CHAPTER 5. OPERATION ....................................................................................................6
A. Programming Numbers Into Memory ........................................................6
B. Making Phone Calls ..................................................................................6
1. Dialing on the keypad ..................................................................6
2. Memory dialing from console ........................................................6
3. Auto dialing the first number stored in M1 ....................................7
4. Dialing using the Scan button ......................................................7
5. Dialing using the Remote Transmitter ..........................................7
C. Answering Phone Calls ............................................................................7
1. Using the keypad ..........................................................................7
2. Using the Remote Transmitter ......................................................7
3. Voice activated answering ............................................................8
D. Other Operations ......................................................................................8
1. Redialing ......................................................................................8
2. Flash ............................................................................................8
3. Voice mail indicator ......................................................................8
4. Unanswered call indicator ............................................................8
5. Telebanking and credit card calling ..............................................8
CHAPTER 6. OPTIONAL ACCESSORIES ............................................................................9
A. Air Switch™ ..............................................................................................9
B. Pillow Switch..............................................................................................9
C. Lapel Microphone......................................................................................9
D. Headset ....................................................................................................9
QUICK START GUIDE/SUMMARY ......................................................................................10
CHAPTER 7. IN CASE OF DIFFICULTY ..............................................................................12
CHAPTER 8. MAINTENANCE ..............................................................................................14
CHAPTER 9. FCC INFORMATION ......................................................................................14
CHAPTER 10. WARRANTY..................................................................................................15
CHAPTER 11. FEATURE SUMMARY ..................................................................................16
INDEX........................... ........................................................................................................16
CHAPTER 1
INTRODUCTION
Thank you for selecting the exciting
new DIALOGUE RC Remote Control
Speakerphone from AMERIPHONE, Inc. It
has been designed to meet the highest
quality standards in order to provide you
with years of convenient and trouble–free
service.
CHAPTER 2
PACKAGE CHECKLIST
Your DIALOGUE RC package includes
the items as shown below:
Please read these operating instructions
thoroughly before using the DIALOGUE
RC. Or, to begin using the DIALOGUE
RC as quickly as possible, see Chapter 5
"Quick Start Guide/Summary". Keep this
manual for future reference.
You must save your sales receipt as proof
of purchase in the event that you need warranty service.
If you have any questions about your
DIALOGUE RC, please call our Customer
Service Department at:
(714)897–0808
(714)897–4703 Fax
Figure 1 – DIALOGUE RC Components.
2
CHAPTER 3
FEATURES IDENTIFICATION
Jack for Air Switch or accessory
switch
AC adapter plug
Phone line jack
Ringer volume control
AC
ADAPTER
AIR SWITCH
PHONE
LINE
OFF LO HI
RINGER
Lapel Microphone jack
Headset port (Operational in
RC–200 only)
Memory location indicators
M1
TM
POWER
Memory directory
Memory buttons
M2
Power indicator
M3
Speaker
M4
Battery compartment
(underneath)
M5
Tone/pulse selector (underneath)
DIALOGUE R C
M6
M7
M8
M9
2
A
B
C
3
D
E
F
4
G
H
I
5
J
K
L
6
M
N
O
Headset on/off button
(Operational in RC–200 only)
7
P
R
S
8
T
U
V
9
W
X
Y
Mute button
*
0
O
P
R
M10
VOL
PROG
SCAN
Remote Flash on/off switch,
underneath (Operational in
RC–200 only,)
1
MUTE
FLASH/PAUSE
HEADSET
REDIAL
MIC
#
Flash/Pause button
On/Off button
Redial button
ON/OFF
Voice Mail/Unanswered Call
Indicator
Microphone
Scan button
Volume control
Memory Program button
Figure 2 – Features Identification
3
CHAPTER 4
INSTALLATION
A. Battery (included with RC–200)
B. Connections
Speakerphone
1. Six "AA" size,
Nickel Cadmium
(NiCad) rechargeable batteries are
used for back–up
during a power outage (Fig 3). They
power the DIALOGUE RC for Figure 3 – battery
compartment
approximately
3 hours. DO NOT USE ALKALINE
BATTERIES, they will damage your
equipment.
Remote Transmitter
2. Install the "23A" size 12V alkaline cigarette
lighter battery in the Remote Transmitter
(included) as shown (Fig 4). With normal
usage, it lasts 6–12 months. If the power
indicator light is faint or does not come on
when the button is pressed, replace the
battery. The Remote Transmitter has an
operating range of up to 40 feet.
Figure 4 – Remote Transmitter
4
Y
ER
TT
BA
Battery
compartment
Thread both
ends of necklace
through hole and
tie a small knot.
(optional)
1. Connect the phone line and AC adapter
as shown.
2. Set the tone/pulse selector (T/P) to T if
you have touch tone service, set to P if
you have pulse dialing (rotary). (See Fig 2)
The DIALOGUE RC can be placed on a desk,
or mounted on the wall. Do not put the
DIALOGUE RC on or next to metal surfaces,
computers, televisions, radios, microwaves, or
other electrical equipment that can cause interference to the wireless signal from the Remote
Transmitter.
C. Setting up your RC
The DIALOGUE RC comes with the following
operating settings from the factory:
Power
indicator
Jack for
accessory
switch
Figure 5 – Connection of phone line and
AC adapter
1. Scan rate is 5 seconds per memory
location.
2. Voice activated answering (RC–200
only) is off.
3. Unanswered call indicator is on.
4. Voice mail indicator (RC–200 only) is
off.
5. Tone/pulse switch set to Tone.
6. Ring volume set to Hi.
7. "0" (operator) is programmed into first
memory location of M1.
8. Remote flash switch (RC–200 only) is off.
CHAPTER 4
(CONTINUED)
You may set up the DIALOGUE RC in the
following manner to better suit your needs.
3. Press SCAN
button.
MUTE
VOL
PROG
SCAN
HEADSET
Setting the Scan Function
MIC
If you have DIALOGUE RC–100:
Only the first six numbers in the memory are
automatically scanned. It stops at each memory location for 5 seconds to allow you to
select.
To turn scan function off (or on):
1. Press PROGRAM.
2. Press 0 on the keypad to turn it off;
or press 1 key on the keypad to turn it on.
3. Press SCAN button.
If you have DIALOGUE RC–200:
All memory locations with numbers stored are
automatically scanned. The scan rate determines how long the DIALOGUE RC–200
pauses at each memory location before moving on to the next one.
To turn scan function on or off:
1. Press
PROGRAM.
MUT
VOL
PROG
HEAD
SCAN
MIC
Figure 6
2. Using chart, select length of pause
and press the corresponding digit on
keypad.
Key Entered
Length of Pause at Each
Location in Seconds
Scan Function Off
5
4.5
4
3.5
3
2.5
2
1.5
1
Figure 7
Figure 8
To turn Voice Activation on (or off)
(RC–200 only):
1. Press PROGRAM.
2. Press MUTE button twice. The MUTE
indicator flashes once, and the RC200 emits four beeps to confirm that
Voice Activation has been turned on.
3. To turn it off, repeat steps 1 and 2.
This command is confirmed by four
beeps.
To turn the Unanswered Call Indicator
(RC-200) feature off (or on):
1. Press PROGRAM.
2. Press HEADSET button twice.
(Emits four beeps to confirm command).
3. To turn it on again, repeat steps 1
and 2, and the HEADSET indicator
flashes once.
To turn the Voice Mail Indicator feature
on (or off), (RC–200 only):
1. Press PROGRAM.
2. Press FLASH/PAUSE button twice.
RC–200 emits four beeps and the
FLASH/PAUSE indicator flashes
once.
3. To turn it off again, repeat steps 1
and 2, and the FLASH/PAUSE
indicator does not flash.
To turn the Remote Flash feature on (or
off) (RC–200 only):
1. Slide remote flash switch to "On" (or
"Off") position.
5
CHAPTER 5
OPERATION
For optimum communication clarity, speak
into the DIALOGUE RC as close as possible, not to exceed 15 feet away. Keep the
microphone free from obstructions. Do not
speak at the same time as the other
person. Also, adjust the volume control and
set the ring volume to best suit your
hearing needs.
A. Programming numbers into memory
Your DIALOGUE RC can store up to 20
numbers (two numbers per button) in its
memory for fast, one–touch dialing. When
programming, pressing the FLASH/PAUSE
button between numbers inserts a 2 second
pause in dialing.
To program a number into memory:
1. Press PROGRAM.
MUTE
VOL
PROG
HEADSET
SCAN
B. Making phone calls
Dialing on the keypad
1. Press ON/OFF button
and listen for dial tone.
MUTE
FLASH/PAUSE
HEADSET
REDIAL
ON/OFF
MIC
Figure 11
2. Dial the number on the
keypad. (If no number
is dialed within 7
seconds, DIALOGUE
RC automatically
dials the first number
stored in memory
location M1.)
M9
M10
VOL
OG
SCAN
MUTE
FLASH/PAUSE
HEADSET
REDIAL
ON/OFF
MIC
Figure 12
3. When finished, press the ON/OFF
button to hang up.
MIC
Memory dialing from console
Figure 9
1. For the first number
stored in each memory
button, press the
memory button once.
Figure 13
For the second number,
press the memory button twice. The
indicator light on the directory shows
the memory selected.
M8
2. Dial the number (up
to 40 digits).
M9
M9
M10
M10
VOL
ROG
SCAN
MUTE
FLASH/PAUSE
HEADSET
REDIAL
MUTE
FLASH/PAUSE
HEADSET
REDIAL
VOL
ON/OFF
PROG
SCAN
ON/OFF
MIC
MIC
Figure 10
3. Select the memory button to store this
number, press once for first location,
or twice for second location. When the
number is programmed, it emits four
"beeps" to confirm the number is
stored.
4. If you make a mistake or want to
change the number, repeat from step 1.
5. To erase a number, press PROGRAM,
then FLASH/PAUSE, and then the
corresponding memory location.
6
2. The number is dialed after a 3 second
wait, allowing you time to change your
selection.
3. When finished,
press the ON/OFF
button to hang up.
MUTE
FLASH/PAUSE
HEADSET
REDIAL
ON/OFF
MIC
Figure 14
CHAPTER 5
(CONTINUED)
Auto Dialing the first number stored in M1.
A. From keypad
1. Press ON/OFF button or just press M1.
2. The number is dialed automatically
within 7 seconds.
B. Using Remote Transmitter With Scan
function on:
1. Press Remote Transmitter.
2. The number is dialed automatically
after scanning all memories 3 times.
C. With Scan function off:
1. Press Remote Transmitter.
2. The number is dialed automatically.
Dialing by using the SCAN button
Before you can use memory scanning for dialing, you must have the phone numbers stored in
the memory first (page 6). To use memory scanning, the Scan function must be on. See
Chapter 4 section C. Memory locations with no
number stored are skipped. The memory directory is scanned three times or until a number is
selected. If no number is selected, the first number
in M1 is dialed.
PROG
MUTE
FLASH/PAUSE
HEADSET
REDIAL
ON/OFF
MIC
5. Press the ON/OFF
button to hang up.
Figure 16
Dialing using the Remote Transmitter
A. With Scan function on:
1. Press the Remote
Transmitter to begin
scanning.
Figure 17
2. When the desired memory location is lit,
press the Remote Transmitter. The
DIALOGUE RC automatically dials the
number selected.
3. Press the Remote Transmitter once
to hang up.
B. With Scan function off:
1. Press the Remote Transmitter once.
2. It dials the first number stored in M1.
C. Answering phone calls
MUTE
VOL
1. Press the SCAN
button.
4. The DIALOGUE RC
automatically dials the
number selected.
SCAN
HEADSET
MIC
Figure 15
2. The memory location indicators light
up as it scrolls down the memory
locations.
If you have DIALOGUE RC–100:
Only the first six memory locations
are scanned.
If you have DIALOGUE RC–200:
All 20 memory locations are
scanned (It "beeps" when advancing
to the next memory location.)
3. When the desired memory location is
lit, press the SCAN button again to
select.
Using the keypad
1. When the phone rings,
press the ON/OFF
button to turn it on.
2. When finished, press
the ON/OFF button to
hang up.
MUTE
FLASH/PAUSE
HEADSET
REDIAL
ON/OFF
MIC
Figure 18
Using the Remote Transmitter
1. When the phone rings,
press the Remote
Transmitter to turn on.
2. Press the remote
button once to hang up.
Figure 19
7
CHAPTER 5
(CONTINUED)
Voice Activated answering (DIALOGUE
RC–200 only)
1. The voice activated Answering feature
has been preset to OFF in the factory.
To activate this feature, see page 5.
2. Say "Hello" or whistle loudly, between
rings. (If a headset is used, answer by
speaking into the headset microphone.)
3. Use the remote control, or press the
ON/OFF button on the console to hang up.
Please Note: When the party that called
you hangs up, the telephone company
switching office may re-establish a dial
tone on your line.
When dial tone returns, your RC–200
will hang up automatically. Prior to
hanging up, the RC–200 emits two
short beeps as a reminder.
D. Other Operations
MUTE
FLASH/PAUSE
HEADSET
REDIAL
ON/OFF
MIC
Figure 20
ADSET
MUTE
REDIAL
ON/OFF
FLASH/PAUSE
REDIAL
ON/OFF
If the DIALOGUE RC rings
three or more times and is not
Figure 23
answered, the FLASH/PAUSE
light flashes to indicate that you
missed a call.Turning on the DIALOGUE RC
cancels the indicator.
ON/OFF
Figure 21
Flash button
The flash button is used to access special telephone functions and services available from
your local phone company, such as call waiting,
3–way calling, and others. Call your phone
company for more information.
8
MUTE
Telebanking and Credit Card Calling
FLASH/PAUSE
REDIAL
If you subscribe to voice mail service from your
phone company, the FLASH/PAUSE light flashes
and the RC beeps (once every 3.5 minutes) to
inform you that you have voice mail messages.
You also hear a special "stutter" dial tone sent from the
FLASH/PAUSE
phone company. To retrieve your
messages,
follow the instructions
Figure 22
provided by your phone
company. Making an
outgoing call cancels the
indicator light.
ADSET
OR
2. Press and hold the
Remote Transmitter for
3 seconds, until the
ON/OFF indicator on
DIALOGUE RC
turns on.
Voice Mail Indicator (VMI)
Unanswered Call Indicator
Redialing the last number dialed
1. Press the REDIAL
button on the keypad.
If you have the DIALOGUE RC–200, you can
use the Flash feature with the Remote Transmit-ter. Turn the Remote Flash switch on (see
Chapter 4 section C). When you are on the
phone line, press the Remote Transmitter button
twice in succession, within three seconds, to
generate the “flash”.
You can transmit account or personal
identification numbers (PIN) from the
DIALOGUE RC by pre–storing them in memory.
1. Program account or PIN numbers into
a memory location in advance by
following the same steps you would
program a phone number.
2. When the automated phone system
requests it, press the memory button
where your account number or PIN is
stored.
CHAPTER 6
OPTIONAL ACCESSORIES
A. AIR SWITCH™
This Accessory
switch allows you
to place and
answer calls and
control every
function of the
Dialogue RC by
blowing gently on
its air sensor. It
snaps on to either
the rear of the
console or the
remote control for
the ultimate in
“no-touch” accessory and control.
C. LAPEL MICROPHONE
This highly
sensitive
microphone,
clips to your
collar and provides handsfree, crystal
clear, high fidelity sound for people
who have weak voices. It has a cord
that is 5 feet long.
D. HEADSET WITH MICROPHONE
Ensure the utmost privacy for personal conversations or confidential business calls. This light weight unit plugs
into the telephone with a 61/2 foot
long cord and is comfortable to wear,
even for extended periods of time.
B. PILLOW SWITCH
Plugs into the
console or the
remote control
for your convenience. Allows
you to control
phone functions
by gently touching it with your
arm, leg, head,
shoulder or
other body
movement. A 6
foot long cord
connects it easily.
For a complete catalogue, please
call or write: AMERIPHONE, Inc.,
Product Catalogue
12082 Western Ave., Garden Grove,
CA 92841
(714) 897-0808 VOICE
(714) 897-1111 TTY
(714) 897-4703 FAX
9
QUICK START GUIDE/
SUMMARY
For more detailed description see Chapter 5.
OPERATION
FACTORY PRESET MODES OF OPERATION:
TO CHANGE MODES OF OPERATION
Setting the Scan Function
If you have DIALOGUE RC-100
To turn Scan function off (or on):
If you have DIALOGUE RC-200
To turn Scan function off (or on):
To turn Voice Activation on (or off),
(RC-200 only):
To turn the Unanswered Call
Indicator feature off (or on):
To turn the Voice Mail Indicator
feature on (on off), (RC-200 only):
PROGRAMMING NUMBERS INTO MEMORY
STEPS
•
•
Scan rate = 5 seconds per memory
location.
Tone/pulse switch set to Tone.
1 Press PROGRAM.
1 Press PROGRAM.
1 Press PROGRAM.
1 Press PROGRAM.
1 Press PROGRAM.
1 Press PROGRAM.
MAKING A CALL BY DIALING ON THE RC
A. From the keypad
B. Auto Dialing the first number stored in M1
1 Press ON/OFF button.
1 Press ON/OFF button.
C. Memory Dialing
1 Press a memory button once to dial the first
stored number, twice for the second number.
MAKING A CALL USING THE REMOTE TRANSMITTER
1 Press Remote Transmitter once.
A. With Scan function on
B. With Scan function off
ANSWERING A CALL
A. From the keypad
B. Using the Remote Transmitter
C. Using Voice Activation,
(DIALOGUE RC-200 only).
10
1 Press Remote Transmitter once.
1 Press ON/OFF button to answer.
1 Press Remote Transmitter once to answer.
1 Say “Hello” or whistle between rings
to turn on phone.
•
•
Voice Activated answering
is off, (RC-200 only).
Ring volume set to Hi.
•
•
Unanswered call indicator is
on.
”0“ (operator) is programmed into
the first memory location of M1.
•
•
Voice Mail indicator is off,
(RC-200).
Remote Flash switch is off,
(RC-200 only).
2 Press 0 on the keypad to
3 Press SCAN button.
turn it off; or Press 1 key on
the keypad to turn it on.
2 Press 0 key to turn it off; or
3 Press SCAN button.
Press 1-9 keys to turn it on. See
Page 5 for rate selection guide.
2 Press MUTE twice.
2 Press HEADSET twice.
2 Press FLASH/PAUSE twice.
2 Dial the number (up to
40 digits).
2 Dial the number.
2 The number is dialed in
3 Select the memory button. Press once for first location, or
twice for second location.
3 Press ON/OFF button to hang up.
7 seconds.
2 When the desired directory
3 Press Remote Transmitter to hang up.
location is lit, press it again.
2 The first number stored
under M1 is dialed.
3 Press Remote Transmitter once to
hang up.
2 Press ON/OFF button to hang up.
2 Press Remote Transmitter once to hang up.
2 It hangs up automatically after one minute of silence or when it detects dial tone.
11
CHAPTER 7
IN CASE OF DIFFICULTY
If any problem should occur during operation of your DIALOGUE RC, review the list below.
Should the difficulty persist, contact AMERIPHONE or your authorized dealer before sending
the phone for service.
SYMPTOM
CAUSE AND REMEDY
No dial tone
– Check all phone line connections.
No power
– Check power connection.
Does not dial out
– Check all phone line connections and power
connection.
– Change to pulse dialing and try again.
Does not dial memory number
– No number programmed in memory.
Remote Transmitter does not work
– Check or replace battery.
– Check channel settings.
– Make sure no part of the DIALOGUE RC
system is on or near metal surfaces or electrical
equipment.
No audible ring
– Make sure the ringer is not set to "Off" position.
Does not scan through memory
– Turn on Scan function.
Scanning too fast/slow
– Program Scan rate to a slower/faster setting.
(Dialogue RC–200 only.)
Cuts in and out while speaking/
listening
– Avoid speaking at the same time as the other
party. Take turns.
SENSITIVITY ADJUSTMENT
YOU MUST CONTACT AMERIPHONE BEFORE MAKING THE FOLLOWING ADJUSTMENT:
Callers can’t hear your voice when
using the optional headset with
integrated microphone
12
– Turn HEADSET MIC GAIN adjustment, located
on bottom of unit, clockwise to increase
sensitivity, counterclockwise to decrease.
CHAPTER 7
(CONTINUED)
ON
MATCH EXA
C
If your system encounters interference and
repeatedly activates by itself for no obvious
reasons, it may be necessary to change
DIP Switch settings on the DIALOGUE RC
and Remote Transmitter.
SE
TO
Your phone and remote have been preset
at the factory to a standard channel setting.
Under normal operating conditions, there is
no adjustment necessary.
1 2 3 4 5 6 7 8
T
The DIALOGUE RC and Remote
Transmitter use radio signals to communicate with each other. For the Remote
Transmitter to activate the DIALOGUE
RC, they both have to be on the same
"channel." A "DIP Switch" is used for channel selection.
ON
LY
T
CHANNEL SETTINGS
1 2 3 4 5 6 7 8
(Remove cover to
expose switch)
Figure 24 – Channel setup
1. Unscrew bottom of the Remote
Transmitter.
2. Locate DIP Switches on Remote
Transmitter and on bottom of
DIALOGUE RC.
3. Using a ball point pen, change the
settings on all switch positions to
match exactly on both DIALOGUE RC
and Remote Transmitter.
4. Replace remote cover and test.
13
CHAPTER 8
MAINTENANCE
To ensure trouble–free service, your
DIALOGUE RC should always be treated
with care. Do not drop or subject the phone
to high impact. The unit can be cleaned
with a damp cloth and a mild detergent.
Never use abrasives or solvents.
Keep the unit plugged into the electrical
outlet at all times, except when cleaning.
This will automatically recharge the optional back–up batteries, and keep the phone
operational for incoming calls. We recommend using a surge protector to prevent
damage to the DIALOGUE RC in case of
power surges or electrical storms.
CHAPTER 9
FCC INFORMATION
Your local telephone company is required
by the FCC to allow you to connect FCC
registered telephone equipment to their
telephone lines.
They may ask you to provide them the
Federal Communications Commission
(FCC) registration number and the Ringer
Equivalence Number (REN) of the
DIALOGUE RC printed on the label on the
bottom of the unit.
DIALOGUE RC uses a FCC Part 15
approved transmitter and receiver. Its
operation is subject to the following two
conditions:
1. This device may not cause harmful
interference.
2. This device must accept any interference that may be received, including
interference that may cause undesired
operation.
14
CHAPTER 10
WARRANTY
This
warranty
applies
only
to
AMERIPHONE products that are purchased and used in the United States or
Canada.
AMERIPHONE,
Inc.
warrants
the
DIALOGUE RC–100 and DIALOGUE
RC–200 against any defect in materials or
workmanship for the period of one year
from the date of purchase.
If your AMERIPHONE product is defective
and returned within 30 days of the date of
purchase, your authorized AMERIPHONE
dealer will replace it at no charge.
If returned after 30 days but within one year
from the date of purchase, we will repair or
replace it at no charge. In the repair of your
DIALOGUE RC, we may use new or
reconditioned replacement parts. If we elect
to replace your DIALOGUE RC, we may
replace it with a new or reconditioned product of the same or similar design. Repair or
replacement will be warranted for either 90
days or the remaining time on the original
warranty period, whichever is longer.
Implied warranties, including those of
fitness for a particular purpose and merchantability (an unwritten warranty that the
product is fit for ordinary use), are limited to
one year from date of purchase. We will not
pay for loss of time, inconvenience, loss of
use of your DIALOGUE RC, or property
damage caused by your DIALOGUE RC
or its failure to work, or any other incidental
or consequential damages. Some states do
not allow limitations on how long an implied
warranty lasts or the exclusion of incidental
or consequential damages, so the above
exclusions or limitations may not apply to
you.
To get warranty service for your DIALOGUE
RC, you must provide proof of the purchase date. Within 30 days of the date of
purchase, return your DIALOGUE RC to
the place where you purchased it for immediate replacement. After 30 days, call
AMERIPHONE at (714) 897–0808 for the
authorized service center nearest you. You
must prepay all shipping costs. We suggest
you save the original packaging materials in
the event you need to ship the DIALOGUE
RC. When in need of warranty repair,
please call our Customer Service
Department at (800) 874-3005-VOICE or at
(800) 772-2889-TTY. They will help you
process your return shipment.
This warranty does not cover defects resulting from accidents, damage while in transit
to our service location, alterations, unauthorized repair, failure to follow instructions,
misuse, use outside the United States or
Canada, fire, flood, and acts of God. Nor do
we warrant the product to be compatible
with any particular telephone equipment,
party line, key telephone systems or more
sophisticated switching systems. If your
DIALOGUE RC is not covered by this warranty, call us at (714) 897–0808 for advice
as to whether we will repair your
DIALOGUE RC and other repair information. The repaired parts shall be warranted
for 90 days.
15
CHAPTER 11
FEATURE SUMMARY
Feature
Memory
INDEX
RC-100 RC-200
20
20
Auto dialing M1
•
•
Memory scanning
•
•
No. of memory
scanned
6
20
Scanning speed
fixed
selectable
Remote dialing
•
•
Voice activated
answering
•
Remote flash
•
Voice mail indicator
•
Unanswered call
indicator
•
Headset operation/
control
•
Connection for Air Switch
or accessory switch
Back-up battery
provided
•
•
•
DIALOGUE RC, Air Switch, and
AMERIPHONE are registered trademarks
of AMERIPHONE, INC.
AC adapter ..............................................4
Air switch ..................................................9
Amplification ............................................6
Assistive switches ....................................9
Auto dialing ..............................................7
Batteries ..................................................4
Channel setting ......................................13
Connections..............................................4
Credit card calling ....................................8
Dial mode ................................................4
FCC information ....................................14
Feature summary ..................................16
Flash ....................................................5, 8
Headset, accessory ..................................9
Headset button ........................................3
Installation ................................................4
Lapel microphone ....................................9
Maintenance ..........................................14
Memory dialing ........................................6
Memory, programming..............................6
Microphone ..........................................3, 6
Mounting ..................................................4
On/Off button ....................................3, 6-7
Pause ......................................................6
Pillow switch ............................................9
Power ......................................................3
Program ....................................................6
Pulse dialing ............................................4
Quick start guide ....................................10
Redial ......................................................8
Remote Transmitter ..........................4, 7-8
Remote Flash switch ........................3-5, 8
Ringer volume ................................3, 6, 10
Scan ..................................................4-5, 7
Scan rate ..................................................5
Telebanking ..............................................8
Tone dialing ..............................................4
Troubleshooting ......................................12
Unanswered call indicator ................4-5, 8
Volume..................................................3, 6
Voice Activation ................................4-5, 8
Voice Mail Indicator ..........................4-5, 8
Warranty ................................................15
16