1
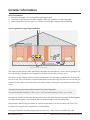
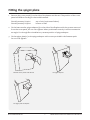
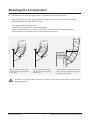
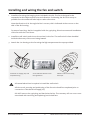
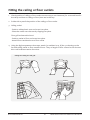
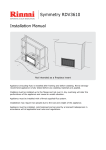
Symmetry
Heat Transfer Kit
Customer Information and Installation Instructions
Up to two additional rooms can be warmed through the heat from the transfer system using either a
floor or ceiling outlet.
Suitable for use with the Rinnai Symmetry RDV3610 and RDV3600
It is best to install the Rinnai Heat Transfer Kit at the same time as the Rinnai Symmetry as
unrestricted access to the side of the unit is needed. One kit will heat one room.
The Rinnai Heat Transfer Kit must not be mounted in areas subject to direct splashing—
relevant to underfloor installations that could be exposed to water.
The Rinnai Symmetry gas fireplace must be turned on for the heat transfer system to work
(wall switch to operate).
Installation can be completed by a skilled DIY homeowner, however a licensed electrician is
required to install the wall switch.
Please retain this manual for future reference.
Limited Warranty
Rinnai brings you peace of mind
with a 2 year minimum warranty.
TERMS AND CONDITIONS
1. During the 24 month period from date of
purchase and subject to clauses 2 and
3 below, Rinnai New Zealand Limited
(“Rinnai”) will, at its own discretion, either
replace or repair any defective product at
no charge to the customer.
2. This warranty covers manufacturing defects
only. This warranty will not apply if (for
example) the product has been improperly
installed or is otherwise installed contrary
to manufacturer’s recommendations, has
been damaged during or after installation,
has not been operated in accordance
with operating instructions, or has been
subjected to damage or abuse beyond that
expected from conditions of normal use.
3. Warranty claims may be invalid if not
accompanied by details of the installing or
supervising gas fitter’s registration number
and the gas fitting certification number.
4. This warranty commences from the date of
purchase. Proof of purchase is required at
the time of any warranty claim.
5. Servicing of the product is to be carried out
by a Rinnai authorised service centre.
All Rinnai appliances meet or exceed the
safety standards required by New Zealand
gas and electrical regulations. The company
is constantly improving its products and as
such specifications are subject to change or
variation without notice.
Please keep these instructions in a safe place for future reference.
RECORD AND ATTACH YOUR PROOF OF PURCHASE BELOW:
Your Retailer:__________________________________________________
Name:________________________________________________________
Address:______________________________________________________
_____________________________________________________________
Telephone:( _______ ) __________________________________________
Date of Purchase: ______ / ______ / _________
Contents
About the heat transfer kit
4
Installer information
5
Kit contents
6
Fitting the spigot plate
7
Attaching the 6 m duct
8
Installing and wiring the fan and switch
9
Fitting the ceiling or floor outlets
10
Testing
11
Some wording in these instructions have been written verbatim from the Weiss
Heat Transfer System 1 Room to 1 Room instruction sheet (INS601 r05:010702). This
wording is denoted with a (W) at the end of the sentence.
WARNING
Improper installation, adjustment, alteration, service or maintenance can cause
property damage, personal injury or loss of life.
For assistance or additional information contact Rinnai on
0800 RINNAI (0800 746 624).
Rinnai New Zealand Ltd.
3
RDV36 Heat Transfer Kit Installation 11700-E 05-11
About the heat transfer kit
Traditional fires heat one part of the house, but with the Rinnai Symmetry’s innovative heat
ducting, heat can be transferred to an additional room in your home. This feature helps you
make the most of the heat that is being generated.
The fire’s flexible heat ducting can be run horizontally and vertically through a wall or through
the floor to distribute warm air to another area without the need for a second heat source.
Heat output
The heat output system is capable of providing up to 2 kW of heat to additional areas.
Will this reduce the heat output of the Rinnai Symmetry?
Yes, the heat output of the Rinnai Symmetry will be reduced roughly by the kilowatt output
being diverted through the heat transfer system.
How hot is the air coming out through the ceiling or floor outlets?
This can be anywhere from 60-75 °C (including ambient air temperature). While this sounds hot,
this heat quickly mixes with the cooler air in the room.
Can I keep the door closed of the room being heated?
It is not advisable as the room can overheat (no temperature control). Circulation of air is also
maximised when internal doors are left open.
How long will it take to heat a room?
Approximately 1-2 hours depending on the size of the room.
Floor outlet
When not in use, close the louvres. This will reduce the amount of dust and other particles
entering the ducting system.
The air flow direction of the floor outlet can be altered by taking out the side vents and
repositioning.
Maintenance
The outlets can be cleaned using a soft damp cloth and mild detergent. Do not use solvents and
do not attempt to clean the outlets while the heat transfer system is in operation.
There is no servicing required for the fan.
Safety
The supply cord to the fan motor of this equipment cannot be replaced. If damaged, the entire
unit should be replaced (W).
• When the heat transfer system is operating, do not restrict the warm air discharge by
closing off, or placing articles directly over the outlets
• Do not allow anyone to place or drop articles in the outlets
• Children should be supervised at all times to ensure they do not play with any part of the
system
Rinnai New Zealand Ltd.
4
RDV36 Heat Transfer Kit Installation 11700-E 05-11
Installer information
Before installation
• Check for damage—do not install any damaged items
• Check all components have been supplied, refer kit contents on following page
• Read these instructions to get an overview of the steps required before starting
General guidelines regarding installation
3m
6 m (cannot be cut)
6 m (cannot be cut)
3m
All duct bends to be kept as smooth as possible
The heat transfer kit has been specifically designed and tested as a 9 m kit. Ducting length can
be increased by joining two kits together, however, some heat loss may occur.
The first 6 m duct length must be positioned between the Symmetry and the fan. It must not
be cut down. This is to ensure excessive heat does not run through the fan. Do not cut the 3 m
section of duct that connects the fan to the heat outlet—doing this may create excessive fan
noise.
Example of two Symmetry heat transfer kits joined together
6 m (must not be cut down) + fan + 3 m + 6 m (can be cut down) + fan + 3 m = 18 m
Connection outlets for the heat ducting kits are on the right and left hand side of the fireplace.
Two heat ducting kits—one on each side can be attached to the Symmetry unit.
Any bends in the ducting should be as smooth as possible so as not to restrict air flow. The
insulated ducting has zero clearance to combustibles.
Ducting and bends should be supported as necessary—with wire from rafters etc. (W)
Rinnai New Zealand Ltd.
5
RDV36 Heat Transfer Kit Installation 11700-E 05-11
Kit contents
The Symmetry Heat Transfer Kit (R3626) comes packaged in one box and contains the
following:
1
2
5
6
3
4
7
8
Not included, ordered separately
9
10
Component
11
Quantity
1
Ceiling outlet
1
2
Duct 3 m (150 mm inner diameter)
1
3
Duct 6 m (150 mm inner diameter)
1
4
Spigot plate
1
5
Fan*
1
6
Wall switch
7
High temperature duct tape
1
8
Hanging chain 2 m
1
9
Fastener pack
1
10
Spigot adaptor
1
1 roll
Floor outlet (ordered separately)
11
Floor outlet and transition boot
1
* Hi Temp Weiss Inline Fan Unit, 230 Volt, 50 Hz. T-class motor with nylon casing, dB(A) rating 51
Rinnai New Zealand Ltd.
6
RDV36 Heat Transfer Kit Installation 11700-E 05-11
Fitting the spigot plate
1. Remove the cover panel(s) on the side of the heater and discard. The position of the cover
panel will differ according to the model installed.
Rinnai Symmetry DV3610:
Rinnai Symmetry DV3600:
top of unit (as pictured below)
bottom of unit
2. Fit the heat transfer spigot adaptor(s) to the side of the fireplace with the screws removed
from the cover panel, do not over tighten. When positioned correctly it will be mounted at
an angle. For through-floor installations, reverse position of spigot adaptor.
3. Fit the spigot plate(s) to the spigot adaptor with screws provided in the fastener pack.
Do not over tighten.
Remove cover panels and discard.
Fit spigot adaptor.
Fit spigot plate to adaptor.
Rinnai New Zealand Ltd.
7
RDV36 Heat Transfer Kit Installation 11700-E 05-11
Attaching the 6 m heat duct
1. Tape the inner duct to the spigot plate. This ensures a secure attachment.
2. Tape the outer duct to the spigot plate. This keeps the outer duct from bunching and
touching the side of the fireplace. Ensure:
- a complete seal around the duct
- a smooth bend as the duct exits the appliance
- a 250 mm distance from the side of the unit to the duct bend, the spigot adaptor
automatically (if mounted correctly) provides this clearance
Outer duct &
insulation
Outer Duct &
Insulation
Inner duct
Inner duct
Tape
Tape
250 mm
Tape
Tape inner duct to spigot. This
securely attaches the inner duct
to the spigot.
IMPORTANT
Tape
Tape outer duct to spigot. Be
sure that no ducting touches
the fireplace.
Maintain 250 mm distance from side of
unit—ensure the duct does not come
into contact with the fire.
The first 6 m length of duct cannot be cut down. This will cause excessive heat to pass
through the fan.
Rinnai New Zealand Ltd.
8
RDV36 Heat Transfer Kit Installation 11700-E 05-11
Installing and wiring the fan and switch
1. Install the fan using the hanging chain included in the kit. The fan is designed to be
suspended as this helps reduce noise and vibration. Positioning the fan as far away as
possible from the outlet will also help to reduce fan noise.
Note the direction of air through the fan is correct, this is indicated with an arrow on the
side of the fan housing.
For ease of servicing, the fan is supplied with the 3-pin plug. Rinnai recommends installation
of the fan with the cord down.
2. Install the wall switch and wire to the socket for the fan. The wall switch is best installed
inside the doorway of the room being heated.
3. Attach the 6 m ducting to the fan using the high temperature duct tape provided.
Install fan on hanging strip and
complete wiring.
Arrow indicates direction of air
through the fan.
Attach 6 m duct to fan using
duct tape.
A licensed electrician is required to install the wall switch.
IMPORTANT
All duct work, securing and positioning of the fan unit should be completed prior to
connection of the electrical supply (W).
DO NOT remove the 3-pin plug and hard-wire the fan. The warranty will not cover costs
associated with removing and replacing hard-wired fans.
Rinnai New Zealand Ltd.
9
RDV36 Heat Transfer Kit Installation 11700-E 05-11
Fitting the ceiling or floor outlets
1. Check position of ceiling or floor outlet to ensure a 450 mm clearance (for a smooth bend in
the duct) and that no ceiling or floor joists are in the way.
2. Scribe with a pencil the position of the ceiling or floor outlet.
3. Ceiling outlet:
- Position white plastic vent and screw into place
- Place the outlet over the vent by clipping into place
Floor grill and transition boot:
- Position outlet in floor and screw into place
- Attach floor transition boot to floor outlet
4. Using the high temperature duct tape, attach (as outlined on p. 8) the 3 m ducting to the
fan and ceiling outlet or floor transition boot. The 3 m length of duct cannot be cut down as
this could create excessive fan noise.
Fitting the ceiling fan and grill
Rinnai New Zealand Ltd.
10
RDV36 Heat Transfer Kit Installation 11700-E 05-11
Testing
With the fireplace operating and the fan switched on, observe that there is a steady flow of
warm air coming from the outlets. The ducting will look inflated, and where there are bends,
these should be as smooth as possible.
Rinnai New Zealand Ltd.
11
RDV36 Heat Transfer Kit Installation 11700-E 05-11
Address:
105 Pavilion Drive, Mangere, Auckland
PO Box 53177, Auckland Airport, Auckland 2150
0800:
Phone:
0800 RINNAI (746 624)
(09) 257 3800
Fax:
(09) 257 3899
Email:
[email protected]
Website:www.rinnai.co.nz
All Rinnai appliances meet or exceed the safety standards required by New Zealand
gas and electrical regulations.
Rinnai is constantly improving its products and as such information and
specifications are subject to change or variation without notice.