1
Rollei dsx410
Gebrauchsanleitung
Instruction Manual
Contents
Read First . . . . . . . . . . . . . . . . . . . . . . . . . . . . . . . . . . . . . . . . . . . . . . . . . .6
Unpack the Camera . . . . . . . . . . . . . . . . . . . . . . . . . . . . . . . . . . . . . . . .10
Quick Start . . . . . . . . . . . . . . . . . . . . . . . . . . . . . . . . . . . . . . . . . . . . . . .11
Chapter 1 : Getting Started . . . . . . . . . . . . . . . . . . . . . . . . . . . . . . . . .13
Camera Parts . . . . . . . . . . . . . . . . . . . . . . . . . . . . . . . . . . . . . . . . . . . . .13
Set Up . . . . . . . . . . . . . . . . . . . . . . . . . . . . . . . . . . . . . . . . . . . . . . . . . . .16
Attaching the Wrist Strap . . . . . . . . . . . . . . . . . . . . . . . . . . . . . . . . .16
Inserting the Batteries & the Memory Card . . . . . . . . . . . . . . . . . . . .17
Using the AC Adaptor . . . . . . . . . . . . . . . . . . . . . . . . . . . . . . . . . . . .18
Turning on Power . . . . . . . . . . . . . . . . . . . . . . . . . . . . . . . . . . . . . . .19
Selecting the Language . . . . . . . . . . . . . . . . . . . . . . . . . . . . . . . . . . .20
Setting the Date and Time . . . . . . . . . . . . . . . . . . . . . . . . . . . . . . . . .21
Chapter 2 : Taking Pictures & Recording Video Clips . . . . . . . . . .22
Using the LCD Display . . . . . . . . . . . . . . . . . . . . . . . . . . . . . . . . . . . . .22
Changing the Contents on the LCD Monitor . . . . . . . . . . . . . . . . . . .23
Using Zoom . . . . . . . . . . . . . . . . . . . . . . . . . . . . . . . . . . . . . . . . . . . . . .24
Optical Zoom . . . . . . . . . . . . . . . . . . . . . . . . . . . . . . . . . . . . . . . . . .24
Digital Zoom . . . . . . . . . . . . . . . . . . . . . . . . . . . . . . . . . . . . . . . . . . .24
Taking Still Pictures . . . . . . . . . . . . . . . . . . . . . . . . . . . . . . . . . . . . . . . .25
Using Auto Focus . . . . . . . . . . . . . . . . . . . . . . . . . . . . . . . . . . . . . . .26
Using Focus Lock . . . . . . . . . . . . . . . . . . . . . . . . . . . . . . . . . . . . . . . .26
Using Still Mode . . . . . . . . . . . . . . . . . . . . . . . . . . . . . . . . . . . . . . . .27
Taking a Series of Pictures . . . . . . . . . . . . . . . . . . . . . . . . . . . . . . . . .28
Using Macro Mode . . . . . . . . . . . . . . . . . . . . . . . . . . . . . . . . . . . . . .29
Setting Exposure Compensation . . . . . . . . . . . . . . . . . . . . . . . . . . . .30
Using Quick View . . . . . . . . . . . . . . . . . . . . . . . . . . . . . . . . . . . . . . .31
Using Self-timer . . . . . . . . . . . . . . . . . . . . . . . . . . . . . . . . . . . . . . . . .32
Using Built-in Flash . . . . . . . . . . . . . . . . . . . . . . . . . . . . . . . . . . . . . .33
3
Contents
Recording Video Clips . . . . . . . . . . . . . . . . . . . . . . . . . . . . . . . . . . . . . .34
Using the Capture Menu . . . . . . . . . . . . . . . . . . . . . . . . . . . . . . . . . . . .35
Setting Image Size . . . . . . . . . . . . . . . . . . . . . . . . . . . . . . . . . . . . . . .36
Setting Image Quality . . . . . . . . . . . . . . . . . . . . . . . . . . . . . . . . . . . .37
Setting White Balance . . . . . . . . . . . . . . . . . . . . . . . . . . . . . . . . . . . .38
Setting Sensitivity . . . . . . . . . . . . . . . . . . . . . . . . . . . . . . . . . . . . . . .39
Setting Exposure Area . . . . . . . . . . . . . . . . . . . . . . . . . . . . . . . . . . .40
Setting Auto Focus Area . . . . . . . . . . . . . . . . . . . . . . . . . . . . . . . . . .41
Setting Sharpness . . . . . . . . . . . . . . . . . . . . . . . . . . . . . . . . . . . . . . .42
Adjusting Saturation . . . . . . . . . . . . . . . . . . . . . . . . . . . . . . . . . . . . .43
Setting Style . . . . . . . . . . . . . . . . . . . . . . . . . . . . . . . . . . . . . . . . . . .44
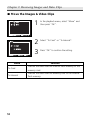
Chapter 3: Reviewing Images and Video Clips . . . . . . . . . . . . . . .45
Using the LCD Display . . . . . . . . . . . . . . . . . . . . . . . . . . . . . . . . . . . . . .45
Using Playback . . . . . . . . . . . . . . . . . . . . . . . . . . . . . . . . . . . . . . . . . . . .46
Using Index Display . . . . . . . . . . . . . . . . . . . . . . . . . . . . . . . . . . . . . .47
Activating Digital Enlargement . . . . . . . . . . . . . . . . . . . . . . . . . . . . .48
Using the Playback Menu . . . . . . . . . . . . . . . . . . . . . . . . . . . . . . . . . . .49
Deleting All Pictures . . . . . . . . . . . . . . . . . . . . . . . . . . . . . . . . . . . . .50
Displaying a Slide Show . . . . . . . . . . . . . . . . . . . . . . . . . . . . . . . . . . .51
Recording Audio Clips for Still Images . . . . . . . . . . . . . . . . . . . . . . . .52
Setting DPOF . . . . . . . . . . . . . . . . . . . . . . . . . . . . . . . . . . . . . . . . . . .53
Folder . . . . . . . . . . . . . . . . . . . . . . . . . . . . . . . . . . . . . . . . . . . . . . . .55
Protecting Pictures and Video Clips . . . . . . . . . . . . . . . . . . . . . . . . . .56
Copying the Images & Video Clips . . . . . . . . . . . . . . . . . . . . . . . . . . .57
Moving the Images & Video Clips . . . . . . . . . . . . . . . . . . . . . . . . . . .58
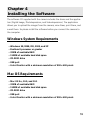
Chapter 4: Installing the Software . . . . . . . . . . . . . . . . . . . . . . . . . .59
Windows System Requirements . . . . . . . . . . . . . . . . . . . . . . . . . . . . . .59
Mac OS Requirements . . . . . . . . . . . . . . . . . . . . . . . . . . . . . . . . . . . . . .59
Installing the Software . . . . . . . . . . . . . . . . . . . . . . . . . . . . . . . . . . . . .60
Installing the Driver . . . . . . . . . . . . . . . . . . . . . . . . . . . . . . . . . . . . . .60
Installing the Application (Windows) . . . . . . . . . . . . . . . . . . . . . . . . .62
4
Installing the Application (Macintosh) . . . . . . . . . . . . . . . . . . . . . . . .64
Using the Application . . . . . . . . . . . . . . . . . . . . . . . . . . . . . . . . . . . . . .68
Digital Image . . . . . . . . . . . . . . . . . . . . . . . . . . . . . . . . . . . . . . . . . . .68
PhotoImpression . . . . . . . . . . . . . . . . . . . . . . . . . . . . . . . . . . . . . . . .69
VideoImpression . . . . . . . . . . . . . . . . . . . . . . . . . . . . . . . . . . . . . . . .70
Chapter 5: Uploading, Printing, and Displaying Images . . . . . . .72
Uploading to a Computer . . . . . . . . . . . . . . . . . . . . . . . . . . . . . . . . . . .72
Printing Images . . . . . . . . . . . . . . . . . . . . . . . . . . . . . . . . . . . . . . . . . . .73
Displaying images on a TV . . . . . . . . . . . . . . . . . . . . . . . . . . . . . . . . . .74
Chapter 6: Adjusting the Camera Settings . . . . . . . . . . . . . . . . . . .75
Using the Set Up Menu . . . . . . . . . . . . . . . . . . . . . . . . . . . . . . . . . . . . .75
Formatting the Memory Card . . . . . . . . . . . . . . . . . . . . . . . . . . . . . .76
Formatting the Built-in Memory . . . . . . . . . . . . . . . . . . . . . . . . . . . . .76
Setting Power Saving Function . . . . . . . . . . . . . . . . . . . . . . . . . . . . .77
Setting Camera Sound . . . . . . . . . . . . . . . . . . . . . . . . . . . . . . . . . . .78
Setting TV System . . . . . . . . . . . . . . . . . . . . . . . . . . . . . . . . . . . . . . .79
Setting LCD Brightness . . . . . . . . . . . . . . . . . . . . . . . . . . . . . . . . . . .80
Customizing Your Start-up Screen . . . . . . . . . . . . . . . . . . . . . . . . . . .81
Setting the Start-up Sound . . . . . . . . . . . . . . . . . . . . . . . . . . . . . . . .82
Resetting Your Camera . . . . . . . . . . . . . . . . . . . . . . . . . . . . . . . . . . .83
Trouble Shooting . . . . . . . . . . . . . . . . . . . . . . . . . . . . . . . . . . . . . . . . . .84
Specifications . . . . . . . . . . . . . . . . . . . . . . . . . . . . . . . . . . . . . . . . . . . . .86
5
Read First
Before using the camera, please make sure that you read and understand all
the following safety precautions. Always ensure that the camera is operated
correctly. The safety precautions will instruct you in the safe and correct
operation of the camera and its accessories, preventing injuries or damage to
yourself, other persons and equipment.
In the following pages, the term "equipment" refers mainly to the camera
and its power supply accessories.
WARNINGS
To prevent possible injury, please observe the following warnings when using
this product.
• Do not aim the viewfinder at the sun or other intense light.
Aiming at the sun through the viewfinder could injure your eyesight.
• Do not use the flash too close to eyes
Using the flash too close to your subject’s eyes can injure the eyesight.
Especially, remain at least one meter (39 inches) away from infants when
you use the flash.
• Do not place camera strap around neck
The strap could result in suffocation when accidentally wound around neck.
• Do not open or disassemble
Disassembling the equipment may cause high-voltage electrical shock.
Interior inspections, modifications and repairs should be conducted by qualified service staff. Please take the product to an authorized service center for
inspection.
6
• Turn off immediately when malfunction
If you notice unusual smell or smoke coming from the equipment, please
unplug the AC adaptor and remove the battery immediately. Proceed swiftly
with caution to avoid burns. Take the equipment to an authorized service
center for inspection.
• Unplug the adaptor when the camera is not in use
If you use the adaptor as the power source, unplug the adaptor when the
camera is not in use to prevent fire and other dangers. Continuous use over
a long time may lead to overheating, deformation and fire.
Battery
Observe the following instruction when handling battery used in this product.
Improper use of battery may lead to leakage or explosion.
• Recharge only Li-ion rechargeable batteries. We suggest you use batteries
that meet the requirements of UL.
• Check battery polarity before inserting. Do not attempt to insert the battery
upside down or backward.
• Do not disassemble or short circuit the battery.
• Do not expose battery to fire or excessive heat.
• Do not immerse or contact with water or other liquids.
• Stop using the battery immediately if noticing any deformation or changes
in color.
• Do not put the batteries along with metal objects such as coins, keys or hairpins in your pocket.
• Keep battery out of the reach of children. Seek medical attention right away
if a child swallows a battery.
7
Read First
CAUTIONS
Observe and exercise the following cautions to avoid damage and keeping
your camera in an optimum working status.
• Keep Dry
This camera is not waterproof, and may malfunction when immersed in
water, or any liquids to enter the interior of the camera
• Away from Moisture, Salt or Dust
Wipe off salt or dust with a slightly dampened soft cloth after using your
camera at the beach or seaside, then, dry your camera thoroughly.
• Away from Strong Magnetic Fields
Never put the camera too close to any equipment producing strong electromagnetic fields, such as electric motor. Strong electromagnetic fields could
lead to camera malfunctions or interfere the data recording.
• Avoid Intense Heat
Do not use or store the equipment under sunlight or high temperatures.
Such exposure could lead to the leakage of the batteries or deformation of
the casing.
• Avoid rapid temperature change
Rapidly moving the equipment between hot and cold temperatures may
form water droplets on its exterior and interior. To prevent the condensation, place the equipment in its carry case or a plastic bag before exposing it
to a rapid temperature change.
• Do not drop
Strong shock or vibration of dropping could cause malfunction. Keep the
strap around your wrist when carrying the camera.
8
• Do not unplug or remove the battery when processing data
When images data are being recorded or deleted from memory cards, cutting off power could result in data loss or damage the internal circuitry or
memory.
• Carefully handle the lens and all moving parts
Be careful not to apply too much force to the lens, memory card, battery or
the jack cover. These parts are not designed to take extra force than regular
use.
• Battery
In low temperature circumstances, the battery’s capacity may decrease significantly due to the inactive chemical reaction. When taking pictures in cold
weather, keep a warm backup battery on hand.
Should the battery terminals become dirty, wipe them with a dry, clean cloth
or use an eraser to remove the stain.
• Memory cards
Turn off the power before inserting or removing the memory card.
Otherwise, the memory card could become unstable.
Memory cards may getting hot during use, remove memory card from the
camera with care.
Digital Camera
dsx410
Tested To Comply
With FCC Standards
FOR HOME OR OFFICE USE
This mark on your camera certifies that this camera meets the requirements of the EU (European Union) concerning interference causing
equipment regulations. CE stands for Conformité Européenne
(European Conformity).
This device complies with Part 15 of the FCC Rules. Operation is subject
to the following two conditions: (1) This device may not cause harmful
interference, and (2) this device must accept any interference recieved,
including interference that may cause undesired operation.
This Class B digital apparatus complies with Canadian ICES-003.
Do not remove the ferrite cores form the cables.
9
Unpack the Camera
Digital camera x 1
Li-ion battery x 1
Camera case x 1
Camera wrist strap x 1
Video cable x 1
USB cable x 1
Driver software CD-ROM x 2
User guide x 1
Warranty card x 1
10
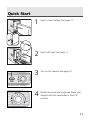
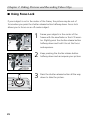
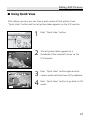
Quick Start
1
Insert a Li-ion battery. See page 17.
2
Insert a SD card. See page 17.
3
Turn on the camera. See page 19.
4
Rotate the mode dial to
and frame your
subjects with the viewfinder or the LCD
monitor.
11
Quick Start
12
5
Slightly press the shutter release button halfway down and hold it to set the focus and
exposure.
6
Press the shutter release button all the way
down to take the picture.
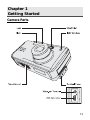
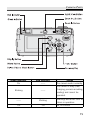
Chapter 1
Getting Started
Camera Parts
13
Chapter 1: Getting Started
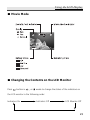
Set Up Mode
Movie Mode
Playback Mode
Still Mode
14
Camera Parts
Green Indicator
On
Red Indicator
------
Blinking
------
------
Blinking
On
On
Status
The camera works normally
The camera is busy (flash
charging, process recording,
loading) and cannot be
operated.
Warnings and errors such as
failure in operation.
AE, AF success
15
Chapter 1: Getting Started
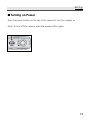
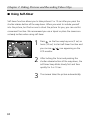
.
Set Up
16
Attaching the Wrist Strap
1
Insert the small loop of the wrist strap into
the strap mount, and then insert the long
loop of the wrist strap into the small loop of
the strap.
2
Tighten the wrist strap to the strap mount.
.
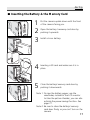
Set Up
Inserting the Battery & the Memory Card
1
2
3
Put the camera upside down with the front
of the camera facing you.
4
Inserting a SD card and make sure it is in
place.
5
Close the battery/ memory card door by
pushing it downwards.
Open the battery / memory card door by
pushing it upwards.
Install a Li-ion battery.
Note 1: To save the battery power, use the
viewfinder, instead of the LCD monitor
to take the picture. Besides, you can also
activate the power saving function. See
page 77.
Note 2: Be sure to close the battery/ memory
card door firmly, or you can't turn on the
camera.
17
.
Chapter 1: Getting Started
Using the AC Adaptor
When reviewing pictures or operating the camera indoors, you can use the AC
adaptor as the power source to save the battery power.
18
1
Connect the AC adaptor connector to the
AC adaptor terminal of the camera.
2
Connect the other end of the AC adaptor to
the electrical outlet.
.
Set Up
Turning on Power
Press the power button on the top of the camera to turn the camera on.
Note: To turn off the camera, press the power button again.
19
.
Chapter 1: Getting Started
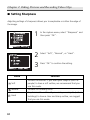
20
Selecting the Language
1
Rotate the mode dial to
2
Scroll through the menu by using
on
the four-way key and move to "Language".
Enter the submenu by pressing"OK".
3
Select the language you need and then press
"OK" to confirm the setting.
"Set up".
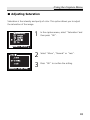
.
Set Up
Setting the Date and Time
Set the date and time so that they appear correctly when you’re reviewing the
images with your camera.
1
Rotate the mode dial to
2
Scroll through the menu by using
on
the four-way key and move to "Date/Time".
Enter the submenu by pressing "OK".
3
Move to the item you want to adjust by
4
Press "OK" to confirm the setting.
"Set up".
using
on the four-way key, and adjust
the value of the item by pressing
on
the four-way key.
Note: Date and time do not appear when you
print your pictures.
21
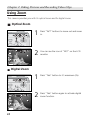
Chapter 2
Taking Pictures and Recording Video Clips
Using the LCD Display
When you turn the camera on, the LCD monitor turns on automatically. With
the LCD monitor, you can frame images that you want to take or record as
video clips. You can also view the menus of each mode. The following figure
gives you the information of the icons appearing on the LCD monitor.
Note: You may not see the LCD display clearly when using the LCD monitor
under intense light, such as sunlight. You can adjust the LCD brightness
to improve the situation. See page 80.
.
22
Still Mode
.
.
Using the LCD Display
Movie Mode
Changing the Contents on the LCD Monitor
Press
button in
, or
mode to change the status of the indicators on
the LCD monitor in the following order:
Indicators On
Indicators Off
LCD Monitor Off
23
Chapter 2: Taking Pictures and Recording Video Clips
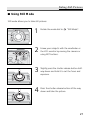
Using Zoom
.
This camera provides you with 3x optical zoom and 2x digital zoom.
.
24
Optical Zoom
1
Press "W/T" buttons to zoom out and zoom
in.
2
You can see the icon of "W/T" on the LCD
monitor.
1
Press "Tele" button to it's maximum (3x).
2
Press "Tele" button again to activate digital
zoom function.
Digital Zoom
Taking Still Pictures
.
Taking Still Pictures
Using Auto Focus
Press the shutter release button halfway down to set the focus and exposure.
The camera will automatically focus on the subject in the center of the frame.
1
Frame your subject with the viewfinder or
the LCD monitor. Slightly press the shutter
release button halfway down and hold it to
set the focus and exposure.
2
Press the shutter release button all the way
down to take the picture.
Note: If the focus lock fails, Red and Green
Indicator beside the viewfinder will be
blinking.
25
.
Chapter 2: Taking Pictures and Recording Video Clips
Using Focus Lock
If your subject is not in the center of the frame, the picture may be out of
focus when you press the shutter release button halfway down. Focus lock
allows you to focus on an off-center subject.
26
1
Frame your subjects in the center of the
frame with the viewfinder or the LCD monitor. Slightly press the shutter release button
halfway down and hold it to set the focus
and exposure.
2
Keep pressing the shutter release button
halfway down and recompose your picture.
3
Press the shutter release button all the way
down to take the picture.
.
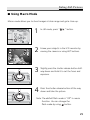
Taking Still Pictures
Using Still Mode
Still mode allows you to take still pictures.
1
Rotate the mode dial to
2
Frame your subjects with the viewfinder or
the LCD monitor by moving the camera or
using W/T buttons.
3
Slightly press the shutter release button halfway down and hold it to set the focus and
exposure.
4
Press the shutter release button all the way
down and take the picture.
"Still Mode".
27
.
Chapter 2: Taking Pictures and Recording Video Clips
Taking a Series of Pictures
When the drive mode sets to "Single", you can capture a single picture each
time you press the shutter release button all the way down. If you want to
shoot images of sporting events, you can activate "Burst" to gain a series of
pictures. After you take the picture, the camera resets to "Single".
1
In
mode, press . Select “Drive Mode”
and then press “OK”.
2
3
Select “Burst” and then press “OK” to
confirm the setting.
After setting the focus and exposure, press
the shutter release button all the way down
and hold it to capture continuous pictures till
the memory card is full or till you release the
shutter release button.
Note : The default flash mode in “Burst” is
"Off".
28
.
Taking Still Pictures
Using Macro Mode
Macro mode allows you to shoot images at close range and get a close-up.
1
In still mode, press "
2
Frame your subjects in the LCD monitor by
moving the camera or using W/T buttons.
3
Slightly press the shutter release button halfway down and hold it to set the focus and
exposure.
4
Press the shutter release button all the way
down and take the picture.
" button.
Note: The default flash mode is "Off" in macro
function. You can change the
flash mode by using
button.
29
.
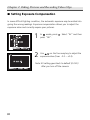
Chapter 2: Taking Pictures and Recording Video Clips
Setting Exposure Compensation
In some difficult lighting condition, the automatic exposure may be misled into
giving the wrong readings. Exposure compensation allows you to adjust the
exposure value and correctly expose your pictures.
1
In
mode, press
press "OK".
2
Use
on the four-way key to adjust the
exposure value (from -2.0 ~ +2.0).
. Select "EV" and then
Note: EV setting goes back to default (0.0 EV)
after you turn off the camera.
30
.
Taking Still Pictures
Using Quick View
After taking a picture, you can have a quick review of that picture. Press
"Quick View" button and the last picture taken appears on the LCD monitor.
1
Press "Quick View" button.
2
The last picture taken appears as a
thumbnail at the lower-left corner on the
LCD monitor.
3
4
Press "Quick View" button again and the
camera mode switches from still to playback.
Press "Quick View" button to go back to still
mode.
31
.
Chapter 2: Taking Pictures and Recording Video Clips
Using Self-timer
Self-timer function allows you to take pictures 3 or 10 sec after you press the
shutter release button all the way down. When you want to include yourself
into the picture, but find no one to shoot the picture for you, you can use this
convenient function. We recommend you use a tripod or place the camera on
a steady surface when using self-timer.
1
Press
on the four-way key once (3 sec) or
twice (10 sec) to start self-timer function and
you can see
/
LCD monitor.
32
icon appearing on the
2
After locking the focus and pressing the
shutter release button all the way down, the
self-timer lamp blinks slowly first and then
quickly for 3 or 10 sec.
3
The camera takes the picture automatically.
.
Taking Still Pictures
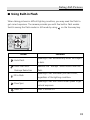
Using Built-in Flash
When taking pictures in difficult lighting condition, you may need the flash to
get correct exposure. The camera provides you with five built-in flash modes.
Switch among the flash modes in still mode by using
Mode
Auto Flash
on the four-way key.
Function
Speedlight fires automatically when the subject
is dark.
Auto Flash with
Reduces the "red-eye" effect results from the
Red-eye Reduction
flash.
Fill in Flash
Slow Sync
Flash Off
Speedlight fires whenever you take a shot,
regardless of the lighting condition.
Speedlight fires with slow shutter speed to get
natural exposure.
Flash is turned off.
33
Chapter 2: Taking Pictures and Recording Video Clips
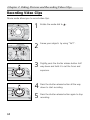
Recording Video Clips
Movie mode allows you to record video clips.
34
1
Rotate the mode dial to
2
Frame your subjects by using "W/T".
3
Slightly press the shutter release button half
way down and hold it to set the focus and
exposure.
4
5
Press the shutter release button all the way
down to start recording.
.
Press the shutter release button again to stop
recording.
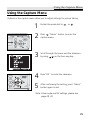
Using the Capture Menu
Using the Capture Menu
Options in the capture menu allow you to adjust settings for picture taking.
1
2
Rotate the mode dial to
3
Scroll through the menu and the submenu
by using
on the four-way key .
4
5
Press"OK" to enter the submenu.
, or
.
Press
"Menu" button to enter the
capture menu.
After confirming the setting, press "Menu"
button again to exit.
Note: Drive mode and EV settings, please see
page 28, 30.
35
.
Chapter 2: Taking Pictures and Recording Video Clips
Setting Image Size (Resolution) [
only]
In this function, you can choose in which image size (the number of pixels) you
want your pictures stored in the memory card. This camera provides you with
four kinds of image size. You can gain detailed images with high resolutions;
the file size will be large, and vice versa.
36
1
In the capture menu, select "Image Size"
and then press "OK".
2
3
Select "2288 x 1720", "1600 x 1200",
"1280 x 960" or "640 x 480".
Press "OK" to confirm the setting.
.
Using the Capture Menu
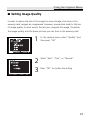
Setting Image Quality
In order to reduce the size of the image for more storage of pictures in the
memory card, images are compressed. However, compression leads to the loss
of image quality. In other words, the less you compress the image, the better
the image quality, and the fewer pictures you can store in the memory card.
1
In the capture menu, select "Quality" and
then press "OK".
2
3
Select "Best", "Fine", or "Normal".
Press "OK" to confirm the setting.
37
.
Chapter 2: Taking Pictures and Recording Video Clips
Setting White Balance
WB allows you to correct color shifts resulting from different lighting conditions
when taking pictures.
Mode
Auto
Daylight
Fluorescent
Tungsten
Cloudy
38
1
In the capture menu, select "WB" and then
press "OK".
2
3
Select "Auto", "Daylight", "Fluorescent",
"Tungsten" , or "Cloudy".
Press "OK" to confirm the setting.
Function
The camera will automatically adjust the setting according
to the lighting condition.
Setting for shooting in sunny or cloudy condition.
Setting for shooting in fluorescent condition
Setting for shooting in incandescent or halogen condition.
Setting for shooting in overcast condition.
.
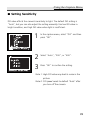
Using the Capture Menu
Setting Sensitivity
ISO value affects the camera’s sensitivity to light. The default ISO setting is
"Auto", but you can also adjust the setting manually. Use low ISO value in
bright condition, and high ISO value when light is insufficient.
1
In the capture menu, select "ISO" and then
press "OK".
2
3
Select "Auto", "200", or "400".
Press "OK" to confirm the setting.
Note 1: High ISO value may lead to noise in the
picture.
Note 2: ISO speed resets to default "Auto" after
you turn off the camera.
39
.
Chapter 2: Taking Pictures and Recording Video Clips
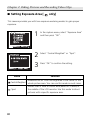
Setting Exposure Area [
only]
This camera provides you with two exposure-metering modes to gain proper
exposure.
Mode
Central Weighted
Spot
40
1
In the capture menu, select "Exposure Area"
and then press "OK".
2
3
Select "Central Weighted" or "Spot".
Press "OK" to confirm the setting.
Function
Measures the EV from the large area in the center of the
whole picture area. You can use this mode in most cases.
Meters the EV from a circular area (about in 3-5mm) in
the middle of the LCD monitor. Use this mode to shoot
pictures with a specific exposure area.
.
Using the Capture Menu
Setting Auto Focus Area [
only]
1
In the capture menu, select "Focus Area"
and then press "OK".
2
3
Select "Central" or "Spot".
Press "OK" to confirm the setting.
41
.
Chapter 2: Taking Pictures and Recording Video Clips
Setting Sharpness
Adjusting settings of sharpness allows you to emphasize or soften the edge of
the image.
Mode
Soft
Normal
Hard
42
1
In the capture menu, select "Sharpness" and
then press "OK".
2
3
Select "Soft", "Normal", or "Hard".
Press "OK" to confirm the setting.
Function
Softens the outline. If you want your subjects (such as
people) to have a soft outline, we recommend that you
use this mode.
Suitable for ordinary shots.
Emphasizes the outline. If you want your subjects (such as
buildings) to have a clear and sharp outline, we suggest
that you use this mode.
.
Using the Capture Menu
Adjusting Saturation
Saturation is the intensity and purity of color. This option allows you to adjust
the saturation of the image.
1
In the capture menu, select "Saturation"and
then press "OK".
2
3
Select "More", "Normal" or "Less".
Press "OK" to confirm the setting.
43
.
Chapter 2: Taking Pictures and Recording Video Clips
Setting Style
This mode allows you to have special effect on the pictures or the video clips.
Mode
Normal
Sepia
Black & White
44
1
In the capture menu, select "Style" and then
press "OK".
2
3
Select "Normal", "Sepia", or "Black &
White".
Press "OK" to confirm the setting.
Function
No special effect.
Makes the pictures look like ancient ones.
(reddish -brown)
Produces black & white photos.
Chapter 3
Reviewing Images and Video Clips
Using the LCD Display
45
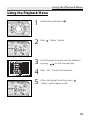
Chapter 3: Reviewing Images and Video Clips
Using Playback
Playback mode allows you to review the still images and video clips.
46
1
Rotate the mode dial to
2
The last still picture you take and the
information of that picture appear on the
LCD monitor.
3
Use
on the four-way key to move
forth and back through the still pictures.
4
Use
on the four-way key to start/ stop
playing video clips.
"Playback" mode.
.
Using playback
Using Index Display
By using the function of index display, you can view at most six still pictures at a
time.
1
Press " Wide" button and switch single
display to index display.
2
Use
on the four-way key to highlight
single picture and
on the four-way key
to move to the previous or the next six pictures.
3
Press " Tele" to return to single playback.
47
.
Chapter 3: Reviewing Images and Video Clips
Activating Digital Enlargement
The function of digital enlargement allows you to enlarge a single image to 2x.
48
1
Press "Tele" button in single display and
then navigate the enlarged image by using
the four-way key.
2
Press "Wide" button to return to the original
image size step by step.
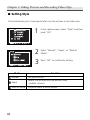
Using the Playback Menu
Using the Playback Menu
1
Rotate the mode dial to
2
Press
3
4
5
Scroll through the menu and the submenu
by using
on the four-way key.
.
"Menu" button.
Press "OK" to enter the submenu.
After confirming the setting, press
"Menu" button again to exit.
49
.
Chapter 3: Reviewing Images and Video Clips
Deleting All Pictures
This function allows you to delete all of the still pictures and video clips.
1
In the playback menu, select "Delete All"
and then press "OK".
2
3
Select "No" or "Yes".
Press "OK" to confirm the setting.
Note 1: To delete single picture, choose the one
you want to delete and then press
.
Choose "Yes" or "No" and then press
"OK".
Note 2: If the file is under protection, you have to
remove the protection first and then
delete it. See page 56.
50
.
Using the Playback Menu
Displaying a Slide Show
When reviewing still pictures, you can adjust some settings here and the camera
automatically displays the pictures one by one on the LCD monitor.
1
In the playback menu, select "Slide"
and then press "OK".
2
3
Select "Start", "Interval", "Direction" or
"Repeat".
Press "OK" to confirm the setting.
Mode
Start
Interval
Direction
Repeat
Function
Begins the display.
Adjusts the interval (1sec~30sec) between each picture
during the display.
Decides in which direction ("Forward" or "Backward") to
display the pictures.
Repeat playing the slide show.
Note: During the slide show, you can press
on the four-way key to stop it.
51
.
Chapter 3: Reviewing Images and Video Clips
Recording Audio Clips for Still Images
You can record audio memos for each still picture.
1
First, select one picture that you want to add
an audio clip to. In the playback menu, select
"Memo" and then press "OK".
2
To record an audio memo, select "Record".
In the submenu, press
on the four-way
key to start/stop recording.
3
To play an audio memo, select "Play". In the
submenu, press
on the four-way key to
pause/start. Press "OK" to stop playing.
4
To delete a memo, select "Delete".
Note : You can also record audio memos in playback mode by directly using
(recording
memos) and
(play/pause memos) on the
four-way key without entering the menu.
52
.
Using the Playback Menu
Setting DPOF (Digital Print Order Format)
DPOF allows you to set the print order format of still images.
1
In the playback menu, press "DPOF" and
then press "OK".
2
To decide the number of copies, select
"Standard".
3
Use
on the four-way key to select the
pictures and
on the four-way key to
adjust the numbers of copies. Press "OK"
button to confirm the setting.
4
To print index of pictures, select "Index".
53
Chapter 3: Reviewing Images and Video Clips
5
54
To cancel all of the settings for printing,
select "Delete".
.
Using the Playback Menu
Folder
You can view pictures in different folders of the memory card. The camera
creates a new folder when the file number is over 9999.
1
In the playback menu, select "Folder" and
then press "OK".
2
3
Choose among the folders and select the
one that you would like to view.
Press "OK" to confirm the setting.
55
.
Chapter 3: Reviewing Images and Video Clips
Protecting Pictures and Video Clips
Protect function prevents the pictures and video clips from modifying and
deleting.
1
In the playback menu, select "Protect" and
then press "OK".
2
3
Select "Set One", "Remove One", "Set All"
or "Remove All".
Press "OK" to confirm the setting.
Note 1:
appears on the LCD monitor when you
protect the picture.
Note 2: All of the images, including the protected
ones, are deleted when you format the
memory card or the built-in memory.
Mode
Function
Set One
Protects the current picture you’re viewing.
Remove One
Cancels the protection of the picture.
Protects all the pictures.
Cancels all the protection.
Set All
Remove All
56
.
Using the Playback Menu
Copying the Images & Video Clips
Mode
To Card
To Internal
1
In the playback menu, select "Copy" and
then press "OK".
2
3
Select "To Card" or "To Internal".
Press "OK" to confirm the setting.
Function
Copy the data in the internal flash memory and then save
it in the memory card.
Copy the data in the memory card and then save it in the
internal flash memory.
57
.
Chapter 3: Reviewing Images and Video Clips
Move the Images & Video Clips
Mode
To Card
To Internal
58
1
In the playback menu, select "Move" and
then press "OK".
2
3
Select "To Card" or "To Internal".
Press "OK" to confirm the setting.
Function
Transfer the data from the internal flash memory to the
memory card.
Transfer the data from the memory card to the internal
flash memory.
Chapter 4
Installing the Software
The software CD supplied with the camera includes the driver and the application (Digital Image, PhotoImpression, and VideoImpression). The application
allows you to upload the images from the camera, view them, print them, and
e-mail them. So please install the software before you connect the camera to
the computer.
Windows System Requirements
• Windows 98, 98SE, ME, 2000, and XP
• Pentium II processor or greater
• 32MB of available RAM
• 110MB of available hard disk space
• CD-ROM drive
• USB port
• Color Monitor with a minimum resolution of 800 x 600 pixels
Mac OS Requirements
• Mac OS 9.x, 10.0, and 10.1
• 32MB of available RAM
• 110MB of available hard disk space
• CD-ROM drive
• USB port
• Color Monitor with a minimum resolution of 800 x 600 pixels
59
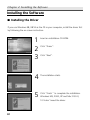
Chapter 4: Installing the Software
.
Installing the Software
Installing the Driver
If you use Windows 98, 98 SE as the OS in your computer, install the driver first
by following the on-screen instruction.
60
1
2
3
Insert an installation CD-ROM.
4
The installation starts.
5
Click "Finish " to complete the installation.
Windows ME, 2000, XP and Mac OS 9.X,
10.X don't need the driver.
Click "Driver".
Click "Next".
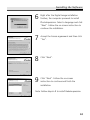
Installing the Software
6
Click "Yes" to continue install DirectX
8.1.
Note : We suggest to install DirectX 8.1 for all
Win OS.
7
Click "Yes".
8
Starting install DirectX 8.1.
9
10
Click "Sure" to complete the installation.
Restart your computer.
Note : Before installing the driver, insert the
memory card first.
61
.
Chapter 4: Installing the Software
62
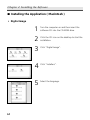
Installing the Application ( Windows )
1
2
Turn on the computer and then insert the
software CD into the CD-ROM drive.
3
Select a language and click "Next". Follow
the on-screen instruction to continue the
installation.
4
Accept the license agreement and then click
"Next".
5
Click "Next". Follow the on-screen instruction to continue and finish the installation.
After you insert the CD into the CD-ROM
drive, the first Install window will appear.
If the install window doesn’t appear, click
"Start" and then "Run". Type "E:\ Rollei.
exe" E is the drive letter that contains the
software CD.
Click "Digital Image • PhotoImpression".
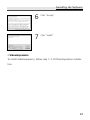
Installing the Software
6
Right after the Digital Image installation
finishes, the computer proceeds to install
PhotoImpression. Select a language and click
"Next". Follow the on-screen instruction to
continue the installation.
7
Accept the license agreement and then click
"Yes".
8
Click "Next".
9
Click "Next". Follow the on-screen
instruction to continue and finish the
installation.
Note: Follow step 6~9 to install VideoImpression.
63
.
Chapter 4: Installing the Software
Installing the Application ( Macintosh )
• Digital Image
64
1
2
3
Turn the computer on and then insert the
software CD into the CD-ROM drive.
4
Click "Installers".
5
Select the language.
Click the CD icon on the desktop to start the
installation.
Click "Digital Image".
Installing the Software
6
Click "Accept".
7
Click "Install".
8
Restart your computer.
65
Chapter 4: Installing the Software
• PhotoImpression
66
1
2
3
Insert the software CD into the CD-ROM
drive.
4
Select the language.
5
Click "PhotoImpression Installer".
Click the CD icon on the desktop to start the
installation.
Click "PhotoImpression".
Installing the Software
6
Click "Accept".
7
Click "Install".
• VideoImpression
To install VideoImpression, follow step 1~7 of PhotoImpression installation.
67
Chapter 4: Installing the Software
.
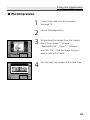
Using the Application
68
Digital Image
1
2
Connect the camera to the computer. See
page 72.
3
To reserve the images in the memory card,
click "No"; to delete all of the images in the
memory card, click "Yes".
4
Select the image that you want to edit.
5
Use the tools to edit the image or click
link PhotoImpression.
Launch Digital Image and click "Yes" to
download the images from the camera.
to
.
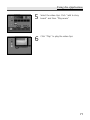
Using the Application
PhotoImpression
1
2
3
Connect the camera to the computer.
See page 72.
4
You can open two images at the same time.
Launch PhotoImpression.
To download the images from the camera,
select "From Folder", "Browse",
"Removable Disk", "Dcim", "100xxxxx",
and click "Ok". Click the image that you
want to edit in the frame.
69
.
Chapter 4: Installing the Software
70
VideoImpression
1
2
Connect the camera to the computer. See
page 72.
3
Click "Get".
4
Select "DCIM" to download the video clips
from the camera.
Launch VideoImpression and then select
"New".
Using the Application
5
Select the video clips. Click "add to story
board" and then "Play movie"
6
Click "Play" to play the video clips.
71
Chapter 5
Uploading, Printing and Displaying Images
After you take pictures, you can upload images to a computer from your
camera, print them with a printer, and display them on a TV.
Uploading to a Computer
1
Connect the larger end of the USB cable to
the USB slot of a computer.
2
In any mode, open the terminal cover and
connect the small end of the USB cable to
the camera.
3
The computer automatically detects the
camera as a mass storage device so that you
can copy the image file from your camera to
the hard drive of a computer.
Note 1: Upon connecting the camera to a
computer, the LCD monitor turns off
automatically.
Note 2: If you use Windows 98/98SE as the OS in
your computer, you have to install USB
driver from the software CD-ROM.
72
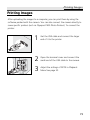
Printing Images
Printing Images
After uploading the images to a computer, you can print them by using the
software packed with the camera. You can also connect the camera directly to
some specific printers (such as Olympus P400 Photo Printers). To connect the
printer:
1
Get the USB cable and connect the larger
end of it to the printer.
2
3
Open the terminal cover and connect the
small end of the USB cable to the camera.
Adjust the settings of DPOF in Playback
Menu.See page 53.
73
Chapter 5: Uploading, Printing, and Displaying Images
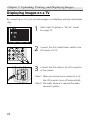
Displaying Images on a TV
By connecting to a TV, you can view images as a slideshow and play audio/video
clips.
1
Select right TV system in "Set Up" mode.
See page 79.
2
Connect the A/V (Audio/Video) cable to the
A/V inputs of a TV.
3
Connect the A/V cable to the A/V connector
of the camera.
Note 1: When you connect your camera to a TV,
the LCD monitor turns off automatically.
Note 2: The audio terminal is red and the video
terminal is yellow.
74
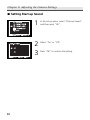
Chapter 6
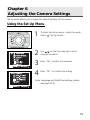
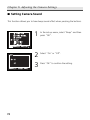
Adjusting the Camera Settings
Set up mode allows you to adjust the default settings of this camera.
Using the Set Up Menu
1
To enter the set up menu, rotate the mode
2
3
4
Use
on the four-way key to scroll
through the menu.
dial to
"Set Up mode".
Press "OK" to enter the submenu .
Press "OK" to confirm the setting.
Note: Language and Date/Time settings, please
see page 20-21
75
.
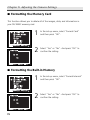
Chapter 6: Adjusting the Camera Settings
Formatting the Memory Card
This function allows you to delete all of the images, data, and information in
your SD/ MMC memory card.
.
76
1
In the set up menu, select "Format Card"
and then press "OK".
2
Select "Yes" or "No". And press "OK" to
confirm the setting.
Formatting the Built-in Memory
1
In the set up menu, select "Format Internal"
and then press "OK".
2
Select "Yes" or "No". And press "OK" to
confirm the setting.
.
Using the Set Up Menu
Setting Power Saving Function
To save the battery power, the camera turns off automatically when it is not in
use for 1~30 minutes.
1
In the set up menu, select "Auto Off"and
then press "OK".
2
3
Select "Off","1 Min", "2 Min", "3 Min", "5
Min","10 Min", or "30 Min".
Press "OK" button to confirm the setting.
77
.
Chapter 6: Adjusting the Camera Settings
Setting Camera Sound
This function allows you to have beep sound effect when pressing the buttons.
78
1
In the set up menu, select "Beep" and then
press "OK".
2
3
Select "On" or "Off".
Press "OK" to confirm the setting.
.
Using the Set Up Menu
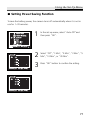
Setting TV System
Both NTSC and PAL are TV's broadcast systems. The NTSC system is mainly used
in U.S.A., Japan, Canada, Mexico, the Philippines, and Korea. The PAL system is
used in the western Europe such as Germany, England, Switzerland, Holland,
Italy (except for France) and Australia, Singapore, Thailand and China.
As these systems have no compatibility, you cannot watch an NTSC system
based TV in an area where a PAL system is used.
This camera can switch the video output signal to both an NTSC system and a
PAL system so you can watch the images on TV not only in your own country,
but around the world.
1
In the set up menu, select "Video Out" and
then press"OK" .
2
3
Select "NTSC" or "PAL".
Press "OK" to confirm the setting.
Note: Image will be black and white on the TV
screen if you choose the wrong TV system.
79
.
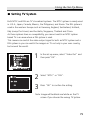
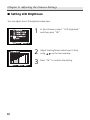
Chapter 6: Adjusting the Camera Settings
Setting LCD Brightness
You can adjust the LCD brightness value here.
80
1
In the still menu, select " LCD brightness"
and then press "OK".
2
3
Adjust the brightness value from 0~9 by
using
on the four-way key.
Press "OK" to confirm the setting.
.
Using the Set Up Menu
Customizing Your Start-up Screen
This option allows you to choose the welcome screen displayed when you turn
the camera on. The camera provides you with two default start-up screen.
1
In the set up menu, select "Start-up Screen"
and then press "OK".
2
3
Select "Off", "Default 1", or "Default 2".
Press "OK" to confirm the setting.
81
.
Chapter 6: Adjusting the Camera Settings
82
Setting Start-up Sound
1
In the set up menu, select "Start-up Sound"
and then press "OK".
2
3
Select "On" or "Off".
Press "OK" to confirm the setting.
.
Using the Set Up Menu
Resetting Your Camera
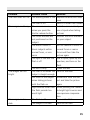
You can restore the settings to default by using "Reset" function.
Setting
1
In the set up menu, select "Reset" and then
press "OK".
2
3
Select "Yes" or "No".
Press "OK" to confirm the setting.
Default
2288 x 1720
Best
Exposure Compensation 0.0
Single
Drive Mode
Auto
White Balance
Full Area
Exposure Area
Central
Focus Area
Auto
ISO
Normal
Sharpness
Normal
Saturation
Normal
Style
Image Size
Quality
Setting
Flash Mode
Self-timer
Slide Show Interval
Auto Off
Beep
Video Out
LCD Brightness
Language
Start-up Screen
Start-up Sound
Default
Off
Off
3 Sec
3 Min
Off
NTSC
5
English
Default 1
Off
83
Trouble Shooting
Problem
The camera does not
work
The camera does not
take a picture when I
press the shutter
release button
Possible Cause
The power is off
The batteries are inserted incorrectly
The batteries are low or
drained
The camera is not in
shooting mode
You did not press the
shutter release button
hard enough
The memory card is full
Solution
Press the power button to
turn it on
Reload the batteries correctly
Replace batteries with new
ones
Rotate the mode dial to
shooting mode
Press the shutter release
button all the way down
Replace another memory
card, upload the images to
a computer or delete all
images
The camera is still saving Wait until the camera finthe last image you take ishes storing the image
The flash is still recharg- Wait for a few seconds
ing
until the recharging is completed.
The batteries are low
Replace batteries with new
ones
The built-in memory is
Upload the images to a
full and you did not
computer, delete all
insert a memory card.
images, or insert a memory
card.
84
Problem
The flash does not fire
The images are blurry
The images are too
bright
The images are too
dark
Possible Cause
Solution
The battery power is low Replace batteries with new
ones
The flash is off
Switch to other flash modes
The camera moves
Hold the camera steady or
when you press the
use a tripod when taking
shutter release button.
pictures
The focus brackets are
Position the focus brackets
not positioned on the
on your subject
subject
Use macro mode to
Set the camera to shoot in
shoot subjects within
normal focus or macro
normal focus, or vice
focus and then take the
versa
picture again
The light is low and the Use a tripod, open up the
flash is off
aperture, and turn on the
flash
The lens is dirty
Clean the lens
The flash is on when the Turn off the flash
subject is bright enough
Too close to the subject Move back from the subwhen taking pictures
ject and take the picture
with the flash on
again
Light sources other than Avoid pointing the camera
the flash provide too
to bright light sources and
much light
use exposure compensation
The flash is off
Turn on the flash
The subject is in dark
Turn on the flash
85
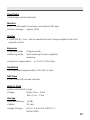
Specifications
Type
• Recording media exchangeable 3x zoom digital camera with LCD monitor.
Effective Pixels
• [Total] 4.1M pix
• [Image] 3.9M pix
Image Capture Unit
• Sensor :
1/2.5 inch-type interline CCD
• Image Size :
2288 x 1720
1600x1200
1280 x 960
640x480
Lens
• Focal length :
• f/-number :
• Distance :
• Macro :
f=5.6 - 16.8mm (35mm camera format
equivalent : 34 – 100mm)
F2.8/ F4.8 (Wide), F4.9/ F 8.4 (Tele)
0.5m-infinity
0.10m-0.5m (wide only)
Digital Zoom
• 2.0 x
Auto Focus (AF)
• Focusing type :
TTL CCD AF
• AF sensing range : From EV 8 to EV 16
• AF area :
Spot metering/ Central Metering
86
Viewfinder
• Real image optical viewfinder
Monitor
• 1.5", 71000 pixels Low power consumption LED type
• Frame coverage : approx. 85%
Shutter
• 1/2000[F4.8] - 2 sec., electro-mechanical and charge-coupled shutter plus
aperture control.
Exposure
• Exposure mode
• Metering mode
Program mode
Spot metering/ Center- weighted
metering.
• Exposure Compensation +/- 2.0 Ev (1/3 Ev Step)
Sensitivity
• ISO equivalent approximately 200, 400 or Auto
Self timer
• 3 or 10 sec with red eye indicator
Build-in Flash
• Auto control built-in type
• Range
Wide: 0.5m – 3.0m
Tele: 0.5 m – 2.5m
Storage
• Internal Memory 16 MB
• Media
SD card
• Image file type
DCF v1.0, Exif v2.0, DPOF v1.1,
Motion JPEG
87
Specifications
I/O External
• DC input
• Video output
• PC connection
DC 5V adaptor (regular plug)
NTSC and PAL (selectable)
Mini-plug type USB, mini USB connector for serial cable
Power Sources
• Li-ion batteries
• AC adaptor (DC 5 volt)
Dimensions
• Size
• Weight
110mm x 56mm x 35mm
160 grams (without batteries)
System Requirements: Windows
• CPU
Pentium II or more
• Memory
At least 32MB
• OS
Windows 98 / Windows 98SE / Windows ME /
Windows 2000 / Windows XP
• Interface
USB 1.1
• VGA color monitor
• CD-ROM
System Requirements: Macintosh
• Memory
At least 32MB
• OS
Mac OS 9 / 9.0.2 / 9.0.4 / 9.1 / 10.0
• Interface
USB 1.1
• VGA color monitor
88