1
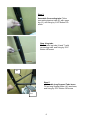
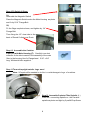
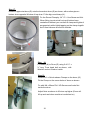
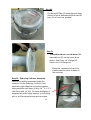
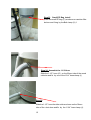
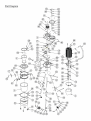
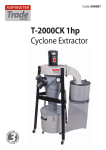
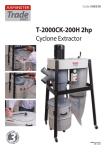
Code 505088
T-2000CK 2hp
Cyclone Extractor
3
INVENTORY LIST
C1
B
F
A
G
A1
Q
O
B1
T
H
Z
N
I
J
E
K
R
L
W
C
D
M
S
P
X
V
Y
A. Reducing Collector
N. Lower Leg (Short-2 off)
B. Round Collector
C. 7”*4” Y-adapter
O. Upper Leg (3 off)
P. PE Bag (Small for under filter)
D. Housing Cover
E. Connecting Bracket (3 off)
Q. Lower Dust Drum
R. Upper Dust Drum
F. Main Housing Assembly
S. PE Bag (Big for waste drum)
G. 1-1/2” Hose
T. Lower Leg (Long-1 off)
H. Round Clamp (Large)
U. Wheels (2 off)
I. Round Clamp
(Small)
V. Ball Caster (4 off for Waste Drum)
J. 1-3/4”Hose Clamp
(2 off)
W. Hardware Bags
K. Handle
X. Filter Bag Clamp
L. Connecting Shaft
Y. Caster with Brake (1 off)
M. Filter Handle
Z. Drum Lid
A1 Brace (2 off long)
B1 Brace (1 off Short)
C1 Canister Filter
D1 Negative Gage Set
4
U
Machine Assembly
Step 1 Assemble Round Collector Main Housing
Place the main housing (F) upside down, and place the
Round Collector (B) on the housing on motor side with inlet
Chute positioned as shown
Fixing by 12 off,3/16” x 3/8” Cap screws around drum and
6 off, 1/4 Hex head Bolts on leg supports
Notice:
The Position of
Inlet
12 of Cap
Screws
6 off Hex Head Bolts
Step 2 Assemble Upper Leg with Round Collector
Fit three pcs Upper Legs (O)in the tube bracket on
the round collector as shown. Fixing by Three 5/16” Button
HD Screw for each leg
5
Step 3
Assemble Connecting tube Fit the
connecting bracket tube (E) with upper
leg (O), and fixing by 5/16” Button HD
screw
Step 4 leg tube
Fit the lower leg tube (N and T) with
connecting tube, and fixing by 5/16”
Button HD screw
A1
Step 5
Assemble long Support Tube brace
Fit two long Support brace (A1) as shown,
and fixing by 5/16” Button HD screw
A1
6
Step 6
Assemble Short Support Tube brace
Fit the short Support Tube Brace (B1) as shown,
and fixing by 5/16” Button HD screw
B1
Step 7
Assemble 7” (U) Wheel in short lower leg (N)
as shown, and fixing by 3/8” Nut
Step 8
Assemble 3” Caster(Y) in the Long lower leg (T)
as shown,
7
Step 9 Fit Switch & Gage
9A)
Assemble the Magnetic Switch
Place the Magnetic Switch under the Main Housing as photo
and fix by 5/16” Flange Bolt.
9B)
Fit the Gage as photo shows, and tighten by 1/4”
Flange Bolt.
Then fixing the 1/2” clear tube to the
back of Round Collector as Photo
Step 10 Assemble the Canister
Filter (C1) with Main Housing (F) Carefully turn dust
collector on its side to assist in the assembly of the main
filter to the housing Use 6 x Flange head 5/16” x 3/4”
long Whitworth bolts supplied.
Step 11 Turn unit upright onto its Legs now!
Note: 3 People will be needed to do this to avoid damage to Legs of machine.
Step 12 Assemble Canister Filter Spindle .(L)
Place the connecting Spindle on the Canister
spindle as photo and tight by 2 pcsM6 Cap Screw
8
Step 13 Fit top lid (D)
Please the main Housing cover with Main Housing
and fit as photo 3/16" x 3/8 socket head cap screws.
Step 14 Assemble canister filter cleaning Handle
(M) Place Handle on the Canister and fix by the M6
set Screw.
Step 15 Assemble Y-Adaptor (C)
Fit as shown and fasten with 3x 3/ 16"x 3/ 8 socket head
cap screws
Step 16 Assemble dust drum
Assemble Dust Drum
Fix the 4 x Ball Caster (V) under the lower dust drum
(Q) as photo
9
Step 17 .
Place the upper dust drum (R) onto the lower dust drum (Q) as shown, with suction pips on
bottom drum opposite Window of top drum. Fit the big round clamp (H).
Fix the Round Clamp by 1/4”*4” L Hex Screw and Nut.
When fitting top drum half on top of bottom base
centralize it the best you can then fit clamp and tighten it
progressively while lightly tapping on the clamp ringwith
a soft face hammer around the outside.
Step 18.
Fit Handle (K) to Drum (R) using 2 off ¼” x
¾” long Truss head bolt as shown, with
Washer and nut fitted on inside.
Step 19.
Install the 3 x Quick release Clamps on the drum,(W)
Fit the Clamp on the screw holes of drum as shown.
Fix with M4 x 20mm Phil. HD Screws and locks Nut
inside the drum.
Adjust Nuts as shown to lift drum up higher.(Drum will
lift up and seal when machine is switched on)
10.
Step 20
Put the big PE Bag (S) inside the dust drum.
And try to get air between the Drum and PE
bag out as much as possible
Step 21
Assemble reducer cone to drum lid
Assemble Lid (Z) and top cone (A) as
shown. And Fix by 1/4” Flange HD
Screw, and 1/4”Flange Nut
Place this assembly on top of the
mobile collection drum to assist in
the next step
Step 22 Reducing Collector Assembly
When d rum and lid assembled under the
machine. Lift the Reducing Collector, and
assemble under Machine to connect together.
Using small Round Clamp (I) fix by 1/4” *2 - 1 /2 ” L
Hex Screw and 1/4” Nut. Fit clamp and tighten it
progressively while lightly tapping on the clamp
with a soft face hammer around the outside
11
Step 23
Small PE Bag Install
Place the small PE bag (P) as shown on canister filter
bottom and fixing by the Belt clamp (X) 1
Step 24 Assemble the 1-1/2 Hose
Slide the 1-1/2” hose (G) on the 38mm tube of the round
collector and fix by one of the1-3/4” hose clamp.(J)
Step 25.
Slide the 1-1/2” hose the other side as shown on the 38mm
tube of the dust drum and fix by the 1-3/4” hose clamp (J).
12
Part List
1
2
3
4
5
6
7
8
9
10
11
12
13
14
15
16
17
18
19
20
21
22
23
24
25
26
27
28
29
30
31
32
33
34
35
36
37
38
39
41
42
44
46
47
48
50
51
52
Motor
Main Housing
Aluminum Impeller
Reducing Collector
PE Bag
PE Bag
Ball Caster
Round Clamp
Hose
Switch Plate
Magnetic Switch
Hose Clamp
Inlet
Steel Clamp
Impeller Washer
Handle
Square Pad
PC Board
Inlet Cap
Lower Fixing Plate
Flapper
Bearing Fixing Plate
Washer
Flange Nut
Lower Drum
Round Clamp
Upper Drum
Hex Bolt
Rivet 4-2
Canister Filter
Main Housing Cover
Caster
Wheel Bolt
Nut
Wheel
Motor packing
Key
Bearing
Cap Screw
Phil. HD Screw
Phil. HD Screw
Hex Bolt
Button HD Screw
Washer
Lock Nut
Hex Bolt
Round Collector
Upper Leg
12-3/4"
Big(101)
Small
2" *5/16"
Dia. 347
1-1/2"* 1.8M
1-1/2"
7"*4"*2
Dia. 370
Plastic
4"
New
1/4* 13mm
1/4"
Dia. 525
1/4"* 2-1/2"
1 Micron
3" * 3/8" w/ Brake
7"
7*7*25
M6*30 LH
1/4"* 5/8"
M5*10
M6* 10
5/16"* 1/2"
1/2"*19mm
1/2"
1/2"*4"
1
1
1
1
1
1
1
1
1
1
1
2
1
1
1
1
1
1
1
1
3
2
2
8
1
1
1
2
8
1
1
1
2
3
2
3
1
3
1
2
6
7
33
4
4
2
1
3
NO. Description
Specification
Q'TY
53
Connecting Tube
3
54
Lower Leg
3
55
Power Cord W/ Plug
1
56
N Type Handle
1
57
Cap Screw
3/16"* 3/8"
27
58
Main Spindle
1
59
Connecting Spindle
1
60
Cap Screw
M6* 12
2
61
Bearing Fixing Plate
1
62
Hex Bolt
M6* 16
1
63
Flange Bolt
1/4"*1/2"
8
64
Flange Bolt
1/4"* 1/2"
14
66
Nut
M5
4
67
Drum Lid
1
68
Cap Nut
1/4"
2
69
Phil. HD Screw
M4*8
12
70
Lock Nut
M4
12
71
Tooth Washer
3/8"
3
72
Fixing Plate
2
73
Phil. HD Screw
M5*15
4
74
Nut
5/16"
4
75
Hex Bolt
5/16"* 3/4"
4
76
Washer
1/4"
7
77
Gage Fixing Plate
1
78
Gage Fixing Ring
1
79
Negative Gage
1
80
Button HD Screw
2
81
Nut
1/4"
2
83
Flange Nut
5/16"
4
84
Support Brace (A1)
85
Clear Hose
Dia. 12
1
86
Hose Clamp
3/4"
2
87
Support Brace (B1)
Short 410
1
88
Rubber Packing
2
89
Spring Washer
M6
1
Long 520
2
General Machinery Safety Instructions
Read this entire Manual before using this machine.
1. Read the entire Manual before starting
machinery. Machinery may cause serious injury if
not correctly used.
2. Always use correct hearing protection when
operating machinery. Machinery noise may cause
permanent hearing damage.
3. Machinery must never be used when tired, or
under the influence of drugs or alcohol. When
running machinery you must be alert at all times.
4. Wear Correct Clothing. At all times remove all
loose clothing, necklaces, rings, jewelry, etc. Long
hair must be contained in a hair net. Non-slip
protective footwear must be worn.
5. Always wear correct respirators around fumes
or dust when operating machinery. Machinery
fumes & dust can cause serious respiratory illness.
Dust extractors must be used where applicable.
6. Always wear correct safety glasses. When
machining you must use the correct eye protection
to prevent injuring your eyes.
7. Keep work clean and make sure you have good
lighting. Cluttered and dark shadows may cause
accidents.
8. Personnel must be properly trained or well
supervised when operating machinery. Make
sure you have clear and safe understanding of the
machine you are operating.
9. Keep children and visitors away. Make sure
children and visitors are at a safe distance for you
work area.
10. Keep your workshop childproof. Use padlocks,
Turn off master power switches and remove start
switch keys.
11. Never leave machine unattended. Turn power off
and wait till machine has come to a complete stop
before leaving the machine unattended.
12. Make a safe working environment. Do not use
machine in a damp, wet area, or where flammable
or noxious fumes may exist.
13. Disconnect main power before service
machine. Make sure power switch is in the off
position before re-connecting.
14. Use correct amperage extension cords.
Undersized extension cords overheat and lose
power. Replace extension cords if they become
damaged.
15. Keep machine well maintained. Keep blades
sharp and clean for best and safest performance.
Follow instructions when lubricating and changing
accessories.
16. Keep machine well guarded. Make sure guards
on machine are in place and are all working
correctly.
17. Do not over reach. Keep proper footing and
balance at all times.
18. Secure workpiece. Use clamps or a vice to
hold the workpiece where practical. Keeping the
workpiece secure will free up your hand to operate
the machine and will protect hand from injury.
19. Check machine over before operating. Check
machine for damaged parts, loose bolts, Keys and
wrenches left on machine and any other conditions
that may effect the machines operation. Repair and
replace damaged parts.
20. Use recommended accessories. Refer to
instruction manual or ask correct service officer
when using accessories. The use of improper
accessories may cause the risk of injury.
21. Donot force machinery. Work at the speed and
capacity at which the machine or accessory was
designed.
22. Use correct lifting practice. Always use the
correct lifting methods when using machinery.
Incorrect lifting methods can cause serious injury.
23. Lock mobile bases. Make sure any mobile bases
are locked before using machine.
24. Allergic reactions. Certain metal shavings and
cutting fluids may cause an ellergic reaction in
people and animals, especially when cutting as the
fumes can be inhaled. Make sure you know what
type of metal and cutting fluid you will be exposed
to and how to avoid contamination.
25. Call for help. If at any time you experience
difficulties, stop the machine and call you nearest
branch service department for help.
Wood Dust Collector Safety Instructions
Read this entire Manual before using this machine.
1. Maintenance. Make sure the Dust collector is
turned off and disconnect from the main power
supply and make sure all moving parts have come to
a complete stop before any inspection, adjustment
or maintenance is carried out.
2. Dust collector Condition. Dust collector must be
maintained for a proper working condition. Never
operate a Dust collector that has damaged or
worn parts. Scheduled routine maintenance should
performed on a scheduled basis.
3. Inlet Hazard. Do not place hands or tools near the
open inlets during operation for any reason. The
impeller could cause serious damage to body parts if
touched while spinning.
4. Avoiding Entanglement. Guards and dust bags
must be used at all times. Remove loose clothing,
belts, or jewelry items. Tie up long hair and use the
correct hair nets to avoid any entanglement with the
Dust collector.
5. Understand the machines controls. Make sure you
understand the use and operation of all controls.
6. Power outage. In the event of a power failure
during use of the Dust collector, turn off all switches
to avoid possible sudden start up once power is
restored.
7. Work area hazards. Keep the area around the Dust
collector clean from oil, tools, chips. Pay attention to
other persons in the area and know what is going on
around the area to ensure unintended accidents.
8. Hearing protection and hazards. Always wear
hearing protection as noise generated from dust
collector can cause permanent hearing loss over
time.
9. Dust Collector use. This Dust Collector is designed
to be used with wood & Metal only. Do not pick
up material that can not safety pass through the
impeller.
10. Fire Hazard. Ensure machines and hoses are
thoroughly cleaned inside and out of all wood
dust and chips before using this machine for steel
dust. Ensure the dust extraction hose used is heat
resistant and flame retardant and a minimum length
of 2 meters between machine and dust collector.
11. Bags & guards. All safety bags and guards must
be used at all times. Bags must be replaced when
damaged.
12. Emptying bags hazard. Always wear a respirator
and safety glasses when emptying dust into
approved containers and dispose of properly.
13. Wood dust may cause allergic reactions. Make
sure you know what type of dust you are exposed
to as it may cause you an allergic reaction. Always
wear an approved respirator.
14. Call for help. If at any time you experience
difficulties, stop the machine and call you nearest
branch service department for help
The Axminster guarantee is available on
Hobby, Trade, Industrial, Engineer, Air Tools & Axcnc Technology Series machines
It’s probably the most comprehensive FREE guarantee ever- buy with confidence from Axminster!
So sure are we of the quality, we cover all parts and labour free of charge for three years!
• Look for the icon and put your trust in Axminster
• No registration necessary - just keep your proof of purchase
• Optional Service Plan for Industrial Series machinery
AXMINSTER
Hobby
SERIES
Great value & easy-to-use,
perfect for use at home
Solid, reliable machines
designed for daily use
Top performers with class leading features and
build quality for use in busy workshops
Quality, precision machines
for the workshop or education
Small machines for the home
engineer
Compressors and tools for home or
workshop use; durable and great value
Precision CNC machines for
industry and education
Free Three Year Guarantee on Axminster Hobby, Trade and Industrial Series woodworking and
engineering machines, Axminster Air compressors and Air Tools, and bench top grinders - no
registration necessary just proof of purchase.
Normal wear and tear; misuse, abuse and neglect are excluded and the machine should not have been
modified in any way. Please do not attempt to service the product without first contacting us; we are
happy to guide you but failure to do so may invalidate the guarantee.
We will repair or replace at our discretion and will collect only from a UK mainland address,
irrespective of the original delivery address.
The Guarantee is transferable from owner to owner in the first three years but you must have original
proof of purchase. Should we need to replace a machine in the first three years the guarantee will still
continue to be effective from the original purchase date.
The Guarantee assumes that you have bought the correct machine for the required operation, in
accordance with our guidelines; have operated and maintained it in accordance with the instruction
manual; and that all cutting machines will be used with a blade which is sharp and serviceable at all
times. It does not cover consumable items purchased with the original product, including original
blades or abrasives.
Full Terms and Conditions can be found at axminster.co.uk/terms
This guarantee does not affect your statutory rights.
For more information visit axminster.co.uk/3years
Please dispose of packaging for the product in a responsible manner. It is suitable for recycling. Help to
protect the environment, take the packaging to the local recycling centre and place into the appropriate
recycling bin.
Only for EU countries
Do not dispose of electric tools together with household waste material. In observance of European
Directive 2002/96/EC on waste electrical and electronic equipment and itsimplementation in accordance
with national law, electric tools that have reached the end of their life must be collected separately and
returned to an environmentally compatible recycling facility.
Axminster Tools & Machinery Ltd
Weycroft Avenue, Axminster, Devon EX13 5PH
axminster.co.uk