1
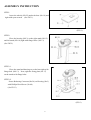
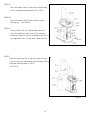
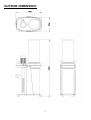
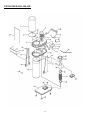
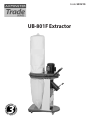
Code 501215
UB-801F Extractor
CONTENTS:
IMPORTANT SAFETY RULES -------------------------------------------------------------- 2
SAFETY LABEL --------------------------------------------------------------------------------- 5
GROUNDING INSTRUCTIONS ------------------------------------------------------------- 7
SPECIFICATIONS ------------------------------------------------------------------------------ 8
CONTENTS OF PACKAGE & TRANSPORTATION------------------------------------ 9
ASSEMBLY INSTRUCTION ----------------------------------------------------------------- 11
WIRING DIAGRAM ---------------------------------------------------------------------------- 13
OUTSIDE DIMENSION ----------------------------------------------------------------------- 14
EXPLODED DIAGRAM ---------------------------------------------------------------------- 15
PARTS LIST ------------------------------------------------------------------------------------- 16
MAINTENANCE / SERVICE ----------------------------------------------------------------- 17
• WARNING!
Please read this manual carefully before assembly,
testing and operating.
• WARNING!
Do not operate this unit until the hose is connected to
the inlet port.
• WARNING!
This machine is for woodworking machinery use only, and
prohibited for other purposes. The collection equipment
(machine) is used for dry woodworking debris/chips/swarfs
collection purpose. Any other application is prohibited. No
explosive proof design is used.
1
IMPORTANT SAFETY RULES
Wood working can be dangerous if safe and proper operating procedures are not followed. As with all machinery, there are
certain hazards involved with the operation of the product. Using the machine with respect and caution will considerably
lessen the possibility of personal injury. However, if normal safety precautions are overlooked or ignored, personal injury to
the operator may result.
Safety equipment such as guards, push sticks, hold-downs, feather boards, goggles, dust masks and hearing protection
can reduce your potential for injury. But even the best guard won’t make up for poor judgment, carelessness or inattention.
Always use common sense and exercise caution in the workshop. If a procedure feels dangerous, don’t try it. Figure out an
alternative procedure that feels safer. REMEMBER: Your personal safety is your responsibility.
WARNING: FAILURE TO FOLLOW THESE RULES MAY RESULT IN SERIOUS PERSONAL INJURY
1.
FOR YOUR OWN SAFETY, READ INSTRUCTION
15. DON’T OVERREACH. Keep proper footing and balance
MANUAL BEFORE OPERATING THE TOOL. Learn the
tool’s application and limitations as well as the specific
at all times.
16. MAINTAIN TOOLS IN TOP CONDITION. Keep tools
hazards peculiar to it.
sharp and clean for best and safest performance. Follow
2.
KEEP GUARDS IN PLACE and in working order
instructions for lubricating and changing accessories.
3.
ALWAYS WEAR EYE PROTECTION
4.
GROUND ALL TOOLS. If tool is equipped with
three-prong plug, it should be plugged into a three-hole
17. DISCONNECT TOOLS before servicing and when
changing accessories such as blades, bits, cutters, etc.
18. USE RECOMMENDED ACCESSORIES. The use of
electrical receptacle. If an adapter is used to
accessories and attachments not recommended by us
accommodate a two-prong receptacle, the adapter plug
must be attached to a known ground. Never remove the
5.
may cause hazards or risk of injury to persons.
19. REDUCE THE RISK OF UNINTENTIONAL STARTING.
third prong.
Make sure switch is in “OFF” position before plugging in
REMOVE ADJUSTING KEYS AND WRENCHES. Form
power cord.
habit of checking to see that keys and adjusting wrenches
20. NEVER STAND ON TOOL. Serious injury could occur if
are removed from tool before turning it “ON”.
6.
KEEP WORK AREA CLEAN. Cluttered areas and
benches invite accidents.
7.
8.
9.
the tool is tipped or if the cutting tool is accidentally
contacted.
21. CHECK DAMAGED PARTS. Before further use of the
DON’T USE IN DANGEROUS ENVIRONMENT. Don’t
tool, a guard or other part that is damaged should be
use power tools in damp or wet locations, or expose them
carefully checked to ensure that it will operate properly
to rain. Keep work area well lighted.
and perform its intended function – check for alignment of
KEEP CHILDREN AND VISITORS AWAY. All children
moving parts, binding of moving parts, breakage of parts,
and visitors should be kept a safe distance from work
mounting, and any other conditions that may affect its
area.
operation. A guard or other part that is damaged should
MAKE WORKSHOP CHILDPROOF – with padlocks,
master switches, or by removing starter keys.
be properly repaired or replaced.
22. DIRECTION OF FEED. Feed work into a blade or cutter
10. DON’T FORCE TOOL. It will do the job better and be
safer at the rate for which it was designed.
against the direction of rotation of the blade or cutter only.
23. NEVER LEAVE TOOL RUNNING UNATTENDED. TURN
11. USE RIGHT TOOL. Don’t force tool or attachment to do a
POWER OFF. Don’t leave tool until it comes to a
job for which it was not designed.
12. WEAR PROPER APPAREL. No loose clothing, gloves,
complete stop.
24. DRUGS, ALCOHOL, MEDICATION. Do not operate tool
neck-ties, rings, bracelets, or other jewelry to get caught in
while under the influence of drugs, alcohol or any
moving parts. Non-slip footwear is recommended. Wear
protective hair covering to contain long hair.
medication.
25. MAKES SURE TOOL IS DISCONNECTED FROM
13. ALWAYS USE SAFETY GLASSES. Wear safety glasses.
POWER SUPPLY while motor is being mounted,
Everyday eyeglasses only have impact resistant lenses;
they are not safety glasses. Also use face or dust mask if
connected or reconnected.
26. WARNING: The dust generated by certain woods and
cutting operation is dusty.
wood products can be injurious to your health. Always
14. SECURE WORK. Use clamps or a vise to hold work when
operate machinery in well ventilated areas and provide for
practical. It’s safer than using your hand and frees both
proper dust removal. Use wood dust collection systems
hands to operate tool.
whenever possible.
2
Safety Contents:
1.
CAUTION: This appliance is not suitable for picking up hazardous dust.
2.
CAUTION: This appliance is for dry use only and is not to be used or stored outdoors in wet conditions.
3.
Regularly examine the supply cord for damage. If damaged, replace the cord specified, before further use.
4.
Only replace the supply cord with the type specified In the Instructions.
5.
Only use the socket outlet/or plug on the appliance for purposes specified in the instruction manual
6.
If the supply cord is damaged, it must be replaced by the manufacturer, its service agent or similarly
qualified persons in order to avoid a hazard.
7.
The appliance is to disconnected from its power source during cleaning or maintenance and when
replacing parts or converting the appliance to another function.
8.
WARNING: This appliance contains wood debris/dust hazardous to health. Operating emptying and
maintenance operations, including removal of the dust collecting means, must only be carried out by
authorized personnel wearing suitable personal protection. Do not operate without a good personal
respiration device wearing or without a good ventilation system acc. to national health code/regulation.
9.
When carrying out service or repair operations, all contaminated items which cannot be satisfactorily
cleaned, are to be disposed of; such items shall be disposed of in impervious bags in accordance with any
current regulation for the disposal of such waste.
10. It is necessary to provide for an adequate air change rate ∠ in the room if the exhaust air is returned to
the room. Reference to National Regulations is necessary.
3
IMPORTANT SAFETY RULES FOR DUST COLLECTORS
WARNING: Basic precautions should always be
11.
DO NOT unplug the dust collector by pulling on
followed when using your dust collector. To reduce the
the power cord. ALWAYS grasp the plug, not the
risk of injury, electrical shock or fire, comply with the
cord.
safety rules listed below:
12.
1. READ and understand the instruction manual
before operating the dust collector.
DO NOT handle the plug or dust collector with wet
hands.
13.
2. DO NOT leave the dust collector plugged into the
REPLACE a damaged cord immediately. DO
NOT use a damaged cord or plug. If the dust
electrical outlet. Unplug dust collector from outlet
collector is not operating properly, or has been
when not in use and before servicing, changing
damaged, left outdoors or has been in contact
bags, unclogging and cleaning.
with water, return it to an Authorized Service
3. ALWAYS turn the power switch “OFF” before
unplugging the dust collector.
Center for service.
14.
4. WARNING: TO REDUCE THE RISK OF
ELECTRICAL SHOCK do not use outdoors or on
use near or around children.
15.
wet surfaces. Use for dry pickup only!
DO NOT insert fingers or foreign objects into the
dust intake ports. Keep hair, loose clothing,
5. FOLLOW all electrical and safety codes, including
fingers, and all body parts away from openings
the National Electric Code (NEC) and the
Occupational Safety and Health Regulations
DO NOT use the dust collector as a toy. DO NOT
and moving parts of the dust collector.
16.
DO NOT use the dust collector without a filter bag
(OSHA). All electrical connections and wiring
and dust collection bag in place and properly
should be made by qualified personnel only.
secured.
6. DO NOT use the dust collector to pick up
17.
DO NOT operate the dust collector with unused
flammable or combustible liquids, such as gasoline.
dust intake ports uncapped. ALWAYS cover
NEVER use the dust collector near any flammable
exposed dust intake ports.
or combustible liquids.
18.
7. USE the dust collector to pick up wood materials
any cuts, rips or tears. NEVER operate the dust
only. DO NOT use the dust collector to pick up
metal shavings, dust, water, or parts.
collector with a damaged bag or vacuum hose.
19.
8. NEVER use the dust collector to dissipate fumes or
smoke. NEVER pick-up anything that is burning or
The dust collector is designed for home use or
light commercial duty ONLY!
20.
smoking, such as cigarettes, matches or hot ashes.
9. USE only as described in this manual.
PERIODICALLY INSPECT dust and filter bags for
CONNECT dust collector to a properly grounded
outlet only. See Grounding Instructions.
21.
10. DO NOT pull the dust collector by the power cord.
The residual current device (RCD) is used in the
power supply system to reinforce the safety.
NEVER allow the power cord to come in contact
with sharp edges, hot surfaces, oil or grease.
MAINTENANCE:
1.
2.
Please unplug the plug and turn off the power supply before doing maintenance & change
the filters/filter bags & cleaning & repair.
Please clean the filters/filter bags after daily work and also maintain the appliance in a period of
time.
SAVE THESE INSTRUCTIONS
4
GROUNDING INSTRUCTIONS
The appliance must be grounded; if it should malfunction or breakdown, grounding provides a path of
least resistance for electric current to reduce the risk of electric shock. This appliance is equipped with
a cord that has a equipment-ground conductor and grounding plug. The plug must be inserted into an
appropriate outlet that is properly installed and grounded in accordance with all local codes and
ordinances.
WARNING – Improper connection of the equipment-grounding conductor can result in a risk of
electric shock. Check with a qualified electrician or service person if you are in doubt as to whether the
outlet is properly grounded. Do not modify the plug provided with the appliance – if it will not fit the
outlet; have a proper outlet installed by a qualified electrician.
For grounded, cord-connected appliances:
This appliance is for use on a circuit having a normal rating more than 120 volts and is
factory-equipped with a specific electrical cord and plug to permit connection to a proper electrical
circuit. Make sure that the appliance is connected to an outlet having the same configuration as the
plug. No adaptor should be used with this appliance. If the appliance must be reconnected for use on
a different type of electrical circuit, qualified service personnel should make the reconnection.
For a permanently connected appliance:
This appliance must be connected to a grounded metal, permanent wiring system, or an
equipment-grounding conductor must be run with the circuit conductors and connected to the
equipment grounding terminal or lead on the appliance.
Operation Conditions:
Voltage Steady state voltage: 0,9 to 1,1 of nominal voltage.
Frequency 0, 99 to 1, 01 of nominal frequency continuously; 0, 98 to 1,02 short time.
Harmonics Harmonic distortion not exceeding 10% of the total r.m.s. voltage between live conductors
for the sum of the 2nd through to the 5th harmonic.
Voltage interruption Supply interrupted or at zero voltage for not more than 3 ms at any random time
in the supply cycle with more than 1 s between successive interruption.
Voltage dips Voltage dips not exceeding 20% of the peak voltage of the supply for more than one
cycle with more than 1 s between successive dips.
The minimum requirement for all electrical equipment is correct operation between air temperature of
+5℃ and +45℃.
Electrical equipment is capable of operating correctly when the relative humidity does not exceeding
50% at a maximum temperature of +45℃.
Electrical equipment is capable of operating correctly at altitude up to 1000 m.
Electrical equipment is designed to withstand to protected against the effects of transportation, and
storage temperature within a range of -25℃ to +55℃ and for short periods not exceeding 24h at up to
+70℃.
Avoid exposing to vibration environment.
Avoid exposing to direct sunlight or heat rays.
Have to connect to the factory grounding system correctly away from electric magnetic interference
source sites, such welding, discharge machine.
5
Specifications:
Motor-----------------------------------------------------------------------------------------1HP/1 Phase
Motor Speed------------------------------------------------------------------------------- 2850 RPM
Suction Capacity------------------------------------------------------------------------- 700 CFM
Static Pressure---------------------------------------------------------------------------- 5.4 Inch H2O
Impeller Size------------------------------------------------------------------------------- 10”
Inlet Size------------------------------------------------------------------------------------- 4”
Switch----------------------------------------------------------------------------------------- ON/OFF Switch
Overall Dimensions of Base----------------------------------------------------------- 700 x 380 x 1450 mm
N.W. -------------------------------------------------------------------------------------------- 30 KGS
G.W. --------------------------------------------------------------------------------------------- 33 KGS
CUFT--------------------------------------------------------------------------------------------- 7.6’
Noise:
Average A weighted sound pressure level of UB-801F: 78.5 dB (A)
Associated uncertainty K = 4 dB
Measured made in accordance with EN ISO 3746
6
UNPACKING & CHECKING CONTENTS:
NO.
A
B
C
D
E
F
G
H
I
J
K
L
M
N
O
P
Description
Housing
Base
Hanger
Wheel
Upper Bag
Right Stand
Left Stand
Bag Clamp
Handle
Fixing Plate
Polyester Bag
Blast Gate
Y-Inlet
Hose Clamp
Hose
Reducing
Connector
Specification
4”
4”
4”
7
Q’TY
1
1
1
4
1
1
1
2
1
1
1
1
1
2
1
Part List No.
NO.3
NO.19
NO.30
NO.22
NO.1
NO.15
NO.14
NO.2
NO.8
NO.17
NO.16
NO.36
NO.32
NO.35
NO.37
1
NO.34
Hardware package:
NO.
Description
Specification
Q’TY
Part List No.
5/16”*1/2”
16
NO.13
5/16”*1-1/4”
4
NO.7
10*12
1
NO.31
A
Flange Bolt
B
Flat Head Screw
C
Open Wrench
D
Phillips Head Screw
3/16”*1/4”
4
NO.40
E
Phillips Head Screw
3/16”*3/8”
2
NO.33
TRANSPORTATION:
Please have at least 2 people work together when lifting up!!!
8
ASSEMBLY INSTRUCTION
STEP1.
Insert the wheels (NO.22) under the base (No.19) and
tight with open wrench. (See FIG.1).
(FIG.1)
STEP2.
Place the housing (NO.3) on the right stand (NO.15)
and left stand (NO.14) tight with flange bolts. (NO.13)
(See FIG.2)
(FIG.2)
STEP3-1.
Place the stand and housing set on the base tight with
flange bolt. (NO.13) Next, tight the fixing plate (No.17)
on the stands with flange bolts.
STEP3-2.
Secure Reducing Connector(No.34) on Housing (No.3)
with Phillips Head Screw (No.40)
(See FIG.3)
(FIG.3)
9
STEP4-1.
Place the handle (NO.8), on the top of the housing
(NO.3) and tight with flat head screw. (NO.7)
STEP4-2.
Insert the hanger (NO.30) into the holes of the
housing top. (See FIG.4)
STEP4-3
Attach Y Inlet (No.32) on Reducing Connector
(No.34) and then use Hose (No.37) to connector
Reducing Connector (No.34) and Blast Gate (No.38)
also tight Hose (No.37) with Hose Clamp (No.35)
(FIG.4)
STEP5.
Place the upper bag (N0.1) and lower polyester bag
(NO.16) on the top and bottom of the housing (NO.3),如圖所示(FIG.4)位置,利用鐵環固定帶
and tight with bag clamps. (NO.2)
(See FIG 5)
(Fig.5)
10
OUTSIDE DIMENSION:
11
EXPLODED DIAGRAM:
12
Part List:
NO.
1
2
3
4
5
6
7
8
9
10
11
12
13
14
15
16
17
18
19
20
21
22
23
24
25
26
27
28
29
30
31
32
33
34
35
36
37
38
39
40
Description
Upper Bag
Bag Clamp
Upper Housing
Motor
On/Off Switch
Cap
Flat Head Screw
Handle
Impeller
Impeller Washer
Cap Screw
Lower Housing
Flange Bolt
Right Stand
Left Stand
Lower Plastic Bag
Fixing Plate
Set Screw
Base
Flange Bolt
Washer
Ball Wheel
Motor Packing
Key
Pushing
Power Cord
Tapping Screw
Foam
Housing Foam
Hanger
Open Wrench
Inlet
Phillip Head Screw
Reducing Connector
Cap
Blast Gate
Hose
Blast Gate
Phillip Head Screw
Phillip Head Screw
Specification
Φ280*800
80H
1HP
3/4”
5/16”*1-1/4”
10”
M6*20
5/16”*1/2”
Φ280*800
5/16”*5/16”
1/4”*1/2”
1/4*25mm
2”
5*5*25
M5*10
7/8”*430*5
10*12
4”
3/16”x 3/8”
4”
4”
4”
4”
3/16”x 1/2”
3/16”x1/4”
13
Q’TY
1
1
1
1
1
2
4
1
1
1
1
1
16
1
1
1
1
1
1
4
4
4
1
1
1
1
16
1
1
1
1
1
2
1
1
1
1
1
6
4
The Axminster guarantee is available on
Hobby, Trade, Industrial, Engineer, Air Tools & Axcnc Technology Series machines
It’s probably the most comprehensive FREE guarantee ever- buy with confidence from Axminster!
So sure are we of the quality, we cover all parts and labour free of charge for three years!
• Look for the icon and put your trust in Axminster
• No registration necessary - just keep your proof of purchase
• Optional Service Plan for Industrial Series machinery
Great value & easy-to-use,
perfect for use at home
Solid, reliable machines
designed for daily use
Top performers with class leading features and
build quality for use in busy workshops
Quality, precision machines
for the workshop or education
Small machines for the home
engineer
Compressors and tools for home or
workshop use, durable and great value
Precision CNC machines for
industry and education
Free Three Year Guarantee on Axminster Hobby, Trade and Industrial Series woodworking and
engineering machines, Axminster Air compressors and Air Tools, and bench top grinders - no
registration necessary just proof of purchase.
Normal wear and tear, misuse, abuse and neglect are excluded and the machine should not have been
modified in any way. Please do not attempt to service the product without first contacting us; we are
happy to guide you but failure to do so may invalidate the guarantee
We will repair or replace at our discretion and will collect only from a UK mainland address,
irrespective of the original delivery address
The Guarantee is transferable from owner to owner in the first three years but you must have original
proof of purchase. Should we need to replace a machine in the first three years the guarantee will still
continue to be effective from the original purchase date
The Guarantee assumes that you have bought the correct machine for the required operation, in
accordance with our guidelines; have operated and maintained it in accordance with the instruction
manual; and that all cutting machines will be used with a blade which is sharp and serviceable at all
times. It does not cover consumable items purchased with the original product, including original
blades or abrasives
Full Terms and Conditions can be found here. This guarantee does not affect your statutory rights.
For more information visit axminster.co.uk/3years
Please dispose of packaging for the product in a responsible manner. It is suitable for recycling. Help to
protect the environment, take the packaging to the local recycling centre and place into the appropriate
recycling bin.
Only for EU countries
Do not dispose of electric tools together with household waste material. In observance of European
Directive 2002/96/EC on waste electrical and electronic equipment and itsimplementation in accordance
with national law, electric tools that have reached the end of their life must be collected separately and
returned to an environmentally compatible recycling facility.
Axminster Tool Centre,
Unit 10 Weycroft Avenue, Axminster, Devon EX13 5PH
axminster.co.uk