1
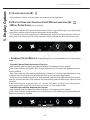
USER GUIDE - TOUCH GLASS CONTROLS
www.zephyronline.com
www.zephyronline.com
CONTROLS - User instructions
Pag. 4
COMMANDES - Notice d’utilisation
Pag. 14
MANDOS - Manual de utilización
Pag. 25
COMANDI - Istruzioni per l’uso
Pag. 36
Contents
USA
www.zephyronline.com
1.
SAFETY
1.1 Safety...............................................................................................................................................5
2.
REMOTE CONTROL
2.1Synchronisation.............................................................................................................................7
2.2 Operation.......................................................................................................................................7
2.3 General Information....................................................................................................................7
3.
USER INTERFACE
3.1 Keypad layout................................................................................................................................8
3.2 Displaylayout.................................................................................................................................8
4.
INDIVIDUAL BUTTON FUNCTIONS
4.1PowerButton(1).............................................................................................................................9
4.2FanSpeedButton(2).....................................................................................................................9
4.3LightButton(3)...............................................................................................................................9
4.4DelayOffButton(4)........................................................................................................................9
5.
DISPLAY OPTIONS
5.1LightIndicator..............................................................................................................................10
5.2 Filter Clean and Charcoal Filter Replace Indicators.......................................................10
- Metal Filter Clean Indicator
- Charcoal Filter Replace Indicator
5.3 Delay Off Indicator.....................................................................................................................11
5.4CleanAirIndicator......................................................................................................................11
5.5 Fan Speed Indicator...................................................................................................................12
6.
MAINTENANCE
6.1 Maintenance...............................................................................................................................13
6.2 Light Bulb Replacement........................................................................................................14
7.
WARRANTY
7.1 Warranty....................................................................................................................... ...............15
-4-
READ AND SAVE THESE INSTRUCTIONS
PLEASE READ ENTIRE INSTRUCTIONS BEFORE PROCEEDING.
IMPORTANT: Save these Instructions for the Local Electrical Inspectors use.
INSTALLER: Please leave these Instructions with this unit for the owner.
OWNER: Please retain these instructions for future reference.
Take care when using cleaning agents or detergents.
Suitable for use in household cooking area
WARNING - To reduce the risk of fire or electric shock, do not use this fan with any Solid-State
Speed Control Device.
CAUTION - To reduce risk of fire and to properly exhaust air, be sure to duct air outside – Do
not vent exhaust air into spaces within walls or ceilings or into attics, crawl spaces, or garages.
CAUTION - For general ventilating use only. Do not use to exhaust hazardous or explosive
materials and vapors.
CAUTION - To avoid motor bearing damage and noisy and/or unbalanced impellers, keep drywall
spray, construction dust, etc. off power unit.
CAUTION - Please read specification label on product for further information and requirements.
WARNING – TO REDUCE THE RISK OF FIRE, ELECTRIC SHOCK, OR INJURY TO PERSONS, OBSERVE
THE FOLLOWING:
A. Use this unit only in the manner intended by the manufacturer. If you have ques
tions,
contact the manufacturer.
B. Before servicing or cleaning unit, switch power off at service panel and lock the service
disconnecting means to prevent power from being switched on accidentally. When the service
disconnecting means cannot be locked, securely fasten a prominent warning device, such as a
tag, to the service panel.
WARNING - TO REDUCE THE RISK OF A RANGE TOP GREASE FIRE:
A. Never leave surface units unattended at high settings. Boilovers cause smoking and greasy
spillovers that may ignite. Heat oils slowly on low or medium settings.
B. Always turn hood ON when cooking at high heat or when flambeing foods ( i.e. Crepes Suzette,
Cherries Jubilee, Peppercorn Beef Flambè ).
C. Clean ventilating fans frequently. Grease should not be allowed to accumulate on fan or
filter.
D. Use proper pan size. Always use cookware appropriate for the size of the surface element.
E. Keep fan, filters and grease laden surface clean.
F. Use high range setting on range only when necessary.Heat oil slowly on low to medium setting.
-5-
1. Safety
IMPORTANT SAFETY INSTRUCTIONS
FOR RESIDENTIAL USE ONLY
1. Safety
www.zephyronline.com
G. Don’ t leave range unattended when cooking.
H. Always use cookware and utensils appropriate for the type and amount off food being prepared.
WARNING – TO REDUCE THE RISK OF INJURY TO PERSONS IN THE EVENT OF A RANGE TOP
GREASE FIRE, OBSERVE THE FOLLOWING:
A. SMOTHER FLAMES with a close-fitting lid, cookie sheet, or metal tray, then turn off the burner.
BE CAREFUL TO PREVENT BURNS. If the flames do not go out mmediately, EVACUATE AND CALL
THE FIRE DEPARTMENT.
B. NEVER PICK UP A FLAMING PAN – You may be burned.
C. DO NOT USE WATER, including wet dishcloths or towels – a violent steam explosion will result.
D. Use an extinguisher ONLY if:
1. You know you have a Class ABC extinguisher, and you already know how to perate it.
2. The fire is small and contained in the area where it started.
3. The fire department is being called.
4. You can fight the fire with your back to an exit.
Proper maintenance of the Range Hood will assure proper performance of the unit.
INSTALLATION INSTRUCTIONS
WARNING – TO REDUCE THE RISK OF FIRE, ELECTRIC SHOCK, OR INJURY TO PERSONS, OBSERVE
THE FOLLOWING:
A. Installation work and electrical wiring must be done by qualified person(s) in accordance with
all applicable codes and standards, including fire-rated construction.
B. Sufficient air is needed for proper combustion and exhausting of gases through the flue (chimney)
of fuel burning equipment to prevent back drafting. Follow the heating equipment manufacturer’s
guideline and safety standards such as those published by the National Fire Protection Association (NFPA), and the American Society for Heating, Refrigeration and Air Conditioning Engineers
(ASHRAE), and the local code authorities.
C. When cutting or drilling into wall or ceiling, do not damage electrical wiring and other hidden
utilities.
D. Ducted fans must always be vented to the outdoors.
E. This unit must be grounded.
WARNING - TO REDUCE THE RISK OF FIRE, USE ONLY METAL DUCTWORK.
WARNING - UNDER CERTAIN CIRCUMSTANCES DOMESTIC APPLIANCES MAY BE DANGEROUS.
A. Do not check filters with hood working.
B. Do not touch the lamps after a prolonged use of the appliance.
C. No food must be cooked flambè underneath the hood.
D. The use of an unprotected flame is dangerous for the filters and could cause fires.
E. Watch constantly the fried food in order to avoid the cooking oil flares up.
F. before performing any mainteinance operation, disconnect the hood from the electrical service.
The manufacturers will not to accept any responsability for eventual damages, because of failure
to observe the above instructions.
-6-
To synchronise the remote control with the range hood for
the first time, proceed as follows:
1. With range hood off, press and hold the “lights” button on
the range hood until the light indicator begins to flash.
Fig.1
2. Rotate the upper part of the remote control until the “lights”
indicator light on the range hood switches off. Fig. 2
The range hood may now be activated using the remote
control. If you experience any problems, repeat the
procedure.
2.2 OPERATION:
- BLOWER SPEED:
The blower speed may be adjusted by rotating the upper
part of the remote control and aligning the marker with the
desired speed. Fig. 2
0= Off
1= Low
2= Medium
3= High
- LIGHTS:
The lights may be switched on by pressing the remote
control. Fig. 3
The brightness may be progressively reduced by pressing it
a second or third time.
The fourth time the remote control is pressed, the lights will
be switched off.
2.3 GENERAL INFORMATION:
- The remote control has a range of approximately 15-20
feet.
- The remote control is equipped with a magnetic base and
may therefore be attached to ferrous surfaces.
- BATTERY REPLACEMENT:
The battery will last for approximately 12-15 months,
depending on usage.
1. Remove the rubber cover as shown in Fig. 4
2. Remove the battery by pressing the side of it. Fig. 5
3. Replace the battery with a 3 volt type 5004LC / CR 2032
-7-
2. Remote Control
2.1 SYNCHRONISATION:
3. User Interface
www.zephyronline.com
3.1 KEYPAD LAYOUT
3.2 DISPLAY LAYOUT
-8-
- Power Button will turn power on and off for the entire hood (fan and lights)
- Hood will remember the last speed and light level it was last turned off at (Example: hood is turned off at when it was last on high speed and high lights; hood will turn back on at high speed
and high lights when Power Button is pressed)
4.2 FAN SPEED BUTTON (2)
- From off, press once for low speed (1), twice for medium (2), and three times for high (3).
- Fan should cycle through speeds low (1), medium (2), and high (3) continuously.
4.3 LIGHT BUTTON (3)
- Lights are three level (high, medium, low)
- From off, touch once for high
- From off, touch twice for medium
- From off, touch three times for low
- From off, touch four times to cycle back to off
- Light level will cycle from high, medium, low, off
4.4 DELAY OFF BUTTON (4)
- If fan is off, press once and fan will turn on at low speed and automatically turn off after five (5)
minutes.
- If the fan is already on (example high speed) the fan will change to low speed when the Delay
Off Button is pressed and turn off after five minutes.
- When the Delay Off Function is on, the user can still change the fan speed by pressing the Fan
Speed Button without interrupting the five minute Delay Off Timer.
- Delay Off Function can be turned off by pressing Delay Off Function button or Power Button.
-9-
4. Individual Button Functions
4.1 POWER BUTTON (1)
5. Display Options
www.zephyronline.com
5.1 LIGHT INDICATOR (5)
- Light indicator will turn on when lights are turned on at any light level
5.2 FILTER CLEAN AND CHARCOAL FILTER REPLACE INDICATOR (6)
- METAL FILTER CLEAN (always enabled)
- Filter Clean Indicator will illuminate after 30 hours of fan usage indicating it is time to clean the
metal filter. Indicator light will remain illuminated, it will not blink
- This function must be reset by the user. With hood off, hold the Fan Speed Button for five seconds, after five seconds the Filer Clean Indicator will turn off and the 30 hour timer will reset
clean metal filter indicator becomes illuminated and fan on speed 3 (indicator turns on after 30 hours of fan usage)
- CHARCOAL FILTER REPLACE (disabled by default, must be enabled by user if recirculating
hood)
- To enable Charcoal Filter Replacement Function:
With hood off, hold Fan Speed and Delay Off buttons simultaneously for 5 seconds.
Filter Clean Indicator will quickly flash 3 times indicating the Charcoal Filter Replacement Function is enabled.
- Filter Clean Indicator will continuously blink after 120 hours of unit fan usage indicating it is time
to replace the charcoal filter. Indicator light will blink, it will not remain illuminated.
- This function must be reset by the user. With hood off, hold the Delay Off Button for five seconds,
after five seconds the Filter Clean Indicator will stop blinking and turn off and the 120 hour timer
will reset.
Order replacement charcoal filter kit number Z0F-00AC through your local dealer,
www.zephyronline.com or the Zephyr customer service department.
- To disable Charcoal Filter Replacement Function:
With hood off, hold Fan Speed and Delay Off buttons simultaneously for 5 seconds.
Filter Clean Indicator will illuminate for 3 second then turn off indicating the Charcoal Filter Replacement Function is disabled.
replace charcoal filter indicator blinking and fan on speed 3 (indicator turns on after 120 hours of fan usage)
- 10 -
- Delay Off Indicator will light up when Delay Off Function is activated by pressing the Delay Off
Button.
- Delay Off Indicator will turn off after the Delay Off Function has completed the five minute
cycle or if the user presses the Delay Off Button again or the Power Button.
delay off timer enabled and fan speed changed to 1
5.4 CLEAN AIR INDICATOR (8)
- Clean Air Indicator is disabled by default and must be enabled by the user.
- To enable Clean Air Function:
With hood off, hold the Power Button down for five seconds. Clean Air Indicator light will illuminate, and the fan will turn on low speed for 10 minutes. After 10 minutes the fan will turn off and
the 4 hour timer will begin.
Clean Air Indicator will remain on when Clean Air Function is enabled, even if fan is not on.
- When Clean Air Function is enabled, every four hours of non fan usage the fan will automatically
turn on at low speed for 10 minutes. After 10 minutes the fan will turn off and the 4 hour timer
will reset.
- When the Clean Air Function automatically turns the fan on the Clean Air Indicator will blink and
the Low Speed fan indicator will illuminate.
- If the user changes the fan speed while the Clean Air Function is operating, the Clean Air Indicator
will stop blinking but will remain illuminated. When the user manually turns the hood off the 4
hour timer will reset.
- To disable Clean Air Function:
With hood off, hold Power Button down for five seconds until Clean Air Indicator light turns off.
Note1: Changing the fan speed and interrupting the Clean Air Function while it is operating does
not disable the Clean Air Function. Clean Air Function will only be disabled by holding the Power
Button for 5 seconds
Note2: Turning lights on/off does not disable the Clean Air Function
clean air function enabled with low fan speed turned on by clean air function
- 11 -
5. Display Options
5.3 DELAY OFF INDICATOR (7)
5. Display Options
www.zephyronline.com
5.5 FAN SPEED INDICATOR (9)
1 = Low
2 = Medium
3 = High
- On speed low, only number 1 indicator will be on
- On speed medium, 1 and 2 indicator will be on
- On speed high, 1, 2 and 3 indicators will be on
- When fan off, no fan speed indicator will be on
- 12 -
- 13 -
6. Maintenance
• It is recommended to operate the range hood prior to cooking. It is recommended to leave
the range hood in operation for 15 minutes after cooking is terminated in order to completely
eliminate cooking vapors and odors. The proper function of the range hood is conditioned
by the regularity of the maintenance operations.
• The anti-grease filters capture the grease particles suspended in the air, and are therefore
subject to clogging according to the frequent use of the range hood. In order to prevent fire
hazard, it is recommendable to clean the filter a minimum of every 2 months by carrying out
the following instructions:
- Remove the filters from the range hood and wash them in a solution of water and neutral
liquid detergent, leaving to soak.
- Rinse thoroughly with warm water and leave to dry.
- The filters may also be washed in the dishwasher at low setting.
The aluminium panels may discolor after several washes. This is not cause for customer
complaint nor replacement of panels.
• Clean the fan and other surfaces of the cooker hood regularly using a cloth moistened with
denatured alcohol or non abrasive liquid detergent.
6. Maintenance
www.zephyronline.com
REPLACING THE LIGHT BULB:
WARNING
Disconnect the hood from electricity and be sure the lights are cool.
If new lights do not operate, make sure the light bulb is inserted correctly before calling service.
For bulb type GU4/MR11 12V 20W; hood models ALA, ALL, APN, ASU and ASL
For bulb type GU5/MR16 12V 20W; hood models AHZ and ATI
- Using a small flat head screwdriver or equivalent tool, carefully pry loose the light bulb to
disconnect it from the spring clamps in the socket. Take care not to scratch the bottom of the
hood.
- Pull down on bulb to remove.
- Check proper orientation of bulb to socket before inserting new bulb. Push upwards until bulb
engages into socket and spring clamps. Replacement bulb must have a safety heat fused lens
“suitable for use in open luminaries”.
For bulb type G4 12V 20W; hood models ADU, ADL, and AED
light bulb
- Using a small flat head screwdriver or equivalent tool, carefully pry loose the light cover. Take
care not to scratch the bottom of the hood.
- Remove the defective light bulb and replace with a new light bulb, “suitable for use in open
luminaries”. Follow package directions and do not touch new light bulb with bare hands.
- Reinstall the light cover.
- 14 -
STAPLE YOUR RECEIPT HERE
Proof of the original purchase
date is needed to obtain
service under warranty
Limited Warranty
TO OBTAIN SERVICE UNDER WARRANTY OR FOR ANY SERVICE RELATED QUESTIONS, please call:
1-888-880-8368
Zephyr Corporation (referred to herein as “we” or “us”) warrants to the original consumer purchaser (referred to herein
as “you” or “your”) of Zephyr products (the “Products”) that such Products will be free from defects in materials or workmanship as follows:
One Year Limited Warranty for Parts: For one year from the date of your original purchase of the Products, we will
provide, free of charge, Products or parts to replace those that failed due to manufacturing defects. We may choose, in
our sole discretion, to repair or replace parts before we elect to replace the Products.
One Year Limited Warranty for Labor: For one year from the date of your original purchase of the Products, we will
provide, free of charge, the labor cost associated with repairing the Products or parts to replace those that failed due to
manufacturing defects. After the first year from the date of your original purchase, you are responsible for all labor costs
associated with this warranty.
Warranty Exclusions: This warranty covers only repair or replacement, at our option, of defective Products or parts
and does not cover any other costs related to the Products including but not limited to: (a) normal maintenance and
service required for the Products and consumable parts such as light bulbs, metal and carbon filters and fuses; (b) any
Products or parts which have been subject to freight damage, misuse, negligence, accident, faulty installation or installation contrary to recommended installation instructions, improper maintenance or repair (other than by us); (c) commercial use of the Products or use otherwise inconsistent with its intended purpose; (d) natural wear of the finish of the Products or wear caused by improper maintenance, use of corrosive and abrasive cleaning products, pads, and oven cleaner
products; (e) chips, dents or cracks caused by abuse or misuse of the Products; (f) service trips to your home to teach
you how to use the Products; or (g) damage to the Products caused by accident, fire, floods or act of God. If you are
outside our service area, additional charges may apply for shipping costs for warranty repair at our designated service
locations and for the travel cost to have a service technician come to your home to repair, remove or reinstall the Products. After the first year from the date of your original purchase, you are also responsible for all labor costs associated
with this warranty.
Limitations of Warranty. OUR OBLIGATION TO REPAIR OR REPLACE, AT OUR OPTION, SHALL BE YOUR SOLE
AND EXCLUSIVE REMEDY UNDER THIS WARRANTY. WE SHALL NOT BE LIABLE FOR INCIDENTAL, CONSEQUENTIAL OR SPECIAL DAMAGES ARISING OUT OF OR IN CONNECTION WITH THE USE OR PERFORMANCE OF
THE PRODUCTS. THE EXPRESS WARRANTIES IN THE PRECEDING SECTION ARE EXCLUSIVE AND IN LIEU OF
ALL OTHER EXPRESS WARRANTIES. WE HEREBY DISCLAIM AND EXCLUDE ALL OTHER EXPRESS WARRANTIES FOR THE PRODUCTS, AND DISCLAIM AND EXCLUDE ALL WARRANTIES IMPLIED BY LAW, INCLUDING
THOSE OF MERCHANTABILITY AND FITNESS FOR A PARTICULAR PURPOSE. Some states or provinces do not
allow limitations on the duration of an implied warranty or the exclusion or limitation of incidental or consequential damages, so the above limitations or exclusions may not apply to you. To the extent that applicable law prohibits the exclusion of implied warranties, the duration of any applicable implied warranty is limited to the same one-year period
described above. Any oral or written description of the Products is for the sole purpose of identifying the Products and
shall not be construed as an express warranty. Prior to using, implementing or permitting use of the Products, you shall
determine the suitability of the Products for the intended use, and you shall assume all risk and liability whatsoever in
connection with such determination. We reserve the right to use functionally equivalent refurbished or reconditioned
parts or Products as warranty replacements or as part of warranty service. This warranty is not transferable from the
original purchaser and applies in the United States and Canada.
To Obtain Service Under Limited Warranty: To qualify for warranty service, you must: (a) notify us at the address or
telephone number stated below within 60 days of the discovery of the defect; (b) give the model number and part identification number and serial number; and (c) describe the nature of any defect in the Product or part. At the time of the
request for warranty service, you must present evidence of your proof of purchase and proof of the original purchase
date. If we determine that the warranty exclusions listed above apply or if you fail to provide the necessary documentation to obtain service, you will be responsible for all shipping, travel, labor and other costs related to the services.
Please check our website for any revisions, www.zephyronline.com.
Zephyr Corporation Service Department, 2277 Harbor Bay Parkway, Alameda, CA 94502 1-888-880-8368
JUN08.0101
- 15 -
3LIK0516