1
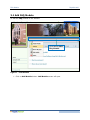
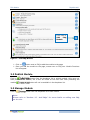
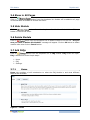
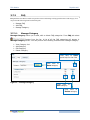
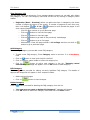
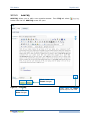
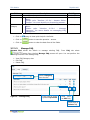
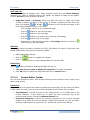
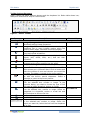
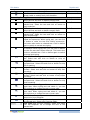
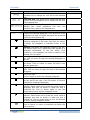
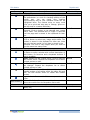
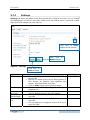
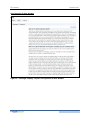
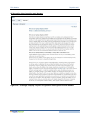
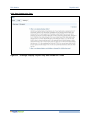
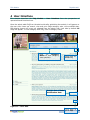
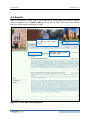
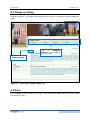
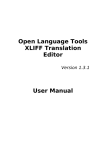
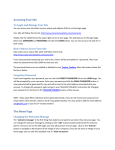
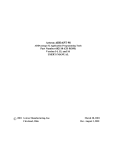
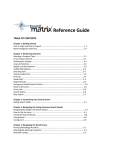
FAQ
USER MANUAL
Statement of Confidentiality, Disclaimer and Copyright
This document contains information that is proprietary and confidential to JCT Web, which
shall not be disclosed, transmitted, or duplicated, used in whole or in part for any purpose
other than its intended purpose. Any use or disclosure in whole or in part of this information
without express written permission of JCT Web is prohibited.
Any other company and product names mentioned are used for identification purpose only,
and may be trademarks of their respective owners and duly acknowledged.
Notice
The information contained in this document is subject to change without notice. Although
efforts have been made to ensure the accuracy of the document, JCT Web assumes no
liability for damages incurred directly or indirectly from errors, omissions or discrepancies.
FAQ Module
RapidVector®
Content
1
1.1
1.2
PREFACE
PURPOSE OF THIS DOCUMENT
ASSUMPTIONS
3
3
3
2
ABOUT FAQ
4
3
ADMIN INTERFACE
5
3.1 ADD FAQ MODULE
3.2 PUBLISH MODULE
3.3 MANAGE MODULE
3.4 SHOW IN ALL PAGES
3.5 HIDE MODULE
3.6 DELETE MODULE
3.7 ADD FAQS
3.7.1 HOME
3.7.2 FAQ
3.7.2.1 Manage Category
3.7.2.2 Add FAQ
3.7.2.3 Manage FAQ
3.7.2.4 Answer Editor Toolbar
3.7.3 SETTINGS
6
7
7
8
8
8
8
8
9
9
11
12
13
18
4
23
4.1
4.2
4.3
4.4
USER INTERFACE
SEARCH
CATEGORY LISTING
PRINT
MODIFIED DATE
24
25
25
26
2
FAQ Module
RapidVector®
1 Preface
This preface describes the document. The preface contains the following sections:
Section
Purpose of this Document
Assumptions
Page
3
3
1.1 Purpose of this Document
The purpose of this document is to provide the fundamental skills necessary to productively
use the FAQ module. This document contains descriptions of definitions used in the system
as well as in the document and a functional usage guide for the FAQ module. This document
is designed to provide a comprehensive, step-by-step introduction to each of the functions
of the FAQ module.
1.2 Assumptions
This guide assumes you are using a mouse. At times, based on personal need or
circumstances beyond your control, you may need to use the keyboard.
It is assumed you are using a right-handed mouse, so the left button is the primary button.
When asked to click or double click, you should use the left mouse button. If you are lefthanded use the Control Panel in Windows to reverse the primary key to the right mouse
button. Refer to the Microsoft Windows documentation for additional information.
The FAQ is clear and simple to operate. You do not need to learn several confusing concepts
or possess any additional technical skills to work with the FAQ. Of course, you will need to
be familiar with the graphical user interface and web browser. However, if you’re not
accustomed to working with a web browser, mouse, windows, icons, and the other elements
of a graphical environment, refer to the tutorial or reference manual for your operating
system.
3
FAQ Module
RapidVector®
2 About FAQ
FAQ is an abbreviation for Frequently Asked Question. It is an often a hypertext document
containing common questions and answers for a particular website or topic. In Rapidvector
FAQ module is for those who doesn’t know javascript and would like to add / edit / delete
question-answers. Admin can select different styles of FAQ from three available options.
Admin can do settings for FAQs and enable print and search options.
The FAQ can work in two interfaces: User Interface and Admin Interface. In User
interface, the user can view answers of questions. In order to create a FAQ you should have
Admin rights.
4
FAQ Module
RapidVector®
3 Admin Interface
This chapter describes the FAQ Module – Admin Interface from the perspective of
operational and functional use. FAQ is used to add question-answers on the website.
The chapter includes the following sections:
Section
Add FAQ Module
Publish Module
Manage Module
Show in All Pages
Hide Module
Delete Module
Add FAQs
Home
FAQ
Settings
Page
6
7
7
8
8
8
8
8
9
18
5
FAQ Module
RapidVector®
3.1 Add FAQ Module
To add the FAQ module to the website:
Click here to Add
FAQ Module
Figure 1 – Add Module
¾
Click on Add Module button. Add Module screen will open
6
FAQ Module
RapidVector®
Click here to
Add
FAQ
Module
Figure 2 – Add FAQ Module
¾
¾
Click on
button next to FAQ to add the module to the page
Once you add the module to the page, mouse-over on FAQ icon. Module Functions
list will appear.
3.2 Publish Module
Click on
button from the dropdown list to publish module. Only once you
have published the module, will it then be visible on the user side. After publishing the
module
button will not be available in the dropdown list.
3.3 Manage Module
Click on
button from the dropdown list to edit module.
Note:
Please refer to “Section: 3.7 - Add FAQs” for more details on adding new FAQ
on the site.
7
FAQ Module
RapidVector®
3.4 Show in All Pages
Click on
button from the dropdown list. Module will be added to all page
of the site. Click on button to reverse the effect.
3.5 Hide Module
Click on
button from the dropdown list. Module will be hidden. Click on
button to reverse the effect.
3.6 Delete Module
Click on
button from the dropdown list to delete module from the site. ‘Are you
sure you want to delete this Module?’ message will appear. Click on Ok button to delete
module other wise click on Cancel button.
3.7 Add FAQs
Click on
button from the dropdown list of FAQ module. FAQ screen will open.
FAQ is divided into three simple steps:
¾
¾
¾
Home
FAQ
Settings.
3.7.1
Home
Home tab provides a brief introduction to what the FAQ Module is and what different
features are available.
Figure 3 – Home
8
FAQ Module
3.7.2
RapidVector®
FAQ
FAQ tab allows the admin to add a new question-answer and manage existing question-answer and category. You
can perform the following functions from FAQ tab:
¾
¾
¾
Manage FAQ
Add FAQ
Manage Category.
3.7.2.1
Manage Category
Manage Category allows you to add, edit or delete FAQ categories. From FAQ tab select
button from the list. A list of all the FAQ categories will appear in
Manage Category screen. You can perform the following functions from Manage Category:
¾
¾
¾
¾
View Category List
Add Category
Edit Category
Delete Category.
Click here to View
quick help for the field
Click here to
Save category
Figure 4 – Manage Category
Click here to
Edit category
Click here to
Delete category
9
FAQ Module
RapidVector®
View Category List
You can view list of the categories. From manage category screen you can add, edit, delete
FAQ category. You can view category name and sort the list by clicking on category name
header.
¾
Pagination (Next – Previous): When you add more than 10 categories, site shows
number of pages at bottom of the screen. If number of pages are more than one,
1 2 3 4..
buttons to move around the pages. It will
then it will appear
show viewing page at bottom of the page
o Click on page number to go on particular page
o
Click on
button to view the next page
o
Click on
button to view last page
o
Click on
button to go back to the previously viewed page
o
Click on
button to go to first page
o
Alternatively. Enter the page number in Go to Page text box and click on
button to go to particular page.
Add Category
From manage category you can add a new FAQ category.
¾
To add a new FAQ category, Enter Category name in text box. It is a Mandatory
field
¾
¾
button to view quick help for the field
Click on
Click on category name header to short the category list
¾
button to add a new category in the list. “Category saved
Click on
successfully.” message will appear. Click on Ok button to add category.
Edit Category
button provided for editing currently available FAQ category. The details of
Click on
appropriate categories will appear in their respective fields.
¾
Make required changes
¾
Click on
button to save changes.
Delete Category
Click on
¾
¾
button provided for deleting the FAQ category from the list.
“Are you sure you want to delete this Category?” message will appear
Click OK button to delete the category otherwise click on Cancel button.
10
FAQ Module
3.7.2.2
RapidVector®
Add FAQ
Add FAQ allows you to add a new question-answer. From FAQ tab select
button from the list. Add FAQ screen will open.
Click here to
Reset changes
Figure 5 – Add FAQ
Click here to
Save changes
Click here to View
quick help for the field
11
FAQ Module
RapidVector®
Field
Question
Answer
Description
• Enter the question
• Enter the answer
Note:
Please refer “Section: 3.7.2.4 - Answer Editor
Toolbar” for more details on formatting answer.
• Select a category from the dropdown list
Note:
Please refer “Section: 3.7.2.1 - Manage
Category” for more details on managing FAQ
Categories.
Select
Category
Mandatory
button to view quick help for the fields
¾
Click on
¾
Click on
button to save the question - answer
¾
Click on
button to clear the data from all the fields.
3.7.2.3
Field Type
Mandatory
Mandatory
Manage FAQ
Manage FAQ allows the admin to manage existing FAQ. From FAQ tab select
button from the list. Manage FAQ screen will open. You can perform the
following functions from Manage FAQ:
¾
¾
¾
View FAQ Category wise
Edit FAQ
Delete FAQ.
Select Category
from the list
Figure 6 – Manage FAQ
Click here to move
question Up-Down
Click here
to Edit FAQ
Click here to
Delete FAQ
12
FAQ Module
RapidVector®
View FAQ List
You can view FAQ list category wise. Select category name from the Show Category
dropdown list. FAQs of selected category will appear. By default all FAQs list will appear.
Click on Arrows to move questions up-down.
¾
Pagination (Next – Previous): When you add more than 10 FAQs, site shows
number of pages at bottom of the screen. If number of pages are more than one,
1 2 3 4..
buttons to move around the pages. It will
then it will appear
show viewing page at bottom of the page
o Click on page number to go on particular page
o
Click on
button to view the next page
o
Click on
button to view last page
o
Click on
button to go back to the previously viewed page
o
Click on
button to go to first page
o
Alternatively. Enter the page number in Go to Page text box and click on
button to go to particular page.
Edit FAQ
button provided for editing the FAQ. FAQ details will open in edit mode with
Click on
details filled exactly same as when FAQ was created.
¾
Make appropriate changes
¾
Click on
button to update the changes
¾
Click on
button to clear changed data from all the fields.
Delete FAQ
Click on
¾
¾
button provided for deleting the FAQ from the list.
“Are you sure you want to delete this Question?” message will appear
Click OK button to delete the FAQ otherwise click on Cancel button.
3.7.2.4
Answer Editor Toolbar
You can write answers in editor. After writing answers you can format or insert object in the
editor using toolbar.
Inspectors
Inspectors are the special tools used to provide extra information for who work with Editor
in Edit mode. Currently, there are two modules shipped out-of-the box with the editor:
¾
¾
Tag Inspector: It shows the path of the selected item (i.e. the DOM path of the
current element). It also allows you to select the last (innermost) tag in the
hierarchy and remove it using the Remove Element link
Properties Inspector: It shows the relevant properties of the currently selected
element. As a result, the user can quickly configure the element (e.g. set cell width,
shading, image alignment, hyperlink, etc.) without the need to open dialogs.
13
FAQ Module
RapidVector®
Toolbar buttons Summary
Editor Toolbar has below different buttons and the dropdown list. Below table shows icon,
description and shortcut keys for the functions.
Figure 7 – Editor Toolbar
Icon
Description
Inserting Elements
Image Manager: allows you to insert, upload, create
thumbnails and set image properties.
Image Map Editor: allows you to create images
containing one or more invisible regions which are
linked to other pages, otherwise known as hotspots.
Flash Manager: allows you to work with flash files to
insert and upload animations.
Media Manager: allows you to insert/upload media
objects (AVI, MPEG, WAV, etc.) and set their
properties.
Document Manager: allows you to insert a predefined
document at the cursor position into the editor.
Template Manager: allows you to manage templates.
Insert Table: allows you to Insert a table in the HTML
Editor as easy as in Microsoft Word. Click on button and
select the number of rows and columns you would like
to create. The table is inserted at the cursor position.
Insert Symbol: Click on button to show the dropdown
list with the built-in special characters. Select a
character to insert at the cursor position.
Hyperlink Manager: allows you to create a hyperlink
from the selected text, number or image. In the
hyperlink dialog, you need to choose the type of link
you want to insert: Hyperlink, Anchor or E-mail.
Remove Hyperlink: allows you to remove hyperlink
from the selected text, number or image. Select an
image/text in a hyperlink, anchor or e-mail link and
click on button to remove the link.
Anchor: allows you to Anchor.
Email Link: allows you to insert E-mail.
Custom Link: allows you to create a preset hyperlink
on the selected text, number or image. Select the
object you want link, select the link from the dropdown
list to use.
Shortcut Key
Ctrl+M
-
Ctrl+K
Ctrl+Shift+K
-
14
FAQ Module
Description
Set Absolute Position: allows you to move an object
(image, table or media) freely into the editor.
Formatting Text Appearance
Bold: Applies bold formatting to the selected text.
Select the text and click on button to apply bold.
Underline: Applies underline formatting to the
selected text. Select the text and click on button to
apply underline.
Italic: Applies italic formatting to the selected text.
Select the text and click on button to apply Italic.
Strikethrough: Applies strikethrough formatting to the
selected text. Select the text and click on button to
apply strikethrough.
Superscript: allows you to make text or numbers
appear as superscript. When typing text, you can click
on button to make the text that follows superscript.
The button also works on selected text. Click on button
again to switch to normal text typing.
Subscript: allows you to make text or numbers appear
as subscript. When typing text, you can click on button
to make the text that follows subscript. The button also
works on selected text. Click on button again to switch
to normal text typing.
Strip All Formatting: allows stripping all formatted
text. Select text and click on button to strip all
formatting.
Strip CSS Formatting: allows to stripping CSS
formatted text. Select text and click on button to strip
CSS formatting.
Strip Font Formatting: allows to stripping font
element. Select text and click on button to strip font
formatting.
Strip Span Formatting: allows to stripping span
element. Select text and click on button to strip span
formatting.
Strip Word Formatting: allows to stripping word
formatted text. Select text and click on button to strip
word formatting
Convert Lower to Upper: Converts selected text to
upper case. When typing text and select it, you can
click on button to change the text to upper case.
Convert Upper to Lower: Converts selected text to
lower case. When typing text and select it, you can
click on button to change the text to lower case.
Font Color: Changes the color of the selected text.
Select color from the pallet.
Background Color: Changes the background color of
the selected text. Select color from the pallet.
Font Type: Sets the font typeface. Select font name
from the dropdown list to change the font of the
selected text.
RapidVector®
Icon
Shortcut Key
-
Ctrl+B
Ctrl+U
Ctrl+I
-
-
-
15
FAQ Module
Description
Font Size: Sets the font size. Select font size from the
dropdown list to change the font size of the selected
text.
Font Real Size: Sets the font size. Select font real size
in pixel from the dropdown list to change the font size
of the selected text.
Apply CSS Class: Applies predefined styles to the
selected text. Select predefined CSS from the
dropdown list to apply to the selected text.
Formatting Paragraphs and Lists
Paragraph Style: Applies standard or predefined text
styles to the selected paragraph. Click anywhere in the
paragraph you want to format and select the preferred
style from the dropdown list.
Indent: Indents a paragraph to the right. This button
indents a paragraph to the right. Each time this button
is clicked, the paragraph is indented further to the
right.
Outdent: Decreases the paragraph indent to the left.
This button works only if indent has been applied to a
paragraph beforehand. To use this button, click
anywhere in the paragraph you want to indent to the
left and click on button.
Left Alignment: Aligns the selected paragraph to the
left. Click on button to align the selected paragraph to
the left.
Center Alignment: Aligns the selected paragraph to
the center. Click on button to center the lines in the
selected paragraph.
Right Alignment: Aligns the selected paragraph to the
right. Click on button to right the lines in the selected
paragraph.
Justified: Justifies the selected paragraph to the left
and to the right.
Click on button to justify the selected paragraph.
Remove Alignment: Remove justified paragraph to
the left and to the right. Click this button to remove
justification of selected paragraph.
Numbered List: Creates a numbered list from the
selection. Select some text or place the cursor inside a
paragraph and click on button to make the text a
numbered list. Click on button again to turn the
numbered list into a regular paragraph of text.
Bulleted List: Creates a bulleted list from the
selection. Select some text or place the cursor inside a
paragraph and click on button to make the text a
bulleted list. Click on button again to turn the bulleted
list into a regular paragraph of text.
Horizontal Ruler: Inserts a horizontal line (ruler).
Click on button to insert a horizontal line below the
cursor position.
RapidVector®
Icon
Shortcut Key
-
-
-
-
-
-
-
16
FAQ Module
Icon
Description
Working with Portion of Text
Spell Check: Launches either the AjaxSpellChecker.
The spellchecker is a tool for checking spelling of the
written
text.
You
can
check
your
spelling
asynchronously and all your mistaken words will be
highlighted inline. The context menu on every word
gives you a quick and easy way to Change, Ignore or
Add the word to a custom dictionary.
Cut: Cuts the selected content and copies it to the
clipboard. Click on button to cut selected text, image
and/or table. The selected text or image is removed
from the page and is stored in the clipboard for later
use.
Copy: Copies the selected content to the clipboard.
Click on button to select text, image and/or table. The
content is stored in the clipboard for later use. Note
that only the last copied (or cut) item is stored in the
clipboard. This tool is very helpful when you need to
type the same text many times
General
Help: Shows help on the functionality of buttons. Click
on button to open a window with a short description of
each button, its functions and a keyboard shortcut if
such is available.
Redo: Redoes the last undone action. Click to redo the
last undone action. Expand the dropdown list to select
multiple actions to redo.
Undo: Disregards the last action. Click to undo your
last changes. Expand the dropdown list to select
multiple actions to undo.
Show/Hide Border: Shows/hides table borders.
Toggles borders of all tables within the editor ON and
OFF. The ON function works on tables with hidden
borders.
Repeat Last Command: Click to repeat the last
action.
Select Module: allows you to add other modules.
Select the module from the dropdown list to add.
Others
Ctrl + A
Selects the whole content of the editor (text, images,
tables, etc.)
RapidVector®
Shortcut Key
-
Ctrl+X
Ctrl+C
-
Ctrl+Y
Ctrl+Z
-
F4
Ctrl + A
17
FAQ Module
3.7.3
RapidVector®
Settings
Settings tab allows the admin to set the look and feel of FAQ at user side. You can change
the displaylayout of FAQ at user side, enable print and search option, show/hide modify
date, show/hide category at user side, etc.
Click here to View
display layout options
Click here to
Reset changes
Figure 8 – Settings
Click here to
Save changes
Field
Select Layout
•
•
Enable Paging
Hide Category
from User
Show
Last
Modified date
Show
‘Top’
link
•
•
•
•
•
•
Description
Click on check box to select display layout of FAQ
at user side
Options for display layout can be One Question &
One Answer, All Question then Question and
Answer, Only One Answer at a time
Click on View link to view preview of layout
Select number of FAQs per page from the given
dropdown list
Click on check box to hide category name at user
side. By default category name will appear
Click on check box to show last modified date at
user side
Click on check box to show Top link in FAQ at
user side
You can add text or image as a top link to go to
top of the FAQ
Field Type
Mandatory
Optional
Optional
Optional
Optional
18
FAQ Module
Text/Image
Enable Print
Enable Search
RapidVector®
•
Click on radio button to show text or image as a
top link
• If you will select Image than browse image
option will appear
Note:
This options will be available only if you have
selected Show ‘Top’ Link check box
• Click on check box to enable print option to users
• Click on check box to enable search option to
users
Optional
Optional
Optional
¾
Click on
button to save the settings. “Settings saved successfully.”
Message will appear
¾
Click on
button to clear changes.
There are three display layouts of FAQ at user side as below:
19
FAQ Module
RapidVector®
One Question & One Answer
Figure 9 – Settings: Display Layout: One Question & One Answer
20
FAQ Module
RapidVector®
All Question then Question and Answer
Figure 10 – Settings: Display Layout: All Question then Question and Answer
21
FAQ Module
RapidVector®
Only One Answer at a time
Figure 11 – Settings: Display Layout: Only One Answer at a Time
22
FAQ Module
RapidVector®
4 User Interface
This chapter describes the FAQ Module – User Interface from the perspective of
operational and functional use.
Once the admin adds FAQ from the admin side after publishing the module, it will appear on
the user side. Users can search, view and print FAQs category wise, view modified date.
FAQ display layout will be as per selected from the admin side. User side by default All
FAQs will appear. To view category wise FAQ, click on category name.
Click
on
Category
Name to view category
wise questions
Click here to
Print FAQ
Displays Date of Last
Modification Date
Figure 12 – User Side
Click here to
go to Top
23
FAQ Module
RapidVector®
4.1 Search
Enter the keyword to search FAQ. Click on Go button to find particular question. Search
result will appear. Click on Back to FAQ link to go back to FAQ. If the admin has enabled
than only search option will appear to users.
Enter keyword and click
on Go to view search
result
Displays total number
of search result
Figure 13 – User Side: Search Question
24
FAQ Module
RapidVector®
4.2 Category Listing
Click on category name to view questions category wise. Click on All to view all category
question to gather. If the admin has selected option than only category name will appear to
users
Click
on
Category
Name to view category
wise questions
Displays
Category Name
Figure 14 – User Side: Category Wise List
4.3 Print
Click on Print button to take print of FAQ. If the admin has enabled than only print option
will appear to users.
25
FAQ Module
RapidVector®
4.4 Modified Date
Right side of the question users can view question-answer’s last modified date. If the admin
has enabled than only last modified date will appear to users.
26