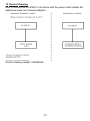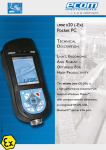
1
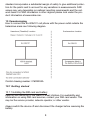
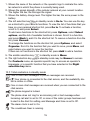
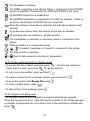
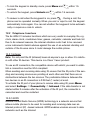
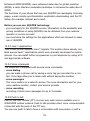
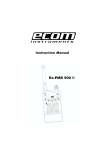
BAL Ex-GSM 01_US_Umschl #6
29.11.2005
11:59 Uhr
Seite 2
Safety instructions
Subject to change without notice!
Ex-GSM 01
Industriestr.2
97959 Assamstadt
Germany
Tel.: +49 (0) 62 94 / 42 24-0
Fax: +49 (0) 62 94 / 42 24-90
E-Mail: [email protected]
0163AL01A01 11/05
ecom instruments GmbH
1
2
3
4
5
6
7
8
Application
Safety instructions
Errors and load restrictions
Safety regulations
Ex-data
Accessories
Technical Data
Operating instructions
8.1 Safety in traffic
8.2 Operating environment
8.3 Electronic equipment
8.3.1 Cardiac pacemaker
8.3.2 Hearing aid
8.3.3 Other medical equipment
8.3.4 Places with appropriate signs
8.4 Transport
8.4.1 Motor vehicles
8.4.2 Aircrafts
8.5 Emergency calls
9 Certification Information (SAR)
10 Commissioning
10.1 Getting started
10.1.1 Installing the SIM card and battery
10.1.2 Charging the battery
10.1.3 Switching the phone on and off
10.1.4 Keys and connectors
10.1.5 Changing the shell and key mat
10.1.6 Attaching the carrying strap to the phone
10.2 Standby mode
10.2.1 Main indicators in standby mode
10.2.2 Some useful shortcuts in standby mode
10.2.3 Keypad lock (Keyguard)
10.3 Telephone functions
10.3.1 Infrared
10.3.2 GPRS
10.3.3 Java™-Applications
10.3.4 Voice commands
10.3.5 Push to talk
10.3.6 E-Mails
10.4 Access codes
11 Repairs
12 Care and maintenance
13 Warranty and Liability
14 Certificate of Compliance
14.1 For USA
14.2 For Canada
15 Control Drawing
1
2
2
2
3
3
3
3
4
4
4
4
5
5
5
5
6
6
6
6
7
9
9
9
11
11
12
13
14
15
16
16
17
17
17
17
18
18
18
19
19
20
20
21
23
23
25
27
Note:
The current safety instructions, and the Ex-certificate are available
for download from the relevant product page under www.ecom-ex.com;
alternatively they can be requested directly from the manufacturer.
1 Application
The Ex-GSM 01 is a portable Non-Incendive cell phone for industrial use in
explosion-hazardous areas of Class I, DIV 2, Groups A, B, C and D according
to FM standards.
2 Safety instructions
These safety instructions contain information and safety regulations that must
be followed to ensure safe and reliable operation of the unit under the described conditions. Failure to follow the information and instructions can have
dangerous consequences or may contravene applicable regulations.
Please take the time to carefully read through the owner’s manual before you start
using the unit.
3 Errors and load restrictions
If there is any risk that the safety or integrity of the unit has been compromised, the unit must be taken out of operation immediately and removed from
the Ex-area without delay.
Action must be taken to prevent the device from being accidentally placed into
operation again.
We recommend that the unit should be sent to the manufacturer to be examined.
The safety and reliability of the unit may be at risk if, for example:
- visible damage is evident on the housing,
- the unit has been subjected to excessive loads for which it is not designed,
- the unit has been improperly stored,
- the unit has been damaged in transit,
- inscriptions or lettering on the unit are illegible,
- malfunctions occur,
- permitted tolerances or threshold values have been exceeded.
2
4 Safety regulations
Any person using the unit must observe the standard safety regulations and
read the certificate to prevent incorrect operation or abuse of the unit.
The following additional safety regulations must also be observed:
- The unit must not be opened within the Ex-area.
- The battery must only be changed outside the Ex-zone.
- Additional or spare batteries must not be carried in the Ex-area.
- The battery must only be charged outside of the Ex-area with the appropriate/original charger.
- Only the battery module NOKIA BL- 5B may be used.
- It must be ensured that the unit is not taken into DIVISION 1.
- Only accessories approved by ecom instruments GmbH may be used.
- Avoid the use in aggressive acids and alkalis.
5 Ex-data
Report Job Identification No.: 3025128
FM-Indicator:
NI/I/2/ABCD T6, Ta = 50°C
Intrinsically Safe for use in a Class I, Division 2, Groups A, B, C & D with a
Temperature class of T6
6 Accessories
It is possible to connect the associated NOKIA headset HS-8 - other connections are not allowed inside hazardous areas.
The battery must be charged with the appropriate charging set outside of the
hazardous area only.
7 Technical Data
Ambient temperature Ta:
Battery type:
Talk Time:
Standby Time:
14 °F to 122 °F (-10 °C to 50 °C)
Standard Li-Ion Battery 760 mAh, NOKIA BL- 5B
Up to 5 hours
Up to 10 days
Battery talk and standby times are estimates only and depend on network configuration, signal strength,
features used, battery age and condition, charging practices, temperatures to which battery is exposed,
whether use is in digital mode (or analog mode, if any), and many other factors. Please note that the
amount of time a phone is used for calls will affect its standby time. Likewise, the amount of time that the
phone is turned on and in standby mode will affect its talk time.
3
Size:
Weight:
4.1 in x 1.8 in x .9 in (10.6 cm x 4.7 cm x 2.4 cm)
3.5 ounces (101 grams)
8 Operating instructions
Before using the equipment for the first time, please read the safety and operating instructions very thoroughly. Remember there is no vibra call in your
modified ex-cell phone, please ignore all instructions in the original operating
manual which describe the use and function of the vibra call. Further, the integrated camera is deactivated due to ex-relevant reasons.
8.1 Safety in traffic
NEVER attempt to hold a mobile phone in the hand whilst driving a motor vehicle. Never lay it on the passenger seat or in an unsecured place, as in the
event of sudden braking or manoeuvres serious injury or damage may be
caused by the unit being thrown around. Secure the phone in the holder provided for it.
Never forget that:
Road safety has priority!
8.2 Operating environment
The regulations valid for a particular area must be complied with under all circumstances. The mobile phone unit must always be switched off when the
use of mobile telephones is forbidden or when interference could be caused
which could result in dangerous situations.
The unit must always be held in the normal operating position. As parts of the
telephone are magnetic, metal objects could be attracted. Particularly, persons
with a hearing-aid should not use the on an ear which has a hearing-aid fitted.
To prevent metal objects being attracted to the telephone, it should always be
secured in the suitable holder provided for it. Never let a credit card or other
device storing data magnetically come near the telephone as this could result
in the data being erased.
8.3 Electronic equipment
Most modern electronic equipment is screened to prevent interference from
socalled RF-signals (radio frequencies). However it is just possible that certain
pieces of equipment are not screened against the RF-signals generated by
your mobile telephone.
4
8.3.1 Cardiac pacemaker
The following instructions apply to persons fitted with a cardiac pacemaker:
• When the mobile phone unit is switched-on, ensure that a minimum distance
of 20 cm between the mobile- phone unit and the Pacemaker is maintained.
• In order to help guarantee this distance, it is recommended that the mobile
phone unit is not kept in a breast pocket.
• To minimise interference we recommend that the ear furthest away from the
Pacemaker is used when using the mobile phone unit.
• Furthermore, we recommend that should you suspect that damage to the
Pacemaker has been caused, you should switch the mobile phone unit off
immediately. In order to guarantee the correct functioning of your
Pacemaker, you should seek medical advice.
8.3.2 Hearing aid
In case of malfunctioning of certain types of hearing aid, please refer the problem to your local service provider.
8.3.3 Other medical equipment
As with other electronic equipment, your mobile phone can interfere with
inadequately screened medical equipment. Should you need information on
the screening needed to protect an item of medical equipment against external RF signals, please contact the doctor responsible or the manufacturer of
the equipment. In general, to avoid malfunctioning, you should switch your
mobile phone off in all health institutions where this is specifically requested
by signs, labels or regulations.
Please remember:
In hospitals and other health institutions, equipment is used which is
very susceptible to interference from external RF.
8.3.4 Places with appropriate signs
You should switch your mobile phone off wherever there are signs requesting
this.
5
8.4 Transport
8.4.1 Motor vehicles
In certain circumstances, RF signals can interfere with the correct functioning
of incorrectly installed or inadequately screened systems in your motor vehicle (e.g. electronically controlled fuel injection, electronic ABS - (Antilock
Brake Systems), electronic speed controllers or airbag systems). You can
obtain information about your vehicle from the manufacturer or his representative.
To be on the safe side and avoid malfunctioning, you should have your mobile
phone built into your car by a qualified person. Incorrect installation or maintenance can have dangerous consequences.
Don’t forget that these faults result in invalidation of the guarantee given with
the unit.
We recommend a regular check of the parts of the mobile telephone installed
in your vehicle. In the case of an accident in a vehicle fitted with airbag(s),
these are filled with great force. In order to minimize the risk of injury or malfunctioning, no parts should be installed in the space that would be taken up
by the inflated airbag
8.4.2 Aircrafts
The use of mobile phones in aircrafts is normally forbidden. You should therefore switch the mobile phone off before boarding the aircraft. Because the use
of a mobile telephone on board an aircraft can have dangerous consequences, failure to comply with this regulation can result in the mobile telephone
services of the offender being suspended or denied and/or legal action taken
against the offender.
8.5 Emergency calls
Because a 100% coverage of the mobile-telephone network is technically very
difficult to realize, a connection cannot be guaranteed in all situations and
locations.
We therefore recommend that you do not rely entirely on the mobile telephone
when it is question of communication in a medical emergency. A guaranteed
acceptance of an
emergency call is also not possible when additional telephone functions or net
services are activated. Information on this subject can be obtained from the
mobile telephone operator.
6
Procedure in the event of an emergency call:
1. Switch the telephone on if it is not already switched on. Check whether
the signal strength is adequate. In certain networks it may be necessary
to plug a valid SIM card into the telephone.
2. Press the red off / END key as many times as is necessary (e.g. to end
call or quit a menu etc.) to erase the display and prepare the mobile
telephone for making a call.
3. Enter the emergency number (e.g. 911, 112 or some other official emer
gency number) which is valid for your current location. The emergency
numbers vary from place to place.
4. Press the green call / SEND key.
Important :
If you happen to have activated several functions, it may be that you
must
switch them off first before you can make the emergency call.
9 Certification Information (SAR)
THIS DEVICE MEETS THE GOVERNMENT’S REQUIREMENTS FOR EXPOSURE
TO RADIO WAVES.
Your wireless phone is a radio transmitter and receiver. It is designed and
manufactured not to exceed the emission limits for exposure to radio frequency (RF) energy set by the Federal Communications Commission of the U.S.
Governement. These limits are part of comprehensive guidelines and establish
permitted levels of RF energy for the general population. The guidelines are
based on standards that were developed by independent scientific organizations through periodic and thorough evaluation of scientific studies. The standards include a substantial safety margin designed to assure the safety of all
persons, regardless of age and health.
The exposure standard for wireless mobile phones employs a unit of measurement known as the Specific Absorption Rate, or SAR. The SAR limit set by
7
the FCC is 1.6 W/kg*. Tests for SAR are conducted using standard operating
positions accepted by the FCC with the phone transmitting at its highest certified power level in all tested frequency bands. Although the SAR is determined
at the highest certified power level, the actual SAR of the phone while operating can be well below the
maximum value. This is because the phone is designed to operate at multiple
power levels so as to use only the power required to reach the network. In
general, the closer you are to a wireless base station antenna, the lower the
power output.
Before a phone model is available for sale to the public, it must be tested and
certified to the FCC that it does not exceed the limit established by the
government-adopted requirement for safe exposure. The tests are performed
in positions and locations (for example, at the ear and worn on the body) as
required by the FCC for each model.
The highest SAR value for this model phone as reported to the FCC when
tested for use at the ear is 1.26 W/kg, and when worn on the body, as described in this user guide, is 1.29 W/kg. (Body worn measurements differ among
phone models, depending upon available enhancements and FCC requirements).
While there may be differences between the SAR levels of various phones and
at various positions, they all meet the government requirement. The FCC has
granted an Equipment Authorization for this model phone with all reported
SAR levels evaluated as in compliance with the FCC RF exposure guidelines.
SAR information on this model phone is on file with the FCC and can be found
under the Display Grant section of http://www.fcc.gov/oet/fccid after searching
on FCC ID LJPNPL-4.
For body worn operation, this phone has been tested and meets the FCC RF
exposure guidelines for use with a carry case, belt clip, or holder that contains
no metal and that positions the headset a minimum of 5/8-inch (1.5 cm) from
the body. Use of other carry cases, belt clips, or holders may not ensure compliance with FCC RF exposure guidelines. If you do not use a body-worn
accessory and are not holding the phone at the ear, position the handset a
minimum of 5/8-inch (1.5 cm) from your body when the phone is switched on.
* In the United States and Canada the SAR limit for mobile phones used by
the public is 1.6 watts/kilogram (W/kg) averaged over one gram tissue. The
8
standard incorporates a substantial margin of safety to give additional protection for the public and to account for any variations in measurements. SAR
values may vary depending on national reporting requirements and the network band. For SAR information in other regions please look under the product information at www.nokia.com.
10 Commissioning
How to connect the Ex-GSM 01 cell phone with the power outlet outside the
hazardous areas see following diagram.
Control drawing number: 0163EX04A
10.1 Getting started
10.1.1 Installing the SIM card and battery
Keep all SIM cards out of the reach of small children. For availability and
information on using SIM card services, contact your SIM card vendor. This
may be the service provider, network operator, or other vendor.
Always switch the device off and disconnect the charger before removing the
battery.
9
1 – With the back of the phone facing you,
press the indentations on both sides of the
lower shell.
2 – Slide the bottom of the shell off to
remove it.
3 – Grasp the removal flap, and gently pull it up.
4 – Lift the battery from the compartment.
5 – Slide the cover of the SIM card holder toward
the bottom end of the phone until it unlocks.
6 – Swing the cover of the SIM card holder open.
7 – Insert the SIM card into the holder. Ensure that
the beveled corner of the SIM card is on the
left, and the golden contact area is facing
downward.
8 – Close the cover of the SIM card holder.
9 – Slide the cover of the SIM card holder toward
the top end of the phone until it locks into
place.
10– Position the battery with the contacts aligned
to the golden contacts on the phone. Insert
the battery into the battery slot, contact end
first.
11– Close the battery flap.
10
12 – Place the phone into the lower shell, sliding
the shell forward until it locks into place.
10.1.2 Charging the battery
Warning: Use only batteries, chargers, and enhancements approved by Nokia
for use with this particular model. The use of any other types may invalidate any
approval or warranty, and may be dangerous.
The Ex-GSM 01 mobile phone must only be charged outside of the Ex-hazardous areas and only with an approved battery charger type. Check the model
number of any charger before use with this device. This device is intended for
use when supplied with power from ACP-12, ACP-7, ACP-8 and AC-1.
1 – Open the flap on the bottom of the phone.
2 – Connect the lead from the charger to the
socket on the bottom of the phone.
3 – Plug the charger into a standard wall
outlet.
The battery indicator scrolls on the display during charging. Charging is displayed briefly if the phone is switched on. If the battery is completely discharged, it may take a few minutes before the charging indicator appears on the
display, or before calls can be made.
You can use the phone while the charger is connected.
The charging time depends on the charger and the battery used.
10.1.3 Switching the phone on and off
Your device has an internal antenna.
Note: As with any other radio transmitting device, do not touch the antenna
unnecessarily when the device is switched on. Contact with the antenna affects
call quality and may cause the device to operate at a higher power level than
otherwise needed. Avoiding contact with the antenna area when operating the
device optimises the antenna performance and the battery life.
11
Hold the phone as you would any other telephone with the antenna pointed
up and over your shoulder.
To switch the phone on or off, press and hold the power key.
If the phone displays Insert SIM card, even though the SIM card is properly
inserted or SIM card not supported, contact your service provider. If the phone
asks for a PIN code or security code, enter the code, and press OK.
10.1.4 Keys and connectors
1
2
3
4
—
—
—
—
5—
6—
7—
8—
Flashlight. To activate the flashlight, press and hold in standby mode.
Power key, to turn the phone on and off.
Bubble level, to level the phone while using the compass.
Volume keys, to adjust the volume of the earpiece or loudspeaker, or the
headset when connected to the phone.
Push to talk key
Left selection key, middle selection key, and right selection key. The function of these keys depends on the guiding texts shown above the keys on
the display.
Four-way scroll key, to scroll through the menu, for example, or to move
the cursor when writing text.
Call key
, to dial a phone number, or to answer a call.
12
9 — End key
10 — Keys
Keys
, to end a call, or to exit functions.
and
, to enter numbers and characters.
are used for various purposes in different functions.
1 – Charger connector
2 – Pop-Port™ connector used, for example, for headsets and the data cable
(please refer to the control drawing number: 0163EX04A for allowed connections to Ex-GSM 01).
3 – Camera lens (deactivated)
4 – Infrared (IR) port
10.1.5 Changing the shell and key mat
Note: Do not open the device inside Ex-hazardous areas. Before removing the
cover, always switch off the power and disconnect the charger and any other
device. Avoid touching electronic components while changing the covers.
Always store and use the device with the covers attached.
1 – With the back of the phone facing you,
press the indentations on both sides of
the lower shell. Slide the bottom of the
shell off to remove it.
2 – To remove the top shell, slide it upwards.
3 – To remove the key mat from the lower
shell, push it down, and pull it out of the
shell.
4 – To replace the key mat, slide it into the
lower shell, and press it into place.
13
5 – Slide the upper shell onto the phone.
6 – Slide the lower shell onto the phone until
it clicks into place, meeting the upper
shell.
10.1.6 Attaching the carrying strap to the phone
1 – Connect the elastic band to the holster.
2 – Connect the pins on the end of the holster to the holes in the lower end of the
phone.
3 – Connect the pin on the other end of the
holster to the hole in the top end of the
phone.
4 – Wrap the elastic band, for example,
around your wrist and connect the band
to the holster.
5 – Connect the hook to the loop on the
elastic band. The hook contains a
magnifying glass and a whistle.
10.2 Standby mode
When the phone is ready for use, and you have not keyed in any characters,
the phone is in standby mode.
14
1 -Shows the name of the network or the operator logo to indicate the cellular network in which the phone is currently being used.
2 -Shows the signal strength of the cellular network at your current location.
The higher the bar, the stronger the signal.
3 -Shows the battery charge level. The higher the bar, the more power in the
battery.
4 -The left selection key
in standby mode is Go to. You can use the key
as a shortcut to your favorite functions. To view the list of functions that you
have on your personal shortcut list, press Go to. To activate a function,
scroll to it, and press Select.
To add more functions to the shortcut list, press Options, select Select
options, and the list of available functions is shown. Scroll to a function,
and press Mark to add it to the shortcut list. To remove a function from the
list, press Unmark.
To arrange the functions on the shortcut list, press Options, and select
Organise. Scroll to the function that you want to move, press Move, and
select where you want to move the function.
If there are no functions in the shortcut list, press Add to add a function.
5 -The middle selection key
in standby mode is Menu.
6 -The right selection key
in standby mode may be Names to access
the Contacts menu, an operator-specific key to access an operator’s
homepage, or a specific function that you have selected in the Right
selection key menu.
10.2.1 Main indicators in standby mode
One or more text messages or picture messages are received.
or Your phone is connected to the chat service, and the availability status is online or offline.
One or more chat messages are received when you are connected to the
chat service.
The phone keypad is locked.
The phone does not ring for an incoming call or text message when
Incoming call alert is set to Off, or none of the caller groups has been set
to alert in the Alert for setting, and Message alert tone is set to Off.
The alarm clock is set to On.
The countdown timer is running.
15
The stopwatch is running.
The GPRS connection mode Always online is selected and the (E)GPRS
service is available. The indicator for GPRS and EGPRS is the same.
An (E)GPRS connection is established.
The (E)GPRS connection is suspended (on hold), for example, if there is
an active call during an (E)GPRS dial-up connection.
When the infrared connection is activated, the indicator is shown continuously.
If you have two phone lines, the second phone line is indicated.
All incoming calls are diverted to another number.
The loudspeaker is activated, or the music stand is connected to the
phone.
Calls are limited to a closed user group.
,
,
A headset, handsfree, or loopset is connected to the phone.
The timed profile is selected.
or
Push to talk connection is active or suspended.
10.2.2 Some useful shortcuts in standby mode
• To access the list of dialed numbers, press
. Scroll to the number or
name that you want, and press
to call the number.
• To call your voice mailbox, press and hold
.
• To make a connection to a browser service, press and hold
• To open the push to talk Group list, press
• To find a contact name, press
.
• To start writing a text message, press
.
.
.
10.2.3 Keypad lock (Keyguard)
The keyguard disables your keypad to prevent accidental key presses.
When the keypad lock is on, calls still may be possible to the official emergency number programmed into your device. Key in the emergency number and
press
.
16
• To lock the keypad in standby mode, press Menu and
within 1.5
seconds.
• To unlock the keypad, press Unlock and
within 1.5 seconds.
• To answer a call when the keyguard is on, press
. During a call, the
phone can be operated normally. When you end or reject a call, the keypad
automatically locks again. You can set whether the keyguard locks automatically or requires a code to unlock.
10.3 Telephone functions
The Ex-GSM 01 includes functions which are very useful in everyday life, e.g.
clock, alarm-clock, countdown timer, games, calculator, calendar and task list.
Due to Ex-relevant reasons, the internal vibration motor had to be removed.
ecom instruments GmbH advises against the use of an external vibrating unit
outside of the Ex-area since it could damage the mobile phone.
10.3.1 Infrared
Note: Do not point the IR (infrared) beam at anyone’s eye or allow it to interfere with other IR devices. This device is a Class 1 laser product.
To use an IR connection, the compatible device with which you want to establish a connection must be IrDA compliant.
When sending and receiving data using IR, ensure that the IR ports of the sending and receiving devices are pointing at each other and that there are no
obstructions between the two devices. The preferable distance between the
two devices in an IR connection is 3.28 feet (1 meter) at most.
To activate the IR port of your phone to receive data using IR, press Menu,
and select Settings
Connectivity
Infrared. If the data transfer is not
started within 2 minutes after the activation of the IR port, the connectin is
cancelled and must be restarted.
10.3.2 GPRS
General Packet Radio Service (GPRS) technology is a network service that
allows mobile phones to be used for sending and receiving data over an
Internet protocol (IP) –based network. GPRS enables wireless access to data
networks such as the Internet.
17
Enhanced GPRS (EGPRS), uses enhanced data rates for global evolution
(EDGE), a radio interface modulation technique, to increase the data rates of
GPRS.
The functions of your phone that may use (E)GPRS are messaging, browsing
pages, e-mail, remote synchronization, application downloading, and the PC
dialup (for example, Internet and e-mail).
Before you can use (E)GPRS technology:
• you must apply for the (E)GPRS service. Information on the availability and
pricing conditions of using (E)GPRS can be obtained from your network
operator or service provider.
• you must store the settings for the applications which are allowed to make
use of (E)GPRS.
10.3.3 Java™-Applications
Your mobile phone supports Java™ Applets. This mobile phone already contains several Java™ applications which were specially developed for mobile
phones. You can install further programmes in your telephone by using a PC
and appropriate software.
10.3.4 Voice commands
The telephone is equipped with several voice commands:
• voice dialing
you can make a phone call by saving a voice tag you recorded for a contact. Voice tags allow you to make calls without keying the number.
• voice messages
The voice mailbox is a network service. For more information and for your
voice mailbox number, contact your service provider.
• voice recording
recording of short voice messages for up to 3 minutes.
10.3.5 Push to talk
Push to talk over cellular (PTT) is a two-way radio service available over a
GSM/GPRS cellular network. Push to talk provides direct voice communication
connected with the push of the PTT key.
You can use push to talk to have a conversation with one person or with a
18
group of people having compatible devices. When your call is connected, the
person or group you are calling does not have to answer the phone. Besides
the GPRS counters, the phone registers only one-to-one calls in the recent call
list in Call log. The participants should confirm the reception of any communications where appropriate as there is no other confirmation whether the recipient(s) have heard the call.
To check availability and costs, and to subscribe to the service, contact your
network operator or service provider. Note that roaming services may be more
limited than normal calls.
Before you can use the push to talk service, you must define the required push
to talk service settings.
While you are connected to the push to talk service, you can use the other
functions of the phone. The push to talk over cellular service is not connected
to traditional voice communication, and therefore many of the services available
for traditional voice calls (for example, voice mailbox) are not available for push
to talk over cellular communications.
10.3.6 E-Mails
You can use your mobile phone to send and receive e-mails. Information on
the availability and conditions of using the e-mail service can be obtained from
your network operator or service provider.
10.4 Access codes
• Security code
The security code (5 to 10 digits) protects your phone against unauthorized
use. The pre-set code is 12345. Change the code, and keep the new code
confidential and in a safe place separate from your phone. You can set
whether the phone requests the code. If you key in an incorrect security
code five times in succession, the phone ignores further entries of the code.
Wait for 5 minutes and key in the code again.
• PIN and PIN2 codes (4 to 8 digits), module PIN, and signing PIN
The personal identification number (PIN) code protects your SIM card against
unauthorized use. The PIN code is usually supplied with the SIM card.
Set the phone to request the PIN code each time the phone is switched on.
The PIN2 code may be supplied with the SIM card and is required to access
some functions.
19
The module PIN is required to access the information in the security module.
The module PIN is supplied with the SIM card if the SIM card has a security
module in it.
The signing PIN is required for the digital signature. The signing PIN is supplied with the SIM card if the SIM card has a security module in it.
If you key in an incorrect PIN code three times in succession, the phone
may display PIN blocked or PIN code blocked PIN code blocked, for example, and ask you to enter the PUK code.
• PUK and PUK2 codes (8 digits)
The personal unblocking key (PUK) code is required to change a blocked
PIN code. The PUK2 code is required to change a blocked PIN2 code.
If the codes are not supplied with the SIM card, contact your local service
provider for the codes.
• Barring password (4 digits)
The barring password is required when using the Call barring service.
You can obtain the password from your service provider.
• Wallet code (4 to 10 digits)
The wallet code is required to access wallet services. If you key in an incorrect wallet code three times, the wallet application is blocked for 5 minutes.
After the next three incorrect attempts, the length of time for which the application is blocked will be doubled.
11 Repairs
Repair work is subject to the nationally valid regulations and directives. We
therefore recommend that such work be performed by ecom instruments
GmbH, Germany, as all repairs must be examined to ensure functional safety.
12 Care and maintenance
Your device is a product of superior design and craftsmanship and should be
treated with care. The suggestions below will help you protect your warranty
coverage.
• Keep the device dry. Precipitation, humidity and all types of liquids or
moisture can contain minerals that will corrode electronic circuits. If your
20
•
•
•
•
•
•
•
•
device does get wet, remove the battery and allow the device to dry completely before replacing it.
Do not use or store the device in dusty, dirty areas. Its moving parts and
electronic components can be damaged.
Do not store the device in hot areas. High temperatures can shorten the life
of electronic devices, damage batteries, and warp or melt certain plastics.
Do not store the device in cold areas. When the device returns to its normal
temperature, moisture can form inside the device and damage electronic circuit boards.
Do not attempt to open the device other than as instructed in this guide.
Do not drop, knock, or shake the device. Rough handling can break internal
circuit boards and fine mechanics.
Do not use harsh chemicals, cleaning solvents, or strong detergents to clean
the device.
Do not paint the device. Paint can clog the moving parts and prevent proper
operation.
Use only the supplied or an approved replacement antenna. Unauthorised
antennas, modifications, or attachments could damage the device and may
violate regulations governing radio devices.
All of the above suggestions apply equally to your device, battery, charger,
or any enhancement. If any device is not working properly, take it to the nearest authorized service facility for service.
It is recommended that the manufacturer checks and tests the Ex-safety components and operation of the unit every 2 years.
13 Warranty and Liability
For this product, ecom Instruments GmbH warrants the function and material
for a period of two years beginning on the date of the purchase under normal
operating and maintenance conditions. Wearing parts, rechargeable and nonrechargeable batteries are exempt from this. A six-month warranty applies to
rechargeable batteries.
The warranty does not apply to products which are improperly used, modified,
neglected, damaged in accidents or exposed to abnormal operating conditions. Claims under the warranty can be made by returning the defective
21
equipment to the manufacturer. We reserve the right to repair, renew the settings or exchange the device.
The above-mentioned warranty conditions are the sole and only right of the
purchaser to compensation, are exclusively valid and replace all other contract or legal warranty obligations. ecom instruments GmbH accepts no responsibility for special, direct, indirect, accompanying or consequential damage
as well as losses including the loss of data which may arise through the use
or acquisition of the equipment independent of whether it was caused by violation of the warranty obligation, lawful or unlawful action, action in good faith
or any other action.
If in certain countries the limitation of a legal warranty as well as the exclusion
or limitation of accompanying or consequential damage is not permissible, it
may be that the abovementioned limitations and exclusions are not valid for
every purchaser. Should any such clauses of these warranty terms be declared null and void or not realisable by a competent court, then the effectiveness or enforceability of any of the other conditions of these guarantee terms
will be unaffected by the court decision.
Note about the protection of minors:
This mobile phone, suitable for programs and games, may only be accessible
to a child or young person in public when the programs or games on the unit
have been approved and identified by the highest federal state authority or an
organization for voluntary self-monitoring, or when they are using information,
instruction or educational programs, that have been designated as "Info program” or "Educational program” by the supplier.
22
14 Certificate of Compliance
14.1 For USA
23
24
14.2 For Canada
25
26
15 Control Drawing
How to connect the Ex-GSM 01 cell phone with the power outlet outside the
hazardous areas see following diagram.
Control drawing number: 0163EX04A
27
BAL Ex-GSM 01_US_Umschl #6
29.11.2005
11:59 Uhr
Seite 2
Safety instructions
Subject to change without notice!
Ex-GSM 01
Industriestr.2
97959 Assamstadt
Germany
Tel.: +49 (0) 62 94 / 42 24-0
Fax: +49 (0) 62 94 / 42 24-90
E-Mail: [email protected]
0163AL01A01 11/05
ecom instruments GmbH