1
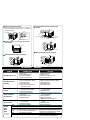
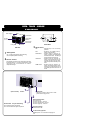
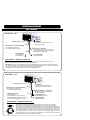
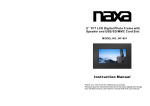
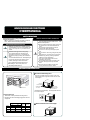
WINDOW ROOM AIR CONDITIONER
O WNER’S MANUAL
SAFETY PRECA UTIONS
Please observe the following safety precautions when
using your air conditioner
.
Failure or negligence in observing these safety precautions
could cause fire, electrical shock or personal injury .
PRECAUTIONS DURING OPERATION
PRECAUTIONS DURING INSTALLATION
WA R NING
C A UT IO N
Please ask your sales agent or qualified technician
for the installation of your unit. W ater leakage, short
circuit or fire may occur if you install the unit
yourself.
Please use earth line(ground the unit properly).
Do not place the earth line near water or gas
pipes, lightning-conductor , or the earth line of
telephone. Improper grounding can cause electric
shock.
A circuit breaker should be inst alled depending on
the mounting site of the unit. Without a circuit
breaker , the danger of electric shock exists.
Do not install near a location where there is
flammable gas. The unit may catch fire if
flammable gas leaks around it.
WA R NING
Avoid an extended period of direct air flow . It can
lead to health problems.
Do not modify the length of the power cord or use
an extension cord. It can cause electrical shock
or fire.
Do not attempt to operate the unit with wet
hands, this can cause fatal accident.
Do not turn on the unit by inserting the power
cord.
Do not switch of f the unit by pulling out the power
cord.
Please switch of f the unit and turn of f the circuit
breaker during cleaning, as the high speed fan
inside the unit may cause danger .
Turn off the circuit breaker if the unit is not
operated for a long period.
Do not splash or direct water to the body of the
unit when cleaning it as this may cause short
circuit.
Do not block the air intake and outlet vanes,
cooling performance will be af fected.
AIR CONDITIONER INST ALLATION
1 Remove the chassis locking screw
Unscrew the chassis lock from the side of the outer
wrapper. Disconnect the ground wire from the front of the
outer wrapper .
C E ILING
Over 150mm
Ov
WALL
er
50
m
0m
Ground wire
F ence
or likewis e
Counter clockwise
Chassis locking screw
*For Chassis 1
Les s than 240mm
Counter clockwise
Chassis locking screw
*For Chassis 2 & 3
Unscrew and remove the base p an locking bracket from the
front of outer wrapper .
Dimensions (Clearances)
! There should not be any obstacle surrounding the unit.
! Prepare an inst allation hole slightly bigger than the outer
wrapper size.
Counter clockwise
bracket
*For PMX
CAP ACITY
kJ/h
W
BTU/h
(Width,mm)
H
(Height,mm)
Chassis 1
5,300~8,250
5,025~7,800
476
333
Chassis 2
5,300~9,750
5,025~9,200
476
333
Chassis 3
11,100~13,500 10,700~12,800
566
378
P MX/QS X
19,600~24,000 18,000~22,000
665
431
2 Slide the chassis out from the outer wrapper
.
6 Lock the chassis to the outer wrapper reusing
3 Fix the outer wrapper to the frame.
Place the wrapper at the hole and fix with the appropriate
screws and seal gasket . Purchase from T
otaline if not
supplied with the unit.
the screw .
Frame
Seal gasket
Connect the
ground wire
10 mm
tilt (max.)
C lockwis e
*For Chassis 1
Bracket (n ot include d)
C lockwis e
40~45 mm
*For Chassis 2 & 3
Secure it with screws
4 Inst all the drain p an at the right corner of the
outer wrapper .
Screws
*For PMX
Clockwise
Drain pan
5 Slide the chassis back into the outer wrapper
7 Attach the front grille to the outer wrapper
.
TR OUBLESHOO
PROBLEM
.
TING GUIDE
POSSIBLE CAUSE
SOLUTION
Unit does not st art
1. Blown fuse
2. Circuit breaker tripped
3. Unit cord unplugged
4. Supply volt age too low .
1. Replace only once.
2. Reset only once .
3. Replug into wall recept acle.
4. Consult electrician.
Unit does not cool
properly
1. Air filter dirty
2. Improper thermost at setting.
3. Unit on dry mode.
4. Unit on sleep mode.
5. Check if the air conditioner is
exposed to sunlight.
1. Clean the air filter .
2. Reset to desired temperature setting.
3. Press cool button.
4. Press sleep button.
5. Provide an awning.
Fan motor does
not run
1. Check whether fan hitting
cowling or foreign material.
2. Check fan motor bearing.
1. Adjust fan position or remove the
foreign material.
2. Replace fan motor .
Ice or frost forms
on indoor coil
1. Low out side temperature.
2. Air filter dirty.
3. Check system for leak.
4. Check thermostat.
1.Operate the fan without cooling until
the frost disappears.
2. Clean the air filter .
3. Rep air and recharge.
4.Replace thermost at if defective.
Water dripping
into the room
1. Outer wrapper not tilted properly
on the outside.
2. Drain hole clogged.
1. Tilt the outer wrapper by maximum of
10mm.
2. Clean drain hole.
Check coil thermistor
Control
Panel
Error
Code
(Fo r ele ctronic
model o nly)
E5
E4
E3
E2
E1
FL
Coil thermistor problem
Room thermistor problem
Unrecoverable loss of E2RAM dat a
Loss or corruption of stored dat a
Code validation check fail
Filter check warning
Check room thermistor
Shut down the unit and restart.
Using remote control, go to Cool mode
and shut down the system, & then restart.
Shut down the unit and rest art
Press the ‘mode” and “ “ (down)
buttons simultaneously for 3-5 sec.
8
CALL CENTER AND REGION AL OFFICES
Worry about after sales service?
Here is the nationwide list of Concepcion-Carrier Regional Of
when you need it, where you need it...
fices
TO REGISTER YOUR UNIT PLEASE CALL US, JUST DIAL
863-5555 - GMA HOTLINE
TOLL FREE HOTLINE - PROVINCIAL
1 800-10-8635555 - PLDT
1 800-3-8635555 - DIGITEL
or TEXT US @
0917 843-5555 SMART
0918 917-5555 GLOBE
CONCEPCION-CARRIER CUST
OMER CARE
For
Provincial
areas, just
cont just
act contact
our Regional
of regional
fices/T otaline
stores
For
Provincial
areas,
our
Offices
DAGUPAN REGIONAL OFFICE
Star Bldg. Arellano St., Dagupan City
Tel. No.: (075) 522-9555
Fax No.: (075) 515-7899
(075) 522-9555
CEBU REGIONAL OFFICE
AC Cortez Ave., Cor Rizal St.
Mandaue City
Tel. No.: (032) 344-7773
Fax No.: (032) 344-7132
SAN FERNANDO REGIONAL OFFICE
PSP Bldg. Gapan - Olangapo Road
Dolores, San Fernando Pampanga
Tel. No.: (045) 963-0178
Fax No.: (045) 963-0164
(045) 963-0178
ILOILO REGIONAL OFFICE
Door #2 RTG Bldg. Quezon Avenue
Iloilo City
Tel. No.: (033) 335-0687
Fax No.: (033) 335-0687
BICOL REGIONAL OFFICE
MMCN Bldg. Brgy. Panganiban Drive
Concepcion, Naga City
Tel. No.: (054) 473-3144
Fax No.: (054) 473-3149
CAGAYAN DE ORO REGIONAL OFFICE
Cor. Yacapin & Capistrano St.,
Cagayan De Oro City
Tel. No.: (088) 231-2152
Fax No.: (088) 856-8587
(08822) 754-454
CONCEPCION-CARRIER
AIR CONDITIONING
DAVAO REGIONAL OFFICE
Door#1-3 Argao IV Bldg.
JP Laurel Avenue Bajada,
Davao City
Tel. No.: (082) 221-3653
Fax No.: (082) 22-6614
(082) 222-6615
(082) 226-4418
(082) 221-3653
WARRANTY CERTIFICATE
PRODUCT WARRANTY
Certificate
ONE YEAR WARRANTY ON P AR TS & LABOR
Concepcion-Carrier Airconditioning Co., warrants this Room Air Conditioner to the original purchaser/user to be free
from defects in material and workmanship. We shall, within one year from the date of purchase, repair the unit at no cost
to the original purchaser/user using the original parts or their equivalent subject to the warranty exclusions.
WARRANTY
EXCLUSIONS
Ÿ Unit subjected to misuse, abuse, neglect, accident, alteration, cleaning or servicing by non-CCAC accredited service
centers.
Ÿ Unit installed on harsh environment e.g. sea going vessel, port area, power plant, chemical laboratories, kitchen, etc.
Ÿ Abnormal voltage conditions i.e. unstable and/or fluctuating voltage.
Ÿ Lack of proper maintenance i.e. regular inspection and cleaning of air filters & cooling coils (for non-residential
applications).
Ÿ Units not rendered for cleaning once every six months by authorized service center during the duration of warranty
Ÿ
Ÿ
Ÿ
Ÿ
period.
Improper unit installation i.e. obstructed discharge and fresh air intake, under capacity etc.
All direct, indirect or consequential injury, loss or damage arising out of the use or inability to use the product.
Force majeure, Acts of God and all other fortuitous events.
Units not registered within one (1) year from the date of purchase.
FOUR YEAR LIMITED COMPRESSOR WARRANTY EXTENSION
The compressor (part only, excluding unit pull-out and delivery charges, accessories, labor and expandable material
charges) shall be covered by a four (4) year warranty extension subject to the warranty exclusions. No other warranties
shall apply.
CONCEPCION-CARRIER AIRCONDITIONING CO.
Km. 20 East Service Road, South Superhigway
Alabang, Muntinlupa City
MODEL:
SERIAL. NO.
(CUST OMER’S COPY)
NOTE: To register product warranty , call Customer Care at 863-5555 or visit our website: www.carrier .com.ph or fill up and det ach
Warranty Registration Card and mail. Registration must be done within ten (10) days from the date of purchase.
P leas e affix y our proof of purc has e here for future referenc e.
WARRANTY REGISTRA TION
C ONC E P C ION-C A R R IE R
A IR
C O N DIT IO N IN G
OWNER:
MODEL:
ADDRESS:
SERIAL NO.:
TEL. NO.:
E-MAIL:
DEALER/BRANCH:
PURCHASE DA
TE:
OPERA TION PR
OCEDURE
ST AND ARD MODEL
Outer wrapper
Air inlet louver
Air filter
ma x
10
2
4-W ay airflow
direction
(behind the front grille)
min
2
3
8
4
7
6
5
A IR
S WING
turbo
cool
3
quiet
cool
ON
fan
off
T HE R MOS TAT
S E L E C TOR
Control Panel
Power cord
3 Selector Control
Main Unit
OFF
FAN
1 Air Swing Switch
QU IE T CO OL
ON Air swing is in operation. (Cool mode only)
OFF S tops the operation of air swing.
HIGH COOL
2 Thermost at Control
Automatically controls the room temperature when set to
desired temperature. Turn the knob clockwise for cooler
temperature and counterclockwise for warmer
temperature settings.
TURBO COOL
1
- completely stop s fan and cooling
operation.
- provides air at moderate velocity
without cooling operation.
- provides cooling at minimum air
velocity, maximum dehumidification
and lowest sound level. This setting is
recommended for night time use.
- provides cooling at moderate air
velocity. This is preferred during mid
mornings and early evenings when
outdoor temperatures are likely to be
lower.
- provides cooling at maximum air
velocity. This setting is ideal for quick
lowering of room temperature, but it is
not normally required once the room is
cooled.
For Initial Use
Make sure the selector switch is set to “OFF”
position and then plug the unit.
Open the control p anel door .
2
Set the thermost at to your desired setting.
Turn clockwise for lower temperature.
Turn counterclockwise for higher temperature.
1
OFF
Control p anel
Control cover
Front grille
high
cool
1
9
3
Switch to desired position.
For normal air - fan
For cool air (low fan) - quiet cool
For cool air (medium fan) - high cool
For cool air (high fan) - turbo cool
To stop the operation
Turn the knob to “OFF ”.
T o resume cooling operation
Repeat step 2 af ter 3 minutes from stopping the
unit.
OPERATION PR OCEDURE
DE L UXE MODEL
De luxe 12Hr T imer
Open the control p anel door .
Set the thermost at to your desired setting.
Turn clockwise to cool the room.
Turn counterclockwise to cool less.
1
For Initial Use
Make sure the timer switch is set to “ OFF”
position and then plug in.
4
12-Hr On-Off T imer Control
2 Set
the timer for desired unit running time by
turning the knob clockwise. The green lamp will
light up indicating ionizer is ON .
3
Fan S peed Control
For cool air (quiet) For cool air (turbo) -
FAN PLUG OPERA
To stop the operation
Turn the knob to OFF .
TION (Philippine Market only)
Plug the electric fan into the built-in receptacle outlet on the unit power cord and set the electric fan on your
desired fan speed setting. Follow steps 2,3, & 4 for cooling operation.
For example: You want your unit to operate and turn off automatically after 4 hours. Turn the timer knob clockwise
and set the indicator @4. Unit cools for these hours and goes off automatically after 4 hours. The electric fan will turn
"on" and will continue to ventilate while maintaining comfort level inside the room.
Note: Electric fan will not operate when timer switch is set to MANUAL ON.
De luxe 24Hr T imer
1
Open the control p anel door .
Set the thermost at to your desired setting.
Turn clockwise to cool the room.
Turn counterclockwise to cool less.
Switch to desired position.
For normal air - fan
For cool air with ion (low fan) - quiet cool
For cool air with ion (medium fan) - high cool
For cool air with ion (high fan) - turbo cool
FAN PLUG OPERA
A UTO
PI
OF F
MA NUA L
4
For Initial Use
Make sure the selector/timer switch
is set to “ OFF” position & then plug in.
Programmable T imer Control
2 24-Hr
Set dial to AUT O to permit unit timer to
3
operate automatically .
For continuos operation
Set dial to MANUAL position.
To stop the operation
Set dial to OFF position.
TION (Philippine Market only)
Plug the electric fan into the built-in receptacle outlet on the unit power cord and set the
electric fan on your desired fan speed setting. Follow steps 2,3, & 4 for cooling operation.
For example: You are leaving for work at 6:00 am. Make sure timer dial is at day time position 6,
timer switch is on AUTO, thermostat and cool mode are in desired positions. You expect to be
home @7:00 pm and you want room to be cool. You expect to retire at 12:00 am. To set unit to
turn 'on" one hour before you arrive home and turn "off" one hour before you retire, slide pins on
shaded dial at positions 6,7,8,9,10,11. Unit cools for these hours and goes off @11:00 pm. The
electric fan will then turn "on" and continue to ventilate the air conditoned room when the time
unit's operation shutdown at 11:00 pm (see illustration).
OPERA TION PR
OCEDURE
REMO TE MODEL
1 Power Button
Outer wrapper
If you press this button, the unit will begin operation. Press the
button again, and operation stops. (Y ou can hear a receiving beep.)
Air inlet louver
Air filter
4-W ay airflow
direction
(behind the front grille)
Control panel
Control cover
Front gril
2
If you set the desired room temperature, then the unit will maint
the room temperature at the set temperature.
3
wer cord
Remote control
Main Unit
2
1
MODE
3
Temperature Setting Buttons
4
4
ain
Operation Mode Selecting Button
Press this button to select the desired mode.
In COOL mode, the unit will run at normal cooling mode.
In FA N mode, only fan will operate at the selected fan speed and
circulate the room air .
In DR Y mode, fan speed goes to low and dehumidification takes
place.
In AUT O mode, fan speed will be automatically controlled by the
microcomputer of the unit.
Timer Light Indicator
Indicates that the Timer function is ON .
Control Panel
Remote Model
For programming the unit to turn off
after a cert ain
time (from 1 to 12 hours), press the T imer button.
When this is activated, the corresponding LED
remains turned on at the p anel.
Note: The unit display will be turned of f 5 minutes after
the function activation, while the Timer indicator
remains on.
Operating the Unit through the Remote Control
To turn the unit on or off , press the Power Button.
(Note: The equipment sounds a “ beep” for each activated
function)
Fan
Speed
+
Temp
_
Cool
Auto
Dry
Fan
Sleep
Turbo
To adjust the air speed
press the Fan S peed
selection button.
The speed can be selected between one of the 3
levels.
For increasing or decreasing the room
temperature , press the Temperature buttons (+) or
(-), as necessary .
(Note: The temperature adjustment varies from 18 to
29˚C, and upon reaching the maximum or the
minimum, the unit sounds 2 beeps.)
To provide cooling , press the Cool function button.
When this function is activated, a letter C lights up at
the control panel display .
For the unit to adjust
according to the room
temperature variations, press the
Auto function
button. This function also controls the fan speed.
To eliminate the room air
moisture, press the Dry
function button. The unit will operate always in low
cooling.
To provide air at cert
ain fan speed without
cooling, press the Fan button.
To have more comfort while sleeping
, press the
Sleep function button before going to sleep.
This
function adjust gradually the temperature, avoiding
the excessive cold or heat due to the body
metabolism deceleration.
To quickly cool the room , press the Turbo function
button. This will temporarily set the Fan speed to
high.
When this function is activated, the letter t lights up at
the panel display . The turbo will be turned of f when
the selected temperature is reached.
Timer
To adjust the turning off time
, press the Adjust
buttons (+) or (-) until the desired time is reached
.These buttons adjust the time in 1 hour interval, from
1 to 12 hours.
Note: To cancel this function press the Timer button
again, and adjust the time to 0.
+
Temp
_
+
Temp
_
Operating the Unit through the Control Panel
Select Functions
F - F an
C - Cooling
D - Dry/Dehumidifica tion
A - Auto (Automa tic )
Press once “Mode” button and
programmed function will
appear at the display , then press “ ” or “ ” buttons until the
desired function is reached. Release the button and the unit
assumes this new programming.
To alter the fan speed, press “Mode” button twice. The display
will show the programmed speed F1, F2, or F3.
Then press “ ”
or “ ” buttons until the desired speed is reached. Release
button and the unit will assume this new programming.
To change ˚F to ˚C or vice versa, press “Mode” and “
“
buttons simultaneously for 3-5 seconds.
FA N P L UG O P E R AT IO N
1. Plug the “Electric Fan” into the built-in recept acle outlet on
the air conditioner service cord.
2. Set the controller consistent to the comfort level you desired.
3. Press the timer button on the remote controller to set the
desired hour settings.
Example : You want your air conditioner to turn on from 9:00
P.M. to 2:59 A.M. and turn of f at 3:00 A.M. Press the power
button to start the air conditioner . Set the controller consistent
to the desired temperature setting. Press the timer on the
remote controller and then press the (-) button or (+) button to
adjust the time setting to 6 hours. Unit cools for those hours
and goes of f at 3:00 A.M. The “Electric Fan” (except for those
controlled by a wireless remote control) will then turn-on and
continue to ventilate the air conditioned room.
NOTES:
Heat - this button can function only for unit s that are configured
as “heat pump” .
C AR E AND MAINT E NANC E
6
C A UT ION
C ONDE NS E D WAT E R DR A INA G E
Always turn off the air conditioner and the main power
s upply before unplugging the power cord to clean the unit.
C leaning the unit.
C lean the outer wrapper, front grille with a mild s oap or
detergent and lukewarm water.
T he room air conditioner’s water s plas hing component
dis pens es water in your condens er coil, res ulting in better
performance, thus producing a s plas hing s ound. If the
s plas hing s ounds annoys you, an outs ide drainage can be
provided.
1. S lide the c has s is out from the outer wrapper.
2. K noc k-out the s lot loc ated on the bas e pan.
K noc k-out
portion
C leaning the air filter.
If the air filter is clogged with dus t, the air flow volume will
decreas e res ulting in poor cooling performance, and
increas ed operating nois e. B e s ure to clean the filter every 2
weeks .
R emoval of anti-mould filter
F or C has s is 2&3
a. R ais e the grille by approximately 90˚.
b.S lide it to the left to unhinge then pull outwards to releas e
the grille ins ert.
c. P ull the air filter on the holder and s lide downward.
b
a
c
T he air filter and anti-bacterial filter can be eas ily cleaned us ing
a vacuum cleaner. Vacuum the front and back of the filter. If it is
badly s oiled, was h with a mild hous ehold detergent.
Anti-mould filter
Anti-bacterial filter
C leaning the IA Q filter
ZE OL IT E F ILT E R
Avoid contact with water, s hake off every 2 months .
Technical life : 2 years
E L E C T R OS TAT IC F ILT E R
Avoid contact with water, s hake off every 2 months .
Technical life : 1 year
A C T IV E C A R B ON F ILT E R
Avoid contact with water, s hake off every 2 months .
Technical life : 1 year
3. S lide the c has s is bac k into the outer wrapper.