1
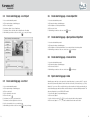
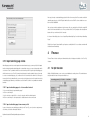
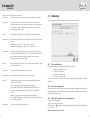
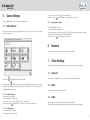
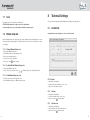
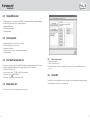
SETUP MANUAL
TOUCH TOY
ENGLISH
4.5Dataprint
4.6 Terminal serial number
4.7 Game statistics
4.7.1 Show game statistics
4.7.2 Delete game statistics
Manual SET UP SYSTEM 2009
Touch Toy
1
General Information
5
1.1
Content setup menu
5
2
Overview Controls
6
3
Advertising 7
3.1
3.2
3.3
3.4
3.5
3.6
3.7
3.8
3.9
3.10
Preview of an advertising page
Adjust display time of advertising page
Create advertising page - adjust background
Create advertising page - insert clipart
Create advertising page - insert text
Create advertising page - remove clipart / text
Create advertising page - adjust position of clipart / text
Create advertising page - remove all items
Export advertising page or video
Import advertising page or video
3.10.1 Import advertising pages to or from another terminal
3.10.2 Import advertising page from a memory stick
4 Finance
4.1
4.2
4.3
4.4
Fair Split Calculator
Bookkeeping 4.2.1 Check cash balance
4.2.2 Check accounting period
4.2.3 Delete book keeping / reset accounting period
4.2.4 Switch to Fair Split Calculator
Credit value settings 4.3.1 Change coin & note profile
4.3.2 Activate and delete Free Play
4.3.3 Display or edit bonus profile
4.3.4 Bonus profile - edit entry
4.3.5 Bonus profile - add entry 4.3.6 Bonus profile - remove entry
4.3.7 Reset bous profile
Reset credits
7
8
9
10
10
11
11
11
11
12
12
12
13
13
14
15
15
15
16
16
16
17
17
17
18
18
18
18
5
Game Settings
5.1
Games Overview
5.1.1 Deactivate game
5.1.2 Activate game
5.1.3 Change game status
18
19
19
19
19
20
20
20
20
21
6
Network 21
7
Other Settings
21
7.1
7.2
7.3
7.4
7.5
7.6
7.7
7.8
8
Licence list
Export
Import
Language Settings
7.4.1 Change language settings
7.4.2 Define standard language
Operator Code
7.5.1 Change operator code
7.5.2 Activate / Deactivate operator code
Country specific profiles 7.6.1 Activate country profile
Reset
Minimal setup-code
7.8.1 Change minimal setup code
7.8.2 Activate / delete minimal setup code
7.8.3 Start minimal setup via code
Technical settings 8.1
8.2
8.3
8.4
8.5
Set date / time
8.1.1 Set date
8.1.2 Set time
8.1.3 Set time zone
Display NSB-number
Start test picture Start Touch Toy long term test
Money device test
21
21
21
22
22
22
22
23
23
23
23
24
24
24
24
24
25
25
25
25
25
26
26
26
26
8.6
8.7
8.8
8.9
Test credits 8.6.1 Book test credits
Calibrate touchscreen
Touchscreen test
Set volume
27
28
28
28
29
1
General information
To activate the setup, start up the TOUCH TOY terminal. As soon as the main menu appears, press the red
„setup switch“ (book keeping switch). The „setup switch“ is on the left side behind the monitor next to the
counter. You have to open the terminal to reach the switch.
1.1
Content setup menu
The setup main menu shows 6 entries:
• Advertising
Managing of advertising pages and videos; creation of individual advertising pages
• Finance
Access to book keeping and statistical information
• Game settings
Deactivating games; setting prices for games etc.
• Network
Settings concerning the Touch Toy Network (for detailed information see manual „Touch Toy
Network 2009“)
4
5
•
•
Other settings
Language settings, terminal reset, code settings etc.
Technical settings
Settings for technical components like camera, touch screen, volume control etc.
New game icon Active
2
Overview Controls
Hidden
Deactivated
Edit control
Check box control
3Advertising
Save control
Add control
Remove control
Ok control
Cancel control
In this area important settings for the advertising pages can be made, but it is also possible to create or
change individual advertising pages.
If the national version of the TOUCH TOY software contains specific videos, the settings for these videos
can be adjusted here as well.
The advertising pages are divided into different categories:
• General advertising pages
• Import / export advertising pages
• Host advertising pages
• Main sponsor advertising pages
• Operator advertising pages
• General distributor advertising pages
• Advertising videos
The advertising pages can not be accessed via the minimal setup.
Up / Down control
3.1
Preview of an advertising page
Top game icon
1. Access „Advertising“ area
2. Access desired advertising module -> previews of advertising pages are shown
Carousel game icon
6
7
3.2
Adjust display time of advertising page
1. Access desired advertising module
2. Click on preview image of advertising page
3. Click on control „Time display“
4. Adjust start and end time with the „+“ and „-“ controls or use the checkbox control „unlimited“
if you do
5. In the frame „Time display“ adjust how long the advertising page should be displayed
6. After finishing your entries use the save control
3.3
Create advertising page - adjust background
1. Access desired advertising module
2. Click on preview image of advertising page
3. Click on control „Background“
4. In the frame „Background“ choose a background image or use the colour palette to adjust the back
ground to your favoured colour
5. After finishing your entries use the save control
to save your changes
8
9
3.4 Create advertising page - insert clipart
3.6
1. Access desired advertising module
2. Click on preview image of advertising page
3. Click on control „clipart“
4. In the frame „clipart“ choose a clipart image
5. in the frame „size use the slide control to adjust the size of the clipart
6. After finishing your entries use the save control
to save your changes
1. Access desired advertising module
2. Click on preview image of advertising page
3. Click on clipart or text in the preview window
4. Click on control „clear“
5. After finishing your entries use the save control
3.7
Create advertising page - remove clipart/text
to save
Create advertising page - adjust position of clipart/text
1. Access desired advertising module
2. Click on preview image of advertising page
3. Click on clipart or text in the preview window. You can drag the item to the desired position
4. After finishing your entries use the save control to save
your changes
3.8
Create advertising page - remove all items
1. Access desired advertising module
2. Click on preview image of advertising page
3. Click oncontrol „Delete all“
4. After finishing your entries use the save control to save
3.9
3.5 Create advertising page - insert text
1. Access desired advertising module
2. Click on preview image of advertising page
3. Click on control „text“
4. Use the keyboard to enter a text
5. Click on ok control
6. In the frame „font“ choose your favoured font
7. In the frame „font size“ adjust the size of the font
8. Use the colour palette to choose your desired colour
9. After finishing your entries use the save control
to save your changes
10
your changes
Export advertising page or video
Advertising pages and videos can be exported to external data storage (e.g. memory stick). To store the
data, a directory named „My Advertises“ must exist in the root directory of the data storage (e.g. „E:\MyAdvertises“). You can use a PC to create this directory on the external device. After the export function, the
selected advertising pages and videos will be saved to this directory in a structured XML representation. This
data can get imported to a second TOUCH TOY terminal.
1. Access module „Import / export advertising pages“
2. Click on control „Export“
3. Use the check box controls
to choose the categories that should get exported
4. Click on control „Import“ -> the import starts, if a suitable external volume can be found
11
Now copy the newly created advertising page into this file on the memory stick. Please make sure that the
advertising page has a size of 1024*768 pixel and that it is saved as JPG. The colours should have a resolution of at least 16bit/RGB.
Once you have saved the advertisement on the memory stick, you can plug in the stick into the empty USB
device on the Powercube inside the case. Then you can turn on the Touch Toy and press the red setup menu
button, which you can find next to the Powercube.
In the menu “Advertising” please choose “Import/Export Advertising Pages” and then “Import Advertising
Pages”.
Finally click on “Import” and wait until it says “import successfully finished”. You can activate and work with
the advertisement immediately.
4Finance
3.10 Import advertising page or video
Advertising pages and videos can be imported from external data storage (e.g. memory stick). As the import
function includes information about display time or advertising category, you can only import data, which
comes from a Touch Toy terminal or which is saved on the memory stick in a specific way. Advertising pages
which have been used on a Touch Toy terminal can be imported to another terminal. However, if you want
to create a new advertising page, you can either do this on the terminal, via the Admin Tool or through a
memory stick. On the terminal directly you can merely use the pictures stored on the terminal for creating
an advertising page. Otherwise you would have to use the Admin Tool, which is only available for networked
terminals.
The area Finance includes settings and information about book keeping and statistics of the Touch Toy
Software.
4.1
Fair Split Calculator
With the Fair Split Calculator you can create your own individual accounting scheme. The terminal automatically calculates the share for the operator and the host.
3.10.1 Import advertising pages to or from another terminal
1. Access module “Import / export advertising pages”
2. Click on control “Import”
3. Use the check box controls XXX to choose the categories which should be imported
4. Click on control “Import” -> the import starts, if a suitable external volume can be found
3.10.2 Import advertising page from a memory stick
In order to import your own advertising page directly on the Touch Toy, you only need an empty memory
stick, where you create the following file structure:
MyAdvertises\data2007\media\grafix\background\common
12
13
Explanation of the terms (by means of an example):
Cash content
Sum of the inserted money according to the financial book-keeping (e.g. 64,00 €)
Cash balance If the value displayed in the current cash field is not exact the same as the real
counted amount of money in the cash box, then the difference can be inserted here. The cash difference will be deducted from the current cash value (e.g. 4,00 €) are
too much indicated by the program
Turnover
Cash content minus cash balance (e.g. 64,00 € minus 4,00 € results in 60,00 €)
Original amount
An amount that is deducted from the turnover and is added to the host‘ or operator‘s
share e.g.
Original amount „telecom fees“ = 7,00 € -> in favour of the host
Original amount „game update“ = 10,00 € -> In favour of the operator
Variable share
A variable amount that is deducted from the turnover and is added to the host‘s or
operator‘s share. E.g. Variable share „Prizes“ = 6% of the turnover will be taken off to
buy monthly prizes for the players (monthly tournament). This amount can be
managed either by the host or by the operator
Sub total
Amount to be shared. Sum of the turnover minus all deducted amounts (original
amounts, variable shares)
Host‘s share
Percentage amount of the „subtotal“ for the host (e.g. 40%)
Operator‘s share
Percentage amount of the „subtotal“ for the operator (e.g. 60%)
Payment
The final amount of cash that the host and the operator will get paid out from the
cash box of the terminal. E.g.
Host .... 40% of the turnover plus original amount and variable share
40% of 60,00 EUR (turnover) plus 7,00 EUR (original amount 1) and plus 5% of
the turnover (3,00 EUR variable share 1) results in a final sum of 26,00 EUR for
the host.
Operator .... 60% of the turnover plus original amount and variable share
60% of 60,00 EUR (turnover) plus 10,00 EUR (original amount 2) results in a final sum
of 34,00 EUR for the operator
Check results
The „Check“ sum must be equal to the turnover
14
4.2Bookkeeping
The book-keeping provides information about the amount of inserted coins and notes.
4.2.1 Check cash balance
The amount of inserted money is displayed in the left table. The data shows
• the type of money inserted (coin, note)
• the amount of inserted money
• the value of each monetary unit
• the total sum (amount times value)
The sum of the inserted money is equal to the cash balance (right table). All inserted currencies are stated
separately.
4.2.2 Check accounting period
In order to guarantee a complete settlement, the current accounting period is displayed in the top part of the
financial management. The period starts with the day when the book-keeping feature was deleted the last
time and ends with the present day.
4.2.3 Delete book keeping / reset accounting period
1. Access module „Book-keeping“
2. Click on control „Delete book-keeping“
3. Click on ok control
to confirm -> the book-keeping data is deleted and start of the accounting period is
set to today!
Attention: Deleted data can‘t be restored!
15
4.2.4 Switch to Fair Split Calculator
1. Access module „Book-keeping“
2. Click on control „To fair split calculator“ -> the Fair Split Calculator will be accessed.
4.3
Credit value settings
In this module you can set the number of credits one receives, when a certain amount of money is inserted
4.3.2 Activate and delete Free Play
If the „Free Play“ setting is active, no credits are needed to play games at the TOUCH TOY terminal. Use the
check box controls
to activate or deactivate the „Free Play“.
After finishing your entries use the save control
to save your changes.
4.3.3 Display or edit bonus profile
In the list „Bonus profile“ you can select what profile is displayed or will be edited. An individual bonus profile
can be configured for each supported currency on the country specific TOUCH TOY software. Token are
representing a currency, too. In most countries there are two bonus profiles: One profile for the country
specific currency and one profile for token. A bonus profile consists of individual entries; each entry consists
of the amount of inserted money and the equivalent amount in credits. It is possible to reward a player with
bonus credits, if higher amounts of money are inserted. Example for a bonus profile:
The accuracy of settings is reviewed to avoid incorrect entries by users. The most common errors involve
bonus levels for which a player must pay more than he had to pay for the previous level. e.g. If you only enter
11 credits for Euro 5,- in the list given above, the TOUCH TOY software will recognise that a player would
pay more for a game when inserting Euro 5,- than when he would inserted Euro 4 +
1. When you attempt to make such an entry, the system will draw this to your attention and prompt you to
change this error accordingly.
a) Access module „Credit value settings“
b) In the frame „Bonus profile“ choose the desired currency ->
bonus profile of the chosen currency is displayed
4.3.1 Change coin & note profile
With the setting „Current coin & note profile“ you can adjust the coin that is currently installed on your
TOUCH TOY terminal (in most countries, there is only one coin & note profile).
1. Access module „Credit value settings“
2. In the frame „Current coin & note profile“ use the arrow control to choose the desired profile
3. After finishing your entries use the save control
to save your changes
4. In the frame „Insert“ and „Value“ use the up/down control to adjust the values
5. Click on control „Apply“ -> data is applied to the list „Insert - Credits“
6. The bonus profiles will be validated by the software. An error message will appear in case of invalid
entries
7. After finishing your entries use the save control to save your changes
16
4.3.4 Bonus profile - edit entry
1. Access module „Credit value settings“
2. In the frame „Bonus profile“ choose the desired currency
3. In the list „Insert - Credits“ choose the row that should be edited
4. Click on the edit control
-> data is displayed on the right side of the screen
5. In the frame „Insert“ and „Value“ use the up/down control
to adjust the values
6. Click on control „apply“ -> data is applied to the row „Insert - Credits“
7. The bonus profiles will be validated by the software. An error message will appear in case of
invalid entries.
8. After finishing your entries use the save control
to save your changes
17
4.3.5 Bonus profile - add entry
1. Access module „Credit value settings“
2. In the frame „Bonus profile“ choose the desired currency
3. Click on the „Add“ control
The overview contains the following data:
• Inserted money
• Idle time
• Time played
• Number of games
• Number of bonus games
4.3.6 Bonus profile - remove entry
1. Access module „Credit value settings“
2. In the frame „Bonus profile“ choose the desired currency
3. In the list „Insert - Credits“ choose the line that should be removed
4. Click on the „Delete“ control
5. Click on ok control
to confirm
6. The bonus profiles will be validated by the software. An error message will appear in case of invalid
entries.
7. After finishing your entries use the save control
to save your changes
4.3.7 Reset bonus profile
If you click on the „standard“ Button, all settings will be reset to the default value.
4.4
4.6
Terminal / serial number
In this module an individual ID for the terminal can be stored (This is used for the DATAPRINT function). To
edit the terminal / serial number follow the above mentioned steps
1. Access module „Terminal / serial number“
2. Use the backspace key to delete the serial number
3. Use keyboard to enter new serial number
4. After finishing your entries use the save control
to save your changes
4.7
Game statistics
The game statistics show, how often a particular game has been played.
The statistics contain the following data:
• name of the game
• frequency of games played in percent (base is the total amount of all games)
• number of games played
4.7.1 Show game statistics
1. Access module „Game statistics“
4.7.2 Delete game statistics
1. Access module „Game statistics“
2. Click on control „Delete statistics“
Reset credits
This function resets the amount of credits to 0. To reset the credits to 0, follow this steps:
1.
2.
Access module „Reset credits“
Click on ok control
to confirm
4.5DATAPRINT
You can print accounting data and statistics of particular games with a serial printer.
Therefore a „Data-Print 3000“ is required! This Data-Print can be obtained from your general distributor.
18
19
5
Game Settings
In the area „Game Settings“ you can activate and deactivate games.
5.1
Games Overview
In this games overview all your games are displayed. In the corner of every game you can see, if the game
is active or deactivated.
3. Use the check box control
to select status „active“
4. Select save control
after the changes -> status of game becomes „active“
5.1.3 Change game status
1. Start module „Games overview“
2. Select game button of desired game
3. Select desired status in the check box control
(active, hidden, deactivated); not all forms of
status are available for all types of games (Fixed, Carousel, New)!
4. Select save control
after the changes have been made
6Network
The topic Network is covered in a separate manual (see network manual).
7
Other Settings
The topic Other Settings deals with language settings, country-specific profiles, code settings etc.
7.1
Active games
can be found in the menu and are playable.
Deactivated games CAN NOT be found in the menu and CAN NOT be played. Single games can be
deactivated manually to prevent them from being played on the terminal (i.e. when new country specific
legislations prohibit certain games).
Licence list
The list shows you all available licences on your terminal (licence name, add information).
7.2Export
All setup settings can be exported via USB stick.
5.1.1 Deactivate game
1. Start module „overview games“
2. Select game button of desired game
3. Use the check box control
to select status „deactivated“
4. Select save control
after the changes -> status of the game becomes „deactivated
7.3Import
Selected settings concerning your terminal can be imported via USB stick.
The topic other settings deals with language settings, country-specific profiles, code settings etc.
5.1.2 Activate game
1. Start module „Games overview“
2. Select game button of desired game
20
21
7.4
Language settings
A country specific version of the Touch Toy Software may contain up to 6 languages.
The language setting defines which languages can be selected by the players. Hereby we distinguish
between “Active Language” and “Standard Language”. The “Standard Language” is the one that will be
used most of the time on the terminal. Active languages are all languages that can be selected by the players. If a player chooses another language than the standard one, it will be switched back to the standard
language as soon as a certain period of inactivity has passed.
7.5.1 Change operator code
As soon as you have activated more than one language in the setup menu, there will appear a globe image
on the bottom right side of the games menu. By clicking on this symbol a language selection page pops
up, where the player can choose the desired language. The languages are represented by the respective
country flags and the name of the language.
7.4.1 Change language settings
Select „active“ for the desired language in the check box control
activated/deactivated
-> language becomes
1. Start module „Operator code“
2. Delete operator code with „backspace“ key
3. Enter new code with number keys
4. Re-enter new code for confirmation
5. Select save control
after the changes
7.5.2 Activate / Deactivate operator code
1. Start module „Operator code“
2. Select check box control
„active“ -> operator code is activated/deactivated
7.4.2 Define standard language
Select „standard“ for the desired language in the check box controls
standard language
7.5
-> language is defined as
Operator code
If the operator code is active, important settings for the setup are secured with a code.
The operator code can be chosen freely and must consist of 4 numbers.
WARNING: Never forget your entered code - without your code, you will no longer be able to define
important settings in the setup. Contact your general distributor if you have forgotten your code.
22
7.6
Country specific profiles
In some country specific versions TOUCH TOY Software offers several regional specific profiles.
These profiles may affect the availability of TOUCH TOY Software features.
7.6.1 Activate country profile
1. Start module „Country profiles“
2. Select check box control
in the frame „Select profile“.
3. Select save control
after the changes
23
8
7.7Reset
The Module „Reset“ resets all settings to default values.
ATTENTION: All settings in the setup are reset to the default values.
Changed settings are lost (e.g. network settings, statistics, bookkeeping etc)
7.8
Minimal-Setup code
Technical Settings
The area Technical settings deals with individual technical settings, information and tests.
8.1
Set date/time
In this module date, time and time zone can be set for the terminal.
When the Minimal-setup code is active, parts of the setup (=minimal setup) can be displayed on the screen
without using the book-keeping button. The Minimal-setup code can be chosen freely and has to consist
of 4 numbers.
7.8.1 Change Minimal-Setup code
1. Start module „Minimal-setup code“
2. Delete Minimal-setup code with „backspace“ key
3. Enter new code with number keys
4. Re-enter new code for confirmation
5. Select save control
after the changes
7.8.2 Activate/Delete Minimal-Setup code
1. Start module „Minimal setup code“
2. Select „active“ in the check box control
-> Minimal-setup code is activated/deactivated
7.8.3 Start Minimal-Setup via code
1. Touch the screen 6 times in the upper left corner
2. Enter the Minimal-setup code -> Minimal-setup is opened
8.1.1 Set date
1. Start module „Set date/time“
2. Set day, month and year with the „+“ and „-“ keys
3. Select save control after the changes
8.1.2 Set time
1. Start module „Set date/time“
2. Set hours and minutes with „+“ and „-“ keys
3. Select save control
after the changes
8.1.3 Set time zone
1. Start module „Set date/time“
2. Select desired time zone in the table „time zone“
3. Select save control
after the changes
24
25
8.2
Display NSB-number
The NSB-number is the version number of the TOUCH TOY Software and enables the distinct identification
of a TOUCH TOY Software version (e.g. for support questions)
To display the NSB-number:
1. Start module „NSB-number“
2. Read NSB-number
8.3
Start test picture
Test pictures enable the user to check the screen settings.
To start the test picture, proceed as follows:
1. Start module „test picture“
2. Touch the screen on any point -> next test picture is displayed
2. Read NSB-number
8.4
Start Touch Toy long term test
The long-term test tests the games of the TOUCH TOY Software by simulating (random) touches. Errors can
be found by evaluating the resulting log files. To start the long term test, proceed as follows:
1. Start module „long-term test“
2. Select check box control
„TOUCH TOY long-term test“
3. Select save control
after the changes
4. Quit setup -> long-term test is started automatically
8.5
Money device test
8.5.1 Check coin acceptor
1. Activate „Coin acceptor“
2. Throw in coins or insert notes.
3. Check channels (if a coin/ note is recognized by the money device the counter will be increased one
by one).
8.6
Test credits
The module „Test credits“ enables the user to book credits on the terminal without them being registered by
the book-keeping or counter (e.g. for service purposes).
The money device test shows the functionality of the coin acceptor.
26
27
8.9 Set volume
The module „Set volume“ enables the user to adjust the volume of games, advertising sounds and the minimum volume of the TOUCH TOY terminal.
8.6.1 Book test credits
1. Start module „Test credits“
2. Book credits with the „+1“ or „+5“ controls
3. Select save control
after the changes
8.7
Calibrate touchscreen
This setup option calibrates the touchscreen. The TOUCH TOY terminal can only be calibrated under normal
operating temperatures and when closed. To calibrate the touch screen, proceed as follows:
1. Start module „Calibrate touchscreen“
2. Follow the instructions and touch the given points of intersection (in total 3 intersections)
3. Confirm process with ok
8.8
To set and test the volume proceed as follows:
1. Start module „Volume setting“
2. Move the slide control into the direction „min“ or „max“.
3. Select the sound/music control -> test sound/music is played
4. Select save control
after the changes
Touchscreen test
The calibration of the touch screen can be checked here. To accomplish the touch screen test, proceed as
follows:
1. Start module „touch screen test“
2. Touch the screen wherever you want -> a square reveals where the touch was registered
3. Select quit control
to exit
28
29
Quanmax AG | Division funworld
Photo Play Str. 1, A-4860 Lenzing
Tel. +43 7662 6785 0, Fax +43 7662 6785 55
[email protected], www.funworld.com