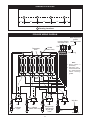
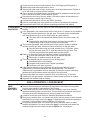
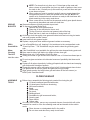
1
INSTALLATION AND OPERATING INSTRUCTIONS
Electric Drop-In Griddles
With Griddle Box
Models: EGD48GB & EGD72GB
PRODUCT MANUAL
Safety Instructions
Installation Instructions
Operation Instructions
Maintenance Instructions
Replacement Parts List
Warranty/Service Information
IMPORTANT FOR FUTURE REFERENCE
Please complete this information and retain this manual for the life of the equipment. For
Warranty Service and/or Parts, this information is required.
Model Number
!
Serial Number
Date Purchased
WARNING: Improper installation, operation, service or maintenance can cause
property damage, injury or death. Read and understand these instructions thoroughly
before positioning, installing, maintaining or servicing this equipment.
!
ANSI/NSF4
8/03 Form #8815200 REV-B
APW WYOTT Foodservice Equipment Company
P.O. Box 1829
Cheyenne, WY 82003
(307) 634-5801 Phone
(307) 637-8071 Fax
(800) 752-0863 Toll Free
1
2
Installation and start-up should be performed by a qualified installer who thoroughly read, understands and
follows these instructions.
If you have questions concerning the installation, operation, maintenance or service of this product, write
Technical Service Department APW/Wyott Foodservice Equipment Company, P.O. Box 1829, Cheyenne,
WY 82003.
SAFETY PRECAUTIONS
Before installing and operating this equipment be sure everyone involved in its operation is fully trained and
is aware of all precautions. Accidents and problems can result by a failure to follow fundamental rules and
precautions.
The following words and symbols, found in this manual, alert you to hazards to the operator, service
personnel or the equipment. The words are defined as follows.
!
DANGER: This symbol warns of imminent hazard which will result in serious injury or
death.
!
!
WARNING: This symbol refers to a potential hazard or unsafe practice, which could result
in serious injury or death.
!
!
CAUTION: This symbol refers to a potential hazard or unsafe practice, which may result in
minor or moderate injury or product or property damage.
!
!
NOTICE: This symbol refers to information that needs special attention or must be fully
understood even though not dangerous.
!
GENERAL INFORMATION
THIS MANUAL SHOULD BE RETAINED FOR FUTURE REFERENCE
!
CAUTION: These models are designed, built, and sold for commercial use. If these
models are positioned so the general public can use the equipment, make sure that
cautions, warnings, and operating instructions are clearly posted near each unit so that
anyone using the equipment will use it correctly and not injure themselves or harm the
equipment.
!
!
WARNING: Check the data plate on this unit before installation. Connect the unit only to
the voltage and frequency listed on the data plate. Connect only to 1 or 3 phase as listed on
the data plate.
!
!
WARNING: Improper installation, operation, service or maintenance can cause property
damage, injury or death. Read and understand these instructions thoroughly before
positioning, installing, maintaining or servicing this equipment.
!
!
WARNING: Electrical and grounding connections must comply with the applicable
portions of the national electrical code and/or other local electrical codes.
!
!
WARNING: Disconnect device from electrical power supply and place a Tag Out-Lockout
on the power plug indicating that you are working on the circuit.
!
3
!
WARNING: Install per the spacing requirements listed in the installation section of this
manual. We strongly recommend having a competent professional install the equipment.
A licensed electrician should make the electrical connections and connect power to the
unit. Local codes should always be used when connecting these units to electrical power.
In the absence of local codes, use the latest version of the National Electrical Code.
!
!
WARNING: A factory authorized agent should handle all maintenance and repair. Before
doing any maintenance or repair, contact APW Wyott.
!
!
WARNING: An earthing cable must connect the appliance to all other units in the
complete installation and from there to an independent earth connection.
!
!
NOTICE: This product is intended for commercial use only. Not for household use.
!
!
WARNING: SHOCK HAZARD: Do not open any panels that require the use of tools.
!
!
WARNING: Improper installation, adjustment, alteration, service or maintenance can
cause property damage, injury or death. Read installation, operating and maintenance
instructions thoroughly before installing or servicing this equipment.
!
!
NOTICE: The unit, when installed, must be electrically grounded and comply with local
codes, or, in the absence of local codes, with the national electrical code ANSI/NFPA70latest edition. Canadian installation must comply with CSA-STANDARD C.22.2 Number 0
M1982 General Requirements-Canadian Electrical Code Part II, 109-M1981Commercial Cooking Appliances.
!
!
NOTICE: Local codes regarding installation vary greatly from one area to another. The
National Fire Protection Association, Inc., states in its NFPA96 latest edition that local
codes are “Authority Having Jurisdiction” when it comes to requirement for installation of
equipment. Therefore, installation should comply with all local codes.
!
Congratulations on your purchase of APW/Wyott commercial cooking or refrigeration equipment.
APW/Wyott takes pride in the design and quality of our products. When used as intended and with proper
care and maintenance, you will experience years of reliable operation from this equipment. To ensure best
results, it is important that you read and follow the instructions in this manual carefully.
TABLE OF CONTENTS:
Safety Precautions..................................3
Specifications..........................................5
Installation...............................................5
Equipment Preparation...........................6
Seasoning...............................................6
Operation ................................................7
Cleaning .................................................8
Cooking Chart.........................................9
Trouble Shooting ....................................9
Calibration Procedure...........................10
Wiring Diagram 48” ...............................11
Wiring Diagram 72”...............................12
Parts Breakdown & List ..................13, 14
Overview...............................................15
Preparation/Setup.................................16
Grill Position Responsibilities ...............19
Grill Operation-Loading Meat ...............20
Close/Clean-up .....................................21
Warranty ...............................................24
4
LOCATION OF DATA PLATE
The data plate for the electric drop-in griddles with grill box is located on the bottom panel near the knock
out for bringing in the power cord.
IMMEDIATELY INSPECT FOR SHIPPING DAMAGE
All containers should be examined for damage before and during unloading. The freight carrier has
assumed responsibility for its safe transit and delivery. If equipment is received damaged, either apparent
or concealed, a claim must be made with the delivering carrier.
A) Apparent damage or loss must be noted on the freight bill at the time of delivery. It must then be
signed by the carrier representative (Driver). If this is not done, the carrier may refuse the claim.
The carrier can supply the necessary forms.
B) For concealed damage or loss, if not apparent until after equipment is uncrated, a request for
inspection must be made to the carrier within 15 days. The carrier should arrange an
inspection. Be certain to hold all contents and packaging material.
SPECIFICATIONS
Electrical
EGD48GB, 208 Volt, 50/60 Hz, 3 Ph, 21,600 Watts, 3 Ph Amps L1-69.0, L2-69.0, L3-45.0
EGD48GB, 240 Volt, 50/60 Hz, 3 Ph, 21,600 Watts, 3 Ph Amps L1-60.0, L2-60.0, L3-39.0
EGD48GB, 480 Volt, 50/60 Hz, 3 Ph, 21,600 Watts, 3 Ph Amps L1-30.0, L2-30.0, L3-20.0
EGD72GB, 208 Volt, 50/60 Hz, 3 Ph, 32,400 Watts, 3 Ph Amps L1-90.0, L2-90.0, L3-90.0
EGD72GB, 240 Volt, 50/60 Hz, 3 Ph, 32,400 Watts, 3 Ph Amps L1-78.0, L2-78.0, L3-78.0
EGD72GB, 480 Volt, 50/60 Hz, 3 Ph, 32,400 Watts, 3 Ph Amps L1-39.0, L2-39.0, L3-39.0
Dimensions
EGD72GB
EGD48GB
Body
Height
14”
356mm
14”
356mm
Griddle Surface Dimensions
Width
EGD72GB
69.5”
EGD48GB
46.5”
Depth
35-5/8”
905mm
35-5/8”
905mm
Width
75-3/4”
1924mm
51-3/4”
1314mm
Depth
23.94”
23.94”
With Work Shelf
Height Depth
14”
51”
356mm 1295mm
14”
51”
356mm 1295mm
Width
1181mm
1765mm
Ship weight
Width
75-3/4”
1924mm
51-3/4”
1314mm
556 lbs.
377 lbs.
Depth
608mm
608mm
INSTALLATION
A qualified installer who thoroughly reads, understands and follows these instructions should perform
installation and start up. If you have questions concerning the installation, operation, maintenance or
service of this product. Call:
APW Wyott Technical Services Department
1-800-752-0863 Ask for Jerry Knowlton or Rod Commander
Monday through Friday 9AM 6:30PM Eastern Time
Uncrate the griddle, make sure no parts are discarded with crating material. Place the griddle in it’s
mounting position.
5
This griddle is wired for 208 volt or 240 volt service. Proper installation should comply with the attached
rating plate containing model number, serial number, voltage and amperage. The unit has been pre wired
at the factory. Connect the leads supplied to branch circuit protecting device of adequate rating for the
griddle. Consult local and/or national electrical code for proper protection device.
!
WARNING: This unit is supplied with connection wires for the length provided. If the wires
are connected to a longer run, the size of the wires must be confirmed. Consult your local
electrical code or the national electrical code if the wiring is longer than those supplied.
!
!
WARNING: This device should be safely and adequately grounded in accordance with
local codes, or, in the absence of local codes, with the National Electrical code,
ANSI/NFPA 70, Latest Edition to protect the user from electrical shock. It requires a
grounded system and a dedicated circuit protected by a fuse or circuit breaker of proper
size and rating. Canadian installation must comply with the Canadian Electrical Code,
CSA C22.2, as applicable
!
EQUIPMENT PREPARATION
The griddle is shipped with protective coatings of oil and/or grease. Remove the griddle plate coating just
prior to its first cooking use. If the griddle is to be shut down for an extended period, put a heavy coat of clean
grease back over the griddle plate.
Wipe the remaining cabinet parts down with a hot, wet cloth to remove any shipping dust and protective oil.
!
CAUTION: Care must be exercised not to overheat the griddle plate on initial start up by
setting the controls above normal operating temperature. Overheating may cause the
plate to warp and will carbonize the grease (this will cause sticking).
!
!
CAUTION: This griddle plate is steel, but the surface is relatively soft and can be scored or
dented by carelessly using a spatula. Be careful not to dent, scratch, or gouge the plate
surface. Do not try to knock off loose food that may be on the spatula by tapping the corner
or the edge of the spatula on the griddle surface.
!
SEASONING
1.
2.
3.
4.
5.
6.
7.
8.
9.
10.
11.
Wipe any remaining water off grill with paper towels.
Use a 1/9-sized pan to pour a small amount of liquid corn shortening (from bag-in-box) onto grill
surface.
Use a dry paper towel to cover entire grill surface with a VERY LIGHT coat of shortening.
Caution: Do not use hot shortening from fryers.
Coating grill with shortening is called “seasoning” and prevents rusting of grill surface.
Pour remaining corn shortening into a fry kettle.
Take sandwich board to back room to be washed, rinsed and sanitized.
Wipe clean area between board and grill with a sanitized towel. Check entire grill area again.
Also, wipe ledge below grill, surrounding walls and bottom of bun warmer (or MPHC).
Take condiment pan and grill cleaning tools to back room to be cleaned and properly stored. C l e a n
grill cleaning tools with hot, soapy water.
Return sandwich board and grill guards to grill.
Empty grease buckets following “Grease Bucket” procedures, as necessary.
6
OPERATION
Turning the dial knob (recessed in the front panel) controls the heat of the griddle surface. When a control is
turned on, a signal light directly above the dial will glow. This indicates the griddle is heating in that zone.
The individual controls operate each 12” wide cooking zone. Make sure power is supplied to the unit then
turn the control knob to the desired temperature. When the light is out, with the dial set on a temperature
setting, the griddle plate has reached the desired temperature. The lights will intermittently come on during
cooking cycles to indicate temperature is being maintained. For best results, allow the griddle to heat 20-30
minutes before beginning to cook product.
When setting zones to different temperatures, do not set zones beside each other more than 50ºF apart.
Because of the mass of the griddle plate and conduction of the heat they will tend to reach the same
temperature. When you want zones at greater temperature variation, leave a zone or more between the
cooking zones. Turn off the zone or zones between the two cooking areas. Note: this will effect the
efficiency of the griddle. The heat being supplied will heat the areas between the cooking zones. You can
run the zones not being used at a temperature between the two set points, this will improve the recovery of
the hotter zone.
During idle times during the day, turn the griddle to a lower temperature setting. If you need to prepare
product, the griddle will heat up rapidly; and, holding the griddle at a lower temperature will save energy
costs.
When finished, turn all temperature controls to “OFF.”
PILOT LIGHT: WILL BE LIT
WHEN UNIT ISPilot
HEATING
Light: Will be lit
when unit is heating
Temperature Control Knob:
Set to desired temperature
TEMPERATURE CONTROL KNOB: SET
TO DESIRED TEMPERATURE
7
CLEANING
IMPORTANT: At the end of each day’s operation, turn all temperature controls to “OFF.”
NEVER clean any electrical unit by immersing it in water.
After each cooking load, scrape the griddle surface with a scraper or rigid spatula to remove excess fat and
food particles.
Once a day, or whenever necessary, thoroughly clean and wipe out grease trough. As necessary during
use, wipe out accumulated material to provide good drainage. Remove the grease receptacle, empty and
wash.
!
CAUTION: Turn off the griddle and allow it to cool before cleaning. Hot surfaces can burn.
Avoid contacting hot surfaces.
!
Clean all stainless surfaces with warm soapy water. Use a sponge or soft cloth, wipe clean and dry. Do not
use abrasive cleaners since this might damage the stainless finish. If the stainless steel surfaces become
discolored, scrub by rubbing only in the direction of the finish grain. Never use vinegar or corrosive
cleaner. Do not use steel wool, steel wool may leave particles that can rust and cause pitting. To remove
the control knobs for cleaning, pull straight out. Wash in soapy water. Rinse, dry and replace on the shaft.
KEEP GRIDDLE PLATE SURFACE CLEAN. To produce evenly cooked, perfectly browned griddle
products, keep the griddle free of carbonized grease.
Carbonized grease on the surface hinders the transfer of heat from the griddle surface to food. This results
in spotty browning and loss of cooking efficiency; and, worst of all, carbonized grease tends to cling to the
griddled foods, giving them a highly unsatisfactory and unappetizing appearance. To keep the griddle clean
and operating at peak efficiency, follow these simple instructions.
After each use, clean the griddle with a wire brush or flexible spatula.
Each week, or whenever necessary, clean the griddle surface thoroughly. If desired, use a pumice or
griddle stone over the surface. Rub with the grain of the metal while still warm. A detergent may be used on
the plate surface to help clean it, but care must be taken to be sure the detergent is thoroughly removed.
After removal of the detergent, the surface of the plate should then be covered with a thin film of oil to
prevent rusting. Avoid steel wool. After each thorough cleaning, the cooking surface must be reseasoned.
8
COOKING CHART
CAPACITIES
CAPACITIES
MODEL EGD48GB
QTY/
APPROX
LOAD
PROD/HR
MEATS
Hamburgers 2.5oz 3.5”dia
Minute steak 4 oz 1/2”th
Beef Tenderloin 5 oz 1”th
Liver 3 oz. 3/8” th.
Bacon 22 to 32 slices/lb
Pork Link Sausages
fresh 1.25 oz 3.5” long
Hot Dogs split
Ham Steak 1lb 1/2” th
OTHER FOODS
Eggs, Fried
Pancakes 4” diameter
Fried Potatoes blanched
Servings
Fried Onions blanched
Servings
Hamburger Buns 3.5” dia.
MODEL EGD72GB
QTY/
APPROX
LOAD
PROD/HR
BOTH MODELS
COOKING TIME &
TEMPERATURE
65
24
48
36
3.5lbs
945+
360+
280+
450+
30lbs
86
32
64
48
4.67lbs
1300+
400+
370+
600+
40lbs
3 min. @ 350ºF
4 min. @ 350ºF
8 min. @ 360ºF
3-4 min. @ 350ºF
5-6 min. @ 350ºF
12lbs
64
24
70lbs
900+
325+
16lbs
86
32
93lbs
1200+
433+
10 min. @ 325ºF
3 min. @ 350ºF
4 min. @ 350ºF
64
40
900+
450+
86
53
1200+
600+
3 min. @ 300ºF
3-4 min. @ 375ºF
51
750+
68
1000+
3 min. @ 375ºF
76
32
1100+
600+
103
43
1470+
852+
3 min. @ 340ºF
2 min. @ 350ºF
TROUBLE SHOOTING GUIDE
PROBLEM
PROBABLE CAUSE
Unit Fails to No Power
Operate
Loose Connection
Open Circuit Breaker
or Fuse
Faulty Thermostat
Temperature Draft on Product
Too Low
Set Point too Low
Thermostat Calibration
Incorrect
Heating Element
not Working
CORRECTIVE ACTION
Make sure the thermostat is set to a temperature and not turned
off.
Make sure the unit is connected to a live power source.
Place all of the thermostats in the “OFF” position and disconnect
power from the unit. WARNING: Failure to do so may result in
electrical shock. Check and tighten all connections.
Reset breaker or replace fuse.
Place all of the thermostats in the “OFF” position and disconnect
power from the unit. WARNING: Failure to do so may result in
electrical shock.
Replace thermostat.
Remove draft
Adjust the thermostat to the temperature desired.
Calibrate the thermostat using the procedure in this manual.
Place all of the thermostats in the “OFF” position and disconnect
power from the unit. WARNING: Failure to do so may result in
electrical shock. Replace heating element.
Place all of the thermostats in the “OFF” position and disconnect
Faulty Thermostat
power from the unit. WARNING: Failure to do so may result in
electrical shock. Replace thermostat.
Adjust the thermostat to the temperature desired.
Temperature Set Point too High
Thermostat Calibration Calibrate the thermostat using the procedure in this manual.
Too High
Incorrect
Place all of the thermostats in the “OFF” position and disconnect
Faulty Thermostat
power from the unit. WARNING: Failure to do so may result in
electrical shock. Replace thermostat.
9
If all of the above are correct and the unit still does not work, call an APW Wyott Authorized Service Agency.
NOTICE: Only a qualified technician who is experienced in and knowledgeable with the operation of this
electrical equipment should perform Service work. Contact the Authorized Service Agency for reliable
service, dependable advice or other assistance and for genuine factory parts.
A current listing of all authorized APW Wyott Authorized Parts and Service Distributors is included with this
unit. In the absence of this list, call the APW Wyott 24-Hour Service Hot Line at 1-800-733-2203. This will
give access to the nearest Authorized APW Wyott Parts & Service Distributor.
WARRANTY WILL BE VOID AND THE MANUFACTURER IS RELIEVED OF ALL LIABILITY IF:
1.
2.
Service work is performed by other than an APW Wyott Authorized Service Agency.
Other than Genuine APW Wyott replacement parts are installed.
CALIBRATION
Checking the Grill Thermometer:
1.
Fill a meat pan with two inches of water and place it on the chili stove.
2.
Place a half-size pan into the meat pan to float in the water. CAUTION HOT
3.
Allow the water to come to a boil.
4.
Place the thermometer in the half-size pan for five minutes.
5.
The thermometer should read 212°F. at sea level. Subtract 1.8°F. for every 1000 feet above sea
level.
6.
Adjust the thermometer according to the manufacturer’s instructions.
Calibrating the Grill:
1.
Set the grill at the proper setting and allow to heat for at least one hour.
2.
Place the grill thermometer directly over the sensing bulbs. (See “Sensing Locations”diagram on
following page). Measure off the grill according to the diagram. Use only these locations for
calibration points.
3.
Make a note of the high temperature (when element light turns off) and the low temperature (when
the element light turns on). You can use the work sheet to write down the readings. Get a high and a
low reading for each of the sensing locations.
4.
Add the high and low temperatures together for each sensing location and divide by two to get an
average.
5.
If the difference between the high and low reading for any of the sensing locations exceeds 30°F.,
call a technician.
6.
If the average temperature of a sensing location is within 10°F. of the proper temperature, no
adjustment is needed for that thermostat.
To Adjust a Thermostat:
1.
2.
3.
4.
5.
6.
Pull off the knob.
Use a small screwdriver to turn the set screw clockwise to decrease temperature, counterclockwise
to increase temperature. A quarter turn is equal to about 18°F. You may have to hold the shaft to
prevent it from turning while adjusting the set screw.
Check the high and low temperatures again. Adjust the set screw again if necessary.
When finished adjusting the set screw, put a drop of nail polish or appliance paint on the screw head
to keep it from turning.
Replace the knob.
For grills installed after 1979, there are calibration plates between the control panel and the
adjustment knobs. To adjust these thermostats:
A.
Loosen the three screws that hold the calibration plate.
B.
Hold the temperature adjustment knob and turn the calibration plate so the indicator arrow
lines up with the average temperature for that section of the grill.
C.
Tighten the screws.
10
SENSING LOCATIONS
6”
12”
12”
12”
6”
Sensing Locations
EGD48GB WIRING DIAGRAM
Incoming Supply
See Notes 1 & 5
Griddle
(Bottom View)
Thermostat
Bulb
16
16
15
15
17
17
55
44
55
5
5
99
33
5
55
66
22
5
TB2 L1 L2 L3 E1
10
66 88 77
10
11
13
12
12
11 99 13
14
14
55
55
11
11
Ground Lug
Note:
1. Wiring shown 3
phase only.
5. Servicing Only Power source must
be disconnected
before servicing
griddle.
55
11
Make equipment
ground
connection here
10
10
Trough
Side
44
88
77
33
12
12
18
18
18
18
13
13
11
22
18
18
18
18
Wire Nut
17
17
HS1
16
16
15
15
HS3
Single wrap
tape around
all pilot light
leads
Sleeve
(208 & 240V Only)
Indicator
Lights
DS1
DS1
HS2
DS2
DS2
DS3
DS3
11
14
14
HS4
DS4
480V Only
12
21
21
DS1
27
27
E1
10
10
L2 L3
19
17
88
19
17
TB1 L1
HS1
77
Indicator
Lights
66
66
20
20
27
27
21
21
55
55
12
12
88
4
20
20
Trough 4
Side
13
13
HS2
Sleeve
(208 & 240V
Only)
DS2
26
26
10
10
20
20
12
12
26
26
21
21
19
19
20
20
DS3
25
25
25
25
Thermostat
Bulb
HS3
17
77 17
11
11
20
20
T
Single wrap
tape around
all pilot light
leads
44
33
20
20
24
24
21
21
DS4
24
24
22
12
12
12
12
23
23
99
11
20
20
HS4
33
14
14
22
22
Griddle
(Bottom View)
18
18
20
20
DS5
23
23
21
21
See Note 5
16
16
Thermostat
21
21
DS6
22
22
E2
18 15
15
11
18
11
16
16
L1 L2 L3
HS5
22
TB2
35
28 29 30
See Note 5
Ground Lug
31 32 33
34
Incoming Supply
See Notes 1 & 5
Incoming Supply
See Notes 1 & 5
EGD72GB WIRING DIAGRAM
Wire Nut
480V Only
15
99 15
HS6
11
Note:
1. Wiring shown 3 phase
only.
5. Servicing Only - Each
half of the griddle is
wired separately
and terminates in each
own junction box. Each
j u n c t i o n b o x
requires a separate
fused branch circuit
power supply. Power
sources must be
disconnected before
servicing griddle.
Ground Lug
PARTS BREAKDOWN
34 38
31
1
37
10
3
21
4
40
20
35
58
6
63 60
34
7
57
26
5
62
32
31
36
61
15
59
17
14
30
64
65
33
2
42
45
18
29
23
39
22
24
56
42
46
48
9
19
27
28
44
8
47
25
13
41
16
59
12
59
55
43
13
11
PARTS LIST
ITEM PART NUMBER DESCRIPTION
QUAN ITEM PART NUMBER DESCRIPTION
QUAN
1
643355-30
Grease Chute Bottom
2
34
8417100 Nut, Hex, KEPS 10-32
28
2
644635-05
Thermostat Assembly
6
35
8436200 Hex Nut 5/16-18
106
3
14397-25
Heater Element, 208V
12
36
84364-00 Reg. Wing Nut, 5/16-18
24
4
642567-01
Pressure Plate
12
37
85030-00 Washer, Flat, #8
12
5
646251-01
Baffle
12
38
85066-00 Washer, Flat, #10, S/S
24
6
646378-03
Clamp Assembly
6
39
88610-00 Label, Spec
1
7
646380-01
Clamp
12
40
85093-00 Washer, Flat, SAE, 5/16
8
88250-00
Decal, Caution Disconnect
2
41
88383-00 Decal, French Supply
2
9
8830100
Label, APW/Wyott
1
42
1603600 Clamp, Cable
4
10
642634-11
Top & Plate Weldment Assy
1
43
29592-01 Skid, Base (Shown for Ref. Only)
1
11
642634-40
Panel Enclosure
1
44
29592-02 Carton Wendy's Box
1
12
642634-38
Panel Enclosure
1
45
81342-00 8-32 x 1/4 S/S Pan Hd
12
13
642634-43
Bottom Panel, Grill Box
1
46
88220-10 UL C Recognized
1
14
642634-12
Conduit, 16' Flex
2
47
29003-00 Tray Clip
4
15
642634-60
Griddle Box
1
48
8837400 Box Label, APW/Wyott
2
16
81300-00
8-32 x 3/8 Type T
8
49*
64416801 Label, 90°C
2
17
1605800
Bushing, 3/4" Anti-short
2
50*
8837876 Label, Caution
3
18
642634-64
Terminal Box
2
51*
8815200 Manual, EGD-72GB
1
19
642634-65
Cover
2
52*
8837933 Label, L3, L2, L1
2
20
642634-68
Gasket Strip, Short
2
53*
8837201 Bag, Cloth, 4" x 6" w/Drawstring
1
21
64263469
Gasket Strip, Long
2
54*
88370-01 Label, Ground Marker
2
22
653844-01
Control Panel Assembly
3
55
88252-00 Label, Shock Hazard
3
23
11260-35
Terminal Block
2
56
16062-00 Elbow, 3/4"
4
24
81423-00
8-32 x 3/4 Tr Hd
4
57
16062-10 Locknut, 1-14 x .15 Thick
4
25
644557-01
Label, 90°C Wire
2
58
642634-52 Divider, Griddle
1
26
644582-01
Label, Container
2
59
8837870 Label
3
27
11260-37
Lug, Terminal
2
60
64263470 Conduit, 3/4"
1
28
8153100
#8-32 x 3/8 Type T
4
61
1610610 J-Box 2 x 4, Mod.
2
29
81537-00
8-32 x 1.500 Long, Oval Hd
24
62
1610905 Cover J-Box
2
30
81697-00
10-32 x 3/8 Long, Screw
8
63
1605200 Fitting, Conduit, Str 3/4"
2
31
81712-00
10-32 x 1/2 Long SHWH Type 26
64
8175900 10-32 x 1/2 Tr Hd
4
32
82055-00
1/4-20 x 1/2 Tr Hd
24
65
84176-00 Nut, Hex 10-32
4
33
84083-00
8-32 Hex Nut, KEPS, NI
16
*
14
NOT SHOWN
130
OVERVIEW
OVERVIEW
PURPOSE
To prepare, hold and serve ground beef patties.
To prepare meat for chili.
To review grill position, maintenance and responsibilities.
To describe grill set up and cleaning procedures.
QUICK
REFERENCE
Ground beef shelf life: Use-by date stamped on box.
Cases are dated by meat packer for proper rotation.
Do not stack cases more than five high in walk-in cooler.
Walk-in temperature: 34°F. to 38°F.
Freezer temperature: 0°F. to 10°F.
Grill temperature: 250°F.
Patty sizes are 2-ounce and 4-ounce.
4-ounce patty cook time: 5 to 5 ½ minutes.
2-ounce patty cook time: 3 to 3 ½ minutes.
Ground beef case: 40 pounds; four 10-pound sleeves.
Use perforated, stainless steel, false bottoms in all meat pans.
Meat sleeves opened in meat pans on-line using a red handled, serrated spatula.
The bottom side of the plastic meat sleeve is opened with a red-handled, serrated
spatula to allow blood drainage from the sleeve.
Used meat pans with false bottoms replaced with clean pans and false bottoms at
post-rush lunch, post-rush dinner and at close.
Use lids on meat pans on-line.
Pink colored, disposable towels used at grill position only and replaced hourly.
Sanitizer solution for grill replaced hourly.
4-hour hold time marked for all meat pans on-line.
Grill operator does not assist with sandwich preparation or touch any ready-to-eat
food items.
Minimum acceptable cooked temperature: 160°F.
TOOLS AND
SUPPLIES
Two grill spatulas per grill.
Pink grill towels.
1/6-sized, 6-inch deep, stainless steel pan for sanitizer solution.
Full aluminum salt dredge.
Empty stainless steel pan for chili meat.
Chili meat ziplock plastic freezer bags.
Marking pen.
Scale to weigh meat.
Trash can.
Thermometer.
Grease buckets and liners.
Full-sized, 6-inch deep, stainless steel pans.
Full-sized, perforated, stainless steel, false bottoms.
1/2-sized solid, clear plastic lids.
Plastic wrap.
Colander.
1/3-sized, 6-inch deep, stainless steel pans.
1/3-sized, perforated, stainless steel, false bottoms.
1/3-sized solid, clear plastic lids.
1/2-sized (long), 6-inch deep, stainless steel pans.
1/4-sized, 6-inch deep, stainless steel pans.
1/4-sized, perforated, stainless steel, false bottoms.
1/4-sized solid, clear plastic lids.
Grill cleaning tools.
Red-handled serrated spatula.
Box knife.
Cut-resistant glove.
15
Rubber apron.
Rubber gloves.
Safety glasses or face shield.
Disposable, plastic gloves.
HEALTH AND
SAFETY
Wash hands before and after handling meat to prevent contamination and health
hazards.
Grill operators must thoroughly wash hands before taking position, after leavung
position and before and after completing any off-line task.
Disposable gloves must be worn over Band-Aid or bandages while working with
foods.
!
CAUTION
! CAUTION
Ground beef is potentially hazardous and must be stored at the proper
temperatures.
34°-38°F. in the walk-in cooler.
40°F. or below on service line.
To avoid cross-contamination, towels used for the grill position must be distinctly
different from all other towels in the store and must not be shared with other
positions.
To avoid cross-contamination, the grill operator must not touch cheese or any
other ready-to-eat food item.
No other position can assist the grill operator without washing hands after finishing
at the grill.
Disposable, plastic gloves will be worn for cooking breaded chicken, grilled
chicken, chicken nuggets and fish.
Clean up grease spills immediately.
Wear cut-resistant glove, with a plastic glove over it, when using any type of knife.
Use caution when opening meat sleeves with the red-handled, serrated spatula.
Be careful not to contaminate ready-to-eat foods or work areas with blood from
empty meat sleeves as they are being discarded.
When removing an empty meat pan from the service line, drain the excess blood
into a trash can or grease bucket and take the pan to the sink for proper washing,
rinsing and sanitizing. Do not pour meat juice into the sink!
Do not use glass containers to hold water when cleaning grill because they could
break.
When transporting hot grill guards, wear rubber gloves and call out “hot grill
guards.”
Be careful not to touch grill or splash hot meat juices while scraping or cleaning
grill.
PREPARATION/SETUP
BULK MEAT
STORAGE
Bulk meat must be stored in the walk-in cooler between 34°F.-38°F.
To prevent cross-contamination, no other food products should be stored below
raw meat.
For best temperature control, store meat away from cooler doors.
Ensure the carryover meat (open cases or sleeves) is properly rotated and used
first.
Place a clean and sanitized, empty, full-sized, 6-inch deep, stainless steel pan with
perforated false bottom into the large opening of the meat well.
Place two 1/2-sized, clear, solid plastic lids on top of the pan.
Place empty 1/3-sized, 6-inch deep, stainless steel pans with false bottoms and
lids into the small openings of the meat well.
Place a clean and sanitized, red-handled, serrated spatula on top of the meat well,
along the side closest to the grill.
Stock the reach-in cooler beneath the free-standing meat well with sleeves of 4ounce and 2-ounce meat patties. A total of nine sleeves of meat can be placed in
the reach-in cooler.tock 4-ounce and 2-ounce sleeve quantities based on
expected product mix levels during the rush periods.
16
! CAUTION
PANNING
PROCEDURES
FOR 2-OUNCE
MEAT
Fifteen minutes prior to opening, remove one sleeve each of 4-ounce and 2-ounce
meat patties from the reach-in cooler beneath the free-standing meat well.
Be sure to use any carryover sleeves from the previous day first.
Remove clear, plastic lids from top of empty meat pan and place sleeves of meat
side by side in the pan, on top of the perforated, stainless steel false bottom.
Stand each sleeve of meat on end with bottom side facing you.
Using the red-handled, serrated spatula, carefully make a slit lengthwise in the
bottom of each sleeve and separate the plastic. This will allow the blood to drain
from the sleeves when stored in the meat pan.
Using the red-handled, serrated spatula, carefully open the top of the plastic
sleeve down both sides and on the end of the sleeve facing the front of the meat
well.
When using the red-handled, serrated spatula, be careful to avoid injury and not to
damage the meat patties in the sleeve.
Peel the open section of the plastic towards the back of the sleeve and tuck it
between the sleeve and the meat pan.
Repeat the above procedure for the second sleeve of meat.
Place plastic lids on top of the meat pan and mark the 4-hour hold time on the
stainless steel surface on the side of the meat well for the 4-ounce and 2-ounce
meat.
Wipe the red-handled, serrated spatula with a sanitized grill towel and place
spatula back on top of meat well.
This meat should be used within 4 hours. If meat left in the pan on-line at
the end of 4 hours has exceeded 40°F. it must be discarded.
Any meat left in the pan at the end of 4 hours, which is at or below 40°F.,
can continue to be used. Remark 4-hour hold time on stainless steel
surface.
Thoroughly wash hands.
Place cut-resistant glove with a plastic glove over it on hand which will not hold
the box cutter used to cut open boxes of meat.
Place disposable, plastic glove on hand holding knife.
Get needed number of clean and sanitized 1/4-sized, 6-inch deep, stainless steel
pans and place on prep table.
Place a clean and sanitized, stainless steel, perforated false bottom into each ¼sized pan.
Remove one case of 2-ounce patties from walk-in and place on prep table. (Use
oldest use-by dated meat first).
Cut open the cardboard box using the safety box cutter.
Remove sleeves of meat from case and place on prep table.
Cut open one sleeve of meat along side with red-handled, serrated spatula.
Place two stacks of sixteen 2-ounce patties into each 1/4-sized pan, for a total of
32 patties or 4 pounds per 1/4-sized pan.
Cover the pan with plastic wrap, tucking wrap along sides of stacks to help
maintain temperature.
Mark use-by or expiration date on the meat pan. That date is: By close on the
following day.
Place pan in walk-in on lower shelves of meat storage rack and never above foods
which require no further cooking. Make sure carry-over meat pans with use-by
date have been rotated to upper shelves of meat storage rack to be used first.
Repeat above process for additional pans of meat.
Once all meat panning is complete, discard disposable, plastic gloves and
thoroughly wash hands.
Wash and sanitize the cut-resistant glove and wipe down and sanitize the prep
table.
17
GRILL SETUP
Place full aluminum salt dredge on sandwich board in front of grill. Do not use fine
flake salt for grill.
Make sure grease buckets are directly under grease chutes.
Place chili meat pan in sandwich board warmer, MPHC drawer or on grill. If holding
chili meat on grill, fill 1/3-sized pan ½ full with water.
Place two grill spatulas on sandwich board in front of grill.
Turn grill on to 250°F. 30 minutes prior to use.
GRILL TOWEL/
SANITIZER/
PAN SETUP
During opening, prepare pans of sanitizer solution for each grill.
Fill 1/6-sized, 6-inch deep, stainless steel pans 2/3-full of properly mixed
(200ppm) sanitizer solution dispensed from the Chemical Blend Center.
Place a pan of sanitizer solution in the pan holders located at each grill.
Place a clean, pink colored, disposable towel into each pan of sanitizer solution.
These towels will be used every 15 minutes to help control sanitation of the grill
area.
Place one dry, pink colored towel at each grill.
These towels will remain dry and will be used to soak up blood and
grease from the grill area as needed, but minimally every 15 minutes.
BOILING &
CHOPPING
CHILI MEAT
Set chili stove to the #4 setting or 560°F.
Assemble the following tools and supplies:
Frozen chili meat,
1/2-sized, 6-inch deep, stainless steel pan and slotted lid,
Colander,
Oven mitts,
Rubber apron,
Grill spatulas,
Chili meat chopping tool (if used),
Full-sized, 6-inch deep, stainless steel pan (if using chopping tool).
Remove oldest bags of chili meat from walk-in freezer.
Discard chili meat more than five days old.
Place frozen chili meat into a 1/2-sized, 6-inch deep, stainless steel pan and
discard plastic freezer bag. Do not reuse bags.
Using a grill spatula, break the block of frozen meat in half so that all of the meat
fits into the pan.
Fill pan with hot tap water to within one inch of the top, to cover meat. The hot
water will help separate the frozen meat patties.
Place 1/2-sized, slotted lid on pan and place on the preheated chili stove to boil.
After approximately 45 to 60 minutes on the chili stove, the pan of meat will begin
to boil.
Allow meat to boil for a full 10 minutes to kill bacteria and make meat
easier to chop.
Wearing the rubber apron, remove lid from boiling chili meat and, using oven mitts
to hold pan, pour boiled meat into colander that has been placed over the rinse
(middle) compartment of the three compartment/PowerSoak sink. Caution: Meat
and water are extremely hot; use safety equipment to avoid burns.
There is a minimal amount of grease in this water. The chemicals that are flushed
down the sink when changing the sinks will sufficiently flush the lines.
Press excess water and grease from meat with grill spatula.
Return drained and pressed meat to pan.
Place colander in three compartment sink to be washed and sanitized.
Using two hamburger spatulas, chop meat. Use a piston-like motion by forcing one
spatula down into meat and then the other.
If using the chili meat chopping tool, chili meat should be placed in a full-sized, 6inch deep meat pan prior to chopping.
Chop meat until pieces are smaller than a dime but larger than a pea (between
6mm. and 18mm).
! CAUTION
18
MEAT FOR
CHILI
Once meat is boiled and chopped, add hot chopped meat directly to chili
ingredients, stir, tag and immediately place entire chili on stove to cook.
It is unacceptable to combine hot chopped meat with chili ingredients and
then refrigerate mixture for cooking at a later time. The entire mixture will
remain above the 40°F. temperature for an unacceptable amount of time
resulting in possible rapid bacteria growth.
Likewise, it is also unacceptable to hold chopped chili meat in the walk-in
cooler due to the reasons listed above.
GRILL POSITION RESPONSIBILITIES
QUALITY
Serve only high-quality, hot (at least 160°F.) and juicy meat patties. Characteristics
of properly cooked meat patties are as follows:
Meat is no longer pink,
No red juices,
Meat has shiny, juicy appearance,
Steam is present,
Properly pressed.
Do not serve chili meat. Characteristics of chili meat are as follows:
Dark and dry in appearance,
Overcooked,
Improperly pressed,
Missing pieces larger than a dime,
Steam no longer present.
NOTE: Sporadic, dark-brown highlights are acceptable providing the
overall meat patty is hot and juicy. To check for steam, lift the patty from
the grill and look for steam coming off the top of the patty. Only use steam
as an indicator along with the other visuals used to describe chili meat.
Steam alone should not be used to judge meat quality.
Ensure chili meat is thoroughly cooked and drained, remove from grill and place in
chili meat pan.
Chili meat can be stored in a 1/3-sized, 4-inch deep, stainless steel pan in the
MPHC drawer closest to the grill operator or in a 1/6-sized, 6-inch deep, stainless
steel pan with a lid in the sandwich board warmer.
Chili meat may also be held on the grill in a 1/3-sized, 6-inch deep, stainless steel
pan half-filled with water.
Chili meat must maintain a temperature of 140°F. or above.
Patties with cheese or condiments on them cannot be used for chili meat and must
be discarded.
If meat has an unusual (spoiled or old) odor while cooking, do not serve. Inform
manager immediately.
Drain meat thoroughly before serving. Before draining and serving, turn the meat
patty so that the hottest side of the patty is upright when placed on the heel of the
bun. This will help to melt cheese (if ordered) when placed on the meat.
Run a “wet grill” to help maintain a moist product. A wet grill is a grill from which
meat juices have not been completely removed. Periodically, some of the juice will
need to be scraped from the grill to avoid cooked meat patties from becoming
“greasy.”
If meat is cooked too fast, check thermostat for proper temperature setting
(250°F.). Notify manager. If meat continues to cook too fast, check calibration with
an accurate grill thermometer and call maintenance/repair service for recalibration,
if needed.
SERVICE
PUW grill operator must wear a headset with a fully charged battery.
Wash hands before beginning work on grill or before returning to your position.
Listen carefully to the speaker/headset or observe the monitor as the customer
places their order.
19
Project correct amount of meat needed. (See “Grill Staging and Projection.”)
Always have meat done and ready to serve.
Always load fresh meat to begin cooking prior to serving cooked meat. Failure to
do so will result in frequent product outages.
Stay in position to maintain staging and quality and be prepared to interrupt postrush or nonservice tasks in order to serve guests.
Serve meat to the heel of the bun within 3 seconds of when the sandwich was
started to ensure smooth flow of service.
Communicate stock level of buns and MPHC products.
Ask line coordinator how many guests are in line to help determine projection.
Communicate with PUW grill operator regarding projections and staging.
CLEANLINESS/
SANITATION
The grill operator will use two towels to clean and sanitize the grill area throughout
the day.
A dry, disposable, pink colored towel will be used every 15 minutes or as needed to
wipe meat blood and grease from the grill area. This towel will be contaminated
with meat blood and must not be used to wipe any other surface.
This towel will be discarded and replaced every hour with a clean, dry
towel.
Discarding the towel each hour helps to minimize the possibility of
contaminating foods or work surfaces with meat blood.
The second disposable, pink colored towel will be stored in a pan of sanitizer
solution near the grill area. Use this solution exclusively for the grill towel.
Use this towel after using dry towel, at least every 15 minutes, (when
product stir timer goes off), to clean and sanitize the grill area. This
includes the grill board and splash walls around the grill.
Each hour discard the towel and sanitizer solution and replace both.
A clean pan should be used for the fresh sanitizer solution.
Return pan of sanitizer solution to grill area.
The hourly discards can be monitored in one of three ways.
Coordinate with hourly readings.
Program multi-product timer if space is available.
Purchase a one-hour egg timer.
If the sanitizer solution on-line becomes dirty and greasy before the hourly
replacement, it should be discarded and replaced sooner. The sanitizer
effectiveness is reduced as soil from the towel is placed in the pan. Ineffective
sanitizer will not kill bacteria which may exist on the grill board.
Clean when there is a break in customer flow, or at least every 15 minutes.
Scrape grill, with grill spatula, when there is heavy carbon build-up on surface.
Organize and restock meat as needed.
GRILL OPERATION - LOADING MEAT
FREESTANDING
MEAT WELL
Remove lid from meat pan and carefully separate the end stack of meat patties
from the other stacks of meat patties in the sleeves.
Load patties from this stack of meat until it is completely used, then carefully
separate remaining stacks in the sleeve. This procedure will minimize the amount
of meat that could be damaged when removing meat from the pan.
Continue to load and cook meat per standard operational procedures.
During busy periods when a 4-ounce meat sleeve has two stacks or fewer, transfer
the stack(s) of 4-ounce meat to the back 1/3-sized pan and rewrite the remaining
hold time on the hold time bar along side the 1/3-sized pan.
During busy periods when a 2-ounce meat sleeve has three stacks or fewer,
transfer the stack(s) of 2-ounce meat to the front 1/3-sized pan and rewrite the
remaining hold time on the hold time bar along side the 1/3-sized pan.
20
GREASE
BUCKETS
GRILL
ScotchBrick
Water
Cleaning
The Grill
NOTE: For stores that only have one 1/3-sized pan at the meat well,
when a sleeve of meat (either size) has one stack of patties or less, move
the stack to the 1/3-sized pan (to be used first), mark hold time and open
a new sleeve of meat.
When a sleeve of meat is emptied, carefully remove empty sleeve from
meat pan and place in a trash can located next to the grill. NOTE: Be
careful not to contaminate work surfaces or ready-to-eat food items with
blood remaining in the empty meat sleeve.
Place a new sleeve of meat into the pan and carefully open plastic sleeve
as previously described and mark new hold time.
Grease buckets are typically emptied at post-rush.
To dispose of grease bucket liner:
Remove liner from grease bucket.
Grasp top of liner and twist to form a seal.
Tie top of liner into a knot to seal grease inside of the bag.
Place tied liner in trash can to dispose of during trash run.
At the mop sink, thoroughly clean grease buckets inside and out using hot water
and multi-purpose surface cleaner.
Insert new liner into grease bucket.
Replace, empty and clean additional grease buckets as necessary.
Use a ScotchBrick on grill, cleaning 1-foot sections at a time as described under
“Clean-Up/Close.” The ScotchBrick may be used to clean the grill during postrush.
If the ScotchBrick is not available, the grill may be water cleaned during post-rush.
Move meat to side of grill before you begin to water clean grill.
Water clean only 1-foot sections of grill at a time.
Slowly pour water on grill surface to be cleaned. Use a 1/9-sized condiment pan to
hold this water.
Do not use glass containers to hold water because of possibility that these could
break.
Scrape off all carbon deposits by holding grill spatula with two hands and scraping
grill surface with flat edge of spatula.
Scrape this excess carbon and water to front of grill, into trough and down chutes.
Use grease rake to remove grease and particles from grill trough.
Wipe splash guards, the ledge below grill and bottom of the bun warmer (or
MPHC) with a sanitized towel.
CLOSE/CLEAN-UP
ASSEMBLE
TOOLS
Before close, assemble the following tools needed for closing the grill:
1/9-sized condiment pan filled with water,
1/9-sized pan of liquid corn shortening,
Chili meat container,
Scale,
Plastic wrap,
Dry towel,
Sanitized towel,
ScotchBrick or grill screen and holder,
Scouring pad,
Paper towels,
Grease rake.
One hour prior to close, remove any unopened sleeves of meat which will not be
needed from reach-in of the free standing meat well and transfer to the walk-in
cooler.
Place sleeves on a designated shelf in the walk-in.
Do not store meat above any ready-to-eat foods.
21
Using a pan of hot, soapy water and a clean towel, wash inside of free standing
meat well reach-in.
Next, sanitize the reach-in with a fresh pan of sanitizer water and a clean towel.
GRILL
! CAUTION
Thoroughly cook any hamburger patties remaining on the grill after close for chili
meat.
Remove chili meat from grill and store properly.
Turn off heating elements.
Place any opened sleeves of meat into clean meat pans with perforated false
bottoms and cover with plastic wrap.
Mark pans with next day’s date and store in walk-in cooler for use first the next
day.
Place pan on designated shelf of walk-in. Do not store meat above any
ready-to-eat foods.
Wash and sanitize free-standing meat well opening and cover with stainless steel
night cover.
Turn off swing away meat well and wash and sanitize with pans of soapy water and
sanitizer and clean towels.
Thoroughly wipe grill area with a towel and hot soapy water followed by a sanitized
towel.
Use rubber gloves to remove the grill guards from grill and take to back room to be
washed and sanitized.
Caution: Grill guards are hot.
Water-clean grill carefully pouring warm water on grill surface. Allow water to boil
briefly then scrape off carbon build-up with a grill spatula.
ScotchBrick
Procedures
Pour a small amount of liquid corn shortening onto grill surface with a 1/9-sized
condiment pan.
Caution: Do not use hot shortening from fryers.
Use front-to-back motions for better leverage and to reduce cleaning time.
When done, there should be no carbon build-up on grill.
Use the grease rake to push any grease build-up or particles from the grill trough
down the grease chute.
Scrub the trough with a scouring pad or ScotchBrick.
Grill Screen
Procedures
Assemble grill screen, scouring pad and grill screen holder.
Place a small amount of water on grill.
With both hands on holder, scrub clean grill surface and edges, but not trough.
Use front-to-back motions for better leverage and to reduce cleaning time.
Use left-to-right motion to clean back edge of grill surface.
Scrub 1-foot sections at a time. Cleaning a small section enables you to remove dirty
water before it dries on grill.
Apply small amounts of water as needed and continue scrubbing until entire grill is
clean.
When done, there should be no carbon build-up on grill.
Use grease rake to push any grease build-up or particles from the grill trough down
the grease chute. Scrub the trough with a scouring pad. Do not use a grill screen.
22
23
12. APW WYOTT EQUIPMENT LIMITED WARRANTY
APW Wyott Foodservice Equipment Company warrants it's equipment against defects in materials and workmanship, subject to the
following:
This warranty applies to the original owner only and is not assignable.
Should product fail to function in its intended manner under normal use within the limits defined in this warranty, at the option of APW
Wyott such product will be repaired or replaced by APWWyott or itsAuthorized Service Agency.APW Wyott will only be responsible
for charges incurred or service performed by its Authorized Service Agencies. The use of other than APW Wyott Authorized Service
Agencies will void this warranty and APW Wyott will not be responsible for such work or any charges associated with same. The
closest APW Wyott Authorized Service Agent must be used.
This warranty covers products shipped into the 48 contiguous United States, Hawaii, metropolitan areas of Alaska and Canada. There
will be no labor coverage for equipment located on any island not connected by roadway to the mainland.
Time Period
One year parts, one year labor, effective from the date of purchase by the original owner. The Authorized Service Agency may, at their
option, require proof of purchase. Parts replaced under this warranty are warranted for the un-expired portion of the original product
warranty only.
Exceptions
*Gas/Electric Cookline Models GCB, GCRB, GF, GGM, GGT, GHP-H, EF, EG, EHP Three (3) Year Warranty on all
component parts, except switches and thermostats. (2 additional years on parts only. No labor on second or third year.)
*Heat Strips Models OH & FD Two (2) YearWarranty on element only No labor second year.
*Glass Windows, Door Seals, Rubber Seals, Light Bulbs, Broiler Briquettes 90 Day Material Only No Labor.
In all cases, parts covered by extended warranty will be shipped FOB the factory after the first year.
Portable Carry In Products
Equipment weighing over 70 pounds or permanently installed will be serviced on-site as per the terms of this warranty. Equipment
weighing 70 pounds or under, and which is not permanently installed, i.e. with cord and plug, is considered portable and is subject to
the following warranty handling limitations. If portable equipment fails to operate in its intended manner on the first day of
connection, or use, at APW Wyott's option or its Authorized Service Agency, it will be serviced on site or replaced.
From day two through the conclusion of this warranty, portable units must be taken to or sent prepaid to the APW Wyott Authorized
Service Agency for in-warranty repairs. No mileage or travel charges are allowed on portable units after the first day of use. If the
customer wants on-site service, they may receive same by paying the travel and mileage charges. Exceptions to this rule: (1)
countertop warmers and cookers, which are covered under the Enhanced Warranty Program, and (2) toasters or rollergrills which have
in store service.
Exclusions
The following conditions are not covered by warranty:
*Equipment failure relating to improper installation, improper utility connection or supply and problems due to
ventilation.
*Equipment that has not been properly maintained, calibration of controls, adjustments, damage from improper cleaning
and water damage to controls.
*Equipment that has not been used in an appropriate manner, or has been subject to misuse misapplication, neglect, abuse,
accident, alteration, negligence, damage during transit, delivery or installation, fire, flood, riot or act of god.
*Equipment that has the model number or serial number removed or altered.
If the equipment has been changed, altered, modified or repaired by other than a qualified service technician during or after the
warranty period, then the manufacturer shall not be liable for any damages to any person or to any property, which may result from the
use of the equipment thereafter.
This warranty does not cover services performed at overtime or premium labor rates. Should service be required at times which
normally involve overtime or premium labor rates, the owner shall be charged for the difference between normal service rates and such
premium rates. APW Wyott does not assume any liability for extended delays in replacing or repairing any items beyond its control.
In all cases the use of other than APW Wyott Authorized OEM Replacement Parts will void this warranty.
This equipment is intended for commercial use only. Warranty is void if equipment is installed in other than commercial application.
Water Quality Requirements
Water supply intended for a unit that has in excess of 3.0 grains of hardness per gallon (GPG) must be treated or softened before
being used. Water containing over 3.0 GPG will decrease the efficiency and reduce the operation life of the unit.
Note: Product failure caused by liming or sediment buildup is not covered under warranty.
“THE FOREGOING WARRANTY IS IN LIEU OF ANY AND ALL OTHER WARRANTIES EXPRESSED OR IMPLIED
INCLUDING ANY IMPLIED WARRANTY OR MERCHTABILITY OR FITNESS FOR PARTICLUAR PURPOSES AND
CONSTITUTES THE ENTIRE LIABILITY OF APW WYOTT. IN NO EVENT DOES THE LIMITED WARRANTY
EXTEND BEYOND THE TERMS HEREIN.”
24