1
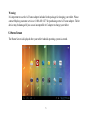
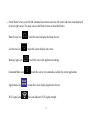
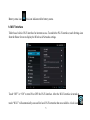
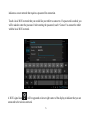
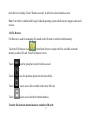
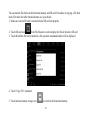
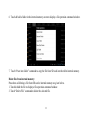
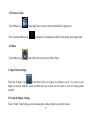
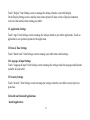
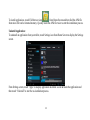
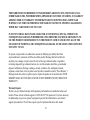
Table of Contents
1. Getting Started -----------------------------------------------------------------------------------------------------------2
1.1 Power On/Off ---------------------------------------------------------------------------------------------------2
1.2 Battery Charging -----------------------------------------------------------------------------------------------2
1.3 Home Screen----------------------------------------------------------------------------------------------------3
1.4 Wi-Fi Interface -------------------------------------------------------------------------------------------------5
1.5 How to Use Micro SD Card ----------------------------------------------------------------------------------7
2. Pre-installed Application -----------------------------------------------------------------------------------------------8
2.1 Internet Browser------------------------------------------------------------------------------------------------8
2.2 YouTube---------------------------------------------------------------------------------------------------------8
2.3 E-mail ------------------------------------------------------------------------------------------------------------8
2.4 File Browser ----------------------------------------------------------------------------------------------------9
2.5 Picture & Video ---------------------------------------------------------------------------------------------- 12
2.6 Music ---------------------------------------------------------------------------------------------------------- 12
3. Adjust Tablet Settings ------------------------------------------------------------------------------------------------ 12
3.1 Sound & Display Settings ---------------------------------------------------------------------------------- 12
3.2 Application Settings ----------------------------------------------------------------------------------------- 13
3.3 Date & Time Settings---------------------------------------------------------------------------------------- 13
3.5 Security Settings --------------------------------------------------------------------------------------------- 13
3.6 Install and Uninstall Applications ------------------------------------------------------------------------- 13
4. Limited Warranty------------------------------------------------------------------------------------------------------ 15
1
1. Getting Started
The first thing you probably want to do when you get Maylong Mobility™ Tablet is to familiarize
yourself with a few basics.
Unpack tablet box and identify the key items included. You should have:
1. Tablet device: The device includes a touch-sensitive LCD screen, a micro SD memory card slot, USB
port, and a power switch button etc.
2. A/C home adapter: This is used to charge the tablet device which has a built-in chargeable battery.
3. User Manual: You’re holding this in your hands.
Warning: Don’t use the device in the hot environment.
1.1 Power On/Off
Power On: Press and hold the power switch button for a few seconds to turn on the tablet device.
You may have to charge the tablet by using the A/C home adapter before the tablet can be powered on, if
the tablet battery power is very low.
Power Off: Press and hold the power button to turn off the tablet. A dialog box with options may be
available for your selection.
1.2 Battery Charging
Maylong Tablet has a built-in chargeable battery. Please charge the battery using the A/C adapter included
when the battery life indicator shows low.
2
Warning:
It is important to use the A/C home adapter included in the package for charging your tablet. Please
contact Maylong customer service at 1-888-403-9477 for purchasing extra A/C home adapter. Tablet
device may be damaged if you use an incompatible A/C adapter to charge your tablet.
1.3 Home Screen
The Home Screen is displayed after your tablet Android operating system is started.
3
On the Home Screen, you will find command icons shown on lower-left corner and status icons displayed
on lower-right corner. The main icons on the Home Screen are described below.
Home Screen icon
Last Screen icon
Running Apps icon
Command Menu icon
: touch this icon to display the Home Screen.
: touch this icon to display last screen.
: touch this icon to list applications running.
: touch this icon to list commands available for current application.
Application icon
: touch this icon to display Application Screen.
Wi-Fi signal icon
: this icon indicates Wi-Fi signal strength.
4
Battery status icon
: this icon indicates tablet battery status.
1.4 Wi-Fi Interface
Tablet has a built-in Wi-Fi interface for internet access. To enable the Wi-Fi interface, touch Settings icon
from the Home Screen to display the Wireless & Networks settings.
Touch “OFF” or “ON” to turn ON or OFF the Wi-Fi interface. After the Wi-Fi interface is turned on,
touch “Wi-Fi” will automatically scan and list local Wi-Fi networks that are available. A lock icon
5
indicates a secure network that requires a password for connection.
Touch a local Wi-Fi network that you would like your tablet to connect to. If a password is needed, you
will be asked to enter the password. After entering the password, touch “Connect” to connect the tablet
with the local Wi-Fi network.
A Wi-Fi signal icon
will be appeared on lower-right corner of the display to indicate that you are
connected to the wireless network.
6
It is recommended that you disable Wi-Fi interface if you want to extend the battery life when you’d like to
use your tablet without Internet access.
1.5 How to Use Micro SD Card
The micro SD card is used for transferring files between tablet and your personal computer, downloading
applications, and playing stored media. There is no micro SD card included in the package. Micro SD card
can be purchased from local electronics stores.
Insert micro SD card:
Insert SD card into the SD card slot until a “click” sound is heard. Once the SD card is inserted properly, a
card icon will be shown on lower-right corner of the display.
Browsing files in SD card:
from Home Screen and then touch icon
from the File Manager
Touch File Manager icon
screen. All files & folders under the root directory of the micro SD card will be shown.
Remove SD memory card:
To remove the micro SD card, please close all applications or documents which have been opened from the
SD card. Push the SD card lightly to eject the SD card.
7
2. Pre-installed Applications
Tablet device comes with some pre-installed applications. Touch
from Home Screen, preinstalled applications will be displayed on the Application screen. A few popular applications are
introduced below.
2.1 Internet Browser
Touch Internet Browser icon
from Home Screen to access the internet and surf the web.
2.2 YouTube
Touch YouTube icon
from Home Screen to start the YouTube application.
Note: Some YouTube video format may not be supported by the YouTube application pre-installed.
2.3 Email
from the Home Screen. Enter your email address
To set up email account, touch “Email” icon
and password and then touch Next button. After you have more than one email account set up, you can
select email account for email access. Email account can be removed by selecting an account and scrolling
8
down the list of settings. Touch “Remove account” to delete the selected email account.
Note: Your tablet is enabled with Google Android operating system which may not support some email
services.
2.4 File Browser
File Browser is used for managing files stored on the SD card or in built-in tablet memory.
from Home Screen to explore the files available in internal
Touch the File Browser icon
memory or micro SD card. From File Browser screen,
Touch
icon for going back to prior folder accessed.
Touch
icon for operation options for the selected files.
Touch
icon to access files available in the micro SD card.
Touch
icon to access the tablet internal memory.
Transfer files between internal memory and micro SD card:
9
You can transfer files between tablet internal memory and SD card. Procedures of copying a file from
micro SD card to the tablet internal memory are given below.
1. Make sure a micro SD card is inserted into the SD card slot properly.
from File Browser screen to display the files in the micro SD card
2. Touch SD card icon
3. Touch & hold the file to be transferred, a file operation command window will be displayed.
4. Touch “Copy File" command.
5. Touch internal memory storage icon
to switch to tablet internal memory.
10
6. Touch & hold a folder in the internal memory screen to display a file operation command window.
7. Touch “Paste into folder” command to copy the file from SD card into the tablet internal memory.
Delete files from internal memory:
Procedures of deleting a file from SD card or internal memory are given below.
1. Touch & hold the file to display a file operation command window.
3. Touch “Delete File” command to delete the selected file.
11
2.5 Picture & Video
Touch Photo icon
from Application screen to start the Media Player application.
to display the commands available for the media player application.
Press Command Menu icon
2.6 Music
Touch Music icon
from Home Screen to start the Music Player.
3. Adjust Tablet Settings
Touch the Settings icon
from Home Screen to display the Settings screen. You can use your
fingers to touch & hold the screen and then move up or down on the screen to view all setting options
available.
3.1 Sound & Display Settings
Touch “Sound” from Settings screen to manage the settings related to your tablet sound.
12
Touch “Display” from Settings screen to manage the settings related to your tablet display.
On the Display Settings screen, enabling Auto-rotate option will allow switch of display orientation
(vertical or horizontal) when rotating your tablet.
3.2 Application Settings
Touch “Apps” from Settings screen to manage the settings related to your tablet applications. Touch an
application to see operation options for the application.
3.3 Date & Time Settings
Touch “Date & time” from Settings screen to manage your tablet time related settings.
3.4 Language & Input Settings
Touch “Language & input” from Settings screen to manage the settings related to language and keyboard
available for your tablet.
3.5 Security Settings
Touch “Security” from Settings screen to manage the settings related to your tablet security & privacy
protection.
3.6 Install and Uninstall Applications
Install Application:
13
To install applications, touch File Browser icon
from Home Screen and then find the APK file
from micro SD card or internal memory. Quickly touch the APK file twice to start the installation process.
Uninstall Application:
To uninstall an application from your tablet, touch Settings icon from Home Screen to display the Settings
screen.
From Settings screen, touch “Apps” to display application installed. Locate & touch the application and
then touch “Uninstall” to start the un-installation process.
14
4. Limited Warranty
All Maylong products and services are warranted to be free from defects in materials or workmanship for
one year from the date of purchase. Within the one-year period of time, Maylong will, at its sole option,
repair or replace any components which fail from normal use. Such repairs or replacement will be made at
no charge to the customer for parts or labor, provided that the customer shall be responsible for any
transportation cost related to the repairs or replacement.
This warranty does not apply if the product or part thereof, has been damaged or rendered defective
through alteration, improper installation, mishandling, misuse, neglect, accident, or by removal or
defacement of the factory serial number/bar code label(s). The opinion of Maylong's customer service
advisors with respect to this matter shall be final.
15
THE WARRANTIES AND REMEDIES CONTAINED HEREIN ARE EXCLUSIVE AND IN LIEU OF ALL
OTHER WARRANTIES, WHETHER EXPRESS, IMPLIED OR STATUTORY, INCLUDING ANY LIABILITY
ARISING UNDER ANY WARRANTY OF MERCHANTABILITY OR FITNESS FOR A PARTICULAR
PURPOSE, STATUTORY OR OTHERWISE. THIS WARRANTY GIVES YOU SPECIFIC LEGAL RIGHTS,
WHICH MAY VARY FROM STATE TO STATE.
IN NO EVENT SHALL MAYLONG BE LIABLE FOR ANY INCIDENTAL, SPECIAL, INDIRECT OR
CONSEQUENTIAL DAMAGES, WHETHER RESULTING FROM THE USE, MISUSE OR INABILITY TO
USE THE PRODUCT OR FROM DEFECTS IN THE PRODUCT. SOME STATES DO NOT ALLOW THE
EXCLUSION OF INCIDENTAL OR CONSEQUENTIAL DAMAGES, SO THE ABOVE LIMITATIONS MAY
NOT APPLY TO YOU.
No person or representative is authorized to assume for Maylong any liability other than
expressed herein in connection with the sale of this product. Maylong shall not be liable for
any delay, loss, damage or injury caused by Acts of God, governmental order or regulation,
restraining imposed by governmental action, war, war-like situation, hostilities, governmental
disposal, mobilization, blockage, embargo, custody, revolution, fire, earthquake, tornado,
explosion, storm, flood, or for any other cause beyond its reasonable control (“Force Majeure”).
Maylong retains the exclusive right to repair or replace the product at its sole discretion. SUCH
REMEDY SHALL BE YOUR SOLE AND EXCLUSIVE REMEDY FOR ANY BREACH OF
WARRANTY.
Warranty Repairs:
We have one year limited warranty for the products purchased from our authorized sellers and
retailers. Please call our technical support at 1-888- 403-9477 for questions. If you have done any
troubleshooting on your own, please be prepared to provide this information to our technical
support representatives. We will also require a proof of purchase that shows date, model
16
number, and location.
RMA Procedure:
1. Call Maylong customer service at 1-888-403-9477
2. Troubleshoot problem over the phone
3. Request for RMA number & return instruction. You may be asked to fill out a RMA
form at our Web site.
4. Return product in a secure and durable package to prevent damage during transit
5. Please make sure to include the following information along with the return package:
Your name & mailing address
Telephone number
A short description of the issue with your tablet
Model number and serial number (S/N number)
RMA number
6. Please mark your assigned RMA number visibly and clearly on the outside of the box
7. Your claim will be evaluated by our technical specialist. Repair services will be
performed as soon as possible.
Note: Repaired product has a 45 day warranty. If the unit sent in for repair is still under its original warranty, then the
new warranty is 45 days or remaining time of the original one year warranty, depending upon which is longer.
Copyrights:
MAYLONG. MAYLONG Connecting Life and Let’s GO! are trademarks of Maylong Group LLC in the United States
and/or other countries.
© 2010-2012 Maylong Group LLC
17