1
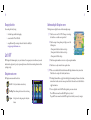
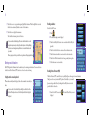
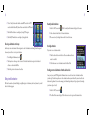
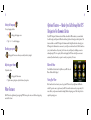
GPS Navigation
User’s Manual
Safety and Regulatory Information
Important Safety Notices and Warnings
When using the GPS Navigation For Dummies device, it is
your responsibility to make sure you are operating the device in
compliance with all local, state, and federal laws and regulations.
It is the sole responsibility of the driver of the vehicle to operate
the vehicle in a safe manner and not become distracted by the
navigation device. You should not operate the controls of the
navigation system while driving, nor place the device where it
obstructs airbag operation. The supplier and distributor of the GPS
navigation system shall not be liable for any accident.
Compliance with federal, state, and local laws
Before mounting this product in your vehicle, please check your
local and state laws. Currently, state law from California and
Minnesota prohibits drivers from placing the suction mount on
the windshields. Other dashboard or friction mounting options
should be considered and used. The manufacturer, supplier and
distributor of the GPS Navigation For Dummies device do not take
any responsibility for any penalties, fines, and/or damages from
ignoring the local and state laws.
Global Positioning System
The Global Positioning System (GPS) is a satellite-based system
that provides location and timing information around the globe.
GPS is operated and controlled under the sole responsibility of the
government of the United States of America, who are responsible
for its availability and accuracy. Any changes in GPS availability
and accuracy, or in environmental conditions, may impact the
operation of your device. We cannot accept any liability for the
availability and accuracy of GPS.
Precautions and Notices
For your own safety, donít operate the controls of the product while
driving.
Use this product prudently. The product is intended to be used only
as a navigation aid. It is not for precise measurement of direction,
distance, location or topography.
The calculated route is for references only. It is the userís
responsibility to follow the traffic signs and local regulations along
the roads when you get off the car, donít leave your device on the
dashboard or the car glass that is subject to direct sunlight. The
overheating of the battery can cause malfunction and/or danger.
GPS satellite signals can not pass through solid materials (except
glass).When you are inside a tunnel or building, GPS positioning
is not available.
A minimum of 3 GPS satellite signals is needed to determine
current GPS position. Signal reception can be affected by situations
such as bad weather or dense overhead obstacles (for instance, trees
and tall buildings).
The wireless devices might interfere with the reception of satellite
signals and cause the reception of the signal to be unstable. For
better signal reception, it is recommended that you use a car
antenna when the GPS device is used in vehicles.
Copyrights
For Dummies, the Dummies Man logo and related trademarks
and trade dress are registered trademarks of Wiley Publishing, Inc.
Any use of such trademarks by Maylong Group is under license.
These trademarks may not be used without the express permission
of Wiley. Letís GO! is a registered trademark of Maylong Group
LLC in the United States and/or other countries.
© 2007 Maylong Group LLC
4
Table of Contents
Getting Started . . . . . . . . . . . . . . . . . . . . . . . . . . . . . . . . . . . . . . . . . . . . . . . . . . . . . . . . . . . . . . . . 6
Using your navigator right out of the box . . . . . . . . . . . . . . . . . . . . . . . . . . . . . . . . . . . . . . . . . . . . . 7
Step 1: Install the GPS Navigation For Dummies device on the vehicle windshield . . . . . . . . . . . . . . . . . . . . . . 7
Step 2: Perform the configurations . . . . . . . . . . . . . . . . . . . . . . . . . . . . . . . . . . . . . . . . . . . . . . . . . . . . 8
Step 3: Acquire the GPS signal . . . . . . . . . . . . . . . . . . . . . . . . . . . . . . . . . . . . . . . . . . . . . . . . . . . . . . . 8
Step 4: Set up navigation if you’re using the device for the first time . . . . . . . . . . . . . . . . . . . . . . . . . . . . . . . 8
Step 5: Familiarize yourself with the functions . . . . . . . . . . . . . . . . . . . . . . . . . . . . . . . . . . . . . . . . . . . . . 9
Step 6: Let’s GO! . . . . . . . . . . . . . . . . . . . . . . . . . . . . . . . . . . . . . . . . . . . . . . . . . . . . . . . . . . . . . . . . . 9
Charging the device . . . . . . . . . . . . . . . . . . . . . . . . . . . . . . . . . . . . . . . . . . . . . . . . . . . . . . . . . . 10
Let’s GO! . . . . . . . . . . . . . . . . . . . . . . . . . . . . . . . . . . . . . . . . . . . . . . . . . . . . . . . . . . . . . . . . . . . . 10
Navigation main screen . . . . . . . . . . . . . . . . . . . . . . . . . . . . . . . . . . . . . . . . . . . . . . . . . . . . . . . . 10
Understanding the Navigation screen . . . . . . . . . . . . . . . . . . . . . . . . . . . . . . . . . . . . . . . . . . . . . . 11
Entering new destinations . . . . . . . . . . . . . . . . . . . . . . . . . . . . . . . . . . . . . . . . . . . . . . . . . . . . . . 12
Using the touch-screen keyboard . . . . . . . . . . . . . . . . . . . . . . . . . . . . . . . . . . . . . . . . . . . . . . . . . . . . 12
Finding an address . . . . . . . . . . . . . . . . . . . . . . . . . . . . . . . . . . . . . . . . . . . . . . . . . . . . . . . . . . . . . . 13
Finding Points of Interest (POI) . . . . . . . . . . . . . . . . . . . . . . . . . . . . . . . . . . . . . . . . . . . . . . . . . . . . . . 13
Choosing a destination on the map . . . . . . . . . . . . . . . . . . . . . . . . . . . . . . . . . . . . . . . . . . . . . . . . . . . 14
Using stored destinations . . . . . . . . . . . . . . . . . . . . . . . . . . . . . . . . . . . . . . . . . . . . . . . . . . . . . . 14
Recently used destinations . . . . . . . . . . . . . . . . . . . . . . . . . . . . . . . . . . . . . . . . . . . . . . . . . . . . . . . . 15
Storing destinations . . . . . . . . . . . . . . . . . . . . . . . . . . . . . . . . . . . . . . . . . . . . . . . . . . . . . . . . . . . . . 15
Finding your stored destinations . . . . . . . . . . . . . . . . . . . . . . . . . . . . . . . . . . . . . . . . . . . . . . . . . . . . . 15
Menu options during navigation . . . . . . . . . . . . . . . . . . . . . . . . . . . . . . . . . . . . . . . . . . . . . . . . . . 16
Customizing Your GPS Navigation For Dummies Device . . . . . . . . . . . . . . . . . . . . . . . . . . . . . . . . . . . . . 16
Adjusting the System Settings . . . . . . . . . . . . . . . . . . . . . . . . . . . . . . . . . . . . . . . . . . . . . . . . . . . 16
Adjusting the backlighting . . . . . . . . . . . . . . . . . . . . . . . . . . . . . . . . . . . . . . . . . . . . . . . . . . . . . . 17
Reviewing system information and calibrating . . . . . . . . . . . . . . . . . . . . . . . . . . . . . . . . . . . . . . . . . 17
Setting the language . . . . . . . . . . . . . . . . . . . . . . . . . . . . . . . . . . . . . . . . . . . . . . . . . . . . . . . . . 18
5
Checking your power . . . . . . . . . . . . . . . . . . . . . . . . . . . . . . . . . . . . . . . . . . . . . . . . . . . . . . . . . 18
Adjusting your volume . . . . . . . . . . . . . . . . . . . . . . . . . . . . . . . . . . . . . . . . . . . . . . . . . . . . . . . . 18
Other Features . . . . . . . . . . . . . . . . . . . . . . . . . . . . . . . . . . . . . . . . . . . . . . . . . . . . . . . . . . . . . . . . 18
Optional Feature — Hands-free Call through the GPS Navigation For Dummies Device . . . . . . . . . . . . . . . . . 19
Bluetooth Menu . . . . . . . . . . . . . . . . . . . . . . . . . . . . . . . . . . . . . . . . . . . . . . . . . . . . . . . . . . . . . 19
Paring Your Phone . . . . . . . . . . . . . . . . . . . . . . . . . . . . . . . . . . . . . . . . . . . . . . . . . . . . . . . . . . . 19
Placing a Call . . . . . . . . . . . . . . . . . . . . . . . . . . . . . . . . . . . . . . . . . . . . . . . . . . . . . . . . . . . . . . . 20
Receiving a Call . . . . . . . . . . . . . . . . . . . . . . . . . . . . . . . . . . . . . . . . . . . . . . . . . . . . . . . . . . . . . 21
Viewing Your Call Record . . . . . . . . . . . . . . . . . . . . . . . . . . . . . . . . . . . . . . . . . . . . . . . . . . . . . . . 21
Changing Hands-fee Call Properties . . . . . . . . . . . . . . . . . . . . . . . . . . . . . . . . . . . . . . . . . . . . . . . . 21
Using Your Vehicle Speakers for Your Hands-free Calls . . . . . . . . . . . . . . . . . . . . . . . . . . . . . . . . . . . . 22
Safety and Privacy Warning . . . . . . . . . . . . . . . . . . . . . . . . . . . . . . . . . . . . . . . . . . . . . . . . . . . . . 22
Appendix . . . . . . . . . . . . . . . . . . . . . . . . . . . . . . . . . . . . . . . . . . . . . . . . . . . . . . . . . . . . . . . . . . . 23
Downloading files into the GPS Navigation For Dummies device . . . . . . . . . . . . . . . . . . . . . . . . . . . . . 23
Troubleshooting . . . . . . . . . . . . . . . . . . . . . . . . . . . . . . . . . . . . . . . . . . . . . . . . . . . . . . . . . . . . 23
Resetting your system . . . . . . . . . . . . . . . . . . . . . . . . . . . . . . . . . . . . . . . . . . . . . . . . . . . . . . . . . . . 23
Power problems . . . . . . . . . . . . . . . . . . . . . . . . . . . . . . . . . . . . . . . . . . . . . . . . . . . . . . . . . . . . . . . 24
Screen display problems . . . . . . . . . . . . . . . . . . . . . . . . . . . . . . . . . . . . . . . . . . . . . . . . . . . . . . . . . . 24
GPS problems . . . . . . . . . . . . . . . . . . . . . . . . . . . . . . . . . . . . . . . . . . . . . . . . . . . . . . . . . . . . . . . . . 24
Voice is too low or no voice from the device speakers . . . . . . . . . . . . . . . . . . . . . . . . . . . . . . . . . . . . . . . 25
Maintaining your device . . . . . . . . . . . . . . . . . . . . . . . . . . . . . . . . . . . . . . . . . . . . . . . . . . . . . . . . . . 25
Battery, charger, and safety precautions . . . . . . . . . . . . . . . . . . . . . . . . . . . . . . . . . . . . . . . . . . . . . 26
About charging . . . . . . . . . . . . . . . . . . . . . . . . . . . . . . . . . . . . . . . . . . . . . . . . . . . . . . . . . . . . . . . . 26
About the AC adapter and the car charger . . . . . . . . . . . . . . . . . . . . . . . . . . . . . . . . . . . . . . . . . . . . . . 26
About the battery . . . . . . . . . . . . . . . . . . . . . . . . . . . . . . . . . . . . . . . . . . . . . . . . . . . . . . . . . . . . . . 27
Important instructions for service personnel only . . . . . . . . . . . . . . . . . . . . . . . . . . . . . . . . . . . . . . . 27
Limited Warranty . . . . . . . . . . . . . . . . . . . . . . . . . . . . . . . . . . . . . . . . . . . . . . . . . . . . . . . . . . . . . . 28
6
7
Getting Started
The first thing you probably want to do when you get your new device is to go on a trip. However, you first need to
unpack your new friend from its box and familiarize yourself with a few basics.
Unpack your device box and identify the contents. You should have:
1.Device: This is your actual navigation device with pre-loaded map. Its main features are a touch-sensitive
LCD screen, one SD card slot, and one power switch button.
2.Mounting kit: The mounting kit includes one cradle and mounting stand for installing the GPS device in
the vehicle.
3.Vehicle charging cable with 12V cigarette lighter adapter: This is the normal way of providing power to
your device when the device is used in vehicle.
4. User Manual: You’re holding this in your hot little hands.
Using your navigator right out of the box
If you’re the type of person who wants to use your new toys without having to read all about them first (and who
isn’t?), the following steps should get you started without needing to know too much more. However, the rest of this
guide is here to explain everything else you need to know about your new GPS Navigation For Dummies device.
To get started, follow these steps:
Step 1: Install the GPS Navigation For Dummies device on the vehicle windshield.
Check your state and local transportation related laws before installation. Currently, California and Minnesota
prohibit drivers from installing suction mounts on the vehicle windshields while they are operating the
vehicles. Other installation options with additional accessories are recommended. Please check the additional
accessories at www.gpsnavigationfordummies.com.
Here are some tips:
1. Select a safe spot on the windshield for the installation. A good spot is on the lower left corner.
2. Identify all the items for the mount kit.
3. Clean up and dry a spot on the windshield and the suction cup.
4.If there is a plastic sheet on the bottom of the suction cup, take it off before the installation.
Please check optional accessories (for example, AC power adapter) available at
www.gpsnavigationfordummies.com.
Locate the stylus on back of the device to use with this system.
5. Push the suction cup hard onto the clean spot on the windshield.
6. Secure the suction cup on the windshield by turning the lever on the mounting stand clockwise.
7.Plug the vehicle charge cable into the device. The red light on the front face of the device will become a
green light when the device is fully charged.
8. Attach the device to the mount kit installed on the windshield.
9. Plug the other end of the vehicle charge cable into a vehicle power outlet.
8
9
Step 2: Perform the configurations.
Press, hold, and release the
Power switch button on the GPS Navigation For Dummies device to turn ON the
Step 5: Familiarize yourself with the functions.
From the Navigation Main Menu:
device.
Touch the Let’s GO! button to start the navigation to your destination.
Step 3: Acquire the GPS signal.
Touch the Options button to customize the options for the navigation software application.
Usually, it takes a few minutes to receive the GPS signal the first time when you power on the GPS Navigation For
Dummies device. Keep the device outdoors in an open area and away from trees and tall buildings.
Touch the View Map button to browse the map and locate an address on the Map.
The Green GPS icon on map screen is displayed when the GPS signal is acquired.
The Red GPS icon on map screen is displayed when the GPS signal has not been acquired.
For more information about the GPS satellite signal, please visit www.gpsNavigationForDummies.com.
Step 4: Set up navigation if you’re using the device for the first time.
When you first get your device, the factory defaults for the GPS navigation application are in place. When you press
the Let’s GO! button from the top menu to start your first navigation, your device may guide you through several
configuration screens to set up your options for GPS navigation operation.
Your GPS Navigation For Dummies device automatically determines the time using the GPS signal. However, you
set the time zone for your local time. The time zone you choose can be changed at any time under Options from the
Navigation Main Menu.
Touch the Quit button to exit the Navigation application.
Step 6: Let’s GO!
From Navigation Main screen, touch the Let’s GO! button to start the navigation to your first destination.
Usually, it takes a few minutes to receive the GPS signal the first time you power on the device. Your device
must locate three satellites to function. If you move your device over a long distance (for example, if you move
it a couple of hundred miles without using it) the device may need a few minutes to acquire the GPS signal
again).
10
11
Charging the device
Understanding the Navigation screen
You can charge the device by using:
The Navigation screen displays the route and the surrounding area map.
• the vehicle charger included in the package.
• connection with a PC via a USB cable
1, 7.Touch the icons to zoom IN or OUT of the map to view a larger,
less detailed area or a smaller area in greater detail
• compatible home AC power adapter that can be checked for availability at
www.gpsnavigationfordummies.com.
2. Touch the compass to change the map view display as one of the
following modes:
2D map view with the forward direction at the top.
3D map view with the forward direction at the top.
2D map view with North at the top.
3. Touch this navigation simulation icon to start or stop the navigation simulation.
4. Touch this icon to adjust or mute the device speaker volume.
Let’s GO!
GPS Navigation For Dummies guides you to your destination. You can generate your route with an easy-to-use and
intuitive interface, plan your trip to suit your personal preferences, and find and save interesting destinations before
you begin your trip.
Navigation main screen
5, 10.When a route is calculated, this Direction Information Bar displays information about your next turn.
Touch this bar for a complete list of turn-by-turn directions.
The Navigation main screen has three buttons:
Let’s Go!Select your destination in several ways.
View Map Browse the map and locate an address on the map.
Options Select options for routing, map, and other system
features.
6. The Driving Information Bar is a toggle button that displays the remaining travel distance and travel time,
estimated time of arrival, current street name, speed and altitude of the current location. Touch this bar to
toggle the information.
8. Two icons display the status of the GPS satellite signal and power source and status
The red GPS receiver means that a reliable GPS signal is not yet located.
The green GPS receiver means that a reliable GPS signal is located and that you are ready to navigate.
12
13
9. Touch this icon to set your quick navigation (QuickNav) destination. When the QuickNav is set, touch
this button to automatically calculate a route to this destination.
11. Touch this icon to display the main menu.
The ? identifies the current position of the device.
You can enable or disable display of the icons and information bars on the
navigation map screen by selecting the related options on the Map Display
Options screen. A navigation map with fewer icons and an information bar
is provided.
Finding an address
From the Let’s GO! screen
1. Touch
2. The Address Entering screen is displayed.
3.Touch the State/City First button to enter an address with State/City to be
given first.
4.Touch the Street First button to enter an address in the current state.
5.Touch the Intersections button to enter an address of an intersection.
6.Touch the In Other Countries button to change country/state map data.
7. Follow the screens to enter an address.
.
Entering new destinations
The GPS Navigation For Dummies device has intuitive ways for entering new destinations. You can search for an
address, browse Point of Interest (POI) directories, or choose locations on the map.
Finding Points of Interest (POI)
When you approach a turn, you hear the voice guidance at the appropriate time.
Using the touch-screen keyboard
When a touch-screen keyboard is displayed, touch a letter or number to enter what you
desire.
You can see a list of search results by touching the See List button on the
bottom of the keyboard screen. Touch the Keyboard button to display the
keyboard.
The Points of Interest (POI) search allows you to quickly find places, such as gas stations and restaurants.
These places can be near your current GPS position (the default) or you can search
places around a specified address by touching Another City button to enter the
specified address for the search.
1.From the Let’s GO! screen, touch
displayed.
. The Search Places Nearby screen is
14
15
2.To set a Nearby location other than the current GPS location for the POI
search, touch the Another City button. Enter a new address for the POI search.
Recently used destinations
1.In the Let’s GO! screen, touch
3. Touch the Browse button to search places by using POI categories.
2. Select a destination from the list of the recent destinations.
4. Touch the By Name button to search places by using key words.
3. Choose an action by touching a button on the bottom of the screen.
Choosing a destination on the map
Another way to enter a destination for the navigation is to select the destination on the map. Browse the map and
choose any street address to set it as your destination.
. A list of recently used destinations is displayed on the screen.
Storing destinations
If you want to save a destination address
2.Touch any street on the map to select a location. The address detail and action options for the selected
address are shown in the Info Box.
1.Touch the Actions button on the bottom of the screen when an address is
entered or available.
2. Follow the screens to save the destination into the Address Book.
3. Touch the option to take action on the address.
Finding your stored destinations from the address book
1. In the Navigation Main menu, touch
.
Using stored destinations
This device has several easy features that help you quickly navigate to destinations you’ve already entered so you don’t
have to look them up again.
An easy way to use your GPS Navigation For Dummies device is to search for and store the destinations before
you take a trip. You then have quick access to these destinations when you need them. Use your saved and favorite
destinations for guidance. You can choose among your bookmarks, previously saved trips, and presets (for example,
your home or place of work).
1. In the Let’s GO! screen, touch
2. The Address Book screen is displayed. Follow the screens to select a pre-stored destination address.
.
16
17
Menu options during navigation
To access options during navigation,
Adjusting the backlighting
To adjust the brightness of the screen
1.Touch the Menu icon from the Navigation screen and touch the Options button from the Navigation
Main Menu screen to access the options. Touch the View Map button from the Navigation Main Menu to
resume the navigation.
1. Tap
2. Choose among these options
2.Touch the relative icon on the Navigation screen for adjusting the device speaker volume or setting map
view on 2-D or 3-D mode.
•Under the Backlight icon, tap the minus sign to reduce the backlight, and tap the plus sign to increase the
backlight.
Customizing Your GPS Navigation For Dummies Device
You can configure your GPS Navigation For Dummies device to suit your needs. Start from the Navigation Main
Menu
to bring up the Backlight screen.
•Under battery icon, tap “<”or “>” to select the duration of auto power off the backlight.
•Under AC power icon, tap “<”or “>” to select the duration of auto power off the backlight when using
the AC adapter.
1.For the route management related settings, touch the Let’s GO! button then touch the Manage Route
button to manage the route and its settings.
Reviewing system information and calibrating
2.For the map and general option settings, touch the Options button and follow the screens to set the options
such as map 2-D or 3-D mode, map Day View or Night View mode, icon display on the map, language
and time zone, and other options.
the product.
Adjusting the System Settings
To adjust the Settings, just tap the System icon on the Main Screen to bring up the System Settings screen.
Tap
to bring up the System Info screen, which (as you may expect) gives you some information about
To calibrate your device, follow these steps
1. Tap Calibration.
2. Press the cross centers as requested until your device is recalibrated.
18
19
Setting the language
To set your language and skin:
1. Tap
2. Tap “<”or “>” to select the language.
to bring up the Language screen.
Checking your power
Tap
to bring up the Power screen, where you can check your battery strength.
Adjusting your volume
To adjust the volume
1. Tap
2. Tap the minus or plus signs to adjust the volume of your speaker.
to bring up the Volume screen.
Other Features
The GPS device has a digital music player supporting WMA format, a photo viewer, and eBook reader supporting
content in Text format.
Optional Feature — Hands-free Call through the GPS
Navigation For Dummies Device
If your GPS Navigation For Dummies device has Bluetooth enabled and FM transmitter, you can make handsfree calls through your cell phone with Bluetooth enabled and play the audio through your vehicle’s speakers. This
feature is available on certain GPS Navigation For Dummies models. Using Bluetooth wireless technology, your
GPS navigation For Dummies device can connect to your cell phone to make hands-free calls. The first time when
you try to make hands-free calls, you must “pair” the device and your cell phone by establishing a connection
relationship using a PIN code or passkey. After the initial pairing, the GPS device and cell phone can connect
automatically each time when they are powered on and stay in a proximity of 10 meters.
Bluetooth Menu
Touch the Bluetooth button from the Top Menu on your GPS device, the
Bluetooth Menu will be displayed.
Paring Your Phone
Before hands-free calls can be made, you need to pair your GPS device with your cell phones with Bluetooth
enabled. To pair and connect, your phone and your GPS device must be turned on and stay in a proximity of 10
meters. Refer to your phone user’s manual for initiating the Bluetooth pairing process. Follow the steps below to
complete the pairing process.
20
21
1.On your phone, make sure the phone’s Bluetooth module is enabled. This setting may be in a menu called
Settings, Connections, Bluetooth or Hands-free on your phone.
2.Initiate a search for Bluetooth devices from your phone
3. Touch Add Device button from the Bluetooth Menu of the GPS device
4.Select the GPS device (“Maylong”) from the list of devices detected by your phone
5.Enter the GPS device PIN (the default PIN code is 8888) into your phone. If the PIN code is changed,
enter the new PIN code.
6.Follow other steps on your phone to establish the Bluetooth connection as necessary
7.A connection status is displayed on the bottom of the Bluetooth screen of the GPS device. If the status
shows “Connected”, the GPS Navigation For Dummies device is ready for hands-free calls.
Placing a Call
To initiate a call, touch the Dialpad button from the Bluetooth Menu to bring up the Phone Keypad screen.
U Enter a phone number and touch the handset off-hook
icon to initiate the call.
U Touch the Call Record button on the lower-right corner of the Phone Keypad screen to bring up the Call
Record screen. Select a phone number from the list of call record and touch the handset off-hook icon
to initiate the call.
To re-dial the phone number from last call received or placed, touch the Redial button from the Bluetooth Menu.
Receiving a Call
Your GPS device must be powered on for receiving calls. You can receive incoming calls when you are in the middle
of the GPS navigation or access other pages. When a call is received by your GPS device, the Incoming screen is
displayed. Touch handset off-hook icon
to answer the call. After you finish the call, touch the handset on-hook
icon
to hang up the call.
Viewing Your Call Record
Touch the Call Record button from the Bluetooth Menu to bring up the call record screen. Select a call record and
touch the handset off-hook icon
to re-dial the phone number associated with the call record. Call record can be
deleted and sorted (e.g. inbound call, outbound call or missed call) by touching the appropriate icon on the Call
Record screen.
Changing Hands-fee Call Properties
Touch the Properties button on the Bluetooth Menu to bring up the Properties screen. The following properties
related to the Bluetooth hands-free call can be changed.
U PIN code. Touch the keypad icon to change the PIN code. Please enter 4 digits for the new PIN code when
you try to change it.
U Ring tone. Touch the CD icon on the lower-right of the screen to bring up the screen for selecting the ring
tone file. Double click the folder or file name to have it selected.
U Bluetooth system On/Off setting. Touch the option on the bottom of the Properties screen to disable or
enable the Bluetooth system after exiting the Bluetooth Menu. If you want to receive incoming calls when
you are not in the Bluetooth Menu, this option must be enabled.
22
23
Using Your Vehicle Speakers for Your Hands-free Calls
If an FM transmitter is available on your GPS navigation For Dummies device, the audio of the GPS device can be
played through your vehicle speakers by following the steps below.
1.Enable the FM transmitter on your GPS device. Touch the System > Sys Info. > Volume to bring up the
Volume setting screen. Touch “Use FM” on the Volume screen to enable or disable the FM transmitter on
the GPS device.
2.Tune your vehicle stereo to an unused FM channel that is consistently static. Normally, a low FM frequency
number, such as 79.9MHz or 80.1MHz would be good trials initially.
3.Adjust the FM frequency to the same frequency on the Volume screen. You should hear the audio of the
GPS device through the vehicle’s speakers.
Safety and Privacy Warning
U For your driving safety, please do not adjust your Bluetooth and FM transmitter settings on your GPS
device when you are driving your vehicle.
U When the audio of the GPS device is played through your vehicle speakers, the audio including your phone
calls received or dialed might be overheard by adjacent vehicles through the FM stereo.
U During your travel, the FM frequency for the FM transmitter might need to be changed. A FM frequency
not used by a station in one area might be used by a station in another area. Do not adjust the FM
frequency while you are driving your vehicle.
Appendix
Downloading files into the GPS Navigation For Dummies device
U Using the USB plug and play: Connect the device to the PC via a USB cable. The device supports the
USB plug and play. If a SD card is inserted into the device, the device can be accessed from the PC as a
removable USB drive. Note: You can purchase a SD card from a local electronics store or
www.gpsnavigationfordummies.com.
Troubleshooting
If your GPS Navigation For Dummies device isn’t working correctly, this section guides you through some of the
more common problems.
Resetting your system
Resetting your system is similar to restarting your computer. Occasionally, you may need to reset your device. For
example, you should reset your system when it stops responding or appears to be frozen or locked up. To reset your
system, press the Reset button on the side of your device using the stylus or a pin.
24
25
Power problems
If your device can’t be powered on when using battery power
U Check if the remaining battery power is too low to run your device.
U Connect the vehicle charger or AC adapter (if available) to your device.
Screen display problems
If the screen doesn’t respond with the device power ON, try the following in order until the problem is solved:
U Connect the Vehicle charger or AC adapter (if available) to your device.
U Verify that the Backlight Setting is appropriate.
U Reset your device to see if the problem is fixed.
GPS problems
When the GPS signal isn’t available after the device is powered on for over ten minutes, try the following in order
until the problem is solved:
U Make sure that the device is in an open area and severe weather conditions aren’t going on.
U Exit the Navigation application and restart the navigation application by pressing the Let’s GO! button from
the main screen.
U Reset the device.
Voice is too low or no voice from the device speakers
U If an earphone is in the earphone jack, you will not be able to hear a voice from the device speaker. Simply
unplug the earphone from the device jack.
U Check the Speaker Volume Setting on the device to make sure the voice is not muted or set too low.
Maintaining your device
Taking good care of your device will ensure trouble-free operation and reduce the risk of damage to your device.
U Keep your device away from excessive moisture and extreme temperatures.
U Avoid exposing your device to direct sunlight or strong ultraviolet light for extended periods of time.
U Don’t place anything on top of your device or drop objects on your device.
U Don’t subject your device to sudden and severe temperature changes. This could cause moisture
condensation inside the unit, which could damage your device. In the event of moisture condensation,
allow the device to dry out completely before using it again.
U The screen surface can easily be scratched. Use only the stylus or your fingers to tap on the screen.
U Avoid touching the device with any sharp objects.
U Never clean your device with it powered on. Use a soft, lint-free cloth moistened with water to wipe the
screen and the exterior of your device.
U Don’t use paper towels to clean the screen.
U Never attempt to disassemble, repair, or make any modifications to your device.
U Disassembly and modification of the device could cause damage to your device and even bodily injury or
property damage and will void any warranty.
26
27
Battery, charger, and safety precautions
About charging
U Use only the vehicle charger that comes with your device or a compatible AC adapter. Using any
incompatible vehicle charger or home AC adapter will damage the device and may cause fires and other
injuries.
U AC adapter input: 100~240V AC, 50/60Hz, output: +5V DC / 1.5 A. The Vehicle charge input: +12V
DC, output: +5V, 1.5A. Please visit www.gpsnavigationfordummies.com for more information about the
purchase availability of the device accessories.
About the AC adapter and the car charger
U Don’t use the adapter or the car charger in a high moisture environment. Never touch the adapter when
your hands or feet are wet.
U Allow adequate ventilation around the adapter or the car charger when using it to operate the
device or charge the battery. Don’t cover the AC adapter or the car charger with paper or other
objects that will reduce cooling. Don’t use the AC adapter while it is inside a carrying case.
U Connect the AC adapter to a proper power source. The voltage requirements are found in the user’s manual.
U Don’t use the AC adapter or the vehicle charger if the charging cable becomes damaged.
U Don’t attempt to repair the unit. There are not spare parts inside.
About the battery
U Use the recommended battery.
This unit contains a non-replaceable internal Lithium Ion battery. The battery can burst or explode, releasing
hazardous chemicals. To reduce the risk of fire or burns, don’t disassemble, crush, puncture, or dispose of in fire
or water.
Important instructions for service personnel only
U Replace the battery only with the same or equivalent type recommended by the manufacturer
or authorized third parties.
U The battery must be recycled or disposed of properly.
U Use the battery only in the specified equipment.
There is a risk of explosion if the battery is replaced by an incorrect type.
U Dispose of the used batteries according to the laws and instructions.
Please visit www.gpsnavigationfordummies.com for more information.
(888-403-9477)
248-85-EZGPS (248-853-9477)
888-40-EZGPS
888-40-EZGPS (888-403-9477)
248-85-EZGPS (248-853-9477)