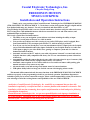
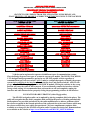
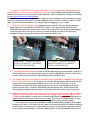
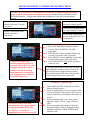
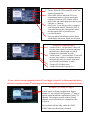
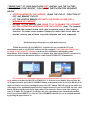
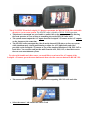
1
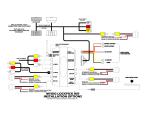
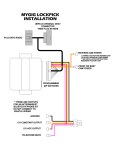
TO LOCKPICK BLACK GROUND WIRE REVERSE CAM POWER TO LOCKPICK ORANGE W/BLACK STRIPE WIRE UNPLUG ORIGINAL RADIO CONNECTORS THEN PLUG IN HERE PLUG AND PLAY NO OTHER CONNECTIONS ARE NECESSARY FOR OVERRIDE FEATURES AFTERMARKET REVERSE CAMERA VIDEO CONNECT HERE REV IN FACTORY CONNECTORS AUDIO IN INCLUDED AUDIO IN VIDEO IN AUDIO AND VIDEO INPUTS TO IPOD, DVD, GAME, SAT TV, ETC. ALWAYS PLUG IN BOTH LOCKPICK CONNECTORS TO RADIO (EVEN IF YOUR RADIO HAD ONLY ONE) AUDIO OUT ** THE LOCKPICK V.5 INCLUDES AUDIO/VIDEO INPUTS FOR AFTERMARKET CAMERA(S) OR ANY STANDARD VIDEO SOURCE (IPOD, DVD, GAME, ETC.) CONNECT USB CABLE HERE AUDIO OUT AUDIO AND VIDEO OUTPUTS FOR EXTERNAL SCREEN OR HEADREST VIDEO OUT FOR FUTURE UPDATES ACCESSORY 12V POWER OUTPUT CONNECT CAMERA(S) OR THE VIDEO OF YOUR CHOICE CONSTANT 12V OUTPUT GROUND FOR ALL AFTERMARKET CAMERAS AFTERMARKET FRONT OR LEFT CAMERA VIDEO CONNECT HERE FRONT/LEFT POWER TO LOCKPICK RED W/BLACK STRIPE WIRE TO LOCKPICK BLACK GROUND WIRE REVERSE CAM ORANGE/BLACK 12V POWER OUTPUT VEHICLE SELECT (0) OPTIONS SELECT COMMUNICATION OPTIONS AFTERMARKET BABY OR RIGHT CAMERA VIDEO CONNECT HERE BABY/RIGHT POWER TO LOCKPICK RED W/BLACK STRIPE WIRE TO LOCKPICK BLACK GROUND WIRE BABY/FRONT/LEFT/RIGHT CAM RED BLACK 12V POWER OUTPUT OPTIONAL POWER OUTPUTS IDENTIFIED BY COLOR AND PRINTING ON WIRE TM MYGIG FIM LOCKPICK V.5 INSTALLATION OPTIONS COPYRIGHT 2014 COASTAL ELECTRONIC TECHNOLOGIES, INC. TM MYGIG FIM LOCKPICK V.5 STEERING WHEEL CONTROLS STEERING WHEEL CONTROLS ARE ENABLED WHEN A CAMERA IS ACTIVATED MANUALLY USING THE TOUCH SCREEN OR BY PRESSING THE UCONNECT BUTTON ON RADIO 2X. PRESS TO TOGGLE TO REVERSE CAM VIDEO INPUT (FACTORY OR AFTERMARKET) CONTROLS ON BACK OF STEERING WHEEL CAM OFF PRESS TO TOGGLE BETWEEN VIDEO INPUT 1 (FRONT OR LEFT CAM) OR VIDEO INPUT 2 (BABY OR RIGHT CAM) AUTOMATIC ACTIVATION OF THE FRONT CAMERA OR TURN SIGNAL CAMERA VIDEO CAN BE TEMPORARILY TURNED OFF BY PRESSING THE CAM OFF BUTTON. COPYRIGHT COASTAL ELECTRONIC TECHNOLOGIES, INC. 2014 Coastal Electronic Technologies, Inc. Chrysler/Dodge/Jeep FREEDOM IN MOTION MYGIG LOCKPICK Installation and Operation Instructions Thank you for your purchase of the Coastal Electronic Technologies, Inc. FREEDOM IN MOTION (FIM) LOCKPICK. The FIM LOCKPICK V. 5 is the latest version of the popular Mygig Lockpick and has been updated with many new features! Not only can it unlock and allow full use of your Chrysler/Dodge/Jeep MYGIG radio it can now set and control many functions using the radio touch screen PLUS it integrates a full multimedia harness with direct connections for rear and front cameras, and multimedia input and headrest output. This is only a partial list of included features: The ability to use your navigation system without restrictions including the ability to input addresses, search points of interest, etc. while in motion. You can also enjoy full use and video viewing of your radio’s DVD player and, if equipped, Rear Seat Entertainment (VES) Aux input jacks and Sat TV, while in motion if you desire. Even if your car does not already have rear seat entertainment with AUX input jacks, the Lockpick can provide full multimedia audio/video inputs. Included in your Lockpick harness are Audio and Video inputs to plug in your video iPOD, Zune, gaming or computer system and view them on demand and while in motion. Automatic activation of the TV mode in your radio with custom “channels” to control and activate Lockpick functions. (fully compatible with factory Sat TV rear entertainment systems without loss of function). Automatically enables the camera function in your radio with connections for up to 2 cameras. (fully compatible with vehicles already equipped with a factory rear camera) Automatic camera options for rear camera while in reverse and front camera while parking, plus manual activation of any camera at any time. Advanced touch screen and steering wheel button control of camera functions USB update ability built in to keep your Lockick current with changing software needs. This manual will document in detail, the many functions of the FREEDOM IN MOTION LOCKPICK and how to properly set the programming switches to your desired operation. Installation diagrams are included to guide you in various connection strategies. Please read this manual fully so that you can learn to take advantage of all of the exciting features and capabilities of the new FIM LOCKPICK. At this time, Coastal Electronic Technologies, Inc. would like to recommend that you have this installation completed by a certified mechanic or someone familiar with automotive electronics. This installation, while not time consuming, does require careful attention to detail and precise following of installation instructions. Coastal Electronic Technologies, Inc. accepts no responsibility due to the improper installation or use of this product. Installation and / or use of this product implies and signifies user acceptance of this term of use. Please adhere to all driving laws in your state. OK, let’s get started. On your FIM LOCKPICK V. 5 control box are switch settings which allow you to program your Lockpick for your vehicle and the features you would like to enable. The diagrams below are important to enable the FIM module to work with MYGIG radio systems. More than one switch may be turned on at a time to create the feature list you desire. Improper switch settings will not damage anything however it could cause your radio to fail to turn on or conflict with existing accessories. COMMUNICATION TYPE **CHECK APPLICATION GUIDE Place switches 1 AND 2 UP if your vehicle uses LOW SPEED communications Place switches 1 and 2 DOWN if your vehicle uses HIGH SPEED communications SET VEHICLE SELECT TO “0” NOT USED NOT USED BLOCK VIDEO IN MOTION (DEALER MODE) Place switch 5 DOWN to BLOCK all Video viewing while in motion. Navigation address input and camera use while in motion is not blocked. LEAVE ALL COMMUNICATION SWITCHES IN THE UP / OFF POSITION APPLICATION GUIDE ADDITIONAL VEHICLES MAY APPLY OR BE ADDED LATER IMPORTANT VEHICLE COMMUNICATION PROGRAMMING SETTINGS IDENTIFY YOUR VEHICLE FROM THE APPLICATION GUIDE BELOW AND PLACE SWITCH 1,2 UP OR DOWN AS DIRECTED BEFORE PLUGGING IN THE LOCKPICK LOW SPEED APPLICATIONS SWITCH 1,2 UP 2007 – 2011 CHRYSLER SEBRING 2007 – 2013 DODGE AVENGER 2008-2010 CHRYSLER 300 AND 300C 2008-10 DODGE DURANGO 2008-2010 CHRYSLER ASPEN 2008-2010 DODGE CHARGER 2008-2011 DODGE DAKOTA 2008-2010 JEEP GRAND CHEROKEE 2008-2010 JEEP COMMANDER 2009-2013 CHALLENGER 2009-2013 PATRIOT/COMPASS 2011-2013 CHRYSLER 200/CIRRUS HIGH SPEED APPLICATIONS SWITCH 1,2 DOWN 2008-2013 CHRYSLER TOWN AND COUNTRY 2008-2013 DODGE CARAVAN 2007 – 2011 DODGE NITRO 2008-2013 JEEP LIBERTY 2007-2013 JEEP WRANGLER 2009-2010 JOURNEY 2009-2012 DODGE RAM 2011-2013 JEEP GRAND CHEROKEE 2010-2012 CALIBER 2011-2012 DURANGO 2008-2012 ROUTAN Vehicles can be engineered to operate with different types of communication systems. Chrysler/Dodge/Jeep uses two types of systems in current year models. The MYGIG LOCKPICK V.5 is designed and programmed to operate in any MYGIG capable vehicle regardless of communication type, however switch 1 AND 2 must be configured properly to identify the proper system before plugging in the interface. Consult the list above and position switch 1 AND 2 to the proper orientation before plugging in the LOCKPICK module. Placing the switches in the wrong position will cause the radio to fail to turn on. If you accidentally connect the interface with the wrong switch setting, it is recommended that you turn the car off and completely unplug the interface and radio harness before properly setting the programming switches on the interface. NAVIGATION RADIO UPDATING (older Mygig radios) The MYGIG navigation radio can be updated by placing an update disk in the player. The radio will recognize that the disk is an update disk and begin the process of loading automatically. Radio updates are provided periodically by the radio manufacturer to address problems which have been recognized in the normal operation of the radio and also to increase features which may have been created since your vehicle was purchased. We have complimentary updates disks available at no charge for the MYGIG navigation radio if you need or desire one. Demonstrations are available on the website at http://www.coastaletech.com/MYGIG_SOFTWARE.htm The MYGIG LOCKPICK V.5 is designed with simple “T” harness connectors, equipped with factory male and female connectors for direct connection to your screen. Specific links with videos demonstrating methods of gaining access to the rear of the standard MYGIG radio is available for viewing at various links at: http://www.coastaletech.com/MYGIG.htm Most installations are relatively simple with just a single panel surrounding the radio which must be pulled free before exposing the radio. Remove 4 screws holding the radio to view the connectors on the rear of the radio. Consult a professional installer if you require assistance plugging in your Lockpick. 1. With access to the rear of the screen, unplug the matching GRAY connector and plug it into the female connector of your MYGIG LOCKPICK V.5 harness. Then plug the male connector of the LOCKPICK harness into the earlier factory location. The connectors are keyed and cannot be plugged in to the wrong location. Line up the connectors carefully and make sure that no pins are bent or misaligned before pressing hard to make sure the connector is fully seated. PLUG GRAY CONNECTOR FROM MYGIG LOCKPICK V.5 HARNESS INTO LOCATION SHOWN PLUG WHITE CONNECTOR FROM MYGIG LOCKPICK V.5 HARNESS INTO LOCATION SHOWN 2. Next, unplug the White connector from the rear of the radio and plug it into the female connector of the Lockpick harness. Then plug the male connector of the Lockpick harness into the earlier factory location. Make sure the connector is fully lined up properly and fully seated. 3. The switch settings for your Lockpick were detailed earlier and should be configured before plugging the controller into the harness. If you plug in the controller and then change switch settings, the new settings will not be programmed and improper operation will result. To reset the box if you accidentally perform switch changes while plugged in, turn the car off and unplug the Lockpick harness from the factory connector. Momentarily place all switches down. Then set them to the desired setting and plug the harness back in to the factory connector to lock in the programming. 4. 2008-2009 (some 2010) vehicles with factory rear view cameras are powered only while the vehicles is in Reverse. If you would like to enable full control and viewing of your FACTORY REAR VIEW CAMERA while in DRIVE or other gears, the included REVERSE CAMERA POWER output wire must be connected as the power source for your camera. This 12V power output will turn on when the vehicle is placed in reverse and also when selected by the user using the radio buttons. If you choose not to connect the REVERSE CAMERA POWER wire provided by the Lockpick harness to your factory rear camera, the rear camera view while backing up will continue working as normal. However, because the rear camera will have no power in other gears, it cannot be activated by the Lockpick and will display as a blank or flashing picture if activated manually while in Drive. If your installation requires the use of the REVERSE CAMERA POWER Lockpick wire to enable factory camera operation in all gears, it is simply a matter of running a wire to the factory camera and connecting it in place of the original power wire. Remove any panels covering the rear hatch in your vehicle. Then use a meter or indicator lamp to determine the reverse power connection on the factory camera connector. Make sure you are measuring directly on the connector at the camera location and not further back in a different location. This wire will switch to 12V while the vehicle is in REVERSE and will be zero at other times. Then cut this wire and connect the REVERSE CAM 12V+ power connection from the Lockpick to the camera directly. Do not reconnect the original camera power source wire or fail to cut the wire at the camera. Instead tape it up and disregard it. The Lockpick will provide all necessary power and timing for the factory camera. Failing to cut the wire or connecting the Lockpick power and factory power at the same time could cause the reverse tail light to illuminate at improper times. Also, cutting the wire at a different location other than directly on the camera connector could possibly interrupt power to other functions such as the actual reverse taillights or rear obstacle detection systems. 5. If you do not currently have a rear view camera and want to add one to your vehicle, the Lockpick makes it easy. The REVERSE CAM 12V + power output provided on the Lockpick will be your source for powering the 12V needs of your aftermarket rear camera. Also, a GROUND connection is already provided for you on the Lockpick harness to make powering your camera simple. 6. If you want to add a front camera or side cameras to your vehicle, the Lockpick is prewired and programmed for exciting options. The Lockpick harness has a 12V power output labeled ADDITIONAL CAM POWER 12V+ that is specially designed to automatically provide the power needs of your front and side cameras or to provide power and control of an interior baby camera if desired. Connect the power needs of your additional cameras to the camera power output and attach the GROUND connection of your camera to the GROUND connection provided for you on the Lockpick harness. Connect the video from your cameras to the RCA video inputs labeled on your Lockpick module 7. Also present on your Lockpick harness is a 12V ACC output connection. This ACC output is created by the Lockpick and can be used as a convenient 12V switched power source for many of your accessories. It is rated for a constant 1.5 AMPs and will automatically turn on and off at the proper times of your vehicle use. If your power needs are greater than 1.5 Amps, you may use the CONSTANT 12V output conveniently provided by the Lockpick harness and switch it on and off through a relay powered by the ACC power output of the Lockpick harness. **NOTE: The connections for 12V Constant Battery power (YELLOW), ACC Ignition power (RED), GROUND (BLACK), Reverse power(ORANGE W/STRIPE), Front/Baby cam power (RED W/STRIPE), are provided as a BONUS in your wiring harness for you to use when connecting additional accessories such as a DVD player, Game, Cameras, Radar detector, etc., without worry that they might drain your battery when the car is turned off. The ACC wire can power up to 1.5 Amps constant. Higher loads should be connected with a relay. ** Do not attach the Constant or ACC wires directly to the vehicle wiring or ignition switch. The Lockpick is plug and play for standard DVD/AUX/NAV/VIDEO/AUDIO/CAM unblocking and does not require connections for power or ground. Connecting these Lockpick outputs to the vehicle wiring can damage the unit and cause improper operations. ** When the MYGIG LOCPICK V.5 is turned on for the first time, allow 30 seconds before operating the various functions and features. This allows the Lockpick to prepare the radio and screen views for standard operations. During the first startup, the Lockpick will create the SAT TV mode and all touch screen options to begin your interface for use. The Lockpick will automatically update the TV channels, requiring only a couple of seconds, each time the TV mode is selected. During the time that “Updating Channels” or “Initializing” is displayed on the TV mode screen, the touch screen options are not available for selection. MYGIG LOCKPICK V.5 OPERATION INSTRUCTIONS The MYGIG LOCKPICK V.5 automatically activates the TV mode and generates up to 4 pages of touch screen options for simple user control. Touch the on-screen button to select the desired function. **Mygig radio buttons and locations may vary with year and options present. Select Radio/Media button and then select the TV touch screen tab Select PAGE to advance through Lockpick options Select LIST to display presets on right of display as shown. Displays information about current selection or instructions Press VIEW VIDEO to see picture from factory SAT TV (if equipped). 1. 2. 3. **You can also press the Uconnect button 2x quickly in any mode (AM, FM etc.) to view a camera selected here. Once a camera is turned on, steering wheel buttons are activated for easy toggling between cameras or to turn a camera off. 4. Lockpick V.5 Options Page 1 Select LOCKPICK tab to display software revision. The LOCKPICK v.4 is USB upgradable. Select REAR CAM to manually activate and view the rear camera video (if present). Select FRONT CAM to manually activate and view the front camera video (if present). Press CHANGE OPT first, before selecting a camera to view. ** Steering wheel button controls are activated while manually viewing a camera. Press Seek UP or Seek Down to toggle between cameras. Press middle button on the back of the left side of the steering wheel to turn cameras off. Lockpick V.5 Options Page 2 **If AUTO OVR is set to OFF, (manual mode), press power button 2x while in any mode (DVD, VES, Nav input etc.) as needed to temporarily turn override on and off. 1. Touch CHANGE OPT to turn ON or OFF the feature selected below it. 2. Select to automatically view a rear camera while in reverse (default is ON). Select OFF if no rear camera is present to avoid blank screen while in reverse. 3. Select to automatically view a front camera when the vehicle is below 7 mph. (default is OFF). 4. Select to automatically provide override for navigation address entry (if equipped) and for automatic enabling of VIEW VIDEO button. (default is ON). Touch VIEW VIDEO to display the camera video. Lockpick V.5 Options Page 3 5. Touch CHANGE OPT to turn ON or OFF the feature selected below. 6. Select ADD VES to enable the VES rear entertainment mode in vehicle not already equipped. (default is OFF). Enable VES to input Video and Audio inputs provided in your Lockpick V.4 harness. 7. Select NAV if your Mygig radio is equipped with Navigation features. (default is ON). If your radio does not have navigation features, turn this option OFF to provide proper override functions. 8. Select to enable left and right camera inputs which display when turn signals are activated. Lockpick V.5 Options Page 4 1. Touch to arm 0 – 60 mph timer. Timer will activate when vehicle is in motion and stop automatically when 60 mph is reached. Elapsed time will display on radio. 2. Touch to arm 0 – 10 second timer. Timer will activate when vehicle is in motion and stop automatically after 10 seconds. Maximum speed reached will display on radio. 3. Touch to STOP either timer. 4. Touch to Reset time or speed to 0. If your vehicle is already equipped with Sat TV, the Mygig Lockpick V.4 will automatically detect the factory system and add a 4th option page with the factory channels to preserve full functionality. Lockpick V.5 Factory TV Page 5 If your vehicle is already equipped with factory satellite TV, the Lockpick will generate a 5th page of options which includes the original three factory TV channels. The normal operation of these factory channels are not affected by the installation of the Lockpick. The Lockpick will also fully enable the VIEW VIDEO button for these factory channels. **IMPORTANT** IF YOUR RADIO DOES NOT ALREADY HAS THE FACTORY UCONNECT FEATURE PRESENT, FOLLOW THE INITIALIZATION SEQUENCE BELOW. AFTER PLUGGING IN THE LOCKPICK, CRANK THE CAR UP, THEN TURN IT OFF AND REMOVE THE KEY. LET THE VEHICLE REMAIN OFF WITH THE DOORS CLOSED FOR A MINIMUM OF 1 MINUTE. RETURN TO THE VEHICLE AND CRANK IT UP TO ENABLE THE UCONNECT BUTTON OPERATION NECESSARY FOR THE LOCKPICK. (note: The Lockpick will allow the uconnect button to be used to operate some of the Lockpick functions. It cannot create uconnect features in radios that do not have the internal circuitry and software to provide telephone and voice commands) (Radio buttons positions may vary with model and year) Within the the MYGIG LOCKPICK V.5 options, the user can add the VES rear entertainment mode to any MYGIG radio not already equipped. Video and audio INPUTS are provided on the Lockpick V.4 harness which can allow aftermarket multimedia systems (iPod/iPhone, DVD, Satellite, Streaming, etc.) to display their video on the MYGIG system screen and have the audio play through the factory sound system WITHOUT FM modulators. The Lockpick video and audio inputs are selected on the touch screen by pressing the VES mode button created by the MYGIG LOCKPICK V.5. If the on-screen display does not show the AUX input selections, press the VES MODES button at the bottom of the screen. The REAR AUX 1 input can then be selected by touching the onscreen AUX 1 button. This will activate the audio and video inputs of the multimedia inputs on the Lockpick harness. If you are in PARK, the view video button will be available in the lower right corner of the screen for front screen video viewing of your AUX input. The Lockpick V.5 can allow the view video button to be automatically enabled even if you switch to DRIVE or, if the AUTO OVERRIDE is disabled, it can be enabled manually by pressing the power button 2x. The A/V OUTPUTS on the Lockpick V.5 harness can output the MYGIG DVD video and audio directly to a rear screen system. The MYGIG radio is capable of DUAL ZONE operation. This means it can output one set of audio or audio/video to the rear system while allowing the front operator to view or listen to something else on the MYGIG radio itself. The system cannot output the A/V inputs from the Lockpick V.5 harness to the A/V outputs on the harness at the same time. The MYGIG radio can output the video from the internal DVD player to the rear system while simultaneously viewing and listening to either the AUX input audio and video provided on the Lockpick v.4 harness or any of the standard functions of AM, FM, SAT or hard drive. You can also send just the audio from the AM, FM, SAT, or hard drive out to the rear seat entertainment system. To select which audio and video source you would like to send out of the A/V output of the Lockpick v.5 harness, press the menu button and then select the onscreen button for REAR VES. The screen will then show the possible options for outputting MYGIG radio and video Select the source 1 tab and not the source 2 tab Any option for output is available on the radio or media tabs. The VES output options are not selectable as they are applicable only to a factory VES system. If you would like to send out the picture and the sound from a DVD playing in the MYGIG radio to your additional screen, select the MEDIA tab and then the DISC option. The DVD in your MYGIG radio will continue to play and output its audio and video to your rear seat system even if you then switch to any of the different functions available on the MYGIG radio for the front seat operator. Thank you for your trust in Coastal Electronic Technologies, Inc. Installation Q & A: 1. I installed the Lockpick and now my radio does not turn on. Check all interface controls and switches. Insure that vehicle select is set for (0) and that option switches 1 and 2 and correctly set them for the vehicle type (see application chart). Check to make sure you have installed the Gray connector behind the radio and that all pins were straight before fully inserting the connectors. 2. When I put the car in Reverse, the radio screen blanks out. I do not have a rear view camera. The Lockpick automatically activates a rear view camera input for your radio. If you do not intend to install a rear view camera or do not want it activated automatically, refer to page 2 of the Lockpick options in the TV mode to disable the AUTO REAR function. 3. I installed the Lockpick but I do not see a VES mode. The default setting for the Lockpick is VES mode OFF. To activate the VES mode and take advantage of the audio and video inputs provided by the Lockpick harness, select the ADD VES option on page 3 of the Lockpick options menus. After setting the option to ON, turn the car off and then back on. The VES mode will be activated and ready for use. 4. I installed the Lockpick and now my factory VES rear entertainment is intermitting. The Lockpick is able to create a VES mode within your radio to allow a multimedia audio and video input as well as an output for additional screen(s) if desired. The default setting on page 3 of the Lockpick options is VES OFF. If you change the option and turn it ON when you already have a factory VES system, the communication will conflict. Set the option to OFF to restore factory VES operation. 5. My radio does not have a VIDEO button viewable at any time. Will the Lockpick work for this car? The Lockpick will enable the video function regardless of whether it is currently activated. 6. I do not have a navigation radio or my radio is a new RHB navigation radio. Will the Lockpick turn on the Uconnect and voice recognition functions? No, these radios do not have the hardware internally to receive Bluetooth or provide support for voice recognition. The Lockpick will remove the error message saying the feature is not active when the Uconnect button is pressed. Follow the initialization procedure described earlier. 7. I turned on one of the Camera or VES AUX input functions created by the Lockpick and all I see is a flashing picture or blank screen when I try to look at the video. This means you don’t have anything connected or, do not have the camera turned on to supply a video input. The radio screen will be blank or flash when there is no video from your connected device. Common solutions for camera pictures are normally resolved by rechecking the power connections and insuring that all cameras are powered by the connections provided on the Lockpick harness. This includes the factory rear view camera, if your vehicle requires a Lockpick connection to power it while in a gear other than reverse. Also, check to make sure you have fully inserted the White connector on the Lockpick harness and the video connections for your device are plugged in. Connectors not fully inserted may create intermitting operations. 8. I turned on my car for the first time after installing the Lockpick and I do not have any of the menus in the SAT TV mode as shown in the illustrations. The first time the Lockpick is powered on, it will wait 30 seconds before loading the menus for Lockpick operations in the SAT TV mode. After this initialization, the menus will be loaded and present when the radio is turned on. The Lockpick will also refresh the menus each time the SAT TV mode is selected. During the couple of seconds that the menus are reloaded, the touch screen options are not available for selection. USB UPDATING (make sure module is also connected to Lockpick harness and vehicle) Your Lockpick FIM interface includes the ability to be updated via a USB connection to a PC. Included with your interface is a cable designed to plug into the mini USB jack on the Lockpick module and connect it to the standard USB jack on a laptop computer. A software program is available for download and installation on our website at www.coastaletech.com/usbupdate.htm Download the application and save it to your computer. Open the folder and select the SETUP file to install the FIRMWARE UPDATER program on your computer. On our website we provide updates and changes that will use the FIRMWARE UPDATER program to allow simple updates to your Lockpick module when desired. If an update becomes available, download and save the desired Lockpick FIM update from our website. Make sure the module is plugged into the Lockpick harness and connected to your vehicle with the key off. Plug in the USB cable to the Lockpick module and your computer. Then open the FIRMWARE UPDATER program on your computer and when prompted, browse to the location you saved the desired update. Start the update as directed in the software and do not stop the process once begun. After completion, disconnect the USB cable, start the car and explore the installed firmware changes. ENJOY YOUR LOCKPICK™ !! Available accessories to make your camera installations easy MINICAM 221 Color Camera Digital Distance Markings Standard or Mirror Image (front or rear) Waterproof 21’ Power and Video cable BARCAM 221 Color Camera Digital Distance Markings Standard or Mirror Image (front or rear) Night Vision Illumination Waterproof 21’ Power and Video cable MYGIG FREEDOM IN MOTION LOCKPICK V.5 CABLE ASSEMBLY AND INSTALLATION INSTRUCTIONS ENCLOSED