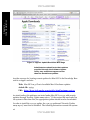
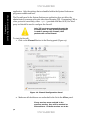
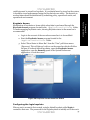
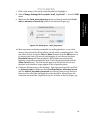
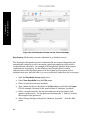
1
UNCLASSIFIED Report Number:I331-009R-2004 Apple Mac OS X v10.3.x “Panther” Security Configuration Guide Guide Version 1.1 Systems and Network Attack Center (SNAC) National Security Agency 9800 Savage Rd. Ft. Meade, MD 20755-6704 UNCLASSIFIED UNCLASSIFIED This Page Intentionally Left Blank UNCLASSIFIED UNCLASSIFIED Warnings This document is only a guide containing recommended security settings. It is not meant to replace well-structured policy or sound judgment. Furthermore this guide does not address site-specific configuration issues. Care must be taken when implementing this guide to address local operational and policy concerns. The security changes described in this document only apply to Apple Mac OS X v. 10.3.x “Panther” and should not be applied to any other Mac OS versions or operating systems. This document is current as of July 8, 2005. See http://www.apple.com for the latest changes or modifications to the Mac OS X v10.3.x “Panther” operating system. iii UNCLASSIFIED Warnings Do not attempt to implement any of the settings in this guide without first testing in a non-operational environment. UNCLASSIFIED This Page Intentionally Left Blank UNCLASSIFIED UNCLASSIFIED Trademark Information All other names are registered trademarks or trademarks of their respective companies. v UNCLASSIFIED Trademark Information Apple, Macintosh, Mac OS X, and “Panther” are either registered trademarks or trademarks of the Apple Computer Corporation in the U.S.A. and other countries. Trademark Information UNCLASSIFIED This Page Intentionally Left Blank UNCLASSIFIED UNCLASSIFIED Table of Contents Warnings......................................................................................................................iii Table of Contents ........................................................................................................vii Introduction.................................................................................................................xi Getting the Most from this Guide ...........................................................................xi About this Guide.....................................................................................................xii Scope of Guidance......................................................................................................... 1 Introduction to Mac OS X Security ..............................................................................3 Multi-user, UNIX-based system ..............................................................................3 Security Features......................................................................................................4 Secure Configuration by Default .........................................................................4 Secure Network Services......................................................................................4 Keychain...............................................................................................................4 Security Support for Applications .......................................................................5 Smart Cards .........................................................................................................5 Initial Installation ......................................................................................................... 7 System Installation and Configuration.................................................................... 7 Before Installation ............................................................................................... 7 Begin Installation.................................................................................................8 Continue Through Installation Screens...................................................................9 Initial System Configuration.................................................................................. 12 Create First Administrative Account ..................................................................... 13 System Updates ...................................................................................................... 14 Downloading and Verifying Updates ................................................................ 15 Installing Updates.............................................................................................. 17 Fix Disk Permissions .............................................................................................. 19 Configuring System Settings ...................................................................................... 21 Removing Registration Information......................................................................22 Managing System Preferences ...............................................................................22 Desktop and Screen Saver .................................................................................23 Security Settings ................................................................................................25 FileVault.............................................................................................................25 Additional Security Settings ..............................................................................28 Bluetooth........................................................................................................... 30 CDs & DVDs ....................................................................................................... 31 Energy Saver ......................................................................................................32 Sound .................................................................................................................34 vii UNCLASSIFIED Table of Contents Trademark Information................................................................................................ v Table of Contents UNCLASSIFIED Network..............................................................................................................36 Sharing ............................................................................................................... 37 Accounts.............................................................................................................42 Date and Time....................................................................................................44 Software Update.................................................................................................45 Setting the Global umask .......................................................................................46 Securing Initial System Accounts ..........................................................................46 Restricting Administrator’s Home Folder Permissions....................................47 Securing the Root Account ................................................................................47 Using sudo ........................................................................................................49 Securing Single-User Boot.................................................................................49 Logon Warning Banners ........................................................................................52 Auditing and Log File Configuration .....................................................................53 Configuring syslogd ...........................................................................................54 Local Logging .....................................................................................................55 Remote Logging .................................................................................................56 Disabling Hardware Components..........................................................................56 Disabling Mac OS 9 ................................................................................................ 57 Configuring User Accounts......................................................................................... 61 Guidelines for Creating Accounts .......................................................................... 61 Creating User Accounts..........................................................................................62 Granting Administrative Privileges .......................................................................64 Limiting a User Account ........................................................................................65 Managed User: Some Limits .............................................................................65 Managed User: Simple Finder.......................................................................... 68 Securing Users’ Accounts ...................................................................................... 68 Restrict Home Folder Permissions................................................................... 68 System Preferences Settings ..............................................................................69 Overriding the Default umask ...........................................................................74 Setting Up Keychains for a User Account ..............................................................74 Keychain Access ................................................................................................. 75 Configuring the login keychain.......................................................................... 75 Creating Multiple Keychains .............................................................................79 Keychain Examples............................................................................................79 Setting the Default Keychain ............................................................................ 84 Additional Notes on Protecting Keychains........................................................85 Using an Account Securely.................................................................................... 86 Future Guidance .........................................................................................................87 Encrypting Files and Folders..................................................................................... 89 Using Disk Utility .................................................................................................. 89 Creating a New, Blank Disk Image With Encryption....................................... 89 viii UNCLASSIFIED UNCLASSIFIED Creating an Encrypted Image From Existing Data ...........................................92 References...................................................................................................................95 Additional Resources..................................................................................................97 Table of Contents ix UNCLASSIFIED Table of Contents UNCLASSIFIED This Page Intentionally Left Blank x UNCLASSIFIED UNCLASSIFIED Introduction Introduction The purpose of this guide is to provide an overview of Mac OS X v10.3.x “Panther” operating system security and recommendations for configuring the security features. This guide provides recommended settings to secure systems using this operating system, and points out problems that could cause security concerns in systems using this operating system. This document is intended for anyone managing a locally-administered Apple Mac OS X v10.3.x system. It is assumed that anyone using this guidance will have some experience using Mac OS X, and understands the basics of the Mac OS X user interface. Some instructions within this guidance are complex, and deviation could result in serious adverse effects on the system and its security. Modification of these instructions should only be performed by experienced Mac OS X administrators, and followed by thorough testing. Getting the Most from this Guide The following list contains suggestions for successfully using the Apple Mac OS X Security Configuration Guide: • Read the guide in its entirety. Subsequent sections can build on information and recommendations discussed in prior sections. • This guidance should always be tested in a non-operational environment before deployment. This non-operational environment should simulate the architecture where the system will be deployed as much as possible. • This guidance is intended primarily for a locally-administered Mac OS X system. Much of the guidance may still be applicable even for a Mac OS X system being managed by another server. If the system being configured will be centrally managed by another system, the guidance given here should be followed as closely as possible within that context, but some guidance may not be applicable. • Any deviations from this guidance should be evaluated to determine what security risk that deviation may introduce, and measures should be taken to monitor or mitigate those risks. UNCLASSIFIED xi UNCLASSIFIED About this Guide This document consists of six chapters and two appendices: Introduction Chapter 1, “Scope of Guidance,” contains an overview of the type of system for which this guidance is intended. Chapter 2, “Introduction to Mac OS X Security,” contains a brief overview of some of the key security features found in the Mac OS X operating system. Chapter 3, “Initial Installation” contains step-by-step guidance for installing a new Mac OS X system. Chapter 4, “Configuring System Settings,” contains information on how to securely configure a Mac OS X system once it has been installed. Chapter 5, “Configuring User Accounts,” contains guidance on how to create new user accounts, how to give an account administrative access, how to limit account capabilities, how to configure each type of account to make it secure, and information that should be passed on to users about using their accounts securely. Chapter 6, “Future Guidance,” contains information about topics that were not covered in this guidance, but which are slated for future guidance. Appendix A, “Encrypting Files and Folders,” gives instructions on two additional ways to encrypt files under Mac OS X that may provide additional security for information that is to be transferred via removable media (e.g. CD) or network. Appendix B, “References,” contains a list of resources used in creating this guide. Many of these resources are valuable sources of additional information about Mac OS X in general, including many features not discussed in this guidance. Appendix C, “Additional Resources,” contains a list of references that, though not used in preparation of this guide, may be of interest to the reader. xii UNCLASSIFIED UNCLASSIFIED Chapter 1 Apple’s Mac OS X operating system is very versatile, and can be used not only as a client workstation, but also to manage entire networks of machines and users. Apple offers two versions of the operating system: Mac OS X and Mac OS X Server. The two products offer many of the same administration and configuration features. The server version provides additional tools designed to assist the administrator in managing networks of computers and users, to include other environments such as Windows and other UNIX-based systems. The default configuration for Mac OS X Server is not as “locked-down” from a security standpoint as Mac OS X. This is by design, since a server being used to administer an entire network will typically need more services available. The goal of this guidance is to provide instruction on securing a locally-administered Mac OS X system, including the management of user accounts on that system. The guidance concentrates on providing the information needed to configure and use a single Mac OS X system in a secure manner. This does not preclude addressing some networking issues; this guidance will address those networking issues that would most commonly be needed by a locally-administered Mac OS X system that will occasionally or regularly connect to either the Internet or a local area network. This configuration guidance may not be valid if the machine is managed by other systems, Mac OS X or otherwise. Although the guidance may be valid by itself, implementing some of the recommendations might result in interoperability problems between the system and any server managing it. Guidance in this document is geared towards a locally-administered Mac OS X system. Guidance contained here may not be applicable to Mac OS X Server or to a Mac OS X network. Additionally, the guidance in this document is geared towards allowing the user to change his password. As there is currently no way in a Mac OS X standalone system of enforcing strong passwords or of forcing the user to periodically change his password, this could result in passwords on a system never being changed, and being easily guessable. This is especially true for locally-administered laptops, which will likely have little administrative oversight. If the risk from a user’s password never being changed is greater than the difficulties and risks introduced by not allowing a user to change his password, each user should be restricted from changing his password. Restricting a user's ability to change his password causes the system to require an administrator's password used to change a user password. For this solution, the administrator should regularly schedule password changes with each UNCLASSIFIED 1 Chapter 1 Scope of Guidance Scope of Guidance UNCLASSIFIED Chapter 1 – Scope of Guidance user. This method is labor-intensive for the system administrator, so the most appropriate method of password control for the operational site should be chosen. The guidance is also written such that a system secured using this guide should be easily transitioned into being a managed client in a Client-Server environment. If the system being secured will eventually reside in a Client-Server environment, the ability for a user to change his password should not be disabled. Finally, it is EXTREMELY important on portable systems that very strong user passwords be used. FileVault uses the user’s login password as a key for the FileVault encryption. FileVault encryption is used to encrypt the user’s entire home directory to give some protection against files being viewed by unauthorized users. All encryption methods mentioned in this guide are the default encryption routines that come standard on Mac OS X. Following this guide does not provide an exception to the encryption policies implemented by the site where the system will reside. 2 UNCLASSIFIED UNCLASSIFIED Chapter Chapter 2 Intro to Mac OS X Security 2 Introduction to Mac OS X Security Mac OS X v10.3.x (a.k.a. “Panther”) is the latest version of the Mac OS X operating system as of the printing of this guidance. This system combines the GUI-based, user-friendly features of the Macintosh operating system with the underlying foundation of a BSD Unix system. This chapter provides a brief look at the security features built into the Mac OS X system. Multi-user, UNIX-based system As stated above, the Mac OS X operating system was built with BSD Unix as a major part of its foundation. The core of the operating system is called Darwin, and is made up of two parts: the Mach kernel, and the BSD subsystem. The Mach kernel and the BSD subsystem provide security features that were unavailable on Mac OS 9 and earlier versions. The Mach kernel handles all interaction with the system hardware, providing control and security over the applications running on the system. In addition, the kernel also provides a modern virtual memory system that provides each process with its own memory address space. Applications can no longer interfere with the system memory space or the memory space of other processes without special permissions, also controlled by the system, or Darwin. The BSD subsystem provides a multi-user environment, where each user has a unique login ID and can be made a member of various groups. The system can then use a user’s ID and group memberships to determine what the user is allowed to do on the system. In this way, the system restricts a user’s ability to run privileged processes and it controls access to system files. Users are protected from each other this way as well. Like most UNIX-based systems, Mac OS X has a super-user, or root account, which is able to do basically anything on the system. Unlike most UNIX-based systems, however, Mac OS X disables the root account by default. For any action that must be performed by root, the administrator must either enter his administrator credential (e.g. password, smart card) when prompted, or must enable the root account and enter the root account id and password. This not only prevents users from inadvertently performing system-level actions, but also provides an extra layer of authentication needed to perform system level actions. Another benefit to having the root account disabled is the effect on logging. Since a user cannot log in as root directly if the root account is disabled, he must act as root UNCLASSIFIED 3 Chapter 2 – Intro to Mac OS X Security UNCLASSIFIED from an administrator account login. This means there will be an audit log showing when users have acted as root. Without this kind of accountability, it is difficult to know if an adverse action on the system was the result of an administrator error or a malicious attack. The root account should never need to be enabled, and it is strongly recommended that root remain disabled. Security Features In addition to the permission-protected, multi-user environment described above, Mac OS X incorporates a number of other security features. Secure Configuration by Default The system’s default configuration is one of the most important security features provided by Mac OS X. First, as stated above, the root account comes disabled in Mac OS X. Second, network services are all initially disabled. Third, the initial logging setup is consistent with good security practice. Secure Network Services Another feature provided in Mac OS X is the SSH protocol, whose programs replace the plaintext services such as telnet, rlogin, rcp, and ftp. These older services do not encrypt usernames, passwords, or other sensitive data that pass over a network between hosts. SSH provides protection for network communications by establishing an encrypted link between hosts before any data are exchanged. The encryption facility should be completely transparent to the user. Table 1 shows SSH replacements for the plaintext services. Table 1: Insecure programs and their SSH replacements Insecure program: telnet login rcp ftp SSH Replacement: ssh slogin scp sftp A Mac OS X system can act as an SSH client or an SSH server. As a client, no settings require modification. The user can use the SSH client programs to connect to remote hosts that act as SSH servers. If operationally required, the SSH server can be started by turning on the Remote Login service in the System Preferences. Server programs for the plaintext services should never be activated. Use of plaintext service client programs is acceptable only when no sensitive data will be transmitted, such as downloading a file using anonymous FTP. Keychain Although available in previous versions, the Keychain feature has been improved and becomes a more important feature in Mac OS X. Keychain can be used to 4 UNCLASSIFIED UNCLASSIFIED Security Support for Applications The Keychain Access application provides a user-friendly interface that allows storage of secure keys, passwords, and certificates for use with Mail and Safari, as well as other applications. Importing a certificate, for example, is a point and click operation. This allows users to easily configure their computer for encrypted network transmissions, enhancing the security of e-mail and web applications. Smart Cards Mac OS X provides the ability to use Department of Defense Common Access Cards, or Federal Smart Cards, for user authentication. This guide does not contain instructions for using Smart Cards for authentication. Guidance of this nature is planned for future versions. Apple provides the “Apple Federal Smart Card Package Installation and Setup Guide” (http://docs.info.apple.com/article.html?artnum=25526) which provides guidance on setting up and using this capability in Mac OS X v10.2.3 – v10.2.8. Apple is currently developing a comprehensive guide for Smart Card usage in Mac OS X v10.3.x. Users interested in taking advantage of the Smart Card capability in Mac OS X should refer to the Apple guidance as listed above. Detailed help for this capability is available from the Help menu while running the Common Access Card Viewer application. UNCLASSIFIED 5 Chapter 2 Intro to Mac OS X Security manage the multitude of credentials and certificates that a user must maintain. Multiple keychains can be set up for a single user, each protected by a different credential such as a passphrase. All items stored in a keychain are encrypted, and can only be viewed as plaintext after authentication. Each keychain can have a different usage configuration, such as requiring the user to re-authenticate every time a credential in the keychain is used, or automatically unlocking a keychain when upon login so that all its credentials can be accessed automatically by applications. Each item in a keychain retains a unique Access Control List (ACL) that specifies applications authorized to access it. Certificates can be managed using a keychain and this can be used in conjunction with e-mail applications to enable a user to digitally sign messages. If configured correctly, keychains can be a useful tool for managing user credentials. Chapter 2 – Intro to Mac OS X Security UNCLASSIFIED This Page Intentionally Left Blank 6 UNCLASSIFIED UNCLASSIFIED Chapter 3 Although secure configuration of an existing Mac OS X installation is possible, securely configuring a fresh installation is much simpler. Although this may not always be practical, it is the recommended way to configure Mac OS X. This section details the steps involved in such an installation. If it is not possible to re-install the system, much of this chapter will not be applicable. The guidance in this chapter can still be used, however, to determine any differences between the previous installation and the recommended one. Wherever differences exist, the previous installation should be modified to match the recommended one; this may entail deleting installed packages, deleting registration information, changing an administrative account name, installing updates, and fixing disk permissions. This guide does not provide instructions on making these types of modifications to a previously installed system. Also, administrators should be aware that applying these recommendations to an existing system might cause the system to operate incorrectly. System Installation and Configuration THE SYSTEM SHOULD BE DISCONNECTED FROM NETWORK UNTIL IT IS COMPLETELY AND SECURELY CONFIGURED! Before Installation If the Open Firmware password had been enabled, it should be disabled before beginning installation. To do this: 1. Hold down command-option-O-F while restarting the system to enter Open Firmware mode. (Note: The command key has an apple symbol on it, and is located next to the space bar on the keyboard.) 2. Enter the Open Firmware password when prompted. 3. At the Open Firmware prompt (“>”) enter: reset-nvram reset-all The following installation process will destroy all information on the hard drive. If there is any information on the system that should be retained, it should be backed up to an alternate location before beginning this installation. When backing up and restoring any information, the following guidelines should be used: UNCLASSIFIED 7 Chapter 3 Initial Installation Initial Installation Chapter 3 – Initial Installation UNCLASSIFIED • Only user files and data should be saved and later restored; restoring system settings or previous accounts may change the system configuration specified in this guidance. • Applications should be re-loaded from the original media, not restored from a backup. • An “Archive and Install” option is available during installation. This option saves the current user accounts and restores them once the system has been re-installed. It is recommended that this option not be used, and that a completely new installation is performed. If it is necessary to retain the previous accounts using this option, each account should be configured according to this guide. Additionally, any restored files and directories may not have permissions set as recommended in this guide. All restored accounts should be examined carefully for potential security problems. Begin Installation To begin a system installation, it is necessary to boot from the CD/DVD drive. All data on the target drive will be lost during the installation process. The following instructions will cause all information on the target drive to be lost. Backup any data on the system that should be retained. To begin the installation, use the following steps: 1. Insert the first Mac OS X v10.3.x installation disk in the CD/DVD drive. 2. Boot or reboot the system while holding down the “C” key on the keyboard. This will cause the system to boot from the CD/DVD drive and will start the installation process. The following list of screen titles appears during the installation of Mac OS X. Each bulleted item is the title of a separate screen. All screens are included so the administrator can gauge installation progress. Instructions are provided only for those screens where the administrator will need to perform configuration according to these guidelines. If instructions are not included for a screen, the installer should select default values (if any) and continue on to the next screen. 8 UNCLASSIFIED UNCLASSIFIED Continue Through Installation Screens Chapter 3 Initial Installation Any necessary partitioning of the hard drive can be performed at this point, by selecting Disk Utility from the Installer menu. Only experienced administrators who understand how to properly partition a drive should perform disk partitioning. For information on using Disk Utility to partition a drive, see Disk Utility Help. All startup disks on a system should be securely configured. If Mac OS X is to be installed on multiple partitions, each installation should be configured according to this guidance. Select Language Install Mac OS X – Welcome to the Mac OS X Installer Install Mac OS X – Important Information Install Mac OS X – Software License Agreement The installer must accept the agreement to continue. Install Mac OS X – Select a Destination 1. Click on the drive or partition where the system is to be installed to highlight it. 2. Click the Options button. 3. Select the Erase and Install button. The installer also provides an “Archive and Install” capability. This type of installation enables reloading of the system while saving existing files. This capability may be useful in re-installing a system that was configured incorrectly. Use of this option has not yet been tested for inclusion here, but may be included in a later version. Use of the “Archive and Install” option is NOT recommended. 4. Select the Mac OS Extended (Journaled) option from the Format disk as: drop-down menu list. This filesystem is the Mac OS X default, and provides cross-platform compatibility. 5. Click the OK button. UNCLASSIFIED 9 UNCLASSIFIED 6. Click the Continue button when the Select a Destination screen re-appears. Chapter 3 – Initial Installation Install Mac OS X – Easy Install on <partition-name> 1. DO NOT CLICK “INSTALL” YET! Click on the Customize button to bring the list of packages available for installation. Skipping unnecessary packages can drastically reduce Mac OS X installation time. For example, not installing the Language Translation Package saves the time required to install the 695 MB package. 2. Decide which options should be installed. The following is a list of the available packages, followed by a “Yes” if the option should be installed, and a “No” if it should not be installed. The packages installed should follow the recommendations given here unless an operational requirement necessitates different settings. If there is an arrow to the left of an option, it means that option has selectable sub-options. To see the sub-options, click on the arrow. → BSD Subsystem – Yes. Installs additional BSD command line utilities. → Additional Applications – Installs several additional applications provided with the system installation: Internet Explorer – No. Internet Explorer (IE) for the Mac OS is no longer being developed, and while support is available now, future security updates are not guaranteed and may not be timely. If IE is operationally required, caution should be used. It is recommended that IE not be used. Stuffit Expander – Yes. StuffIt Expander is frequently needed to uncompress files that have been compressed for network transmission iTunes – No. *(see note below) iMovie – No. *(see note below) iPhoto – No. *(see note below) * iTunes, iMovie, and iPhoto are applications primarily used for personal multimedia creation and management. They have Internet connectivity features that may introduce additional security risk. It is recommended that they not be installed unless an exception must be made due to operational requirements. 10 UNCLASSIFIED UNCLASSIFIED iCal – Optional. iCal provides an electronic calendar, including some Internet connectivity features that present a security concern in some environments. Site policy and operational requirements should determine whether this tool is loaded. → Printer Drivers – Installs printer drivers for some Canon, Epson, Lexmark, and Hewlett-Packard printers. Install only those needed for the environment where the system will reside. → Additional Speech Voices – No. Speech recognition requires use of a microphone, which is not recommended. Also, speech synthesis may violate local security policy. → Fonts – No. This package contains fonts for displaying the text of Middle-Eastern, Russian, Asian, and other languages. If additional languages will not be used on this system, de-select the entire “Fonts” option. Otherwise, select only the appropriate sub-options. → Language Translation – No. In addition to the selected primary language, this package installs Mac OS X in all available languages. Unless additional languages will be used on this system, the entire option should be de-selected. Otherwise, select only the appropriate sub-options. → X11 – No. The X11 X Window system provides the ability to run X11-based applications under Mac OS X. While this capability may be useful in some environments, it introduces configuration and security issues. It is recommended that this package not be installed. 3. When finished choosing portions to include with the installation, click Install to begin installation. Install Software The installation program displays “Checking Installation Media” while it verifies the installation CD or DVD, which can be time-consuming. Although this test may be skipped to save time, this is not recommended because an undiscovered error may cause installation to fail abruptly and leave the system unusable. After verifying the integrity of the installation disk, the installation program formats the target drive and installs the operating system, requesting additional disks as needed. Once the software installation has completed, the process of configuring the system will begin. UNCLASSIFIED 11 Chapter 3 Initial Installation iSync – No. This application is used to synchronize calendar, address book, and similar information across computers, PDAs, wireless phones, and other devices. This tool should not be loaded unless operationally required. UNCLASSIFIED Chapter 3 – Initial Installation Initial System Configuration The next set of screens deals with configuring the just-installed operating system. Again, instructions will only be provided for screens where specific actions should occur to conform to this guidance. Welcome Personalize Your Settings Your Apple ID The administrative account should not be used for any purpose other than administration; therefore, it does not require an Apple ID. To prevent an ID from being associated with the first administrative account being created on the system: 1. Select Don’t create an Apple ID for me. 2. Click Continue. Registration Information Any information entered in this screen will be stored and forwarded to Apple when the machine is connected to the Internet. This information gathering section of the installation process should be skipped. To bypass this part of the process: 1. Press command-Q. This will cause the registration process to end, and the information gathering process will be skipped. 2. In the You have not finished setting up Mac OS X dialog box, click Skip to bypass the remaining registration and setup process. If information had been inadvertently entered during the installation process, it should be removed before the system is connected to a network. In Chapter 4, “Configuring System Settings,” instructions will be given on how to delete this information to prevent it from being automatically transmitted over a network. Any information entered in this screen, if not deleted before the system is connected to the Internet, will be transferred across the Internet in plaintext to Apple. Even if the system is connected only to an internal network, and not the Internet, registration information may be transmitted across that network in an attempt to forward it to Apple. It is very important that no sensitive information is entered in these screens. Information entered during this phase of the installation will be transmitted 12 UNCLASSIFIED UNCLASSIFIED across the network when the machine is connected to one. Sensitive information should never be put in these screens. Create Your Account This screen sets up the initial account, which is also an administrative account. If information was entered into the registration screen, that information is used to fill in default values for the name and short name fields; otherwise, these fields are blank. Account information for the initial account should be entered as follows: 1. Enter a name for the initial administrator in the Name text box. Any name may be used for the administrator account; however, it should not be an easily guessable name, such as “Administrator.” 2. Enter a short name for this administrator in the Short Name text box. This name will be used as an ID for this administrative user and it should not be an easily guessable name, such as “admin.” Both the “short name” and the “name”, or full name, are accepted by the system for authentication. The “short name” is used by Unix commands or services. 3. Enter the administrator’s password in both the Password and Verify boxes. Passwords in Mac OS X can be up to 255 characters long and contain uppercase letters, lowercase letters, numbers, and special characters. Choosing a password that consists of at least 12 characters, that would not be found in a dictionary, and that contains mixed case, numbers, and special characters is recommended. There are many references available which describe how to choose good passwords; therefore, this guide will not go into any further detail about choosing a password. Although there is currently no built-in method for enforcing good password use on a locally administered Mac OS X system, a utility that will assist a user in choosing a better password is provided. This feature is currently available only as a part of the Keychain Access program, described further in the section on Keychain. 4. Leave the Password Hint field blank. If a hint is provided, anyone attempting to guess the password would be presented with a hint after 3 failed attempts, giving him additional information that could be used to compromise the account. 5. Click Continue. UNCLASSIFIED 13 Chapter 3 Initial Installation Create First Administrative Account UNCLASSIFIED Get Internet Ready Chapter 3 – Initial Installation Note: This screen will only appear if the entry of registration information was NOT skipped. The network security settings should be configured and validated before enabling networking on the machine. See the section on “Securing the Network” in Chapter 4 for information about configuring Mac OS X for network access. Skip connecting the machine to the Internet at this time: 1. Select I’m not ready to connect to the Internet. 2. Click Continue. Register With Apple Note: This screen will only appear if the entry of registration information was NOT skipped. 1. Select Register Later. 2. Click Continue. Select Time Zone 1. Select the appropriate time zone. 2. Click Continue. Set the Date and Time 1. Set the date and time appropriately. 2. Click Continue. Don’t Forget to Register If entry of the registration information was skipped, select Done at this screen, and continue configuration with the next section on performing system updates. Otherwise: 1. Select Register Later. 2. Click Continue. System Updates System updates should be installed immediately after the operating system installation. At the time of the writing of this guide, the most recent updates are 14 UNCLASSIFIED UNCLASSIFIED "Mac OS X Update 10.3.4" and security updates "Security Update 2004-05-24" and “Security Update 2004-06-07”. The guidance in this document has been confirmed under these updates. After Mac OS X v10.2.8, all security updates contain only fixes for security issues. It is possible to review the contents of each security update before installing it. To see the contents of a security update, go to Apple’s Security Support Page (http://www.apple.com/support/security) and click on the “Security Updates page” link. All security updates published by Apple contain only fixes for security issues, and are usually released in response to a specific known security problem. Applying these updates is essential. Downloading and Verifying Updates The Software Update panel in the System Preferences panel might pop up to indicate any updates available for the system. Software Update will ask if any new downloads found should be downloaded and installed. Software Update should not be used to automatically perform updates. Select Quit to exit Software Update, and continue installing updates manually. Updates can be downloaded from http://www.apple.com/support/downloads (Figure 1) using a machine designated specifically for downloading and verifying updates, and should be copied to a disk for installation. The download should be done separately so that file integrity can be verified before the updates are installed. UNCLASSIFIED 15 Chapter 3 Initial Installation If there are newer security updates than those listed here, they should be installed. After updating the system as indicated, all security updates released later than the last update given above should also be installed, in the order in which they were released. Chapter 3 – Initial Installation UNCLASSIFIED Figure 1: Apple’s Update Download Web Page Administrators should note that updates provided through the Software Update utility may sometimes appear earlier than the standalone updates. Another resource for locating current updates for Mac OS X is the Knowledge Base article on Apple’s website: Title: Mac OS X 10.3: Chart of available Mac OS software updates Article ID: 25633 URL: http://docs.info.apple.com/article.html?artnum=25633 As stated earlier, this guidance was tested under Mac OS X v.10.3.4 with security updates through “Security Update 2004-06-07.” If the version that was loaded on the system is older than this, the appropriate updates should now be downloaded. In order to install the v.10.3.4 update, the v.10.3.3 update and “Security Update 2004-05-24” must first be installed. The following instructions assume the system 16 UNCLASSIFIED UNCLASSIFIED being updated is loaded with Mac OS X v.10.3.2 or earlier. If any of the listed updates have already been installed on the system being configured, skip the instructions for those updates. The updates that need to be downloaded are: Mac OS X (10.3.3) Combined Update 10.3.3 • Security Update 2004-05-24 (10.3.3) • Mac OS X Update 10.3.4 • Security Update 2004-06-07 (10.3.4) Make sure to note the SHA-1 digest for each of these files. The SHA-1 digest should be posted on-line with the download. Once the software updates have been downloaded from Apple they should be checked for viruses and written to a CD. Apple also provides a SHA-1 digest for their updates so that the integrity of the update can be verified. The SHA-1 digest should be checked to confirm the authenticity of the updates. Check the updates using the following steps: 1. Start the Terminal program, located in /Applications/Utilities. 2. In the Terminal window, issue the following command: /usr/bin/openssl sha1 <full path filename> where <full path filename> is the full path filename of the update for which the SHA-1 digest is being checked. Repeat this for each update. 3. The pathname of the file will be displayed in the Terminal window followed by the SHA-1 digest for that file. 4. Check the SHA-1 digest for each update against the SHA-1 digest displayed on the Apple site. The SHA-1 digest will be displayed in the “Information and Download” document for the update. In most cases, this will be the document that is displayed when the link for downloading the document is clicked. If not, search for the name of the update in the downloads section of the Apple support page, and find the “Information and Downloads” document for the update to obtain the SHA-1 digest. 5. The SHA-1 digest for each update should match the digest given on Apple’s web site for that update. If it does not, the file was corrupted in some way and a new copy should be obtained. Installing Updates Updates must be installed in the proper order. Make sure each of the updates are installed on the system in the order given below. Use the following procedure to install the 10.3.3 update on the system: UNCLASSIFIED 17 Chapter 3 Initial Installation • UNCLASSIFIED 1. Place the CD with the 10.3.3 Update package in the CD-ROM drive. Mac OS v.10.3.3 must be loaded before 10.3.4 can be installed. Chapter 3 – Initial Installation 2. Open the CD and double-click the MacOSXUpdateCombo10.3.3.dmg to open the disk image containing the update package. 3. Double-click the MacOSXUpdateCombo10.3.3.pkg to start the installation. 4. Follow the instructions provided by the Installer. 5. When the installation is complete, click Restart to continue, and the system will reboot. After the reboot, the system will automatically log into the administrator's account. Next, use the following procedure to install the first security update to the system: 1. Insert the disk containing SecUpd2004-05-24Pan.dmg. 2. Open the disk and double-click the SecUpd2004-05-24Pan.dmg to open the disk image containing the first security update. 3. Double-click the security update package SecUpd2004-05-24Pan.pkg to start the installation. 4. Follow the instructions of the Installer. 5. When the Installer has completed, click Close. Next, use the following procedure to install the 10.3.4 update to the system: 1. Place the disk with the 10.3.4 Update package in the CD-ROM drive. 2. Open the disk and double-click the MacOSXUpdate10.3.4.dmg to open the disk image containing the update package. 3. Double-click the MacOSXUpdate10.3.4.pkg to start the installation. 4. Follow the instructions provided by the Installer. 5. When the installation is complete, click Restart to continue, and the system will reboot. After the reboot, the system will automatically log into the administrator's account. Next, use the following procedure to install the second security update to the system: 1. Insert the CD-ROM with the security update. 2. Open the CD and double-click the SecUpd2004-06-07Pan.dmg to open the disk image containing the security update. 3. Double-click the security update package SecUpd2004-06-07Pan.pkg to start the installation. 18 UNCLASSIFIED UNCLASSIFIED 4. Follow the instructions of the Installer. 5. When the Installer has completed, click Restart. The system will reboot and automatically login to the administrator account. Fix Disk Permissions Permissions on files can sometimes become set incorrectly, especially during a software installation. Incorrect permissions can cause the system to operate incorrectly and even introduce security vulnerabilities. Fixing these permissions is recommended after performing any software installation on Mac OS X. Use the following instructions to repair permissions: 1. Insert disk 1 of the original Mac OS X 10.3.0 installation set and restart the Macintosh while holding down the “C” key to boot from a CD/DVD disk. 2. When the gray screen with the Apple logo appears, release the “C” key as the Macintosh is now booting from the disk. It is necessary to boot from an installation disk because the utility cannot fix permissions on the partition where the system is currently running. 3. When the first screen of the Installer appears asking the user to select a language, go to the menu bar and select Open Disk Utility from the Installer menu. 4. Once Disk Utility is open, select the installation drive from the list of disk drives on the left of the Disk Utility screen. 5. Select the Repair Disk Permissions button at the bottom of the First Aid screen. 6. Once the permissions have been repaired, quit the disk utility by selecting Quit Disk Utility under the Disk Utility menu. 7. Then select Quit Installer under the Installer menu. When the Installer asks if you are sure you want to quit the Installer, select the Quit button. The system will then reboot, start from the start-up disk, and log directly into the administrator account. 8. Eject the installation disk. The procedure for repairing disk permissions should be performed after every software installation, including the UNCLASSIFIED 19 Chapter 3 Initial Installation All security updates after the most recent system update should be installed. These updates should be installed in order by release date, oldest to newest. Although SecurityUpd2004-06-07.dmg was the latest available at the time this guide was written, newer security updates may be available, and should be installed since security updates address specific known security issues. UNCLASSIFIED Chapter 3 – Initial Installation operating system, updates, and applications. 20 UNCLASSIFIED UNCLASSIFIED Chapter Configuring System Settings System configuration follows the installation of the operating system and its updates. System-wide configuration settings are the focus of this chapter. This chapter also includes instructions for configuring the initial administrative account. In addition to these settings, user accounts should be created for each user. Chapter 5 describes the steps for creating and securely configuring additional accounts. The instructions in this chapter assume that the system has been installed and updated as described in the previous chapter. However, most instructions in this chapter should still be applicable to any Mac OS X v10.3.x system. If applying these instructions to an existing system, extra caution should be used to ensure the applicability of the instructions. For example, if the system being configured already has FileVault enabled, the instructions for doing so in this chapter will not be applicable to that system. As it is impossible for this guide to address all possible previous system configurations, instructions in this chapter are given under the assumption that the system was installed as described in Chapter 3. If this is not the case, each step in this chapter must be evaluated to determine how it applies to the current system configuration and how to adapt those steps to fit that system. Frequently during system configuration, text files must be edited as root. Several text editors are included with the system and available from the command line. Those familiar with a particular editor are free to substitute that editor for the one used in this guidance, pico. Pico was chosen because of its accessibility to new users, even those with very limited command line experience. It is assumed that the reader, once he has started pico, will be able to use the editor, and additional instruction will not be required. All system configuration guidance given in this chapter should be performed from an administrator’s account. (If the system has been installed as directed in Chapter 3, the initial system administrator’s account will be the only account on the system and the system will automatically log into this account at startup.) Once automatic login is disabled, it will be necessary to log in anytime the machine is rebooted or a user has logged out. Once the system is in that state, an administrator’s account should be logged in to perform the configuration described in this chapter. UNCLASSIFIED 21 Chapter 4Configuring System Settings 4 Chapter 4 – Configuring System Settings UNCLASSIFIED Removing Registration Information Mac OS X stores any registration information gathered during the installation in a file. The system attempts to send the registration information from that file to Apple the as soon as a network connection is made. Earlier in this guide, instructions were given to bypass entry of registration information. If, however, information was entered into the registration screen, it should be deleted before the system is connected to a network. The following steps will prevent this information from being sent: 1. Make sure the first administrator account is logged in. If the steps in this guide have been followed, that account will have been logged in automatically when the machine booted. 2. Open the home folder. 3. If an alias named Send Registration is located in the home folder, drag it to the Trash. 4. Open the folder Library/Assistants under the home folder of the first user account. 5. If the file Send Registration.setup exists there, drag it to the Trash. 6. Choose Secure Empty Trash from the Finder menu to delete the files. Managing System Preferences The System Preferences program provides a graphical interface for controlling many of the system’ security features. To start the System Preferences program, select System Preferences… from the Apple menu at the top left corner of the screen, or click on the System Preferences icon in the dock. The System Preferences program will start in a “Show All” view, displaying icons for configurable system features (Figure 2). 22 UNCLASSIFIED UNCLASSIFIED Chapter 4Configuring System Settings Figure 2: System Preferences Application Many options within the System Preferences application require an administrator’s password to unlock. When an option has been selected and its settings appear in the System Preferences panel, a lock icon will appear in the bottom left corner of the window if that particular option is lockable. The locked preferences are automatically secured when a regular user logs in, and are automatically unlocked when an administrator logs in. They can be locked by anyone, and unlocked by anyone who knows the administrator’s name and password. To unlock an option for editing, click on the locked lock icon, and enter an administrator’s login ID and password when prompted. To lock a panel, simply click on the unlocked lock icon. The following sections review options in the System Preferences application with security implications and indicate recommended settings. Options within System Preferences that are not relevant to system security are not addressed. Options with security implications that are relevant to user accounts are addressed in Chapter 5. Desktop and Screen Saver The Desktop and Screen Saver option is found in the Personal row in System Preferences. The screen saver should be automatically activated when the computer has been idle for a specified amount of time. When used in conjunction with requiring a password to wake the machine from sleep or the screen saver, this will help prevent an unattended system from being used by unauthorized users. Instructions for configuring the password requirement can be found later in this chapter, under the Other Security Settings section. The Desktop and Screen Saver option is not lockable and must be set separately for each user account. Even if the administrator sets a time to automatically activate the screen saver, the user will be able to change that value for his own account. The 23 UNCLASSIFIED Chapter 4 – Configuring System Settings UNCLASSIFIED system’s method of restricting a user from doing this places other serious restrictions on the account, such as losing the ability to change the login password, that make it impractical. Issues such as this should be addressed by user policy and made clear to all users of the system. This preference screen also allows configuration of the Hot Corner settings, which allow a user to enable certain features, such as the screen saver, by placing the cursor in a corner of the screen. To make locking the screen convenient, a Hot Corner to activate the screen saver should be set for each user. To configure the current account’s screen saver: 1. Start the System Preferences application. 2. Click on the Desktop & Screen Saver icon in the Personal row. 3. Click on the Screen Saver button (Figure 3). Figure 3: Screen Saver Options Panel 4. Use the slider in the panel to set the Start screen saver time to 5 minutes, or whatever is dictated by site policy. 5. Click on the Hot Corners button at the bottom left of the Desktop & Screen Saver panel. 6. Choose which corner is to be used as the hot corner for starting the screen saver (Figure 4). 24 UNCLASSIFIED UNCLASSIFIED Chapter 4Configuring System Settings Figure 4: Active Screen Corners Panel 7. Use the pull-down menu corresponding to the corner chosen as the screen saver hot corner, and select Start Screen Saver in the menu. 8. Click the OK button. Security Settings The Security option is found in the Personal row in System Preferences. Unlike most panels, the Security panel’s lock only applies to part of the panel, the bottom section for All Accounts on this Computer. The other settings in the panel are not affected by the lock and apply only to the account currretly logged in. Turning on encryption for the user’s directory (FileVault), however, requires an administrator ID and password. This means FileVault must be set up by an administrator while logged into the user account. Configuring FileVault for individual users is addressed in the section on configuring user accounts in Chapter 5. FileVault Mac OS X’s FileVault feature for encrypting home folders is strongly recommended for systems whose physical security cannot always be guaranteed, such as portables like the iBook and PowerBook. FileVault encryption should be enabled for the system and for all user accounts. When FileVault is enabled for a user account, files in the user’s home folder files are encrypted, and thereby protected from casual viewing if the system is compromised. However, FileVault may adversely affect disk-intensive tasks such as video editing. If delays in disk-intensive tasks interfere with operational needs, use of FileVault may not be practical. FileVault cannot guarantee the confidentiality of a file that existed before FileVault was activated because the file itself or an application’s working copy of the file may have been deleted. Deleted data still exist on the drive, unless removed with the Secure Empty Trash feature, which applications do not typically use. Consider files protected by FileVault only if they have been received or created after FileVault was activated. Running a commercial tool to sanitize all unused space on the drive (where deleted files may exist) is another means of addressing the problem of unencrypted data that users wish protected by FileVault. UNCLASSIFIED 25 UNCLASSIFIED Chapter 4 – Configuring System Settings Some users reported data loss under certain circumstances when using Mac OS X version 10.3. The 10.3.1 update addresses these problems. The use of FileVault is only recommended in version 10.3.1 or later of Mac OS X. FileVault is not used to protect files transmitted over the network or saved to removable media. Mac OS X provides methods for encrypting files in these situations, described in Appendix A. A master password must be set before FileVault can be activated for any user accounts. This master password can decrypt any home folder on the system, which would be necessary if a user forgets his password. The password should be written down, sealed in an envelope, and stored in a physically secure location, such as a safe. The master password should not match the administrator’s password. However, it should at least meet the selection and changing guidelines for an administrator password. The master password should be long (greater than 12 characters, and up to 255 characters long) and contain special characters, mixed case, and numbers. Although there is no automatic facility for checking the strength of a FileVault password, the Keychain Access application can be used to perform this sort of checking. Refer to the keychain section of this guide, found in Chapter 5, for further instructions. A strong password is vital to making FileVault a useful security measure! If the master FileVault password is lost, there will be no way to recover a user’s data if that user also loses his password. If this data loss risk outweighs the security benefits of using FileVault, FileVault should NOT be enabled. More information on FileVault can be found in Mac Help, available from the Finder’s Help menu. The topics “About FileVault,” “Encrypting your home folder,” and “Turning off FileVault” explain how to use FileVault and are the basis for the instructions below. FileVault must be enabled for a user from that user’s account by someone with administrative access. FileVault deactivation must also be performed by an administrator while logged into the user’s account. 26 UNCLASSIFIED UNCLASSIFIED To set the FileVault master password: Chapter 4Configuring System Settings 1. Click on the Show All icon in System Preferences, or restart System Preferences if necessary. 2. Select Security from the personal preferences row. 3. Unlock the window for editing, if necessary. 4. Select the Set Master Password button (Figure 5). Figure 5: FileVault Panel 5. Enter the master password for the system in the Master Password field, and again in the Verify field. Do not enter anything into the hint field. The hint information could be used to compromise the account. 6. Select the OK button to return to the FileVault screen. UNCLASSIFIED 27 UNCLASSIFIED Chapter 4 – Configuring System Settings At this point, FileVault may now be activated for any user or administrative account. Enabling FileVault for individual users is addressed in Chapter 5. To enable FileVault for the current administrative account: 1. Click Turn on FileVault. A window will open asking for the user’s password. Since this is the administrator’s account, this password will be the administrator’s password. 2. Read the warning message that appears. To continue, click Turn on FileVault in the dialog, or click Cancel to stop. It is recommended that FileVault be enabled at this time; however, realize that this may take a while, depending on how much space is currently being used in the administrator’s account, since everything currently in the account will now have to be encrypted. Also, the system will require all users to log out during the conversion process, except the user for whom FileVault is being enabled. 3. Before beginning the conversion process, the system will log the user out of the system. Once the machine is done encrypting the user’s home folder, log back into the administrator’s account to continue configuring the machine. Additional Security Settings The first setting in the bottom section of the Security panel, “Require password to wake this computer from sleep or screen saver,” affects only the account currently logged in, and can be changed by any user for his own account. The remaining settings in that section of the panel affect all user accounts on the computer. These settings should be configured as follows: 1. Click on the Show All icon in System Preferences, or restart System Preferences if necessary. 2. Click the Security icon located on the Personal row (Figure 6). 28 UNCLASSIFIED UNCLASSIFIED Chapter 4Configuring System Settings Figure 6: Security Panel Additional Settings 3. Place a check in the box for Require password to wake this computer from sleep or screen saver. Note that the lock icon has no effect on this particular option. This means that any user may disable this capability for his own account, even if the administrator has enabled it. 4. Unlock the window for editing if necessary. 5. Place a check in the box for Disable automatic login to ensure that anyone using the machine must first enter a valid user ID and password. 6. Place a check in the box for Require password to unlock each secure system preference. 7. The Log out after x minutes of inactivity box should be unchecked for three reasons. First, automatically logging out a user can become extremely annoying to the user. Second, it can cause operational difficulties if a user runs processes that may be killed by the automatic logout process. Third, the automatic logout process can sometimes fail to complete without intervention, leaving the user with a false sense of security. If a program is hung or cannot quit properly, the logout process may be blocked from completing. For example, if an unsaved document is open in Microsoft Word, the automatic logout process will 29 UNCLASSIFIED UNCLASSIFIED Chapter 4 – Configuring System Settings not complete until the user makes a decision about whether to save the file. Automatically activating the screen saver after a certain period of inactivity is preferred, even though the user can disable it. Administrators should periodically verify that users have not disabled the capability. 8. Click the unlocked lock icon at the bottom of the window. Bluetooth The Bluetooth panel in the System Preferences program facilitates configuration of Bluetooth, the standard used in Mac OS X to allow wireless devices, such as wireless keyboards, wireless mice, and cellular phones to communicate with the machine. This panel will not appear on machines not equipped with Bluetooth. If this icon does not appear in the System Preferences panel of the machine being configured, skip the Bluetooth settings section, and move on to the next section. Bluetooth should not be used. Though System Preferences may be used to disable Bluetooth, there are a few notes about the management of Bluetooth in Mac OS X: • This panel only disables Bluetooth for the currently logged in user. An administrator will need to log on as each user and disable Bluetooth for that account. • Even if an administrator does ensure that Bluetooth has been disabled for every user, a user will be able to go back and re-enable the capability at any time, unless the user’s accounts have been severely limited. If the account is limited to the point where the user will not be able to change settings such as Bluetooth and the screen saver, he will also be unable to do more important things, such as change his own password. Limitations of user accounts such as this will be discussed in further detail in Chapter 5. • Bluetooth, IR ports, CD writers, and any other hardware capability that could be dangerous in a secure environment should be physically disabled if possible; however, disabling or modifying the hardware will likely void the warranty on the machine if it is not performed by an Apple Certified Technician. For information on becoming an Apple Certified Technician, send a request for information to the Apple Federal e-mail address: [email protected]. Settings for Bluetooth should be configured in System Preferences as given below. Additional steps for disabling Bluetooth are presented in a later section of this chapter on disabling hardware. To disable Bluetooth for the administrator’s account using this panel: 30 UNCLASSIFIED UNCLASSIFIED 2. Click on the Bluetooth icon in the Hardware row of options. If there is no Bluetooth icon, Bluetooth capability is not installed on the machine. In this case, skip to the next section. 3. Click the Turn Bluetooth Off button (Figure 7). Figure 7: Bluetooth Configuration Panel CDs & DVDs The system should not perform an automatic action when a CD or a DVD is inserted. As with Bluetooth, this is an option that is set for the current user only, must be set for each user account, and can be changed by a user without administrative privileges. To prevent automatic actions when a disk is inserted (for the currently logged in account): 1. Click on the Show All icon in System Preferences, or restart System Preferences if necessary. 2. Click on the CDs & DVDs icon in the Hardware row of options (Figure 8.) UNCLASSIFIED 31 Chapter 4Configuring System Settings 1. Click on the Show All icon in System Preferences, or restart System Preferences if necessary. Chapter 4 – Configuring System Settings UNCLASSIFIED Figure 8: CDs & DVDs Panel 3. Pull down and select Ignore for the When you insert a music CD option. 4. Pull down and select Ignore for the When you insert a picture CD option. 5. Pull down and select Ignore for the When you insert a video DVD option. Energy Saver The Energy Saver panel allows an administrator to configure the computer to sleep after a period of inactivity. This can be used in conjunction with requiring a user to enter a password to wake the computer from sleep in order to make the machine more secure. These settings should be configured as follows: 1. Click on the Show All icon in System Preferences, or restart System Preferences if necessary. 2. Click on the Energy Saver icon to bring up the Energy Saver preferences panel. 3. If a Sleep button is not visible, click the Show Details button. Select the Sleep panel of the Energy Saver option by clicking on the Sleep button (Figure 9). 32 UNCLASSIFIED UNCLASSIFIED Chapter 4Configuring System Settings Figure 9: Energy Saver Sleep Panel 4. Unlock the window for editing if necessary. 5. Set the Put the computer to sleep when it is inactive for: slider to 15 minutes or whatever value is indicated by site policy. 6. All other options in this panel can be left at the default value, or changed to personal preference or to meet site policy guidelines. 7. Click on the Options button in the Energy Saver panel (Figure 10). UNCLASSIFIED 33 Chapter 4 – Configuring System Settings UNCLASSIFIED Figure 10: Energy Saver Options Panel 8. Uncheck the checkbox in front of the Wake when the modem detects a ring option to disable it. 9. Uncheck the checkbox in front of the Wake for Ethernet network administrator access option to disable it. 10. Uncheck the checkbox in front of the Restart automatically after a power failure option to disable it. 11. Click on the unlocked lock icon at the bottom of the panel to re-lock the panel. Sound The microphone setting in the Sound panel may carry security implications. This is especially important as an internal microphone is standard on many Macintosh computers. If the machine also has a Line In jack, then it will be possible to disable the microphone in this panel as described below: 1. Click on the Show All icon in System Preferences, or restart System Preferences if necessary. 2. Click on the Sound icon in the Hardware row in the System Preferences panel. 3. Click on the Input button on the Sound option panel. 34 UNCLASSIFIED UNCLASSIFIED 4. Click on the Internal Microphone selection (if available) and set the input volume slider bar to the minimal level. Chapter 4Configuring System Settings 5. Click on the Line In selection in the Choose a device for sound input box to select that as the default input for sound (if available). This will effectively disable the internal microphone (Figure 11). Figure 11: Sound Panel Line In Setting 6. Set the Input volume slider bar for the Line In selection (if available) to the minimal level. 7. Use a dummy plug (a plug with no wires, not connected to any other devices) to plug the Line In jack on the machine. If there is no Line In jack, then the only setting available under the Choose a device for sound input box will be the internal microphone (if there is one), and there will be no way to remove that option. In a system with an internal microphone and no Line In jack, the internal microphone will be selected by default. If this is the case, the slider bar for the internal microphone input volume should be set to the lowest possible level (Figure 11). In either case, it is recommended that the internal microphone be physically disabled. As explained in the section on Bluetooth above, disabling or modifying the hardware will likely void the warranty on the machine if not performed by an Apple Certified Technician. For information on becoming an Apple Certified Technician, UNCLASSIFIED 35 UNCLASSIFIED Chapter 4 – Configuring System Settings send a request for information to the Apple Federal e-mail address: [email protected] Additional instructions for disabling the microphone appear in a later section of this chapter. Network AirPort and Bluetooth wireless connectivity options should be turned off. They will only be present in the panel if supporting hardware is installed on the system. To configure the network settings: 1. Click on the Show All icon in System Preferences, or restart System Preferences if necessary. 2. Click on the Network icon in the Internet & Network row. 3. Unlock the window for editing if necessary. 4. Pull down the Show menu and select Network Port Configurations (Figure 12). Figure 12: Network Port Configurations Panel 5. If present, make sure the AirPort and Bluetooth boxes in the Port Configurations list are unchecked. Also, uncheck the Internal Modem box if present and the modem is not operationally required. 36 UNCLASSIFIED UNCLASSIFIED 6. Pull down the Location menu and repeat step 5 for any other locations in the menu. 8. Click the unlocked lock icon at the bottom of the panel to re-enable the lock on the System Preferences panel. Anytime a new location is added to the configuration, AirPort, Bluetooth, and Internal Modem should be disabled as described here. Again, all wireless capability, such as AirPort and Bluetooth, should be physically disabled in secure environments. Disabling or modifying the hardware will likely void the warranty on the machine if not performed by an Apple Certified Technician. Further instructions for disabling capabilities such as Airport and Bluetooth will be given in a later section of this chapter. Sharing The Mac OS X default installation has all services switched off, and services should remain disabled unless operationally required. If these services are enabled, they may provide a means for an unauthorized user to access the machine remotely. The services available in this panel are: • Personal File Sharing: Enabling this option gives users of other computers access to each user’s Public folder. • Windows Sharing: Enabling this option allows users to access shared files and printers using the SMB/CIFS protocol. This option should not be used. There are well-known risks associated with SMB/CIFS. • Personal Web Sharing: This service allows any user on the network to view web sites located in the Sites folders on the machine. If this service is operationally required, the administrator must be familiar with securely configuring the Apache web server. • Remote Login: This service allows users to access the machine remotely using SSH. If a remote login capability is required, using SSH is still preferable to telnet. • FTP Access: This service allows users on other computers to access the computer via the File Transfer Protocol. FTP transmits passwords in the clear. Also, if SSH is enabled on the system, encrypted methods of transmitting files, such as scp or sftp, are available, and should be used instead. • Apple Remote Desktop: This allows the machine to be managed via the Remote Desktop program. As networked management is out of scope for UNCLASSIFIED 37 Chapter 4Configuring System Settings 7. Click the Apply Now button. UNCLASSIFIED Chapter 4 – Configuring System Settings this guide, there is no need for this capability when configuring according to this guide. This capability should remain disabled. • Remote Apple Events: This service enables the machine to respond to Apple events from other computers, which may carry security implications. Configuring this capability is out of scope for this guide and it should remain disabled. • Printer Sharing: If enabled, users on other computers will be able to access a printer connected to this machine. As this guide is addressing a machine in a standalone capacity, this capability is not needed and should remain disabled. Also, the name of the machine should be changed. During installation, Mac OS X gives the computer a name derived from the first account created on the system, in the form of “Account Name's Computer”. This is undesirable because the machine name appears in the login window and is often transmitted over the network. The computer name should be changed to something unrelated to any accounts on the system before connecting to the network. Confirm configuration of the Services options and change the machine name as follows: 1. Click on the Show All icon in System Preferences, or restart System Preferences if necessary. 2. Click on the Sharing icon in the Internet & Network row. 3. Click on the Services button in the Sharing panel (Figure 13). 38 UNCLASSIFIED UNCLASSIFIED Chapter 4Configuring System Settings Figure 13: Sharing Services Configuration Panel 4. Unlock the window for editing if necessary. 5. Make sure all checkboxes are unchecked. These services are all disabled by default, and unless there is a specific operational need for a service, it should remain disabled. If a service is enabled because of operational requirement, the risks incurred by opening that service should be considered. Also, note that when setting up the built-in firewall in the next section, it is expected that all services are off in order to correctly enable the firewall, and any services enabled here will also have to be allowed through the firewall. 6. Replace the entry in the Computer Name box at the top of the screen with a new name for the system. The name should be unrelated to any account names on the system. Mac OS X includes basic firewall filtering. This firewall prevents incoming network connections to certain ports; it does not restrict outgoing transmissions by default. The firewall can be configured in two ways: by using the System Preferences program, or by using the ipfw command in a terminal window. A limited subset of possible configurations can be managed through the System Preferences UNCLASSIFIED 39 UNCLASSIFIED Chapter 4 – Configuring System Settings application. Only the settings that are handled within the System Preferences program are addressed here. The Firewall panel in the System Preferences application does not allow the administrator to manage protocols other than incoming TCP. If managing UDP or other protocols is necessary, either ipfw (provided with Mac OS X) or a thirdparty tool should be used to configure the firewall. Only TCP ports are managed through the Firewall panel. If only the Firewall panel is used to manage the firewall, UDP packets will not be filtered. To start the firewall: 1. Click on the Firewall button in the Sharing panel (Figure 14). Figure 14: Firewall Configuration Panel 2. Make sure all checkboxes are unchecked in the list in the Allow panel. If any services were enabled in the previous section, they will be marked as allowed here. If these services are to be 40 UNCLASSIFIED UNCLASSIFIED left enabled, you will need to allow them through the firewall here. The rationale for whether the ports should be opened for incoming access is the same as given above for Services. There are two ports that may be included in this list that do not appear as services in the Services panel. These ports are “iChat: (5297, 5298)” and “iTunes Music Sharing (3689).” These ports should not be necessary in a normal operational environment. For a complete list of ports used by Apple Software and Services, see: “Well Known TCP and UDP Ports Used by Apple Software Products” (http://docs.info.apple.com/article.html?artnum=106439) or the Mac OS X Server manuals (http://www.apple.com/server/documentation/). The firewall should always be enabled, and incoming ports should be enabled only if absolutely necessary based on operational requirements. The entire firewall should never be disabled to allow for use of only specific ports. The Internet section of the Sharing panel is used to allow multiple machines to share a single Internet connection. Use of this option is out of scope for this guidance. Internet sharing is disabled by default, and it should not be enabled. To ensure it is disabled: 1. Click on the Internet button on the Sharing panel (Figure 15). UNCLASSIFIED 41 Chapter 4Configuring System Settings 3. Click the Start button to turn on the firewall. The button’s label should change to Stop, and the text above the button should state Firewall On. Chapter 4 – Configuring System Settings UNCLASSIFIED Figure 15: Internet Sharing Configuration Panel 2. The words “Internet Sharing Off” should be in the window. If not, click on the Stop button to disable Internet sharing. 3. Click on the unlocked lock icon at the bottom of the panel to re-lock the window. Accounts The Accounts option in System Preferences allows administrators to create and configure user accounts. Any changes made to accounts using the System Preferences application are also made to the local NetInfo database, where all account information is stored. This section only addresses account settings that affect all accounts. Settings that must be set individually for each specific account are discussed in Chapter 5. To edit Accounts settings: 1. Click on the Show All icon in System Preferences, or restart System Preferences if necessary. 2. Click on the Accounts icon in the System row. 3. Click on the lock icon at the bottom of the window and enter the administrator’s password when prompted to open the window to changes. 42 UNCLASSIFIED UNCLASSIFIED 4. Click on the Login Options button near the bottom left side of the panel (Figure 16) to display general settings affecting all accounts. Chapter 4Configuring System Settings Figure 16: Account Login Options 5. Select Name and password as the setting for Display Login Window as:. This causes the machine to require both a user name and a password to be entered for login. If the List of users option is set, the system will provide a list of all valid user accounts. Such information should never be automatically displayed. 6. Uncheck the box for Automatically log in as: if it is checked. If this box is checked, no login is required for the machine; the user selected in this option is always automatically logged in. A user should always be required to authenticate to gain access to the system. 7. Place a check in the Hide the Sleep, Restart, and Shut Down buttons checkbox to prevent a user from attempting to reboot the machine into single user mode without first logging into a valid account. This will not prevent a user from pulling the power cable to abruptly shut down the computer, unless the power cable is inaccessible to the user. Further protection for this problem will be discussed later in this chapter. 8. Uncheck the box for Enable fast user switching to disable it. Immediately after installation, the system automatically logs into the initial administrator’s account. The password for that account has been stored in UNCLASSIFIED 43 UNCLASSIFIED Chapter 4 – Configuring System Settings unencrypted form on the system. The password for this account should be changed as follows: 1. Click on the currently logged in account, shown in the left column of the Accounts panel (Figure 16). 2. Type the new password into both the Password and Verify boxes. It is very important to choose a good password as described previously. 3. Click on the unlocked lock icon to re-lock the Accounts preferences panel. Date and Time The date and time settings can only be changed by the administrator, and there may be security issues associated with having an incorrect date or time on a system. To configure these settings: 1. Click on the Show All icon in System Preferences, or restart System Preferences if necessary. 2. Click on the Date & Time icon in the System row. 3. Unlock the window for editing if necessary. 4. Click on the Date & Time button at the top of this panel (Figure 17). Figure 17: Date and Time Options Panel 5. The checkbox for Set Date & Time automatically should be unchecked. This setting controls the network time protocol (NTP) background process, 44 UNCLASSIFIED UNCLASSIFIED 6. Set the date and time for the machine. 7. Click the Save button. 8. Click the Time Zone button at the top of the panel and select the appropriate time zone. 9. Click on the unlocked lock icon at the bottom of the panel to re-lock the window. Software Update Software updates should not be performed automatically. If the box in front of Check for updates: has been checked, the system automatically checks the Apple site for updates. A dialog box notifies the user of any new updates available, and allows the user to select the updates to be downloaded. Authentication by a system administrator is required before any updates are downloaded and installed. Since all downloads should be conducted on a machine other than the one being configured, the Check for updates: and Download important updates in the background: features should be disabled as follows: 1. Click on the Show All icon in System Preferences, or restart System Preferences if necessary. 2. Click on the Software Update icon in the System row (Figure 18). Figure 18: Software Update Configuration Panel UNCLASSIFIED 45 Chapter 4Configuring System Settings which can automatically update the system’s date and time by communicating with a server. If operational necessity requires the use of NTP, then place a check in the checkbox and enter a trusted NTP server in the text field. UNCLASSIFIED Chapter 4 – Configuring System Settings 3. If necessary, uncheck the checkbox in front of Check for updates: to disable the capability. 4. Exit the System Preferences application. User policy should state that this capability is to remain disabled. If a user reenables this capability, risk is minimal because administrator authentication is still required for download and installation. Setting the Global umask The umask setting determines the permissions of new files and folders created by a user. The default umask setting, 022, removes group and world write permissions. With a umask setting of 027, files and folders created by a user will not be readable by every other user on the system but will still be readable by members of his assigned group. The owner of the file or folder can still make it accessible to others by changing the permissions in the Finder’s Get Info window or by using the chmod command. The NSUmask setting for all users can be set to 027 (decimal equivalent 23) by issuing the following command in a Terminal window: sudo defaults write /Library/Preferences/.GlobalPreferences NSUmask 23 Note that the path above refers to the domain .GlobalPreferences, not to the file .GlobalPreferences.plist, which might accidentally be filled in while using the shell autocomplete feature. This command will affect the permissions on files and folders created by programs that respect the Mac OS X NSUmask settings. Programs should follow the value set for NSUmask, but there is no guarantee that they will. Also, users can override their own NSUmask setting at any time. The changes to the umask settings take effect at next login. Securing Initial System Accounts Two accounts on the system require attention before adding and configuring user accounts. First, the permissions on the home folder of the initial administrator account should be changed. Second, any necessary modifications to the root account should be performed. 46 UNCLASSIFIED UNCLASSIFIED Restricting Administrator’s Home Folder Permissions sudo chmod 700 /Users/<adminname> Securing the Root Account Like other UNIX-based systems, Mac OS X includes a root account that can perform any action on the system. Administration on most UNIX-based systems is performed through the root account and sometimes multiple administrators share access to the root account, which can make it impossible to distinguish the actions of one administrator from another in the audit logs. Mac OS X installs with the root account disabled, preventing direct root login, and it is strongly recommended that the root account remain disabled. Administrative accounts offer additional mechanisms that force authentication before performing critical functions. The root account does not support such mechanisms. If root logins are used to perform administration, then it will be impossible to log individual administrator actions. This configuration guide has only been verified on version 10.3.x of the operating system. Other versions of the system may behave differently. Incorrectly carrying out these procedures may cause the system to become inaccessible, or corrupt the system to the point where a complete reload of the system would be necessary, it is imperative that the administrator perform the procedures exactly as described, and only on the version of the operating system covered by this guidance. If the root account has been enabled, it should now be disabled using the following procedure. There are multiple methods of enabling root access, and this procedure is designed to disable the root account regardless of the method used to enable it. To perform this procedure: 1. Log into an administrator account and start the NetInfo Manager application found in /Applications/Utilities. 2. Click on the users item located in the second column at the top of the NetInfo Manager panel. This will open the list of users in the third column. UNCLASSIFIED 47 Chapter 4Configuring System Settings When FileVault is not enabled, the permissions on the home folder of the just-created administrator account allow any user to browse its contents. To change the permissions on the administrator’s home folder, issue the following command in a Terminal window, where <adminname> is the name of the account. The 700 permission setting allows only the administrator to read and browse files in his home folder. UNCLASSIFIED Chapter 4 – Configuring System Settings 3. Click on the root item in the users column. The root user’s properties and any associated values will appear in the bottom panel of the window (Figure 19). Figure 19: NetInfo Manager 4. Click on the lock in the lower left corner of the NetInfo Manager window. Type an administrator's short name and password into the authentication dialog that appears and click the OK button. 5. If the property authentication_authority is listed in the bottom list in the window, click on it to highlight that property. 6. Go to the top of the NetInfo Manager window and click the Delete icon to remove that property and value. 7. Double click on the value associated with the passwd property located in that bottom property list, and the value should become highlighted for editing. This value will be a single asterisk if the root password has never been set, and either a string of asterisks or a password hash if a password has been set for root. (Which of these appear as the value for passwd depends upon how the root account was enabled.) 8. Type a single asterisk (“*”), replacing the current value of the passwd property. 48 UNCLASSIFIED UNCLASSIFIED 9. Click the lock icon in the lower left corner of the NetInfo Manager window to re-lock the window. 11. Quit the NetInfo Manager application. Root login is now disabled. Using sudo The sudo program allows an administrator to perform command line functions that require root privileges. To use sudo, bring up a Terminal window and type sudo followed by the command to be performed with root privileges. For more detailed information on sudo, enter man sudo in a Terminal window to display its manual pages. The system uses a file called /etc/sudoers to determine which users have the authority to use the sudo program. This file initially contains the root account and all administrative accounts. The format for entries to this file can be found by entering man sudoers in a Terminal window; editing this file correctly can be a complex process. All administrative functions can be performed from an administrator account, using sudo when necessary. None of the administrative functions performed through the graphical interface require root privileges, but some command-line administrative procedures must be performed as root. Securing Single-User Boot On Apple systems running Mac OS X, Open Firmware is the software executed immediately after the computer is powered on. This boot firmware is analogous to the BIOS on an x86-based PC. To prevent users from obtaining root access by booting into single user mode or booting from alternate disks, the Open Firmware settings should be altered. For desktop systems, the Open Firmware security mode should be set to command. To configure the Open Firmware settings: 1. Boot the machine while holding command-option-O-F (all four keys at the same time) to enter the Open Firmware command prompt. 2. At the prompt, enter the command: password A prompt will appear requesting a new password. 3. Enter and verify the password to be used as the Open Firmware password. This password is limited to eight characters. A strong password should be chosen; in this instance, a machine-generated random password would be a good choice. This password should be written down, and secured in the same location as the Master FileVault password. This password will not be needed except for situations where the system must be booted from an alternate disk, such as if the boot disk fails or its filesystem is in need of repair. UNCLASSIFIED 49 Chapter 4Configuring System Settings 10. When the Confirm Modification dialog box appears, select Update this copy. UNCLASSIFIED Chapter 4 – Configuring System Settings 4. At the next prompt, enter: setenv security-mode command 5. To restart the computer and enable the settings, enter the command: reset-all 6. The system should reboot into the Mac OS X Login Window. In command mode, the system will boot from the boot device specified in the system’s boot device variable and disallow users from providing any boot arguments. To test that the system has been put into command mode as recommended: 1. Close all applications and choose Restart from the Apple menu. 2. A confirmation window will pop up. Continue restarting the machine by selecting the Restart button. 3. Hold down the key combination command-S while the machine boots. 4. If command mode has been set correctly, the machine will continue booting into the Mac OS X Login Window. Normally, holding down the command-S key combination during a reboot would cause the machine to reboot into single-user mode. 5. If the system did reboot into single-user mode, restart the system by issuing the command reboot. Then repeat the previous steps for putting the system into command mode. Open Firmware protection can be violated if the user has physical access to the machine. Open Firmware password protection can be bypassed if the user changes the physical memory configuration of the machine and then resets the PRAM 3 times (holding down command-option-P-R during boot). An Open Firmware password will provide some protection, however, it can be reset if a user has physical access to the machine and can change the physical memory configuration of the machine. The following Apple Knowledge Base articles discuss the Open Firmware password: 1) Title: Setting up Open Firmware Password protection in Mac OS X 10.1 or later; Article ID: 106482; URL: http://docs.info.apple.com/article.html?artnum=106482 50 UNCLASSIFIED UNCLASSIFIED 2) Even if a single-user mode boot is successfully initiated by changing the Open Firmware settings, the system can still prevent automatic root login. To require entry of a root password during a single-user mode boot, the console and ttys must be marked as insecure in /etc/ttys. In fact, the system will require entry of a special root password, stored in /etc/master.passwd. If this remains unset as recommended, then it will be impossible for a user to enter the root password and complete the single-user boot, even if the Open Firmware password protection was bypassed. To perform this configuration: 1. Log in as an administrator. 2. Start the Terminal application, located in /Applications/Utilities. 3. At the prompt, issue the command: cd /etc 4. To create a backup copy of /etc/ttys, issue the command: sudo cp ttys ttys.old 5. To edit the ttys file as root, issue the command: sudo pico ttys 6. Replace occurrences of the word “secure” with the word “insecure” in the configuration lines of the file. Any line that does not begin with a “#” is a configuration line. 7. Exit, saving changes. Only if the ability to boot into single-user mode is operationally required should a password be provided for the root account in /etc/master.passwd. To provide this password: 1. Log in as an administrator. 2. Start the Terminal application, located in /Applications/Utilities. 3. At the prompt, issue the command: cd /etc 4. To edit the master password file, issue the command: sudo pico master.passwd 5. Within the editor, delete the asterisk following the word “root”. UNCLASSIFIED 51 Chapter 4Configuring System Settings Title: Open Firmware: Password Not Recognized when it Contains the Letter “U”; Article ID: 107666; URL: http://docs.info.apple.com/article.html?artnum=107666 Chapter 4 – Configuring System Settings UNCLASSIFIED 6. Open a new terminal window and issue the following command, replacing <xx> with two random characters and <password> with an appropriate 8-character password: openssl passwd -salt <xx> <password> A hash of the password will be displayed after executing the command. 7. Type or paste the password hash where the asterisk was deleted in step 10. 8. Exit, saving changes. Logon Warning Banners A logon banner can be used to provide notice of the system’s ownership, warn away unauthorized users, and remind authorized users of their consent to monitoring. The text displayed in the logon banner should be determined by site policy. Warning banners should be displayed on all systems. Banners should be provided to users logging onto the system locally, and also to any users logging into services remotely. To provide a logon warning banner to local (GUI) users: 1. Edit the file /Library/Preferences/com.apple.loginwindow.plist as an administrator. To do this, start the Terminal application, found in /Applications/Utilities, and enter the following command (the entire command is entered on a single line): sudo pico /Library/Preferences/com.apple.loginwindow.plist 2. Immeditately after the <dict> tag, add new lines with a <key> and <string> entry, as show below in bold. The new <key> tag must contain LoginwindowText, but the new <string> can contain whatever warning banner has been indicated by site policy. <?xml version="1.0" encoding="UTF-8"?> <!DOCTYPE plist PUBLIC "-//Apple Computer//DTD PLIST 1.0//EN" "http://www.apple.com/DTDs/PropertyList1.0.dtd"> <plist version="1.0"> <dict> <key>LoginwindowText</key> 52 UNCLASSIFIED UNCLASSIFIED </string> <key>MasterPasswordHint</key> <string></string> . . . 3. Exit, saving changes. The warning banner should appear for the next person logging into the GUI. To provide a logon warning banner to users logging into remote services on the system: 1. Edit the file /etc/motd as an administrator with the following command in a Terminal window: sudo pico /etc/motd 2. Enter the warning banner that has been approved. 3. Exit, saving changes. The warning banner should appear for the next person logging into a remote service. Auditing and Log File Configuration Apple includes a graphical program, Console, to view and maintain log files. Console is found in the /Applications/Utilities folder. Upon starting, the console window shows the console.log file (Figure 20). Clicking on the Logs icon at the top left of the window displays a sidebar that shows other log files on the system in a tree view. The tree may include directories for services that are installed but not running on a typical Mac OS X system (e.g. http, ftp). UNCLASSIFIED 53 Chapter 4Configuring System Settings <string>THIS IS A DEPARTMENT OF DEFENSE COMPUTER SYSTEM. USE OF THE SYSTEM IMPLIES CONSENT TO MONITORING. ANY UNAUTHORIZED USE OF THE SYSTEM WILL BE PROSECUTED. Chapter 4 – Configuring System Settings UNCLASSIFIED Figure 20: Console Log In Mac OS X, log files are handled by either the BSD subsystem or a specific application. The BSD subsystem handles most of the important system logging, while applications such as the Apache web server handle their own logging. Like other BSD systems, Mac OS X uses a background process called syslogd to handle logging. A primary decision to make when configuring syslogd is whether to use remote logging. In local logging, log messages are stored on the hard disk. In remote logging, log messages are transferred over the network to a dedicated log server which stores them. Using remote logging is recommended in addition to local logging when possible. Configuring syslogd The configuration file for the system logging process, syslogd, is /etc/syslog.conf. A manual for configuration of this file is available by issuing the command man syslog.conf in a Terminal window. Each line within /etc/syslog.conf consists of text containing three types of data: a facility, a priority, and an action. Facilities are categories of log messages. The standard facilities include mail, news, user, and kern (kernel). Priorities deal with the urgency of the message. In order from least to most critical, they are: debug, info, notice, warning, err, crit, alert, and emerg. The priority of the log message is set by the application sending it, not syslogd. Finally, the action specifies what to do with a log message of a specific facility and priority. Messages can be sent to files, named pipes, devices, or to a remote host. The following example line specifies that for any log messages in the category “mail”, with a priority of “emerg” or higher, the message will be written to the /var/log/mail.log file: 54 UNCLASSIFIED UNCLASSIFIED mail.emerg /var/log/mail.log *.* /var/log/all.log Local Logging The default configuration in /etc/syslog.conf is already appropriate for the typical Mac OS X system when a remote log server is not available. The system is set to rotate log files using a cron job at the time intervals specified in the file /etc/crontab. Rotation entails compressing the current log file, incrementing the integer in the filename of compressed log files, and creating a new log file for new messages (Table 2). Table 2: Log Files in /var/log Files before rotation: System.log mail.log Files after first rotation: system.log mail.log mail.log.1.gz system.log.1.gz Files after second rotation: system.log mail.log mail.log.1.gz system.log.1.gz mail.log.2.gz system.log.2.gz The log files are rotated by a cron job, and the rotation will only occur if the system is on when the job is scheduled. By default, the log rotation tasks are scheduled for very early in the morning (e.g. 4:30 A.M. on Saturday) in order to be as unobtrusive as possible. If the system will not be powered on at this time, adjust the settings in /etc/crontab. Details on editing the /etc/crontab file can be found by issuing the command man 5 crontab in a terminal window. For example, the following line shows the default for running the weekly log rotation script, which is configured for 4:15 AM on the last day of the week, Saturday (Sunday is 0). An asterisk denotes “any,” so a line of all asterisks would execute every minute. #Minute 15 DayOf Hour 4 Month * DayOf Month * Week 6 User root Command periodic weekly The following line would change the time to 12:15 PM on Tuesday, when the system is much more likely to be on: UNCLASSIFIED 55 Chapter 4Configuring System Settings The facility and priority are separated by only a period, and these are separated from the action by one or more tabs. Wildcards (“*”) may also be used in the configuration file. The following example line logs all messages of any facility or priority to the file /var/log/all.log: UNCLASSIFIED Chapter 4 – Configuring System Settings #Minute 15 DayOf Hour 12 Month * DayOf Month * Week 2 User root Command periodic weekly Remote Logging Using remote logging is recommended in addition to local logging because local logs can easily be altered if the system is compromised. However, remote logging is not always possible; a laptop, for example, may not always be connected to a network and therefore can only store logs locally. Several security issues must also be considered when making the decision to use remote logging. First, the syslog process sends log messages in the clear, which could expose sensitive information. Second, too many log messages will fill storage space on the logging system, rendering further logging impossible. Third, log files can indicate suspicious activity only if a baseline of normal activity has been established, and if they are regularly monitored for such activity. The following instructions assume a remote log server has been configured on the network. Although it is possible to configure a Mac OS X system as a remote log server, that topic is out of the scope of this guide. To enable remote logging for a client: 1. Start the Terminal application, in /Applications/Utilities. 2. To edit /etc/syslog.conf as root, issue the command: sudo pico /etc/syslog.conf 3. Add the following line to the top of the file, replacing your.log.server with the actual name or IP address of the log server. Make sure to keep all other lines intact: *.* @your.log.server 4. Exit, saving changes. 5. Send a hangup signal to syslogd to make it reload the configuration file: sudo killall –SIGHUP syslogd Disabling Hardware Components Hardware components such as wireless features and microphones should be physically disabled if possible. Only an Apple Certified Technician should physically disable these components, which may not be practical in all circumstances. The following instructions provide an alternative means of disabling these components by removing the associated kernel extensions. Removing the kernel extensions does 56 UNCLASSIFIED UNCLASSIFIED not permanently disable the components; however, administrative access is needed to re-load them and restore the capabilities. 1. Open the folder /System/Library/Extensions. 2. To remove AirPort support, drag the following files to the Trash: AppleAirPort.kext AppleAirPort2.kext AppleAirPortFW.kext 3. To remove support for Bluetooth, drag the following files to the Trash: IOBluetoothFamily.kext IOBluetoothHIDDriver.kext 4. To remove support for audio components such as the microphone, drag the following files to the Trash: AppleOnboardAudio.kext AppleUSBAudio.kext AudioDeviceTreeUpdater.kext IOAudioFamily.kext VirtualAudioDriver.kext 5. To remove support for the iSight camera, drag the following file to the Trash: Apple_iSight.kext 6. Open the folder /System/Library. 7. Drag the following files to the Trash: Extensions.kextcache Extensions.mkext 8. Choose Secure Empty Trash from the Finder menu to delete the file. 9. Reboot the system. Disabling Mac OS 9 The previous major version of the Macintosh operating system, Mac OS 9, does not have many of the security features built into Mac OS X. There are two ways of UNCLASSIFIED 57 Chapter 4Configuring System Settings Although disabling hardware in this manner is not as secure as disabling hardware physically, it is more secure than only disabling hardware through the System Preferences. This method of disabling hardware components may not be sufficient to meet site security policy. Consult operational policy to determine if this method is adequate. Chapter 4 – Configuring System Settings UNCLASSIFIED running Mac OS 9 applications: booting the system into Mac OS 9, and running an application in Classic Mode. This mode is an adaptation of Mac OS 9 that runs as an application on a system running Mac OS X. It is not recommended to boot into Mac OS 9 or to use Classic Mode. Mac OS 9 and any Mac OS 9 applications should be removed from the system. To do this, use the following instructions. Please note that great care must be taken in doing this; root access is required to do these steps, and incorrectly entering a folder name could result in removal of the Mac OS X operating system or all Mac OS X applications. Following the instructions below will disable Classic Mode and no users will be able to run Mac OS 9 applications. To remove Mac OS 9 and Mac OS 9 applications and files: 1. Log into the administrator’s account. 2. Start the Terminal application, found in /Applications/Utilities. 3. Type the following command to remove the Classic icon from the System Preferences panel: sudo rm –rf '/System/Library/PreferencePanes/Classic.prefPane' 4. Type the following commands to remove Classic files and directories if they are present on the system. Note that each command should be typed on a single line; they are split across lines here only for readability: 58 UNCLASSIFIED UNCLASSIFIED sudo rm –rf '/System/Library/Classic/' sudo rm –rf sudo rm –rf '/System/Library/UserTemplate/English.lproj/Desktop/ Desktop (Mac OS 9)' 5. Type the following commands to remove additional Mac OS 9 files and directories from the system if they exist: sudo rm –rf '/System Folder' sudo rm –rf '/Mac OS 9 Files/' Make sure the single quotes (apostrophes) are placed correctly here. If this command is typed incorrectly, it could result in removal of the folder named System, which will disable the machine and necessitate a re-installation of the system. 6. Type the following command to remove Mac OS 9 applications if they exist on the system: sudo rm –rf '/Applications (Mac OS 9)' Make sure this command is typed exactly as shown. If the single quotes are not placed correctly, the Applications folder could be deleted. 7. Restart the system. UNCLASSIFIED 59 Chapter 4Configuring System Settings '/System/Library/CoreServices/Classic Startup.app' Chapter 4 – Configuring System Settings UNCLASSIFIED This Page Intentionally Left Blank 60 UNCLASSIFIED UNCLASSIFIED Chapter 5 Once the first administrator account and the root account are securely configured, additional user accounts may be created. This chapter describes the process of creating and configuring new user accounts. Note that some of the instructions in this chapter are repeated from previous chapters. This is because the system should be completely secured before creating and securing individual user accounts. Some of the steps performed in securing the system must be repeated for each new user on the system. The steps are repeated in this chapter so the administrator will not have to skip through the guide to find the appropriate steps to perform. Guidelines for Creating Accounts Accounts should never be shared. Each user should have his own individual account, and each system administrator should have his own administrative account. Each administrator should also have a regular user account for normal activities, and should use his administrative account only for administrative activities. Reasons for these guidelines include: • Individual accounts are necessary to maintain accountability. System logs can track activities of each user account, but if an account is shared among several users it may be impossible to determine which user performed a certain activity. • If all administrators share a single administrative account, it may be impossible to determine which administrator performed a specific system change. • If a shared account is compromised, it will likely take longer to notice that compromise, if it is ever noticed. Each user sharing an account may mistake malicious actions as those of another legitimate user of the account. • Requiring administrators to have a personal account for individual use and an administrative account for administrative purposes reduces the risk of the administrator inadvertently making system configuration changes while performing normal non-administrative tasks. UNCLASSIFIED 61 Chapter 6 Future Guidance Configuring User Accounts UNCLASSIFIED Chapter 6 – Future Guidance Creating User Accounts The following instructions describe creation of a standard user account on the system. A standard user can perform all normal user functions, such as accessing his own files, configuring his environment (e.g. desktop, screensaver), and using applications. These steps may be used for creating all new accounts on the system. Later sections address granting administrative privileges to, or to limiting the capabilities of, that account. 1. Start the System Preferences program. 2. Click on the Accounts icon in the System row (Figure 21). Figure 21: Accounts Password Panel 3. Unlock the screen for changes, if necessary. 4. To create an additional user account, click on the plus (+) button below the Login Options button on the accounts screen. 5. Enter a name in the Name field and a user ID in the Short Name field. Choose a secure password for the user, and enter it into the Password and Verify fields. The administrator will need to know this password in later configuration steps. Once the account is completely configured, the password should be given to the user and he should change it at his first login. Site 62 UNCLASSIFIED UNCLASSIFIED policy should require a new user to change his password immediately upon first login. 6. Leave the Password Hint field blank. If a value is entered in this field, it will be given to anyone after 3 failed attempts to enter a password, making it easier to break into the account. 8. Make sure the Allow user to administer this computer checkbox is unchecked (Figure 22). A later section in this chapter addresses granting administrative privileges to a user, as well as the implications of granting those privileges. Although the option to turn on FileVault protection appears in this panel, it cannot be turned on for the user at this time. The user account must be logged in to enable FileVault protection. Activating FileVault is addressed later in this chapter. Figure 22 : Accounts Security Panel 9. Repeat above steps, beginning with step 4, to create additional accounts. 10. Once all accounts have been created, click the lock in the lower left corner of the screen to relock the panel. UNCLASSIFIED 63 Chapter 6 Future Guidance 7. Select the Security button. UNCLASSIFIED Chapter 6 – Future Guidance Granting Administrative Privileges An administrative user on the system can perform standard user-level tasks, as well as administrative-level activities such as: • Adding a user account • Changing the FileVault master password • Enabling or disabling sharing • Enabling, disabling, or changing firewall settings • Changing other protected areas within System Preferences • Installing system software Administrative privileges should only be granted to users who are responsible for system administration, and should be limited to the smallest number of administrators necessary. To grant a user account administrative privileges: 1. Click on the Show All icon in System Preferences, or restart System Preferences if necessary. 2. Click on the Accounts icon to bring up the Accounts panel. 3. Unlock the screen for changes, if necessary. 4. Find the user account to be given administrative privileges in the list on the left side of the window, and click on that user account. 5. Click on the Security button towards the top of the window. 6. Click to put a check in the box next to Allow user to administer this computer. 7. Repeat steps 4 – 6 for any other users that are to be given administrative privileges (Figure 23). 8. Click on the lock icon at the bottom of the screen to re-lock these preferences. 64 UNCLASSIFIED UNCLASSIFIED Chapter 6 Future Guidance Figure 23: Grant Administrative Privileges Limiting a User Account Two levels of limited user accounts are available: an account with configurable limits, and an account that is limited to a simple Finder. Managed User: Some Limits Within the Accounts System Preferences panel, the Limitations section allows the administrator to restrict a user’s access to programs and settings. Under Some Limits, the following can be configured for each user on the system: • Access to applications on the system • Access to the System Preferences panel • Ability to change the user account password • Ability to burn CDs and DVDs • Ability to modify the dock Account limitations can reduce access to advanced functionality for less knowledgeable users. If a user account is to be given limitations, the following configuration guidelines should be used: UNCLASSIFIED 65 UNCLASSIFIED 1. Click on the Show All icon in System Preferences, or restart System Preferences if necessary. 2. Click on the Accounts icon in the System row to bring up the accounts management panel. Chapter 6 – Future Guidance 3. Unlock the screen for changes, if necessary. 4. Find the user for which limitations are to be set in the list at the left side of the window. Click on that user account to highlight it and display its settings. 5. Click on the Limitations button in the window. Note that if the Limitations button is grayed out, this means that the Allow user to administer this computer checkbox in the Security settings panel for this account has been selected. This is normal, since it does not make sense to limit access to an administrative user. If the Limitations button is grayed out for this reason, click on the Security button, uncheck the Allow user to administer this computer checkbox, and click on the Limitations button again. 6. Click on the Some Limits button in the Limitations pane (Figure 24). Additional selections will then appear in that panel. Figure 24: Limitations Panel 7. Uncheck the Burn CDs and DVDs checkbox. 8. The Modify the Dock option may be enabled or disabled according to site policy. 9. Make sure that both the Open all System Preferences and the Change password checkboxes are checked to ensure the user has these capabilities. 66 UNCLASSIFIED UNCLASSIFIED 10. Check the box for This user can only use these applications. 11. Four categories appear under the Application column: Applications, Utilities, Applications (Mac OS 9), and Others. Expand these categories to list their contents. Uncheck the Allow box for any programs listed in Table 3. Access to any applications not appearing in this guide should be determined by site policy. The Applications (Mac OS 9) and Others options should be empty and require no action. Table 3 : Programs to Restrict for Managed User Applications Utilities Chess AirPort Admin Utility FAXstf AirPort Setup Assistant iChat IM Plugin Converter iDVD Audio MIDI Setup Internet Connect Bluetooth File Exchange Internet Explorer Bluetooth Serial Utility iSync Bluetooth Setup Assistant iTunes Console MSN Messenger Directory Access QuickTime Player EarthLink TotalAccess Uninstall TotalAccess iDiskUtility Installer NetInfo Manager Network Utility ODBC Administrator Software Restore Terminal X11 UNCLASSIFIED 67 Chapter 6 Future Guidance A user with this capability enabled will be able to configure security-related items within the System Preferences panel such as the timing for the screen saver and the timing for the machine to automatically go to sleep. This is an unfortunate side effect; this capability must be enabled to allow the user to change his password. Removing the ability of a user to change his own password is considered a security risk. UNCLASSIFIED 12. Click on the unlocked lock icon at the bottom of the panel to re-lock the preferences panel. Chapter 6 – Future Guidance Managed User: Simple Finder Finally, a user can be restricted to a Simple Finder set of limitations: this user is not given full access to the System Preferences panel, and is only allowed to run applications listed by the administrator. Also, a user with Simple Finder privileges can only open one folder located on the Dock. This type of account also restricts security features, such as the ability of a user to change his password. Use of a managed user account restricted to Simple Finder privileges is not recommended. Securing Users’ Accounts This section describes user account settings that should be implemented before a user is given access to the account. Restrict Home Folder Permissions When FileVault is not enabled, the permissions on the home folder of a newly created user account allow any other user to browse its contents. These permissions are needed to allow the Public and Public/Drop Box folders within each home folder to operate properly. However, users may inadvertently save sensitive files directly into their home folder, instead of into the more-protected Documents, Library, or Desktop folders. Although it will break the intended function of the Public and Public/Drop Box folders, the permissions on each each user’s home folder should be changed to prevent other users from browsing its contents. To change the permissions, issue the following command from a Terminal window: sudo chmod 750 /Users/<username> where <username> is the name of the account. This command should be executed immediately after the creation of a new account. The 750 permission setting still allows members of the group owning the folder to browse it, but on Mac OS X 10.3 that group consists only of the user. If more advanced group management is performed, and members of the group owning the folder should not be granted permission to browse it, then the command above should be issued with the permission 700 instead of 750. The user, as the owner of his home folder, can alter its permission settings at any time. 68 UNCLASSIFIED UNCLASSIFIED System Preferences Settings The following configuration should be done for every user account, and must be performed while logged into the account being configured. 1. Log into the user’s account. 2. Start the System Preferences program. 3. Click on the Bluetooth icon in the Hardware row if it exists. If it doesn’t, skip to step 5. 4. Click on the Turn Bluetooth Off button. Bluetooth should now be off, as shown in Figure 25. Figure 25: Disable Bluetooth Set the screen saver settings: 5. Click on the Show All icon. 6. Click on the Desktop & Screen Saver icon in the Personal row. 7. Click on the Screen Saver button. 8. Use the slider in the panel to set the Start screen saver time to ten minutes, or whatever is dictated by site policy. UNCLASSIFIED 69 Chapter 6 Future Guidance First, turn off Bluetooth for this user (if Bluetooth is present on the system) using the following steps. Note that if the disabling of the hardware components was done correctly in Chapter 4, Bluetooth should not appear in the System Preferences Panel: UNCLASSIFIED 9. Click on the Hot Corners button at the bottom left of the Desktop & Screen Saver panel. Chapter 6 – Future Guidance 10. Choose which corner is to be used as the hot corner for starting the screen saver. 11. Use the pull-down menu corresponding to the corner chosen as the screen saver hot corner, and select Start Screen Saver in the menu. 12. Click the OK button. Set the CD/DVD settings: 13. Click on the Show All icon. 14. Click on the CDs & DVDs icon in the Hardware row of options. 15. Pull down and select Ignore for the When you insert a music CD option. 16. Pull down and select Ignore for the When you insert a picture CD option. 17. Pull down and select Ignore for the When you insert a video DVD option. Turn off the Software Update capability: 18. Click on the Show All icon to see all the categories of preferences for this machine. 19. Click on the Software Update icon in the System row. 20. If the Check for updates button has a checkmark in it, click to remove the checkmark and disable this option (Figure 26). 70 UNCLASSIFIED UNCLASSIFIED Chapter 6 Future Guidance Figure 26: Disable Software Update If an internal microphone is installed on the system, it must be disabled individually for every user. To disable the internal microphone: 21. Click on the Show All icon to see all the categories of preferences for this machine. 22. Click on the Sound icon in the Hardware row. 23. Click on the Input button on the Sound option panel. 24. If the disabling of the hardware components was done correctly in Chapter 4, there should be no input devices in this panel. If this is the case, skip steps 25 – 29. 25. Click on the Internal Microphone selection (if available) and set the input volume slider bar to the minimal level. 26. Click on the Line In selection (if available) in the Choose a device for sound input box to select that as the default input for sound. This will effectively disable the internal microphone. 27. Set the Input volume slider bar for the Line In selection (if available) to the minimal level (Figure 27). UNCLASSIFIED 71 Chapter 6 – Future Guidance UNCLASSIFIED Figure 27: Disable Internal Microphone 28. Use a dummy plug to plug the Line In jack on the machine. 29. If there is no Line In jack, then the only setting available under the Choose a device for sound input box will be the internal microphone (if there is one), and there will be no way to remove that option. In either case, it is recommended that the internal microphone be physically disabled. As stated previously, this should only be done by an Apple Certified Technician to avoid voiding any warranty on the machine. Next, the Require a password to wake this computer from sleep or screen saver restriction should be enabled as follows: 30. Click on the Show All icon at the top of the system preferences panel. 31. Click on the Security icon to bring up the security preferences panel. 32. Place a check in the Require password to wake this computer from sleep or screen saver checkbox. Note that the above settings are not protected. Administrative privilege is not required to change them, and the user may change these settings himself. The configuration for these settings should be clearly indicated in the security policy for the system, and users should be educated about the need to ensure these settings are secure. Also, the system administrators may want to check users’ accounts periodically to ensure users are not changing these settings. 72 UNCLASSIFIED UNCLASSIFIED The next step is to enable FileVault for this user: 33. Make sure all applications (other than System Preferences) are closed, as the user will be logged out as part of the process of starting FileVault. 35. Unlock the window for editing if necessary. 36. Click on the Turn On FileVault button (Figure 28). Figure 28: Enable File Vault 37. When prompted, enter the password given to the account when it was created and click OK. 38. Click on the Turn On FileVault button on the window that appears. At this point the user will be automatically logged out, the user’s file system will be encrypted, and FileVault will be enabled for the user. The above instructions for configuring a user’s System Preference settings should be repeated for every user on the system, and should be performed on every new account created. UNCLASSIFIED 73 Chapter 6 Future Guidance 34. Bring up the security preferences panel in the System Preferences application if necessary. UNCLASSIFIED Chapter 6 – Future Guidance Overriding the Default umask The default umask value can be overridden for a particular user, if needed. To do so, log into the user account to be changed. For example, to set the default umask to 027 (decimal equivalent 23) so that other group members can read files created by a user, issue the following command in a Terminal window: defaults write –g NSUmask –int 23 This command will affect the permissions on files and folders created by programs that respect the Mac OS X NSUmask settings, although there is no guarantee that a program will respect these settings. The user can also change his default umask setting at any time. The changes to the umask settings take effect at next login. Setting Up Keychains for a User Account Mac OS X provides an application called Keychain Access that allows a user to manage collections of passwords and certificates, each of which is called a keychain. Each keychain can hold a collection of credentials and protect them with a single password. Passwords, certificates, and any other private values (called secure notes) that a user or application places into a keychain are encrypted. These values are accessible only by unlocking the keychain using the keychain password. A user can create multiple keychains, each of which will appear in a keychain list in the Keychain Access application. Each keychain can store multiple values; each value is called an item. A user can create a new item in any keychain. When an application needs to store an item in a keychain, it will store it in the one designated as the user’s default. The default is initially the keychain named login, but the user may change that. When a user must keep track of a multitude of passwords, he is likely to either make the passwords identical for all the systems, or keep a written list of all passwords. Use of keychains can greatly reduce the number of passwords a user must remember. Since the user no longer has to remember passwords for a multitude of accounts, the passwords chosen can be very complex and could even be randomly generated. One disadvantage of using a keychain, however, is that if the user does not choose a strong password, or if the password is compromised, then all the accounts protected by that keychain may be compromised. Another disadvantage is that any application may make use of the Keychain API to query for passwords. Therefore, care must be taken in determining which applications are granted access to a keychain. Despite these disadvantages, keychains provide some additional protection for passwords, passphrases, certificates, and other credentials stored on the system. Also, in some cases, such as using a certificate to sign an e-mail message, the 74 UNCLASSIFIED UNCLASSIFIED certificate must be stored in a keychain. If a credential must be stored on the system, it should be stored and managed using the Keychain Access utility. The decision to use keychains should be determined by evaluating policy, operational needs, and operational environment. 1. Login to the account of the user whose menu bar is to be modified. 2. Start the Keychain Access program located in the /Applications/Utilities folder. 3. Select “Show Status in Menu Bar” from the “View” pull-down menu (Figure 29). This will place a lock icon on the menu bar which will allow the user to lock and unlock keychains, open the Keychain Access application, open the Security panel of the System Preferences application, or lock the screen. Figure 29 Keychain Access Menu Bar Status Configuring the login keychain When a user’s account is first created, a single, default keychain called login is created for that user. The password for the login keychain is initially set to the user’s UNCLASSIFIED 75 Chapter 6 Future Guidance Keychain Access Modification of keychains or items within a keychain is performed through the Keychain Access program, located in the /Applications/Utilities folder. To make managing keychains easier, showing Keychain status in the menu bar is recommended: UNCLASSIFIED Chapter 6 – Future Guidance login password and is automatically unlocked when the user logs in. It remains unlocked unless the user locks it, or until the user logs off. The settings for the login keychain should be changed so that the user will be required to unlock the login keychain when he logs in, or after waking the machine from sleep. 1. Start the Keychain Access program. 2. If the drawer showing the user’s keychains is not open, click on the Show Keychains icon to open it. 3. Click on the login keychain to select it. 4. Select Change Password for Keychain “login”… from the Edit menu (Figure 30). 5. To prevent the login keychain from automatically unlocking upon login, select a new password different from the user’s login password. This will be the new password for the keychain. Inside the Change Keychain Password dialog box, click the 'i' button in the lower left corner of the box. This will open a Password Assistant dialog box that provides assistance in choosing a strong password. Enter the current password for the keychain in the Current Password text box and then enter the new password in the New Password text box. As the new password is entered, the Password Assistant dialog box will display messages that provide guidance to increase the strength of the password. The Password Assistant dialog box also displays a quality measure and a visible bar that grows with the length of password. This bar also changes color from red to green as the quality of the password improves. Choose a password that results in a green quality bar, a quality score near 100 and no warning messages in the Password Assistant dialog box. As noted elsewhere in this document, the Password Assistant utility described above can be used to help create strong passwords anytime a password is required, not just within the keychain application. To do this, open the Keychain Access application and choose Change Password for keychain “x”, where “x” is any keychain. Then click on the ‘i’ at the bottom of the Change Keychain Password dialog box, and use the Password Assistant dialog box to create a password. Once a strong password has been determined, this dialog box can be cancelled without actually changing the password of the keychain, and the new password can then be entered where it is needed. 76 UNCLASSIFIED UNCLASSIFIED Chapter 6 Future Guidance Figure 30: Keychain Password Change 6. From the Edit menu, select Change Settings for keychain “login”…. 7. Select Lock when sleeping (Figure 31). UNCLASSIFIED 77 Chapter 6 – Future Guidance UNCLASSIFIED Figure 31: Keychain Settings 8. Check the configuration of each of the items in the login keychain. Each item can be individually configured to permit access by only certain applications. The lower half of the Keychain Access window contains a tabbed view pane for configuring the attributes and settings for each item. Repeat the following steps for each item: a. Select an item within the currently selected keychain. b. Click on the Access Control tab in the bottom of the window to display the attributes of that item. c. The Allow all applications to access this item option should not be selected. If it is, it will allow any application to access the associated credential whenever the keychain is unlocked, without prompting the user. Setting this option allows any application to access the item without user notification or authentication. This setting should never be selected. d. The Confirm before allowing access option should be selected. Selecting this option causes the system to prompt the user for permission before releasing the passphrase to an application. 78 UNCLASSIFIED UNCLASSIFIED f. The Always allow access by these applications list should be kept empty unless operationally required. Any application in this list can access the item without prompting the user or requiring re-entry of the keychain password. If there are any applications in this list, click on one of them, and click on the Remove button at the bottom of the window. Repeat this until all entries have been removed from the list. Creating Multiple Keychains When a user account is created, it will contain only an initial default keychain, login. A user may create additional keychains, each of which may have different settings. This allows the user to create and configure different keychains for different purposes. For example, a user may want to group all his credentials for mail accounts into one keychain. Since mail programs query the server frequently to check for new mail, it would not be practical to expect the user to re-authenticate every time such a check is being performed. The user could create a keychain and configure its settings such that he would be required to enter the keychain password at login and whenever the machine is awakened from sleep mode. He could then move all items containing credentials for mail applications into that keychain and set each item so that only the mail application associated with that particular credential can automatically access it. This would force all other applications to authenticate in order to access that credential. A setting such as the one given above might be appropriate for credentials used by mail applications, but might be unacceptable for others. If a user has an infrequently used web-based account, it would be more appropriately stored in a keychain configured to require re-authentication for every access by any application. The following guidance explains how to set up three keychains in a user’s account, each with a different level of accessibility. This configuration should be adequate for a typical user, and should demonstrate the use of multiple keychains by a single user. Once a user becomes familiar with configuring keychains, he may want to create a custom keychain configuration. Keychain Examples Keychain 1: Frequently accessed credentials (e.g. Mail) UNCLASSIFIED 79 Chapter 6 Future Guidance e. Place a check in the Ask for keychain password checkbox. With this option selected, the user will be required to provide the keychain password before the Keychain Access application will release the passphrase to another application. This is particularly important for high value items, such as personal key certificates which are only needed when signing or decrypting information, although such items should also be placed in their own keychains. Chapter 6 – Future Guidance UNCLASSIFIED The first keychain configured here is designed to protect credentials that are accessed frequently and automatically whenever a user is logged in. A good example of this would be an e-mail account password used by the Mail application. If the keychain holding the credentials used by Mail is set to re-lock every 5 minutes, it is likely that the user will have to re-authenticate the keychain every time the Mail application tries to check for new mail. Most users will find this unacceptable. A keychain protecting credentials for the user’s e-mail account should be automatically unlocked when the user logs in, and should only re-lock when the user logs out or the machine sleeps. Also, each item within the keychain should be configured to allow unrestricted access only to the application for which that credential was intended. All other applications should be required to re-authenticate for every access. 1. Start the Keychain Access application. 2. Select New keychain from the File menu. 3. Select a location for the new keychain. 4. Type a name for the new keychain in the Save As box, and click on Create (Figure 32). For this particular example, the name of the new keychain is “mail_keychain.” Figure 32: New Mail Keychain 5. Select a new password for the keychain and enter it in the window that appears on the screen. Use the password assistant (the “i” button) to check the strength of the password. 6. Click on Show Keychains to display available keychains, if needed. 80 UNCLASSIFIED UNCLASSIFIED 7. Click on the name of the newly created keychain to highlight it. 8. Select Change Settings for keychain “mail_keychain” … from the Edit menu. Chapter 6 Future Guidance 9. Make sure the Lock when sleeping option is selected, and that the Lock after x minutes of inactivity option is not selected (Figure 33). Figure 33: Settings for “mail_keychain” 10. Move any items containing credentials for mail applications, or any other items to be protected by this keychain, into the newly created keychain. This can either be done using the Cut and Paste features from the Edit menu, or by selecting the item to be moved, and dragging it over the new keychain. Keychain Access will then prompt for the keychain password of the keychain originally containing the item. Enter the password and click the Allow Once button. The item should appear in the item list for the new keychain, and should no longer appear in the original keychain. 11. Configure all items now in this keychain. Select an item in the list, and click on Access Control. Make sure both Confirm Before Allowing Access and the Ask for keychain password are selected. Remove any entries in the access list other than the application that should be allowed to use the credential automatically. Repeat this step for all items in the list (Figure 34). UNCLASSIFIED 81 Chapter 6 – Future Guidance UNCLASSIFIED Figure 34: Mail Keychain Items Access Control Settings Keychain 2: Moderately accessed credentials (e.g. database access) This keychain is designed to protect credentials that are accessed frequently and automatically whenever a user is accessing a particular application that needs a credential from a keychain. An example of this might be a database that requires credentials for every query. In this situation, the desired behavior entails authentication of the keychain password at the beginning of a session, and reauthentication on a periodic basis (e.g. every 15 minutes) rather than for every query. 1. Start the Keychain Access application. 2. Select New keychain from the File menu. 3. Select a location for the new keychain. 4. Type a name for the new keychain in the Save As box and click on Create. For this example, the name of the new keychain is “database_keychain”. 5. Select a new password for the keychain and enter it in the window that appears on the screen. Use the password assistant (the “i” button) to check the strength of the password. 6. Select Change Settings for keychain “database_keychain”… from the Edit menu. 82 UNCLASSIFIED UNCLASSIFIED 7. Make sure the Lock when sleeping option is selected, and that the Lock after x minutes of inactivity option is selected and set to a appropriate value, such as 15 (Figure 35). Chapter 6 Future Guidance Figure 35:Database Keychain Settings 8. Move any items containing credentials for database applications, or any other items to be protected by this keychain, into the newly created keychain. This can either be done using the Cut and Paste features from the Edit menu, or by selecting the item to be moved and dragging it over the new keychain. Keychain Access will then prompt for the keychain password of the keychain originally containing the item. Enter the password and click the Allow Once button. The item should appear in the item list for the new keychain, and should no longer appear in the original keychain. 9. Configure all items now in this keychain. Select an item in the list, and click on Access Control. Make sure both Confirm Before Allowing Access and the Ask for keychain password are selected. Remove any entries in the access list other than the application that should be allowed to use the credential automatically. Repeat this step for all items in the list. Keychain 3: Infrequently accessed credentials (e.g. web accounts) This keychain is designed to protect credentials that are either accessed infrequently, or that require very strict control and re-authentication for every access. Initially, it might not seem to make sense to put credentials in a keychain if the user must enter a password every time the credential is used. But if the user uses a single keychain to store all such credentials (e.g. all web-based accounts) then he may use completely different, randomly generated passwords for every account protected with that keychain, and have a single, very strong password for that keychain that will access all accounts. This would be better than using simple passwords for each account, writing down the passwords for each account, or using a single password for several accounts across different systems with different levels of password protection. 1. Start the Keychain Access application. 2. Select New keychain from the File menu. 3. Select a location for the new keychain. UNCLASSIFIED 83 UNCLASSIFIED 4. Type a name for the new keychain in the Save As box in the window, and click on Create. For this example, the name of the new keychain is “accounts_keychain”. Chapter 6 – Future Guidance 5. Select a new password for the keychain and enter it in the window that appears on the screen. Use the password assistant (the “i” button) to check the strength of the password. 6. Select Change Settings for keychain “accounts_keychain”… from the Edit menu. 7. Make sure the Lock when sleeping option is selected, and that the Lock after x minutes of inactivity option is selected and set to 0 (Figure 36). Note that if the value ‘0’ is used here, the user will not be able to see the password for any items in the keychain without first changing the value to ‘1’ or higher. Figure 36:Accounts Keychain Settings 8. Move any items containing credentials for web-based accounts, or any other items to be protected by this keychain, into the newly created keychain. This can either be done using the Cut and Paste features from the Edit menu, or by selecting the item to be moved and dragging it over the new keychain. Keychain Access will then prompt for the keychain password of the keychain originally containing the item. Enter the password and click the Allow Once button. The item should appear in the item list for the new keychain, and should no longer appear in the original keychain. 9. Configure all items now in this keychain. Select an item in the list, and click on Access Control. Make sure both Confirm Before Allowing Access and the Ask for keychain password are selected. If there are any entries in the access list, select and remove them. Repeat this step for all items in the list. Setting the Default Keychain As stated earlier, any new items automatically saved to a keychain by an application are stored in the default keychain, which is initially set to be the login keychain. The user can designate any keychain as the default. The default keychain should be one that is completely protected. The login keychain as configured earlier in this 84 UNCLASSIFIED UNCLASSIFIED guide may be used as the default keychain. If the user chooses to set a different keychain as the default, he should ensure that it is secured in the same manner as given for the login keychain configuration. To change the default keychain: 1. Start the Keychain Access application. Chapter 6 Future Guidance 2. If the drawer showing the user’s keychains is not open, click on the Show Keychains icon to open it. 3. Click to select the keychain that is to be designated as the new default. 4. Pull down the File menu and select Make keychain “X” Default, where “X” is the keychain that was selected in step 3. Additional Notes on Protecting Keychains For laptops it may be advisable to store all keychains on a portable drive, such as a USB flash memory key or a portable FireWire drive, if allowed by organizational policy. The portable USB key can then be removed from the laptop and stored separately when the keychains are not in use. Anyone attempting to access data on the machine will need the laptop, the USB device, and the password for the keychain stored on the USB device, providing an extra layer of protection if the laptop is stolen or misplaced. To use this capability, move all keychain files to the USB storage device and configure the Keychain Access application to use the keychains in the new location. Remember that the default storage location for keychains is in each user’s Library/keychains directory, but that the user may have stored keychains elsewhere as well. To move a keychain to a portable USB drive (or to any new location): 1. Start the Keychain Access application. 2. If the drawer showing the user’s keychains is not open, click on the Show Keychains icon to open it. 3. Click to select the keychain that is to be moved. 4. Pull down the Edit menu and select Change password for keychain “X”…, where X is the keychain being moved. 5. Click on the Details arrow to display more detail about the keychain. 6. Note the Keychain Location and click Cancel. 7. Pull down the File menu and select Delete keychain “X” where X is the keychain being moved. 8. In the window that appears on the screen, select Delete References. Do not delete the files; only the references should be deleted here. 9. Open the folder containing the keychain as noted in step 6. 10. Copy this file to the new location, such as a USB keychain drive. UNCLASSIFIED 85 UNCLASSIFIED 11. Drag the original file to the Trash. Chapter 6 – Future Guidance 12. Choose Secure Empty Trash from the Finder menu to delete the file. 13. In the Keychain Access application, select Add keychain… from the File menu and open the keychain file that was moved.The keychain will appear in the list of keychains in the Keychain Access application. The system will now access the keychain file in its new location. Using an Account Securely Because users can change several security-related settings, site policy must address how they should configure these settings. The following list summarizes those areas: • The user can change the automatic screen saver timeout settings in the Desktop & Screen Saver panel of the System Preferences application. If site policy specifies a timeout period for the screen saver to be initiated, this policy should be made clear to users, and they should be instructed to set and leave this setting at the appropriate value. • The user can turn off the Require password to wake this computer from sleep or screen saver option, found in the Security panel of the System Preferences application. • If Bluetooth was not disabled physically or as described in Chapter 4’s “Disabling Hardware Components” section, the user can turn Bluetooth back on using the Bluetooth panel in the System Preferences program. • If the microphone was not disabled physically or as described in Chapter 4’s “Disabling Hardware Components” section, the user can turn it back on using the Sound panel in the System Preferences program. • Because there is currently no mechanism included in a standalone Mac OS X system for enforcing strong password selection or periodic password changing, site policy should specify password change intervals and rules for password selection. Users should receive instruction on using and managing keychains properly. 86 UNCLASSIFIED UNCLASSIFIED Chapter 6 Chapter 6 Future Guidance Future Guidance Topics for consideration in future versions of this guide or in other guidance documentation include: • Mac OS X v10.3.x Server • Managing Mac OS X networks • Cross-Platform (Mac OS X–Windows, Mac OS X–Linux, etc.) Security Issues • Apple Remote Desktop • A “Pull-out” User’s Guide, which will include a user’s perspective on using keychain effectively for security, settings which users should not change, and other security-related instructions for users. • More Detailed Configuration of the Built-in Firewall • Managing Certificates in Mac OS X • IPSec/VPNs under Mac OS X • Using SmartCards with Mac OS X • Secure File Deletion • Tools for Checking the Security Configuration of a Mac OS X System • Using groups under Mac OS X • Using Global keychains UNCLASSIFIED 87 Chapter 6 – Future Guidance UNCLASSIFIED This Page Intentionally Left Blank 88 UNCLASSIFIED UNCLASSIFIED Appendix Appendix A Encrypting Files and Folders A Encrypting Files and Folders As described earlier, Mac OS X’s FileVault feature can be used to encrypt a user’s entire home directory. However, some situations call for the encryption of individual files and folders, not simply the entire home directory. The Disk Utility program shipped with Mac OS X provides the ability to encrypt disk images containing arbitrary files and folders. Like FileVault, it uses the Advanced Encryption Standard (AES) with a 128-bit key. Using Disk Utility Using Disk Utility is recommended for situations in which either the file system permissions or FileVault may not be sufficient to guarantee the confidentiality of a file or folder. Situations in which filesystem permissions no longer protect a file include: • Transmission of a file over a network using a plaintext protocol such as SMTP or FTP • Transfer of a file to removable media whose physical security cannot be guaranteed • Compromise of a computer’s administrator account The Disk Utility program is located in the folder /Applications/Utilities. Two methods exist for creating encrypted disk images: a new blank image can be created, or an image can be created directly from an existing folder or volume. Disk Utility’s help facility (in the Help menu, choose Disk Utility Help) provides details on how to create and use these encrypted disk images. Creating a New, Blank Disk Image With Encryption Users can add files to blank disk images over a period of time, unlike images created directly from existing data. The instructions below follow those in the Disk Utility help section “Creating a blank disk image,” which describes how to create a new image whose contents can be encrypted. For situations where the threat includes unauthorized administrator access to the machine, creating an encrypted, blank disk image before receiving or creating sensitive data is preferred over directly creating an image from previously existing sensitive data. For example, many application programs create backups, working copies, or caches of files in the same folder as the original. If a file has only been created and accessed from the encrypted image, then these copies will also be protected. UNCLASSIFIED 89 UNCLASSIFIED Appendix A – Encrypting Files and Folders 1. Open Disk Utility, located in /Applications/Utilities, and make sure nothing is selected in the Disk Utility window (Figure 37). Figure 37: Disk Utility Panel 2. In the Images menu, choose New > Blank Image or click the New Image button. 3. Type a name for the disk image and choose where to save it (Figure 38). 90 UNCLASSIFIED UNCLASSIFIED 4. Choose the size of the disk image from the Size pop-up menu. Disk images cannot be directly expanded, so make the size as large as may be needed. 5. Choose an encryption method. The recommended method is AES-128. 6. Choose a format, and then click Create. Although there is some overhead, the sparse format allows the image to maintain a size proportional to its contents (up to its maximum size), which can save disk space. 7. A dialog box (Figure 39) will appear asking for a password to use in encrypting the image. It is important to use a good password here, and to ensure that the password is not forgotten. If the data is very important, it may be a good idea to write down the password, seal it in an envelope, and store it in a secure location. If the password is lost or forgotten, the data cannot be recovered. Figure 39: Password Entry for Encrypted Image This dialog box offers a checkbox which, when checked, causes the password to be saved in the user’s keychain. This means that anytime the user’s 91 UNCLASSIFIED Appendix A Encrypting Files and Folders Figure 38: Disk Utility Save Panel Appendix A – Encrypting Files and Folders UNCLASSIFIED keychain is unlocked, the data will be transparently unencrypted if an attempt to access it is made. This box is checked by default. If the data are particularly sensitive, uncheck the box to prevent storing the password in a keychain. Creating an Encrypted Image From Existing Data The instructions below follow those in the Disk Utility help section “Creating a disk image of a device, folder, or volume.” Creating a disk image from an existing data source is recommended for situations in which the data’s confidentiality is at risk when it is moved from the computer, but encrypted storage on the computer is not needed. These situations include unavoidable plaintext file transfers across a network such as e-mail attachments or FTP, or copying to removable media such as a CD-R or floppy disk. 1. Open the Disk Utility program, located in Applications/Utilities. 2. To create a disk image from a folder, from the Images menu select New > Image from Folder. Next, select the folder from the navigation window. To create a disk image from a device or volume, select it in the list on the left side of the Disk Utility window, then choose from the Images menu New > Image from [disk or volume name] (Figure 40). Figure 40: Creating a Disk Image 3. Type a name for the image, and choose a disk format (Figure 41). 92 UNCLASSIFIED UNCLASSIFIED Appendix A Encrypting Files and Folders Figure 41: Disk Utility Convert Image Panel 4. Select AES-128 (recommended) for Encryption and click Save. 5. As in the case of creating a new, blank encrypted image, a dialog box will appear requesting a password. See step 7 above for discussion. UNCLASSIFIED 93 Appendix A – Encrypting Files and Folders UNCLASSIFIED This Page Intentionally Left Blank 94 UNCLASSIFIED UNCLASSIFIED Appendix B Appendix BReferences References 1. Mac OS X Maximum Security; Ray, John, and Ray, Dr. William C.; Sams Publishing; 2003 2. Mac OS X Panther Unleashed; Ray, John, and Ray, Dr. William C.; Sams Publishing; 2004 3. “Mac Help,” Mac OS X Panther, Apple Computer, Inc., 2003 4. Inside Mac OS X, “System Overview,” Apple Computer, Inc., 2001-2002 5. “Macintosh OS X Security Technical Implementation Guide (Draft);” Version 1, Release 0; Defense Information Systems Agency (DISA); 30 June 2003 6. “Apple Federal Smart Card Package Installation and Setup Guide;” Apple Computer, Inc.; 2003 7. “The Mac OS X File System;” Mac OS X Reference Library. Apple Computer, Inc; March 26, 2004. UNCLASSIFIED 95 Appendix B – References UNCLASSIFIED This Page Intentionally Left Blank 96 UNCLASSIFIED UNCLASSIFIED Appendix C Appendix CAdditional Resources Additional Resources The following are additional resources that may be helpful to readers of this guide. 1. Mac OS X Panther in a Nutshell; Toporek, Stone, and McIntosh; O’Reilly & Associates; 2nd edition, December 2003 UNCLASSIFIED 97