1
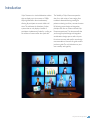
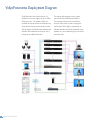
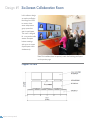
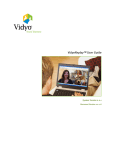
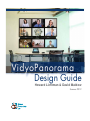
VidyoPanorama
Design Guide
Howard Lichtman & David Maldow
VidyoPanorama
Design Guide
Summer 2012
This Design Guide
was created by the
visual collaboration
specialists at Human
Productivity Lab, a
consultancy specializing
in telepresence,
videoconferencing, and
visual collaboration.
VidyoPanorama Design Guide
Table of Contents
Introduction
1
About Vidyo Panorama
x
Vidyo Panorama Design Guide
3
Vidyo Panorama Design Templates
Design #1 - Six Screen Collaboration Room
4
Design #2 - Nine Screen War Room
6
Design #3 - Touch Screen Information Room
8
VideoPanorama Room Design Process
10
VideoPanorama Room Design Recommendations
13
About Human Productivity Lab
24
About the Authors
25
VidyoPanorama Installation and Configuration
x
But first a few words from our sponsor...
VidyoPanorama™ breaks the performance-price barriers of
traditional telepresence with unmatched quality, accessibility and
capacity at a fraction of the cost.
VidyoPanorama™ eliminates the need for
custom-built rooms, proprietary hardware and
QoS networks, and transforms any room into a
dynamic hub for video collaboration.
With the flexibility to use off-the-shelf hardware
and connect with a full complement of form
factors, VidyoPanorama reduces up-front
investment by 90% and reduces operating costs
by working over low-cost Internet and generalpurpose networks you already use.
No other telepresence system can match
VidyoPanorama in its ability to deliver 1080p
resolution with 60 frames per second
performance across up to nine screens, for the
most natural high quality and low-latency video
conferencing anywhere. Flexible layout options
optimize available space and help you cater to
any conferencing workflow. And participants
can video conference without being tied to a
few fixed physical locations that require advance
scheduling and the time and expense of travel.
The Vidyo Advantage. It all begins with the
Access for Everyone. Because telepresence
software-based infrastructure and patented
Advanced Video Layering™ technology of the
Vidyo™Conferencing system. Video streams
are dynamically optimized to the capabilities of
each endpoint and local network conditions
— with none of the transcoding required by
traditional systems. This allows VidyoPanorama
to connect over low-cost broadband networks
with participants from any location, using mobile,
desktop or room-based systems, and ensure
everyone of a telepresence quality experience.
should support participants thr oughout and
between organizations, every Vidyo solution
includes desktop and mobile software clients.
You can even extend your solution to existing
H.323 and SIP endpoints with the optional
VidyoGateway™ appliance, or create custom
solutions with Vidyo™ APIs and the Vidyo™ SDK.
With unmatched performance and scalability
at a dramatically lower total cost of ownership,
VidyoPanorama sets new standards for the
capability and value of telepresence.
Introduction
Vidyo Panorama is a visual-collaboration solution
that can display up to nine screens of 1080p,
60fps high-definition video simultaneously,
allowing all participants to remain visible at all
times. This addresses the limitations of other
systems that can only display a handful of
participants simultaneously limited by a ceiling on
the number of screen and/or who spoke last.
The flexibility of Vidyo Panorama opens the
door for a wide variety of uses, ranging from
traditional videoconferencing meetings, to
patient monitoring to, military command centers.
By following proper design and integration
principles, the user can create a tailored Vidyo
Panorama experience. This document will take
you through top level design and integration
considerations, design specs as well as layouts
for various use cases, and specific room-design
recommendations. However this guide remains
just that: a guide. The only limitations are your
own creativity and ingenuity.
VidyoPanorama Design Guide
1
VidyoPanorama Deployment Diagram
VidyoPanorama‘s base system consists of a
bundle for two screen support at up to 1080p,
60 fps per screen. The bundle includes one
controller & encoder license and hardware, two
Vidyo decoder licenses and hardware, content
sharing adapter and VidyoRemote software with
hardware. Each additional screen (from 3to 9)
will require an additional decoder.
2
VidyoPanorama Design Guide
The diagram below displays a basic system
overview for the VidyoPanorama solution.
One controller node serves to encode the
camera’s video stream as well as manage the
overall system. Each display is powered by an
individual decoder node while peripherals (mics,
speakers, etc.) are routed through a mixer to the
controller node.
VidyoPanorama Design Guide
This guide is meant to help architects, specifiers,
systems integrators and end-users understand
the options available when designing a
VidyoPanorama room. The guide offers the
following three resources.
Design Templates: Three “recipes” for Vidyo
approved room configurations
Room Design Process: A walkthrough for
integrators and room designers
General Room Design Recommendations:
Ideas to keep in place throughout the design
process.
We recommend that designers first look
through the Design Template section to get an
idea of the possibilities, then follow the process in
the following sections carefully, using the general
recommendations and templates as additional
resources when appropriate.
VidyoPanorama Design Guide
3
Design #1 Six-Screen Collaboration Room
In this reference design
we used cost-effective
furnishings from IKEA
to create a threescreen telepresence
group system that
seats six participants.
This room is designed
for an across-the-table
western European
business meetings
with up to six screens
of participants visible
simultaneously.
Note: This installation does not precisely match the furnishings and layout
on the previous page
Diagram Title Here
4
VidyoPanorama Design Guide
Diagram Title Here
Budgetary Estimate
•VidyoPanorama Six Screen 720p60 Base Kit • Six Samsung 55 Inch LED/LCD Main People Monitors
- Samsung UN55D 8000 x (6) at $1800 MSRP • Wire Runs and Cables
•ClearOne Interact AT Bundle C, including a dialer, mic pod
and mixer with built-in echo cancellation, which drives third-party
wall mounted speakers
•Tilting Wall Mount for Data Display x (6) at $50 each •IKEA Bjursta x (3) at $250 each
•Camera Shelf Bracket IKEA Ekby Jarpen x (3) at $15 each •Camera Shelf IKEA Ekby Bjarmun x (3) at $10 each •IKEA Vika Amon Table Top x (3) at $40 each •IKEA Vika Curry Legs x (12) at $3.50 each •IKEA Verner Chair x (6) at $60 each •Pro-AV Integration and Setup Estimated Total
$43,495
$10,800
$200
$3,000
$300
$750
$45
$30
$120
$42
$360
$3,750 (estimate)
$62,792
VidyoPanorama Design Guide
5
Design #2 Nine-Screen Video War Room
In this reference design
we incorporated
nine monitors to
create a collaboration
environment where
all the members of
a sales, research and
development, project
management, or
executive team can
remain visible during a
collaborative meeting.
Diagram Title Here
6
VidyoPanorama Design Guide
Diagram Title Here
Budgetary Estimate
•VidyoPanorama Nine-Screen 1080p60 Base Kit •9 Samsung PN43D450A2 45 inch displays
MSRP $600
•ClearOne Interact AT Bundle C, including a dialer, mic pod and
mixer with built-in echo cancellation, which drives thirdparty wall mounted speakers
•3 AKG CHM99 Microphones
MSRP $150
•6 IKEA Verner Chairs
MSRP $60 •1 XRackPro2 XRNRE244TX Rack
MSRP $2500
•1 Sony EVIHD7V Camera
MSRP $3500
Options
•1 Caster Set MSRP
MSRP $50 •1 Wolfvision VZ-C12 3 Ceiling Mounted Visualizer •2 IKEA Bjursta Credenzas
MSRP $250
Estimated Total
$60,495
$5,400
$3,000
$450
$360
$2,500
$3,500
$50
$14,500
$500
$90,905
VidyoPanorama Design Guide
7
Design #3 Vertical Information Room
In this reference
design we use multiple
displays to create
a video wall with
two 43”(109 cm)
landscape displays and
an eye-level camera
for across the table
visual collaboration.
Two 37” (94 cm)
portrait-oriented
displays can show
additional video sites
or can display content
including two legal size
documents side-byside for comparison.
Diagram Title Here
8
VidyoPanorama Design Guide
Diagram Title Here
Budgetary Estimate
•VidyoPanorama Six Screen 720p60 Base Kit •2 Samsung LN37A330 37 inch 720p LCD@ MSRP $995 •2 Samsung PN43D450A2 43 inch plasma displays MSRP $600
•ClearOne Interact AT Bundle C, including a dialer, mic pod and mixer with
built-in echo cancellation, which drives 3rd party wall mounted speakers
•3 AKG CHM99 Microphones MSRP $150
•6 IKEA Verner Chairs MSRP $60
•1 XRackPro2 XRNRE244TX Rack MSRP $2500
•1 Sony EVIHD7V Camera MSRP $3500
•5 Display Wall Mounts MSRP $50
$43,495
Estimated Total
$56,745
$1,990
$1,200
$3,000
$450
$360
$2,500
$3,500
$250
VidyoPanorama Design Guide
9
VidyoPanorama Room DesignProcess
10
VidyoPanorama Design Guide
The great flexibility of the VidyoPanorama
solution allows for thousands of possible room
configuration options. Each element affects—
and is affected by—other elements in the
room, from the room shape to the location of
participants to where the monitors have been
placed. Listing templates and specifications for
each possible room configuration would require
a document far larger than this one, but the
following guide will help ensure you consider
how the interplay of elements can maximize user
experience. Customers and integrators planning
a VidyoPanorama deployment should follow the
six steps in this process and, refer to the sections
that follow for more detailed specifications.
Step 1:
Determine Participant Group Size
IMPORTANT NOTE: Talk to your users
2. What size are the existing project teams?
BEFORE you design the room. You aren’t
simply installing a VC solution for your users
to choose (or not choose) for their meetings;
you’re building a tool to actualize their ideal
collaboration sessions. The soul of your
design isn’t the VidyoPanorama, it’s the users’
requirements. Users will not readily change their
desired meeting dynamics to accommodate the
limitations of your design. Remember, your ROI
is tied to usage. The room could and should be
such a valuable productivity tool that your users
will have to create a waiting list to host meetings
in it.
3. What size are current meetings, phone
conferences, etc? How do the users
themselves wish to use this room? Remember,
talk to your users FIRST!
Unlike legacy immersive systems, which typically
require perfectly symmetric furniture for a
site-to-site, six-user-to-six-user deployment only,
VidyoPanorama can be tailored to accommodate
large number of remote participants on
the screens to enable a hub-and-spoke
communication style. When determining the
expected group size for the Panorama room,
consider three key questions:
1. How many people can the room comfortably
accommodate, using the templates in this
document as a guide?
The resulting room will often be flexible. For
example, the camera in a six person room can
be zoomed in to accommodate a meeting with
only two local participants. The goal is to design
for the most expected use case while keeping it
open for other uses as much as possible.
VidyoPanorama Room DesignProcess
Step 2:
Choose Participant / Table Location
In all designs, the on-camera participants should
be between 7(213 cm) and 12(366 cm) feet
from the camera (measured from the back of the
table), if possible. This range will allow the camera
to focus well enough to capture acceptable-sized
images of all participants. Within that 7 (213
cm) to 12 feet (366 cm) range you have some
flexibility based on factors like room size and
shape, table size and shape (if you are limited in
table choices), and how many people you want
to get on screen comfortably. For example, six
participants, each being allocated 26.5 inches(67
cm) of space, would need to be 10 feet(305
cm) from a 70° horizontal view angle camera. In
this case, a 13’ (396 cm) wide room would be
sufficient, as shown below.
(continued)
You may need to adjust based on the limitations
of your environment. If you have wider chairs, for
instanc, you may have to pull back further from
the camera.
When designing participant placement, keep in
mind that the wall users face must be able to
host the Panorama installation. See the section
below regarding the equipment rack, which
must be able to connect to the VidyoPanorama
displays using approximately 15’(457 cm)
cables. Once you’ve determined participant
location, you can select the table based on the
recommendations in the section below.
Diagram Title Here
VidyoPanorama Design Guide
11
VidyoPanorama Room DesignProcess
Step 3: Determine Monitor Size
Choosing monitor size is a simple balance of
one’s willingness to compromise the natural
experience provided by full sized images on
65” monitors with limitations based on available
wall space, room depth and budget. Note that
in many cases, based on camera capability, the
acceptable viewing distance is much farther than
the recommended seating distances listed above.
A 65” monitor can be viewed up to 16 feet(488
cm) away, which is beyond the ideal 7(213 cm)
to 12 feet (366 cm) seating recommendation.
However, this space allows for an additional
row of people to see the monitors. These extra
meeting attendees may not appear full-sized at
the remote location, but they will be able to see
and participate.
Step 4:
Determine Monitor/Camera Layout
VidyoPanorama has great flexibility and Vidyo
will work with customers to create a custom
environment. However we recommend using
one of the three design templates in this guide,
at least as a starting point, as they were created
with expert input for the goal of delivering
the best possible VidyoPanorama end user
experience.
In general, the main monitors should be placed
so that remote participants appear to be sitting
naturally across the table. Monitor placement
and camera placement should be coordinated to
maximize eye contact. Please see the camera and
monitor sections below for more information.
12
VidyoPanorama Design Guide
(continued)
Note: when using VidyoPanorama for war room
configurations, the across-the-table experience
may not be necessary or even desired, but it is
helpful to dedicate one large format monitor in
the room for an across the table experience.
Step 5: Collaboration Tools
Collaboration tools should now be selected and
added to the design, based on the recommendations in the section below.
Step 6: Finish the Room
All other elements of the room can now be
designed. Please see the sections below for
specific recommendations on lighting, room color,
acoustics, etc.
Room Design Recommendations
After determining the basic layout and
configuration of the room, integrators and
designers should follow these recommendations
to complete the installation to give conference
participants the best possible VidyoPanorama
experience.
Selecting the Room
When selecting the room in which to install
VidyoPanorama, you must consider a number of
factors: the placement of the windows, the noise
level in the room, the lighting, and so on. The
basic parameters for these considerations are
included in the following sections. While you can
do much to improve these elements with any
given room, it’s advisable to choose a room that
naturally accommodates a productive meeting
environment, if possible.
Room Size
There is no one recommended room size for
the VidyoPanorama solution, due to its industry
leading flexibility. However, you should consider
on constant when selecting a room: the ability for
the camera to capture the meeting participants.
At a minimum, the room should accommodate
the recommended distance from the camera to
the participants, and enough space behind the
participants for them to move their chairs out
from the table as well as walk behind the table.
The size of the displays can also be a factor in
the chosen room size.
VidyoPanorama Design Guide
13
Room Design Recommendations
(continued)
Camera
The camera that comes standard with
VidyoPanorama has the following specifications:
• 70° horizontal view angle
• Recommended 7 ft. (2.13 m) to 12 ft. (3.66m)
distance between camera and participants to
capture full-sized images.
• Requires a minimum distance of 10 ft. (3.05m)
to the back of the table to capture six
participants.
If you purchase your own camera, ensure that
it meets these specifications. In general, you
should place your camera as close to eye-level as
possible:
• If your displays are laid out horizontally in
one row, we recommend that you place the
camera directly above the displays at the
vertical centerline.
• If your displays are laid out in more than
one row, we recommend placing the camera
above the bottom row of displays at the
vertical centerline.
You can attach the camera on a shelf on the
wall above or between the displays or you can
install the camera on top of a display. Better
still, if there’s room available behind the wall on
which the displays are located, you can recess
your camera in the wall. Doing so will make the
camera less obtrusive as well as provide you with
easy access to the back of the camera.
14
VidyoPanorama Design Guide
No matter how you attach your camera, try to
make it as unobtrusive in the room as possible,
since people tend to behave differently when
“on-camera.” Recessing the camera in the wall
or using other techniques to reduce to visibility
of the camera can put conference participants at
ease so they behave more naturally.
The camera should be pointed in-between
the two seats that would serve as the primary
seats during a meeting. You want to capture and
display the two primary participants at life-size
proportions. Use camera pre-sets for capturing
two participants, four participants, six participants,
the entire room and a pre-set for capturing a
whiteboard if appropriate.
Displays
The bigger the better! LCD screens are generally
superior to plasma—they weigh less and use less
energy. We recommend at least a 50-inch (127
cm) screen mounted across from the primary
seats on the long side of a conference table
at a height that will provide for an across-thetable meeting experience. Do not mount the
displays at the head of the table unless absolutely
necessary. Screens measuring 60 (152 cm) to 65
(165 cm) inches work best for designs expected
to effectively display remote participants at full, or
near to full, size.
Room Design Recommendations
(continued)
Equipment Cabinet / Rack
The XRackPro2 equipment cabinet
recommended by Vidyo (click here for general
features and specifications). When hosting a
three screen Panorama system the cabinet
performs as follows:
• 40.5 dBA total noise generated by the cabinet
when measured 39.37” (1.00 m) in front of
the cabinet.
• The Decoder Nodes and Control Point are
not audible when in the cabinet.
• The temperature when stress testing inside
the rear of the cabinet (where most heat is
generated) does not exceed 102° F (38.9° C).
If you purchase your own equipment cabinet,
make sure that it meets these specifications.
When determining where to place your
equipment cabinet, keep in mind the distance
between the cabinet and the displays. If the
distance is greater than the 45 feet (13.72m)
recommended for HDMI cables without
amplification you may need to purchase
extender cables and an HDMI amplifier. For more
information, refer to the Choosing Peripheral
Devices for VidyoPanorama technical note.
One of the best places to put the equipment
cabinet is behind the wall for the displays. Placing
your equipment in the room behind that wall
yields multiple benefits:
• The noise and heat associated with the
equipment cabinet is removed from the
VidyoPanorama room.
• The distance between the displays and the
equipment cabinet can be minimized (thereby
reducing the need to purchase extender cables).
You can recess the camera in the wall between
or above the displays and have access to the
back of the camera from that room.
If a separate room is not available and you
must place the equipment cabinet in the
VidyoPanorama room, you should purchase an
equipment cabinet that has an office-quality
appearance (such as the one recommended
by Vidyo). The illustration on page 23 shows a
preferred location for the equipment cabinet in
the VidyoPanorama room. By placing the cabinet
near the displays as shown, you minimize the
length of the cables needed to connect to the
displays and other equipment in the room.
The Equipment Rack
A typical Vidyo
Panorama installation
will require the
following components:
•
Vidyo Base System—Encoder / Decoder:
1U Server
•
A Separate Decoder Per Screen for screens
3-9: 1U
•
Server each
Audio Mixer (Example: ClearOne INTERACT
AT): Typically
1U Server
•
Rack Mount KVM for control: 1U
Unit
•
Uninterrupted Power Supply (UPS)
VidyoPanorama Design Guide
15
Room Design Recommendations
(continued)
Table
With VidyoPanorama, you’re free to select
any table of your choosing; however, Vidyo
recommends following these guidelines:
• Choose an oblong-shaped table if you can.
Oblong tables enable more participants to
re-main at the same distance from the camera
lens, which avoids focus and sharpness issues.
• Allow 26.50 in. (67.31 cm) of space per
seated participant. Let’s say, for example, that
you want to fit six participants on one side
of the table. In that case you should select a
table at least 13.25 ft. (4.04 m) long. Typically,
however, you should choose a table slightly
longer than the minimum width to provide
more room between participants.
Diagram Title Here
16
VidyoPanorama Design Guide
When deciding where to place the table in the
room, consider the location of the camera and
displays. Remember that if you purchased the
camera from Vidyo, it has a 70° horizontal view
angle and requires a minimum distance of 10 ft.
(3.05 m) to capture a 13.83 ft. (4.22 m) table and
its participants.
Chairs should be an appropriate width (allowing
26.50 in (67.3 cm) per participant). Chairs should
not have high backs, be too large, or have use
loud colors.
For the best camera viewing angle, you should
align the centerline of the table with the
centerline of the displays, and place the chairs on
the side of the table opposite the displays and
camera as shown in these illustrations:
Room Design Recommendations
(continued)
Collaborative Tools
“The usual and customary tools in their usual and
customary format.”That’s the ideal that creates
the most effective collaboration. An ideal design
would include standard in-room collaboration tools
(whiteboards, laptops, etc) and integrate them so
they can just as easily be used during video meetings.
VidyoPanorama can easily integrate with local
laptop (connected by VGA) and transmit the
information to a dedicated data collaboration
monitor(s) at the remote site. If your organization
works extensively with hand-generated graphics
on a whiteboard, working with someone on
the other end using an interactive whiteboard
will optimize your virtual workflow. A number
of additional tools can be incorporated into a
telepresence environment for organizations that
need more sophisticated collaboration capabilities:
Document Cameras and Ceiling Mounted
Visualizers These technologies let you
collaborate on documents and physical objects.
Ceiling-mounted visualizers eliminate the clutter
that a document camera sitting on the table creates
allowing for seamless sharing by participants.
Whiteboards, Interactive Whiteboards,
and Digital Flipcharts Whiteboards should
be located adjacent to the Panorama Displays, or
on the wall at either side of the meeting table (as
shown in the templates above), so that speakers
can present naturally to the local participants.
The laptop used for local content share should
have VidyoDesktop installed and its webcam
directed towards the speaker and whiteboard.
This will allow remote participants to also view
the speaker and whiteboard.
Optionally, whiteboards can be placed behind
the main participants so they can be easily
accessed and captured by the primary camera.
You can set up a camera preset with a tight shot
of the whiteboard to quickly share its contents.
Interactive white-boards can immediately digitize
work, annotate documents and graphics, and
whiteboard interactively between locations.
Digital flipcharts capture hand-generated content
through virtual “sheets” that can be virtually
“taped to the wall,” replicating a traditional flip
chart brainstorming session.
High Definition Encoders / Decoders
Dedicated encoder/decoder solutions are
designed especially for organizations that need to
work with high-resolution images, real-time video
or real-time visualization information.
Room Control
If a telepresence and visual collaboration room
isn’t easy to use, it won’t get used. This is especially
true in large organizations with hundreds,
thousands, or even tens of thousands of potential
users. The gold standard for control are menudriven, touch-sensitive displays that let you
pre-program your most frequently called remote
locations and make the collaborative tools, camera
presets, and other key features intuitively obvious.
VidyoPanorama Design Guide
17
Room Design Recommendations
(continued)
Windows
Because windows create audio reverberation,
less than 20 percent of the room should have
windows or other vertical glass walls. Also, natural
light coming from windows varies considerably,
which can affect the quality of the video.
Therefore, if your room does have windows, you
should install acoustical window treatments or
blackout curtains.
Flooring, Walls and Ceilings
A room where the floor is carpeted, the walls are
composed of drywall, and the ceiling is suspended
typically provides the best acoustics. Of course,
you can select a room with different surfaces
(such as tile floors or concrete walls), but these
are often more reverberant, and therefore, may
affect the sound quality.
VidyoPanorama Design Guide
If you want to test colors before painting the
walls, try hanging fabric of various colors on the
back wall to see which color looks best on video.
Sound and Acoustics
Room Color
Quality of the sound is just as important as
quality of the video. You want the exchange to
sound like everyone is in the same space, a trick
that involves quality microphones placed in the
right spots. Microphones can be hung from the
ceiling (preferred) or embedded in the table.
Unfortunately, they will occasionally pick up the
sound of papers shuffling.
The color of the walls within the camera field
of view can impact how the far-end participants
perceive the video quality. If you want the far-end
participants to see higher quality video, ensure
that the wall at which the camera is pointing is
non-textured and non-patterned.
Microphones will also pick up sound
reverberating off hard and flat surfaces in a room.
You can dampen reverberations by installing noise
dampening ceiling tiles, fabric wrapped acoustical
panels on the walls, or a combination of both.
To simply and cost effectively improve the
acoustics, add carpeting or rugs. You may also
want to consider adding acoustical sound panels
to the walls.
18
Painting the wall a muted color, such as beige or
blue-gray, looks better on video than bright white
or dark colors. As a general rule of thumb, the
brighter the room, the darker the walls should
be. For example, if your room has no windows,
dark carpeting, and the overhead lights are not
extremely bright, consider painting your walls a
lighter shade, such as pale blue or light beige. If,
on the other hand, your room has some natural
light, light-colored carpeting, and bright overhead
lights, consider painting your walls a darker shade,
such as medium gray-blue or tan.
Room Design Recommendations
Noise and Temperature
When selecting the room in which to install
VidyoPanorama, keep these noise and
temperature considerations in mind:
(continued)
• The VidyoPanorama room and the server room
(if you are using one) must be air conditioned.
Remember, however, that HVAC equipment can
raise the noise level in the room.
• You should consider which rooms are nearby
and try to select a room that is not adjacent
to frequently noisy areas, such as cafeterias or
reception areas.
Environmental specifications for the Controller and Decoder Nodes
Noise specifications for the Controller and Decoder Nodes
VidyoPanorama Design Guide
19
Room Design Recommendations
(continued)
Lighting
Your VidyoPanorama room should have evenly
dispersed, ambient lighting. If possible, you may
want to hire a lighting designer and have the
lighting professionally installed. The first place
a professional may start is by throwing out
standard fluorescent bulbs. The direct fluorescent
common in offices causes harsh shadows on
the faces of the participants and its brightness
can vary considerably in different parts of the
room. If you are on a limited budget or stuck
with fluorescent fixtures, get full spectrum bulbs
designed for video. The ideal color temperature
should be between 3,000 and 3,500 degrees
Kelvin, and about 70 foot candles of intensity at
the subject.
For the best lighting, follow these lighting
guidelines as closely as possible:
• At least 80 percent of the lighting should be
indirect
• The remaining 20 percent should be evenly
distributed direct lighting
• Use LED lights. The upfront cost is higher, the
long-term cost is lower.
• Make sure no lights are pointing in the camera
lens.
• Avoid pointing any lights directly at the
displays. If there are lights that point at the
displays, make sure that you can shut them off
or dim them.
• Don’t use recessed can light fixtures, which
cause uneven pools of light and heavy
shadows on the participants’ faces.
20
VidyoPanorama Design Guide
Here are the four lighting options for an
optimized broadcasting environment:
Key Light: Light shining on the subject from the
front. These lights are generally placed high and
at the center, or to each side of the seating area
if two are required. Aim them downward at a
45-degree angle to light the face without the
eyebrow casting a shadow over the eye-sockets.
Fill Light: Lights shining on the subject from
the front, but placed at a low angle to soften
shadows under the eyes and chin.
Hair Light: Lights at the rear of the room,
above the subjects and aimed downward to help
separate the subjects from the background.
Backdrop lighting: Lights above and (if
space allows) between the subject(s) and the
background. Two lights are usually required,
each aimed toward the opposite half of the
background to evenly light it.
Lighting for video can involve all four lighting
positions, the Key Light being the most important.
For most multi-purpose conference rooms, a
strong color-balanced Key Light supported by
additional full spectrum lighting in the room will
work well enough. Just remember: you don’t
want regular meeting participants feeling like
they’re in a television studio.
Room Design Recommendations
(continued)
Vibration
Network
HVAC equipment, nearby heavy machinery,
passing trains and other factors can cause room
or wall vibration. If the wall holding the camera
and displays vibrates excessively, the camera may
also vibrate, and far-end participants may notice.
If you have vibration issues, consult the building
manager or an architect to determine the
optimal placement for the camera.
Here are the network guidelines for
VidyoPanorama:
Power
• No node will service more than 6 Mbps at a
time.
These are the circuit capabilities:
• 22oV 15A 3250W Max
• 22oV 2oA 4600 W Total
• Output bandwidth: From 1 Mbps to 6 Mbps
• Total output (going from VidyoPanorama to
the cloud): Approximately 10 Mbps
• Input bandwidth (coming from the cloud to
VidyoPanorama): Capped at 40 Mbps.
• No more than 18 video streams at a time.
• Preferred capture/encoding rate: 1080p@60
at 4 Mbps at 3 Layers
When determining your power consumption,
you may find this information useful:
• Each 1080p stream = 4 Mbps
• Each Decoder Node uses up to 130 W.
• Each 360p30 stream = Approximately 500
Kbps
• The Control Point (also known as the
Controller Node) uses up to 250W.
• An average 55” LCD does not exceed 350 W
(LED-based displays use less).
• The equipment rack uses up to 34 W.
• The ClearOne Interact AT Mixer uses 40 W. If
you have additional ClearOne or other audio
components, you should check the power
consumption of those separately.
• Each 720p60 stream = Approximately 2 Mbps
You should maintain a consistent 10 to 15 Mbps
up-stream bandwidth for VidyoPanorama. For
your downstream bandwidth, expect 6 Mbps
per display up to a maximum of 40 Mbps. You
can spread this bandwidth across the number of
displays you have. If you have two displays, you’ll
have 12 Mbps; with six displays, you can spread
the bandwidth among all six of them.
VidyoPanorama Design Guide
21
Room Design Recommendations
(continued)
GUI Configuration and System
Control
The VidyoPanorama solution is primarily
controlled by an integrated Dell Duo tablet.
Please read the VidyoPanorama Installation and
Configuration Guide for complete instructions
on the following:
1. Physically connecting the hardware / cabling.
2. Initially configuring the “cluster” of devices
(encoder, decoders, control point).
3. Enabling the Dell Duo tablet as a remote
control device
4. Administrative Functions
a. Settings : Includes network controls, video
encoding / decoding preferences, etc.
b. Options: Includes auto-answer, far end
camera control, notifications, etc..
c. Control Display Layout : Each monitor can
be assigned a particular stream (Video,
CP Video, Content, or Self View) to
display depending upon current meeting
conditions
5. Configuring peripherals (mics, cameras,
speakers).
6.Reporting.
22
VidyoPanorama Design Guide
Following the configuration device in that guide,
you can create a logical display layout for your
environment. Imagine a three-screen solution
displaying a primary remote speaker (loudest
speaker) on the main monitor, a secondary
remote speaker (last loudest speaker) on
the second monitor, and four more remote
participants in a split / quad-screen view on the
third monitor. The administrator’s layout would
provide for this configuration and automatically
populate the correct monitors as people called
in. It will also automatically switch views as
people speak, or as they bring up shared content.,
in accordance with the administrator’s settings.
The options are endless and surprisingly easy to
pre-configure following the instructions in the
installation guide.
Room Design Recommendations
(continued)
Diagram caption here
VidyoPanorama Design Guide
23
About Human Productivity Lab
The Human Productivity Lab is the leading
telepresence consulting firm for global financial
institutions, multinational telecommunications
and energy companies, and other Fortune 5000
corporations across a broad range of industry
sectors. The Lab advises firms how to successfully
deploy telepresence to enhance internal and
external communications, cut costs and improve
organizational productivity, and increase bottom
line revenue. On the vendor side, the Lab works
with both established technology brands and
emerging companies to provide independent,
third-party product evaluation, and best practice
assessments. For investors, the Lab provides
company and product due diligence and
technology trend forecasting.
24
VidyoPanorama Design Guide
About the Design Guide Series
Human Productivity Lab Design Guides review
the best practices around deploying visual
collaboration solutions with a focus on the
human factors of participants. The Lab creates
reference designs for architects, systems
integrators, and specifiers with budgetary
estimates and room design recommendations to
guarantee a successful installation.
Thank you for reading this design guide. If you
have already purchased a VIdyoPanorama, or are
in the process of due diligence, you should read
the VidyoPanorama Installation and Configuration
Guide for more detailed information about
the actual hardware connections and software
settings.
About the Authors
Howard S. Lichtman- President
Howard S. Lichtman is a productivity-focused
technologist, author, publisher and consultant
with specialties in telepresence and visual
collaboration to improve organizational and
personal productivity. He is the founder and
president of the Human Productivity Lab, an
independent consultancy and research firm that
helps organizations design telepresence and
visual collaboration strategies and deploy and
future-proof solutions.
He is the publisher of Telepresence Options,
the #1 website on the Internet covering the
telepresence revolution and Telepresence
Options Magazine and editor of the Telepresence
Options Telegraph, the world’s most widely read
publication covering telepresence technologies.
David Maldow – Associate Analyst and
Associate Editor
David Maldow is a visual collaboration technologist
with the Human Productivity Lab with extensive
expertise in testing, evaluating, and explaining
telepresence and other visual collaboration
technologies.David is focused on providing thirdparty independent testing of telepresence and
visual collaboration endpoints and infrastructure
and helping industry participants explain
complicated subjects through white papers and
other end-user facing publications.David is also a
contributor to the Lab’s publications: Telepresence
Options, the monthly newsletter: Telepresence
Options’ Telegraph and the bi-annual Telepresence
Options Magazine.
Mr. Lichtman is also the author and/or co-author
of: The Telepresence Options 2011Yearbook
(2011), The Telepresence and Videoconferencing
Exchange Review (2010), The Inter-Company
Telepresence and Videoconferencing Handbook
(2009),Telepresence, Effective Visual Collaboration
and the Future of Global Business at the Speed
of Light (2006), andEmerging Technologies for
Teleconferencing and Telepresence (2005).
Mr. Lichtman is a frequent commentator on
telepresence, videoconferencing and effective
visual collaboration and his writings on and
analysis of the industry have been featured by US
News and World Report, Telephony Magazine,
CXO Magazine, The Chicago Tribune, Reuters,
Pro AV Magazine, Killer App Magazine, ABA
Banking Journal, Bank Systems and Technology
Magazine and CFO Magazine among others.
Prior to joining the team at HPL and
Telepresence Options, David worked at industry
analyst firm Wainhouse Research (WR) as a
member of their video collaboration coverage
team. While at WR, he supported a variety
of videoconferencing, streaming, and enduser consulting projects. David managed WR’s
videoconferencing test lab where he oversaw
and conducted evaluations of rich media
products and solutions. David wrote, or cowrote, numerous evaluations and other reports
for WR publications.
VidyoPanorama Design Guide
25