1
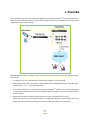
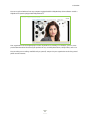
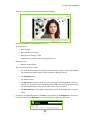
VidyoReplay™ User Guide System Version 2.2.1 Document Version 2.2.1-A TABLE OF CONTENTS 1. Overview .................................................................................................................................................... 3 2. Making a Recording .................................................................................................................................... 5 Preparing To Record ...........................................................................................................................................5 Recording ...........................................................................................................................................................6 3. Hosting a Webcast ...................................................................................................................................... 8 Preparing To Host a Webcast .............................................................................................................................8 Hosting a Webcast ...........................................................................................................................................10 4. Using the VidyoReplay Library .................................................................................................................. 14 Watching Recorded Content ............................................................................................................................14 Working With Your Video Recordings ..............................................................................................................16 Setting the Language for the VidyoReplay Library .....................................................................................19 Adding Information to a Video Recording ..................................................................................................19 Searching for a Video Recording ................................................................................................................21 © 2013 Vidyo, Inc. all rights reserved. Vidyo’s technology is covered by one or more issued or pending United States patents, as more fully detailed on the Patent Notice page of Vidyo's website http://www.vidyo.com/about/patent-notices/, as well as issued and pending international patents. The VIDYO logotype is a registered trademark of Vidyo, Inc. in the United States and certain other countries, and is a trademark of Vidyo, Inc. throughout the world. VIDYO and the Vidyo family of marks are trademarks of Vidyo, Inc. in the United States and throughout the world. 1. Overview Your organization has chosen to include VidyoReplay in your VidyoConferencingTM system. VidyoReplay enables you to record VidyoConferences and produce live webcasts that can be viewed by other people in your organization or by the general public. With VidyoReplay, making recordings is easy. And it is easy for you and others to find and view them at any time desired. Live webcasts are also automatically recorded for later viewing or re-broadcasting. Both webcasts and regular recordings are downloaded from the VidyoReplay library as .mp4 files (Adobe Flash Video, .flv, is no longer supported). If you set up a webcast, you can drive it using your VidyoDesktopTM software. You can invite participants to a webcast by sending them a link with an invitation email. The invitees can then click on the link and join the webcast. Depending on how their computers and browsers are set up, your audience may see the webcast/recording screen in a floating window, in a new browser window, or a new browser tab. The following screenshot shows how a webcast/recording on a webpage appears to a participant. 3 1. Overview You can record and webcast from any computer equipped with the VidyoDesktop client software or with a VidyoRoom™ system equipped with VidyoRemote™. Your organization can use VidyoReplay to create any number of recordings. For example, you can create product demonstrations that show your products in use, assembly instructions, safety videos, and so on. You can make your recordings available only to yourself, everyone in your organization and to the general public over the Internet. 4 2. Making a Recording PREPARING TO RECORD Setting up a recording takes just a few moments. To prepare to record: 1. Log in to your VidyoPortal™. 2. Join or start a VidyoConference as you normally would. 3. Click the Control Meeting link in the upper right-hand corner of the page. You should see the VidyoReplay console in the lower right-hand corner of the page. If you don’t, you don’t have recording and webcasting privileges. The Record and Record & Webcast buttons are available on the VidyoReplay console. Click Record to record a video. Click Record & Webcast to webcast your conference live and record it. Selecting either of these buttons turns them from white to blue. 5 2. Making a Recording RECORDING To record: 1. In the VidyoReplay console on your VidyoPortal, click Record (the button with a red dot in the center). A menu listing the available recording profiles pops up above the Recording Profile field. There are three standard profiles that ship with the system: • Basic Quality • Standard Quality • High Quality However, you may see additional profiles (such as those shown on the screen above) that have been created by your administrator for specific purposes important to your organization. The profiles determine the quality and other parameters (such as layout) of your webcast and recording. There’s sometimes a trade-off between quality and accessibility. For example: If you record in CIF (Common Intermediate Format), your video quality is impacted; however, if there is a limited amount of storage space available to your organization, CIF may be the preferred option. Likewise, if you record in SD (standard definition), you still won’t have the best quality recording possible, but the lower resolution consumes less storage space on your VidyoReplay server. If you record in HD (high definition), you can webcast in highest quality and produce high quality recordings, which requires sufficient storage capacity, approximately 1Gb per hour of recording. If you’re not sure which profile to use, contact your network administrator or help desk, explain what you’re trying to achieve, and use the profile they suggest. It is important to understand that the parameters of your recordings and webcasts, such as the layout, recording quality etc., are defined by the profile you select prior to starting the recording and may be different from the layout you or other conference participants see on the screen. The available profiles are either provided with VidyoReplay (typically the three default profiles) or defined by 6 2. Making a Recording your system administrator for all users in the organization. You need to contact your administrator if you need to change any of the profile parameters. 2. Select the recording profile that best meets your requirements. The recording begins. Once the recording has started: The Record button becomes brighter and is further highlighted with a red margin. The Pause button lights up. You can click this button to pause your webcast or recording, and click it again to resume. When paused, the button becomes brighter and is further highlighted with a white margin. A little red dot displays in the lower right-hand corner of your screen (and the screens of all the conference participants) much like the red light on a camcorder. This is a reminder that the conference is being recorded. 3. When you’re ready to conclude your recording, go back to VidyoPortal screen and click the Record button again to end the recording. Your recording or webcast becomes available in the VidyoReplay Library immediately. 7 3. Hosting a Webcast Hosting a webcast is almost as easy as recording. The main difference between webcasting and recording is that, with a webcast, you must invite the audience to the webcast viewing. PREPARING TO HOST A WEBCAST To prepare to host a webcast: 1. Log in to your VidyoPortal. 2. Click the Control Meeting link. You should see the VidyoReplay console in the lower right corner of the page. If you don’t, you don’t have recording and webcasting privileges. 3. Click Room Links. The Room Links page opens. 8 3. Hosting a Webcast As you can see in the example shown on the following screen, Mallory has two links: a Room Link and a Webcast Link. The Room Link is the link that she’d send to invite participants to a regular VidyoConference. The Webcast Link is the link that she’d use to invite viewers to a view a webcast. Note, however, that the Webcast Link is not yet available. You won’t have one either the first time you use VidyoReplay to create a webcast. 4. Create a webcast link by clicking Create New under the words “Webcast Link”. A confirmation dialog box opens. 9 3. Hosting a Webcast 5. Click OK. You now have a Webcast Link. This is the link you’ll email to those you wish to invite to your webcast. 6. Create a webcast PIN as needed. Because your webcast link is fixed and is reused every time you create a new webcast, you may want to set a webcast PIN for greater security. The webcast PIN is a three to ten digit PIN that viewers have to enter in order to watch your webcast. Here’s why you might want to create a PIN: If you send only your Webcast Link to potential viewers, they can view every subsequent webcast you create. Say you first sent out a webcast to everyone about a charity event your organization is hosting, and the next day you want to create a webcast only for high-level executives about confidential financial numbers. You would create a PIN for the second webcast, so that only the high-level executives can view this webcast. Note that as an alternative to creating PINs for each new webcast, you could create a new Webcast Link. 7. Click Save. 8. Click Close. HOSTING A WEBCAST To perform the procedure in this section, you must already have created a Webcast Link as described in the previous section. To host a webcast: 1. Log in to your VidyoPortal. 2. Click the Control Meeting link. 3. Click Invite by Email. 10 3. Hosting a Webcast 4. Select the Send a link to Webcast checkbox to invite people to watch and listen to the live webcast. (If a person is connected by a non-video capable device such as phone, they can listen only.) 5. Click Send to send email invitations to those you wish to invite to your webcast. Your default email program opens with a prewritten invitation that you can edit to include any pertinent information, such as the time and date of your webcast. 11 3. Hosting a Webcast 6. Address the email to whomever you would like to invite. If your email program supports distribution lists, you can use them. For example, you may have a distribution list called “New York” that you can use to email everyone in your New York City office. 7. If you need to invite others using a link to a room or a link to a webcast, repeat steps 4 through 6. 8. Click Close. 9. Click Record & Webcast. The button turns blue. 10. Click the red Record button and select one of the available Recording Profiles from the list (the list automatically pops up). For more information about selecting Recording Profiles, see page 6. The recording begins. While recording: The Record button becomes brighter and is further highlighted with a red margin. The Pause button lights up. You can click this button to pause your recording, and click it again to resume. When paused, the button becomes brighter and is further highlighted with a white margin. A little red dot displays in the lower right-hand corner of your screen (and the screens of all the conference participants). This is a reminder that the conference is being recorded. 12 3. Hosting a Webcast Next to the red dot is a small white dot emitting white waves. This is a reminder that you are hosting a webcast. 11. When you’re ready to conclude your webcast, click Record in your VidyoPortal again. The recording of your webcast is available in the VidyoReplay Library immediately. 13 4. Using the VidyoReplay Library All recordings are kept in the VidyoReplay library. The library lists information about each of the recordings so you can easily select which one you want to view. The following screen shows an example of a VidyoReplay library. WATCHING RECORDED CONTENT This section describes how to watch a recorded video or watch a webcast that’s in progress. To watch a recorded video: 1. Access the VidyoReplay library in one of the following ways: Click VidyoReplay Library on the Control Meeting page of your VidyoPortal. If your System Administrator has emailed you the URL of the VidyoReplay Library, log in directly using your username and password. You may want to bookmark the page in your browser so you can open the VidyoReplay Library easily any time you want to. 2. Click the video you want to watch. 14 4. Configuring VidyoReplay The video comes up by itself in the window and starts playing. Note the information above and below the screen. Above the screen: Recording title Date and time of recording Name of the recording’s creator Length of the recording and the recording profile used Below the screen: Name(s) of participants The screen itself has these controls: The gold bar and a minute/second timer underneath that provides a visual and quantitative representation to viewers how far into the recording or webcast they are. The Play/Pause button. The Volume control. The Pop-out button that puts the webcast or recording into a floating window, if it isn’t already in one. If you want to close this window, click the X in the upper right-hand corner of the window (the X appears when you view the video in “Pop-out” mode). The Full Screen button. If you want to exit Full Screen mode, press the Esc key on your keyboard. 3. To return to the VidyoReplay Library, click Back on your browser or the Backspace key on your keyboard. You can also click My Videos in the “breadcrumb trail” at the top of the screen. 15 4. Configuring VidyoReplay To watch a webcast that’s in progress: 1. Access the VidyoReplay library in one of the following ways: Click VidyoReplay Library on the Control Meeting page of your VidyoPortal. If your System Administrator has emailed you the URL of the VidyoReplay Library, log in directly using your username and password. 2. Click the webcast you want to watch. A webcast is in progress when this icon appears in the center of the video: from its currently playing, live position. . Viewing begins WORKING WITH YOUR VIDEO RECORDINGS To work with your video recordings: 1. Access the VidyoReplay library in one of the following ways: Click VidyoReplay Library on the Control Meeting page of your VidyoPortal. If your System Administrator has emailed you the URL of the VidyoReplay Library, log in directly using your username and password. 2. From the VidyoReplay Library, you can: Change your language preference by selecting your language of choice from the dropdown box in the upper left-hand corner. Sort by Title, Date Created, or the Room from which the recording originated (this is generally the host’s personal room or it could be a VidyoRoom appliance, which is typically used in conference rooms). Choose to view 15, 30, or ALL the videos. If all of the videos won’t fit on a single page, you can go to other pages (1 2 >>). 16 4. Configuring VidyoReplay Change to an alternative view by clicking the rightmost Change Layout button. To view only the videos you have created, click My Videos in the upper right-hand corner of the screen. If you click My Videos in the upper right-hand corner of the screen, the My Manager panel opens on the left-hand side of the screen, and the individual videos now have various controls above and below them. 3. Work with your individual video recordings in any of the following ways: Download any of your videos to your own computer by clicking on the word Download under the video you wish to download. The recording is automatically downloaded as an .mp4 (.m4a for audio only) file. Prevent the video from being deleted by clicking the lock icon. Note that the Super Admin can still delete your locked videos. Send an invitation to someone to watch a video by clicking the envelope icon. 17 4. Configuring VidyoReplay Delete a video by clicking the trash can icon. Once you delete a video, you cannot recover it. Delete more than one video at a time by selecting the checkbox on each video that you want to delete or by clicking Select All, and then clicking Delete Selected in the upper righthand corner of the page. View the status of the videos by looking at the My Manager panel on the left-hand side of the page. In the screenshot above, all of this user’s recordings are marked “New”. A recording retains its “New” status until you (or an administrator) make a change to its status. Add information to a video by clicking the word Edit under the video you wish to edit. For more information about how to add information to a video, see the following section. 4. When you’re done using the VidyoReplay Library, click Log Out in the upper right-hand corner to exit. If your VidyoPortal is open when you log out of the Library, your VidyoPortal is left in this open state. 18 4. Configuring VidyoReplay Setting the Language for the VidyoReplay Library The VidyoReplay Library interface is available in these 15 languages: English Korean Chinese (Simplified) Polish Chinese (Traditional) Portuguese Finnish Russian French Spanish German Thai Italian Turkish Japanese Set the language of your VidyoReplay Library using the drop down on the upper left corner of the screen. Note: Interfaces are immediately modified after selecting your preferred language or color scheme using the drop downs. To set your preferred language of your VidyoReplay Library using the drop down on the upper left of the screen: Select your desired language using the language drop down on the upper right corner of the VidyoReplay Library. Adding Information to a Video Recording To add information to a video recording: 1. In the VidyoReplay Library, clicking the word Edit under the video you wish to edit. 19 4. Using the VidyoReplay Library New data entry fields open on the left side of the screen. By default all of your videos are named “<your username> conference recording”. 2. In the Title field, change the title of your video if desired. You can give your video a descriptive name like “Product Alpha Conference” or “Job Safety Demonstration” or whatever best describes the purpose of the webcast 3. In the Description field, briefly describe your video. For example, you might describe the audience, subject matter, and so on. 4. In the Tags field, enter the words people might use to search for your video. Separate each tag by a comma and a space. 5. Set the Who can watch setting to one of the following: Private means only you can watch it. Organization means only people in your organization (e.g., your company) can watch it. Public means that anyone in the world with an invitation can watch the video. 6. For added security, select the Set PIN checkbox and enter a PIN code. Distribute the pin to those who were sent the link to the video. 7. Click Save. 20 4. Using the VidyoReplay Library 8. If you desire, do any of the following: If you click Share, a pre-written email message containing the link to the video is created in your default email program. You can address it to as many people as you like. You can add any personalized text if you want to also. Click your email program’s Send button to send the invitation. (Bear in mind that you’re not inviting people to a live webcast, you’re inviting them to view a recorded video.) If you click the clipboard icon, the link to the pre-recorded video is copied to your clipboard. This link can be sent via any messaging system or embedded in a webpage. 9. When you’re done using the VidyoReplay Library, click Log Out in the upper right-hand corner to exit. If your VidyoPortal is open when you log out of the Library, your VidyoPortal is left in this open state. Searching for a Video Recording To search for a video recording: 1. Access the VidyoReplay library in one of the following ways: a. Click VidyoReplay Library on the Control Meeting page of your VidyoPortal. b. If your System Administrator has emailed you the URL of the VidyoReplay Library, log in directly using your username and password. 2. Type all or part of the title or a tag into the search box at the top of the page. 3. Click the magnifying glass icon or press Enter. 21 4. Using the VidyoReplay Library 4. Recordings with a similar title or with matching tags are shown. 22