1
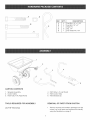
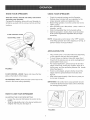
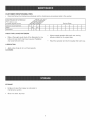
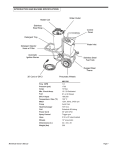
Owner's
Manual
®
CAST
Model No. 48&243222
CAUTION:
,,
,,
,,
,,
,,
Before using this product,
read this manual and follow
al! Safety Rutes and
Operating Instructions.
iMPORTANT
Safety
Assembly
Operation
Maintenance
Parts
- READ THiS FIRST!!!
For Missing Parts or AssembUy Questions
PUease Call 866-576-8388
Mon.-Fri. 7 am - 5 pm CST.
FAX 217-728o2032 or e-maiU [email protected]
Missing parts will be sent UPS in 24 hours directly to your home.
Sears,
Roebuck and Co., Hoffman
Estates,
IL 60179 U.S.A.
www=sears=com/craftsman
FORM NO. 49457 (REV. 5/05)
LiMiTED ONE YEAR WARRANTY
ON CRAFTSMAN
SPREADER
For one year from the date of purchase, when this spreader is maintained and lubricated according to the operating
and maintenance instructions in the owner's manual, Sears will repair any defect in material or workmanship free of
charge. If this spreader is used for commercia! or rental purposes, this warranty applies for only 90 days from the date of
purchase.
This warranty does not cover repairs necessary because of operator negligence or abuse, including the failure to maintain
the equipment according to instructions contained in the owner's manual.
WARRANTY SERVICE IS AVAILABLE BY CONTACTING THE NEAREST SEARS SERVICE CENTER/DEPARTMENT
iN THE UNITED STATES.
This warranty applies only while this product is in the United States.
This warranty gives you specific legal rights, and you may also have other rights which vary from state to state.
Sears, Roebuck and Co. D/817 WA. Hoffman Estates, Chicago, IL 60179
The model number and serial numbers wil! be found on a
decal attached to the spreader.
You should record both the serial number and the date of
purchase and keep in a safe place for future reference.
Read the towing vehicle owners manual and towing
vehicle safety rules. Know how to operate your tractor
before using the broadcast spreader attachment.
Read the chemica! label instructions and cautions for
handling and applying the chemicals purchased for
spreading.
Wear eye and hand protection when handling and
when applying lawn or garden chemicals.
Never operate tractor and spreader attachment
without wearing substantial footwear, and do not allow
anyone to ride or sit on spreader attachment frame.
Never allow children to operate the tractor or spreader
attachment, and do not allow adults to operate without
proper instructions.
MODEL NUMBER:
486.243222
SERIAL NUMBER:
DATE OF PURCHASE:
Always begin with the transmission in first (low) gear
and with the engine at low speed, and gradually
increase speed as conditions permit. Maximum towing
speed - 6 M.RH.
When towing broadcast spreader do not drive too
close to a creek or ditch and be alert for holes and
other hazards which could cause you to goose control
of the broadcast spreader and tractor.
Before operating vehicle on any grade (hill) refer to
the safety rules in the vehicle owner's manual concerning safe operation on slopes. Stay off steep
slopes!
Follow maintenance and lubrication instructions as
outlined in this manual.
Look for this symbo! to point out important safety precautions. It means-oAttention!!
is involved.
Become alert!! Your safety
J
REF.
A
B
C
D
E
CARTON
_ QTY.
4
4
1
8
1
DESCRIPTION
Hex Bolt, 1/4" x 1o3/4"
Hex Bolt, 1/4" x 2"
Hitch Pin
Nut, 1/4"
Hair Cotter Pin, 1/8"
CONTENTS
1. Spreader Assembly
2. Contro! Cable
3. Hitch Tube, R.H. (Right Hand)
4. Hitch Tube, LH. (Left Hand)
5. Hitch ControITube
6. Hitch Brackets (2)
TOOLS
REMOVAL
REQUIRED
(2) 7/16" Wrenches
FOR ASSEMBLY
,
OF PARTS FROM CARTON
Remove a!l parts and hardware packages from the
carton. Lay out all parts and hardware and identify
using the illustrations on page 3.
Assemble
vinylcapsontotheendsoftheR,H,and
LH, HitchTubes,Seefigure1,
Assemble
theR,H,HitchTubetothespreaderframe
tubeusingtwo1/4"x 2"hexboltsand1/4"nuts,Do
not tightenyet. RepeatforLH, HitchTube,See
figure1,
AssembletheHitchBracketstotheHitchControl
Tubeusingtwo1/4"x 1o3/4"hexboltsand1/4"nuts,
Tighten,Seefigure3,
Assemblethehitchpinthroughthehitchbracketsand
securewiththe1/8"haircotterpin,Seefigure3,
HmTCR PUN
_ 1/4" x 1o314"
/ HEX BOLT
_
114"NUT
114"×2"
HEXBOLT
FIGURE1
FIGURE 3
o
Assemble the Hitch Control Tube between the Hitch
Tubes using two 1/4" x 1o3/4" hex bolts and 1/4" nuts,
Tighten all bolts and nuts See figure 2,
®
Assemble the vinyl cap onto the Hitch Control Tube,
See figure 4,
Assemble the Control Cable to the Hitch Control Tube
using the carriage bolt and nylon wing nut, See figure
4,
CARRmAGE
114" NUT
114"× 1o3/4"
HEX BOLT
FIGURE 2
FIGURE 4
BOLT
KNOW YOUR SPREADER
Read this
operating
Compare
familiarize
owner's manual and safety rules before
your Spreader.
the illustration below with your Spreader to
yourself with the various controls and their
USING YOUR SPREADER
.
locations.
.
.
FLOW CONTROL LEVER
ADJUSTABLE
Check the material package and the Spreader
Settings sheet included with your spreader for the
proper spreader setting and application rate.
Before filling spreader, move the control lever to the
"OFF" position.
Move spreader onto a flat surface - either a walk or a
driveway - and fill.
Slide the Adjustable Stop to the desired setting.
Start the spreader in motion, then move the control
lever fon_ard against the adjustable stop to begin
spreading.
STOP
NOTE: Always place control lever in the "OFF" position
while filling spreader and when stopping or turning, to
prevent release of excess fertilizer.
APPLiCATiON
.
.
FIGURE 5
.
FLOW CONTROL LEVER Opens and doses the flow
plate on the bottom of the hopper.
ADJUSTABLE
STOP Allows the flow control lever to be
moved to the same setting repeatedly.
HOW TO USE YOUR
.
TiPS
This unit wii! cover a 4 to 8 foot wide area depending
on the material used and the towing speed.
To avoid misses or striping, make each pass about
5 feet from the previous one so some overlapping of
spread pattern does occur.
For easiest application, spread across the shortest
edges of lawn first, making two "header" strips for a
turning area, and then spreading between the header
strips. See figure 6.
if lawn is odd shaped, spread a border around the
edges and then spread between the border. See
figure 6.
Keep wheel approximately 4 feet from any area you
do not wish to spread.
IMPORTANT: Be careful when using spreader around
ornamental plants because weed control chemicaJs
can damage these plants.
SPREADER
ADJUSTING THE FLOW RATE SETTING
Loosen the wing nut that fastens the control to the
handle.
o Slide the Adjustable stop to the desired setting and
retighten the wing nut. See figure 5.
FIGURE 6
CUSTOMER
RESPONS_B_UT_ES
Read and follow the maintenance schedule and the maintenance procedures listed in this section.
MAINTENANCE
SCHEDULE
Fill in dates as you
complete regular service.
Check for loose fasteners
_,_-/"
Service Dates
X
X
Lubrication
X
X
CHECK FOR LOOSE FASTENERS
Make a thorough visua! check of the Spreader for any
bolts and nuts which may have loosened. Retighten
any loose bolts and nuts.
LUBRICATION
Apply a few drops of oil to all moving parts.
CLEANING
STORAGE
,,
Empty and clean the hopper as instructed in
maintenance section,
,,
Store in a dean, dry area,
Always empty spreader after each use, storing
leftover materia! in it's original bag.
Wash the spreader and dry thoroughly after each use.
REPAIR PARTS FOR MODEL 486.243222
6
26 _ c_._ <" !j_
....
10
14
25
12
3
25
11
15
21
23
22
16
/
/
I
i
i
I
i
i
I
I
i
RER
NO,
PART
NO,
1 47994BLK
2
49085
3
49087
4
49088
5
49091
6
43648
7
1509-69
8
47189
9
43088
10
45165
11
47141
12
47983
13
49820
14
46503
QTY,
1
1
1
1
1
2
4
10
2
1
1
1
1
1
/
4
11
7
22
17
19
DESCRIPTION
Hopper
Frame Tube
Hitch Tube (LH)
Hitch Tube (RH)
Hitch Control Tube
Hex Bolt, 1/4-20 x 1-1/2"
Hex Bolt, 1/4-20 x 1-3/4"
Nylock Nut, 1/4-20
Washer, 1/4 Std
Carriage Bolt 1/4-20 x 2"
Nylon Wing Nut 1/4-20
Flow Slide
Control Cable
Wheel
RER
NO,
15
16
17
18
19
2O
21
22
23
24
25
26
27
PART
NO,
48865
44663
49082
47851
49084
47124
47963
24446
47623
46699
44481
48934
43343
49457
QTY,
1
2
1
2
1
1
2
2
1
4
3
1
1
1
DESCRiPTiON
Drive Wheel
Hub Cap (Push Nut)
Axle
Spacer
Gearbox
impeller
Hex Flange Bearing
Hitch Bracket
Hitch Pin
Hex Bolt, 1/4-20 x 2"
Vinyl Cap
Hairpin, Agitator
Hairpin, Cotter
Owners Manual
iiiiiiiiiiiiiiiiiiiiii_
¸¸¸
HHHHHHHHHH'
HHHHHHHHi_
iiiiiiiiiiiiiiiii}
;!i!ii!ii!ii!ii!ii!ii!ii!ii!ii!ii!ii!ii!ii!
For repair of major brand appliances
in your own home°°°
www.sear$.com/partsdirect
® Registered Trademark
© Sears, Roebuck and Co.
/ TM Trademark
of Sears, Roebuck and Co
® Marca Registrada / TM Marca de F_brica de Sears, Roebuck
and Co.