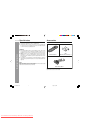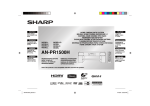
1
Thank you for purchasing this SHARP product. To obtain the best performance from
this product, please read this manual carefully. It will guide you in operating your SHARP
product.
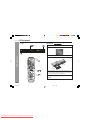
DVD PLAYER
R
POWE
STOP
PLAY
MODEL
1
VOL
MIC
–
– SKIP
D
PBC
TE
REMO
OSE SENSOR
N/CL
OPE
DV-SL1500W
ALL
SVCD
-SL8
PLA
DVD
SUB
I /P
SETU
P
ZOO
M
(–)O
DIGE
ST
PAL/N
OPERATION MANUAL
SHARP CORPORATION
Downloaded From DvDPlayer-Manual.com Sharp Manuals
TITL
E
ANG
LE
SCA
N
2/20/06, 6:01 PM
TSC
RAND
VIDE
O PLA
YER
OM
STE
SLO
W
AUD
IO
P
SOU
MUT
E VOLU
ND
ME
PRO
G
1
4
8
0
SCORE
/PBC
A-B
REP
CE
ON/
STAN
DBY
TITL
E
7
DIRE
CT
MENU
R
H
(+)O
DVD
1
E
ENTE
OSD
DV-SL800W F_B cover
HC
EAT
ON/OFF
2
5
9
6
OPE
CLO N/
SE
3
2
OFF
ON
DV-SL1500W
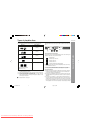
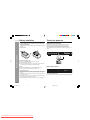
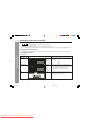
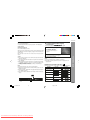
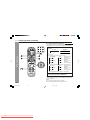
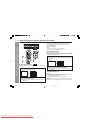
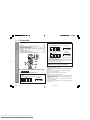
Special notes
Accessories
CAUTION
Please confirm that the following accessories are included.
I This product is classified as a CLASS 1 LASER product.
I This product contains a low power laser device. To ensure continued safety
do not remove any cover or attempt to gain access to the inside of the product. Refer all servicing to qualified personnel.
SUB
TITL
E
ANG
LE
I/P
SCA
SET
UP
ZOO
M
H
(–)O
CE
N
MENU
1
ON/
STA
NDB
Y
2
4
OPE
CLO N/
SE
6
8
9
0
SCORE
/PBC
3
5
7
DIRE
CT
TITL
E
ON/OFF
A-B
ENT
REP
EAT
ER
H
(+)O
CE
OSD
STE
P
DIG
EST
PAL/N
TSC
Important Instruction
WARNINGS
SLO
W
RAN
DOM
AUD
DVD
92L VIDE
WIR O
249 PLA
1-D YER
72
I When the ON/STAND BY button is set at STAND-BY position, mains voltage
is still present inside the unit. When the ON/STAND BY button is set at
STAND-BY position, the unit may be brought into operation by the remote
control.
I This unit contains no user serviceable parts. Never remove covers unless
qualified to do so. This unit contains dangerous voltages, always remove
mains plug from the socket before any service operation and when not in use
for a long period.
I To prevent fire or shock hazard, do not expose this appliance to dripping or
splashing. No objects filled with liquids, such as vases, shall be placed on the
apparatus.
SOU
ND
MUT
E VOL
UME
IO
PRO
G
Remote control x 1
“AAA”
(UM-4, R03, HP-16 or similar ) x 2
NOTE
Audio-visual material may consist of copyrighted works which must not be recorded
without the authority of the owner of the copyright.
Please refer to the relevant laws in your country.
Audio / Video cable x 1
Note:
Only the above accessories are included.
1
DV-SL800W 01-16
1
Downloaded From DvDPlayer-Manual.com Sharp Manuals
2/9/06, 2:53 PM
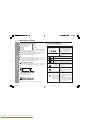
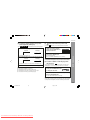
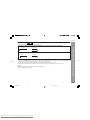
Contents
DV-SL1500W
Page
Precautions ................................................................................... 3
Types of playable discs ............................................................... 4
Description of discs ..................................................................... 5
Controls and indicators ......................................................... 6 - 7
H System Connections
Connecting to a conventional TV ......................................... 8 - 11
Connecting to a TV with Progressive-Scan Capability ... 12 - 13
Additional connections ...................................................... 14 - 18
H Preparation for Use
Battery installation ..................................................................... 19
Turning the power on ................................................................. 19
Changing the system setup ............................................... 20 - 27
General control ........................................................................... 28
H DVD Operation
Page
Various settings
To change the subtitle language ............................................... 37
To change the audio language (audio output) ........................ 37
H Video CD and Super Video CD Operation
Video CD and Super Video CD operation
Playback of a video CD (super video CD) with P.B.C. ON ...... 38
Digest selection of discs and tracks ........................................ 39
Disc digest selection .................................................................. 39
Track digest selection ................................................................ 39
Random play ............................................................................... 40
To change the TV type ............................................................... 41
To change the audio channel .................................................... 41
To change the display on TV screen ........................................ 41
To play without activating the playback control function ...... 42
To start playback from the desired point (direct play) ............ 42
H CD, CD-R and CD-RW Operation
DVD playback
Playback .............................................................................. 29 - 30
To resume playback after stopping (resume play) .................. 30
DVD mode operation indicators ................................................ 30
Basic operation
To locate the beginning of a chapter (track) (skip) ................. 31
Fast forward/Fast backward (search) ....................................... 31
To start playback from the desired point (direct play) ............ 32
Useful operation
Still picture .................................................................................. 33
Slow-motion play ........................................................................ 33
To change the angle ................................................................... 34
To zoom images (zoom) ............................................................. 34
To play repeatedly (repeat play) ................................................ 35
To play the contents between the specified points repeatedly
(A-B repeat) ................................................................................. 36
To select a title from the top menu of the disc ........................ 36
To select a subtitle or audio language from the disc menu ... 36
CD operation
To play in the desired order (programmed play) ..................... 43
JPEG disc operation
Playback on the JPEG menu screen ................................ 44 - 45
Zoom function ............................................................................. 46
H Advanced Features
General Information
H General Information
Enjoying various sounds ........................................................... 47
Playing karaoke .......................................................................... 48
Karaoke scoring ......................................................................... 48
H References
Troubleshooting chart ........................................................ 49 - 50
Error indicators and warnings .................................................. 51
Maintenance ................................................................................ 51
Specifications ............................................................................. 51
Copyright ..................................................................................... 52
2
DV-SL800W 01-16
2
Downloaded From DvDPlayer-Manual.com Sharp Manuals
2/9/06, 2:53 PM
DV-SL1500W
Precautions
H General
I Please ensure that the equipment is positioned in a well ventilated area
and ensure that there is at least 10 cm (4") of free space along the sides,
top and back.
I The ventilation should not be impeded by covering
the ventilation openings with items, such as
newspapers, tablecloths, curtains, etc.
POWER
STOP
PLAY
– SKIP
1
VOL
MIC
2
ON
OFF
–
D
PBC
ALL
REMOTE
SENSOR
SVCD
OPEN/CLOSE
DVD
10 cm (4")
10 cm (4")
15 cm (6")
10 cm (4")
General Information
I Use the unit on a firm, level surface free from vibration.
POWER
PLAY
STOP
1
REW
FWD
VOL
MIC
OFF
VOL
MIC
The voltage used must be the same as that specified on this unit. Using this
product with a higher voltage other than that which is specified is dangerous
and may result in a fire or other type of accident causing damage. SHARP will
not be held responsible for any damage resulting from use of this unit with a
voltage other than that which is specified.
H Care of DVD/CD discs
POWER
STOP
1
Warning:
ON
DV-SL8
PLAY
I No naked flame sources, such as lighted candles, should be placed on the
apparatus.
I Attention should be drawn to the environmental aspects of battery disposal.
I This unit should only be used within the range of 5°C - 35°C (41°F - 95°F).
2
REMOTE
OPEN/CLOSE SENSOR
DVD PLAYER
I Keep the unit away from direct sunlight,
strong magnetic fields, excessive dust,
humidity and electronic/electrical equipment
(home computers, facsimiles, etc.) which
generate electrical noise.
2
OFF
ON
– SKIP –
D
PBC
REMOTE
OPEN/CLOSE SENSOR
SVCD
ALL
V-SL8
DVD PLA
I Do not place anything on top of the unit.
I Do not expose the unit to moisture, to temperatures higher than 60°C (140°F)
or to extremely low temperatures.
I If the unit does not work properly, disconnect the AC power lead from the
wall socket. Plug it back and turn on the unit.
I In case of an electrical storm, unplug the unit for safety.
I Hold the AC power plug by the head when removing it from the wall socket,
as pulling the lead can damage internal wires.
I Do not remove the outer cover, as this may result in electric shock.
Refer internal service to your local SHARP service facility.
DVD/CD discs are fairly resistant to damage, however mistracking can occur
due to an accumulation of dirt on the disc surface. Follow the guidelines below
for maximum enjoyment from your DVD/CD collection and player.
I Do not write on either side of the disc, particularly the non-label side from
which signals are read. Do not mark this surface.
I Keep your discs away from direct sunlight, heat, and excessive moisture.
I Always hold the DVD/CDs by the edges. Fingerprints, dirt, or water on the
DVD/CDs can cause noise or mistracking. If a DVD/CD is dirty or does not
play properly, clean it with a soft, dry cloth, wiping straight out from the
centre, along the radius.
NO
3
DV-SL800W 01-16
3
Downloaded From DvDPlayer-Manual.com Sharp Manuals
PLA
2/9/06, 2:53 PM
YES
Correct
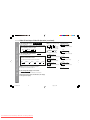
Types of playable discs
DV-SL1500W
Disc contents
General Information
Disc type
DVD Video Disc
Audio and video
(movies)
Super Video CD
Audio and video
(movies)
Video CD
Audio and video
(movies)
Audio CD
Audio
2
or 3
or 4
Icons used in this operation manual
Some functions may not be available depending on discs. The following icons
indicate the discs that can be used in the section.
... Indicates DVDs.
... Indicates Super video CDs.
... Indicates video CDs.
Audio and picture
CD-R/CD-RW (*1)
... Indicates audio CDs.
... Indicates CD-R/RW with JPEG recording.
I Some operations may not be performed depending on discs even if they
are described in this manual.
I During operation, “INVALID KEY” may be displayed on the screen. This
Or CD-R/CD-RW recorded in
JPEG format (*2) (*3)
means that the operations described in this manual are not possible.
(*1): The CD-R/CD-RW may not be played back properly depending on the
recording equipment or the disc.
(*2): JPEG or JPG picture discs also play on this unit. However, pictures may
not be clear (depends on resolution and recording method).
(*3): JPEG maximum resolution limit at 2Mb file size.
If photo bigger than this size, a dialog box will appear to display “over file
size” and go to next picture.
I For unplayable discs, see page 5.
General Information
The DVD player can play back discs bearing any of the following marks:
Types of playable DVD discs vary depending on the region. This unit can play
back only DVDs with the same region number as written on the back of the
unit.
Copyright Information:
I Unauthorised copying, broadcast, public display, transmission, public per
formance and rental (regardless of whether or not such activities are for
profit) of disc contents are prohibited by law.
I This system is equipped with copy protection technology that causes sub
stantial degradation of images when the contents of a disc are copied to a
videotape.
I This system is protected by U. S. patents and other intellectual property
rights, the copyright for which belongs to Macrovision Corporation. The use
of Macrovision’s copy protection technology in the system is authorised by
Macrovision and is intended for home use only, unless otherwise authorised
in writing by Macrovision. Reverse engineering or disassembly is prohibited.
4
DV-SL800W 01-16
4
Downloaded From DvDPlayer-Manual.com Sharp Manuals
2/9/06, 2:53 PM
Description of discs
H Discs that cannot be played
General Information
I DVDs without the region number on
the back of the unit or “ALL”.
I DVDs with SECAM system
I DVD-ROM
I DVD-RAM
I DVD-Audio
I CDG
I CDV
I Photo CD
I CD-ROM
I SACD
I Discs recorded in special formats, etc.
I The discs above cannot be played at all, or no sound is heard although
images appear on the screen or vice versa.
I Incorrect operation may damage the speakers and can have a negative
effect on your hearing when played at high volume settings.
I You cannot play illegally produced discs.
H Icons used on DVD discs
Check the icons on the DVD case before playing your discs.
Display
2
DVDs are divided into “titles” and “chapters”. If the disc has more than one
movie on it, each movie is a separate “title”. “Chapters” are subdivisions of
titles.
3
4
Format recorded on the DVD
Notes:
I A disc with has scratches or fingerprints may not play properly. Refer to
“Care of DVD/CD discs (page 3)” and clean the disc.
I Do not play the discs of special shapes (heart or octagon shaped) as they
can be ejected whilst rotating and cause injury.
Title, chapter and track
Description
Region number
(playable area number)
Chapter 1
Title 2
Chapter 2
Chapter 3
Chapter 1
Recorded in 4:3.
You can enjoy wide images on a wide-screen TV and
4:3 images with the side edges cut on the 4:3 size TV.
Type of subtitles recorded
2
Example:
1: English
2: French
2
Chapter 2
Audio CDs consist of “tracks”.
A “track” is each tune on an audio CD.
Track 1
Track 2
Track 3
Track 4
Track 5
Note:
Title, chapter, or track numbers may not be recorded on some discs.
5
Downloaded From DvDPlayer-Manual.com Sharp Manuals
Recorded subtitle languages.
Language can be selected with the
SUBTITLE button.
Number of angles recorded on the
DVD.
Angles can be selected with the
ANGLE button.
Number of audio tracks and audio The number of audio tracks and aurecording systems
dio recording systems are indicated.
Example:
I The audio recorded on the DVD
1: Original <English>
can be switched by using the
(DTS 5.1 Surround)
AUDIO button.
2: English (Dolby
I The number of audio tracks and
Digital 5.1 Surround)
recording systems vary depending on the DVD. Check them in
the DVD’s manual.
5
DV-SL800W 01-16
To adopt the video format to the
connected TVs (“wide-screen TV” or
“4:3 size TV”).
You can enjoy wide images on a wide-screen TV, and
letterbox size images on the 4:3 size TV.
Number of camera angles
Title 1
DVD discs are programmed with
region numbers indicating countries
in which they can be played. This
system can play discs with region
number on the back of the unit.
2/9/06, 2:53 PM
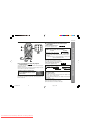
General Information
DV-SL1500W
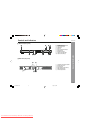
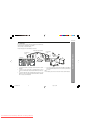
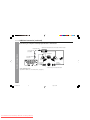
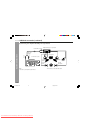
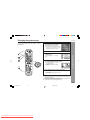
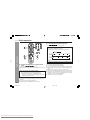
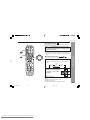
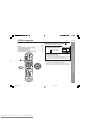
Controls and indicators
DV-SL1500W
1
2
34
DV-SL1500W DVD PLAYER
5
6 7
8
1)
2)
3)
4)
5)
6)
7)
8)
9)
10)
ON/STANDBY Button
Microphone Volume Controls
Play or Pause Button
Stop Button
Disc Tray
Disc Tray Open/Close Button
Remote Sensor
Microphone Sockets
Chapter (track) Skip down
Chapter (track) Skip up
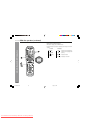
1)
2)
3)
4)
5)
6)
Component Video Output Sockets
Video Output Socket
AC Power Lead
Digital Output Socket (Coaxial)
Audio Output Sockets
S-Video Output Socket
9!
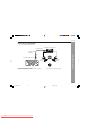
H Main unit (rear panel)
1
2
3
General Information
H Main unit (front panel)
456
6
DV-SL800W 01-16
6
Downloaded From DvDPlayer-Manual.com Sharp Manuals
2/9/06, 2:53 PM
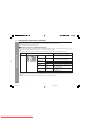
DV-SL1500W
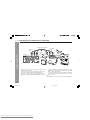
Controls and indicators (continued)
General Information
1
2
3
4
5
6
7
8
9
!
"
#
$
%
&
(
)
~
+
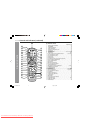
H Remote control
,
.
/
:
;
<
=
>
?
@
[
\
]
^
_
{
|
1.
2.
3.
4.
5.
6.
7.
8.
9.
10.
11.
12.
13.
14.
15.
16.
17.
18.
19.
20.
21.
22.
23.
24.
25.
26.
27.
28.
29.
30.
31.
32.
33.
34.
35.
36.
37.
Reference page
Remote Control Transmitter . . . . . . . . . . . . . . . . . . . . . . . . . . . . . . 19
ON/STANDBY . . . . . . . . . . . . . . . . . . . . . . . . . . . . . . . . . . . . . 20
Subtitle Select Button . . . . . . . . . . . . . . . . . . . . . . . . . . . . . . . . . . . 37
Angle Select Button . . . . . . . . . . . . . . . . . . . . . . . . . . . . . . . . . . . . . 34
Interlace and Progressive Scan . . . . . . . . . . . . . . . . . . . . . . . . . . . . . . 21
Direct Button . . . . . . . . . . . . . . . . . . . . . . . . . . . . . . . . . . . . . . . . . . 42
Setup Button . . . . . . . . . . . . . . . . . . . . . . . . . . . . . . . . . . 20, 21, 22, 23, 24
Title Select Button . . . . . . . . . . . . . . . . . . . . . . . . . . . . . . . . . . . . 36
Zoom Button . . . . . . . . . . . . . . . . . . . . . . . . . . . . . . . . . . 34, 46
Cursor or Echo Level Up and Down Buttons. . . . . . . . . . 20, 34, 44, 48
Key Control Button (normal) . . . . . . . . . . . . . . . . . . . . . . . . . . . . . . 48
Key Control Button (lower) . . . . . . . . . . . . . . . . . . . . . . . . . . . . . . 48
Fast Forward . . . . . . . . . . . . . . . . . . . . . . . . . . . . . . . . . . . . . . . . . . . . . . 31
Fast Backward . . . . . . . . . . . . . . . . . . . . . . . . . . . . . . . . . . . . . . . . . . . . 31
Step Button (Frame by frame advance Playback) . . . . . . . . . . . . . . . 33
On screen Display On/Off Button . . . . . . . . . . . . . . . . . . . . . . . . 41
Video CD Digest Button . . . . . . . . . . . . . . . . . . . . . . . . . . . . . . . . . . 39
Slow Button . . . . . . . . . . . . . . . . . . . . . . . . . . . . . . . . . . . . . . . 33
PAL/NTSC Select Button . . . . . . . . . . . . . . . . . . . . . . . . . . . . . . 20
Disc Tray Open/Close Button . . . . . . . . . . . . . . . . . . . . . . . . . . . . . 29
Direct Number Buttons . . . . . . . . . . . . . . . . . . . . . . . . . . . . . . . . . . 32
Menu/Playback Control On/Off Button . . . . . . . . . . . . . . . 36, 42, 44
KARAOKE Scoring ON/OFF . . . . . . . . . . . . . . . . . . . . . . . . . . . . . . . . . 48
A-B Repeat Button . . . . . . . . . . . . . . . . . . . . . . . . . . . . . . . . . . . . . 36
Repeat Play Button . . . . . . . . . . . . . . . . . . . . . . . . . . . . . . . . . . . . . 35, 45
Enter Button . . . . . . . . . . . . . . . . . . . . . . . . . . . . . . . . . . . . . .20, 35, 43, 44
Play or Pause Button . . . . . . . . . . . . . . . . . . . . . . . . . . . . . . 29, 30, 31, 33
Key Control Button (highest) . . . . . . . . . . . . . . . . . . . . . . . . . . . . . 48
Stop Button . . . . . . . . . . . . . . . . . . . . . . . . . . . . . . . . . . . . . . . . . . . 30
Chapter (track) Skip Up . . . . . . . . . . . . . . . . . . . . . . . . . . . . . . . . . . . . . 31
Chapter (track) Skip Down . . . . . . . . . . . . . . . . . . . . . . . . . . . . . . . . . . 31
Sound Button . . . . . . . . . . . . . . . . . . . . . . . . . . . . . . . . . . . . . . . . 27
Mute Button . . . . . . . . . . . . . . . . . . . . . . . . . . . . . . . . . . . . . . . . . . . 28
Volume Up and Down Buttons . . . . . . . . . . . . . . . . . . . . . . . . . . . . . . 28
Programme Button . . . . . . . . . . . . . . . . . . . . . . . . . . . . . . . . . . . . . 43, 44
Audio Select Button . . . . . . . . . . . . . . . . . . . . . . . . . . . . . . . . . . . . . 37
Random Button. . . . . . . . . . . . . . . . . . . . . . . . . . . . . . . . . . . . . . . . . . 40
7
DV-SL800W 01-16
7
Downloaded From DvDPlayer-Manual.com Sharp Manuals
2/9/06, 2:53 PM
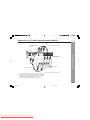
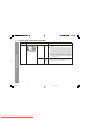
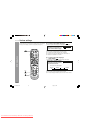
Connecting to a conventional TV
DV-SL1500W
Connect the DVD player to your TV.
To VIDEO
OUT socket
(Yellow)
TV with Audio/Video input sockets
AUDIO
VIDEO
INPUT
1
To AUDIO OUT sockets
R-AUDIO-L
System Connections
(Red) R
(White) L
DVD player
VIDEO
(White) L
Audio/Video cable (supplied)
(Red) R
To audio
input sockets
To video input
socket (Yellow)
Notes:
I Please refer to your TV instruction manual.
I When you connect the DVD player to your TV, be sure to turn off the power
and disconnect both units from the wall socket until all the connections have
been made.
I If your TV has one audio input socket, connect the AUDIO OUT sockets of
the DVD player to a Y-cable adaptor (not supplied), then connect it to the TV
Audio input. Please consult your local audio/video dealer.
I Do not connect the DVD player to a VCR directly. The playback picture will
be distorted because DVD discs are copy protected.
8
DV-SL800W 01-16
8
Downloaded From DvDPlayer-Manual.com Sharp Manuals
2/9/06, 2:53 PM
Connecting to a conventional TV (continued)
Using the S-VIDEO OUT sockets
Notes:
Please follow the steps before turn on the power.
1. If your TV has the S-video input socket, connect the DVD player with the
S-video cable (not supplied). (The VIDEO OUT socket connection is not
necessary.)
You can enjoy clearer picture playback.
2. You also need to connect the left and right audio cables to the AUDIO OUT
sockets of DVD player and the Audio input sockets of the TV.
Using the COMPONENT VIDEO OUT sockets
Notes:
Please follow the steps before turn on the power.
1. If your TV has the component video input sockets, connect the DVD player
to these sockets. (The VIDEO OUT or S-VIDEO OUT socket connection is
not necessary.)
You can enjoy high quality picture playback.
2. You also need to connect the left and right audio cables to the AUDIO OUT
sockets of DVD player and the Audio input sockets of the TV.
DVD player
System Connections
DVD player
TV
TV
*Please consult your local audio/video dealer.
*Component video cable (not supplied)
9
DV-SL800W 01-16
9
Downloaded From DvDPlayer-Manual.com Sharp Manuals
2/9/06, 2:53 PM
Red
*S-video cable
(not supplied)
Blue
COMPONENT VIDEO INPUT
Y
PB
PR
Green
To S-video input
socket
Red
To S-VIDEO
OUT socket
Green
S-VIDEO IN 1
Blue
DV-SL1500W
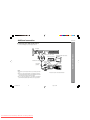
Connecting to a conventional TV (continued)
DV-SL1500W
Using RF Modulator
If your TV does not have a Video input socket and has an aerial terminal only,
please purchase the *RF Modulator (not supplied).
(*Please consult your audio/video dealer.)
Example: DVD player, TV and RF Modulator connections
A/V INPUT
1
TV
TO TV
ANT. IN
CHANNEL
VIDEO R-AUDIO-L
3
4
RF Modulator
4
VHF/UHF
AERIAL
IN
2
1.
2.
3.
Connect the aerial cable (not supplied) to the ANT. IN terminal of the RF
Modulator.
Connect the 75-ohm coaxial cable (not supplied) between the TO TV
terminal of the RF Modulator and the VHF/UHF AERIAL IN terminal of the
TV.
Connect the Audio/Video cable (supplied) between the AUDIO OUT and
VIDEO OUT sockets of the DVD player and the AUDIO INPUT and VIDEO
INPUT sockets of the RF Modulator.
4.
Turn on the TV, and set the channel number (CHANNEL3 or CHANNEL4)
on both TV and RF Modulator, whichever is not used for regular broadcast
in your area.
Note:
For more details, please refer to the instruction manual of the RF Modulator.
System Connections
(White) L
To audio input
sockets
(Red) R
3
To video input
socket (Yellow)
(Red) R
(White) L
DVD player
To VIDEO OUT
socket (Yellow)
Audio/Video cable (supplied)
To AUDIO OUT
sockets
10
DV-SL800W 01-16
10
Downloaded From DvDPlayer-Manual.com Sharp Manuals
2/9/06, 2:53 PM
DV-SL1500W
Connecting to a conventional TV (continued)
Example: DVD player, VCR, TV and RF Modulator connections
Audio/Video cable (supplied)
To audio input
sockets
1
(White) L
(Red) R
To video input
socket (Yellow)
4
To VIDEO OUT
socket (Yellow)
System Connections
DVD player
(Red) R
(White) L
To AUDIO OUT
sockets
A/V INPUT
2
TO TV
VHF/UHF
FROM ANT.
ANT. IN
IN
CHANNEL
VIDEO R-AUDIO-L
3
RF Modulator
4
TO TV
5
3
5
4
OUT
CHANNEL
VHF/UHF
AERIAL
IN
3
TV
1.
2.
3.
Connect the aerial cable (not supplied) to the VHF/UHF FROM
AERIAL IN terminal of the VCR.
Connect the 75-ohm coaxial cable (not supplied) between the TO TV OUT
terminal of the VCR and the ANT. IN terminal of the RF Modulator.
Connect the 75-ohm coaxial cable (not supplied) between the TO TV
terminal of the RF Modulator and the VHF/UHF AERIAL IN terminal of the
TV.
VCR
4.
Connect the Audio/Video cable (supplied) between the AUDIO OUT and
VIDEO OUT sockets of the DVD player and the AUDIO INPUT and VIDEO
INPUT sockets of the RF Modulator.
5. Turn on the TV, and set the channel number (CHANNEL3 or CHANNEL4)
on all TV, VCR and RF Modulator, whichever is not used for regular broadcasts in your area.
Note:
For more details, please refer to the instruction manual of the RF Modulator.
11
DV-SL800W 01-16
11
Downloaded From DvDPlayer-Manual.com Sharp Manuals
2/9/06, 2:54 PM
Connecting to a TV with Progressive-scan Capability
DV-SL1500W
Your TV must be capable of handling progressive scanning and have component video input capability.
*Component video cable (not supplied)
Blue
Red
Green
To COMPONENT VIDEO
OUT sockets
L
(White) L
(Red) R
*Audio cable (supplied)
Y
PB
Red
Blue
Green
R
AUDIO INPUT
PR
COMPONENT VIDEO INPUT
To audio input
sockets
TV with progressive-scan
capability
System Connections
To COMPONENT VIDEO
INPUT sockets
(Red) R
(White) L
DVD player
*Please consult your local audio/video dealer.
1.
2.
3.
Connect the DVD player to the component video input sockets of the TV.
(The VIDEO OUT or S-VIDEO OUT sockets connection is not encourage.)
You also need to connect the left and right audio cables to the AUDIO OUT
sockets of DVD player and the Audio input sockets of the TV.
Set the DVD player to the PROGRESSIVE position. (See page 21)
12
DV-SL800W 01-16
12
Downloaded From DvDPlayer-Manual.com Sharp Manuals
2/9/06, 2:54 PM
DV-SL1500W
Connecting to a TV with Progressive-scan Capability (continued)
Interlaced scanning
+
\
System Connections
Progressive scanning
Progressive Scanning
Whilst interlaced scanning produces one frame of video in two fields, progressive scanning creates one frame in one field.
Conventional interlaced scanning constitutes one second with 30 frames (60 fields), but progressive scanning constitutes it with 60 frames from scratch.
Progressive scanning can reproduce sharper picture with high resolution for still image or other picture containing long texts or horizontal lines.
This model has compliance with 525p (progressive) system.
Notes:
I Please refer to your TV instruction manual.
I When you connect the DVD player to your TV, be sure to turn off the power and disconnect both units from the wall socket until all the connections have been
made.
I Do not connect the DVD player to a VCR directly. The playback picture will be distorted because DVD video discs are copy protected.
Notes:
I For VIDEO connection, please refer to “BASIC CONNECTIONS”.
I Please refer to the instruction manual of your amplifier.
I When you connect the DVD player to your amplifier, be sure to turn off the power and disconnect both units from the wall socket until all the connections
have been made.
13
DV-SL800W 01-16
13
Downloaded From DvDPlayer-Manual.com Sharp Manuals
2/9/06, 2:54 PM
Additional connection
DV-SL1500W
H Connecting to an Audio System and TV
Connect the DVD player to an Audio System and a TV.
(Red) R
(White) L
To VIDEO OUT socket (Yellow)
TV with Audio/Video input sockets
To video input (Yellow)
AUDIO
VIDEO
INPUT
1
R-AUDIO-L
VIDEO
To AUDIO OUT sockets
*Video cable
(supplied)
To audio
input sockets
*Audio cable
(supplied)
(White) L
L
R
Notes:
I Please refer to the instruction manual of your Audio System and
TV.
I When you connect the DVD player to other equipment, be sure to
turn off the power and disconnect all of the equipment from the wall
socket until all the connections have been made.
I Do not connect the DVD player to a VCR directly. The playback
picture will be distorted because DVD discs are copy protected.
Audio System
AUDIO
INPUT
System Connections
DVD player
(Red) R
* Please consult your local audio/video dealer.
14
DV-SL800W 01-16
14
Downloaded From DvDPlayer-Manual.com Sharp Manuals
2/9/06, 2:54 PM
DV-SL1500W
Additional connection (continued)
H Connecting to an Amplifier with Dolby Digital Decoder or DTS Decoder
To digital audio input
Amplifier with Dolby Digital Decoder, DTS Decoder or MPEG 2 Decoder
System Connections
*Coaxial audio cable
(not supplied)
Centre speaker
To COAXIAL DIGITAL
OUT socket
Front left
speaker
Surround left
speaker
To enjoy Dolby Digital or DTS
Select “RAW” in “DIGITAL OUT” on the “AUDIO SETUP”. (See page 23)
Front right
speaker
Surround
right speaker
* Please consult your local audio/video dealer.
15
DV-SL800W 01-16
15
Downloaded From DvDPlayer-Manual.com Sharp Manuals
Subwoofer
2/9/06, 2:54 PM
Additional Connection (continued)
DV-SL1500W
H Connecting to a Digital Amplifier
You can enjoy 2 Channel Digital Stereo Sound.
Amplifier with a coaxial digital input
To digital audio input
To COAXIAL DIGITAL OUT socket
Front left
speaker
To enjoy 2 Channel Digital Stereo sound
Select “PCM” in “DIGITAL OUT” on the “AUDIO SETUP”. (See page 23)
Front right
speaker
* Please consult your local audio/video dealer.
System Connections
*Coaxial audio cable
(not supplied)
16
DV-SL800W 01-16
16
Downloaded From DvDPlayer-Manual.com Sharp Manuals
2/9/06, 2:54 PM
DV-SL1500W
Additional connection (continued)
H Connecting to an Amplifier with Dolby Pro Logic Decoder
To AUDIO INPUT sockets
Amplifier with Dolby Pro Logic Decoder
(White) L
(Red) R
System Connections
*Audio cable
(supplied)
Centre speaker
To AUDIO OUT sockets
Front left
speaker
Front right
speaker
Subwoofer
Surround left
speaker
Note:
Please refer to your amplifier instruction manual.
Surround
right speaker
* Please consult your local audio/video dealer.
17
DV-SL800W 17-24
17
Downloaded From DvDPlayer-Manual.com Sharp Manuals
1/26/06, 6:24 PM
Additional Connection (continued)
DV-SL1500W
H Connecting the AC power lead
System Connections
After checking all the connections have been made correctly, plug the AC power lead of this unit into the wall socket.
Wall socket
(AC 110-240V, 50/60 Hz)
1
2
Note:
Unplug the AC power lead from the wall socket if the unit will not be used for a prolonged period of time.
AC Plug Adaptor
In areas (or countries) where a wall socket as shown in illustration 2 is used, connect the unit using the AC plug adaptor supplied with the unit, as illustrated.
The AC plug adaptor is not included in areas where the wall socket and AC power plug can be directly connected (see illustration 1).
18
DV-SL800W 17-24
18
Downloaded From DvDPlayer-Manual.com Sharp Manuals
1/26/06, 6:24 PM
DV-SL1500W
Battery installation
Turning the power on
1 Open the battery cover.
2 Insert the supplied batteries according to the direction indicated in
the battery compartment.
When inserting or removing the batteries, push them towards the · battery
terminals.
3 Close the cover.
H Test of the remote control
Check the remote control operation after making all the connections.
Point the remote control directly at the remote sensor on the unit.
The remote control can be used within the range shown below:
Press the power button. Does the power turn on? Now, you can enjoy your
system.
0.2 m - 6 m
(8" - 20')
Precautions for battery usage:
I Replace all old batteries with new ones at the same time.
I Do not mix old and new batteries.
I Remove the batteries if the unit is not to be used for long periods of time.
This will prevent potential damage due to battery leakage.
Caution:
I Do not use rechargeable batteries (nickel-cadmium battery, etc.).
I Incorrect installation may cause the unit to malfunction.
Notes concerning usage:
I Replace the batteries if the operating distance is reduced or if the operation
becomes erratic. Purchase 2 “AAA” size batteries (UM-4, R03, HP-16 or
similar).
I Periodically clean the transmitter on the remote control and the sensor on
the unit with a soft cloth.
I Exposing the sensor on the unit to strong light may interfere with operation.
Change the lighting or the direction of the unit.
I Keep the remote control away from moisture, heat, shock, and vibrations.
H To turn the power on
DV-SL1500W DVD PLAYER
Press the ON/STANDBY button:
If the power does not turn on, check the AC power lead is plugged in properly.
19
DV-SL800W 17-24
19
Downloaded From DvDPlayer-Manual.com Sharp Manuals
1/26/06, 6:24 PM
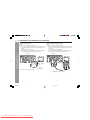
Preparation for Use
Preparation for Use
DV-SL1500W DVD PLAYER
Changing the system setup
DV-SL1500W
Turn on the TV, and switch the input to the “VIDEO 1”, “VIDEO 2”,
etc. accordingly.
1
Press the ON/STANDBY button on
DVD player to turn the power on.
I The SHARP startup screen appears.
I If the startup screen is blurred, press the PAL
/ NTSC button on the remote control
repeatedly to change the TV system
Press the SETUP button.
Press the ∞ or 5 button to select
a Setup menu.
See the list on pages 21 - 24 for setup
menu.
I / P-SCAN
4
SETUP
E
C
H
O
(–)
ENTER
Press the 4, 5 , 2 or 3 button to change the setting and
press the ENTER button after confirm.
I See the list on pages 21 - 24 for the
selectable parameters.
I Press the ENTER button to complete
setting.
E
C
H
O
(+)
PAL/NTSC
5
Preparation for Use
2
3
ON/
STANDBY
Press SETUP button to complete the setting.
I You can complete the setting by select “EXIT SETUP” or press again
SETUP button.
I To change other settings, begin from step 2.
DVD
Notes:
I Settings are stored even if the unit is switch off but it does not include for password and parental settings.
I The backup function protects the stored settings for a few hours should there be
a power failure or the AC power lead disconnection.
I System setup can be perform during playback mode.
20
DV-SL800W 17-24
20
Downloaded From DvDPlayer-Manual.com Sharp Manuals
1/26/06, 6:24 PM
DV-SL1500W
Changing the system setup (continued)
H Change the system with conventional TV connecting
I If you use a conventional TV, you must select the INTERLACE (I) mode from remote control direct button “I/P-SCAN”.
I INTERLACE mode is use for a normal video output.
I For conventional TV connection, please refer to page 11.
H Change the system to a TV with Progressive-Scan
I If you use TV with Progressive-Scan capability and connect it to the COMPONENT VIDEO OUT sockets of the DVD Video Player (see page 12, 13, 24), you
must select the PROGRESSIVE-SCAN (P-SCAN) mode from remote control direct button “I/P-SCAN”.
Note:
If you use a conventional TV and you select “P-SCAN” from remote control direct button “I/P-SCAN”, the TV screen will become blur (not clear).
Preparation for Use
Setup menu
Selectable parameters (* indicates default settings.)
SYSTEM SETUP
Description
TV SYSTEM
NTSC* (PHILLIPINES) Select the correct colour system (TV standard).
(for details, see page 25).
PAL*
AUTO
TV TYPE
4:3PS*
4:3LB
16:9
ON*
SCREEN SAVER
The screen mode should be set according to the
connected TV type (for details, see page 25).
OFF
A screen saver appears.
The screen saver is disabled.
Change the password (for details, see page 26).
DEFAULT
LEVEL 1
↓
LEVEL 8
NO PARENTAL*
RESTORE
Sets a restriction level for DVD viewing (for details, see
page 26).
Enter a 4-digit password.
It is set to 0000 by default.
This resets all setting, except for PARENTAL to the
factory defaults.
EXIT SETUP
–
The setting is completed.
PASSWORD
PARENTAL
(*1) Selects the dynamic range compression to fit the individual listening situation of the audience. This function can be used in DVD playback.
Depending on the disc, sounds may become too loud or inaudible during playback. Dolby Digital’s dynamic range control allows you to adjust the sound range.
Caution:
Make sure the unit is on the STOP condition before changing the Interlace or P-Scan (Progressive Scan) mode.
21
DV-SL800W 17-24
21
Downloaded From DvDPlayer-Manual.com Sharp Manuals
1/26/06, 6:24 PM
Changing the system setup (continued)
Selectable parameters (* indicates default settings.)
Description
OSD LANGUAGE
ENGLISH*
CHINESE
THAI (THAILAND)
You can select the desired (On TV Screen Display)
language for the setup menu or playback control
screen.
AUDIO LANG
ENGLISH*
CHINESE
JAPAN
FRENCH
SPANISH
PORTUGUESE
GERMAN
Selects the language audible from the speakers.
SUBTITLE
LANG
ENGLISH*
CHINESE
JAPAN
FRENCH
SPANISH
PORTUGUESE
GERMAN
OFF
Selects the subtitle displayed on the TV screen.
MENU LANG
ENGLISH*
CHINESE
JAPAN
FRENCH
SPANISH
PORTUGUESE
GERMAN
–
Selects the disc menu language.
EXIT SETUP
Preparation for Use
Setup menu
LANGUAGE SETUP
DV-SL1500W
The setting is completed.
22
DV-SL800W 17-24
22
Downloaded From DvDPlayer-Manual.com Sharp Manuals
2/21/06, 10:54 AM
DV-SL1500W
Changing the system setup (continued)
Setup menu
Selectable parameters (* indicates default settings.)
Preparation for Use
AUDIO SETUP
DIGITAL OUT
DYNAMIC RANGE
RAW*
PCM
FULL
6/8
4/8
2/8
OFF*
Description
I Highlight the AUDIO OUT option, and press the 1, 2, 5 or 4
buttons to choose the audio output mode you prefer. Press ENTER
to confirm.
I RAW: Choose this setting if your DVD player is connected to a
power amplifier with a coaxial cable; When playing a disc recorded
with Dolby Digital, DTS and MPEG audio formats, the
corresponding digital signals will be output from the Coaxial Output
socket. This Player’s digital output sockets are designed for a
connection to a Dolby Digital, DTS, or MPEG receiver or decoder.
I PCM: Choose this setting if your DVD player is connected to a 2channel digital stereo amplifier; When playing a disc recorded with
Dolby Digital and MPEG audio formats, audio signals will be
modulated into 2-Channel PCM signal, and it will be output from
the Coaxial Output socket.
DYNAMIC RANGE:
If adjusting to FULL, the audio signal peak value will be the
minimum; whilst adjusting to OFF, maximum.
* Use the 5∞ buttons to adjust the setting level and press the “ENTER” to complete it.
23
DV-SL800W 17-24
23
Downloaded From DvDPlayer-Manual.com Sharp Manuals
1/26/06, 6:24 PM
Changing the system setup (continued)
DV-SL1500W
Selectable parameters (* indicates default settings.)
VIDEO SETUP
Description
BRIGHTNESS
12
10
8
6*
4
2
0
To adjust TV screen brightness level.
CONTRAST
12
10
8
6*
4
2
0
To adjust TV screen contrast level.
HUE
+6
+4
+2
0*
-2
-4
-6
To adjust TV screen hue level.
SATURATION
12
10
8
6
4
2
0*
To adjust TV screen saturation level.
VIDEO OUT
YUV*
P-SCAN
S-VIDEO
Select “INTERLACE-YUV” mode if connect DVD
Video Player (Video Output Socket or S-Video
Output Socket) to TV (Video Input Socket or SVideo Input Socket) (For details, see page
8,9,10,11,14).
Select “P-SCAN YPBPR” mode if connect DVD
Video Player (component video output socket) to
TV (component video input socket with
progressive-scan capability) (for detail, see page
12,13).
–
The setting is completed.
EXIT SETUP
Preparation for Use
Setup menu
* Use the 5∞ buttons to adjust the setting level and press the “ENTER” to complete it.
24
DV-SL800W 17-24
24
Downloaded From DvDPlayer-Manual.com Sharp Manuals
1/26/06, 6:24 PM
DV-SL1500W
Changing the system setup (continued)
H TV type setting
Indicator
4:3PS
H Language setting
Setting
When playing a wide image (16:9) disc,
the left and right sides of the image are
cut (pan scan) to display a natural-looking 4:3 size image.
A wide image disc without pan scan PS
is played back in 4:3 letterbox.
Indicator
Setting
A language for screen display can be set for the setup menu,
OSD
LANGUAGE messages, etc.
English
Chinese
DISC LOADING
DISQUE CHARGEMENT
A 4:3 disc is played in 4:3.
Preparation for Use
4:3LB
When playing a wide image (16:9) disc,
black bands are inserted at the top and
bottom and you can enjoy full wide images (16:9) on a 4:3 size TV.
AUDIO
LANG
A language for audio can be set.
You can specify a language for conversation and narration.
English
Tha
A 4:3 disc is played in 4:3.
16:9
French
A wide image (16:9) is displayed when
playing a wide image (16:9) disc.
SUBTITLE
LANG
Note:
When playing the disc with a fixed video format, it will not change even if the
TV screen size is changed.
Thank you
MENU
LANG
Mer
A language for subtitle can be set.
The subtitles are displayed in a specified language.
English
• When playing a 4:3 image disc, the image size depends on
the setting of the connected TV.
• If you play back a wide image (16:9) disc with this unit connected to a 4:3 TV, the vertically shrunk image is displayed.
n
u
k yo
French
Merci
A language for disc menus can be set.
Menu screens are displayed in a specified language.
English
French
H TV system setting
Indicator
AUTO
NTSC
PAL
Setting
Select this mode for the multi-system TV.
Select this mode for the NTSC TV.
Select this mode for the PAL TV.
CAST
ACTEURS
STAFF
PERSONNEL
Note:
I Please refer to page 21 for TV system setting.
25
DV-SL800W 25-42
25
Downloaded From DvDPlayer-Manual.com Sharp Manuals
2/9/06, 3:01 PM
ci
DV-SL1500W
H Parental setting
H Password setting
1
From the setup menu, select “SYSTEM SETUP”, “PASSWORD” and choose
“_ _ _ _
”.
3
4
5
Before setting “PARENTAL”, ensure password is unlock “ ”. The
“PARENTAL” level can’t be setting if the password is lock “ ”.
After selecting “PARENTAL” in steps 1 - 4 on page 20, select the
parental level and press the “ENTER” button to confirm.
After enter parental level, select “PASSWORD” to lock the password
key.
* If this is the first time, enter “0000” as factory default password.
Indicator
Setting
Level 1
Adult viewing
Level 2
NO ONE 17 AND UNDER ADMITTED
Level 3
RESTRICTED Under 17 requires accompanying parent or adult
1
2
3
guardian.
Level 4
Level 5
Reserve.
PARENTS STRONGLY CAUTIONED Some material may be
inappropriate for children under 13.
Level 6
PARENTAL GUIDANCE SUGGESTED Some material may not
Level 7
Reserve
Level 8
GENERAL AUDIENCES All ages admitted.
be suitable for children.
Picture (b)
Picture (a)
Enter a 4-digit password using the DIRECT NUMBER buttons and press
the ENTER button.
4
For the first time setting the password, enter the factory default
password by pressing “0000”.
Enter own new password (maximum 4 digit) using the DIRECT NUMBER buttons.
Enter again same own new password buttons.
Press ENTER button to return.
The “ ” will be unlock as show in picture (b).
Exit setup. The “
” will be lock after exit setup menu.
Preparation for Use
2
Select “SYSTEM SETUP” on the Setup menu screen (see steps 1 - 4
on page 20).
Notes:
I When you forget your password, cancel the current password by
pressing “0000” using the DIRECT NUMBER buttons (0 - 9).
I Please go to page 21 for Parental and Password setting reference.
* Level 1 : for most restrictive viewing ==> Level 8 : for general audiences
viewing.
The smaller the number, the greater the level of restriction.
Note:
Whilst playing a disc with parental lock, the display may appear requesting a
password in order to watch some restricted scenes. In such case, enter the
password to temporarily change the parental level.
26
DV-SL800W 25-42
26
Downloaded From DvDPlayer-Manual.com Sharp Manuals
2/9/06, 3:01 PM
DV-SL1500W
Changing the system setup (continued)
H
1.
2.
3.
4.
H
Sound menu setup
Whilst a disc is playing, press the SOUND button from the direct button key of remote control.
The Sound setup screen appear on TV screen.
Use 2 or 3 button to select the desired sound effect such as SURROUND, EQUALISER & BAND.
Use ∞, 5, 2 or 3 button to select the desired parameters (only for user equaliser level which can be changed) as refer to Sound setup menu on page 27.
Change equaliser level for user
Preparation for use
1. Go to USER (EQ) and press ENTER button to change the level by use 5 or ∞ button key (12dB~ –12dB) and 2 or 3 button to select frequency range.
2. Press ENTER button to confirm the setting.
3. Press SOUND button (time) to exit.
Sound setup menu :
Setup Menu
Selectable parameters (*indicates default settings)
SURROUND (SRND)
SRND
EQ
BAND
OFF
CONCERT
PASSIVE
WIDE
LIVE
EQUALISER (EQ)
SRND
EQ
BAND
STANDARD
CLASSIC
ROCK
JAZZ
POP
USER
BAND
SRND
EQ
BAND
Description
OFF*
CONCERT
PASSIVE
WIDE
LIVE
I You can select certain types of surround sound effect.
I The level of this types of surround sound cannot be
change.
STANDARD*
CLASSIC
ROCK
JAZZ
POP
USER
I You can select certain types of equaliser sound effect.
I The level for equaliser types : STANDARD, CLASSIC,
ROCK, JAZZ & POP cannot be change. Which is already
set to a standard level as factory default setting.
I Only equaliser level for USER can be setting.
BAND*
I You can see the sound effect of band equaliser from TV
screen.
I The BAND equaliser level can’t be set.
u can see the soun
Note:
On a DVD, the Sound function does not operate.
27
DV-SL800W 25-42
27
Downloaded From DvDPlayer-Manual.com Sharp Manuals
2/9/06, 3:01 PM
General control
DV-SL1500W
H Adjusting the volume (only ANALOGUE)
Press the VOLUME + button to increase the volume and the VOLUME –
button for decreasing.
<TV screen>
1
2 .....
15
H Muting
The volume is muted temporarily when pressing the MUTE button on the
remote control. Press again to restore the volume.
VOLUME
* TV screen display “MUTE” when press “MUTE” button.
MUTE
Preparation for use
Preparation for Use
0
28
DV-SL800W 25-42
28
Downloaded From DvDPlayer-Manual.com Sharp Manuals
2/9/06, 3:01 PM
DV-SL1500W
DVD playback
Turn on the TV, and switch the input to the “VIDEO 1”, “VIDEO 2”, etc.
accordingly.
7
H
Playback
1 Press the ON/STANDBY button to turn the power on.
2 “SHARP” startup screen appears on the TV screen.
NO DISC
DV-SL1500W DVD PLAYER
ON/STANDBY
DVD Operation
3 Press the 0 OPEN/CLOSE button to open the disc tray.
4 Place the disc on the disc tray, label side up.
OPEN/
CLOSE
Label side
Disc tray
Be sure to place 8 cm (3") discs in the middle of the disc position.
5 Press the 0 OPEN/CLOSE button to close the disc tray.
Discs supporting auto start will start to play once you close the disc tray
even if you do not press the 3 PLAY (38) button.
6 If playback does not start in step 5, press the 3 PLAY (38)
button.
29
DV-SL800W 25-42
29
Downloaded From DvDPlayer-Manual.com Sharp Manuals
2/9/06, 3:01 PM
DVD playback (continued)
To interrupt playback
Press the 3 PLAY (38) button.
To resume playback from the same point, press the 3 PLAY (38) button.
DV-SL1500W
H To resume playback after stopping
(resume play)
You can resume playback from the point playback is stopped.
To stop playback
DVD/Audio CD/JPEG/VCD:
Press the 7 STOP (7) button twice.
1 Whilst a disc is playing, press
PRE - STOP 38
the 7 STOP (7) button.
When the unit is left unoperated for more than 3 minutes after pressing the 7
STOP (7) button, a screen saver appears (see page 21 when the screen saver
setting is “ON”).
Press any button on the main unit or remote control. The startup screen
returns.
The system stores the point you
stopped.
2 To restart play, press the PLAY (38) button.
Notes:
I During disc initialisation, the volume cannot be adjusted.
I Stop positions may be recorded on some discs. When you play such a disc,
playback stops there.
I During an operation, “INVALID KEY” may appear indicating that the operation is disabled by the disc.
I The main unit detects loaded discs automatically and then the indicators
light up.
To cancel the resume playback:
Press the 7 STOP (7) button twice.
Notes:
I The resume playback feature is disabled on some discs.
I Depending on the disc, playback may resume from slightly before the
stopped position.
H DVD mode operation indicators
The following are examples of operation indicators that appear during DVD playback.
Operation
When the power is
on without a disc
Disc data is being
read
1st time Stop 7
2nd time Stop
VCD CD
Play
Pause
DV-SL1500W DVD PLAYER
TV screen
Unit display
DVD Operation
Play resumes from the point you stopped.
Caution:
I Close the disc tray when not in use. Otherwise, dust may accumulate inside
and cause malfunction.
I The unit gets slightly warm when used for a long time. It does not mean the
unit is damaged.
I When attempting to play disc with scratches or of a different region number,
or unplayable or restricted (*1) discs, an error message will appear on the
TV display and the disc will not play.
(*1) Viewing is prohibited on some DVDs according to the audience age.
NO DISC
LOAD
PRE-STOP 38
pDigital
STOP 7
pDigital
PLAY 3
pDigital
PAUSE 8
pDigital
38
30
DV-SL800W 25-42
30
Downloaded From DvDPlayer-Manual.com Sharp Manuals
2/9/06, 3:01 PM
DV-SL1500W
Basic operation
Fast forward/Fast backward (search)
1
2
3
H
4
5
6
You can search the desired point as you play the disc.
7
8
9
DIRECT
0
1 Whilst a disc is playing, press the 1 or ¡ button.
Example: When the ¡ button is pressed
On DVD/SVCD/VCD/Audio CD, the speed changes as follows:
Forward X 2
DVD Operation
PLAY (Normal play)
Forward X 2
PLAY (Normal play) Backward X 2
Forward X 4
Backward X 4
Forward X 6
Backward X 6
Forward X 8
Backward X 8
The disc is forwarded by the ¡ button and backward by the 1
button.
2 Press the 38 button to return to the normal playback.
H To locate the beginning of a chapter (track)
(skip)
You can move to other tracks with simple operations.
When playing SVCD or VCD, cancel the P.B.C. (playback control) (see page
42).
Whilst a disc is playing, press the 4 or ¢ button.
I Use the ¢ button to skip to the next chapter (track).
I Use the 4 button to skip to the previous chapter (track).
I On SVCD, VCD and Audio CD, the 4 button skips to the
beginning of the current track. Press the 4 button again to skip to
the beginning of the previous track.
Notes:
I On some discs, the search function is disabled.
I On a DVD, search does not operate between titles.
I On SVCD, VCD and audio CD, the search can be operate between tracks.
I Whilst searching on a DVD, the sound is not heard and the subtitles do not
appear.
I Whilst searching on an SVCD or a VCD, the sound is not heard.
I Audio CD disc sounds will break up during search. This is not a malfunction.
I When search is performed during the DVD playback, pictures may not be
forwarded or reversed in the search speed specified in this manual,
depending on the disc or the scene being played.
I The search does not operate on JPEG discs.
Notes:
I Some discs do not display the chapter (track) and the skip feature is
disabled.
I On a DVD, skip does not operate between titles.
I Alternatively, press the 4 or ¢ button on the main unit.
31
DV-SL800W 25-42
31
Downloaded From DvDPlayer-Manual.com Sharp Manuals
2/9/06, 3:01 PM
DV-S1500W
H To start playback from the desired point
(direct play)
To select and play the desired title and chapter:
1 Whilst in the stop or playback mode, press the DIRECT
button.
TT
00/02 CH
1 Whilst in the stop or playback mode, press the DIRECT
button.
TV screen
DVD
To play by specifying time (time search):
You can play back from the desired point by specifying the time.
CD TRK 01/11
000/025
__:__:__
ton and enter the title or chapter number using the
DIRECT NUMBER buttons.
Example:
To select chapter 1: Press “1”.
To select chapter 12: Press “1” and “2”.
To select chapter 22: Press “2” and “2”.
3 Within 10 seconds, press the ENTER button after confirm.
Notes:
I Direct play feature is disabled on some discs.
I Some discs may not display the chapter number.
I With DVDs, you can specify the desired point only in the current title and
not in another title.
2 Specify the time with the DIRECT NUMBER buttons,
and then press the ENTER button.
CD TRK 01/11
I
I
01:23:40
To specify 1 hour 23 minutes and 40 seconds, enter “01:23:40”.
If you enter the wrong number, press cursor 2 or 3 to the desired
change time.
Notes:
I Some discs cannot play from the specified point.
I Time search feature is disabled on some discs.
DVD Operation
If the “_ _:_ _:_ _” is not highlighted, press the 2 or 3 button repeatedly.
2 Select the title or chapter by pressing the 2 or 3 but-
32
DV-SL800W 25-42
32
Downloaded From DvDPlayer-Manual.com Sharp Manuals
2/9/06, 3:01 PM
DV-SL1500W
Useful operation
H Still picture
You can freeze the image during playback.
1 Whilst a disc is playing, press the 38 (Play/Pause) button.
2 The image or picture will be freeze on TV screen.
“8”appears briefly on the TV screen.
Note: The sound is muted during still picture.
H Step function (Frame by frame advance Playback)
DVD Operation
You can advance frame by frame.
1 Whilst a disc is playing, press the STEP button.
Each press of the STEP button advances the frame.
2 Press the 38 button to return to the normal playback.
Notes:
I Frame playback is operated forward only.
I Still picture and frame advance features are disabled on some discs.
I The sound is muted during step function.
STEP
H Slow-motion play
You can slow down the playback speed.
1 Whilst a disc is playing, press the SLOW button
SLOW
repeatedly to select the desired speed.
On DVD, the speed changes as follows:
SF X 1/2
SF X 1/2
PLAY (Normal play)
SF X 1/3
SB X 1/7
SB X 1/6
Slow Forward play
SF X 1/4
SF X 1/5
SBX 1/5
SB X 1/4
Slow Backward play
SF X 1/6
SF X 1/7
SB X 1/3
SB X 1/2
2 Press the 38 button to return to the normal playback.
Note: On some discs, the slow-motion play functions are disabled.
33
DV-SL800W 25-42
33
Downloaded From DvDPlayer-Manual.com Sharp Manuals
2/9/06, 3:01 PM
DV-SL1500W
H To change the angle
You can change the angle of view when playing a DVD disc that contains
scenes recorded from multiple angles.
When “ 2 ” is displayed in the upper left corner of the
TV screen, press the ANGLE button repeatedly to select
the desired angle number.
H To zoom images (zoom)
You can magnify images zoom in and zoom out during playback.
ZOOM
1 Whilst a disc is playing, press the ZOOM button.
Each press of the ZOOM button cycles through the zoom setting as
follows:
ZOOM 2
ZOOM
OFF
(ZOOM IN)
ZOOM 3
ZOOM 4
ZOOM 1/2
(ZOOM OUT)
DVD Operation
Notes:
I The angle number is not displayed if angles are not recorded on the disc.
I Refer to the manual of the disc as the operation may vary depending on
the disc.
ANGLE
2 To shift the view and display the
desired part of a zoomed image,
press the 5, ∞, 2 or 3 button
repeatedly.
To return to normal view:
Press the ZOOM button repeatedly to select “ZOOM OFF”.
Notes:
I Images may become distorted when zoomed.
I Subtitles cannot be zoomed.
I For JPEG ZOOM function, please refer page 46 for details.
DV-SL800W 25-42
34
Downloaded From DvDPlayer-Manual.com Sharp Manuals
2/9/06, 3:01 PM
34
DV-SL1500W
Useful operation (continued)
H
To play repeatedly (repeat play)
You can play a chapter (track) or a title repeatedly by specifying it during playback.
When playing SVCD or VCD, cancel the P.B.C. (playback control) (see page 42).
1
2
3
4
5
6
7
8
9
1 Whilst a disc is playing, press the REPEAT button to
Repeat 1.
TV screen
REP:
[ REP 1 ]
Unit display
TITLE
c
O VCD MP3
TRK
PRESET
CHP
PROG
SLEEP
A-B
KHz
REP 1MHz
DVD Operation
0
MENU/PBC
A-B
TITLE
REPEAT
Each time the button is pressed, the repeat play mode changes in the
following order.
The repeat play mode changes as follows on DVD:
Repeat the currently
REP: [ CHAPTER ]
“ REP 1”
playing chapter.
Repeat the currently
REP: [ TITLE ]
“REP ALL”
playing title.
Repeat the currently
“REP ALL”
REP: [ REP ALL ]
playing disc.
REP: [ OFF ]
“no display”
The normal playback.
The repeat play mode changes as follows on SVCD/VCD/audio CD:
Repeat the currently
“ REP 1”
REP: [ REP 1 ]
playing track.
ENTER
REP: [ REP ALL ]
“REP ALL”
Repeat the currently
playing disc.
REP: [ OFF ]
“no display”
The normal playback.
JPEG is displayed when JPEG menu screen is off (see page 44).
2
To return to the normal playback, press the REPEAT
button repeatedly to select “REPEAT OFF”.
Caution:
After performing repeat play, be sure to press the 7 button. Otherwise, the disc
will play continuously.
Notes:
I On some discs, the repeat play function is disabled.
I For JPEG repeat playback, please refer page 45 for details.
35
DV-SL800W 25-42
35
Downloaded From DvDPlayer-Manual.com Sharp Manuals
2/9/06, 3:01 PM
Useful operation (continued)
H
DV-SL1500W
To play the contents between the specified
points repeatedly (A-B repeat)
H
To select a title from the top menu of the
disc
On a DVD with multiple titles, you can select a title from the top menu.
You can play the desired portion repeatedly by specifying it during playback.
TV screen
Example
1 Whilst in the stop or playback
1 Whilst a disc is playing, press the A-B button.
mode, press the TITLE button to
display the title menu.
Unit display
1 Drama
2 Action
3 SF
4 Comedy
REPEAT ACHP
PROG
SLEEP
REPEAT 1
2 Use the 5, 4,
B
A
2 or 3 button to select a title, and
then press the ENTER button.
KHz
MHz
This registers the start point (A).
I The selected title plays.
I Or use the DIRECT NUMBER buttons for some discs.
2 Press the A-B button again to enter the end point (B).
TV screen
Note:
The procedure shown here provides only general steps. The actual procedure
for using the title menu depends on the disc. See the disc jacket for details.
Unit display
REPEAT A-B
PR
A-B
REPEAT 1
B
KHz
MHz
H
This starts A-B repeat from the start point (A) to the end point (B).
3 Press the A-B button to return to the normal playback.
Notes:
I A-B repeat play is disabled on some discs.
I A-B repeat play for DVD is possible only within a title.
I A-B repeat play for SVCD/VCD is possible only within a track.
I Some scenes on DVD may not allow A-B repeat play.
To select a subtitle or audio language from
the disc menu
You can select the desired subtitle or audio language and sound system
[Dolby Digital (5.1ch) or DTS sound] on your DVD if it has a disc menu.
1
2
Whilst in the stop or playback
mode, press the MENU/PBC button
to display the disc menu.
DVD Operation
PRESET
Example
1.Highlights
2.Start Movie
Press the 5, 4, 2 or 3 button to change the setting
and press the ENTER button.
Or use the direct number buttons for some discs.
Note:
The procedure shown here provides only general steps. The actual procedure
for using the disc menu depends on the disc. See the disc jacket for details.
36
DV-SL800W 25-42
36
Downloaded From DvDPlayer-Manual.com Sharp Manuals
2/9/06, 3:01 PM
DV-SL1500W
Various settings
The subtitle language, audio language and TV type you select during playback
are reset each time you set this unit to the stand-by mode or switch the input.
To keep your own settings, set them in the setup menu (see page 20).
H
To change the subtitle language
You can change the subtitle language or hide subtitles during playback.
Whilst a disc is playing, press the
SUBTITLE button repeatedly to select the desired subtitle language.
Notes:
I On some discs, the subtitle language cannot be changed.
I If no subtitles are recorded on the disc, “OFF” is displayed.
I It may take time to switch the subtitle language to the selected one.
I Subtitles cannot be hidden on some DVDs.
DVD Operation
SUBTITLE
H
To change the audio language
(audio output)
During playback, you can change the audio language (audio output).
Whilst a disc is playing, press the
AUDIO button repeatedly to select
the desired audio number.
: [ 1 ENGLISH p 5.1 CH ]
You can select recorded languages.
ENGLISH
FRENCH
...
SPANISH
Notes:
I On some discs, the audio language cannot be changed.
I For the audio language and audio system, refer to the manual of the disc.
AUDIO
PAL/NTSC
37
DV-SL800W 25-42
: [1 ENGLISH]
37
Downloaded From DvDPlayer-Manual.com Sharp Manuals
2/9/06, 3:01 PM
Video CD and Super Video CD Operation
Page
To locate the beginning of a chapter (track) (skip) . . . . . . . . . . . . . . . . . . . 31
Fast forward/Fast backward (search) . . . .. . . . . . . . . . . . . . . . . . . . . . . . 31
Still picture . . . . . . . . . . . . . . . . . . . . . . . . . . . . . . . . . . . . . . . . . . . . . . 33
Slow-motion play . . . . . . . . . . . . . . . . . . . . . . . . . . . . . . . . . . . . . . . . . . . . . 33
To zoom images (zoom) . . . . . . . . . . . . . . . . . . . . . . . . . . . . . . . . . . . . . . . 34
To play repeatedly (repeat play) . . . . . . . . . . . . . . . . . . . . . . . . . . . . . . . . . . 35
To play the contents between the specified points repeatedly
(A-B repeat) . . . . . . . . . . . . . . . . . . . . . . . . . . . . . . . . . . . . . . . . . . . . . . . . . . 36
To change the subtitle language . . . . . . . . . . . . . . . . . . . . . . . . . . . . . . . . . 37
To change the audio language (audio output) . . . . . . . . . . . . . . . . . . . . . . . 37
To change the TV type . . . . . . . . . . . . . . . . . . . . . . . . . . . . . . . . . . . . . . . . 41
To change the audio channel . . . . . . . . . . . . . . . . . . . . . . . . . . . . . . . . . . . 41
To change the display on TV screen . . . . . . . . . . . . . . . . . . . . . . . . . . . . . . 41
To play in the desired order (programmed play) . . . . . . . . . . . . . . . . . . . . 43
H Playback of a video CD (super video CD)
with P.B.C. ON
1 Press the MENU/ PBC button with PBC ON
The menu will appear on the TV and playback
will be paused.
Example
1
2
2 Select the desired menu number using the DIRECT
NUMBER buttons.
I Playback starts.
I After playback stops, the menu will reappear. Select the menu
number to play.
To interrupt playback:
Press the 06 button.
To resume playback from the same point, press the 06 button.
1
2
3
4
5
6
7
8
9
0
To stop playback:
Press the H button twice.
The P.B.C. function will not work in the following conditions.
Repeat/programmed/direct play or the skip feature is in operation.
Notes:
I During disc initialisation, the volume cannot be adjusted.
I Subtitles and sounds on the super video CD can be switched (see page 37).
I The menu screen cannot be scrolled on some discs.
Video CD and Super Video CD Operation
The following playback functions are the same as DVD or CD operations.
DV-SL1500W
38
DV-SL800W 25-42
38
Downloaded From DvDPlayer-Manual.com Sharp Manuals
2/9/06, 3:01 PM
DV-SL1500W
Video CD and Super Video CD Operation (continued)
H Digest selection of discs and tracks
U
When there are more than 9 tracks on the video CD:
Each press of the ¢ (SKIP ¢) button will display the next 9 tracks.
Press the 4 (4 SKIP) button to return to the previous display.
Video CD and Super Video CD Operation
To cancel the disc digest:
Press the 7 (STOP 7) button.
STOP
PLAY
Notes:
I The disc digest function works only during playback.
I This function is not available with an audio CD.
H Track digest selection
1
2
3
4
5
6
7
8
9
Each track is divided into 9 sections.
You can look at the sections and select the scene you want to start watching
from. This function is convenient when you want to start from the middle of an
undivided track, for example, a movie.
1
During playback, press the DIGEST button.
The track being played back will be divided into 9 sections and playback
will be paused.
0
<TV screen>
DIGEST
H Disc digest selection
You can play back a desired track by selecting one from the 9 displayed tracks
on the screen.
1
Whilst in the stop mode, press the DIGEST button.
Up to 9 tracks will be displayed on the screen.
2
1
2
3
4
5
6
7
8
9
Press the DIRECT NUMBER buttons on the remote control to select the scene you want to watch.
I Playback will be started from the selected scene after pressing the
PLAY 38 button.
<TV screen>
II
BROWSE
2
1
2
3
4
5
6
7
8
9
Press the DIRECT NUMBER buttons on the remote control to select the desired track.
I Playback will be started from the selected track after pressing the
PLAY 38 button.
To cancel the track digest operation:
Press the 7 (STOP 7) button.
Notes:
I The track digest function works only during playback.
I This operation is not accepted by a short time track (less than one minute),
still pictures (menu display, photo, etc.).
I One track is divided into nine frames of equal playing time.
Caution:
Digest function of discs and tracks will not work during P.B.C. and programme
play. Cancel the P.B.C. mode before using this function on a video CD with P.B.C.
39
DV-SL800W 25-42
II
9 FRAME_1
39
Downloaded From DvDPlayer-Manual.com Sharp Manuals
2/9/06, 3:01 PM
Use
DV-SL1500W
H Random Play
The tracks on the disc(s) can be played in random order automatically.
Whilst in the playback mode, press the RANDOM button on the remote control to begin random play.
TV screen
Unit display
RANDOM : [ON]
2
No display
To cancel random play, press the RANDOM button for the second time.
TV screen
Unit display
RANDOM : [OFF]
No display
Notes:
I If you press the NEXT ¢ button during random play, you can move to the track selected next by the random operation. If you press the 4 PREV. button will
allow you to move to the previous track. The beginning of the track being played will be located.
I In random play, the CD player will select and play tracks automatically. (You cannot select the order of the tracks.)
I Repeat or random function will not work during P.B.C. play. Cancel the P.B.C. mode before using this function on a video CD with P.B.C.
Caution:
After performing repeat or random play, be sure to press the 7 (STOP 7) button.
Otherwise, the disc(s) will play continuously.
Video CD and Super Video CD Operation
1
40
DV-SL800W 25-42
40
Downloaded From DvDPlayer-Manual.com Sharp Manuals
2/9/06, 3:01 PM
DV-SL1500W
Video CD and Super Video CD Operation (continued)
H To change the TV type
DVD:
Video CD and Super Video CD Operation
SVCD/VCD/Audio CD:
Current title number Current chapter number
You can select a TV type.
Whilst in the stop or playback mode, press the PAL /NTSC
button repeatedly to select a TV type.
AUTO
NTSC
DVD
TT 1/28 CH
C 00:00:52
1/14
Total number of chapters
Total number of titles
VCD
VCD TRK 7/14
C 00:00:44
PBC
Elapsed playback time for the current track
Elapsed playback time for the total chapter
PAL
1/4ENG p 5.1CH
1/5 ENG
OFF
VCD
VCD TRK 7/14
C –00:05:42
PBC
Current Subtitle and Audio Language
H To change the audio channel
Remaining playback time for the current track
DVD
TT 1/28 CH
C –00:04:59
You can select an audio channel.
Whilst a disc is playing, press the AUDIO button repeatedly
to select the desired audio channel.
DVD
T
The audio channel changes as follows on SVCD/VCD:
1/14
Remaining playback time for the current chapter
TT 1/28 CH
00:01:14
VCD
VCD TRK 7/14
T 00:23:42
PBC
1/14
Total elapsed playback time for the disc
Elapsed playback time for the current title
MONO L
MONO R
AUTO L
AUTO R
STEREO
DVD
T
TT 1/28 CH
–01:27:40
1/14
Remaining playback time for the current title
Notes:
I The audio channel may not be changed on some discs.
I Audio button can not function on audio CD.
OFF
You can display or hide the operation indicators on the TV screen.
Whilst a disc is playing, press the OSD button. (The display
is changed at each press.)
41
41
Downloaded From DvDPlayer-Manual.com Sharp Manuals
2/9/06, 3:01 PM
PBC
Total remaining playback time for the disc
OFF
H To change the display on TV screen
DV-SL800W 25-42
VCD
VCD TRK 7/14
T –00:36:24
playback(continued)
DV-SL1500W
H To start playback from the desired point
DIRECT
2
3
4
5
6
7
8
9
(direct play)
To select and play the desired track:
Cancel the P.B.C. (playback control).
Whilst in the stop or playback mode, press the DIRECT
NUMBER buttons to select the track number.
MENU/PBC
TV screen
Unit display
0
VCD
VCD TRK 03/14
PBC
00:03:56
Press cursor 1 or 0 to select the digit numbers are decided to change.
Example:
To select track 14: Press “1” at track first digit and “4” at track second
digit. Press ENTER after confirm.
Notes:
I Direct play feature is disabled on some discs.
I Some discs cannot play from the specified point.
H To play without activating the playback
control function
You can play a video CD (super video CD) with P.B.C. without activating the
playback control function.
In this case, the menu screen will not appear, and the disc will play in the same
way as a video CD (super video CD) without P.B.C.
To play by specifying time (time search):
Cancel the P.B.C. (playback control).
1 During playback, press the DIRECT button.
VCD
VCD TRK 01/01
PBC
00:00:00
00:00:30
Hour
Minutes
Second
Time search
Whilst in the stop or playback mode,
press the MENU/PBC button to cancel
the P.B.C. mode.
PBC:
[ OFF ]
Note:
Some video CDs (super video CDs) with P.B.C. cannot be played back when
the P.B.C. mode is off.BC OFF
2 Specify the time by use 1 or 0 cursor to select desire
change time digits.
I Enter minutes and seconds.
I To specify 1 hour 23 minutes and 40 seconds, use cursor 1 or 0 to select
hour “01”, minutes “23” and second “40”.
I If you enter the wrong number, press cursor 1 or 0 to direct change the
digit number.
I Press ENTER to confirm.
Video CD and Super Video CD Operation
1
Notes:
I Time search feature is disabled on some discs.
I Time search feature is not available on JPEG discs.
42
DV-SL800W 25-42
42
Downloaded From DvDPlayer-Manual.com Sharp Manuals
2/9/06, 3:01 PM
DV-SL1500W
CD operation
CD, CD-R and CD-RW Operation
The following playback functions are the same as DVD or VCD operations.
Page
Playback . . . . . . . . . . . . . . . . . . . . . . . . . . . . . . . . . . . . . . . . . . . . . . . . . . . . 29
To locate the beginning of a chapter (track) (skip) . . . . . . . . . . . . . . . . . . 31
Fast forward/Fast backward (search) . . . . . . . . . . . . . . . . . . . . . . . . . . . . . . 31
To play repeatedly (repeat play) . . . . . . . . . . . . . . . . . . . . . . . . . . . . . . . . . . 35
To play the contents between the specified points repeatedly
(A-B repeat) . . . . . . . . . . . . . . . . . . . . . . . . . . . . . . . . . . . . . . . . . . . . . . . . 36
To change the audio channel . . . . . . . . . . . . . . . . . . . . . . . . . . . . . . . . . . . . 41
To change the display on TV screen . . . . . . . . . . . . . . . . . . . . . . . . . . . . . . 41
To start playback from the desired point (direct play) . . . . . . . . . . . . .. . . . 32
2
Enter a track and chapter number with the DIRECT
NUMBER buttons.
The PROGRAM screen show as follows on DVD:
PROG
T
C
01:12
TV screen
T
C
T
C
Unit display
T
C
pDigital
DVD
PLAY
8
CLEAR
The PROGRAM screen show as follows on SVCD VCD CD:
PROG
TV screen
Unit display
0015
1
2
3
4
5
6
7
8
9
0
REPEAT
0013
0102
VCD
PLAY
8
CLEAR
I Repeat the procedure above to enter other track numbers by pressing
5, ∞, 2 or 3 cursor.
I If you enter the wrong number, you can change the title/track number
by pressing DIRECT NUMBER buttons.
I If the track number is 2 digits or more, example track 12, just press “1”
and “2” by DIRECT NUMBER buttons.
3 Select “PLAY” at the PROGRAM menu and press
ENTER button on remote control to start play.
PROG
To change the programmed contents:
Repeat the above procedures from step 1.
H To play in the desired order (programmed play)
You can playback the desired tracks in a specific order.
Maximum of 16 tracks can be programmed.
1
Whilst in the stop or playback mode, press the PROG
button.
The PROGRAM screen show as follows on SVCD VCD CD:
PROG
TV screen
Unit display
CD
PLAY
CLEAR
8
Programmed contents will be cleared when you perform the following
operations:
I Press the STOP (7) or PROG button in the stop or play mode twice.
I Switch the input or remove the discs.
I Select “CLEAR” at PROGRAM menu and press ENTER.
Notes:
I Programming is not possible whilst paused.
I Sequential programming does not work if the disc disables programming or
does not have track information.
I During programmed play, repeat play can be performed by pressing the REPEAT button.
I Program menu only can appear on screen at stop mode for JPEG format
when press PROG button.
I Programming (program menu) cannot be access during playback mode for
JPEG format.
43
DV-SL800W 43-52
43
Downloaded From DvDPlayer-Manual.com Sharp Manuals
2/9/06, 3:02 PM
JPEG disc operation
DV-SL1500W
The following playback functions are the same as DVD or VCD operations.
H Playback on the JPEG menu screen
You can play CD-R/RW recorded in the JPEG formats.
1 Load a disc containing JPEG files,
.JPG
the JPEG menu screen appears.
01
001
002
... Indicates folders.
003
... Indicates JPEG data.
2 Press the 5, ∞, 2 or 3 button to select a folder or a
track and press the ENTER.
I Playback starts when you select a track.
I The next file picture can automatically displayed after a whilst for JPEG
format if you select “PLAY” (38) button to start playback.
I Using the direct number buttons, you can open file or folder directly.
MENU/PBC
Notes:
I Up to 11 characters can be displayed for a folder name and a track name.
Underlines, asterisks, and spaces may not be displayed.
I Programming is not possible whilst playback mode for JPEG format. It’s
only can be done during stop mode (refer page 43 for programmed play).
ENTER
CD, CD-R and CD-RW Operation
Page
Playback . . . . . . . . . . . . . . . . . . . . . . . . . . . . . . . . . . . . . . . . . . . . . . . . . . . . 29
To locate the beginning of a chapter (track) (skip) . . . . . . . . . . . . . . . . . . 31
Fast forward/Fast backward (search) . . . . . . . . . . . . . . . . . . . . . . . . . . . . . 31
To play repeatedly (repeat play) . . . . . . . . . . . . . . . . . . . . . . . . . . . . . . . . . . 35
To change the display on TV screen . . . . . . . . . . . . . . . . . . . . . . . . . . . . . . 41
To start playback from the desired point (direct play) . . . . . . . . . . . . . . . . 42
44
DV-SL800W 43-52
44
Downloaded From DvDPlayer-Manual.com Sharp Manuals
2/9/06, 3:02 PM
DV-SL1500W
JPEG disc operation (continued)
Repeat play on the JPEG menu screen:
Whilst a disc is playing, press the REPEAT button.
CD, CD-R and CD-RW Operation
Each time the button is pressed, the repeat play mode changes in the following order.
TV screen
Unit display
REPEAT
REP: (REP 1)
“REP 1”
Repeat the currently playing track.
REP: [REP DIR]
“REP”
Repeat the currently playing folder
(directory).
REP: [REP ALL]
“REP ALL”
Repeat all the tracks.
REP: [OFF]
“No display”
Repeat play is cancelled.
ZOOM
45
DV-SL800W 43-52
45
Downloaded From DvDPlayer-Manual.com Sharp Manuals
2/9/06, 3:02 PM
DV-SL1500W
H Zoom function
H Rotating a picture
You can rotate images.
Each press of the ZOOM button cycles through the zoom setting as
follows:
ZOOM 2
ZOOM
OFF
(ZOOM IN)
ZOOM 3
ZOOM 4
ZOOM 1/2
(ZOOM OUT)
During playback, press the 5, ∞, 2 or 3 button.
The image rotates as shown below.
3 button : 90˚ rotation in a clockwise direction.
2 To shift the view and display the desired part of a zoomed
image, press the 5, ∞, 2 or 3 button repeatedly.
2 button : 90˚ rotation in an anti-clockwise direction.
Press the
button.
Press the
button.
Press the
button.
Press the
button.
5 button : Horizontal mirror image.
To return to normal view:
Press the ZOOM button again, “ZOOM OFF” will show on the screen.
CD, CD-R and CD-RW Operation
1 During playback, press the ZOOM button.
∞ button : Vertical mirror image.
46
DV-SL800W 43-52
46
Downloaded From DvDPlayer-Manual.com Sharp Manuals
2/9/06, 3:02 PM
DV-SL1500W
Enjoying various sounds
H DTS or Dolby Digital Surround
DTS (Digital Theater System)
dts
Enjoy DTS or Dolby Digital sound in 5.1 or 2-channel.
Whilst a disc is playing, press the AUDIO button repeatedly to select
the desired listening mode.
Advanced Features
DV-SL1500W DVD PLAYER
Digital input from discs
with this trademark
One of the digital audio systems for theatrical use. As the sound quality is
emphasised, you can enjoy the realistic sound effect in the home theatre
system.
5.1ch surround
Unit display
sound:
Example: DTS
3
SVCD 8
WMA
REP1ALL
pDigital
A-B
LR
The DTS indicator will light up when the disc recorded in DTS is played
back.
Dolby Digital
p DIGITAL
DV-SL1500W DVD PLAYER
Digital input from discs
with this trademark
One of the digital audio systems for theatrical use. You can enjoy the
stereophonic effect in the home theatre system.
The p DIGITAL indicator will light up when the disc recorded in p
DIGITAL is played back.
Note:
The above sound was more effect if connecting to an Amplifier/Digital Amplifier
with Dolby Digital Decoder, DTS Decoder.
(See additional connection page 15.)
47
DV-SL800W 43-52
47
Downloaded From DvDPlayer-Manual.com Sharp Manuals
2/9/06, 3:02 PM
PGM RND
TV screen
DTS
Playing karaoke
DV-SL1500W
3 Press the ON/STANDBY button to turn the power on.
the volume of the audio source using the VOL.UP or
4 Adjust
VOL.DOWN button on the remote control.
To
control
the volume of both microphones, turn the MIC
5 VOLUME control
towards MAX. (right) to increase and towards
MIN. (left) to decrease.
E
C
H
O
(–)
H
E
C
H
O
(+)
Playing karaoke
Notes:
I The sound is produced in 2-channel stereo whilst playing karaoke.
I Sound of the playback source can be switched (see page 37).
I When you sing too loud through the microphone, your voice may be distorted depending on the devices connected. If this happens, lower the microphone volume.
I If an extremely sensitive microphone is used, howling may be generated.
I Unidirectional microphone is more appropriate for vocal use.
I When you connect or disconnect a microphone, the sound is muted for a
few seconds.
If squealing occurs:
I Reduce the microphone volume.
I Change the direction of the microphone.
I Reduce the volume of the main unit.
I Move the microphone away from the speakers.
Caution:
I When not using the microphone, remove it from the MIC socket.
I When connecting or disconnecting the microphone, set the MIC VOLUME
control to MIN.
H
You can enjoy karaoke by connecting a separately available microphone to
this unit.
1 Set the MIC VOLUME control to MIN to protect the speakers from
shock noise and to avoid disturbing noises.
2 Connect the microphone(s) to the MIC-1 or MIC-2 socket or both
Press the KEY CONTROL button to obtain the desired musical pitch (± 6 notes,
13 steps).
Press the button to lower the key.
Press the button to raise the key.
Press button to return to the normal key.
Pitch returns to the default setting (normal key) when...
I Switched to a disc other than the one selected at the setting.
sockets for enjoying duets.
H
I Use a microphone with a 6.3 mm (1/4") plug, an impedance of 600
ohms.
I Use a standard plug adaptor when using a microphone with a 3.5
mm (1/8") diameter plug.
DV-SL800W 43-52
48
Downloaded From DvDPlayer-Manual.com Sharp Manuals
To obtain the desired musical pitch (key control)
Advanced Features
the ECHO + button on the remote control to increase the
6 Press
microphone echo, and the ECHO – button to decrease it.
ON/STANDBY
Karaoke Scoring
1) During playback of disc, press the SCORE ON/OFF button.
2) Score logo “
SCORE” appear on TV screen.
3) Wait until playback song is finish then score result will be shown on TV screen.
4) To cancel score result, press SCORE ON/OFF button again.
Note: Karaoke scoring is disable for DVD/CD.
2/9/06, 3:02 PM
48
DV-SL1500W
Troubleshooting chart
Many potential problems can be resolved by the owner without calling a
service technician.
If something is wrong with this product, check the following before calling
your authorised SHARP dealer or service centre.
H
General
References
Symptom
Possible cause
No sound is heard.
I Is the volume level set to “0”?
I Are the speaker wires disconnected?
Noise is heard during
playback.
I Move the unit away from any computers
or mobile phones.
Interference or noise occurs
on the TV image.
I Is the unit placed near TV with internal
aerial? Use an external aerial.
The power is not turned on.
I Is the unit unplugged?
I The protection circuit may be activated.
Unplug and plug in the power lead again
after 15 minutes or more.
No images are displayed.
I Is TV turned on?
I Is the input of TV switched?
H
DVD player
Symptom
Possible cause
Even though a disc has been I Is the disc loaded upside down?
I Is the disc very dirty?
loaded, “NO DISC” is
displayed.
Playback sounds are skipped. I Does the disc satisfy the standards?
I Is the unit located near excessive
vibrations?
I Has condensation formed inside the
unit?
The control buttons do not
function. Music or video
playback is interrupted.
I Is the disc very dirty?
I Does the disc satisfy the standards?
I Is the unit located near excessive
vibrations?
I Has condensation formed inside the
unit?
Pictures and sound are
skipped.
I Is the disc very dirty?
I Is the unit located near excessive
vibrations?
I Has condensation formed inside the
unit?
The unit does not operate
even if the power is on.
I Is a disc other than a DVD (region
number on the back of the unit), SVCD,
VCD, audio CD, CD-R or CD-RW
loaded?
Image cannot be played back. I Are the video and audio cables
connected improperly?
(Sound is not heard.)
I Is a disc other than a DVD (region
number on the back of the unit), SVCD,
VCD, audio CD, CD-R or CD-RW
loaded?
I Is the disc very dirty?
I Is the disc loaded upside down?
I Clean the optical pickup if it is dirty.
I Is the TV input set to “VIDEO 1/VIDEO
2”, etc.?
I Is the unit turned on?
49
DV-SL800W 43-52
49
Downloaded From DvDPlayer-Manual.com Sharp Manuals
2/9/06, 3:02 PM
DV-SL1500W
H If trouble occurs
Remote control
Symptom
The remote control does not
operate properly.
Possible cause
Is the battery polarity respected?
Are the batteries dead?
Is the distance or angle incorrect?
Are there any obstructions in front of the
unit?
I Is the remote control sensor exposed to
strong light (inverter fluorescent light,
direct sunlight, etc.)?
I Is the remote control for another
equipment used simultaneously?
I
I
I
I
When this product is subjected to strong external interference (mechanical
shock, excessive static electricity, abnormal supply voltage due to lightning,
etc.) or if it is operated incorrectly, it may malfunction.
If such a problem occurs, do the following:
1 Turn the unit power off and on again.
2 If the unit is not restored in the previous operation, unplug and plug in the
unit, and then turn the power on.
H Before transporting the unit
1 Press the ON/STANDBY button to turn the power on.
2 Press the 0 OPEN/CLOSE button to open the disc tray.
Remove the disc inserted in the unit.
3 Press the 0 OPEN/CLOSE button to close the disc tray.
4 Press the ON/STANDBY button to switch off, and then unplug the AC
power lead from the wall socket.
H Condensation
Sudden temperature changes, storage or operation in an extremely humid
environment may cause condensation inside the cabinet (laser pickup, etc.)
or on the transmitter on the remote control.
Condensation can cause the unit to malfunction. If this happens, leave the
power on with no disc in the unit until normal playback is possible (about 1
hour). Wipe off any condensation on the transmitter with a soft cloth before
operating the unit.
References
H
50
DV-SL800W 43-52
50
Downloaded From DvDPlayer-Manual.com Sharp Manuals
2/9/06, 3:02 PM
DV-SL1500W
Error indicators and warnings
Specifications
When you load an unplayable disc or fail to perform operations properly, the
following messages are displayed on the unit and the TV screen.
As part of our policy of continuous improvement, SHARP reserves the right to
make design and specification changes for product improvement without prior
notice. The performance specification figures indicated are nominal values of
production units. There may be some deviations from these values in individual units.
Unit display
Meaning
I The disc is not loaded.
I The disc is scratched or dirty and cannot be
recognised.
I The disc is loaded up-side down.
I The region number of the DVD is not the
number on the back of the unit.
TV screen
Meaning
I The disc is not loaded.
I The disc is scratched or dirty and cannot
be recognised.
I The disc is loaded up-side down.
References
NO DISC
I The region number of the DVD is not the
number on the back of the unit.
WRONG REGION
I General
Power source
AC 110 - 240 V, 50/60 Hz
Power consumption Power on: 12 W
Dimensions
Width: 430 mm (16-15/16")
Height: 37 mm (1-1/2")
Depth: 200 mm (7-7/8")
Weight
1.70 kg (3.75 lbs.)
Audio input terminals MIC x 2 (ø6.3)
Audio output terminals Analogue output (OUT): RCA type x 1 pair (L/R)
Video output
terminals
S-video output: S-terminal x 1, component (Y, PB, PR)
Video output: RCA type x 1
Digital output terminal COAXIAL
I DVD player
Maintenance
H Cleaning the cabinet
Signal system
PAL/NTSC colour
Supported disc types DVD (with the same region number on the back of
the unit), SVCD, VCD, audio CD, CD-R, CD-RW,
JPEG
Periodically wipe the cabinet with a soft cloth and a diluted soap solution, then
with a dry cloth.
Video signal
Horizontal resolution: 500 lines
S/N ratio: 70 dB
I Do not use chemicals for cleaning (petrol, paint thinner, etc.). It may damage the cabinet finish.
I Do not apply oil to the inside of the unit. It may cause malfunctions.
Audio signal
Frequency characteristics
Linear PCM DVD:
20 Hz to 20 kHz
(sampling rate: 48 kHz)
20 Hz to 20 kHz
(sampling rate: 96 kHz)
CD: 20 Hz to 20 kHz
S/N ratio
CD: 94 dB (1 kHz)
Dynamic range
Linear PCM DVD: 95 dB
CD: 94 dB
Total harmonic
distortion ratio
0.01 % maximum
51
DV-SL800W 43-52
51
Downloaded From DvDPlayer-Manual.com Sharp Manuals
2/9/06, 3:02 PM
Copyright
DV-SL1500W
Copyright information:
I Unauthorised copying, broadcast, public display, transmission, public performance and rental (regardless of whether or not such
activities are for profit) of disc contents are prohibited by law.
I This system is equipped with copy protection technology that causes substantial degradation of images when the contents of a disc
are copied to a video tape.
Apparatus Claims of U.S. Patent Nos.
4,631 ,603, 4,577,216, 4,819,098 and
4,907,093 licensed for limited viewing
uses only.
This product incorporates copyright protection technology that is protected by method claims of certain U.S. patents and other intellectual
property rights owned by Macrovision Corporation and other rights owners.
Use of this copyright protection technology must be authorised by Macrovision Corporation, and is intended for home and other limited
viewing uses only unless otherwise authorised by Macrovision Corporation.
References
Copy Protection
This unit supports Macrovision copy protection.
On DVD discs that include a copy protection code, if the contents of the DVD disc are copied using a VCR, the copy protection code
prevents the videotape copy from playing normally.
Reverse engineering or disassembly is prohibited.
“DTS” and “DTS Digital Out” are trademarks of Digital Theater Systems, Inc.
Manufactured under license from Dolby Laboratories. “Dolby” and the double-D symbol are trademarks of Dolby Laboratories.
52
DV-SL800W 43-52
52
Downloaded From DvDPlayer-Manual.com Sharp Manuals
2/9/06, 3:02 PM
MEMO
DV-SL800W_MEMO
1
Downloaded From DvDPlayer-Manual.com Sharp Manuals
9/29/05, 4:26 PM
MEMO
DV-SL800W_MEMO
1
Downloaded From DvDPlayer-Manual.com Sharp Manuals
9/29/05, 4:26 PM
SHARP CORPORATION
92LYOM20005704
06E R KI 1
DV-SL800W F_B cover
2
Downloaded From DvDPlayer-Manual.com Sharp Manuals
2/20/06, 6:01 PM