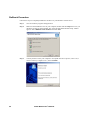
1
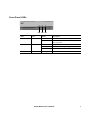
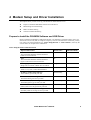
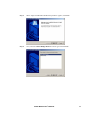
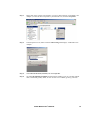
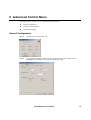
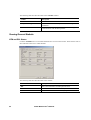
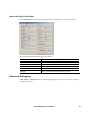
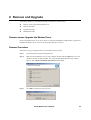
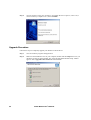
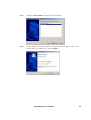
ASUS
AAM6000UG USB ADSL Modem User Guide
Version 2.1
For Software Version 9.5
THE SPECIFICATIONS AND INFORMATION REGARDING THE PRODUCTS IN THIS MANUAL ARE
SUBJECT TO CHANGE WITHOUT NOTICE. ALL STATEMENTS, INFORMATION, AND
RECOMMENDATIONS IN THIS MANUAL ARE BELIEVED TO BE ACCURATE BUT
ARE PRESENTED WITHOUT WARRANTY OF ANY KIND, EXPRESS OR IMPLIED. USERS MUST TAKE
FULL RESPONSIBILITY FOR THEIR APPLICATION OF ANY PRODUCTS.
THE SOFTWARE LICENSE AND LIMITED WARRANTY FOR THE ACCOMPANYING PRODUCT ARE SET
FORTH IN THE INFORMATION PACKET THAT SHIPPED WITH THE PRODUCT AND ARE INCORPORATED
HEREIN BY THIS REFERENCE.
NOTWITHSTANDING ANY OTHER WARRANTY HEREIN, ALL DOCUMENT FILES AND SOFTWARE OF
THESE SUPPLIERS ARE PROVIDED “AS IS” WITH ALL FAULTS. PRODUCT AND THE ABOVE-NAMED
SUPPLIERS DISCLAIM ALL WARRANTIES, EXPRESSED OR IMPLIED, INCLUDING, WITHOUT
LIMITATION, THOSE OF MERCHANTABILITY, FITNESS FOR A PARTICULAR PURPOSE AND
NONINFRINGEMENT OR ARISING FROM A COURSE OF DEALING, USAGE, OR TRADE PRACTICE.
IN NO EVENT SHALL PRODUCT OR ITS SUPPLIERS BE LIABLE FOR ANY INDIRECT, SPECIAL,
CONSEQUENTIAL, OR INCIDENTAL DAMAGES, INCLUDING, WITHOUT LIMITATION, LOST PROFITS OR
LOSS OR DAMAGE TO DATA ARISING OUT OF THE USE OR INABILITY TO USE THIS MANUAL, EVEN IF
PRODUCT OR ITS SUPPLIERS HAVE BEEN ADVISED OF THE POSSIBILITY OF SUCH DAMAGES.
ASUS and the ASUS logo are registered trademarks of ASUSTek COMPUTER INC.
All other trademarks mentioned in this document are the property of their respective owners. The use of the word partner
does not imply a partnership relationship between ASUS and any of its resellers.
ASUS AAM6000UG A1 User Guide
Text Part Number: 6000-0001
ASUSTek COMPUTER INC.
No. 15, Li-Te Rd., Peitou,
Taipei, Taiwan, R.O.C.
www.asus.com
COPYRIGHT ©2002 THE MANUFATURER. All Rights Reserved.
Contents
1 Preface............................................................................................................1
Purpose....................................................................................................................................................... 1
Organization................................................................................................................................................ 1
Conventions ................................................................................................................................................ 1
2 Introduction....................................................................................................3
Overview ..................................................................................................................................................... 3
Features ...................................................................................................................................................... 3
System Requirements................................................................................................................................. 3
3 Hardware Installation ....................................................................................5
Hardware Overview..................................................................................................................................... 5
Parts List ........................................................................................................................................ 5
USB Connectors ............................................................................................................................ 6
Splitter and Microfilter.................................................................................................................................. 6
Front Panel LEDs........................................................................................................................................ 7
4 Modem Setup and Driver Installation ..........................................................9
Prepare to Install the DSLMON Software and USB Driver ......................................................................... 9
MPoA Bridge or Routed Setting ................................................................................................................ 10
Setting Up USB Network IP Address ........................................................................................... 12
PPPoA or PPPoE Setting.......................................................................................................................... 15
Internet Access PPP Setting ........................................................................................................ 17
Connection Status Monitoring ................................................................................................................... 18
5 Advanced Control Menu .............................................................................19
General Configuration ............................................................................................................................... 19
Viewing General Statistic .......................................................................................................................... 20
ATM and DSL Status .................................................................................................................... 20
Advanced of AAL Link Status ....................................................................................................... 21
Advanced Debugging................................................................................................................................ 21
6 Remove and Upgrade..................................................................................23
Remove versus Upgrade the Modem Driver ............................................................................................ 23
Remove Procedure ................................................................................................................................... 23
Upgrade Procedure................................................................................................................................... 24
Rollback Procedure................................................................................................................................... 26
Appendix A .......................................................................................................27
ADSL-Related Acronyms .......................................................................................................................... 27
This page is leave in blank for note or memo use
1 Preface
This preface guide you how the document is organized, the purpose of this document and it
conventions. It includes the following topic:
z
Purpose
z
Organization
z
Conventions
Purpose
The purpose of this guide is to provide detailed information and description about how to configure
the AAM6000UG USB ADSL Modem and contains comprehensive configuration examples.
Organization
This guide contains the following information:
y
y
y
y
y
y
Preface
Introduction
Hardware Installation
Modem Setup and Driver Installation
Advanced Control Menu
Remove and Upgrade
Conventions
This section describes the conventions used in this guide.
9
– Indicate the attention or any notices caution relay on the topical subjects.
This page is leave in blank for note or memo use
2
ADSL Modem User’s Manual
2 Introduction
This chapter provides a general overview of AAM6000UG USB Modem. It covers the key features
and main applications of your Modem.
z
Overview
z
Feature
z
System Requirements
Overview
Thanks you for purchasing this ADSL Modem. This ADSL Modem delivers the highest performance
in Asymmetric Digital Subscriber Line technology, allowing you to simultaneously enjoy telephone
and Internet service using existing copper phone lines. Ideal for home and small business users, this
existing copper phone lines, Ideal for home and small business users, this easy-to-use ADSL Modem
offers reliable connectivity and remarkable data transfer rates. Once the ADSL Modem is online, you
can enjoy real-time 3D animation, video conferencing, or perform other data intensive operations.
Features
Software Feature
y
Supports RFC 2346 protocol (PPP over ATM), RFC 2516 (PPP over Ethernet), RFC 1483
encapsulation (multiple protocol over ATM AAL5), and TFC 1577 protocol (classical IP over
ATM)
y
Software upgrade
y
User Maintenance
System Requirements
The AAM6000UG ADSL Modem requires that your computer has a USB (Universal Series Bus) 1.1
or 2.0 compatible port.
9
You must have your USB port free and capable to use before connect to AAM6000UG
ADSL Modem, USB Hub or other extend USB device are not recommend to connect with
AAM6000UG ADSL Modem.
Operating System Support
y
Windows 98SE
y
Windows ME
y
Windows 2000
y
Windows XP
y
Windows 2003 Server
3
This page is leave in blank for note or memo use
4
ADSL Modem User’s Manual
3 Hardware Installation
This chapter introduces the ports and LED indicators.
z
Hardware Overview
z
USB Connectors
z
Splitter Installation
z
Front Panel LEDs
Hardware Overview
Have your system operating disk or CD handy during the installation, in case a specific file can not be
found on your computer due to installation.
USB Cable
Connect to PC
RJ-11 Phone Cable connect
to Wall or Splitter
The back panel has two interfaces:
y
USB – Connecting to PC USB port
y
LINE – Connecting RJ-11 Phone cable to Phone Jack or Splitter
Parts List
AAM6000UG USB Modem
ADSL Modem User’s Manual
Splitter
RJ-11 Phone Cable
5
USB Cable
Quick Installation Guide
(Optional)
Installation CD
USB Connectors
See the following figure for an explanation of USB connectors.
This cable end will plug into your Modem’s
USB port
This cable end will plug into your computer’s
USB port
Splitter Installation
Use a Splitter in order to plug a phone into the same telephone line.
y
y
y
6
Modem port – connect to USB Modem
Phone port – connect to Phone Set
Line port – connect to telephone wall jack or out line
ADSL Modem User’s Manual
Front Panel LEDs
Power WAN DATA
LED
Color
Status
Description
POWER
Yellow
On
USB is connected and receives power.
Off
Modem’s USB port is not connected or not
receiving power.
On
DSL link is up.
Blinking
DSL in Handshaking training status.
Off
No DSL connection.
Blinking
Data transfer over DSL line.
WAN
DATA
Yellow
Yellow
ADSL Modem User’s Manual
7
This page is leave in blank for note or memo use
8
ADSL Modem User’s Manual
4 Modem Setup and Driver Installation
This chapter shows you how to set up your Modem for ADSL Internet access.
z
Prepare to Install the DSLMON Software and USB Driver
z
MPoA Bridge or Routed Setting
z
PPPoA or PPPoE Setting
z
Connection Status Monitoring
Prepare to Install the DSLMON Software and USB Driver
Before install the AAM6000UG USB ADSL Modem, you should have information below from your
Internet Service Provide (ISP) or Telephone Company. Once the information has confirmed, you may
now choose one of the installation type, “MPoA Bridge/Routed” or “PPPoA/PPPoE”, follow by the
sections below to complete driver installation.
MPoA Bridge/Routed Needed Information
Required Information
Default Value
VPI:
The Virtual Path Identifier number identifies a
bundle of virtual channels.
8
VCI:
The Virtual Path Identifier number identifies a
logical connection between end stations.
35
Framing Type & Encapsulation:
Bridge LLC/VC MUX or Route LLC/VC MUX
Bridge LLC
Connection Standard:
ANSI T1.413, G.lite, G.dmt, Multi-Standard
Multi-Standard
IP address: (When using Static IP)
The IP address given from your ISP.
Automatically
Subnet Mask: (When using Static IP)
The subnet Mask given from your ISP.
Automatically
Default Gateway: (When using Static IP)
The default gateway given from your ISP.
Automatically
Preferred DNS Server: (When using Static IP)
Primary DNS server IP given from your ISP.
Automatically
Alternate DNS Server: (When using Static IP)
Secondary DNS server IP given from your ISP.
Automatically
ADSL Modem User’s Manual
Fill in the Blanks
9
PPPoA/PPPoE Needed Information
Required Information
Default Value
VPI:
The Virtual Path Identifier number identifies a
bundle of virtual channels.
8
VCI:
The Virtual Path Identifier number identifies a
logical connection between end stations.
35
Framing Type & Encapsulation:
Bridge LLC/VC MUX or Route LLC/VC MUX
Bridge LLC
Connection Standard:
ANSI T1.413, G.lite, G.dmt, Multi-Standard
Multi-Standard
User Name and Password:
Let your ISP know which account you are loggin
into and protects your account from unauthorized
users.
N/A
Fill in the Blanks
MPoA Bridge or Routed Setting
9
10
DO NOT connect the modem to your computer at this time.
Step 1
Close all Windows programs and applications.
Step 2
Insert the CD that came with your Modem into your computer. It should automatically run
the driver setup program. If the setup is not automatically run, you can open the CD on
your computer and double click the Setup.exe icon
Step 3
When the following window appears, click OK.
ADSL Modem User’s Manual
Step 4
When “Eagle II USB ADSL Modem Setup window” appears, click Next.
Step 5
Next, select the “MPoA Bridge/Routed” as driver type and click Next.
ADSL Modem User’s Manual
11
Step 6
Screens pop up to report the progress of the installation. You do not need to click anything
until installation complete, selected “Yes, I want to restart my computer now”, and click
Finish to have your computer restart.
Step 7
After system restarted, you can now connect USB Modem to your PC, several screens pop
up to inform USB driver installation progress, when the following window appear, click
OK.
Setting Up USB Network IP Address
This section is relevant when you select MPoA Bridge/Routed driver type using a given IP address
on.
9
Please have your AAM6000UG USB ADSL Modem connecting to PC.
Follow the steps to set up your USB computer to use a static IP address given by your ISP. Window
XP screen shots are shown. Steps and screen shots may very depend on the version of Windows.
Step 1
Click Start Æ Control Panel Æ Network and Internet Connection Æ Network Connections.
Step 2
Double click on the Network Connection icon to open the window screen.
9
12
The follow screen may very from this user guide depending on your MS Windows version.
ADSL Modem User’s Manual
Step 3
Right-click on the icon that corresponds to your new USB connection “USB ADSL LAN
Adapter” (not the one that corresponds to your Ethernet NIC) and select Properties.
Step 4
In the Properties screen, make sure the Connect Using field displays “USB ADSL LAN
Adapter”.
Step 5
Select Internet Protocol (TCP/IP) and click Properties.
Step 6
Click Use the following IP address and fill in the IP address (given by your ISP), Subnet
mask, and Default gateway fields; as same as DNS server address (given by your ISP).
ADSL Modem User’s Manual
13
5 Advanced Control Menu
This chapter shows you how to view advanced modem information.
z
General Configuration
z
Viewing General Statistics
z
Advanced Debugging
General Configuration
Step 1
Double click on the DSLMON icon.
Step 2
Press the ALT and D keys simultaneously to bring up the following window. This is
CONFIG tab for the ATM VPI/VCI and encapsulation setting.
ADSL Modem User’s Manual
19
The following table describes the labels in this CONFIG window.
LABEL
Description
ATM Channel
These are the Virtual Path and Virtual Channel identifiers.
Encapsulation Type
This shows the mode of encapsulation chosen during Modem
installation.
ADSL Standard
ADSL connection modulation type used to establish physical
communications with the DSL provider.
Viewing General Statistic
ATM and DSL Status
Click the ATM/DSL tab to view ATM-related statistics as seen in this window. These statistics refer to
data collected on the active virtual channels.
The following table describes the labels in this window.
20
LABEL
Description
DSL
This is the information of ADSL physical status.
ATM
This is the information of ATM cell layer status.
Packet
This is the information of Ethernet layer packet status.
ADSL Modem User’s Manual
Advanced of AAL Link Status
Click Advanced tab to view AAL (ATM Adapt Layer) related statistics as seen in this window.
The following table describes the labels in this window.
LABEL
Description
Packet Statistics
This is the total number of AAL 5 layer packet statistics.
OAM
This is the total number of ATM OAM cell statistics.
ATM Statistics
This is the total number of ATM cell statistics.
DSL Frame Counts
This is the total number of ADSL Frame counters.
Margin
This is upstream and downstream margin values.
Advanced Debugging
CMV, TEST, and Graph tabs are for engineering debugging only, you may not needs to viewing or
configuring in advice.
ADSL Modem User’s Manual
21
This page is leave in blank for note or memo use
22
ADSL Modem User’s Manual
6 Remove and Upgrade
This chapter tells how to uninstall and reinstall your Modem’s software driver.
z
Remove versus Upgrade the Modem Driver
z
Remove Procedure
z
Upgrade Procedure
z
Rollback Procedure
Remove versus Upgrade the Modem Driver
Remove the Modem driver if you are no longer to using the AAM6000UG USB Modem, Upgrade and
Rollback the Modem driver if you are having trouble with current version.
Remove Procedure
Follow these steps to completely remove your Modem’s software driver.
Step 1
Close all windows programs and application.
Step 2
Make sure the Installation CD is in your computer, Double click the Setup.exe icon as you
did when you first set up the Modem. The “Eagle II USB ADSL Modem Setup” window
appears. Select Remove all install components and click Next.
Step 3
Click OK to confirm the remove process.
ADSL Modem User’s Manual
23
Step 4
You may needs to restart your computer to accomplish the remove process, select “Yes, I
want to restart my Computer now”, and click Finish.
Upgrade Procedure
Follow these steps to completely upgrade your Modem’s software driver.
24
Step 1
Close all windows programs and application.
Step 2
Make sure the Installation CD is in your computer, Double click the Setup.exe icon as you
did when you first set up the Modem. The “Eagle II USB ADSL Modem Setup” window
appears. Select Upgrade to the new driver and click Next.
ADSL Modem User’s Manual
Step 3
Select the “PPPoA/PPPoE” as driver type and click Next.
Step 4
You may needs to restart your computer to accomplish the remove process, select “Yes, I
want to restart my Computer now”, and click Finish.
ADSL Modem User’s Manual
25
Rollback Procedure
Follow these steps to completely Rollback to old driver of your Modem’s software driver.
26
Step 1
Close all windows programs and application.
Step 2
Make sure the Installation CD is in your computer, Double click the Setup.exe icon as you
did when you first set up the Modem. The “Eagle II USB ADSL Modem Setup” window
appears. Select Rollback to the old driver and click Next.
Step 3
You may needs to restart your computer to accomplish the remove process, select “Yes, I
want to restart my Computer now”, and click Finish.
ADSL Modem User’s Manual
Appendix A
ADSL-Related Acronyms
ADSL
Asymmetric High bit rate Digital Subscriber Line
ANSI
American National Standards Institute
ARP
Address Resolution Protocol
ATM
Asynchronous Transfer Protocol
BootP
Bootstrap Protocol
CHAP
Challenge-Handshake Authentication Protocol
DHCP
Dynamic Host Configuration Protocol
DMT
Discrete Multi-Tone
DSLAM
Digital Subscriber Line Access Multiplexer
IETF RFC
Internet Engineering Task Force Request for Comments
IPCP
Internet Protocol Control Protocol
IPoA
IP over ATM
ITU
International Telecommunication Union
ITU-T
ITU Telecommunication Standardization Sector
MAC (address)
Media Access Control (address)
MPoA
Multi Protocol Encapsulation over ATM Adaptation Layer 5
NAT
Network Address Translation
PAP
Password Authentication Protocol
POTS
Plain Old Telephone Service
POP
Point-to-Point Protocol
PPPoA
PPP over ATM Adaptation Layer 5
PPPoE
PPP over Ethernet
PSTN
Public Switched Telephone Network
PVC
Permanent Virtual Connection
Telco
Telephone Company
TCP/IP
Transmission Control Protocol / Internet Protocol
TFTP
Trivial File Transfer Protocol
VCI
Virtual Circuit Identifier
VPI
Virtual Path Identifier
WAN
Wide Area Network
END OF DOCUMENT
ADSL Modem User’s Manual
27