1
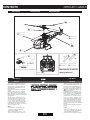
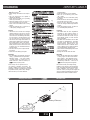
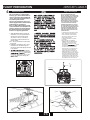
LAMA 6
CO-AXIAL100% READY-TO-FLY
ELECTRIC HELICOPTER
Specifications
Main Rotor Blade Diameter..........................................................................................................340mm
Length..................................................................................................................................................380mm
Height..............................................................................................................................................165mm
Weight.................................................................................................................................................240g
Motor................................................................................................................................................. Dual Motor
Battery...........................................................................................................................2S Li-Po (1000 mAh)
Radio System.............................................................................4 Channel Helicopter Radio( Mode 2)
Charger.........................................................................................................Standard AC Wall Charger
Battery Balancer.......................................................................................................2 Cell Li-Po Balancer
Century Helicopter Products - Copyright C All Rights Reserved - Version 1.0 June 2008
CENTURY LAMA 6
WARNINGS
CAUTION
K
R/C Operating instructions
• Check that all transmitter controls and
Kontrollen vor der Flug
• Stellen Sie sich sicher dass alle
Trimmhebel gut positioniert sind, und
Sender einschalten.
• Empfänger einschalten.
ug mit dem
• Die Funktion vor
Sender überprüfen.
• Nach der Betrieb in umgekehrter
Reihenfolge vorgehen.
• Die Batterie herausnehmen und
abklemmen.
• Überprüfen ob alle Schrauben noch
xiert sind.
trims are in neutral. Make sure the throttle
stick is down. Turn on the transmitter.
• Switch on the receiver.
• Inspect the servo throw and motor
operations prior to taking off.
• Reverse sequence when shutting
ying.
• Make sure to disconnect and remove
the bat
ying.
• Check the model after ying and verify all screws are still fastened.
cations /
Main Rotor Diameter
Length
Weight
Motor Size
Radio Required
Battery
VORSICHT
/ Technische Daten
a
mèt
Longueur fus agel e
i e oa ml ac ne i h
P ds d
Moteur type
Ra o i d
Accu
Hauptrotor Durchmesser
340 mm
Rump änge
380 mm
Gew chti ohne Accu
2 40 g
Moto typr
180 size (2s)
t nder
Benö gtei Se
4 channel, heli
Akku
7.4v, 1000mAh
P.1
CENTURY LAMA 6
WARNINGS
CAUTION
VORSICHT
Caution measures
Use your radio controlled equipment only for
the operations it has been made for.
Avoid ying near high-tension lines and
during rainy and/or windy days. Avoid ying in crowded areas
Vorsichtmassnahme
Benutzen Sie Ihre R/C Radioausrüstung nur
für die Betriebe, wo sie für gebildet worden
ist.
Vermeiden Sie zu iegen, nah am Hochspannungslinien und während regnerischen und/
oder windigen Tage.
Vermeiden Sie, in gedrängte Bereiche zu
iegen.
Beim Lesen Ihres Handbuches, sehen Sie die
folgenden Symbole. Achten Sie immer besonderes auf die Punkte, in denen diese Symbole
bildlich dargestellt werden und respektieren
Sie immer ihre Bedeutung.
While reading your manual, you will see the
following symbols. Always pay special attention to the paragraphs where these symbols
are depicted and always respect their
cance.
Strictly prohibited
Test and verify
Ausschliesslich verboten
Testen und Überprüfen
ight
Never use the same frequency as someone else in your running area. Using the
same frequency at the same time (either
if it is AM, FM or PCM) can cause serious
accidents, whether it’s ying, driving or
sailing.
Do not y outdoors and never y in rainy or
windy days or at night. When ying in the
rain, water may penetrate into the transmitter and will cause either faulty operation,
lack of control and may cause a crash.
Always extend the antenna to its full length
to get the best possible transmission.
Always extend the receiver antenna and
hang it next to the fuselage if you want
to obtain a transmission that is better
then the 5-10 meters with the rolled up
antenna.
Always test the R/C set before
use. Any malfunction in the R/C
set or model may cause a crash.
Before starting the motor, check that
the direction of operation of each servo
matches the operation of its control stick.
If a servo does not move in the proper
direction, or operation is abnormal, do not
y the model.
Vorsichtmassnahme während
des Fluges
Prüfen Sie, dass niemand in der Umgebung dieselbe Frequenz benutzt, den
dadurch können Unfälle entstehen, auch
bei einer unterschiedlichen Modulierung
(PCHM/FM).
Vermeiden Sie das Outdoor Fliegen, Fliegen bei Wind, Regenfall, Gewitter oder
Dunkelheit. Wenn Nässe im Gehäuse sikkernt, kann es die Wirkung des Senders
ernsthaft stören und einen Absturz verursachen.
Antenne des Senders volständig herausziehen. Falls nicht völlig entfaltet hat der
Sender nür eine beschränkte Reichweite.
Antenne des Senders volsändig abwickelen wenn Sie eine grossere Reichweite wie
5-10 Meter haben wollen.
Beobachten Sie immer Empfänger, Sender
und Servo’s auf unregelmässigkeiten vór
dem Fliegen. Ein Reichweitetest ist immer
empfohlen. Falls verdächtige Erschütterungen oder unregelmässigkeiten auftreten, Fliegen Sie dann nicht mit das Model.
Gebrauch vom Sender und Ladeakkus
Inbetriebnahme Ihres Radios:
1. Motorschalter in neutral-Position bringen
und Fernsteuersender einschalten.
2. Empfänger anschalten
3. Die Funktion vor
iegen mit dem Sender
überprüfen.
4. Nach dem Betrieb in umgekehrter Reihenfolge vorgehen.
- Empfänger ausschalten
- Fernsteuersender ausschalten.
Instructions for safe use and proper
charging
R/C operation procedures:
1. Make sure the throttle control is in the lowest position, and switch on the transmitter.
2. Switch on the receiver.
3. Inspect the correct operation of your
transmitter before use.
4. Reverse sequences to shut down after ying.
- switch off the receiver
- switch off the transmitter
Gebrauch des Senderakkus
adbaren
Der Sender kann man mit wieder
NiCad Batterien ausrüsten. Falls Sie wiederadbare NiCad-Batterien benützen, wenden Sie dann ein spezielles Ladegerät, dass
man kaufen kann beim Fachhändler.
Überladen der Batterie kann Brandwunden, Verletzungen oder Blindheit verursachen.
Charging the transmitter batteries
You can charge your batteries with a separately available charger. Please follow the instructions of the manufacturer before charging. It is also possible to use a separately
available digital quick charger.
Please pay close attention to the charger
manual as overcharge can result in re and
can harm skin and eyes due to overheating,
breakage and electrolyte leakage.
P.2
CENTURY LAMA 6
CONTENTS
Kit contents
Contenu de Kit
Baukasteninhalt
Stabilizer
Stabilisierungsstange
Main mast
Hauptwelle
Lower main rotor blades (B)
(B)
Untere Hauptrotorblätter (B)
Upper main rotor blades (A)
(A)
Obere Hauptrotorblätter (A)
Tail
Heckteil
Cabin
Kabinenhaube
Upper main rotor blades (A)
(A)
Obere Hauptrotorblätter (A)
Charger and 1000mAh LiPo battery
100mAh
Lader und 1000mAh LiPo Akku
Now includes 2 cell Li-Po
battery balancer!
Transmitter /
Sender
2 a.
Lower main rotor blades (B)
(B)
Untere Hauptrotorblätter (B)
LiPo battery
LiPo Akku
Caution
Vorsicht
Lithium polymer (LiPo) batteries require particular attentive treatment. This applies to
charging, unloading, storage and other handling. Please pay special attention to the following instructions
Please make sure to keep this manual always
at hand.
Improper treatment can lead to explosions,
res, smoke development and poisonous
danger. Neglecting the following safety and
warning procedures will also lead to reduced battery performance.
Cells with different capacities may not be
connected in parallel or series, because the
cell characteristics are too different. If however you connect LiPo batteries in parallel
or series, Century refuses all warranty claims
or damages that result from this operation.
Century supplied LiPo batteries are therefore
the only ones certified for use.
Charge
• Put the battery on a non flammable, heatproof and non conducting surface during the charging process.
• Never charge the battery while it is situated in your model, and never charge it in
Lithium-Polymer-Akkus (LiPo) bedürfen besonders aufmerksamer Behandlung. Dies gilt
sowohl bei Ladung und Entladung als auch
bei Lagerung und sonstiger Handhabung.
Hierbei sind die folgenden besonderen Spekationen einzuhalten.Bitte bewahren Sie
sorgfaltig diese Anleitung.
Fehlbehandlung kann zu Explosionen, Feuer,
Rauchentwicklung und Vergiftigungsgefahr
Führen. Daneben führt die Nichtbeachtung
der Anleitungs-und Warnhinweise zu Leistungseinbussen und sonstigen Defekten.
Zellen mit verschiedene Kapazitäte dürfen
nicht in Reihe und nicht parallel geschaltet
werden, da die Eigenschafte und der Ladezustand zu unterschiedlich sind. Wenn Sie doch
Akkupacks in Reihe oder parallel schalten,
verweigert Century alle Ansprüche oder Beschädigungen.
Von uns gelieferte Akkupacks sind deshalb
selektiert.
P.3
Ladung
• Während des Ladevorgangs den Akku auf
einer nicht brennbaren, hitzebeständige
und nicht leitenden Unterlage legen.
• Nie den Akku in den Model oder im Nähe
CENTURY LAMA 6
CHARGING
•
•
•
•
•
•
the neighborhood of ammable or easily
ammable products.
Always charge the batteries under supervision.
Only use chargers that are capable of
charging LiPo batteries.
Never charge the battery in an operating
vehicle (car, motorbike, ...).
Should the battery become too warm, remove it immediately from the charger.
Never connect the batteries with a wrong
polarity.
Charge the cells with max. 1C (value of 1C
= cell capacity) charging current.
•
•
•
•
•
•
von brennbare oder leicht entzündliche Gegenstände laden.
Laden Sie die Akkus nur unter Aufsicht.
Akkus nie in ein Fahrzeug (Auto, Motorrad,...) laden.
Gebrauchen Sie nur fur LiPo Akkus geieignete Lader.
Sollte den Akku zu warm werden, entfernen
Sie den Akku sofort vom Lader.
Achten Sie immer darauf dass die Akkuzellen mit richtiger Polarität angeschlossen
werden.
Laden Sie die Zellen mit max. 1C (Wert von
1C = Zellenkapazität) Ladestrom.
Storage
• LiPo cells are to be stored with a charged
capacity of 80% (3.0V per cell). If you don’t
leave them partialy charged, they will become useless. Do not discharge the battery
too low because it will be defective. Only
use your model for 10-12 minutes at a time.
• LiPo cells are more fragile then batteries in
metal housings. Make sure to avoid shock.
If the battery suffers shock or the model
has been damaged in a crash remove the
battery from the model. Leave it for at least
30 minutes on a non flammable and heatresistant surface.
• All contact with any kind of liquid should
be avoided.
• Never take a LiPo battery pack apart.
Lagerung
• LiPo Zellen sollen mit einer eingeladenen
Kapazität von 20% gelagert werden, so
nicht wird den Akku nach einige Zeit unbrauchbar. Der Akku soll nie unter 3.0V pro
Zelle entladen werden, so nicht wird den
Akku unbrauchbar.
• LiPo Akkus sind mechanisch nicht so stabil
wie Akkus in Metallgehäusen. Vermeiden
Sie daher Shocks. Wenn den Akku einen
Schock bekommt, entfernen Sie es vom
Modell und lassen Sie es während mindestens 30 Minute auf einer nicht brennbaren
und hitzebeständige Unterlage liegen.
• Jeder Kontakt mit Flüssigkeit gleich welcher
Art ist zu vermeiden.
• Zerlegen Sie niemals einen LiPo Akku.
Recycling
• If a LiPo battery gets damaged (punctured
casing, ...) please follow the next procedure :
Discharge battery – Cool down battery
– Emerge battery for several hours in a
salted water bath – Hand over battery to a
ed battery recycling center.
Recycling
• Wenn ein LiPo Akku Defekt ist (beschädigte Folie), folgen Sie dann diese Schritte :
Akku entladen – Akku abkühlen lassen –
Akku während einige Stunden in eine Salzwasserlösung eintauchen – Akku bei ein
ziertes Recyclingzentrum eingeben.
Since Century can not supervise the correct charging, unloading and storage, any
warranty resulting from improper charging,
unloading or storage is excluded. Century refuses
all possible warranty claims and/or damage
claims caused by use of these batteries.
Da die Firma Century die richtige Ladung,
Entladung und Lagerung nicht überwachen
kann, wird jegliche Garantie bei Fehlerhafter
Ladung, Entladung oder Lagerung ausgeschlossen. Century verweigert alle mögliche Ansprüche und/oder Beschädigungen die durch
Gebrauch dieser Akkus verursacht werden.
2 b.
Charging LiPo battery
Charger l’accu LiPo
LiPo Akku lade
D
B
C
Battery Balancer
A
METAL BOX
P.4
CENTURY LAMA 6
FLIGHT PREPARATION
4
Flight preparation
Flugvorbereitungen
The “4-in-1 Unit” is a device with a
receiver, gyro, mixer and ESC built-in
one box. Our factory has installed the
“4-in-1” Unit and connected main motors, battery pack and two
servos to the Control-box. The 4-in-1
Unit is equipped with a fail safe device.
If the battery is connected to
the 4 in 1 Unit without having turned
on the transmitter, the helicopter will
refuse to operate. The same applies if
the throttle stick and/or the throttle
trims are not properly positioned.
Die “4 in 1” Einheit enthält Gyro,
Mischer, Empfänger und zwei Drehzahlsteller in einem Gehäuse. Sie ist bereits
eingebaut und beide Motoren, beide
Servos und der Stromversorgungsstecker sind daran angeschlossen.
Die Einstellregler “Gyro Trim” (für der
Gyro) ist werkseitig voreingestellt. Die
4 in 1 Einheit ist mit einer Fail-Safe
Sicherheit ausgerüstet. D.h. wenn Sie
der Akku anchliessen ohne der Sender
ein zu schalten, der Hubschrauber nicht
funtionieren wird. Wenn Sie der Gasstick und/oder Gashebel nicht richtig
positioniert haben wird der Heli auch
nicht funtionieren.
1. VERY IMPORTANT: Before turning the
transmitter on, set the throttle stick as
well as its trim to the lowest (power
off) position. The trim of the elevator and aileron sticks should be set to
neutral position.
2 & 3. Turn the transmitter on and extend
the antenna.
4. Installation of the Battery Pack ; shove
the battery into the battery tray and
connect the cables while paying attention
to the polarity.
5.
ash immediately. If the LED lights up, the helicopter
ashes slowly,
the battery voltage is low, and you will
ying and recharge the
battery.
& 3.1 Korrekt alle Trimmscheiber auf Mitte
stellen. Gasknüppel auf „Nullposition“.
Sender einschalten. Achten Sie darauf
dass alle Servo-Reverse Tasten auf die
richtige Positionen stehen.
& 4.2 Sender einschalten und Antenne
ausschieben.
5. Akku einschieben wie abgebildet.
Die6.Batterie mit dem Mixer-Fahrtregler
verbinden, 1 bis 2 Sekunden warten
bis die Elektronik aktiv ist. Die grüne
LED wird blink
euchten.
Dies bedeutet dass die elektronischen
Anschlüsse korrekt sind und dass die
Elektronik aktiv ist. Ihr Gasknüppel auf
„Stop“ halten und die Funktionsrichtung der Steuerungen überprüfen. Am
Nickknüppel ziehen um zu sehen ob die
Taumelscheibe korrekt reagiert. Nochmals
überprüfen ob alle Bauteile richtig sitzen.
Leuchtet der grüne LED schnell, soll man
unbedingt landen und Akku laden. Nach
dem Flug, trennen Sie den Akku vom 4in1
und schalten Sie dann den Sender aus.
1.
2.
Antenna
Servo reverser
Power switch
3.
An/Aus Schalter
5.
Green LED
LED
Grüner LED
Gyro Trim
4.
P.5
CENTURY LAMA 6
CONTROLS
ight
5a.
Erster Flug
Stick operation
Senderfunktionen
P.6
CENTURY LAMA 6
FLIGHT
6
1. Put the helicopter on a smooth surface
which allows the model to slide and turn
around.
2. Set the throttle stick and its trim lever to
the lowest position (power off). DO NOT
TOUCH THE SERVO REVERSER SWITCHES.
rst. Connect the
3. Turn on the transmit
battery pack to the “4 in 1” Control-box.
The LED will blink green. Wait until it
lights up green.
4. Set the Rudder Stick as well as its Trimmer to the neutr
rst. Gently
push the throttle up until the skids are
about to leave the ground.
5. Never push the throttle stick to full power
or push it abruptly. Continue to practice
“take off and landing” until you become
familiar with the procedure. (5.1)
6. Increase power little by little and let the
machine take off up to 12-16 inches. This
ying as
the “ground effect” makes the helicopter
become unstable (5.2). The machine will
shift away quickly in an unexpected direction. Observe the direction it shifts towards. If it is shifting to the left, correct it
by moving the aileron trim lever a little to
the right. If it is shifting backwards, push
the elevator trim lever a little forward. If
it turns to the right, push the rudder trim
lever a little to the left. And so on.
7. Then, gently push the throttle stick
forward a little more to lift up the machine
to your knee-height (5.3). You have to
carefully correct the machine so as to not
shift away by simultaneously pushing or
pulling the elevator, aileron and rudder
stick to eliminate the shift.
8. Next, push the throttle stick further
forward to raise the helicopter to your
eye-level. If the machine should shift
in any direction, gently move the rudder,
elevator and aileron sticks in the opposite
direction of the movement to return
the machine to its original position.
Congratulations! you have succeeded in
“Hovering”.
y the your heli in different
9. Now, y
y forward or backward,
y to the left or to the right (5.4A/B),
y higher or lower, etc. After practicing
enough, you can do more, such as: Pirouette rotations in hover), Square Patterns,
Landing on Designated Spots, etc.
10. Should the helicopter crash, immediately
pull the throttle stick and set the trim lever
to the lowest position and disconnect the
rst, then turn off your transmitbat
ter to avoid damage to the helicopter
and/or the electronics and radios.
1. Der Heli auf einen ebenen Untergrund stellen,
der es ihm erlaubt zu rutschen und sich zu
drehen.
2. Den Rotorschub-Steuerknüppel und den zugehörigen Trimmhebel in die unterste Position
(Motor Aus) bringen; die anderen Bedienelemente so belassen wie zuvor eingestellt.
3. Zuerst Sender einschalten, dann den Akku an
die 4/1 Einheit anschliessen: die LED blinkt
zunächst grün. Warten Sie bis sie konstant
grün leuchtet.
4. Vorsichtig die Schubsteuerung nach vorn
schieben, bis die Kufen gerade vom Boden
abheben wollen und das Modell sich nach
rechts oder links wegdreht. Wenn nu reine
kleine Korrektur erforderlich ist um das Drehen
zu beenden soll das mit dem Gier-Trimmhebel
passieren.
5. Niemals den Schubsteuerknüppel auf
Vollgas schieben oder abrupt betätigen. So
lange üben, bis das Abheben und Aufsetzen
funktioniert (5.1).
6. Den Schub in kleinen Schritten erhöhen so
dass das Modell 30-50cm hoch abhebt. In
dieser Höhe macht sich der sogenannten
Bodeneffekt (5.2) bemerkbar der das Modell
instabil werden lässt. Dadurch wird das Modell
in unterschiedliche Richtungen davondriften.
Die Bewegungen mit den Steuerknüppeln
abstoppen und mit den Trimmhebeln so
nachtrimmen dass das Modell auf einer
Stelle stehen bleibt und höchsten langsam
davondriftet.
7. Jetzt den Schub weiter erhöhen und das Modell auf Kniehöhe (5.3) steigen lassen. Dabei
muss ständig mit den drei Steuerfunktionen
Rollen, Nicken und Gieren korrigiert werden,
damit das Modell nicht driftet.
8. Nun den Schub weiter erhöhen und das
Modell auf Augenhöhe steigen lassen. Dabei
weiterhin ein Wegdriften des Modells durch
kleine, zur Bewegungsrichtung entgegengesetzte Steuerausschläge verhindern. Damit
be ndet sich das Modell im Schwebe ug.
9. Nun kann der Hubschrauber bewusst in alle
Richtungen ge ogen werden; Vorwärts, Rückwärts, nach links-rechts, höher oder niedriger,
… (5.4A/B). Mit mehr übung lassen sich alle
weiteren Schwebe ugmanöver iegen, wie
beispielweise Pirouetten, Rechteck, Schwebeug-8, Ziellandungen, etc.
10. Wenn das Modell während des Fluges bei
Schuberhöhung plötzlich unkontrollierbar
wegzudrehen beginnt und dabei die Leuchtdiode an der 4/1 Einheit rot au euchtet, ist
das ein Anzeichen dafür dass der Akku leer
ist: Es muss unverzüglich gelandet werden.
11. Sollte es einmal zu einem Absturz kommen,
muss sofort die Schubsteuerung und der
zugehörige trimmhebel in die Motor Auspostion gebracht werden. Dann soll der Akku
abgezogen und als letztes der Sender ausgeschaltet werden um weitere Schäden an
Hubschrauber und Elektronik zu vermeiden.
5.2
P.8
P.7
CENTURY LAMA 6
TRIMMING
6.2
6.3
6b.
Trimming the swashplate
Trimmung Taumelscheibe
A: This adjustment can be used to trim out
the ailerons and controls the right and left
movement of the helicopter. This setting
can be changed with the transmitter or
mechanically.
A: Mit dieser Feinabstimmung kann die links/
rechts Funktion des Hubschraubers getrimmt
werden. Dieser Abstimmung kann auch über
der Sender gemacht werden.
B: Der SSSS System (Superstabiler gleitender
Taumelscheibe) determiniert die Stabilität
der untere Rotorblätter. Über dieser Funktion
kann der Hubschrauber noch stabiler
gemacht werden. Die Schraube soll so
angedreht werden dass die Taumelscheibe
noch frei bleibt.
B: The Swashplate System controls the
stability of the lower main blades. Setting
up the swashplate properly can make the
helicopter even more stable.
C: Adjusting the lengths of the pushrods
for left, right, forward, and back movment.
Making the swashplate level to the ground at
will make the helicopter fly the most neutral.
Getting the pushrods even in length will help
left and right movements to be stable.
C: Dieser Feinabstimmung hat ein Ein uss
auf die vorwärts und rückwärtsgang des
Hubschraubers. Trimm auf neutral setzen.
A
C
B
P.8
CENTURY LAMA 6
TROUBLESHOOTING
7
Co-Axial System
Koaxial Rotorsystem
Instead of using a tail rotor to counter the main
rotor torque, the co-axial counter-rotating system
has two main rotors, one above the other, turning
in opposite directions. This makes it possible to
balance the torque of the two rotors so that the
fuselage won’t be steered during hovering or in
straight ight.
Anstatt das Hauptrotordrehmoment mit einem
Heckrotor auszugleichen, besitzt das koaxial gegenläu ge Rotorsystem zwei Hauptrotoren, die
über einander angeordnet in entgegengesetzte
Richtungen drehen. Das ermöglicht es, dass sich
die Drehmomente der beiden Rotoren gegen einander ausgleichen, so dass sich der Rumpf weder
im Schwebe ug, noch im Vorwärts ug unbeabsichtigt um die senkrechte Asche dreht.
Since the two rotors are separately driven by the
two motors, by increasing the speed of one motor
and decreasing the speed of the other, the torque
of two rotors will differ from each other and steer
the fuselage to turn the helicopter left or right.
In other words, the helicopter can turn while hovering or in ight. The speed of the motors is controlled by the throttle stick and the rudder stick on
the transmitter. When you push the throttle stick
forward towards full power position, the speed of
both upper and lower motors increases. Hence
the speed of both upper and lower rotor blades
increases. But, when you push the rudder stick
to the left or to the right, the speed of one motor
increases and the speed of the other motor decreases. Hence the speed as well as the torque
of one rotor increases and the torque of another
rotor decreases. Therefore, the fuselage will be
steered and make the helicopter turn to the left or
to the right. In other words, rudder stick is used
to control the helicopter to turn around in hover,
or to turn to the left or to the right during ight.
Just like helicopters with single main rotors and a
tail rotor, the elevator stick controls the helicopter
to y forwards or backwards. And, the aileron
stick is used to roll the helicopter to the left or
to the right. These are carried out by the servos
linked to the swashplate which in turn tilt the
lower rotor disc so as to make the helicopter
y forwards or backwards, to the left or to
the right.
Da die beiden Rotoren von separaten Motoren angetrieben werden ist es möglich, durch Erhöhen
der Drehzahl des einen und Verringern der Drehzahl des anderen Motors unterschiedliche Drehmomente (bei gleichbleibendem Gesamtschub) zu
erzugen, was zu einer Drehung des Rumpfs um
die vertikale Achse führt. Dieses nutzt man anstelle
des Heckrotors bei normalen Hubschraubern für
Drehungen im Schwebe ug und Richtungsänderungen im Vorwärts ug.
Die Drehzahlen der Motoren werden am Sender
sowohl mit der Rotorschubfunktion als auch mit
der Gierfunktion gesteuert: drückt man den “Gas”Steuerknuppel nach vorn, so erhöht sich die Drehzahl an beiden Motoren und damit auch an beiden
Rotoren gleichermassen. Wenn man dagegen den
Steuerknüppel für die Gierfunktion nach rechts
oder links drückt, erhöht sich die Drehzahl an einem Motor, während die sich am anderen Motor
verringert. Weil sich damit auch die Drehzahlen
der beiden Rotoren und damit die Drehmomente
gegensinnig verändern, dreht sich entsprechend
der Rumpf des Hubschraubers nach rechts oder
nach links. Genau wie bei einem normalen Hubschrauber mit Haupt- und Heckrotor steuert der
Steuerknüppel für die Nickfunktion das Fliegen vorwärts und rückwärts und der Steuerknüppel für die
Rollfunktion das Fliegen nach rechts und links. Das
wird dadurch erreicht, dass die beiden mit der taumelscheibe verbundenen Servos die Rotorebene
des unteren Rotors entsprechend neigen wodurch
der Heli dann in die gewüschte Richtung iegt.
Problem solving
Fehlerlösung
Helicopter does not move
The charger isn’t properly plugged in or is
malfunctioning.
Battery is empty
Check the connection of the battery
Check if the transmitter is on and if
the frequency is correct
Charge the battery
Helicopter reagiert nicht
Akku nicht geladen
Akkustecker kontrolieren
Schalter kontrolieren
Akku laden
Servos bewegen aber Hubschrauber
bewegt sich nicht
Motor überhitzt oder kaputt
Motor abkühlen lassen. Falls Problem nicht
gelöst wird, Motoren ersetzen
Battery cannot be charged.
Battery is discharged too low.
Battery must not be discharged under 6.0V,
otherwise battery will be damaged.
Only y the model no longer than 12 minutes.
If battery doesn’t work, replace the battery.
Mini Lama bewegt unkontrollierbar
Slechte Trimmung oder Zugluft
Trimmung reglen und/oder Türen schliessen/
Airco abschalten
Servos are working, but the motor is
not running
Motor is worn.
Motor is overheated.
Let the motors cool down.
P.9
CENTURY LAMA 6
TROUBLESHOOTING
Hubschrauber will nicht aufsteigen
Motor überhitzt
Akku fast leer
Motoren abkühlen lassen und eventuell
ersetzen
Akku laden
The helicopter moves left, right,
forward
Trim is not adjusted.
Windows might be open or room fans
might be blowingtoo hard.
Adjust the trim.
The helicopter can’t y when there is wind.
Close the windows and or turn off the room
fans.
Akku will nicht laden
Akku unter 6.0V entladen
Akku defect, Akku ersetzen.
The helicopter does not want to
take-off
Motor overheated.
Battery empty.
Let the motors cool down.
If the problem persists, change the motors.
Charge the battery.
P.10
CENTURY LAMA 6
PARTS DIAGRAM
15
08A
17
03
22
03
12
08A
21
15A
08B
11
02
08B
16
20
13
19
09
18
05
26
26
20
14
01
04
15
40
25
10
24
21
06
07
P.11
CENTURY LAMA 6
PARTS LISTING
DIAGRAM REF
PART #
DESCRIPTION
(1)........................................................CLM6-01
MAIN FRAME
(2)........................................................CLM6-02
LOWER MAIN BLADE GRIPS
(3)........................................................CLM6-03
UPPER MAIN BLADE GRIPS
(4)........................................................CLM6-04
SERVO W/TAPE
(5)........................................................CLM6-05
TAIL TRUSS COVER
(6)........................................................CLM6-06
LANDING GEAR SET
(7)........................................................CLM6-07
BATTERY HOLDER
(8A).....................................................CLM6-08A
MAIN BLADE SET-UPPER
(8B).....................................................CLM6-08B
MAIN BLADE SET-LOWER
(9)..................................................... CLM6-09
CONTROLLER 4-IN-1
(10).....................................................CLM6-10
TAIL ROTOR BLADE
(11).....................................................CLM6-11
ROTOR HEAD
(12).....................................................CLM6-12
AXLE TREE
(13).....................................................CLM6-13
VENT PIPE
(14R)..................................................CLM6-14R CABIN-RED
(14Y)..................................................CLM6-14Y
CABIN-YELLOW
(15).....................................................CLM6-15
TIE BAR (2)
(15A)..................................................CLM6-15A
TIMING PLATE BAR (2)
(16).....................................................CLM6-16
TILTING PANEL
(17).....................................................CLM6-17
FLYBAR W/WEIGHT
(18).....................................................CLM6-18
MAIN MOTOR PLATE
(19).....................................................CLM6-19
B. BEARING(2)-UP/DOWN AXLETREE
(20).....................................................CLM6-20
MAIN MOTORS (2) W/GEAR
(21).....................................................CLM6-21
SIDE FRAMES (2)
(22).....................................................CLM6-22
ROTOR HEAD W/INNER SHAFT
(24).....................................................CLM6-24
INNER GEAR SET
(25).....................................................CLM6-25
B. BEARING SET-INNER GEAR
(26).....................................................CLM6-26
OUTER MAIN SHAFT SET
(27).....................................................CLM6-27
LIPO CHARGER-7.4V 1000MAH (NOT SHOWN)
(29).....................................................CLM6-29
BALANCING CHARGER (NOT SHOWN)
(30).....................................................CLM6-30
7.4V 1000MAH 2-CELL LIPO (NOT SHOWN)
(31).....................................................CLM6-31
TRANSMITTER 4 CHANNEL (NOT SHOWN)
(33).....................................................CLM6-33
USB SIMULATOR CABLE (NOT SHOWN)
P.12
CENTURY LAMA 6
WARRANTY & LIMITATIONS
Warranty Period
Century Helicopter Products warranties that the Products purchased will be free from defects in materials and workmanship
at the date of purchase by the Purchaser.
Limited Warranty
(a) This warranty is limited to the original Purchaser (“Purchaser”) and is not transferable. REPAIR OR REPLACEMENT AS
PROVIDED UNDER THIS WARRANTY IS THE EXCLUSIVE REMEDY OF THE PURCHASER. This warranty covers only
those Products purchased from an authorized Century Helicopter Products dealer. Third party transactions are not covered
by this warranty. Proof of purchase is required for warranty claims. Further, Century Helicopter Products reserves the right to
change or modify this warranty without notice and disclaims all other warranties, express or implied.
(b) Limitations- CENTURY HELICOPTER PRODUCTS MAKES NO WARRANTY OR REPRESENTATION, EXPRESS OR
IMPLIED, ABOUT NON-INFRINGEMENT, MERCHANTABILITY OR FITNESS FOR A PARTICULAR PURPOSE OF THE
PRODUCT. THE PURCHASER ACKNOWLEDGES THAT THEY ALONE HAVE DETERMINED THAT THE PRODUCT WILL
SUITABLY MEET THE REQUIREMENTS OF THE PURCHASER’S INTENDED USE.
(c) Purchaser Remedy- Century Helicopter Product’s sole obligation hereunder shall be that Century Helicopter Products will,
at its option, (i) repair or (ii) replace, any Product determined by Century Helicopter Products to be defective. In the event of
a defect, these are the Purchaser’s exclusive remedies. Century Helicopter Products reserves the right to inspect any and
all equipment involved in a warranty claim. Repair or replacement decisions are at the sole discretion of Century Helicopter
Products. This warranty does not cover cosmetic damage or damage due to acts of God, accident, misuse, abuse, negligence,
commercial use, or modification of or to any part of the Product. This warranty does not cover damage due to improper installation, operation, maintenance, or attempted repair by anyone other than Century Helicopter Products. Return of any goods by
Purchaser must be approved by Century Helicopter Products before shipment.
Damage Limitations
CENTURY HELICOPTER PRODUCTS SHALL NOT BE LIABLE FOR SPECIAL, INDIRECT OR CONSEQUENTIAL DAMAGES, LOSS OF PROFITS OR PRODUCTION OR COMMERCIAL LOSS IN ANY WAY CONNECTED WITH THE PRODUCT,
WHETHER SUCH CLAIM IS BASED IN CONTRACT, WARRANTY, NEGLIGENCE, OR STRICT LIABILITY. Further, in no
event shall the liability of Century Helicopter Products exceed the individual price of the Product on which liability is asserted.
As Century Helicopter Products has no control over use, setup, final assembly, modification or misuse, no liability shall be
assumed nor accepted for any resulting damage or injury. By the act of use, setup or assembly, the user accepts all resulting
liability. If you as the Purchaser or user are not prepared to accept the liability associated with the use of this Product, you are
advised to return this Product immediately in new and unused condition to the place of purchase.
Safety
This is a sophisticated hobby Product and not a toy. It must be operated with caution and common sense and requires some
basic mechanical ability. Failure to operate this Product in a safe and responsible manner could result in injury or damage to
the Product or other property. This Product is not intended for use by children without direct adult supervision. The Product
manual contains instructions for safety, operation and maintenance. It is essential to read and follow all the instructions and
warnings in the manual, prior to assembly, setup or use, in order to operate correctly and avoid damage or injury.
Warranty Inspections and Repairs
To receive warranty service, you must include your original sales receipt verifying the proof-of-purchase date. Provided warranty conditions have been met, your Product will be repaired or replaced free of charge. Repair or replacement decisions are
at the sole discretion of Century Helicopter Products.
www.centuryheli.com
P.13