1
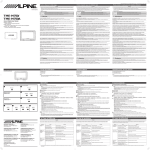
R
EN
TUE-T152
TV TUNER/DIVERSITY UNIT
DE
• OWNER'S MANUAL
Please read before using this equipment.
• BEDIENUNGSANLEITUNG
Lesen Sie diese Bedienungsanleitung bitte vor
Gebrauch des Gerätes.
FR
• MODE D'EMPLOI
Veuillez lire avant d’utiliser cet appareil.
• MANUAL DE OPERACIÓN
Léalo antes de utilizar este equipo.
• ISTRUZIONI PER L’USO
Si prega di leggere prima di utilizzare
l'attrezzatura.
ES
• ANVÄNDARHANDLEDNING
Innan du använder utrustningen bör du läsa
igenom denna användarhandledning.
IT
ALPINE ELECTRONICS, INC.
Tokyo office: 1-1-8 Nishi Gotanda,
Shinagawa-ku,
Tokyo 141-8501, Japan
Tel.: (03) 3494-1101
ALPINE ELECTRONICS OF AMERICA, INC.
19145 Gramercy Place, Torrance,
California 90501, U.S.A.
Tel.: 1-800-ALPINE-1 (1-800-257-4631)
ALPINE ELECTRONICS OF CANADA, INC.
Suite 203, 7300 Warden Ave. Markham,
Ontario L3R 9Z6, Canada
Tel.: 1-800-ALPINE-1 (1-800-257-4631)
Sankei Kikaku Co., Ltd.
1-13-38, Hinodai, Hino, Tokyo, Japan
ALPINE ELECTRONICS OF AUSTRALIA PTY. LTD.
6-8 Fiveways Boulevarde Keysborough,
Victoria 3173, Australia
Tel.: (03) 9769-0000
ALPINE ELECTRONICS GmbH
Kreuzerkamp 7-11 40878 Ratingen, Germany
Tel.: 02102-45 50
ALPINE ITALIA S.p.A.
Via C. Colombo 8, 20090 Trezzano Sul Naviglio
MI, Italy
Tel.: 02-48 47 81
ALPINE ELECTRONICS FRANCE S.A.R.L.
(RCS PONTOISE B 338 101 280)
98, Rue De La Belle Etoile, Z.I. Paris Nord Il
B.P. 50016 F-95945, Roissy, Charles De Gaulle
Cedex, France
Tel.: 01-48 63 89 89
ALPINE ELECTRONICS OF U.K., LTD.
13 Tanners Drive, Blakelands, Milton Keynes
MK14 5BU, U.K.
Tel.: 01908-61 15 56
ALPINE ELECTRONICS DE ESPAÑA, S.A.
Portal De Gamarra 36, Pabellón 32
01013 Vitoria (Alava)-Apdo. 133, Spain
Tel.: 34-45-283588
Designed by ALPINE Japan
Printed in Japan (S)
68P41262Y88-0
SE
ENGLISH
Contents
Operating Instructions
WARNING
WARNING .................................................. 2
CAUTION ................................................... 2
PRECAUTIONS ......................................... 3
Controls on remote control .......................... 4
Battery Replacement .................................... 5
FR
Basic Operations
Turning Power On and Off ................................ 6
Switching the TV Band ...................................... 6
TV Area Setting ................................................. 6
Automatic Memory of Channel Presets ............ 7
Tuning to Preset Channel ................................... 7
ES
Manual Channel Selection ................................. 7
Automatic Seek Tuning ..................................... 7
Manual Storing of Channel Presets ................. 8
Scanning to Preset Channel ............................... 8
Confirming Channel (Channel Call) .................. 8
DE
Information
In Case of Difficulty .......................................... 9
Specifications ..................................................... 9
Installation and Connections
Warning ............................................................ 10
Caution ............................................................. 10
IT
Precautions ....................................................... 11
Preparation ....................................................... 12
Installation ....................................................... 12
Connections ..................................................... 14
SE
1-EN
WARNING
WARNING
This symbol means important instructions.
Failure to heed them can result in serious
injury or death.
CAUTION
This symbol means important instructions.
Failure to heed them can result in injury or
material property damage.
DO NOT OPERATE ANY FUNCTION THAT TAKES
HALT USE IMMEDIATELY IF A PROBLEM APPEARS.
YOUR ATTENTION AWAY FROM SAFELY DRIVING
YOUR VEHICLE.
Failure to do so may cause personal injury or damage to
the product. Return it to your authorized Alpine dealer or
the nearest Alpine Service Center for repairing.
Any function that requires your prolonged attention
should only be performed after coming to a complete stop.
Always stop the vehicle in a safe location before
performing these functions. Failure to do so may result in
an accident.
DO NOT DISASSEMBLE OR ALTER.
Doing so may result in an accident, fire or electric shock.
USE THIS PRODUCT FOR MOBILE 12V APPLICATIONS.
Use for other than its designed application may result in
fire, electric shock or other injury.
KEEP SMALL OBJECTS SUCH AS BATTERY OUT OF
THE REACH OF CHILDREN.
Swallowing them may result in serious injury. If
swallowed, consult a physician immediately.
USE THE CORRECT AMPERE RATING WHEN
REPLACING FUSES.
Failure to do so may result in fire or electric shock.
2-EN
DO NOT MIX NEW BATTERIES WITH OLD
BATTERIES. INSERT WITH THE CORRECT BATTERY
POLARITY.
When inserting the batteries, be sure to observe proper
polarity (+ and –) as instructed.
Rupture or chemical leakage from the battery may cause
fire or personal injury.
PRECAUTIONS
Temperature
Be sure the temperature inside the vehicle is between
+45°C (+113°F) and 0°C (+32°F) before turning your unit
on.
Fuse Replacement
When replacing the fuse(s), the replacement must be of
the same amperage as shown on the fuse holder. If the
fuse(s) blows more than once, carefully check all
electrical connections for shorted circuitry. Also have your
vehicle’s voltage regulator checked.
FR
Maintenance
If you have problems, do not attempt to repair the unit
yourself. Return it to your Alpine dealer or the nearest
Alpine Service Station for servicing.
Installation Location
ES
Make sure the TUE-T152 will not be exposed to:
• Direct sun and heat
• High humidity
• Excessive dust
• Excessive vibrations
DE
IT
SE
3-EN
Controls on remote control
MANUAL
1
2
3
4
5
6
7
8
9
PWR
BAND
CALL
A.MEMO
P.SCAN
MODE
WRITE
REMOTE CONTROL UNIT
p
q
w
1 PWR (Power) button
Press the button to turn the TV tuner unit power
on/off.
2 BAND button
Press the button and the band will change as
shown below.
TV3
TV1
TV2
3 CALL button
Press the button to display channel No. being
received for approx. 5 seconds.
The channel memorization list is displayed for
approx. 5 seconds by pressing the button again
during channel No. display.
4 A.MEMO button
Press the button to automatically memorize
channels receivable.
5 P.SCAN button
Press the button to receive channels for 5
seconds each by scanning the channels
receivable from among memorized channels.
6 MANUAL station-selection button
Press the button to move downward or upward
one step respectively until the desired station
frequency.
7
button
Preset channel is called each time the button is
pressed. A TV area is selected on the TV area
setting screen.
4-EN
8
button
Press the button to automatically seek for a
channel downward.
9
button
Press the button to automatically seek for a
channel upward.
p
button
Preset channel is called each time the button is
pressed. TV area is selected on the TV area
setting screen.
q WRITE button
The channel searched by “Manual Channel
Selection” or “Auto Seek Tuning” can be
memorized by pressing the button for at least 1
second.
w MODE button
Press the button until the TV area setup menu
appears.
Press and hold the button to determine the TV
area.
Battery Replacement
Applicable battery: Use two “AAA” sized dry
batteries or equivalent.
1
2
Opening the battery cover
Slide out the battery cover while firmly pressing
outward.
Replacing the battery
Put the batteries in the case observing the
polarities as illustrated.
FR
ES
3
Closing the cover
Push the cover as illustrated until a click is
heard.
DE
IT
SE
5-EN
Basic Operations
TV3:
PAL and SECAM Broadcasting Reception Band
Automatic Changeover Mode
(factory default)
PWR
NOTE
TV3 band can be used only when selecting No.1 to 6 of
TV area list. When selecting No.7 to 11, only TV1 or
TV2 can be used.
BAND
A.MEMO
TV Area Setting
MODE
This operation registers the channel bandwidth
selecting your TV area on the screen.
Be sure to make this setting before the product is
put to use.
Turning Power On and Off
1
1
2
2
3
Turn the monitor power on and change over the
source to AUX1 or AUX2.
The source to be selected is changed by the
connector to which TUE-T152 was connected.
Press the MODE button.
The TV area setup menu appears.
Press the PWR (Power) button of the remote
control unit.
The TV Tuner power is turned on.
Press the PWR button again to turn off the unit.
The TV Tuner power is turned off.
Switching the TV Band
1
Press the BAND button and select the band of
TV1 or TV2.
Press the BAND button.
The band is switched each time the button is
pressed.
TV3*
TV1
TV2
TV1/TV2:
PAL or SECAM Broadcasting Reception Band
Fixing Mode
Refer to “TV Area Setting”.
TV Area List
Area No. Indication Mode
1
PAL-1
2
PAL-2
3
PAL-3
4
SECAM-1
5
SECAM-2
6
SECAM-3
7
PAL-4
8
PAL-5
9
PAL-6
10
PAL-7
11
PAL-8
6-EN
TV System
PAL B•G/H
PAL B•G
PAL I•I
SECAM L
SECAM D•K
SECAM B•G
PAL B•H
PAL B•G
PAL B•G
PAL B•G
PAL I•I
VHF CH
02 to 12 ch
A to H2 ch
A to J ch
–
R1 to R12 ch
02 to 12 ch
0 to 12 ch
01 to 12 ch
01A to 11 ch
02 to 12 ch
04 to 13 ch
3
4
Press the
or
button to select your TV area.
Press and hold the MODE button for at least 1
second.
The auto preset operation starts.
NOTES
• Only TV1 and TV2 bands can be used for TV area
selection. TV3 band is not usable for this purpose.
• If the present broadcasting reception area is selected,
auto preset operation is not performed. If this is the
case, the operation returns to the status before TV
area selection.
• TV3 band can be used only when selecting No. 1 to 6
of TV area list. When selecting No. 7 to 11, only TV1
or TV2 can be used.
• If TV system is the same as in countries listed in TV
area list, these channels are receivable in other
countries not listed there.
UHF CH
21 to 69 ch
21 to 69 ch
21 to 69 ch
21 to 69 ch
21 to 69 ch
28 to 69 ch
21 to 69 ch
21 to 69 ch
21 to 69 ch
21 to 69 ch
21 to 69 ch
Country
A, B, CH, D, DK, E, FIN, N, NL, P, S
I
GB, IRL, HK
F
BG, CZ, H, PL, RUS
GR, RO
AUS
NZ
RI
IND, MAL
ZA
Automatic Memory of Channel
Presets
Broadcasting stations that can be received within
the present TV area and all the channels
receivable are automatically memorized.
Refer to page 6 for channels of each TV area.
1
Press the BAND button.
The band is switched each time the button is
pressed.
TV3
2
TV1
Tuning to Preset Channel
Call a TV broadcast station memorized by the
auto memory.
1
Press the BAND button.
The band is switched each time the button is
pressed.
TV3
2
TV2
TV1
TV2
Press the or button.
The memorized station is called each time the
button is pressed.
NOTE
In case none of the stations can be called by the auto
memory, this operation is impracticable.
Press the A.MEMO button.
The auto preset operation starts.
FR
Manual Channel Selection
1
Press the
or
button.
Channels are changed 1 CH by 1 CH.
ES
Automatic Seek Tuning
3
After the completion, memorized channel
number list displays for about 5 seconds and the
first memorized station is automatically received.
NOTES
• In poor receive conditions, a broadcasting not
received may be recorded.
• If a channel receivable does not exist, NO PRESET
will appear and unit returns to the status before
starting the auto preset.
• For TV3 band, all the broadcasting stations of PAL
and SECAM are searched and channel numbers are
displayed on the display in order of stations received.
When SECAM is being searched, “SECAM” is
displayed on the display.
• The voice receiving sensitivity of TV3 band lowers by
approx. 6 dB, but this is not due to breakdown.
• When stopping the auto preset halfway, press the
A.MEMO button again during the search. Auto preset
operation comes to an end by the channel at which
search was completed.
Broadcasting stations that can be received within
the present TV area are automatically seeked.
Refer to page 6 for channels of each TV area.
1
Press the
or
button to automatically seek
for a channel downward or upward respectively.
The unit will stop at the next channel it finds.
Press the same button again to seek the next
channel.
NOTES
• When the PWR button or the BAND button or the
MODE button is pressed while Automatic Seek is in
operation, SEEK operation comes to an end. Then
operation is changed over to a mode of the button
that was pressed by memorizing a channel at which
the SEEK operation was completed.
• When the receiving condition is bad, there may be the
case of receiving the channel which picture is not
clear.
DE
IT
SE
7-EN
Basic Operations
Confirming Channel
(Channel Call)
1
Press the CALL button.
Channel No. being received is displayed for
approx. 5 seconds.
CALL
Channel selection mode
P.SCAN
WRITE
Manual Storing of Channel
Presets
The channel searched by “Manual Channel
Selection” or “Auto Seek Tuning” can be
additionally memorized into an auto memorized
channel.
1
2
Select the TV band and tune in a desired
channel.
2
Press the CALL button again during a channel
selection mode.
The channel memorization list is displayed for
approx. 5 seconds.
Channel No. being received is displayed in yellow.
Channel memorization list mode
(TV1 or TV2 band)
Press and hold the WRITE button for at least 1
second.
Preset No. is displayed and memorized.
NOTE
When a smaller channel than a preset one is
additionally preset, the preset No. is replaced in order
of small numbers.
Scanning to Preset Channel
Channel memorization list mode
(TV3 band)
A desired channel can be searched by scanning
in sequence the channels that have been preset
in the present TV band.
1
2
Press the P.SCAN button.
The preset channels are received in sequence
for 5 seconds each.
If a desired channel is found, press the P.SCAN
button.
Then that channel is received.
NOTES
• The channel incapable of reception proceeds to the
next channel a few seconds later.
• The channel before being scanned to the last preset
channel is received.
8-EN
NOTES
• “SECAM” on the screen of TV3 band is displayed
when receiving SECAM-L (mainly in France). In this
case, CH is displayed in blue. CH in white shows the
reception in SECAM or PAL mode, even if “SECAM”
or “PAL” is not displayed.
• CH displays of “AA” to “BA” on the screen are
temporary-named ones and differ from the actual
ones.
Information
In Case of Difficulty
If you encounter a problem, please review the items in
the following checklist. This guide will help you isolate
the problem if the unit is at fault. Otherwise, make sure
the rest of your system is properly connected or consult
your authorized Alpine dealer.
Audio interruption function does not work in
combination with navigation system.
• TV channel 56 is received.
- Switch channel other than 56.
• Poor connection of guide control input cord.
- Connect guide control cord of navigation securely.
Channel display is incorrect.
No power supplied.
• Vehicle's ignition is off.
- Turn the ignition on.
• No fuse or blown fuse.
- Check the cause and replace the fuse.
• Incorrect connections.
- Check connection and remedy.
• Vehicle's battery is weak.
- Check the voltage of vehicle's battery.
Remote control does not work.
• Battery is worn out.
- Replace battery.
• Incorrect battery insertion.
- Insert battery correctly.
• Remote control does not point remote control sensor.
- Operate remote control so that it faces the sensor.
• Remote control sensor or remote control transmitter
window is dirty.
- Clean remote control sensor or transmitter window.
Picture not clear or noises appear.
• Poor signal strength.
• Out of service area of station being received.
- Check by moving car in other location.
• Fluorescent tube is exhausted.
- Replace the fluorescent tube.*
• The field strength is low.
- Move the car to other location and check it again.
Picture becomes whitish.
• Located under a TV tower.
- Move the car to other location to use it.
- If you want to use in that location, turn the TV antenna's
booster switch to off position.
* The fluorescent tube replacement is not free of charge
even within the warranty period, for the tube is an article
of consumption.
MODE button does not work well.
• Even if pressing the MODE button, TV area setup menu
screen does not come out.
- Press the button after changing TV band to TV1 or
TV2. It cannot be operated if it is TV3.
ES
TV area cannot be changed.
• Even if trying to change the TV area, it stays to be the
former one.
- Change the TV area again, and press and hold the
MODE button at least 1 second.
Specifications
No picture obtained.
TV Tuner
• Mode switch is not set to a desired mode.
- Select desired mode by pressing TV/NAV./VIDEO
button.
• Temperature inside car is high.
- Lower the temperature.
• Poor connections between monitor and tuner.
- Check connections.
Color System .................................................... PAL/SECAM
Channel Selection System ........... PLL Frequency Synthesizer System
Channel Coverage
Dots or stripes appear on picture.
• Affected from neon sign, high voltage line, amateur radio
transmission, cars, etc.
- Move car to a location free from interference.
Double or triple pictures or rolling picture appear.
• Signals are reflected by mountain or buildings near car.
- Move car to other locations. Adjust location, direction
and height of antenna.
Noises appear in car radio.
• High frequency signals from TV are received by car
radio.
- Keep away antenna leads and other wire leads from TV.
Too much voice noise is heard.
• TV area is improper.
- Confirm the setting for a TV area.
FR
Television System CH
PAL-B/G
PAL-I/I
Channel Coverage VHF 2~12 ch
A~J ch
–
1~12 ch
2~12 ch
–
–
–
–
A~H2 ch
UHF
DE
SECAM-L SECAM-D/K SECAM-B/G
21~69 ch
* As for TV area 7 to 11, refer to the TV area list on page 6.
Antenna Input ... 4-channel diversity (75 ohms, 3.5 ø mini-jack)
Maximum Sensitivity (–6 dB Output) ... 35 dBµ (at 471 MHz)
Video/Audio S/N (75 dBµ) ................................ 45 dB/50 dB
Video Output System ...................................................... PAL
Video Output Level ....................................... 1.0p-p/75 ohms
Audio Output Level .................................. 500mV/10k ohms
IT
General
Operating Votage ................................. DC14.4V (11 to 16V)
Operating Current ....................................................... 250mA
Operating Temperature Range ...................... –10°C ~ +60°C
Storage Temperature Range .......................... –20°C ~ +80°C
Dimensions (mm) ............. 196.2 (W) x 119.9 (D) x 33.5 (H)
TV Antenna Unit
Output Impedance .......................... 75 ohms, 3.5 ø mini-jack
Operating Voltage ............................... DC14.4V (11 to 16V)
Operating Current ......................................................... 50mA
Operating Temperature Range ...................... –10°C ~ +60°C
9-EN
SE
Installation and Connections
Before installing or connecting the unit, please
read the following and pages 2 and 3 of this
manual thoroughly for proper use.
Warning
Caution
HAVE THE WIRING AND INSTALLATION DONE BY
EXPERTS.
Failure to make the proper connections may result in fire
or product damage.
The wiring and installation of this unit requires special
technical skill and experience. To ensure safety, always
contact the dealer where you purchased this product to
have the work done.
USE ONLY IN CARS WITH A 12 VOLT NEGATIVE
GROUND.
USE SPECIFIED ACCESSORY PARTS AND INSTALL
THEM SECURELY.
(Check with your dealer if you are not sure.) Failure to do
so may result in fire, etc.
Be sure to use only the specified accessory parts. Use of
other than designated parts may damage this unit
internally or may not securely install the unit in place.
This may cause parts to become loose resulting in hazards
or product failure.
MAKE THE CORRECT CONNECTIONS.
BEFORE WIRING, DISCONNECT THE CABLE FROM
THE NEGATIVE BATTERY TERMINAL.
Failure to do so may result in electric shock or injury due
to electrical shorts.
DO NOT SPLICE INTO ELECTRICAL CABLES.
Never cut away cable insulation to supply power to other
equipment. Doing so will exceed the current carrying
capacity of the wire and result in fire or electric shock.
DO NOT USE BOLTS OR NUTS IN THE BRAKE OR
STEERING SYSTEMS TO MAKE GROUND
CONNECTIONS.
Bolts or nuts used for the brake or steering systems (or
any other safety-related system), or tanks should NEVER
be used for installations or ground connections. Using
such parts could disable control of the vehicle and cause
fire etc.
KEEP SMALL OBJECTS SUCH AS BATTERY OUT OF
THE REACH OF CHILDREN.
Swallowing them may result in serious injury. If
swallowed, consult a physician immediately.
DO NOT INSTALL IN LOCATIONS WHICH MIGHT
HINDER VEHICLE OPERATION, SUCH AS THE
STEERING WHEEL OR GEARSHIFT.
Doing so may obstruct forward vision or hamper
movement etc. and results in serious accident.
10-EN
ARRANGE THE WIRING SO IT IS NOT CRIMPED OR
PINCHED BY A SHARP METAL EDGE.
Route the cables and wiring away from moving parts (like
the seat rails) or sharp or pointed edges. This will prevent
crimping and damage to the wiring. If wiring passes
through a hole in metal, use a rubber grommet to prevent
the wire’s insulation from being cut by the metal edge of
the hole.
DO NOT INSTALL IN LOCATIONS WITH HIGH
MOISTURE OR DUST.
Avoid installing the unit in locations with high incidence
of moisture or dust. Moisture or dust that penetrates into
this unit may result in product failure.
Precautions
IMPORTANT
• Be sure to disconnect the cable from the (–) battery
post before installing your TUE-T152. This will reduce
any chance of damage to the unit in case of a shortcircuit.
• Be sure to connect the color coded leads according to
the diagram. Incorrect connections may cause the unit
to malfunction or damage the vehicle's electrical
system.
• When making connections to the car’s electrical
system, be aware of the factory installed components
(e.g. on-board computer). Do not tap into these leads to
provide power for this unit. When connecting the
TUE-T152 to the fuse box, make sure the fuse for the
intended circuit of the TUE-T152 has the appropriate
amperage. Failure to do so may result in damage to the
unit and/or the vehicle. When in doubt, consult your
ALPINE dealer.
• The TUE-T152 uses female RCA-type jacks for
connection to other units (e.g. amplifier) having RCA
connectors. You may need an adaptor to connect other
units. If so, please contact your authorized ALPINE
dealer for assistance.
Please record the serial number of your unit in
the space provided below and keep it as a
permanent record. The serial number plate is
located on the bottom of the unit.
SERIAL NUMBER:
INSTALLATION DATE:
INSTALLATION TECHNICIAN:
PLACE OF PURCHASE:
FR
ES
DE
IT
SE
11-EN
Installation and Connections
Preparation
Installation
1
Installing TV TUNER
2
Park the vehicle in a flat, safe place. Apply the
parking brake, then remove the ignition key.
Check the included parts and organize the tools
and installation instructions.
PIN connection cable
(2m)
TV Antenna
(L/R) (6m)
Power cable
(2m)
Antenna clamper
(x4)
Velcro fastener
Cable clamper
(x4)
This TV TUNER can be placed inside the trunk,
on the kick panel of the front passenger's seat or
underdash. However, to avoid unnecessary
signal wiring, it is better to mount the TV TUNER
as close as possible to the Display.
DO NOT MOUNT THE UNIT IN LOCATIONS
THAT WILL BE IN THE VICINITY OF MOISTURE OR EXTREME HEAT (such as the engine
compartment).
Make sure you have all the necessary parts and
tools. Then, begin mounting according to one of
the following procedures:
Infrared remote
control unit
(5.5m)
Remote control
Battery (AAA)
(Double-sided
adhesive tape)
3
Disconnect the battery’s minus terminal.
Mounting
x2
This installation method is suggested when the
mounting location does not permit drilling.
USE THIS METHOD ONLY WHEN THE UNIT IS
MOUNTED ON A HORIZONTAL SURFACE.
NEVER MOUNT A UNIT UPSIDE-DOWN USING
THE VELCRO TAPE.
1 Remove the adhesive protective paper from
one side of the Velcro fasteners.
2 Attach the exposed adhesive side to the
underside of the unit, in a central location. Do
not cover the serial number.
3 Make sure the mounting location is clean, dry
and free from contaminants.
4 Remove the protective strip from the other side
of the Velcro pad.
5 Press the unit onto its mounting location.
Velcro fastener
12-EN
TV Antenna Mounting Method
1
1 Determine the mounting location.
Determine the mounting locations at left and
right corners of the rear window. (Fig.1).
2 Peel off the base paper and put on the
antenna. Clean dirty of the mounting locations,
and then put on the antenna.
2
Fig.1
3 Pinch the antennas and fix them onto the
window panel, by using the attached antenna
fixing clamps. (Fig. 2)
Press the double-sided adhesive tape onto the
back of the remote control sensor unit.
Before completing the sensor mounting, make
sure the location selected is within the operating
range of the remote control. Peel off the backing
of the adhesive tape and press the sensor onto
the selected mounting location, or inside of the
remote control holder.
FR
Rear window
Antenna
clamper
ES
Short
Long
Antenna
cable
Element
Rear seat
Fig.2
NOTES
• Before put on the antenna, heating the mounting
locations with a hair dryer will assure good result.
• Do not apply any humidity and force within 24 hours
after putting on the antenna.
• In order to keep the good reception, be sure to put the
antenna cable firmly to the body-side of the car
(metal part) when wiring it from the element part to
the side of the car-room.
• Reception may be a bit worse in the car whose
window glasses are of the type not allowing airwaves
to go through.
Remote Control Sensor Unit Mounting
Method
Remote Control
Sensor Unit
To prevent external noise from entering the
audio system.
• Locate the unit and route the leads at least
10cm away from the car harness.
• Keep the battery power leads as far away from
other leads as possible.
• Connect the ground lead securely to a bare
metal spot (remove the coating if necessary) of
the car chassis.
• If you add an optional noise suppressor,
connect it as far away from the unit as possible.
Your Alpine dealer carries various Alpine noise
suppressors, contact them for further
information.
• Your Alpine dealer knows best about noise
prevention measures so consult your dealer for
further information.
NOTES
• The remote control sensor unit is used only when
operating TUE-T152 from the rear monitor.
• When mounting the unit with double-sided adhesive
tape, make sure the mounting surface is dry and
free from dirt or grease.
DE
IT
SE
13-EN
Installation and Connections
Connections
Connections and System Wiring Diagram
REMOTE EYE INPUT
r
TV TUNER/DIVERSITY UNIT TUE-T152
ANTENNA INPUT
AUDIO OUTPUT
POWER SUPPLY
Black
Yellow
VIDEO OUTPUT
2
ACC
Red
6
3
3
Red
Red
ACC
ACC
1
Ignition Key
1
1
Black
GND
4
Black
GND
4
Black
GND
4
Battery
9 REMOTE OUT
White/Brown REMOTE IN
p
Red
White
p
Black 7
Yellow 8
Yellow
q
Red
AV Head Unit
CVA-1006R etc.
(Sold Separately)
or
Monitor
TME-M790 etc.
(Sold Separately)
w
5
Yellow
White/Brown
e
White
Rear Monitor
TME-M750 etc.
(Sold Separately)
NOTE
Caution - when connecting the Rear Monitor
Make sure to use the Remote Control Eye r, when operating TUE-T152 from the rear monitor. In this case, the signal
of the Remote Control Input Lead 5 becomes ineffective.
1 Switched Power Lead (Ignition) (Red)
Connect this lead to an open terminal on the
vehicle's fuse box or another unused power
source which provides (+) 12V only when the
ignition is turned on or in the accessory position.
6 RCA Extension Cable (Included)
2 Fuse Holder (7.5A)
p TV Antenna (Included)
3 Fuse Holder (0.5A)
q AUX Output Terminal
Use when connecting an optional monitor.
4 Ground Lead (Black)
Connect the lead to a good chassis ground on
the vehicle. Make sure the connection is made to
bare metal and is securely fastened using the
sheet metal screw provided.
5 Remote Control Input Lead (White/Brown)
Connect to the remote control output Lead of the
CVA-1006R, etc.
When using the remote control eye, the signal of
this lead becomes ineffective.
14-EN
7 To AUX Audio L-ch (MONO) Input Connector
8 To AUX Video Input Connector
9 Remote Control Output Lead
w RCA Extension Cable (Sold separately)
e To AUX Input Connector
r Remote Control Eye
Make sure to use this when operating TUE-T152
from the rear monitor.
Händlerstemple
Tipps der Polizei:
●
●
●
●
●
●
Stellen Sie Ihr Fahrzeug stets gut sichtbar ab.
Verschließen Sie Türen, Fenster, Schiebedach und Kofferraum immer, auch bei nur kurzer Abwesenheit.
Lassen Sie keine Wertsachen sichtbar im Auto liegen.
Wird Ihr Fahrzeug aufgebrochen, wenden Sie sich sofort an die nächste Polizeidienststelle.
Belassen Sie Ihr Fahrzeug nach einem Aufbruch im Originalzustand.
Informieren Sie sich über technische Sicherungsmöglichkeiten bei einer Kriminalpolizeilichen
Beratungsstelle.
Gerät 1
Modell-Nr.:
Hersteller:
Seriennummer:
A
L
Kaufdatum:
Preis:
R
Car Audio and Navigation Systems
GERÄTE-PASS
AUDIO SYSTEME
Fahrzeugmarke:
Typ:
Amtl. Kennzeichen:
Name des Halters:
Straße:
Wohnort:
Bitte füllen Sie diesen Pass vollständig aus und bewahren Sie ihn
außerhalb des Fahrzeugs auf:
Im Falle eines Diebstahls wird für Sie die Schadensabwicklung mit der
Versicherung einfacher, und Sie erleichtern der Polizei die Fahndung
nach den Tätern.