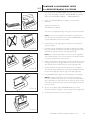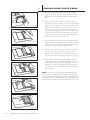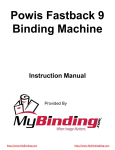
1
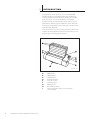
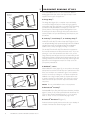
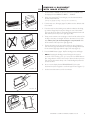
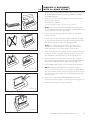
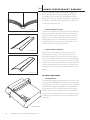
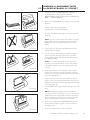
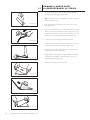
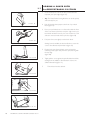
C O NT E NT S
I
SAFETY & COMFORT . . . . . . . . . . . . . . . . . . . . . . 2
II
INTRODUCTION. . . . . . . . . . . . . . . . . . . . . . . . . . . 4
III
FIRST TIME SETUP. . . . . . . . . . . . . . . . . . . . . . . . . 5
IV
DOCUMENT BINDING STYLES. . . . . . . . . . . . . 6
V
TIPS FOR BETTER BINDING. . . . . . . . . . . . . . . 7
VI
IMAGEBINDING
A. About Imagebinding. . . . . . . . . . . . . . . . . . . . . . . . . 11
B. Binding With Image Strips™. . . . . . . . . . . . . . . . . . . 12.
VII
BINDING A DOCUMENT WITH...
A. Lx-Strips™. . . . . . . . . . . . . . . . . . . . . . . . . . . . . . . . . 8.
B. Lx-Comp Strips™. . . . . . . . . . . . . . . . . . . . . . . . . . . . 9.
C . Lx-CP Strips™. . . . . . . . . . . . . . . . . . . . . . . . . . . . . 10
VIII
HALFBACK BINDING. . . . . . . . . . . . . . . . . . . . . 13
IX
PERFECTBACK BINDING
A. About Perfectback Binding. . . . . . . . . . . . . . . . . . . . 14
B. Perfectback LF Binding . . . . . . . . . . . . . . . . . . . . . . . 15
C . Adding Cover with LF Strip. . . . . . . . . . . . . . . . . . . 16
D. Perfectback PS Binding. . . . . . . . . . . . . . . . . . . . . . . 17
E. Adding a Cover with PS Strip. . . . . . . . . . . . . . . . . . 18
X
HARD COVER BINDING. . . . . . . . . . . . . . . . . . 19
XI
USER MENU . . . . . . . . . . . . . . . . . . . . . . . . . . . . . . 21
XII
TROUBLESHOOTING. . . . . . . . . . . . . . . . . . . . . . 25
XIII ERROR MESSAGES. . . . . . . . . . . . . . . . . . . . . . . . 26
XIV
SPECIFICATIONS. . . . . . . . . . . . . . . . . . . . . . . . . . 27
XV
FCC NOTICE. . . . . . . . . . . . . . . . . . . . . . . . . . . . . . 28
WARRANTY. . . . . . . . . . . . . . . . . . . . . . . . . . . . . . 29
Information for Your Reference:
Serial Number:
Purchase Date:
1
I
S AFETY & CO MFO RT
Please read through this manual before setting up and using
your binder.
•
Connect all equipment to properly grounded power
outlets.
•
Do not allow anything to rest on the power cord. Do not
locate the binder where persons will step on the cord.
•
Place the binder on a flat surface. The binder may not
operate properly if it is tilted or at an angle.
•
Do not block or cover the opening on top of the binder.
•
Do not push any objects into the opening of the binder.
•
Use only the type of power source indicated on the
binder’s label on the rear of the machine.
•
Do not use a damaged or frayed power cord.
•
Unplug the binder before cleaning, and clean it with a damp
cloth only.
•
Do not spill food or liquid on the binder.
•
Except as specifically explained in this guide, do not
attempt to service the binder yourself.
•
Keep your binder away from radiators and heat sources.
•
Do not block cooling vents on the bottom; Avoid placing
papers underneath your machine.
•
Use of an extension cord with this machine is not
recommended or authorized. Users should check building
codes and insurance requirements if an extension cord is
to be used.
Make sure that the total of the ampere ratings of the
products plugged into the extension cord does not exceed
the extension cord ampere rating, and that the total
amperage of all products plugged into the wall outlet does
not exceed the outlet rating.
!
!
: Heaters are hot. Do not touch
heater surfaces during binding. Do not touch
heaters immediately after removing book.
CA UT I O N
RE
AD
Y TO
BIN
D
2
FASTBACK 9 USER’S MANUAL, 203860 Rev. A
C A U T I O N : Do not place fingers and other
foreign objects into binding cavity during binding
process. Binding cavity closes during binding
process and may pinch.
S AFETY & CO MFO RT ( co nti nue d )
I
!
In recent years, medical attention on occupational injuries has identified
common, seemingly harmless activities as potential causes of a wide range
of problems collectively known as Repetitive Stress Injuries or Cumulative
Trauma Disorders. It is now recognized that any repetitive motion may
contribute to these health problems. Depending on how it is used, the
prolonged or repetitive use of almost any machine might have a potential
for discomfort or injury. As a user of this binder, you might also be at risk.
The most commonly accepted causes of this type of disorder are
repeated, forceful actions, usually in an awkward position or posture,
without sufficient rest to allow the body to recover. These repetitive
actions may cause nerves, tendons, ligaments, and other soft body parts
to become irritated and inflamed.
By paying attention to the way you perform your work, and do other
activities, you can identify the behaviors that could put you at risk.
The precautions outlined below are examples you can take to help
reduce the likelihood of developing these problems and work more
comfortably with your new binder. Keep in mind, however, that these are
only suggestions. Comfort is personal and only you may be able to judge
what works best for you.
•
•
•
•
•
•
You may find that your body will be most comfortable and relaxed
with the binder placed directly in front of you. The binder and your
supplies should be within easy reach —avoid excessive stretching.
The binder may be used in either a standing or seated position.
If you are standing, make sure that the work surface height that the
binder is on does not require you to bend over in a way that would
strain your back or arms.
If you are seated, adjust the height of your chair to your table so
your body is naturally aligned and make sure you have adequate
legroom. Stay relaxed and relatively upright. Don’t force yourself
into an uncomfortable position.
Do not bend your wrists unnaturally during use.
Don’t stay in one position for too long. Try changing hands and
varying your posture.
Take breaks. Frequent short breaks are probably better than a few
long ones.
Many factors go into creating a comfortable workspace, including proper
placement and adjustment of furniture and equipment. A thorough work
site analysis by a qualified expert is important in order to reduce the risk
of repetitive motion injuries. If you experience pain, throbbing, aching,
tingling, stiffness, a burning sensation, swelling, numbness, or weakness in
your wrists, hands, arms or legs, see your physician immediately.
DO NOT IGNORE THESE WARNING SIGNS. Even if symptoms occur
when you are not using the binder, they can be associated with painful and
sometimes permanently disabling injuries or disorders of the nerves, muscles,
tendons, or other parts of the body.These symptoms could mean that
you are developing a repetitive stress injury that requires prompt medical
attention. For more detailed information, consult your doctor.
FASTBACK 9 USER’S MANUAL, 203860 Rev. A
3
II
INTRO D U CTIO N
Congratulations on the purchase of your new Fastback®
9 binder. As with all our Fastback binders, this machine was
carefully assembled and tested prior to packing. You will find
it fast and easy to use. Use the Fastback 9 to make tapebound documents as well bookstore-quality hard cover and
paperback books. Best of all, the Fastback 9 works with Powis’
revolutionary Image Strips™, which turn every document into a
powerful brand statement.
Once the machine is turned on, it only takes about 30 seconds
to bind a document. With the push of just one button, you can
bind strong, professional-grade documents.
H
G
F
I
RE
A
B
C
AD
YT
OB
IND
D
E
F I G U R E
A
B
C
D
E
F
G
H
I
4
FASTBACK 9 USER’S MANUAL, 203860 Rev. A
BIND button
MENU button
OPEN button
Illuminated display
Instruction card
Tamping surface
Binding recess
Book support fences
Rear panel (power switch, cord connection,
serial number)
1
III
FIR S T TIME S ETU P
A. What’s Included Inside the Box
Fastback® 9 Binder
Accessory box, which contains:
User’s manual
Power cord
3 Book support fences
Starter kit of covers and Lx-Strips™
If any of the preceding items are damaged or missing,
contact Powis Customer Service immediately at:
1‑800‑321‑2463.
B. Setting Up
FR
ON
T
Place the binder on a flat, unobstructed work surface. Insert the three
book support fences into the slots on the top of the binder. The side
with the word FRONT should be facing you (see figure 2).
C. Plugging In
F I G U R E
2
Before plugging in the Fastback binder, be sure the power switch is off by
depressing the “O” side of the power switch. Plug the power cord into
the outlet on the back of the machine.
D. Remove Cardboard
After the Fastback 9 is plugged in, remove the cardboard protector from
the Binding Recess.
E. Ready To Go
Turn the power switch on by depressing the “1” side of the power
switch. In a few moments the display will read “READY TO BIND”.
Now the machine is ready to bind.
HINT: The Model 9 Binder consumes relatively little power when it is
not binding. However, if the machine will not be used for several hours,
save power by turning it off.
!
C A U T I O N : Heaters are hot. Do not touch heater
surfaces during binding. Do not touch heaters
immediately after removing book.
C A U T I O N : Do not place fingers and other foreign
REA
DY
TO
BIN
D
objects into binding cavity during binding process.
Binding cavity closes during binding process and
may pinch.
FASTBACK 9 USER’S MANUAL, 203860 Rev. A
5
IV
F I G U R E
3
Book block
and covers
D O CU MENT BIND ING S TYL ES
Your Fastback® binder lets you choose between different
binding styles. Each style uses its own type of strip or cover
supplies. The five types of supplies are:
A. Image Strip™
Image Strip™
Finished Book
F I G U R E
4
Book block
and covers
The Image Strip (figure 3) is a complete corporate identity
on a strip. You design the strip to include any logos, graphics,
photographs and other information you desire. Now everything
you bind is readily identifiable are uniquely your own. The
primary feature of the Image Strip that distinguishes it from
all other types of strips is the larger front panel surface that is
custom printed to let you add interesting visual impact to your
documents.
B. Lx-Strip™, Lx-CP Strip™, or Lx-Comp Strip™
Lx-Strip™, Lx-CP Strip™, and Lx-Comp Strip™ (figure 4) are
our standard binding strips specifically designed for the Fastback
9 binder. These strips are available in Narrow and Medium
widths, and in a variety of lengths, including 11” and A4.
Lx Strip™
Finished Book
F I G U R E
5
Book block and
back cover
Halfback™
Cover
Finished Book
F I G U R E
Bound
book block
Perfectback®
Strip
6
C. Halfback™ covers
With Halfback™ covers (figure 5), you can produce documents
with printed covers that look like they were perfect-bound. The
front cover and spine are combined to give a more seamless
look. You can create your design on a computer and print the
Halfback cover using an inkjet printer. A separate back cover
is used to complete your document. The covers also come in
solid colors and are pre-scored for easy and accurate results
every time.
NOTE : Do not print Halfback covers on laser printers.
Wraparound
Softcover
Finished Book
F I G U R E
Book block bound
with Endleaves
7
D. Perfectback® Lx-Strip™
Perfectback® LF (Lay Flat), and PS (Pressure Sensitive) Lx-Strips
(figure 6) allow you to produce perfect-bound documents, one
copy at a time. Create paperback books on your desktop
with no muss or fuss. See Section IX, pages 14-18.
E. Fastback® Hardcover™ (figure 7)
Lx or
Lx-CP
Strip
Produce bookstore-quality hard cover books at your desktop in
a matter of minutes. See Section X, pages 19–20.
Headband
6
The Lx-Strip™ and Lx-CP Strip™are identical in appearance.
For most documents, the Lx-Strip is the best choice. If you are
printing to a color laser printer that uses fuser oil, or you are
using extremely smooth paper, then we recommend the Lx-CP
Strip, which provides a stronger bind in these instances. The eyecatching executive look of the Lx-Comp Strip offers a high-end
appearance, and is designed to match our Comp covers for
your special presentations.
Fastback® Hardcover
Finished Book
FASTBACK 9 USER’S MANUAL, 203860 Rev. A
TIP S FO R BETTER BIND ING
V
•
Before binding, tap the pages several times to ensure that they are
even when the document is in the binding recess. The Lx-Strip edge
and document edge should line up.
•
The grain of the paper should run parallel to the binding edge of
the document. All paper has a grain — it is a result of the fibers that
make up the paper. If the grain runs parallel to the long side of the
sheet, the paper is “grain long”. When the grain runs parallel to the
short side of the paper, it is “grain short”.
A sheet of paper will naturally flex more easily along the direction of
its grain. Try it and see. (Hold a piece of paper the long way lightly in
your fingertips and gently bow the paper, allowing it to flex. Now try
it the other way. See the difference?
Most copy papers are grain long, so you should not have any
problems with the bind. Grain long paper will give you the best
bind. Occasionally you may find papers that are grain short, so we
recommend you test unfamiliar papers before binding large numbers
of documents.
•
Coated papers, and papers with heavy ink or toner coverage may
also experience problems with binding. If you have documents with
heavy ink or toner coverage, always do a test bind first to ensure
that your documents will bind properly.
•
After the binding cycle, be sure to place your document entirely
upright, with the bound side down, against one of the two rear
book support fences for five minutes. Improper cooling of your
document may result in a crooked spine. Bind strength increases
over time, and is maximized after 24 hours.
•
NOTE : When placing multiple documents in the front cooling
compartment, make sure it doesn’t get overloaded to where the
front document hangs off the metal step. For questions about, or
problems with paper grain direction or machine operation, call your
Fastback® dealer.
MAINTENANCE TIP : Minor glue buildup on the heaters is
expected. When cleaning the heaters, turn the machine off and
unplug it. Wait for the heaters to cool, and then wipe off any glue
using a dry lint free cloth. Cleaning solution is not necessary.
!
CAUTION: Before cleaning heaters, turn off unit
and unplug power cord. Allow heaters to cool for
one minute before cleaning. Don’t use sharp objects
on heater surfaces.
FASTBACK 9 USER’S MANUAL, 203860 Rev. A
7
VII-A ABO U T IMAGEBIND ING™
Imagebinding™ represents a radically new approach to
document presentation. More than a simple binding solution,
Imagebinding is a completely new approach to corporate
identity. Now you can make a strong impression with every
book you bind. The key element of Imagebinding is the Image
Strip™, which features a front panel that is large enough to add
graphics, logos and photo images. Design your own strips to
reflect your coroporate branding needs.
Design Image Strip
You can create Image Strips in one of two ways:
1. Contact Powis (1-800-321-2463) and let our graphic
design team help you create unique designs for your
business.
2. Visit our web site and obtain the templates and information
you need to create your own strips
For more information visit the website:
www.powis.com/software/
or call 1-800-321-2463
Order
Image Strips
RE
AD
Y TO
BIN
D
Bind Documents
Finished Book
8
FASTBACK 9 USER’S MANUAL, 203860 Rev. A
BIND ING A D O CU MENT
WITH IMAGE S TR IP S ™
VII-B
1. Set the binder to IMAGE mode. If the machine is in IMAGE mode,
the display will read “READY TO BIND” … “IMAGE.”
2. Select your Image Strip™ according to your document thickness:
10-125 sheets= Narrow
(This may vary slightly depending on the paper and cover thickness.)
3. Fold the strip to a 90° angle (figure 7a). Make sure the adhesive side
faces inward.
F I G U R E
7a
F I G U R E
7b
4. Place the strip into the binding recess with the adhesive side facing
up, and the Image Strip’s front panel facing the rear of the binder.
The long side of the bent “L” should be resting against the back wall.
Slide the strip all the way to the right (figure 7b).
5. Tamp your document cover and pages on the front flat surface of the
housing so that they are straight. Place the document on top of the
strip with the front of the document facing the rear of the binder. Slide
the document all the way to the right (figure 8).
F I G U R E
8
6. Tap the document on the top and the left to be sure all pages are
even. Push the pages backward to ensure proper binding. Check that
the document edge aligns with the edge of the strip (figure 9).
7. Press the BIND button (figure 10). The binding process will begin.
•
NOTE : Stopping the binding process: During the first several
seconds of the binding cycle, you can push the OPEN button
(the orange button closest to the front) to abort the whole process
and open the document clamps. Use a new binding strip when the
process resumes.
8. As soon as the display flashes “REMOVE BOOK,” pick up the
document and place it against a rear book support fence (figure 11).
F I G U R E
9
F I G U R E
10
F I G U R E
11
9. Let the bound document cool for five minutes.
FASTBACK 9 USER’S MANUAL, 203860 Rev. A
9
BIND ING A D O CU MENT
WITH L x - S TR IP S ™
VI-A
1. Set the binder to LX mode. If the machine is in LX mode,
the display will read “READY TO BIND” … “LX.”
2. Select your Lx-Strip according to your document thickness:
10-125 sheets= Narrow
125-250 sheets = Medium
(This may vary slightly depending on the paper and cover thickness.)
F I G U R E
8a
F I G U R E
HINT: If you are not sure which strip width to use, simply
place your document in the binding recess and push the
BIND button. The correct width will be shown on the
display.
8b
3. Fold the strip to a 90° angle (figure 8a). Make sure the
adhesive side faces inward.
4. Place the strip into the binding recess with the adhesive
side facing up. The short side of the bent “L” should be
resting against the back wall. Slide the strip all the way to
the right (figure 8b).
F I G U R E
HINT: For a uniform strip wrap width on your front
cover—regardless of document thickness—turn your
document in the binder with the front cover facing the
back of the machine.
9
5. Tamp your document cover and pages on the front flat
surface of the housing so that they are straight. Place the
document on top of the strip and slide the document all the
way to the right (figure 9).
F I G U R E
10
6. Tap the document on the top and the left to be sure all
pages are even. Push the pages backward to ensure proper
binding. Check that the document edge aligns with the edge
of the strip (figure 10).
7. Press the BIND button (figure 11). The binding process will
begin.
•
NOTE : Stopping the binding process: During the first
several seconds of the binding cycle, you can push the
OPEN button (the orange button closest to the front) to
abort the whole process and open the document clamps.
Use a new binding strip when the process resumes.
F I G U R E
11
8. As soon as the display flashes “REMOVE BOOK,” pick up
the document and place it against a rear book support
fence (figure 12).
9. Let the bound document cool for five minutes.
F I G U R E
10
12
FASTBACK 9 USER’S MANUAL, 203860 Rev. A
BIND ING A D O CU MENT
WITH L x - CO MP S TR IP S ™
VI-B
1. Set the binder to LX COMPOSITION mode. If the machine is in LX
COMPOSITION mode, the display will read “READY TO BIND” …
“LX COMPOSITION.”
2. Select your Lx-Comp Strip according to your document thickness:
10-125 sheets= Narrow
125-250 sheets = Medium
(This may vary slightly depending on the paper and cover thickness.)
F I G U R E
13a
F I G U R E
HINT: If you are not sure which strip width to use, simply place
your document in the binding recess and push the BIND button. The
correct width will be shown on the display.
13b
3. Fold the strip to a 90° angle (figure 13a). Make sure the adhesive
side faces inward.
4. Place the strip into the binding recess with the adhesive side facing
up. The short side of the bent “L” should be resting against the back
wall. Slide the strip all the way to the right (figure 13b).
F I G U R E
HINT: For a uniform strip wrap width on your front cover—
regardless of document thickness—turn your document in the
binder with the front cover facing the back of the machine.
14
5. Tamp your document cover and pages on the front flat surface of the
housing so that they are straight. Place the document on top of the
strip and slide the document all the way to the right (figure 14).
6. Tap the document on the top and the left to be sure all pages are
even. Push the pages backward to ensure proper binding. Check that
the document edge aligns with the edge of the strip (figure 15).
7. Press the BIND button (figure 16). The binding process will begin.
F I G U R E
15
•
NOTE : Stopping the binding process: During the first several
seconds of the binding cycle, you can push the OPEN button
(the orange button closest to the front) to abort the whole process
and open the document clamps. Use a new binding strip when the
process resumes.
8. As soon as the display flashes “REMOVE BOOK,” pick up the
document and place it against a rear book support fence (figure 17).
9. Let the bound document cool for five minutes.
F I G U R E
16
F I G U R E
17
FASTBACK 9 USER’S MANUAL, 203860 Rev. A
11
BIND ING A D O CU MENT
WITH L x - CP S TR IP S ™
VI-C
1. Set the binder to LX CP mode. If the machine is in LX CP
mode, the display will read “READY TO BIND” … “LX CP.”
2. Select your Lx-CP Strip according to your document
thickness:
10-125 sheets= Narrow
125-250 sheets = Medium
(This may vary slightly depending on the paper and cover thickness.)
F I G U R E
18a
F I G U R E
HINT: If you are not sure which strip width to use, simply
place your document in the binding recess and push the
BIND button. The correct width will be shown on the
display.
18b
3. Fold the strip to a 90° angle (figure 18a). Make sure the
adhesive side faces inward.
4. Place the strip into the binding recess with the adhesive
side facing up. The short side of the bent “L” should be
resting against the back wall. Slide the strip all the way to
the right (figure 18b).
F I G U R E
HINT: For a uniform strip wrap width on your front
cover—regardless of document thickness—turn your
document in the binder with the front cover facing the
back of the machine.
19
5. Tamp your document cover and pages on the front flat
surface of the housing so that they are straight. Place the
document on top of the strip and slide the document all the
way to the right (figure 19).
F I G U R E
20
6. Tap the document on the top and the left to be sure all
pages are even. Push the pages backward to ensure proper
binding. Check that the document edge aligns with the edge
of the strip (figure 20).
7. Press the BIND button (figure 21). The binding process will
begin.
•
NOTE : Stopping the binding process: During the first
several seconds of the binding cycle, you can push the
OPEN button (the orange button closest to the front) to
abort the whole process and open the document clamps.
Use a new binding strip when the process resumes.
F I G U R E
21
8. As soon as the display flashes “REMOVE BOOK,” pick up
the document and place it against a rear book support
fence (figure 22).
9. Let the bound document cool for five minutes.
•
NOTE : The Lx-CP strip is intended for used with either
endleaves (if you are making a hard cover book), or
cover sheets (e.g., Comp Cover or Clear Cover). Binding
coverless books with the Lx-CP strip is not recommended.
F I G U R E
12
22
FASTBACK 9 USER’S MANUAL, 203860 Rev. A
BIND ING A D O CU MENT
WITH HAL FBACK ™ COVERS
VIII
1. Switch to HALFBACK mode (see Section VII, page 16). If the
machine is already in HALFBACK mode, the display will read:
“READY TO BIND” … “HALFBACK.”
2. Select your Halfback cover according to your document thickness:
10 - 100 sheets = Narrow Halfback
101 - 200 sheet = Medium Halfback
F I G U R E
12
(This may vary slightly depending on the paper and cover thickness.)
•
HINT: If you are not sure which Halfback width to use, simply
place your document in the binding recess and push the BIND
button. The correct width will be shown on the display.
•
NOTE : You can add a custom inkjet-printed design or title to
the front and spine of your Halfback cover. Follow the instructions
included in your Halfback box.
F I G U R E
13
3. Form your Halfback front cover into an “L” shape, by folding it along
the score mark closest to the cover edge. Make sure adhesive side
faces inward. Place the document pages on the short flap so they
are sitting on the un-melted adhesive. Put the back cover in place
(figure 12).
4. Tamp your document cover and pages on the front flat surface
of the housing so that they are straight. Place your assembled
document into the binding recess and slide it all the way to the right
(figure 13). Tap the document on the top and the left to ensure all
pages are even.
F I G U R E
14
5. Push the pages backward to ensure proper binding (figure 14).
Check that the document edge aligns with the edge of the Halfback
cover.
6. Press the BIND button (figure 15). The binding process will begin.
7. As soon as the display flashes “REMOVE BOOK,” pick up the
document and place it against a cooling fence (figure 16). Let it cool
for five minutes.
•
F I G U R E
NOTE : Stopping the binding process: During the first several
seconds of the binding cycle, you can push the OPEN button (the
orange button closest to the front) to abort the whole process
and open the document clamps. Use a new binding strip when the
process resumes.
15
•
NOTE : For proper binding results, the Halfback spine flap must not
be too curled prior to insertion in the binder. Flatten the spine by
hand if necessary.
F I G U R E
16
FASTBACK 9 USER’S MANUAL, 203860 Rev. A
13
IX-A ABO U T PER FECTBACK ™ BIND I NG
With the Fastback® 9 binder and Perfectback binding strips,
you can bind professional looking paperback books right at
your desktop. There are two types of Perfectback Lx-Strips.
Which type of strip you should use will depend on what type of
document you are binding. Perfectback strips are available in 11”
and A4 only. Trim books to size.
F I G U R E
17
F I G U R E
18
F I G U R E
• Lx-Perfectback® LF Strips
LF stands for “Lay-Flat.” These strips create a book bind that lays
flat when opened. The spine hinges free from the book block
(figure 17). The book opens easily without creasing the spine
and you can do the final binding without heat so you can use
printing methods and cover materials that are heat-sensitive.
These strips have two narrow bands of release paper, one on
each side of the back of the strip (figure 18).
• Lx-Perfectback ® PS Strips
PS stands for “Pressure-Sensitive.” These strips have a full
pressure-sensitive adhesive on one side of the strip, and a
thermal plastic adhesive on the other side. The entire spine of
the cover is completely bound to the book block. Final binding
is done without heat so you can use cover materials or printing
methods that are heat-sensitive without worry. These strips have
a narrow and a wide band of release paper on the back of the
strip (figure 19). The final results look like traditional softcover
binding.
19
OPTIONAL EQUIPMENT
• Scoring Machine
The following two pages explain the general procedure to make
each type of Perfectback® book. For greater ease in positioning
and applying the scores to your cover, we recommend using the
Powis Parker Scoring Machine (available separately). With the
Scoring Machine you can quickly and easily add crisp single or
double score lines to your wraparound covers. Spine titles are
always perfectly centered and the scores are exactly where they
should be every time thanks to the Scoring Machine’s unique
technology.
SCORING MACHINE
14
FASTBACK 9 USER’S MANUAL, 203860 Rev. A
BIND ING A D O CU MENT WITH
L x - PER FECTBACK ® L F S TR IP S ™
IX-B
1. If necessary, switch to PERFECTBACK LF mode (see
Section VII, page 16). If the machine is already in
PERFECTBACK LF mode, the display will read: “READY TO
BIND” … “PERFECTBACK LF.”
2. Select your Perfectback® strip according to your document
thickness:
F I G U R E
20a
F I G U R E
10-125 sheets= Narrow Perfectback
125-250 sheets = Medium Perfectback
20b
(This may vary slightly depending on the paper and cover
thickness.)
•
F I G U R E
21
HINT: If you are not sure which strip width to use, simply
place your document in the binding recess and push the
BIND button. The correct width will be shown on the
display.
3. Fold the strip to a 90° angle (figure 20a). Make sure the
adhesive side faces inward.
4. Place the strip into the binding recess with the adhesive
side facing up. The short side of the bent “L” should be
resting against the back wall. Slide the strip all the way to
the right (figure 20b).
F I G U R E
22
HINT: For a uniform strip width on your front cover—
regardless of document thickness—turn your document
in the binder with the front cover facing the back of the
machine.
5. Tamp your document cover and pages on the front flat
surface of the housing so that they are straight. Place the
document on top of the strip and slide the document all the
way to the right (figure 21).
6. Tap the document on the top and the left to be sure all
pages are even. Push the pages backward to ensure proper
binding. Check that the document edge aligns with the edge
of the strip (figure 22).
F I G U R E
23
7. Press the BIND button (figure 23). The binding process will
begin.
•
NOTE : Stopping the binding process: During the first
several seconds of the binding cycle, you can push the
OPEN button (the orange button closest to the front) to
abort the whole process and open the document clamps.
Use a new binding strip when the process resumes.
8. As soon as the display flashes “REMOVE BOOK,” pick up
the document and place it against a rear book support
fence (figure 24).
F I G U R E
24
9. Let the bound document cool for five minutes.
FASTBACK 9 USER’S MANUAL, 203860 Rev. A
15
AD D ING A COVER WITH
L x- P ERFECTBACK ® L F S TRIPS
IX-C
1. Score and fold your cover at the two positions that will
represent your spine edges (figure 25).
•
F I G U R E
25
Tip: The Powis Parker Scoring Machine can do this quickly
and accurately for you.
2. Peel off the thin release paper at the front of your book
block (figure 26).
3. Place your pre-folded cover on a flat surface with the front
of the cover bent up from the rear spine edge. Insert your
book block inside the front of your cover. Position it so full
and even contact is made in the spine area (figure 27).
F I G U R E
26
4. Fold your front cover tightly over the book block.
Starting from the middle, rub back and forth to secure the
cover to the adhesive strip beneath it (figure 28).
5. Flip the book over. Open the back cover and remove the
remaining release paper (figure 29).
F I G U R E
27
6. Tightly pull the cover against the spine. Rub back and forth,
starting from the middle, to bind the back cover to the
adhesive beneath it (figure 30).
7. Trim the book ends to size as desired.
16
F I G U R E
27
F I G U R E
29
F I G U R E
30
FASTBACK 9 USER’S MANUAL, 203860 Rev. A
BIND ING A D O CU MENT WITH
L x- P ERFECTBACK ® PS S TRIPS
IX-D
1. If necessary, switch to PERFECTBACK PS mode (see Section VII,
page 16). If the machine is already in PERFECTBACK PS mode, the
display will read: “READY TO BIND” … “PERFECTBACK PS.”
2. Select your Perfectback® strip according to your document
thickness:
F I G U R E
31a
F I G U R E
10-125 sheets= Narrow
125-250 sheets = Medium
31b
(This may vary slightly depending on the paper and cover thickness.)
•
HINT: If you are not sure which strip width to use, simply place
your document in the binding recess and push the BIND button. The
correct width will be shown on the display.
3. Fold the strip to a 90° angle (figure 31a). Make sure the adhesive
side faces inward.
F I G U R E
32
4. Place the strip into the binding recess with the adhesive side facing
up. The short side of the bent “L” should be resting against the back
wall. Slide the strip all the way to the right (figure 31b).
HINT: For a uniform strip width on your front cover—regardless
of document thickness—turn your document in the binder with the
front cover facing the back of the machine.
5. Tamp your document cover and pages on the front flat surface of the
housing so that they are straight. Place the document on top of the
strip and slide the document all the way to the right (figure 32).
F I G U R E
33
6. Tap the document on the top and the left to be sure all pages are
even. Push the pages backward to ensure proper binding. Check that
the document edge aligns with the edge of the strip (figure 33).
7. Press the BIND button (figure 34). The binding process will begin.
•
NOTE : Stopping the binding process: During the first several
seconds of the binding cycle, you can push the OPEN button
(the orange button closest to the front) to abort the whole process
and open the document clamps. Use a new binding strip when the
process resumes.
F I G U R E
34
8. As soon as the display flashes “REMOVE BOOK,” pick up the
document and place it against a rear book support fence (figure 35).
9. Let the bound document cool for five minutes.
F I G U R E
35
FASTBACK 9 USER’S MANUAL, 203860 Rev. A
17
AD D ING A COVER WITH
L x- P ERFECTBACK ® PS S TRIPS
IX-E
1. Score and fold your cover at the two positions that will
represent your spine edges (figure 36).
•
Tip: The Powis Parker Scoring Machine can do this quickly
and accurately for you.
F I G U R E
36
2. Peel off the thin release paper at the front of your book
block (figure 37).
3. Place your pre-folded cover on a flat surface with the front
of the cover bent up from the rear spine edge. Insert your
book block inside the front of your cover. Position it so full
and even contact is made in the spine area. (figure 38)
F I G U R E
37
4. Fold your front cover tightly over the book block.
Starting from the middle, rub back and forth to secure the
cover to the adhesive strip beneath it (figure 39).
5. Flip the book over. Open the back cover and peel the
remaining release paper away from the spine, starting with
the top edge
(figure 40).
F I G U R E
38
6. Tightly pull the cover against the spine. Rub back and forth,
starting from the middle, to bind the back cover to the
adhesive beneath it (figure 41).
7.
18
F I G U R E
39
F I G U R E
40
F I G U R E
41
FASTBACK 9 USER’S MANUAL, 203860 Rev. A
Trim the book ends as desired.
BIND ING HARD COVER BO O K S
X
In addition to soft cover binding, with the Fastback® 9 binder and our
Fastback® Hardcover Guide you can create professional-quality hard
cover books easily and inexpensively — in less than a minute.
PRINTED
PAGES
FOLDED
ENDLEAVES
42
F I G U R E
Our covers are available in a wide range of sizes, colors and finishes. And, with the addition of our Foilfast. printer, you can apply colorful foil
printed titles and artwork to your covers and spines — in up to seven
great-looking colors with tight registration. The Fastback Hardcover
system works with the Lx-Strip, and the Lx-CP Strip.
Before binding your pages, place folded Fastback endleaves at the front
and the back of your printed pages (figure 42). The folds should be at
the spine side of your pages.
F I G U R E
43a
F I G U R E
43b
1. Set the binder to LX or Lx-CP mode according to which type of
strip you are using (see Section VII, page 16). If the machine is in
LX mode, the display will read “READY TO BIND” … “LX.” If the
machine is in LX CP STRIP mode, the display will read “READY TO
BIND” … “LX CP.”
2. Select your Lx-Strip according to your document thickness:
10-125 sheets= Narrow
125-250 sheets = Medium
(This may vary slightly depending on the paper and cover thickness.)
HINT: If you are not sure which strip width to use, simply place
your document in the binding recess and push the BIND button. The
correct width will be shown on the display.
44
F I G U R E
3. Fold the strip to a 90° angle (figure 43a). Make sure the adhesive
side faces inward.
4. Place the strip into the binding recess with the adhesive side facing
up. The short side of the bent “L” should be resting against the back
wall. Slide the strip all the way to the right (figure 43b).
F I G U R E
45
5. Tamp your document cover and pages on the front flat surface of the
housing so that they are straight. Place the document on top of the
strip and slide the document all the way to the right (figure 44).
6. Tap the document on the top and the left to be sure all pages are
even. Push the pages backward to ensure proper binding. Check that
the document edge aligns with the edge of the strip (figure 45).
7. Press the BIND button (figure 46). The binding process will begin.
F I G U R E
46
•
NOTE : Stopping the binding process: During the first several
seconds of the binding cycle, you can push the OPEN button
(the orange button closest to the front) to abort the whole process
and open the document clamps. Use a new binding strip when the
process resumes.
8. As soon as the display flashes “REMOVE BOOK,” pick up the
document and place it against a rear book support fence (figure 47).
9. Let the bound document cool for five minutes.
F I G U R E
47
FASTBACK 9 USER’S MANUAL, 203860 Rev. A
19
X
BIND ING HARD COVER BO O K S
10. Measure the bound book block with the Book Width
Gauge on the lower right side of the Hardcover Guide to
determine the proper Fastback Hardcover width (figure
48).
F I G U R E
48
F I G U R E
49
11. Place an empty Fastback Hardcover, adhesive side up, in
the Hardcover Guide and clamp in place. The top and right
edges of the cover should be under the translucent green
stops. If the book width is C or greater, you may use the
green plastic inserts to ensure that the book block does
not shift during binding. Remove the narrow release paper
from the right panel of the Fastback Hardcover, exposing
a small portion of the super-strong binding adhesive that
coats the interior hard covers. (figure 49).
12. Set your bound book block into place against the Guide’s
translucent green stops and press down to fasten the book
block to the narrow adhesive area (figure 50). Your book
block is now evenly positioned within the cover.
13. Carefully lift the right side of the book block and remove
the large release paper from the right panel of the
Fastback Hardcover (figure 51). Lower the book block
onto the panel and press it against the panel to secure it.
20
F I G U R E
50
F I G U R E
51
F I G U R E
52
F I G U R E
53
FASTBACK 9 USER’S MANUAL, 203860 Rev. A
14. Remove the remaining release papers, (figure 52), and
bring the left panel of the Fastback Hardcover over onto
the book block with the top and right edges of the cover
abutting the purple stops (figure 52). Remove the book
from Guide and rub the endleaves to ensure that they are
securely fastened.
HINT: If you wish, you can also add headbands (small cloth
strips and the top and bottom edges of the book’s spine) for a
more professional finished appearance (Note: Headbands must
be attached before the Fastback Hardcover is attached. Foilfast
Title Sheets are available on the Comp and Suede covers only.
XI
U S ER MENU
Activate the USER MENU by pressing the MENU button, which is the
middle button. Use the MENU button to shift through the different
functions, and the green BIND button to select the desired function
(figure 54).
BIND button:Selects
menu functions
MENU
button:Cycles forward
through functions
OPEN button:Cycles
backwards through
functions
F I G U R E
54
User Menu choices are as follows:
A.
B.
C.
D.
E.
F.
G.
H.
I.
J.
IMAGE (bind style)
LX (bind style)
LX COMPOSITION (bind style)
LX CP (bind style)
HALFBACK (bind style)
PERFECTBACK LF (bind style)
PERFECTBACK PS (bind style)
EDIT MODE
SETTINGS
EXIT
A. IMAGE (Refer to Page 12 for instructions on binding in this mode)
This setting allows the user to bind a document with Image strips.
The Image Strip lets you use strips that have your brand and identity
information printed on them. Intended for use with Clear Covers, or
foil-printed Comp Covers.
B. LX (Refer to Page 8 for instructions on binding in this mode)
This is the standard setting. It allows the user to bind a document with
Lx-Strips.
NOTE : When a different bind setting is selected, after the machine is
turned off and on, that setting will be retained.
FASTBACK 9 USER’S MANUAL, 203860 Rev. A
21
XI
U S ER MENU ( co nti nu ed )
B. LX COMPOSITION (Refer to Page 9 for Lx-Comp
Strip binding instructions.)
This setting allows the user to bind a document with
Lx-Comp strips. The eye-catching executive look of the
Lx-Comp strip offers a high-end appearance, and is
designed to match our Comp covers for your special
presentations.
C. LX CP (Refer to Page 10 for instructions on binding in
this mode)
This setting allows the user to bind a document with
Lx-CP strips. If you are printing to a color laser printer that
uses fuser oil, or you are using extremely smooth paper, the
Lx‑CP Strip can provide a stronger bind in these instances
(not recommended for use with glossy coated paper).
Intended for use with the Fastback Hardcover products,
Comp Cover, and Clear Cover.
D. HALFBACK. (Refer to Page 13, for Halfback binding
instructions.)
This setting allows the user to bind a document with
Halfback covers . With Halfback covers, you can produce
documents that look like they were perfect-bound.
The covers come in solid colors and are pre-scored for
easy and accurate results every time.
E. PERFECTBACK LF (Refer to Page 15, for
Lx-Perfectback LF binding instructions.)
This setting allows the user to bind a document with
Lx-Perfectback LF strips. Perfectback LF strips produce a
wraparound cover spine that hinges freely from the bound
spine of your book block.
F. PERFECTBACK PS (Refer to Page 17, for
Lx-Perfectback PS binding instructions.)
This setting allows the user to bind a document with
Lx-Perfectback PS strips. Lx-Perfectback PS strips produce a
wraparound cover that bonds fully all around the spine
of your book block.
See Page 14 for more detailed information about the benefits
of each Perfectback strip.
NOTE: To ensure optimal bind quality, make sure to always
bind with the correct bind mode selected. Contact Powis
Customer Service for more information.
22
FASTBACK 9 USER’S MANUAL, 203860 Rev. A
XI
U S ER MENU ( co nti nu ed )
H. EDIT MODE
NE
W
The Edit Mode enables removal and insertion of pages in a document
previously bound by the Fastback® 9 binder.
GE
PA
1. Select EDIT MODE in the User Menu. The display will read “READY
TO EDIT.”
2. Open and flatten your document to the page you wish to remove.
Fold down the corner of that page.
F I G U R E
55
3. Behind this page insert the new page you want to add (figure 55).
Slip it in as far as you can. When you’re sure it’s straight, close your
document.
4. Put your document in the binder and press the BIND button. This
begins the Edit cycle.
5. While the binder is re-melting the spine adhesive, pinch the front
and back portions of the document with one hand, leaving the
bent page free (figure 56). When the clamps start to open and the
display reads “EDIT NOW,” immediately pull the bent page from the
document. (Holding the front and back portions of your document
keeps the remaining pages in place.) If the page doesn’t remove
easily the first time, simply repeat this step.
As soon as you remove the bent page, tap down the new page
until it’s flush with the rest of the document. Make sure
you are directly tapping the document’s pages—not just the tops
of the document’s covers. Now press the BIND button again. The
binder will now rebind the book.
F I G U R E
56
6. When the display flashes “REMOVE BOOK,” place the edited
document between the cooling fences for five minutes.
NOTE: To ensure the strongest possible binding results, it is
recommended that you edit a document no more than three times
FASTBACK 9 USER’S MANUAL, 203860 Rev. A
23
XI
U S ER MENU ( co nti nu ed )
I. SETTINGS
SPINE BIND TIME allows the user to increase or decrease the
time it takes to bind the spine of a document. The bind can be
improved on some difficult-to–bind paper stocks by increasing
the Spine Bind Time.
COVER BIND TIME allows the user to increase or decrease
the time it takes to bind the cover of a document. The binding
of heavy covers may require additional Cover Bind Time for the
heat to transfer through the thicker material.
LANGUAGE allows the user to change the language on the
display. The choices are:
ENGLISH
DUTCH
DEUTSCH
FRANCAIS
ITALIANO
ESPAÑOL
NORSK
SVENSKA
DANSK
J. EXIT
Returns the user to the “READY TO BIND” mode.
24
FASTBACK 9 USER’S MANUAL, 203860 Rev. A
XII
T RO U B LESHOOT IN G - BIND QUAL ITY
Problems
•
The spine is not square.
Solution
•
Fold the Lx-Strip into a 90 degree angle. The better you
fold the strip the more square the spine will be.
•
After binding, make sure the book is placed in the
cooling rack to properly cool down.
Problems
•
•
The pages protrude past the strip
The edges of the pages are not even.
Solution
•
Tap on the top and left sides of the pages until the
edges are even.
•
Make sure the strip is flush against the right side of the
binding recess.
Problems
•
•
•
•
Bind quality is unsatisfactory.
Part of the page separates from the
strip.
Gaps in the pages where the strip can
be seen.
Thermal plastic adhesive leakage.
Solution
•
Verify the machine is set to the correct binding style. (See the
User Menu section for more details.)
•
Contact Powis Customer Service or Technical Support for
additional assistance.
Problems
•
Solution
The pages are not adhering to the strip •
very well. (Some paper stocks and some
heavy cover material can be difficult to
bind.)
•
•
The bind may be improved by increasing the Spine Bind Time in
the Setting Menu. See the User Menu.
Use Lx-CP strip.
Contact Powis Customer Service or Technical Support for
additional assistance.
FASTBACK 9 USER’S MANUAL, 203860 Rev. A
25
XIII
T RO U BLESHOOT IN G - ERRO R MES S AGES
•
Error Message: “INSERT BOOK”
Possible Cause
Solution
The operator pressed the Bind button without inserting a
book into the binding recess.
Place a book into the machine and then press the Bind
button.
The sheets are not fully justified against the right side of the
binding recess.
Tap the edges of the sheets until the book is flush against
the right side of the binding recess prior to pressing the
BIND button.
The book sensor is damaged
Contact Powis Customer Service for service.
•
Error Message: “USE SMALLER SIZE”
Possible Cause
Solution
The strip is too wide for the amount of sheets placed in the
binding recess.
Add more sheets or use a narrower width strip.
The strip is not folded.
Make sure to fully fold the strip into a 90 degree angle.
The strip is not lined up properly.
Make sure the strip and the sheets are justified against
the back of the binding recess.
•
Error Message: “BOOK TOO THICK”
Possible Cause
Solution
You are trying to bind too many sheets with the medium strip. Remove some sheets.
•
Error Message: “USE MEDIUM SIZE”
Possible Cause
Solution
You are trying to bind too many sheets with a narrow strip.
Remove some sheets or use a medium width strip.
There is no strip in the binding recess.
Insert a medium strip.
•
Error Message: “USE NARROW SIZE”
Possible Cause
You are trying to bind too few sheets with a medium strip.
Add some sheets or use a narrow width strip.
There is no strip in the binding recess.
Insert a narrow strip.
•
Error Message: “REVERSE STRIP”
Possible Cause
The strip is inserted into the machine backwards.
•
Solution
Make sure the short end of the strip is vertical and the
long end of the strip is flat.
Error Message: “MACHINE ERROR XX”
Possible Cause
Machine needs technical attention.
26
Solution
FASTBACK 9 USER’S MANUAL, 203860 Rev. A
Solution
Turn the machine off and then back on. If the error still
appears contact Powis Technical Support.
XIV
S P E CIF ICATION S
Power Requirements:
9: 120V (110-125VAC) 50-60 Hz, 10 Amps
9A: 230V (220-240VAC) 50-60 Hz, 5 Amps
9E: 230V (220-240VAC) 50-60 Hz, 5 Amps
9J: 100V (90-110VAC) 50-60 Hz, 10 Amps
Power Consumption:
9: 1150 Watts while binding, 55 Watts standby
9A: 1150 Watts while binding, 55 Watts standby
9E: 1150 Watts while binding, 55 Watts standby
9J: 1150 Watts while binding, 55 Watts standby
Recommended Operating
Temperature and
Humidity:
15 to 35 degrees (C), 59 to 95 degrees (F)
Humidity Range: 5 to 80% RH noncondensing
Weight:
17 lbs
Dimensions:
With book fences attached: 19.3” W x 11.1” H x 12.5” D
Without book fences attached: 19.3” W x 6.0” H x 10.6” D
Bind Capacity:
Image Strip
Lx-Strip/Lx-Comp
Lx-CP
Halfback covers
Perfectback Strips
.040” to .370” (1mm to 9.5mm), about 10-100 sheets.
.040” to 1.000” (1mm to 25.4mm), about 10-250 sheets.
10-125 sheets = Narrow
126-250 sheets = Medium
.040” to .700” (1mm to 18mm), about 10-175 sheets.
10-85 sheets = Narrow
86-175 sheets = Medium
.040” to .740” (1mm to 19mm), about 10-200 sheets.
10-100 sheets = Narrow
.040” to 1.000” (1mm to 25.4mm), about 10-250 sheets.
10-125 sheets = Narrow
126-250 sheets = Medium
Duty Cycle:
500 binds per month average
Bind Speed:
30-60 seconds
Safety Certifications:
UL60950
IEC60950/EN60950
FASTBACK 9 USER’S MANUAL, 203860 Rev. A
27
XV
F CC N OT ICE
•
Modifications made to the product, unless expressly approved by Powis Parker, could void the
user’s authority to operate the equipment.
Note: This equipment has been tested and found to comply with the limits for a Class B digital
device, pursuant to Par t 15 of the FCC Rules. These limits are designed to provide reasonable
protection against harmful interference in a residential installation. This equipment generates,
uses, and can radiate radio frequency energy and, if not installed and used in accordance with
the instruction, may cause harmful interference to radio communications. However, there is no
guarantee that interference will not occur in a par ticular installation. If this equipment does cause
harmful interference to radio or television reception, which can be determined by turning the
equipment off and on, the user is encouraged to tr y and correct the interference by one or more of
the following measures:
•
•
•
•
Reorient or locate the receiving antenna.
Increase the separation between the equipment and receiver.
Connect the equipment into an outlet on a circuit from that to which the receiver is connected.
Consult the dealer or an experienced radio/TV technician for help.
DECLARATION OF CONFORMITY
We, Powis Parker, Incorporated
775 Heinz Avenue
Berkeley, CA 94710 U.S.A
1-800-321-2463
declare under our sole responsibility that the product
Fastback ® Model 9 Binder
complies with Par t 15 of FCC Rules.
Operation is subject to the following two conditions: (1) this device may not cause harmful
interference, and (2) this device must accept any interference received, including interference that
may cause undesired operation.
•
Binder does not contain any user ser viceable par ts. Return unit to an authorized Powis Parker
representative for repair or ser vice.
POWIS PARKER PART NUMBERS FOR YOUR REFERENCE:
203860
551-778
POWER CORD (DOMESTIC)
551-779
POWER CORD (INTERNATIONAL)
200754
438-4382
28
FASTBACK 9 USER’S MANUAL, 203860 Rev. A
FASTBACK 9 USER’S MANUAL
BOOK SUPPORT FENCES (SET OF 3)
INSTRUCTION CARD
Copyright Information
This document contains proprietar y and confidential information of Powis Parker Incorporated (PPI).
Copyright © Powis Parker Incorporated 2006
All Rights Reser ved.
No par t of this document may be photocopied, reproduced in any form, or translated into another
language without prior written consent of PPI, except as allowed under the copyright laws.
Warranty
One (1) Year from date of purchase.
The information contained in this document is subject to change without notice.
PPI makes no warranty of any kind with respect to this information. PPI specifically disclaims the implied
warranty of merchantability and fitness for a par ticular purpose.
PPI shall not be liable for any direct, indirect, incidental, consequential, or other damage alleged in
connection with the furnishing or use of this information.
N otice
Changes are periodically made to this document. Revisions, changes, any technical inaccuracies, and
typographical errors will be corrected in any subsequent editions.
FASTBACK 9 USER’S MANUAL, 203860 Rev. A
29
30
FASTBACK 9 USER’S MANUAL, 203860 Rev. A