1
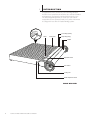
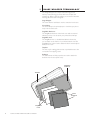
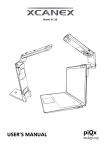
IMAGE WRAPPER
IMAGE WRAPPER U S E R ’ S M A N U A L
www.powis.com
fax: 510 848 2462
phone: 510 848 2463
toll-free: 800 321 BIND
775 Heinz Ave, Berkeley, CA 94710
C O NT E NT S
I
INTRODUCTION. . . . . . . . . . . . . . . . . . . . . . . . . . . 2
II
FIRST TIME SETUP. . . . . . . . . . . . . . . . . . . . . . . . . 3
III
IMAGE WRAPPER TERMINOLOGY . . . . . . . . . 4
IV
SUPPLIES & PRINTING INFORMATION. . . . 5
V
USING THE IMAGE WRAPPER. . . . . . . . . . . . . . 7
Cutting the Cover Wrap. . . . . . . . . . . . . . . . 7
Attaching the Cover Wrap. . . . . . . . . . . . . . 8
VI
ATTACHING THE COVER LINERS. . . . . . . . . 12
VII
FINISHING THE BOOK. . . . . . . . . . . . . . . . . . . . 14
APPENDIX A: Alternate Wrap Method. . . . . . . . . 15
APPENDIX B: Safety & Comfort. . . . . . . . . . . . . . . . 17
APPENDIX C: Troubleshooting . . . . . . . . . . . . . . . . . 18
SPECIFICATIONS & WARRANTY. . . . . . . . . . . . . . . . 21
Information for Your Reference:
Serial Number:
Purchase Date:
POWIS IMAGE WRAPPER USER’S MANUAL
1
I
INTRO D U CTIO N
Congratulations on the purchase of your Powis Image Wrapper.
As with all our equipment, this machine was carefully assembled
and tested prior to packing. You will find it fast and easy to use.
The Powis Image Wrapper lets you create your own custom
wrapped hard covers quickly and easily in any office environment.
It is designed for use with our Fastback binding systems.
Utility Knife
Holder
Cover Stop (Green)
Slider
Cutting Mat
Wrap Stop (Gray)
Rollers
Adjustment Knob
Turn Wheel
Locking Nut
Roller Adjustment Screw
IMAGE WRAPPER
2
POWIS IMAGE WRAPPER USER’S MANUAL
FIR S T TIME S ETU P
II
A. What’s Included Inside the Box
•
•
•
The Powis Image Wrapper
Instruction Card
Image Wrapper Manual
If any items are damaged or missing, contact your Powis Parker dealer
immediately.
B. Setting Up
1. With the help of someone else, remove the Image Wrapper from
the box and place on a flat, level surface.
2. Remove any cardboard or styrofoam shipping pieces from the Image
Wrapper before using.
3. Position the machine on the desk, table, or counter where it will
reside. For optimum comfort we recommend a table height
between 27” – 30” (69 cm – 76 cm). All four feet should be on the
table, but the center slot between the two rollers should be clear
of the front edge of the table to allow covers to slide completely
through the rollers.
You will also need a utility knife to cut your printed cover wraps to size.
CAUTION: Utility knives are very sharp! Always handle them carefully
and replace them in the utility knife holder when not in use.
POWIS IMAGE WRAPPER USER’S MANUAL
3
III
IMAGE WR APP ER TERMINO L OG Y
The Image Wrapper uses unique new technology, and, as
with any new technology, it comes with new concepts and
terminology . Refer to this list anytime you are unsure about the
meanings of terms used in this guide .
Image Wrapper
This is the machine itself that is used to create the hard covers .
Cover Wrap
The Cover Wrap is the printed paper or cloth that you plan to
wrap onto the hard cover .
ImageBack Hardcover
The ImageBack Hardcover is the hard cover with an external
adhesive panel you use to attach your printed Cover Wraps .
ImageBack Liner
The ImageBack Liner is a double-sided adhesive sheet that
you can attach to the interior of your finished book cover . The
ImageBack Liner is then used to attach the book contents (book
block) to the cover .
Template
The clear acrylic cutting guide used to cut printed sheets to the
correct size for wrapping covers .
Endleaves
The folded sheets of thick paper that are used to attach the
book block to the case (hard cover) .
ImageBack
Hardcover
Template
Black
Endleaves
ImageBack
Liners
4
POWIS IMAGE WRAPPER USER’S MANUAL
IV
SUPPLIES & PRINTING INFORMATION
Before you begin printing the wraps for your covers, some familiarity with
the properties of the paper you are using is recommended. Laminating
is strongly recommended to prevent the paper from cracking along
the spine and the ink from rubbing off at the corners. There are three
primary types of laminates: polyester (PET), polypropylene (BOPP), and
nylon. Check with your vendor for the best laminate to use for your type
of printing. Keep in mind that thicker papers are more difficult to wrap
properly. The following information will help you decide which type of
laminate to use. For more information, check with your laminate vender
about the avilability of the correct materials.
Digital Offset Printers: Digital printer inks have oils in them, which can
inhibit the adhesion of the glues on the laminates. Ask your laminate
vender about the more aggressive laminate glues.
Toner-based Printers: Toner-based printers often use fuser oil which—like
the digital printer inks—can infere with lamination. Ask your laminate
vender about the more aggressive laminate glues.
Inkjet Printers: Inkjet printers should use a low melt adhesive. Any of the
three types of laminates are available in low melt versions. Ask your
laminate vender about the low-melt laminates.
Dye-Sublimation Printers: Like inkjet printers, dye-sub printers should
use a low melt adhesive. Ask your laminate vender about the low-melt
laminates.
The ImageWrapper uses the following supplies:
SIZES
SPINE
ImageBack Template
(3 per carton, ABC spines)
ImageBack Hardcover
(25 per carton)*
ImageBack Liner
(200 per carton)
Black Endleaves
8.5” x 11”
Landscape
A
B
IBTA-JLX
IBTB-JLX
HJIBA-LX
HJIBB-LX
IBLJ-LX
203078
11” x 8.5”
Portrait
A
B
IBTA-JPX
IBTB-JPX
HJIBA-PX
HJIBB-PX
IBLJ-PX
HZEJBB
A4
Landscape
A
B
IBTA-4LX
IBTB-4LX
H4IBA-LX
HAIBB-LX
IBL4-LX
202936
A4
Portrait
A
B
IBTA-4PX
IBTB-4PX
H4IBA-PX
H4IBB-PX
IBL4-PX
204614
8” x 10”
Landscape
A
B
C
IBTA-NLX
IBTB-NLX
IBTC-NLX
HNIBA-LX
HNIBB-LX
HNIBC-LX
IBLN-LX
206077
10” x 8”
Portrait
A
B
C
IBTA-NPX
IBTB-NPX
IBTC-NPX
HNIBA-PX
HNIBB-PX
HNIBC-PX
IBLN-PX
202129
12” x 12”
Square
A
B
C
IBTA-ASX
IBTB-ASX
IBTC-ASX
HAIBA-SX
HAIBB-SX
HAIBC-SX
IBLA-SX
HOEBBXS
* Package includes 50 ImageBack Liners
POWIS IMAGE WRAPPER USER’S MANUAL
5
IV
SUPPLIES & PRINTING INFORMATION
Image Area Specifications
Below are listed the minimum printed areas required for the cover wraps.
8”x10”:
A spine: 22.26” × 9.52” (565.4mm × 241.8mm)
B spine: 22.39” × 9.52” (568.7mm × 241.8mm)
C spine: 22.64” × 9.52” (575.1mm × 241.8mm)
12”x12”:
A spine: 26.26” × 13.52” (667mm × 343.4mm)
B spine: 26.39” × 13.52” (670.3mm × 343.4mm)
C spine: 26.64” × 13.52” (676.7mm × 343.4mm)
8.5”x11” (portrait and landscape):
Portrait:
A spine: 19.26” × 12.52” (489.2mm × 318mm)
B spine: 19.39” × 12.52” (492.5mm × 318mm)
C spine: 19.64” × 12.52” (498.9mm × 318mm)
Landscape:
A spine: 24.26” × 10.02” (616.2mm × 254.5mm)
B spine: 24.39” × 10.02” (619.5mm × 254.5mm)
C spine: 24.36” × 10.02” (618.8mm × 254.5mm)
A4 (portrait and landscape):
Portrait:
A spine: 18.8” × 13.21” (477.5mm × 335.5mm)
B spine: 18.92” × 13.21” (480.6mm × 335.5mm)
C spine: 19.17” × 13.21” (486.9mm × 335.5mm)
Landscape:
6
A spine: 25.64” × 9.79” (651.3mm × 248.7mm)
B spine: 25.77” × 9.79” (654.6mm × 248.7mm)
C spine: 26.02” × 9.79” (660.9mm × 248.7mm)
POWIS IMAGE WRAPPER USER’S MANUAL
V
U S ING THE IMAGE WRAP PER
CUTTING THE COVER WRAP
BEFORE YOU BEGIN: Please consult Section V: Supplies and Printing
Information to make sure that your wraps have the correct size and
image area specifications . The find the correct book width (A–C), use
the Book Width Gauge located on the bottom right of the Fastback
Hardcover Guide (Figure 1) . For more information on using the Fastback
Hardcover Guide see Section VII, Finishing the Book .
FIGURE
1
LE
TIT
1 . Place your printed sheet (wrap) face-up on the cutting surface on
top of the Image Wrapper . Place the correct size of clear plastic
cutting template on top of the printed wrap and align the spine
along the center line (Figure 2) .
RE
HE
FIGURE
FIGURE
FIGURE
2
2 .
Using a sharp utility knife, cut around the edges of the template
(Figure 3) .
3 .
Remove the excess paper from the edges of the wrap (Figure 4) .
3
4
Place the template and cut wrap aside for the next procedure .
POWIS IMAGE WRAPPER USER’S MANUAL
7
V
Release Liner
(pulled open)
Interior Adhesive Area
Interior panel
U S ING THE IMAGE WRAP PER
ATTACHING THE COVER WRAP
BEFORE YOU BEGIN: After the wrap is cut to size, it is
ready to attach to the Image Back Hardcover. Please consult
Section V: Supplies and Printing Information to make sure that
your wrap specifications conform to the printing and laminating
pre-requisites as listed.
(Interior view)
F I G U R E
5
1. Peel back the inner portion of the release layer on all four
sides of the Image Back Hardcover (Figure 5).
2. Line up the bottom edge of ImageBack Hardcover with the
edge of the green Cover Stop. Position the cover so the
the center of the spine is approximately lined up with the
center notch on the green stop.
HINT: An easy way to line up the cover with the guide is to
pull the hardcover by the long edge of the release paper up to
the green Cover Stop (Figure 6).
F I G U R E
6
3. Slide the purple slider over so the lower gray step touches
the edge of the cover, then tighten the Adjustment Knob in
place (Figure 7).
F I G U R E
7
4. Peel back and crease flat the left edge of the release paper,
exposing approximately an inch of the adhesive surface
(Figure 8).
IMPORTANT: Do not remove the entire release paper from
the ImageBack Hardcover yet.
F I G U R E
8
8
POWIS IMAGE WRAPPER USER’S MANUAL
V
U S ING THE IMAGE WRAP PER
ATTACHING THE COVER WRAP (Continued)
FIGURE
FIGURE
FIGURE
FIGURE
5 .
Place the wrap on top of the cover with its front edge against the
gray step . Be careful not to press down too hard as you might
prematurely attach the wrap to the exposed adhesive (Figure 9) .
6 .
Slide the wrap over so its left edge touches the right side of the
purple piece — the wrap front edge must still be against the long gray
stop . (Figure 10) .
7 .
While holding the wrap in place against the front and left stops,
press the wrap down on the exposed left edge adhesive to secure it
in place (Figure 11) .
8 .
Peel the entire release paper from the Image Back Hardcover
while firmly and evenly smoothing the wrap against the Hardcover
(Figure 12) .
9
10
11
12
POWIS IMAGE WRAPPER USER’S MANUAL
9
V
U S ING THE IMAGE WRAP PER
ATTACHING THE COVER WRAP (Continued)
9 .
FIGURE
FIGURE
13
14
With the interior portion of the cover facing away from
you, firmly push down and rock on the long edge of the
cover to fold and attach the wrap to the edge of the
Hardcover (Figure 13) .
10 . Place the cover in between the Rollers and rotate the Turn
Wheel a half turn to feed the folded edge in and out of the
rollers (Figure 14) .
11 . Repeat steps 9 and 10 with the opposite long edge of the
cover .
FIGURE
15
12 . With a fingernail, tuck and crimp all four corrners, being
careful to make sure that the crimped edges are tucked
FIGURE
10
16
POWIS IMAGE WRAPPER USER’S MANUAL
V
U S ING THE IMAGE WRAP PER
into the fold (Figures 15 and 16) .
ATTACHING THE COVER WRAP (Continued)
13 . Firmly push down and rock the short edge of the cover to fold and
attach the wrap to the edge of the Hardcover (Figure 17) .
FIGURE
FIGURE
FIGURE
17
18
19
14 . Place the short edge of the cover between the Rollers and rotate
the Turn Wheel a half-turn and back to feed the folded edge in and
out of the rollers (Figure 18) .
15 . Repeat steps 13 and 14 with the opposite short edge of the cover .
When finished, feed the entire cover through the rollers to ensure
the wrap is completely adhered to the Hardcover (Figure 19) .
The cover is now ready to attach the Liners (see page 18)
POWIS IMAGE WRAPPER USER’S MANUAL
11
VI
ATTACHING THE COVER L INE R S
Cover Liners are used to attach the book block to the hard
cover . Liners consist of a substrate that has adhesive on both
sides sandwiched between two release papers (Figure 20) .
Release Papers
Adhesive Liner
Look closely at a Cover Liner and you will notice that the
release papers extend past the edge of the adhesive substrate
along one edge . One release paper is slightly longer than the
other . This is the release paper that will line up with the outside
edge of the book .
FIGURE
FIGURE
FIGURE
20
21
22
1 . Peel back the shorter of the two release papers to expose
the adhesive liner along the edge (Figures 21) . Fold and
crease the release paper (Figure 22) .
2 .
Line up the uncreased release paper with the edge of
the hard cover and visually center the Cover Liner top
and bottom being careful not to press on the exposed
adhesive area yet (Figure 23) .
3 .
Once the Cover Liner is in place, press down on the
exposed adhesive area to secure the liner then reach under
and finish peeling off the lower release paper .
4 .
Press the Cover Liner firmly in place .
5 .
Repeat for the other inside panel of the cover .
TIP: After the Cover Liners are in place, you may feed the
finished Hardcover through the Image Wrapper rollers . This will
help ensure that the liners are completely smoothed down .
Please consult Section V: Supplies and Printing Information
to make sure that your Cover Liners have the correct size
specifications .
FIGURE
12
23
POWIS IMAGE WRAPPER USER’S MANUAL
FINIS HING THE BO O K
VII
When the hard cover is wrapped and the liners are attached, you can
use, the Fastback Hardcover Guide (illustrated below) to finish the book .
For more information on binding the book block, please consult the
manual that came with the Fastback Hardcover Guide, or visit, www .
powis .com .
NOTE: Before fastening the cover in the Hardcover Guide, you will
need to fold back and crease the liner on the right panel (i .e ., the panel
that will clamp into the Hardcover Guide) as follows:
FIGURE
FIGURE
FIGURE
24
1 .
Start by peeling the release liner slightly from the outside of the
cover (Figure 24) .
2 .
Continue to lift the release paper around the top edge of the cover
and then down to the spine edge of the liner (Figure 25) .
3 .
Fold and crease the release liner, exposing approximately an inch
(25mm) of adhesive (Figure 26) . The cover is now ready to place in
the Hardcover Guide .
25
26
Rear Paper Stop
Rear Cover Stop
Spacer
Spacer Storage Slot
Clamp Lever
Side Paper Stop
Side Cover Stop
FASTBACK
HARDCOVER
GUIDE
POWIS IMAGE WRAPPER USER’S MANUAL
13
FINIS HING THE BO O K
VII
FIGURE
FIGURE
FIGURE
FIGURE
4 .
Place the finished ImageBack Hardcover interior side up,
in the Hardcover Guide and clamp it in place (Figure 27) .
(The front cover should be on the left side) .
5 .
With the front of your book block facing up, push the page
edges against the top and side green paper stops . (Figure
28), then lower the spine edge firmly onto the exposed
adhesive strip .
6 .
Carefully lift the right side of the book block and remove
the release paper from the right liner (Figure 29) . Roll
and lower the book block onto the hard cover and press it
against the panel to secure it .
7 .
Remove the remaining release paper from the left side,
(Figure 30) .
8 .
Bring the left panel of the Hardcover over the book block
and align, with the top and right edges of the cover
abutting the purple stops (Figure 31) . Press straight down
onto the book block and smooth the cover to the spine .
Remove the book from Guide .
Open and rub the endleaves to ensure that they are
securely fastened .
27
28
29
30
For more detailed information on using the Fastback Hardcover
Guide, see the Fastback Hardcover™ Guide User’s Manual .
FIGURE
14
31
POWIS IMAGE WRAPPER USER’S MANUAL
NOTE: If you wish, you can also add headbands (small cloth
strips and the top and bottom edges of the book’s spine) for
a more professional finished appearance . With the addition of
our Foilfast printer, you can apply colorful foil printed titles and
artwork to your covers and spines . Contact your Powis sales
rep for more information .
A
U SIN G THE IM AG E W RAP PER ( ALTER NATIVE METHO D )
ATTACHING THE COVER WRAP
(Alternative Technique)
LE
TIT
Although the standard technique for attaching the cover wrap yields very
accurate results, the following is an alternative method that offers perfect
alignment every time .
RE
HE
CUTTING THE COVER WRAP
FIGURE
FIGURE
FIGURE
FIGURE
32
BEFORE YOU BEGIN: Please consult Section V: Supplies and Printing
Information to make sure that your wraps have the correct size and
image area specifications .
1 .
Place your printed sheet (wrap) face-up on the cutting surface on
top of the Image Wrapper . Place the correct size of clear plastic
cutting template on top of the printed wrap and align the spine
along the center line (Figure 32) .
2 .
In the center of the template notch closest to you, cut a slit at the
cover wrap bottom . (Figure 33) .
Note: How accurately you center this cut will determine the precision in
centering the cover on your spine.
3 .
Using a sharp utility knife, carefully cut around the edges of the
template (Figure 34) .
4 .
Remove the excess paper from the edges of the wrap .
5 .
Center the template over the spine of the Image Back Hardcover
with its front edge aligned with the cover’s front edge . In the center
of the template notch closest to you, cut a slit all the way through
the edge of the cover . (Figure 35) .
Note: How accurately you center this cut will determine the precision in
centering the cover on your spine.
33
34
35
POWIS IMAGE WRAPPER USER’S MANUAL
15
A
U SIN G THE IM AG E W RAP PER ( ALTER NATIVE METHO D )
ATTACHING THE COVER WRAP (Continued)
(Alternative Technique)
FIGURE
FIGURE
FIGURE
6 .
Bring into position, the Image Back Hardcover, making sure
the cover’s front edges touch along the green edge, and
line up the slit-cut on the cover with the center of the
notch on the Green Cover Stop (Figure 36) .
7 .
Peel back the left edge of the release paper to expose
approximately an inch of the adhesive (Figure 37) .
8 .
Line up the slit-cut on the wrap with the center point on
the Gray Cover Stop (Figure 38) . Be sure the front edge of
the wrap touches the gray stop .
9 .
Holding the wrap in place, press it down on the exposed
adhesive to secure it in place (Figure 39) .
36
37
38
Proceed with assembly procedure starting with step 8 on page 9 .
FIGURE
16
39
POWIS IMAGE WRAPPER USER’S MANUAL
B
SA F ET Y & COM F ORT
In recent years, medical attention on occupational injuries has identified
common, seemingly harmless activities as potential causes of a wide
range of problems collectively known as Repetitive Stress Injuries or
Cumulative Trauma Disorders. It is now recognized that any repetitive
motion may contribute to these health problems. Depending on how it is
used, the prolonged or repetitive use of almost any machine might have
a potential for discomfort or injury. As a user of this Image Wrapper, you
might also be at risk.
The most commonly accepted causes of this type of disorder are
repeated, forceful actions, usually in an awkward position or posture,
without sufficient rest to allow the body to recover. These repetitive
actions may cause nerves, tendons, ligaments, and other soft body parts
to become irritated and inflamed.
By paying attention to the way you perform your work, and do other
activities, you can identify the behaviors that could put you at risk.
The precautions outlined below are examples you can take to help
reduce the likelihood of developing these problems and work more
comfortably with your new Image Wrapper. Keep in mind, however, that
these are only suggestions. Comfort is personal and only you may be
able to judge what works best for you.
•
•
•
•
•
You may find that your body will be most comfortable and relaxed
with the Image Wrapper placed directly in front of you. The Image
Wrapper and your supplies should be within easy reach — avoid
excessive stretching.
The Image Wrapper is best used in a standing position. Make sure
that the work surface height that the Image Wrapper is on does not
require you to bend over in a way that would strain your back or
arms.
Do not bend your wrists unnaturally during use.
Don’t stay in one position for too long. Try changing hands and
varying your posture.
Take breaks. Frequent short breaks are probably better than a few
long ones.
Many factors go into creating a comfortable workspace, including proper
placement and adjustment of furniture and equipment. A thorough work
site analysis by a qualified expert is important in order to reduce the risk
of repetitive motion injuries. If you experience pain, throbbing, aching,
tingling, stiffness, a burning sensation, swelling, numbness, or weakness in
your wrists, hands, arms or legs, see your physician immediately.
DO NOT IGNORE THESE WARNING SIGNS. Even if symptoms occur
when you are not using the Image Wrapper, they can be associated
with painful and sometimes permanently disabling injuries or disorders
of the nerves, muscles, tendons, or other parts of the body. These
symptoms could mean that you are developing a repetitive stress injury
that requires prompt medical attention. For more detailed information,
consult your doctor.
POWIS IMAGE WRAPPER USER’S MANUAL
17
C
T RO U B LESHOOT IN G
PROBLEM
SOLUTION
Spine title is not centered.
Check the left edge when you are cutting the wrap to make
sure that it is flush with the template.
Make sure that the spine title is properly aligned under the
template before cutting.
Make sure that the cover and the wrap are butted up against
the stops on the bottom and the left.
Try the Alternative Method of attaching the cover wrap (see
Appendix A, page 15).
Air bubbles in the finished cover.
To avoid this problem, make sure that you press the wrap firmly
in an even and thorough motion from left to right when you
are applying the wrap to the Hardcover.
If the book cover is finished and has an air bubble, it is possible
to eliminate the air bubble by ironing the cover. To do this,
set the iron on its lowest setting and cover the wrap with a
discarded release paper. Iron the wrap from the center out
towards the edges. Be careful to keep the iron moving at all
times while it is in contact with the release paper.
Cover material sticks to and/or pulls off onto the rollers.
18
POWIS IMAGE WRAPPER USER’S MANUAL
Some inkjet papers have a surface that can pull off onto the
rollers. If this happens, put the cover between two release
papers when you feed it through the rollers.
C
T RO U B LESHOOT IN G
The Rollers are set at our factory at the optimal distance for our standard ImageBack Hardcovers. It is possible that you may
encounter Hardcovers with thicker substrates that will not feed properly through the Rollers. Or you may find that your
machine has been reset by someone and you want to set it back to the factory specifications. If so, use the following procedures.
Before proceeding, please familiarize yourself with the Roller Adjustment mechanism illustrated at the bottom of this page. There
are two Roller Adjustment screws; one on each side of the Image Wrapper.
PROBLEM
SOLUTION
Hardcover is too thick to feed properly
through the Rollers.
Turn the Locking Nuts on both sides of the Image Wrapper to the left to
loosen them.
Turn the Roller Adjustment Screws on both sides of the machine one
quarter turn to the left and check the Roller gap. The Rollers should be
close enough exert pressure on the Hardcover when it is fed through
them, but not so close that feeding the cover through the rollers is
difficult to do.
If the Roller gap is still too narrow. Turn both screws another quarter
turn to the left and check again. Repeat if necessary.
When you have reached the desired pressure point, turn the Locking
Nuts to the right to tighten on both sides.
Locking Nut
Roller Adjustment Screw
POWIS IMAGE WRAPPER USER’S MANUAL
19
C
T RO U B LESHOOT IN G
PROBLEM
SOLUTION
Rollers are misaligned.
Turn the Locking Nuts on both sides of the Image Wrapper to
the left to loosen them.
Turn the Roller Adjustment Screws on both sides of the
machine to the right until the rollers are just touching each
other on the right and left ends.
Then turn both Adjustment Screws to the left two full turns.
Turn the Locking Nuts to the right to tighten on both sides.
20
POWIS IMAGE WRAPPER USER’S MANUAL
SP E CIF ICAT ION S
Dimensions: 23” D x 32” W x 3.25” H (58.42cm D x 81.28cm W x 8.26cm H)
Weight: 46 lbs (20.87 kg)
Copyright Information
This document contains proprietar y and confidential information of Powis Parker Incorporated (PPI).
Copyright © Powis Parker Incorporated 2009
All Rights Reser ved.
No par t of this document may be photocopied, reproduced in any form, or translated into another language
without prior written consent of PPI, except as allowed under the copyright laws.
Warranty
One (1) Year from date of purchase.
The information contained in this document is subject to change without notice.
PPI makes no warranty of any kind with respect to this information. PPI specifically disclaims the implied warranty
of merchantability and fitness for a par ticular purpose.
PPI shall not be liable for any direct, indirect, incidental, consequential, or other damage alleged in connection with
the furnishing or use of this information.
N otice
Changes are periodically made to this document. Revisions, changes, any technical inaccuracies, and typographical
errors will be corrected in any subsequent editions.
POWIS IMAGE WRAPPER USER’S MANUAL
21