1
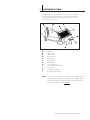
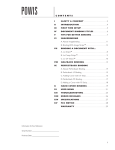
C O NT E NT S I SAFETY & COMFORT . . . . . . . . . . . . . . . . . . . . . . 2 II INTRODUCTION. . . . . . . . . . . . . . . . . . . . . . . . . . . 3 III MACHINE SETUP . . . . . . . . . . . . . . . . . . . . . . . . . . 4 IV CONTROL PANEL. . . . . . . . . . . . . . . . . . . . . . . . . . 5 V IMPORTANT - BEFORE YOU START. . . . . . . . 6 VI CONTENT ASSEMBLY - DOUBLE SIG.. . . . . . 7 VII CONTENT ASSEMBLY - PANORAMIC. . . . . 13 VIII APPLYING SPINE TAPE . . . . . . . . . . . . . . . . . . . 17 IX APPLYING HEADBANDS. . . . . . . . . . . . . . . . . . 18 X ADDING THE COVER . . . . . . . . . . . . . . . . . . . . . 19 XI CONTENT ASSEMBLY - FLATBOOK. . . . . . . 20 XII CONTENT ASSEMBLY -ACCORDION. . . . . . 24 XIII TIPS AND TECHNIQUES . . . . . . . . . . . . . . . . . . 27 XIV SPECIFICATIONS. . . . . . . . . . . . . . . . . . . . . . . . . . 28 XV FCC NOTICE. . . . . . . . . . . . . . . . . . . . . . . . . . . . . . 29. Information for Your Reference: Serial Number: Purchase Date: FASTBACK PHOTOPRESS USER’S MANUAL 1 I S AFETY & CO MFO RT Please read through this manual before setting up and using your PhotoPress. • Connect all equipment to properly grounded power outlets. • Do not allow anything to rest on the power cord. Do not locate the PhotoPress where persons will step on the cord. • Place the PhotoPress on a flat surface. The PhotoPress may not operate properly if it is tilted or at an angle. • Do not push any objects into the interior of the PhotoPress. • Use only the type of power source indicated on the label on the rear of the machine. • Do not use a damaged or frayed power cord. • Unplug the PhotoPress before cleaning, and clean it with a damp cloth only. • Do not spill food or liquid on the PhotoPress. • Do not put anything into the PhotoPress other than a properly prepared and assembled book block. • Except as specifically explained in this guide, do not attempt to service the PhotoPress yourself. • Keep your PhotoPress away from radiators and heat sources. • Use of an extension cord with this machine is not recommended or authorized. Users should check building codes and insurance requirements if an extension cord is to be used. Make sure that the total of the ampere ratings of the products plugged into the extension cord does not exceed the extension cord ampere rating, and that the total amperage of all products plugged into the wall outlet does not exceed the outlet rating. ! ! C A U T I O N : Do not attempt to lift the PhotoPress alone. See First Time Setup instructions. 2 FASTBACK PHOTOPRESS USER’S MANUAL II INTRO D U CTIO N Congratulations on the purchase of your new Powis Model 88 PhotoPress™ binder. As with all our machines, The PhotoPress was carefully assembled and tested prior to packing. You will find it fast and easy to use. B D C J E A F K I H G L A B C D E F G H I J K L Handle Upper latch Upper Platen Lower Platen Latch Hook Control Panel BIND Button Book size buttons Unlock/Move plate button Pressure Pad Left Alignment Edge Bottom Alignment Edge Note: The pressure pad (item J) has a useful life of approximately 5 to 10 thousand binds. Rotating the pad 180˚ every 500 to 1000 binds will increase its life. Replacement pads are available from your local distributor. Part# K-205905. FASTBACK PHOTOPRESS USER’S MANUAL 3 MACHINE S ETU P III A. What’s Included Inside the Box • • • The PhotoPress™ binder PhotoPress Manual Power Cord If any items are damaged or missing, contact Powis customer service immediately. NOTE : Fastback Hardcover Guide ships separately. B. Setting Up 1. 2. FIGURE 1 Cut straps on the box. Lift cardboard cover off, exposing the Styrofoam-encased machine (Figure 1). 3. Remove the top Styrofoam piece from the PhotoPress. 4. With four people (two on each side), grab the PhotoPress by the lifting handles located on the undercarriage of the PhotoPress body (Figure 2). 5. Place the PhotoPress onto the table and slide it into position (Figure 3). Make sure that the table on which the PhotoPress will sit can safely hold at least 250 lbs (133 Kg.). 6. For regions prone to earthquakes, we recommend bolting the PhotoPress to the table. Two mounting tabs are provided on back of machine. IM PORTANT: If possible please save all the packing materials for future shipping. C. Plugging In 1. FIGURE 2 2. The power switch is located on the back lower right side of the machine. Before plugging in the PhotoPress, make sure the power switch is off by depressing the “O” side of the power switch. Plug the power cord into the outlet on the back of the machine. Then connect it to a standard, grounded electrical outlet. D. Power On Turn the power switch on by depressing the “1” side of the power switch. E. Ready To Go FIGURE 3 Wait for the machine to go through the start up cycle. At the end of which, the lock unlatches and the door opens. The machine is ready to use. The machine is shipped with a foam pad. Make sure the foam pad has the black side facing up. ! C A U T I O N : Do not attempt to lift the PhotoPress by yourself! 4 FASTBACK PHOTOPRESS USER’S MANUAL HINT: The PhotoPress consumes relatively little power when it is not binding. However, if the machine will not be used for several hours, save power by turning it off. IV CO NTRO L PANEL The Control Panel buttons control the length of the bind cycle, the locking mechanism on the PhotoPress and the beginning of the bind cycle. You can also adjust the plate levels if desired. BIND Button UNLOCK/MOVE button The BIND button starts the binding cycle. When the light above the BIND button is blinking, the platens are moving and you cannot open the PhotoPress. SIZE Buttons BIND button SIZE buttons The SIZE buttons control the length of time that the PhotoPress compresses the book block. They also control the compression configurations, which vary (as shown below left) according to book size. We recommend the following settings according to book size and thickness. UNLOCK/MOVE Button If the binder is closed, the UNLOCK/MOVE Button opens the machine. If the binder is open, it moves the lower platen up and down. BINDING CHART Small button 4" × 6" 5" x 7" Medium Button 6" x 8" 8" x 8" 8" x 10" 10" x 10" Large Button 8" x 12" 12" x 12" Locking The clamp locks automatically when the binder has been idle for more than a few minutes. To unlock, press the UNLOCK/ MOVE Button once. Moving the Platen When the binder lid is open, the UNLOCK/MOVE Button allows you to adjust the starting level height of the lower platen. Normally the platen will always return to its last point. For binding thick book, the platen should be lower than the starting position. For thin books, it may be desirable to have the platen higher than normal. To adjust the height of the lower platen, press and hold the UNLOCK/MOVE Button until the platen reaches the desired level, then release. FASTBACK PHOTOPRESS USER’S MANUAL 5 V Key components of PhotoPress book assembly are the Signature Sheets, which feature adhesive layers that activate under pressure. This makes it easy to assemble a book without photos prematurely adhering to the signatures. There are two types of PhotoPress Signatures: Double Sheets, and Single Sheets. Adhesive Panels No Adhesive Adhesive Panel FIGURE 1 Double Signature PH PH OT OP OP AP AP ER ER PH PH OP OT OT OP AP OP E AP R AP OT PH ER PH ER OP OT OT OP AP OP PH ER A OT P AP PH ER PH ER OP OT OT AP O OP PAP ER A PH E P P R ER HO OT OP TO AP PAP PH ER PH ER OT OT OP OP AP AP PH ER PH ER OT O PH OP TO OT AP PAP OP PH ER PH ER OT AP OT PH OP ER OP OT AP AP OP PH E P R E H OT AP R OT PH OP ER OP O A TO AP PER PH PH ER PAP OT O PH OP TO ER OT AP PAP OP PH ER PH ER OT AP OT OP ER OP AP AP PH ER PH ER OT OT OP O PAP AP ER ER OT PH PH OT Adhesive Panel Adhesive Panel FIGURE 2 Single Signature SPINE EDGE Spine edge (fold) (fold) Signature Sheets; shiny (non-adhesive) side up. Photopress Double Signature Sheets are used to bind single pages. The Double Signature Sheets are folded and have three adhesive sides and one side that has no adhesive (Figure 1). The shiny side without adhesive is easily distinguished from the softer adhesive sides. Books made with Double Signature Sheets generally need no trimming after pressing. The PhotoPress Single Signatures are used to bind folded pages. For these books, the folds in the photo pages form the book’s hinge parts. Single Signature Sheets have adhesive on both sides (Figure 2). Books made with Single Signature Sheets normally need to be trimmed after pressing due to limitations on how accurately photos can be folded. Before you begin the assembly process -- here are a few important tips for making great books: • Clean the surface of your work table. You don’t want foreign materials picked up and trapped under photos. Endleaves Photographs (In order from the top down) IMP O RTANT - BEFO R E YO U S TA RT FIGURE 3 • Organize your work. Arrange your photos, endleaves and Signature Sheets as show in Figure 3. This will make it faster and easier to assemble your finished books. The photos should be arranged from first to last. For a windowed photobook, the top photo should be the photo that will show through the window on the cover of the book. The Signature Sheets should be placed with the non-adhesive side facing up, and the folded edge to the right. Endleaves also should be arranged with their fold to the right. • Check that photos are correctly sized. For best results, photo pages should be within 1/32 (.8mm) of the standard nominal dimensions. Example: for a landscape 8x10 (203x254mm)book, the 10 inch (254mm) length should be 10 inches (254mm), preferably within approximately 1/32 (.8mm) of an inch. Smaller photos will leave a larger than normal gap at the spine. Larger photos will show some white past the endleaf edges. • Photo printers are often out of adjustment and cut short. This is not desirable for Photopress books. If your printer is cutting short, please have it adjusted to cut to the correct nominal dimensions. • If your photos are already printed too small, it is still possible to use them but endleaves should be trimmed to match the photo size. 6 FASTBACK PHOTOPRESS USER’S MANUAL VI CO NTENT AS S EMBLY-DOUB LE SIGN AT URE Making a Photopress book with Double Signatures is a 3-step process. 1. Assemble and press the content. 2. Apply spine tape 3. Apply hardcover Structure of a book containing eight single-page interior photos and one front window photo. Photos Endleaf Endleaf Front Photo (appears in cover window) Adhesive Side PhotoPress™Double Signature Sheets Structure of a book containing seven single-page interior photos and no front window photo. Endleaf Non-windowed Hardcover Non-Adhesive Side Signature is reversed so adhesive side is face to face with the next signature. If your book has an odd number of photos, open endleaves as seen here. FASTBACK PHOTOPRESS USER’S MANUAL 7 VI CO NTENT AS S EMBLY-DOUB LE SIGN AT URE With Window: 1. Take the first photo from the top of the stack of photos. 2 Place it face down in the PhotoPress, justify it to the left corner. Skip this step if binding a non-windowed book. FIRST PHOTO (face down, top up) PHOTO PAPER PHOTO PAPER PHOTO PAPER PHOTO PAPER PHOTO PAPER PHOTO PAPER PHOTO PAPER PHOTO PAPER PHOTO PAPER PHOTO PAPER PHOTO PAPER PHOTO PAPER 8 PHOTO PAPER PHOTO PAPER PHOTO PAPER PHOTO PAPER PHOTO PAPER PHOTO PAPER PHOTO PAPER PHOTO PAPER PHOTO PAPER PHOTO PAPER PHOTO PAPER PHOTO PAPER PHOTO PAPER PHOTO PAPER FASTBACK PHOTOPRESS USER’S MANUAL Note that the first signature in the sequence in step 5 (opposite page) is reversed so that the adhesive side is face to face with the signature and not the platen, otherwise your book block will became stuck to the platen during binding! VI CO NTENT AS S EMBLY-DOUB LE SIGN AT URE 3. Orient the first photo and endleaf as shown. Making sure when inserting the endleaves, that the folds of the endleaves are along the binding edge (i.e., the scored edge of the Signature Sheets). PHOTO PAPER PHOTO PAPER PHOTO PAPER PHOTO PAPER PHOTO PAPER Photo Facing Down PHOTO PAPER PHOTO PAPER PHOTO PAPER PHOTO PAPER PHOTO PAPER PHOTO PAPER PHOTO PAPER PHOTO PAPER PHOTO PAPER PHOTO PAPER PHOTO PAPER PHOTO PAPER Endleaf PHOTO PAPER PHOTO PAPER PHOTO PAPER PHOTO PAPER PHOTO PAPER PHOTO PAPER PHOTO PAPER PHOTO PAPER PHOTO PAPER PHOTO PAPER PHOTO PAPER PHOTO PAPER PHOTO PAPER PHOTO PAPER PHOTO PAPER PHOTO PAPER PHOTO PAPER PHOTO PAPER PHOTO PAPER PHOTO PAPER PHOTO PAPER PHOTO PAPER PHOTO PAPER PHOTO PAPER PHOTO PAPER PHOTO PAPER PHOTO PAPER PHOTO PAPER PHOTO PAPER PHOTO PAPER PHOTO PAPER PHOTO PAPER PHOTO PAPER PHOTO PAPER PHOTO PAPER PHOTO PAPER PHOTO PAPER PHOTO PAPER PHOTO PAPER PHOTO PAPER PHOTO PAPER PHOTO PAPER PHOTO PAPER PHOTO PAPER PHOTO PAPER PHOTO PAPER PHOTO PAPER PHOTO PAPER PHOTO PAPER PHOTO PAPER PHOTO PAPER PHOTO PAPER PHOTO PAPER PHOTO PAPER PHOTO PAPER PHOTO PAPER PHOTO PAPER PHOTO PAPER PHOTO PAPER PHOTO PAPER PHOTO PAPER PHOTO PAPER PHOTO PAPER PHOTO PAPER PHOTO PAPER PHOTO PAPER PHOTO PAPER PHOTO PAPER PHOTO PAPER y PAPERe nPHOTO iv shi PHOTOesPAPER dh PAPER PHOTO PAPER -aPHOTO p n u o PHOTOn PAPER ide s PHOTO PAPER PHOTO PAPER PHOTO PAPER PHOTO PAPER PHOTO PAPER PHOTO PAPER PHOTO PAPER PHOTO PAPER PHOTO PAPER PHOTO PAPER Insert the photo and endleaf into a signature sheet with the shiny non-adhesive side of the signature facing up . If you are making a nonwindowed photobook, the shiny non-adhesive side should be facing down. See diagram at the beginning of this section. PHOTO PAPER PHOTO PAPER PHOTO PAPER HINT: Do not open the Signature sheets fully when you are inserting the photographs and endleaves. This will help you produce better results . PHOTO PAPER PHOTO PAPER PHOTO PAPER PHOTO PAPER PHOTO PAPER PHOTO PAPER PHOTO PAPER 5 . Place the Signature in the Photopress . Check that the shiny (nonadhesive) side of the signature sheet is facing up, with the fold to the right . 6 . Place your loosely assembled signature and photos into the machine, tap the photos and signature squarely against the left and bottom alignment edges of the machine . The goal is to seat photos completely into the signature fold. Visually check that the alignment of the photos and signature is good before placing the next one. The shiny (non-adhesive) side of the signature sheet should be facing up, with the fold to the right. PHOTO PAPER PHOTO PAPER PHOTO PAPER 4. PHOTO PAPER PHOTO PAPER PHOTO PAPER PHOTO PAPER PHOTO PAPER PHOTO PAPER PHOTO PAPER PHOTO PAPER PHOTO PAPER PHOTO PAPER PHOTO PAPER PHOTO PAPER PHOTO PAPER PHOTO PAPER PHOTO PAPER PHOTO PAPER FASTBACK PHOTOPRESS USER’S MANUAL 9 VI PHOTO PAPER PHOTO PAPER PHOTO PAPER PHOTO PAPER PHOTO PAPER Photo Facing Down PHOTO PAPER PHOTO PAPER PHOTO PAPER PHOTO PAPER PHOTO PAPER PHOTO PAPER PHOTO PAPER PHOTO PAPER PHOTO PAPER PHOTO PAPER PHOTO PAPER PHOTO PAPER PHOTO PAPER PHOTO PAPER PHOTO PAPER PHOTO PAPER PHOTO PAPER PHOTO PAPER PHOTO PAPER PHOTO PAPER Photo Facing Up PHOTO PAPER PHOTO PAPER PHOTO PAPER PHOTO PAPER PHOTO PAPER PHOTO PAPER PHOTO PAPER PHOTO PAPER PHOTO PAPER PHOTO PAPER PHOTO PAPER PHOTO PAPER PHOTO PAPER PHOTO PAPER PHOTO PAPER PHOTO PAPER PHOTO PAPER PHOTO PAPER PHOTO PAPER PHOTO PAPER PHOTO PAPER PHOTO PAPER PHOTO PAPER PHOTO PAPER PHOTO PAPER PHOTO PAPER PHOTO PAPER PHOTO PAPER PHOTO PAPER PHOTO PAPER PHOTO PAPER PHOTO PAPER PHOTO PAPER PHOTO PAPER PHOTO PAPER PHOTO PAPER PHOTO PAPER PHOTO PAPER PHOTO PAPER PHOTO PAPER PHOTO PAPER PHOTO PAPER y PAPERe nPHOTO iv shi PHOTOesPAPER h d PHOTO PAPER -aPHOTO p n e uPAPER o n PHOTO PAPER id s PHOTO PAPER PHOTO PAPER PHOTO PAPER PHOTO PAPER PHOTO PAPER PHOTO PAPER PHOTO PAPER PHOTO PAPER PHOTO PAPER PHOTO PAPER PHOTO PAPER PHOTO PAPER PHOTO PAPER PHOTO PAPER PHOTO PAPER PHOTO PAPER 10 Place your loosely assembled signature and photos into the machine, tap the photos and signature squarely against the left and bottom alignment edges of the machine to seat photos completely into the signature fold . PHOTO PAPER PHOTO PAPER PHOTO PAPER PHOTO PAPER PHOTO PAPER PHOTO PAPER PHOTO PAPER PHOTO PAPER PHOTO PAPER PHOTO PAPER PHOTO PAPER PHOTO PAPER PHOTO PAPER 10. Visually check that the alignment of the photos and signature is good before placing the next one. The shiny (non-adhesive) side of the signature sheet should be facing up, with the fold to the right. PHOTO PAPER PHOTO PAPER 9. PHOTO PAPER PHOTO PAPER PHOTO PAPER PHOTO PAPER PHOTO PAPER Insert photos face-to-face inside signature sheet . Note the photo from the top of your stack should be the one facing up and the next photo in the sequence should be facing down, assuming that your book is organized from first to last photo. PHOTO PAPER PHOTO PAPER PHOTO PAPER 8 . PHOTO PAPER PHOTO PAPER PHOTO PAPER PHOTO PAPER Check orientation, order of photos and face photos together. PHOTO PAPER PHOTO PAPER PHOTO PAPER 7. PHOTO PAPER PHOTO PAPER PHOTO PAPER CO NTENT AS S EMBLY-DOUB LE SIGN AT URE PHOTO PAPER PHOTO PAPER PHOTO PAPER PHOTO PAPER PHOTO PAPER PHOTO PAPER PHOTO PAPER PHOTO PAPER PHOTO PAPER PHOTO PAPER PHOTO PAPER PHOTO PAPER PHOTO PAPER PHOTO PAPER FASTBACK PHOTOPRESS USER’S MANUAL VI PHOTO PAPER PHOTO PAPER PHOTO PAPER PHOTO PAPER PHOTO PAPER PHOTO PAPER PHOTO PAPER PHOTO PAPER PHOTO PAPER PHOTO PAPER PHOTO PAPER PHOTO PAPER PHOTO PAPER PHOTO PAPER PHOTO PAPER PHOTO PAPER PHOTO PAPER PHOTO PAPER PHOTO PAPER PHOTO PAPER PHOTO PAPER PHOTO PAPER PHOTO PAPER PHOTO PAPER 11. Apply light pressure with your right hand against the fold and press firmly with you left hand fingertips to temporarily tack in place. This will ensure the book will not lose alignment during binding. PHOTO PAPER PHOTO PAPER PHOTO PAPER PHOTO PAPER PHOTO PAPER CO NTENT AS S EMBLY-DOUB LE SIGN AT URE PHOTO PAPER PHOTO PAPER PHOTO PAPER PHOTO PAPER PHOTO PAPER PHOTO PAPER PHOTO PAPER PHOTO PAPER PHOTO PAPER PHOTO PAPER PHOTO PAPER PHOTO PAPER PHOTO PAPER 12. Press down on the book block and apply pressure along the spine with one finger. Repeat steps 6 and 11 Visually check that the alignment of the photos and signature is good before placing the next one. The shiny (non-adhesive) side of the signature sheet should be facing up, with the fold to the right. until all except the last photo and endleaf are assembled and placed in the PhotoPress . 13. Orient last photo and endleaf as shown. If you have an odd number of photographs (not including a window photo) there wil be no final photo in the position. The endleaf will bind to both faces of the signature sheet . See diagram at beginning of section . Endleaf 14. Slide the final picture into the Signature Sheet face up. Slide an endleaf into the Signature Sheet on top of the photo and place the assembled Signature into the PhotoPress . Photo Facing Up FASTBACK PHOTOPRESS USER’S MANUAL 11 VI CO NTENT AS S EMBLY-DOUB LE SIGN AT URE 14. Check signature and endleaf alignment. Apply light pressure with your right hand against the fold and press firmly with you left hand fingertips. 15. Close the PhotoPress and select a size. See page 5. 16. Press the green button to begin the binding process. When the binding cycle is complete, the machine will beep and the latch will release. Note: Put unused signatures back in bag for storage. It’s important they don’t collect dirt or other foreign materials. 17. Open the machine and remove the book. The book is now ready for spine tape, and a hardcover. 12 FASTBACK PHOTOPRESS USER’S MANUAL VII CO NTENT AS S EMBLY-PANORAM IC Panoramic Book Assembly Making a Photopress book with Double Signatures is a 5-step process. PHO TO PA PHO PHO TO PA PHO PER TO PA PHO PER PHO PER TO PA PHO PER TO PA PHO PER TO PA PER TO PA PER PHO PER TO PA PHO PER TO PA PER PER TO PA PER TO PA PER TO PA PHO PER TO PA PHO PHO PHO PER TO PA PHO PER TO PA PHO PER PER TO PA PHO PER TO PA TO PA PER TO PA PHO PER TO PA PHO PHO TO PA PHO PER TO PA PHO PER TO PA PHO PHO PER TO PA PHO PER PER TO PA PHO PER TO PA PER TO PA PHO PER TO PA PHO PER TO PA TO PA PHO PER TO PA PHO PHO PER TO PA PHO TO PA PHO PER TO PA PER PHO PER TO PA PHO TO PA TO PA PHO PER PHO PER PHO PER TO PA PHO TO PA PER TO PA PHO PHO PER TO PA PHO PER TO PA PER 1. Fold the content 2. Assemble and press content 3. Apply spine tape 4. Trim leading edge 5. Applying hardcover PhotoPress™Single Signature Sheets Optional Windowed Photo Endleaf Scored Photo IMPORTANT: Before assembling a book with panoramic sheets, the photos or pages, must first be scored and folded. We recommend using the Powis Scoring Machine. Stack the photos with the last page on top (in the reverse order from Double Signature book assembly) . Folded Side Against Left Edge 1. Place the endleaf into the lower left corner of the PhotoPress with the fold against the left edge of the machine . FASTBACK PHOTOPRESS USER’S MANUAL 13 VII CO NTENT AS S EMBLY-PANORAM IC gle Sin ture na g i S PHO TO P APER TO P APER PHO PHO PHO PHO PHO PHO TO P APER PHO TO P APER TO P APER PHO TO P APER TO P APER PHO PHO TO P APER TO P APER PHO PHO PHO PHO PHO TO P APER TO P APER TO P APER PHO PHO PHO Place a scored and folded panoramic photo in the machine on top of the Single Signature sheet . PHO 4 . Make sure the fold is against the left edge of the machine . 5 . Place another PhotoPress Single Signature sheet in the PhotoPress on top of the scored and folded panoramic photo . TO P APER TO P APER PHO TO P APER TO P APER PHO TO P APER TO P APER TO P APER TO P APER PHO TO P APER TO P APER TO P APER TO P APER PHO PHO TO P APER TO P APER PHO PHO TO P APER TO P APER TO P APER TO P APER PHO TO P APER PHO PHO PHO TO P APER PHO TO P APER 3 . TO P APER PHO TO P APER TO P APER Place a PhotoPress Single Signature sheet on top of the Endleaf PHO TO P APER PHO PHO PHO TO P APER PHO 2 . PHO TO P APER TO P APER PHO PHO TO P APER TO P APER PHO Folded Side Against Left Edge PHOTO PAPER PHOTO PAPER PHOTO PAPER PHOTO PAPER PHOTO PAPER PHOTO PAPER PHOTO PAPER PHOTO PAPER PHOTO PAPER PHOTO PAPER PHOTO PAPER PHOTO PAPER PHOTO PAPER PHOTO PAPER PHOTO PAPER PHOTO PAPER PHOTO PAPER PHOTO PAPER PHOTO PAPER PHOTO PAPER PHOTO PAPER PHOTO PAPER PHOTO PAPER PHOTO PAPER PHOTO PAPER PHOTO PAPER PHOTO PAPER PHOTO PAPER PHOTO PAPER PHOTO PAPER PHOTO PAPER PHOTO PAPER PHOTO PAPER PHOTO PAPER PHOTO PAPER PHOTO PAPER PHOTO PAPER PHOTO PAPER 14 PHOTO PAPER PHOTO PAPER PHOTO PAPER PHOTO PAPER PHOTO PAPER PHOTO PAPER PHOTO PAPER PHOTO PAPER PHOTO PAPER PHOTO PAPER PHOTO PAPER PHOTO PAPER PHOTO PAPER PHOTO PAPER FASTBACK PHOTOPRESS USER’S MANUAL VII CO NTENT AS S EMBLY-PANORAM IC PHOTO PAPER PHOTO PAPER PHOTO PAPER PHOTO PAPER PHOTO PAPER PHOTO PAPER PHOTO PAPER PHOTO PAPER PHOTO PAPER PHOTO PAPER PHOTO PAPER PHOTO PAPER PHOTO PAPER PHOTO PAPER 6. Place your loosely assembled signature and photos into the machine, tap the photos and signature squarely against the left and bottom alignment edges of the machine. Visually check that the alignment of the photos and signature is good before placing the next one. 7. Check to make sure the book block is square by pushing your fingers against the spine edge and top edge of book. Repeat Step 4-7 until the last photo is placed . 8 . Place the last endleaf on top of the single Signature sheet . Optional for making a windowed photobook: Place a front window photo on top of an additional single Signature sheet . 9 . Close the PhotoPress . Check to see the correct size book is selected . PHOTO PAPER PHOTO PAPER PHOTO PAPER PHOTO PAPER PHOTO PAPER PHOTO PAPER PHOTO PAPER PHOTO PAPER PHOTO PAPER PHOTO PAPER PHOTO PAPER PHOTO PAPER PHOTO PAPER PHOTO PAPER PHOTO PAPER PHOTO PAPER PHOTO PAPER PHOTO PAPER PHOTO PAPER PHOTO PAPER PHOTO PAPER PHOTO PAPER PHOTO PAPER PHOTO PAPER PHOTO PAPER PHOTO PAPER PHOTO PAPER PHOTO PAPER PHOTO PAPER PHOTO PAPER PHOTO PAPER PHOTO PAPER PHOTO PAPER Folded Side Against Left Edge PHOTO PAPER PHOTO PAPER PHOTO PAPER PHOTO PAPER PHOTO PAPER PHOTO PAPER PHOTO PAPER PHOTO PAPER PHOTO PAPER PHOTO PAPER PHOTO PAPER PHOTO PAPER PHOTO PAPER PHOTO PAPER PHOTO PAPER PHOTO PAPER PHOTO PAPER PHOTO PAPER PHOTO PAPER PHOTO PAPER PHOTO PAPER PHOTO PAPER PHOTO PAPER PHOTO PAPER PHOTO PAPER PHOTO PAPER FASTBACK PHOTOPRESS USER’S MANUAL 15 VII CO NTENT AS S EMBLY-PANORAM IC 10 . Press the green button to begin the binding process . When the binding cycle is complete, the machine will beep quietly and the latch will release. Open the machine and remove the book block. The book is now ready for spine tape, and a hardcover. Note: Put unused signatures back in bag for storage . It’s important they don’t collect dirt or other foreign materials . 11 . Open cover and remove the book block . The book block is bound and ready for spine tape and trimming . 12. With Panoramic books, it is typically necessary only to trim the leading edge. Trim only what is necessary to get a clean edge so that the book size is retained as much as possible to match with the hardcover . Note: Adhesive from the signature may leave some residue on the cutter blade. The blade will need to be cleaned periodically. We recommend using a natural citrus based solvent for this purpose . Be careful cleaning the cutter blade as it may be extremely sharp. 16 FASTBACK PHOTOPRESS USER’S MANUAL VIII APP LYING S PINE TAP E Before a book block is cased into a Hardcover, a Spine Tape is added to strengthen the bind and extend the book’s life. Applying the Spine Tape 1. 1/2” (6mm) Cut approximately 1/2” off one end of the Spine Tape. Skip this step if the book will be without headbands — (see next section). (headbands only) 2. Peel off the release paper from the back of the Spine Tape. Place the Spine Tape along one edge of the book so that when the tape is completely attached, it will wrap evenly around the spine and press down. The Tape is offset by about 1/4” (12mm) from edges of book. 3. Turn the book over, so that the Spine Tape is on the table, with the adhesive side facing up. Tilt the book up while applying downward pressure on the spine edge. 4. Carefully press the rest of the Spine Tape to the back panel of the book. FASTBACK PHOTOPRESS USER’S MANUAL 17 APP LYING HEAD BAND S IX Before a book block is cased into a Hardcover, a headband is added to each end for a beautiful finishing touch Applying Headbands 1/4” (6mm) 1. For books with headbands, it is preferable that the spine tape is 1/4” (6mm) off set from the edges. In this way a portion of the headband contacts directly with the edges of the signature sheets. This will ensure a smooth hinging action for the finished book. 2. Cut the self adhesive headband at an approximate 45˚ angle. 3. Place it against the book block to measure and determine width of headband before cutting the other side at an angle. 4. Peel back the release liner and apply. Rub firmly into place. 1/4” (6mm) Note: Use “Photopress headbands”. Regular headbands are too thick to use with Photopress books. Photopress headbands are specifically made with a light weight and strong weave which will not interfere with the book’s hinging action. 18 FASTBACK PHOTOPRESS USER’S MANUAL AD D ING THE COVER X Powis Parker offers PhotoPress™ Photobook covers in a wide range of sizes, colors and finishes. Contact your Powis sales rep for more information. With the addition of our Foilfast printer, you can apply colorful foil printed titles and artwork to your covers and spines. FIGURE 01 PhotoPress Photobook Hardcovers™ come in two styles: windowed and windowless. The window allows the picture on the first page of the book block to act as a design element for the cover. For more detailed information on using the Fastback Hardcover Guide, see the Fastback Hardcover™ Guide User’s Manual. Once the book block is bound, assembling your hard cover book can be done quickly and accurately: FIGURE FIGURE 1. Measure the bound book block with the Book Width Gauge on the lower right side of the Hardcover Guide to determine the proper cover width. If the book width is C or greater, you may use the green plastic inserts to ensure that the book block does not shift during binding (Figure 01). 2. Place an empty PhotoPress Photobook Hardcover, adhesive side up, in the Hardcover Guide with the window on the left, and clamp in place. The top and right edges of the cover should be under the translucent green stops. Remove the narrow release paper from the right panel (back) of the Fastback Hardcover, exposing a small portion of the super-strong binding adhesive that coats the interior hard covers. (Figure 02). 02 03 3. Set your bound book block in place against the Guide’s translucent green stops and press down to fasten the book block to the narrow adhesive area (Figure 03). The window on the book block and the window on the cover should be aligned and evenly positioned within the cover. FIGURE 04 4. Carefully lift the right side of the book block and remove the large release paper from the right panel of the cover (Figure 04). Roll and lower the book block onto the panel and press it against the panel to secure it. 5. FIGURE 05 Remove the remaining release papers from the left side, (Figure 05), and bring the left panel of the Hardcover over the book block and align, with the top and right edges of the cover abutting the purple stops (Figure 06). Press straight down onto the text block and smooth the cover to the spine. Remove the book from Guide. Open and rub the endleaves to ensure that they are securely fastened. TIP: Some people find that they get better registration if they clamp the windowed panel of the Hardcover on the right, and then build the book face down. FIGURE 06 FASTBACK PHOTOPRESS USER’S MANUAL 19 XI CO NTENT AS S EMBLY-F LATBOOK A Flatbook resembles the stiff-paged board books that are popular for children’s books and cookbooks . Making Flatbooks is a 4-step process . 1. A book block is made in the same way as the Panoramic photobook. 2. A cover is scored an folded 3. Pressing the cover to the book block 4. Trim the Book PhotoPress™Single Signature Sheets Endleaf Folded Pages Cover Board IMPORTANT: Before assembling a Flatbook, the pages first must be folded. Scoring the pages prior to folding will give the best results. We recommend using the Powis Scoring Machine. Fold and score your sheets as firmly and evenly as possible. A folding bone is a helpful tool for doing this and can be purchased at any graphic arts supplies store . Flatbook Contents Assembly Assemble the book block the same way as the Panoramic Photobook. Cover board may be added to the first and last positions of the book to give the finished book cover added stiffness . See diagram above . Note: Powis Comp Cover material is a good choice for a making a book with medium stiffness. 20 FASTBACK PHOTOPRESS USER’S MANUAL CO NTENT AS S EMBLY-F LATBOOK XI Scoring Flatbook Cover Flatbook pages must be scored before binding. We recommend using the Powis Scoring Machine for this purpose, which will help you score your pages easily and accurately. The Scoring Machine comes with either a single score die, or a double score die. For Flatbook page scoring, you will need the single score die. Third Fold Second Fold First Fold Three scores are necessary for a flatbook cover. Two for the spine and the third for a hinge. 1. Place your bound book block between the Book Thickness Rings. Push the two rings together (A) and tighten the Book Thickness Locking Knob (B). Remove your book block. Slide a Flatbook Cover under the clear scoring die. Looking down through the top of the clear die, align the spine title or center marks with the scoring blade in the center of the die. Once it is centered, push the Lever to the right to clamp the cover in postion. Move the Paper Alignment Guide under the cover so that the orange ‘X’ on the Alignment Guide is bisected by the edge of the cover and tighten the Alignment Stop screw. 2. Release the Lever and move the cover to the first stop (marked ‘1’ on the Guide). Push the Lever to the left to make the first score. 3. Move the cover to the second stop on the Guide (marked ‘2’ on the Guide), and again push the Lever to the left to score. 4. Move the cover to the third stop on the Guide (marked ‘3’ on the Guide), and again push the Lever to the left to score. FASTBACK PHOTOPRESS USER’S MANUAL 21 CO NTENT AS S EMBLY-F LATB OOK XI Pressing the Cover to the Book Block Book cover is attached to the book block by two Single Signature Sheets to the front and the back . Note that the Signature attaching the back portion of the cover needs to be offset from the spine to provide relief for when the book is opened. Third Fold Second Fold First Fold Single Signature 1 . Place a Sheet of Single Signature to the back of the back cover aligning it to the third fold . 2 . Press down to temporarily hold in position. 3 . Insert the book block into the scored cover . Insert an additional Signature for the front . 4 . Place into machine and bind . First Fold (Front of Spine) Second Fold (Back of Spine) Third Fold [3/8” (9.53mm) From Back of Spine] 22 FASTBACK PHOTOPRESS USER’S MANUAL CO NTENT AS S EMBLY-F LATB OOK XI Trim Book and Round Corners 5. Trim the finished book to the desired size. Note: Adhesive from the signature may leave some residue on the cutter blade. The blade will need to be cleaned periodically. We recommend using natural citrus based solvent for this purpose . Be careful cleaning the blades as they are typically extremely sharp. HINT: Sharp corners on a Flatbook are easily damaged. For this reason, we recommend rounding the corners on the finished Flatbook after trimming (see below). Inexpensive corner rounders are available at most stationery stores . FASTBACK PHOTOPRESS USER’S MANUAL 23 XII CO NTENT AS S EMBLY-ACCORD IO N Accordion books have no spine and open up in concertina fashion. They are popular items for displaying several pictures at the same time. They are no more difficult, technically, to make than standard photo books, but they do require a little more care and attention during assembly. Before you begin, familiarize yourself with the diagrams below to make sure that you understand the assembly pattern that you’ll need to use to create your accordion book. It may look confusing at first, but once you start making them, you’ll find that it is not that difficult. Making an accordian book is a 2 step process. 1. Assemble and press the content. 2. Apply Hardcovers PhotoPress™ Signature Sheets (Double) Photos Accordion Cover Back Accordion Cover Front (with window) Accordion Book Assembly Pattern, with windowed front cover. Front Window Photo Photos Accordion Cover Front (no window) PhotoPress™Signature Sheet (Double) non-adhesive side to the left. 24 FASTBACK PHOTOPRESS USER’S MANUAL PhotoPress™Signature Sheet (Double) non-adhesive side to the left. Accordion Cover Back Accordion Book Assembly Pattern, no window. CO NTENT AS S EMBLY-ACCORDI O N XII Accordion Book Assembly 1. Arrange the photographs in the order that you want them to appear. You should have two piles. One set of photographs (Set #1) will appear on one side of the Accordion Book and the other set of photographs (Set #2) will appear on the opposite side of the book. IMPORTANT: Before starting, make sure that you have the correct number of photographs needed to finish a book. For a windowed cover, you will need an odd number of photos. For a non-windowed cover, you will need an even number of photos . FIRST PHOTO (face down, top up) 2. Place first picture face down in the PhotoPress. This is the photo that will appear in the window on the front of the book. PHOTO PAPER PHOTO PAPER PHOTO PAPER PHOTO PAPER PHOTO PAPER PHOTO PAPER PHOTO PAPER PHOTO PAPER PHOTO PAPER PHOTO PAPER PHOTO PAPER PHOTO PAPER PHOTO PAPER PHOTO PAPER PHOTO PAPER PHOTO PAPER PHOTO PAPER PHOTO PAPER PHOTO PAPER PHOTO PAPER PHOTO PAPER PHOTO PAPER PHOTO PAPER PHOTO PAPER PHOTO PAPER Photo Facing Down PHOTO PAPER PHOTO PAPER PHOTO PAPER PHOTO PAPER PHOTO PAPER PHOTO PAPER PHOTO PAPER PHOTO PAPER PHOTO PAPER PHOTO PAPER PHOTO PAPER PHOTO PAPER PHOTO PAPER PHOTO PAPER PHOTO PAPER PHOTO PAPER PHOTO PAPER PHOTO PAPER PHOTO PAPER PHOTO PAPER PHOTO PAPER PHOTO PAPER Photo Facing UpPHOTO PAPER PHOTO PAPER PHOTO PAPER PHOTO PAPER PHOTO PAPER PHOTO PAPER PHOTO PAPER PHOTO PAPER PHOTO PAPER PHOTO PAPER PHOTO PAPER PHOTO PAPER PHOTO PAPER PHOTO PAPER PHOTO PAPER PHOTO PAPER PHOTO PAPER PHOTO PAPER PHOTO PAPER PHOTO PAPER PHOTO PAPER PHOTO PAPER PHOTO PAPER PHOTO PAPER PHOTO PAPER PHOTO PAPER PHOTO PAPER PHOTO PAPER PHOTO PAPER PHOTO PAPER PHOTO PAPER PHOTO PAPER PHOTO PAPER PHOTO PAPER PHOTO PAPER PHOTO PAPER NOTE: If there is no front picture on your book (i.e., non-windowed cover), then place the first Signature sheet in the PhotoPress with the non-adhesive panel facing down. If there is a front picture, then place the Signature sheet on top of the first photo with the non-adhesive side facing up. In both cases, all following Signature sheets should be placed non-adhesive side face up . PHOTO PAPER PHOTO PAPER PHOTO PAPER PHOTO PAPER PHOTO PAPER 3. Slide the first two photos from Set #1 facing each other into the first Signature sheet. Place the Signature sheet in the PhotoPress (see Note) . The folded edge of this Signature sheet should be on the right. Tap the Signature on the right and top edges to ensure that it is completely seated in the PhotoPress . 4. Place the next Signature sheet in the PhotoPress, with the folded edge on the left. Slide two photos from Set #2 facing each other into the Signature sheet . Tap the Signature on the right and top edges to ensure that it is completely seated in the PhotoPress . PHOTO PAPER PHOTO PAPER PHOTO PAPER PHOTO PAPER PHOTO PAPER PHOTO PAPER PHOTO PAPER PHOTO PAPER PHOTO PAPER PHOTO PAPER PHOTO PAPER PHOTO PAPER PHOTO PHOTO PAPER ER PAPER R AP PHOTO PAPER PE PHOTO PAPER OP PAPAPER ER PHOTO ER P O R AP PHOTO PAPER PA PE OT R P P A E PHOTO H O PAPER O PHOTO P PAPER AP OT OP OT ER R OP PH OT R PEPHOTO PAPER AP PH OT PE PH PA ER OP R PA PH AP TO PE OT ER R TO PA OP PE AP PH HO R O T P A P E O P H O R P O P R OT PE PA PH TO OT R PE R PH PA PE TO PA PE PH HO R O A P A O E O T P P R P O PH OT PE PA TO ER TO PH R PA PH AP ER TO HO HO PE P O P P O A R T AP O O ER PE PH R OP OP OT PA PH AP R PE OT R OT PH PE PA OP TO PE PH R PH PA R OT TO PA HO PE E O H P O R A O T P P E R O R PH PA OT OP AP PE PE PH PH TO OT R R PA PA OP E E O H T P O P P O R O A R E R PH PA OT OT PE PH PE AP OP PH TO PH PA PA R O OT OP ER E O T O P H H P P P O R R OT PA OT PA PE PE ER PH PH PH TO R TO PA PA AP R E O P O E P O O P PH R PH PA TO OT OT PA R ER PE PH TO PH HO PE AP TO PA P A O P R O R P E O E O P PH PH OT TO AP PA OT ER ER R PH HO AP PH OP AP TO PE P P T P O A R R O O O E E PH OP PH OT AP R AP OT ER R OT PE PH PH AP OP OP PE PH PA R PA OT OT R OP E O E T H H O T P P P P R T O R A O E O PA PE PH PH AP OP PH PA TO R OT ER OP O E O P T H P T H R A P O A P E O ER AP OP PH PH OP AP OT R OP OT OP PE PH OT PH R R OT PA PE PH PE PH PA TO PA R O O E O PH OT AP OT PH PH OP OT ER PH AP ER AP OP P T O ER O AP PH OT ER AP OP PH OT OP PH OT PH T HO FASTBACK PHOTOPRESS USER’S MANUAL 25 XII CO NTENT AS S EMBLY-ACCORDIO N 5. Continue with steps #3 & #4 until all the photos are inserted into Signature sheets. Every Signature sheet should have two photos in it. The final Signature Sheet must be non-adhesive side facing up. PhotoPress™ Signature Sheet Scored edge on the left. 6. Close the PhotoPress and press the green button to begin the binding process. Applying Book Block to Front and Back Hardcover Accordion hardcover comes in 2 pieces — front and back. 7. 26 FASTBACK PHOTOPRESS USER’S MANUAL Using the Powis Hardcover Guide. Apply the front and back hardcovers same technique as in Chapter X (page 19). TIP S & TECHNIQU ES XIII PhotoPress binder • If you are binding thick or thin books, you may want to adjust the platen height. To set the platen height, open the PhotoPress, then press and hold the UNLOCK/MOVE button. When the platen reaches the desired height, release the button. Photo Prints • Humidity, light, and heat are the enemies of all photographs. Whenever possible, keep your photo albums in a cool and dry environment. 75º F (24º C) or below with a relative humidity between 30–50% is recommended. • In humid environments, the pages of the photo albums may develop waviness. This will disappear when the humidity falls below 50%. • In very humid environments, as with many photo albums, photos may stick together during storage. It is recommended that you separate the photos by interleaving the pages with sheets of paper. FASTBACK PHOTOPRESS USER’S MANUAL 27 XIV S P E CIF ICATION S Power Requirements: PHP: 120V (110-125 VAC) 50-60 Hz, 2.5A PHPE: 230V (220-240 VAC) 50-60 Hz, 2.5A PHPJ: 100V (90-110 VAC) 50-60 Hz, 2.5A Recommended Operating Temperature and Humidity: 15 to 35 degrees (C), 59 to 95 degrees (F) Humidity Range: 5 to 80% RH noncondensing Maximum Weight: <198 lbs. ( 90 kg) Dimensions: 23.5” W x 22.5” H x 19.6” D (597mm x 572mm x 498mm) Bind Capacity: up to 1.00” (up to 25.4 mm) Bind Time: 45-90 seconds Regulatory Approvals UL, CUL , CE Copyright Information Copyright © Powis Parker Incorporated 2009 All Rights Reser ved. Warranty One (1) Year from date of purchase. The information contained in this document is subject to change without notice. PPI makes no warranty of any kind with respect to this information. PPI specifically disclaims the implied warranty of merchantability and fitness for a par ticular purpose. PPI shall not be liable for any direct, indirect, incidental, consequential, or other damage alleged in connection with the furnishing or use of this information. N otice Changes are periodically made to this document. Revisions, changes, any technical inaccuracies, and typographical errors will be corrected in any subsequent editions. 28 FASTBACK PHOTOPRESS USER’S MANUAL XV F CC N OT ICE • Modifications made to the product, unless expressly approved by Powis Parker, could void the user’s authority to operate the equipment. Note: This equipment has been tested and found to comply with the limits for a Class B digital device, pursuant to Par t 15 of the FCC Rules. These limits are designed to provide reasonable protection against harmful interference in a residential installation. This equipment generates, uses, and can radiate radio frequency energy and, if not installed and used in accordance with the instruction, may cause harmful interference to radio communications. However, there is no guarantee that interference will not occur in a par ticular installation. If this equipment does cause harmful interference to radio or television reception, which can be determined by turning the equipment off and on, the user is encouraged to tr y and correct the interference by one or more of the following measures: • • • • Reorient or locate the receiving antenna. Increase the separation between the equipment and receiver. Connect the equipment into an outlet on a circuit from that to which the receiver is connected. Consult the dealer or an experienced radio/TV technician for help. DECLARATION OF CONFORMITY We, Powis Parker, Incorporated 775 Heinz Avenue Berkeley, CA 94710 U.S.A 1-800-321-2463 declare under our sole responsibility that the product Fastback ® PhotoPress complies with Par t 15 of FCC Rules. Operation is subject to the following two conditions: (1) this device may not cause harmful interference, and (2) this device must accept any interference received, including interference that may cause undesired operation. • Binder does not contain any user ser viceable par ts. Return unit to an authorized Powis Parker representative for repair or ser vice. POWIS PARKER PART NUMBERS FOR YOUR REFERENCE: FASTBACK PHOTOPRESS USER’S MANUAL POWER CORD (DOMESTIC) POWER CORD (INTERNATIONAL) ASSEMBLY STAND FASTBACK PHOTOPRESS USER’S MANUAL 29