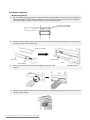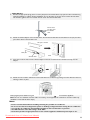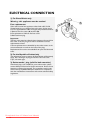
1
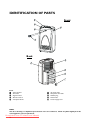
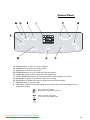
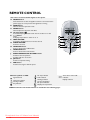
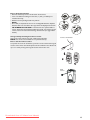
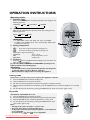
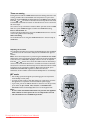
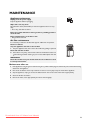
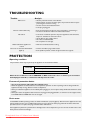
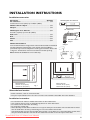
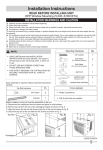
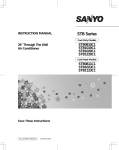
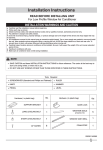
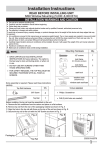
INSTRUCTIONS FOR USE
PORTABLE AIR CONDITIONER WITH GREEN
GAS
PREPARATION BEFORE USE
SAFETY PRECAUTIONS
INTRODUCTION
IDENTIFICATION OF PARTS
REMOTE CONTROL
OPERATION INSTRUCTIONS
MAINTENANCE
TROUBLESHOOTING
PROTECTION
INSTALLATION INSTRUCTIONS
ELECTRICAL CONNECTION
This appliance is marked according to the European directive 2002/96/EC on Waste Electrical and
Electronic Equipment (WEEE).
By ensuring this product is disposed of correctly, you will help prevent potential negative
consequences for the environment and human health, which could otherwise be caused by
inappropriate waste handling of this product.
The symbol
on the product, or on the documents accompanying the product, indicates that
this appliance may not be treated as household waste. Instead it shall be handed over to the
applicable collection point for the recycling of electrical and electronic equipment.
Disposal must be carried out in accordance with local environmental regulations for waste
disposal.
For more detailed information about treatment, recovery and recycling of this product, please
contact your local city office, your household waste disposal service or the shop where you
purchased the product.
Downloaded from AC-Manual.com Manuals
19
PREPARATION BEFORE USE
Before using the air conditioner, be sure to check and preset the following.
• Remote Control presetting
The remote control is NOT preset as Cooling Only Air Conditioner or Cooling Air Conditoner with Electric Heater
by manufacturer.
Each time the remote control batteries are replaced, the Cooling indicator
and Heating indicator
will flash
alternately on the remote control LCD.
The user can preset the remote control depending on the type of air conditioner purchased:
when
flashes, press any button to set Cooling Air Conditioner with Electric Heater;
when
flashes, press any button to set Cooling Only.
If you don’t press any button within 12 seconds, the remote control will be automatically preset as Cooling Air
Conditoner with Electric Heater (6th Sense mode).
SAFETY PRECAUTIONS
Be sure not to do the following.
• Do not direct the cool air at yourself for long period of time, this may harm
your health. Deflect the air flow around the entire room.
• Do not direct the air flow towards gas burners and stoves.
• Do not touch the operation buttons when your hands are wet.
Pay attention to such a situation.
• Do not repair the appliance by yourself. Mistakes may result in electric
shock etc..
Be sure to follow this instruction.
• Do not put any objects on the outdoor unit.
Earthing is essential.
• It is the user’s responsibility to have the appliance earthed according to
local laws by a qualified technician.
Warning: Incorrect handling could cause a serious hazard, such as
death, serious injury, etc.
• Connect to the correct power supply as specified on the rating plate and
do not use extension cables which could generate a serious fault or
hazard, or cause a fire to break out.
• Keep the power supply circuit breaker or plug clean. Make sure the power
cable is plugged in securely and correctly as insufficient contact could
cause electric shock or fire.
• Do not try to disconnect the circuit breaker or pull the plug out to turn
the appliance off. This may cause a fire due to sparks, etc.
• Do not twist, pull or press the power cable as this may damage the cable
and result in electric shock or fire.
• Do not insert sticks or similar objects into the appliance as this could cause
injury when the fan rotates at high speed.
• In the event of a fault, switch the appliance off using the remote control
before disconnecting it from the power supply.
Downloaded from AC-Manual.com Manuals
20
INTRODUCTION
Thank you for choosing this portable air conditioner. It will provide you and your family with all the Home Comfort
requirements you may need for your home, cottage or office. The appliance can easily be moved from room to room and
set up in just a few minutes.
It is a multi-functional room air exchanging, air-processing appliance, designed to offer you the functions of:
Air Conditioning, Dehumidifying, Heating and Independent Fan.
This manual will provide you with valuable information necessary for the proper care and maintenance of your new
appliance. Please take a few moments and read the instructions thoroughly. If properly maintained, your appliance will
give you many years of trouble free operation.
Electrical Specifications
1. All wiring must comply with local and national electrical standards and be installed by a qualified electrician. If you
have any questions regarding the following instructions, contact a qualified electrician.
2. Check the available power supply and rectify any wiring problems before installation and operation of this unit.
3. For your safety and protection, this appliance is earthed through the plug on the power cable when plugged into a
matching socket. If you are not sure if the sockets in your home are properly earthed, consult an electrician. Do not
use the appliance with adapters or extension cables.
If an extension cable is required, use only heavy appliance extension cables (available in most local hardware shops).
Downloaded from AC-Manual.com Manuals
21
IDENTIFICATION OF PARTS
Front
Back
Front
1 - Control panel
2 - Air outlet
3 - Signal receiver
4 - Remote control
5 - Transport handle
Back
6 - Air outlet hose
7 - Evaporator air intake
8 - Rubber plug
9 - Drain Hose
J - Power supply cord
NOTE:
The above drawing is a simplified representation of the air conditioner, which may differ slightly from the
actual appliance you have purchased.
Downloaded from AC-Manual.com Manuals
22
Control Panel
A - ON/OFF button: to start or stop the appliance
B - MODE button: to select the operation mode
C - FAN button: to select the fan speed
D - TIMER ON button: to set or cancel the Timer On function
E - TIMER OFF button: to set or cancel the Timer Off function
F - TEMP./TIMER setting buttons: to select temperature, adjust real time or set time
G - RUN indicator (green): lit up when the appliance is running
H - WATER FULL indicator (red): lights up when water needs to be drained
I - HEATER button: to heat the room
J - LCD display: identical to the LCD display on the remote control with the exception of the
temperature display.
Room temperature display
Flashes when temperature is being set
Used to regulate temperature
in 6th sense mode or DRY mode
Downloaded from AC-Manual.com Manuals
23
REMOTE CONTROL
The remote control transmits signals to the system.
A. ON/OFF button
Press this button to start the appliance when it is connected to the
power supply or to stop it when the appliance is running.
B. MODE button
Used to select the operation mode.
C. SWING button
Used to adjust the direction of air flow.
D. 6th Sense button
To enable fuzzy logic function when the unit is either on or off.
E.
button
To display temperature in either °C or °F
F. LOCK BUTTON
To enable or disable buttons on remote control.
G. CLOCK BUTTON
To view or set time.
H. TIMER OFF button
To set or cancel Timer Off function.
I. TIMER ON button
To set or cancel Timer On function.
J. ROOM TEMPERATURE SETTING buttons
To select room temperature.
To adjust real time or set time.
K. JET button
To start or stop fast cooling.
L. FAN button
To select auto, high or low fan speed.
Indication symbols on LCD:
Signal transmit
6th Sense indicator
Cooling indicator
Dry indicator
B
K
D
L
A
I
C
H
E
G
F
Fan only indicator
Lock indicator
Heating indicator
Jet control indicator
Fan speed indicator
Display set temperature
NOTE: Each mode and relevant function is described in the following pages.
Downloaded from AC-Manual.com Manuals
24
J
Timer On or Timer Off
indicator
Display real time
How to insert the batteries
• Remove the battery cover in the direction of the arrow.
• Insert new batteries making sure that the (+) and (-) of battery are
matched correctly.
• Refit the cover by sliding it back into position.
NOTE:
• Use 2 AA (1.5 V) batteries. Do not use rechargeable batteries. Replace
batteries with new ones of the same type when the display becomes dim.
TO BE DONE BY THE USER - If the batteries are replaced within 1
minute, all remote control settings will be preserved. To reset the remote
control, wait 3 minutes before inserting new batteries (see page 20 for
details).
Storage and tips for using the remote control
The remote control can be stored in a wall-mounted holder.
NOTE: The remote control holder is an optional accessory.
Remote control holder
How to use the remote control
To operate the room air conditioner, point the remote control at the signal
receiver. The remote control will operate the air conditioner at a distance of
up to 7 m when pointing at the signal receiver of the indoor unit.
Signal
receiver
Downloaded from AC-Manual.com Manuals
25
OPERATION INSTRUCTIONS
Operating modes
1. Selecting mode
Each time the MODE button is pressed, operating mode changes in the
following sequence:
COOLING
DRY
FAN ONLY
HEATER
2. “FAN” mode
Each time the “FAN” button is pressed, the fan speed changes in the
following sequence:
AUTO
HIGH
LOW
IMPORTANT:
• In “FAN ONLY” mode, only “High” and “Low” are available.
• In “DRY” mode, airflow is set at “Low” automatically, “FAN” button
is ineffective in this case.
3
1
2
4
3. Setting temperature
Press once to raise temperature setting by 1°C
Press once to lower temperature setting by 1°C
Temperature range for presetting:
COOLING
18°C ~ 32°C
DRY
room temperature ± 2°C
FAN ONLY
unable to set
4. Turning on
Press the
button. The RUN indicator will light up on the indoor unit
when the signal is received.
Jet, 6th sense, DRY, TIMER ON and TIMER OFF operating modes
will be specified in the following pages.
IMPORTANT:
• The unit will often not respond immediately when operating mode
is changed during operation. Wait for 3 minutes.
• Allow 3 minutes to elapse before restarting the appliance.
Cooling mode
If you want to cool the room, you can operate the appliance as follows:
1. Press the MODE button and select cooling mode.
2. Press the FAN button to select the fan speed.
3. You also can set the appropriate temperature by using the temperature button.
4. When the above steps have been completed, press the ON/OFF button to make the appliance run in cooling
mode.
5. You can adjust the fan direction by pressing the SWING button; press once to start, again to stop.
Dry mode
This function dehumidifies the room.
1. Press the MODE button and select dry mode.
2. You can set the appropriate temperature by using the temperature button.
3. Press the ON/OFF button to make the appliance run in dry mode.
4. You can adjust the fan direction by pressing the SWING button; press
once to start, again to stop.
Note:
• The dry mode cannot be used to cool the room.
• A hot air outlet hose is required in Dry mode.
• In dry mode, fan speed is preset by the appliance, so the fan button
is not applicable.
• In heater mode,
and
are not applicable.
Downloaded from AC-Manual.com Manuals
26
1
Heater mode
1. Press the MODE button and select heater mode.
2. You can set TIMER ON or TIMER OFF in heating mode.
Additional instructions
1. If you select cooling or dry mode while the appliance is in another mode, the compressor will be delay-protected.
Wait for 3~5 minutes, after which the appliance will run again. Do not press any button during the waiting time,
or the appliance will re-count the protection time.
2. In Cool or Dry mode the compressor and fan will stop when the room temperature reaches the set temperature.
6th Sense mode
Pressing the 6th Sense button enables fuzzy logic function with the unit either on or off. In this mode, temperature and
fan speed are set automatically depending on the actual room temperature.
Pressing the FAN button in 6th Sense mode when the appliance is in cooling mode will change fan speed in the following
sequence: Auto - High - Low. In dry mode, the LCD display will appear as shown in the figure on the right although only
Auto-speed will be enabled.
Operation mode and temperature are determined by indoor temperature
Indoor temperature
Operation
mode
Target temperature
23°C or below
DRY
Room temperature decreases 1.5°C after
operating for 3 minutes
Over 23
COOLING
23°C
Important: 6th Sense button is ineffective in JET mode.
Note: Temperature, airflow and direction are controlled automatically in 6th Sense mode. However, a
decrease or increase of up to 2°C can be set with the remote control or control panel if you still feel
uncomfortable.
A decrease or increase of up to 2°C can be set in 6th Sense mode
Your feeling
Slightly warmer
A decrease up to 2°C can be set
Slightly cooler
A rise up to 2°C can be set
Uncomfortable because of unsuitable air flow
volume.
Uncomfortable because of unsuitable flow
direction.
Button
Adjustment procedure
Press once to lower the set temp by 1°C
Press twice to lower the set temp by 2°C
Press once to raise the set temp by 1°C
Press twice to raise the set temp by 2°C
Indoor fan speed switches from High to Low
each time the button is pressed.
Press once to alter the position of the vertical
louver and change the direction of airflow.
Note: There is no swing button on the
control panel. Pressing the FAN button for
3 seconds will enable the swing function on
the control panel. Press the FAN button
again for 3 seconds to cancel this function.
Downloaded from AC-Manual.com Manuals
27
Timer on setting
Setting the timer with the TIMER ON function when leaving the house in the
morning is ideal to find a comfortable room temperature on your return.
When you press TIMER ON, the ON indicator and 12:00 flash on the display.
Press the
or , to increase or decrease the set time by 10 minutes. Press
and hold for 1.5 seconds to increase or decrease the set time in continuous
10 minute steps.
Time can be set up to 24 hours in advance. When you have set the "TIMER
ON" time, press TIMER ON again to confirm the TIMER ON setting.
How to cancel timer on
To cancel the timer ON setting, press the TIMER ON button for 3 seconds,
or the setting will be active every day.
Timer off setting
Timer Off function is set using the TIMER OFF button in the same way as
TIMER ON.
Adjusting the real time
You can adjust the real time by pressing the CLOCK button. Use the
and
buttons to set the correct time and press the CLOCK button again to
confirm.
Note: Time can be adjusted in any mode using the TIMER ON and TIMER
OFF buttons on the control panel. Press the Timer On and Timer Off button
at the same time, 12:00 will be displayed, and then time can be adjusted.
Press the
or
button once, the set time will increase or decrease by 1
minute. Press and hold the button for 1.5 seconds to increase or decrease
the set time in continuous 10 minute steps. Time is based on a 24-hour clock
and can be set up to 24 hours in advance. After setting the clock, press
TIMER ON and TIMER OFF together to confirm the time set.
Otherwise, the time will be confirmed automatically after a 5 second delay.
JET mode
• Fast cooling operates at high fan speed, changing the set temperature
automatically to 18°C (64 F).
• Jet mode is used to start or stop fast cooling. Jet mode can be set when
the appliance is in operation or connected to the power supply.
• In Jet mode, you can set airflow direction or the timer. To exit Jet mode,
press either the JET, MODE, FAN, ON/OFF or TEMPERATURE
SETTING buttons and the display with return to the original mode.
Note:
• If none of the aforementioned buttons are pressed, the appliance
with continue to run in Jet mode at a set temperature of 18°C.
• 6th sense button is not available in Jet mode.
Downloaded from AC-Manual.com Manuals
28
MAINTENANCE
Appliance maintenance
Unplug from the power supply
Stop the appliance before unplugging.
Wipe with a soft, dry cloth
Use lukewarm water (below 40°C) to clean the appliance when it is very
dirty.
• Use a dry, soft cloth to clean it.
Never use volatile substances such as gasoline or polishing powder to
clean the unit.
Never sprinkle water on the indoor unit
• Danger! Electric shock!
Air filter maintenance
It is necessary to clean the air filter after approx. 100 hours of operation.
Clean it as follows:
Stop the appliance and remove the air filter
1. Stop the appliance first, then remove the air filter by pulling it upwards.
Clean and refit the air filter
2. If the filter is very dirty, clean it with a solution of lukewarm water and
neutral detergent. After cleaning, dry it in a cool, shaded place then refit
it.
IMPORTANT:
Clean the air filter every two weeks when the air conditioner is used
in a dusty environment.
Maintenance after use
1. If the appliance is not going to be used for a long time, pull the rubber plug out of the drain port to drain all remaining
water from the appliance.
2. Run the air conditioner in fan only mode for 12 hours on a sunny day to dry the inside of the appliance.
3. Stop the appliance, unplug it, remove the batteries from the remote control then store appropriately.
4. Clean the air filter and refit it.
5. Remove air hoses, store appropriately and cover the hole tightly.
Downloaded from AC-Manual.com Manuals
29
TROUBLESHOOTING
Trouble
Analysis
• Has the protection device or fuse blown?
• Please wait for 3 minutes and start again, the protection device may be
preventing the unit from running.
• Are the remote control batteries low?
• Is the plug unplugged?
Will not run
Runs for a short while only
• If the set temperature is close to room temperature, try lowering it.
• Are the air conditioner intakes and outlets obstructed?
• Is the door or window open? Are any other appliances such as heaters,
lamps etc. switched on at the same time?
• The air filter is dirty, please clean it.
• Air outlet or intake blocked.
• Set temperature is too high.
No cool air
Water leaks when appliance is
moved
Does not run and water full indicator
lights up
• Drain the condensate before moving.
• Pull out the rubber plug to drain water.
• If the problem persists, contact an approved service engineer.
PROTECTION
Operating condition
The protective device may trip and stop the appliance in the cases listed below.
COOLING
DRY
Outdoor air temperature above 43°C
Room temperature below 18°C
Room temperature below 18°C
When the air conditioner is run in "COOLING" or "DRY" mode with a door or window open and relative
humidity higher than 80%, condensation will drip from the outlet.
Features of protection device
• The protection device will work in the following cases:
- When the appliance is restarted after an interruption to operation or when operating mode is changed with the
appliance already running, allow 3 minutes to elapse first.
- When you switch the appliance on immediately after plugging it in, there may be a delay of 20 seconds before it starts
running.
- When you restart the appliance after it has been unplugged and plugged back in, it will return to the original mode,
and TIMER ON and TIMER OFF must be set again.
Drain water
In COOLING or DRY operating modes, the water full indicator (red) may light up. Disconnect the appliance from the
power supply and move it to a suitable place where you can pull out the water plug and drain the water. After this
operation, be sure to replace the plug, otherwise water will leak out.
If the appliance is placed in a position where drainage water can be disposed of, you can connect the drain tube to the
drain port for continuous drainage.
Downloaded from AC-Manual.com Manuals
30
INSTALLATION INSTRUCTIONS
Installation accessories
Description
Quantity
Air outlet hose ............................................................................. 1/set
stretches from 17 3/4”(45cm) up to 70 4/5”(180cm)
Window/patio door slider kit
Window exhaust adapter........................................................... 1/set
Adapter......................................................................................... 1/set
Air outlet hose
Window/patio door slider kit..................................................... 3/set
from 28 1/3”(72cm) up to 55 1/8”(140cm)
Rain cover..................................................................................... 1/set
Bolt ................................................................................................ 2/set
Gasket ........................................................................................... 2/set
Nut................................................................................................. 2/set
Window exhaust
adapter
Window kit installation
Your window kit has been designed to fit most standard vertical and horizontal
window applications. Nevertheless, some aspects of these installation
procedures may need to be adapted for certain types of windows. Please refer
to Figures 1 & 2 below for minimum and maximum window openings.
Adapter
Rain cover
Note: Window kit available for some models only.
Bolt
Window slider kit
minimum: 28 1/3”(72cm)
maximum:55 1/8”(140cm)
Fig. 1
Gasket
Window slider kit
minimum: 28 1/3”(72cm)
maximum:55 1/8”(140cm)
Nut
Fig. 2
Select the best location
• Beside a window, a door or a French window.
• Keep the required distance from the return air outlet to the wall and at least 50cm from other obstacles.
Installation instructions
•
•
•
•
•
Do not obstruct air outlets or intakes with curtains or other obstructions.
The end of the air hose must not be blocked by shutters or other obstructions.
Do not bend the air hose when assembling.
For single duct models only.
When assembly window slider and slider arm and (or) the third piece of the slider, if the window slider is shorter
than the width of the window, pull the sliding arm out to the width of the window.
If the window slider is longer than the width of the window, cut the slider arm to the width off the window. If the
two-piece window sliders are too short for the width of the window, use the third piece of the slider.
Downloaded from AC-Manual.com Manuals
31
Installation sequence
• Double Hung Window
1. Remove the appropriate plugs (save in a secure place) from the window slider to prepare for either a double hung
window installation or a slider window installation. Line up the holes on the rain cover and the window slider.
Use the bolts, gaskets and nuts to attach the rain cover onto the window slider.
Remove these two plugs
from the window slider
2. Attach the exhaust adapter to the window slider. Then fix the window slider and the slider arm and (or) the third
piece of the slider to the window stool.
Third piece of slider
Window stool
Slider arm
Inside
Window slider
3. Insert the end of the hose into the exhaust adapter and rotate it several times to thread it securely into the
adapter.
Adapter
4. Attach the unit end of the exhaust hose to the back of the air conditioner by pushing it into the exhaust outlet and
twisting to lock it in place.
Downloaded from AC-Manual.com Manuals
32
• Sliding Window
1. Remove the appropriate plugs (save in a secure place) from the window slider to prepare for either a double hung
window installation or a slider window installation. Line up the holes on the rain cover and the window slider.
Use the bolts, gaskets and nuts to attach the rain cover onto the window slider.
Remove these
two plugs from
the window
slider
2. Attach the exhaust adapter to the window slider. Then fix the window slider and the slider arm and (or) the third
piece of the slider to the window stool.
Third piece of slider
Slider arm
Window slider
Inside
3. Insert the end of the hose into the exhaust adapter and rotate it several times to thread it securely into the
adapter.
4. Attach the unit end of the exhaust hose to the back of the air conditioner by pushing it into the exhaust outlet and
twisting to lock it in place.
Now, plug the power cable into a grounded electrical socket. Press the
button to start the appliance.
Note: Do not use a standard extension cable. If necessary, use an approved "air conditioner" extension cable only
(available at most local hardware shops).
Notes
•
•
•
•
•
Please read this manual before installing and using the portable air conditioner.
Do not let air enter the refrigeration system or discharge refrigerant when moving the air conditioner.
Test run the air conditioner after finishing installation, and record details of operation.
The PCB unit uses a fuse with rating 3.15 A, 250V.
Users must provide an appropriate fuse for the current supplied at maximum power input or use.
Downloaded from AC-Manual.com Manuals
33
ELECTRICAL CONNECTION
1) For Great Britain only
Warning - this appliance must be earthed
Fuse replacement
If the mains lead of this appliance is fitted with a BS 1363A
13amp fused plug, to change a fuse in this type of plug use an
A.S.T.A. approved fuse to BS 1362 type and proceed as follows:
1. Remove the fuse cover (A) and fuse (B).
2. Fit replacement 13A fuse into fuse cover.
3. Refit both into plug.
Important:
The fuse cover must be refitted when changing a fuse and if the
fuse cover is lost the plug must not be used until a correct
replacement is fitted.
Correct replacement are identified by the colour insert or the
colour embossed in words on the base of the plug.
Replacement fuse covers are available from your local electrical
store.
2) For the Republic of Ireland only
The information given in respect of Great Britain will frequently
apply, but a third type of plug and socket is also used, the
2-pin, side earth type.
3) Socket outlet / plug (valid for both countries)
If the fitted plug is not suitable for your socket outlet, please
contact Whirlpool Service for further instruction. Please do not
attempt to change plug yourself. This procedure needs to be
carried out by a qualified Whirlpool technician in compliance
with the manufactures instructions and current standard safety
regulations.
Downloaded from AC-Manual.com Manuals
34