1
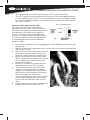
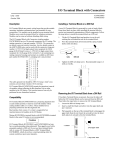
e-series installation instructions
INSTALLATION
Please refer to the installation instructions in the Marquis Owner’s Manual.
ELECTRICAL REQUIREMENTS
It is the responsibility of the spa owner to ensure that all electrical
connections are made by a qualified electrician in accordance with all
national, state, and local electrical codes in effect at the time of installation.
240 Volt
All connections must be made in accordance with the wiring diagram found
on the inside of the control box cover. Connections must be made with
copper conductors only – do NOT use aluminum wire. All conductors, circuit
breakers, and fuses and the GFCI must be sized in accordance to the total
amperage load as specified:
• Permanently connected (Hard wired).
• Rated 240V, 60Hz, 50A, three wires (#6 copper) plus ground (#8
copper (8.42mm2)), [4 wires total].
• Circuit breaker or fuse size: 50A.
• A disconnecting means must be installed within sight from the
equipment and at least 5 feet (1.52m) from the inside walls of the spa.
• Connect only to a circuit protected by a Class A Ground Fault Circuit
Interrupter (GFCI).
• For units used in other than single-family dwellings, a clearly labeled
emergency switch shall be provided as part of the installation. The
switch shall be readily accessible to the occupants and shall be installed
at least five feet (1.52 m) away, adjacent to, and within sight of the unit.
• A pressure wire connector is provided on the exterior of the control box
to allow connection of a bonding wire to any metal ladder, metal water
pipe, common bonding grid (reinforced concrete slab, ground plate
beneath the spa), or any other metal within 5 feet (1.52 m) of the spa.
The bonding wire shall be copper and at least #8 AWG (8.42mm²), #6 in
Canada.
NOTE: Ensure that a Ground Fault Circuit Interrupter (GFCI) is properly
installed. Failure to do so may result in spa malfunction or damage which is
not warranted. GFCIs are available from your authorized dealer.
120 Volt
120 Volt spas shall be plugged into a
properly grounded, grounding type 15
amp receptacle on a dedicated circuit. A
dedicated circuit is a circuit with no other
components that consume power, such
as lights, televisions, radios, computers,
or other electrical devices. These could
cause your spa to malfunction by any of
the following: unusual text on the control
panel, slow heating, poor jet action,
tripping house breaker, or blown fuses. Failure to follow these instructions
could lead to premature failure of spa components that would not be
covered under the warranty. The dedicated circuit shall meet the following
specifications:
•
•
Rated 120V, 60Hz, 15A (2 wires plus ground)
Circuit breaker or fuse size: 15A
e-series installation instructions
•
•
The receptacle must be at least 5 feet (1.52 m) from the spa.
The GFCI power cord provided with the spa must be plugged directly
into the receptacle. Do NOT use an extension cord or any other adaptor. Actual exposed length of cord will vary by model, but will never be
less than 12 feet.
Convert 120 Volt to 240 Volt
120 volt spas may be converted to
operate on 240V, 50A. This conversion
will utilize the factory-installed equipment
components and allow the heater to
run at 4,000 watts and heat when the
pump is on high speed. All connections
must be made by a licensed electrician
in accordance with local and national
electric codes.
1.
2.
3.
4.
5.
6.
7.
8.
Disconnect the power by unplugging the GFCI electrical cord from the
receptacle.
Remove the main equipment door, locate the control box and remove
the access cover.
Remove cord wires from the terminal
block and ground strip, loosen and
remove strain relief from control box
Remove and discard the white wire
that is connected to white AC and red
AC on the lower circuit board (see
photo on the right).
Move DIP switch #2 located on the
upper board to the “ON” position.
The unit is now ready for the 240V
service to be connected. A wiring
diagram is included and attached to
the bottom of the heater housing on
the control box for reference.
Upon completion of the 240v service
connection, replace the control box
cover and reinstall the main access
door.
Apply power to the spa and check for
proper operation and test GFCI.
e-series spa control operation
Start-up
FILLING THE HOT TUB
The water level should be filled to 4” (102mm) down from the top of the spa
shell. Fill only with clean water. If your water source contains particles, please
contact your dealer for a fill filter.
POWERING UP THE SPA
1. After the spa has been filled with water, the power to the hot tub can be
turned on. When the power to the hot tub is turned on, the display on
the control panel will read “RUN PMPS PURG AIR -- -- -- --” . This is an
opportunity to run the pumps and purge any air from the system and
associated plumbing lines. This period will last 4-5 minutes or can be
exited by pressing the Temp +/- button or pump buttons.
2. The hot tub controls are preprogrammed from the factory and will not
require any additional modifications.
OPERATING THE ELECTRONIC CONTROLS
Jets 1
If the jets 1 pump is off, press Jets 1 button to turn on pump 1 to low
speed. Pressing a second time will turn the pump on to high speed.
Pressing a third time will turn the pump off. The high speed of pump 1 will run
for 15 minutes and then switch to low speed. Once on low speed the pump
will run for 15 minutes and then shut off. To restart the pump, press the
Jets 1 button.” The yellow LED indictor under the LCD display will illuminate
anytime the pump is running.
NOTE: If the system is in a filter or heating cycle, low speed will continue to
run.
Jets 2 (Two Pump Models Only)
Pump two has only one speed. Press the Jets 2 button to turn on pump
two high speed. Pressing a second time will turn the pump off. The high
speed of pump 2 will run for 15 minutes and then turn off. To restart the
pump, press the Jets 2 button.
e-series spa control operation
Adjusting temperature (factory default 100° F)
To adjust the temperature of the water, press the Temp +/ – button. The
first press of the button will display the set temperature and begin to
flash. Continue to press or hold the Temp +/ – to reach the desired set
temperature. Once the display stops blinking the new temperature setting
will be set. The factory default setting is 100° F (38° C). The minimum
temperature that can be set is 60° F (16° C) and the maximum temperature
that can be set is 104° F (40° C). The display always shows actual water
temperature.
Soak
Pressing the Soak button will turn off all pump operation. This is a useful
feature when soaking in the hot water with no jets running is desired.
The Soak feature will last 60 minutes and then resume normal operation.
Pressing any jets button will override the soak feature and turn on the
pumps or you can simply press the Soak button to exit the mode. Turning
the LED lights on and off will not affect the quite soak mode. The yellow
LED indictor light under the LCD display will illuminate anytime this feature is
engaged.
Note: If the system is heating it will take a few moments for the Quiet Soak
feature to engage.
Timer
Press the Timer button to start the timer. The display will start at E00 and
begin timing how long you have been in the spa or using a certain feature.
“E” is for elapsed and the two trailing characters track time in one minute
intervals. The display will alternate with the current water temperature every
10 seconds. The timer will continue to run up to 60 minutes. To turn off,
press the Timer button one time. The yellow LED indictor below the LCD
display will illuminate anytime this feature is running.
Light
Press the Light button to turn the interior spa lights on and off. If left on
the lights will run for 60 minutes and then turn off automatically. If your spa
is equipped with an LED light system, pressing the light button repeatedly
(within 2-3 seconds of each press) will change the various colors of the LED
lights.
USER PROGRAMMING
The following features allow for additional control and setting of the onboard electronics. In most cases the factory default settings are adequate
for normal use and operation. To access any of the following features press
Temp +/- and then Light: then scroll through the features by continuing
to press the Light button. You exit the programming mode at any time
by continuing to press the Light button until you arrive back at the
temperature display or by simply pausing for 30 seconds.
e-series spa control operation
Filtration Cycles (Factory default is 2 hours two times per day)
Your hot tub will begin the first of two filtration cycles 5 minutes after it has
been powered up. The second filtration cycle will start 12 hours later. To
change the time when the filtration cycles run, power down the spa for 1
minute and then turn the power back on at the point in time you want the
spa to filter. For example, if you want the spa to filter at 3 PM and 3 AM,
power the hot tub down at 2:55 PM or 2:55 AM. This will reset when the
hot tub will run the filter cycles. In the event that the power to the hot tub is
interrupted, you will need to repeat this procedure.
Programming how long the spa will filter
The electronic controls will allow you to change the length of time the
hot tub will filter the water. This can be useful if your usage patterns vary
from light to heavy and/or you need more or less filtration time to aid in
maintaining water clarity. To adjust the filtration times, press the listed
buttons in the following sequence. Button presses must occur within 30
seconds of each other.
To Program:
1. Press the temp +/- button followed by the light button to enter the
programming mode.
2. Press the temp +/- button to make a change to the desired length of
time. (each press changes the time in 1 hour increments).
3. Press the light button to set your selection and exit the filtration time
option. If you do not do this the choice will not be saved.
Mode (Ready mode is factory default - recommended)
This feature can be used for periods when you will be gone for an extended
amount of time and don’t want the hot tub running on a continual basis.
Running the unit in “Ready” mode will ensure the spa is at full temperature
and ready for use at any time. Running the unit in “Rest” mode will only allow
the spa to heat during a scheduled filtration cycle. To access and change
the mode, press the listed buttons in the following sequence. Button
presses must occur within 30 seconds of each other. Ready and Rest
indicators are shown under the temperature in the display.
To Program:
1. Press the temp +/- button followed by the light button to enter the
programming mode.
2. Press the light button again to enter the “mode” option.
3. Press the temp +/- button to toggle between “Ready” and “Rest”
options.
4. Press the light button to set your selection and exit the filtration time
option. If you do not do this the choice will not be saved.
TEMPO AUDIO SYSTEM
Please refer to the manufacturer’s owner’s manual for features, operation,
and troubleshooting.
This system will support a wide range of personal audio players with 3.5mm
jacks operating at 4.5V or less. Typically this would be the headphone jack
on the device. To use, pull on the recessed handle of the device drawer that
e-series spa control operation
is located on the door of the spa. Once fully extended, open the lid of the
drawer exposing the supplied 3.5mm cable and plug in the personal audio
player. Song selection, volume, and tone are controlled by the personal
audio device. Once the unit is playing, stow the personal audio device in the
drawer, close the lid and push the drawer back in place. This will ensure the
personal audio device is protected during use.
NOTE: Avoid water splashing on the stereo face. Never insert a disk
or operate the stereo with wet hands. Moisture can damage internal
components. Water intrusion into stereo is not covered under warranty.
See manufacturer’s owner’s manual for coverage information. Consult your
Limited Warranty for more information about coverage.
Speakers
Gently push the top of the self-rising speakers to raise them. To lower the
speakers gently push the speaker top until it is completely closed. Make
sure speakers are in the down position before closing the spa cover.
Speaker lift mechanism is manufacturer-warranted against failure to lift due
to manufacturing defects only. Closing the spa cover with speakers in the
up position or forcing the speaker down too rapidly can result in damage.
CAUTION - Risk of Electric Shock. Do not leave compartment door open.
CAUTION - Risk of Electric Shock. Replace components only with identical
components.
Do not operate the audio controls while inside the spa.
WARNING – Prevent Electrocution. Do not connect any auxiliary
components (for example, cable, additional speakers, headphones,
additional audio/video components, etc.) to the system, except as provided
by the following: The 3.5 mm auxiliary jack is designed for input only from
devices such as an MP3 player operating at 4.5 V or less.
• These units are not provided with an outdoor antennae; it should be
installed in accordance with Article 810 of the National Electrical Code,
ANSI/NFPA 70.
• Do not service this product yourself as opening or removing covers
may expose you to dangerous voltage or other risk of injury. Refer all
servicing to qualified service personnel.
• If the power supply connections or power supply cord(s) are damaged;
if water is entering the audio compartment or any electrical equipment
compartment area; if the protective shields or barriers are showing
signs of deterioration; or if there are signs of other potential damage
to the unit, turn off the unit and refer servicing to a qualified service
personnel.
• This unit should be subjected to periodic routine maintenance (i.e. once
every three months) to make sure that the unit is operating properly.
Audio Expansion Port
The built-in audio expansion port allows you to connect optional accessories. Use the supplied 3.5 cm cord to attach MP3 player. NOTE: The 3.5 cm
auxiliary jack is designed for input only from devices such as an MP3 player
operating at 4.5V or less.