1
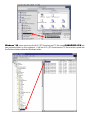
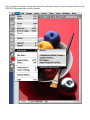
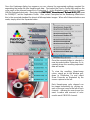
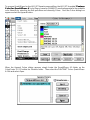
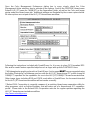
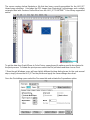
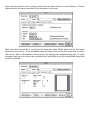
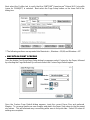
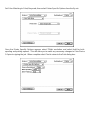
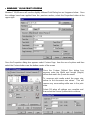
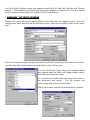
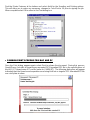
Only the Roland Hi-Fi JET and CAMMJET can achieve over 97% of PANTONE Colors. The Hexachrome Workflow for the Roland Hi-Fi JET and CAMMJET After extensive testing and calibration, Roland is proud to offer a PANTONE Hexachrome workflow for the award winning Hi-Fi JET and CAMMJET printers. By following the steps outlined in this document, the Hi-Fi JET and CAMMJET will be able to simulate over 97% of all PANTONE MATCHING SYSTEM (PMS) Colors. 1. OVERVIEW OF REQUIRED COMPONENTS • The 42" FJ-40/CJ-40 or the 52" FJ-50/CJ50 Roland Hi-Fi JET or CAMMJET products • Set the Hi-Fi JET or CAMMJET for Super 720 dpi unidirectional print mode • Roland Pigment CMYKOG inks • Roland PQM Super Hi Gloss White Film • Macintosh running OS 8.5 or later • PC running Windows 98 for PANTONE HexImage and QuarkXPress compatibility or a PC running Windows NT for QuarkXPress compatibility only. • ColorChoice 3.0 software for Macintosh or PC • Adobe Photoshop 5.x for Macintosh or PC • QuarkXPress 4.x for Macintosh or PC • PANTONE® HexImage™ for Macintosh or PC • Hi-Fi JET Hexachrome color library (same for CAMMJET) added to the QuarkXPress 4.x. • Hi-Fi JET Hexachrome ICC profile (same for CAMMJET) for use within HexImage™ and QuarkXPress 4.x • PANTONE Solid in Hexachrome color fan guide (Available from your Roland Dealer) 2. Hi-Fi JET INK REQUIREMENT Hexachrome is Pantone, Inc.’s patented six-color printing process. Using Roland’s especially vibrant CMYK pigment inks, plus the addition of Roland’s Orange and Green pigment inks, the HiFi JET and CAMMJET are able to simulate over 97% of the solid PANTONE MATCHING SYSTEM ® Colors as compared to 50% achievable in CMYK four-color process printing. Roland’s CMYKOG pigment inks are required to simulate Hexachrome Colors on the Hi-Fi JET. These inks are available from your local Hi-Fi JET dealer. The part numbers for these inks are as follows: • FPG-CY- Cyan Pigment ink • FPG-MG- Magenta Pigment ink • FPG-YE- Yellow Pigment ink • FPG-BK- Black Pigment ink • FPG-OR- Orange Pigment ink • FPG-GR- Green Pigment ink 3. MEDIA REQUIREMENTS Media is one of the critical components of consistent color accuracy. Every media carries with it a unique color gamut or reproducible number of colors due in part to its individual ink-receptive coating, base paper/film, and overall white point. In order for the Hi-Fi JET and CAMMJET to simulate over 97% of the PANTONE MATCHING SYSTEM ® Colors, it was necessary to specify a media that had an extremely large color gamut. Roland’s signature PQM Super Hi Gloss White Film was selected for it's superb high gloss luster, ultra high white point, and immediate drying characteristics. **Roland’s PQM Super Hi Gloss White Film is required in order to simulate PANTONE® or Hexachrome Colors on the Hi-Fi JET and CAMMJET. The PQM Super Hi Gloss White Film is available from your local Roland dealer. The part numbers for this media is as follows: PQM-PETG-66-41 4. SOFTWARE REQUIREMENTS • ColorChoice® 3.0 Beginning in November of 1999, Roland released version 3.0 of the bundled ColorChoice® RIP software for both Macintosh® and PC. This new version supports ripping of Desktop Color Separation / DCS file format data which contains the pre-separated color data for each of the CMYKOG colors. When ColorChoice receives a DCS file all color management processing is turned off since the DCS file contains all the data necessary to represent the total image with the correct location and amount of ink for each channel of CMYKOG color. **ColorChoice® 3.0 is required to run the Hi-Fi JET Hexachrome workflow. All prior versions of C o l o r C h o i c e 1 . x - 2 . x m u s t b e P R O P E R L Y u n i n s t a l l e d from the computer by following the step-by-step instructions located in the on-line help. • ColorChoice® 3.0 SETIINGS Install ColorChoice® 3.0 by following the instructions located in the Readme folder on the ColorChoice 3.0 CD. Windows users should open the R C C . p d f file while Macintosh users should open the U s e r G u i d e E n g l i s h file within the English folder. Once installed select Setup Properties under the Printer pull-down menu. Once the Setup Properties window is open, select the Print tab at the top of the dialog to display the RIP settings. The Perform Color Correction tab can be left on since ColorChoice automatically turns off all color management when working with DCS files. Therefore, settings for the ICC input profile and ICC output profile can be disregarded. Make sure that Resolution is set to 720; Dither Type is set to LX or Error Diffusion (Use Error for best quality); Density adjustment is set to None; Color Mode is set for CMYKOG; and Driver Options are set for SUPER 720 unidirectional printing. • Adobe Photoshop 5.x Adobe® Photoshop ® software for Windows® or Macintosh® combined with the PANTONE® HexImage application is required for the Hexachrome workflow to generate pre-separated bitmap DCS formatted EPS files that will contain the correctly separated Hexachrome defined CMYKOG channels. The bitmap DCS 3.0 file that is generated from Photoshop 5.x can then be added to any design within QuarkXPress 4.x. • P A N T O N E ®® H e x I m a g e ™ PANTONE®® HexImage™ creates six-channel Hexachrome®® separations from RGB, CMYK or L*a*b* images with the HexImage™ plug-in for Photoshop ®® . Using HexImage is as simple as defining the source and separation profiles, the rendering intent, and then by selecting the Separate button. The resulting Hexachrome separations appear as a new image to be saved as a DCS 3.0 file for ColorChoice 3 or placement in QuarkXPress 4.x document. ** PANTONE®® HexImage™ is currently available for Windows®® 98, Windows®® 2000, and Macintosh®® only. Windows®® NT users must run one of these alternative Operating Systems in order to utilize the PANTONE®® HexImage™ application. • A d o b e P h o t o s h o p 5 . x / P a n t o n e ®® H e x I m a g e ™ S E T T I N G S **Adobe Photoshop 5.x and PANTONE®® HexImage™ are required in order to generate preseparated DCS formatted b i t m a p / r a s t e r EPS files that will contain the correctly separated Hi-Fi JET Hexachrome defined CMYKOG channels. Once the HexImage™ generated file is saved as Photoshop DCS 2.0 format, it can be printed using ColorChoice 3, or placed in a QuarkXPress 4.x document as part of the Hi-Fi JET/CAMMJET Hexachrome simulation workflow. After installing Adobe Photoshop 5.x and PANTONE®® HexImage™, the Hi-Fi JET Hexachrome ICC profile must be manually copied to the proper folder location on the computer. M a c i n t o s h ® users must copy the Hi-Fi JET Hexachrome ICC file named P A N T O N E ® H E X A C H R O M E ® R O L A N D from the Roland Hex. Profile folder located inside the Pantone folder on the ColorChoice 3.0 CD into the ColorSync Profiles folder located within the System Folder. W i n d o w s ® 9 8 users must copy the Hi-Fi JET Hexachrome ICC file named P A N H E X R O . I C M into two separate folder on the computer. First the Hi-Fi JET Hexachrome ICC file must be copied into the Pantone folder within the Windows folder. W i n d o w s ® 9 8 users must also copy the same P A N H E X R O . I C M file into the Color Folder located within the Windows folder inside the System folder. • Adobe Photoshop 5.x / PANTONE HexImage™ SETTINGS In order to prepare bitmap/raster data for the Hi-Fi JET/CAMMJET Hexachrome process the desired image must be in an RGB, CMYK, or LAB color space. To verify or change the type of data in a bitmap/raster image file, open it in Photoshop 5.x and go to the Image pull-down and select Mode. The color mode of the file and the bit depth will be checked. The screen capture below illustrates a LAB color file with 8 Bits per channel. (Please note that you will have better image quality and a broader color gamut beginning with an RGB or LAB color file.) Then to begin HexImage, simply select the File pull-down and go to the Automate fly-out so the PANTONE HexImage item can be selected. Once the HexImage dialog box appears you can choose the appropriate settings required for separating the image file into Hexachrome data. First select the Source Profile that matches the color mode of the opened image file in Photoshop 5. In the illustration below the file is the same LAB file illustrated previously. Next select the PANTONE®® Hexachrome ®® Roland Hi - Fi JET (same for CAMMJET) as the Separation Profile. Also, select Perceptual as the Rendering Intent since this is the accepted standard for almost all bitmap/raster images. When all of these selections are made, simply select the Separate button. Once the separate button is selected, a new document within Photoshop 5.x is created where the resulting separated data will reside. To view the resulting Hexachrome colors, simply go to the Window pulldown in Photoshop 5.x and select Show Channels as illustrated by the screen capture to the left. Each Hexachrome color channel can be viewed individually by clicking on each of the eye icons to the left of each channel… allowing the user to see the exact location and amount of color used in each CMYKOG channel. To save the resulting Hexachrome data for use in ColorChoice 3 or QuarkXPress 4.x it must be saved as Photoshop DCS 2.0 data. Simply go to the File pull-down and select Save As… then specify the Format as Photoshop DCS 2.0 and select Save. The DCS 2.0 Format dialog box will appear and the default settings should be the same as the following screen capture. These available options should not effect the Hi-Fi JET Hexachrome workflow, but the screen capture below represents the recommended settings. The DCS 3.0 Format dialog box for W i n d o w s ®® 9 8 is slightly different, and the screen capture below represents the recommended settings. • Q u a r k X P r e s s 4.x Currently, QuarkXpress 4.0 is the only software program that can generate pre-separated DCS formatted b i t m a p / v e c t o r EPS files containing the correctly separated Hexachrome defined CMYKOG channels for the Hi-Fi JET/CAMMJET Hexachrome workflow. QuarkXPress 4.x includes the Hi-Fi JET Hexachrome ICC Profile (same for CAMMJET) used to correctly calculate the ink amount and location within the Hexachrome separations during the print process. T h i s i s a critical step since without correctly calculating ink amounts and location, it would be impossible to match any of the Pantone colors. • QuarkXPress 4.x SETTINGS ** The color management portion of QuarkXPress must be installed during the installation of QuarkXPress 4.x. **ColorChoice ColorChoice 3.0 users MUST remove the PrintRGB XTension for Quark 4.x prior to using the HiHiF i J E T / C A M M J E T H e x a c h r o m e w o r k f l o w . The PrintRGB XTension is recommended in ColorChoice to force the QuarkXPress application to prevent placed RGB bitmap/raster data from being converted to CMYK during the print process. However, it cannot be active when using the Hi-Fi JET Hexachrome workflow and must be temporarily removed from the XTension folder of QuarkXPress 4.x to any temporary storage area. To re-enable the PrintRGB Xtension for future non-Hexachrome printing simply move it back into the XTension folder located within the QuarXPress application folder. **QuarkXPress files to be printed on the Hi-Fi JET or CAMMJET must use the Hi-Fi JET “PANTONE Color Library” (same for CAMMJET). QuarkXPress 3.x/4.x documents that contain items defined using the default Pantone color library of QuarkXPress will not match Hi-Fi JET output because they must be created in Quark using the Hi-Fi JET formatted " P a n t o n e C o l o r f o r Q u a r k X P r e s s 4" 4 color library included on the ColorChoice® 3.0 CD. This is required since all default PANTONE® color libraries were designed to match press printing equipment and each color has the incorrect ink load data for the Roland Hi-Fi JET. For your convenience the Hi-Fi JET formatted color library file can be distributed to any QuarkXPress user for generating QuarkXPress documents for Roland Hi-Fi JET printing. To prepare QuarkXPress for the Hi-Fi JET Hexachrome workflow, the Hi-Fi JET formatted " P a n t o n e C o l o r f o r Q u a r k X P r e s s 4 " color library (same for CAMMJET) must be appended to the available color libraries by selecting the Edit pull-down and choosing Colors. Once the Colors dialog box appears select the Append button. When the Append Colors dialog appears simply locate the QuarkXPress 4.0 folder on the ColorChoice 3.0 CD within the Pantone folder. Then select the PANTONE® Colors QuarkXPress 4.0 file and select Open. Once the Append Colors dialog box is open individual Hi-Fi JET PANTONE Hexachrome colors (same for CAMMJET) can be added one by one or all of the colors can be added to QuarkXPress by selecting the Include All button. The process of including all of the PANTONE® Colors can take some time and the computer will lock out all other processes until all colors have been added. When this process is complete all the new colors will appear on the right side and the OK button can be selected followed by the Save button on the Colors dialog box. Now that the correct PANTONE® color library has been added, the color management engine of QuarkXPress must be set for the Hi-Fi JET/CAMMJET Hexachrome workflow. Simply select the Edit pull-down, followed by the Preferences fly-out, and select Color Management. **If the Color Management fly-out does not appear, please go to the following site for information on adding the Color Management portion of QuarkXPress: http://www.quark.com/tech/technotes/tn402.html Once the Color Management Preferences dialog box is open, simply check the Color Management Active selection box to activate all the options. Specify the PANTONE Hexachrome Roland Hi-Fi JET (same for CAMMJET) as the Separation Printer, as well as the Color and Image printer under the Hexachrome tab. Additional settings are illustrated by the screen capture below. All other options are not part of the Hi-Fi JET Hexachrome workflow. Following the instructions included with QuarkXPress 4.x, it is easy to place DCS formatted EPS files and to create Pantone specified objects such as logos with specific PANTONE Colors. **All bitmap/raster graphics placed in a QuarkXPress 4.x document M U S T be pre-separated using the Adobe Photoshop 5.x/HexImage process with the Hi-Fi JET Hexachrome ICC profile (same for CAMMJET) specified for the separation for use in the Hi-Fi JET/CAMMJET Hexachrome workflow. Other image types including RGB and CMYK used within a QuarkXPress 4.x document intended for the Hi-Fi JET Hexachrome workflow will not render correctly. **Roland DGA Corporation is currently unaware of an existing Hexachrome separation utility for other programs, such as Adobe Illustrator, that will make use of a Hexachrome ICC separation profile. Please refer to the Roland DGA Corporation web site for regular updates regarding the Hi-Fi JET Hexachrome simulation workflow: http://www.rolanddga.com The screen capture below illustrates a file that has been correctly assembled for the Hi-Fi JET Hexachrome workflow. It includes the DCS image from Photoshop 5.x/HexImage, and a simple rectangle filled with Pantone Reflex Blue from the Hi-Fi JET PANTONE Color library appended earlier. To get the data from QuarkXPress to ColorChoice, several specific options need to be selected in the print process. To initiate the print process select the File pull-down and then choose Print. **Even though Windows users will see slightly different looking dialog boxes for the next several steps, simply choose the Hi-Fi JET as the printer and apply the same settings described. Once the Print dialog opens select the Document tab and activate the Separations option. Then select the Setup tab and specify the H i - Fi JET FJ - 50, 50 Hi - Fi JET FJ - 40, CAMMJET CJCJ- 50, 50 or C A M M J E T C J - 4 0 for the Printer Description. Also set the Paper Width according to the document dimension. This can be verified by selecting the Preview tab and noting the Document Size listed on the left. All other settings can be obtained from the screen capture below. Next select the Output tab to verify the settings shown in the screen capture below. These settings should be set by default since the Separation selection was activated under the Document tab. Since the Hi-Fi JET Hexachrome ICC profile (same for CAMMJET) was selected under the Color Management preference the Output screen shown here indicates that Hexachrome separations will be generated. Next select the Options tab to simply confirm that the Data selection is set to Binary. All other settings on this tab can be specified to the preference of the user. Next select the Preview tab to verify that the Setup tab Paper Width value and the Document dimensions are correct. In the illustration below the Paper Size and the Document Size are off by half an inch, which is illustrated in the preview on the right by the overlapping blue line. To make changes simply go to the Setup tab and match the Paper Width to the Document Width listed here on the Preview tab. Next select the Profiles tab to verify that the PANTONE® Hexachrome® Roland Hi-Fi Jet profile (same for CAMMJET) is selected. Next select the Page Setup button on the lower left of the dialog box. **The following sections are separated into Macintosh , Windows 95/98, and Windows NT. • MACINTOSH PRINT SCREENS Once the Adobe Post Script Page Setup dialog box appears select Custom for the Paper, followed by selecting the Page Attributes fly-out box to select the Custom Page Default option. Once the Custom Page Default dialog appears, input the correct Paper Size and preferred Margins. To conserve media use zero margins and match the Paper Size values to the document size values. This will eliminate any surrounding white area in the print data. Select OK when all settings are complete. The Print dialog will appear again and the next step is to select the Printer button located in the lower center of the dialog box which will activate the General Printer settings dialog box. Select the General fly-out box and select Color Matching. Set Color Matching to Color/Grayscale, then select Printer Specific Options from the fly-out. Once the Printer Specific Options appears select 720dpi resolution, and select Hold for both spooling and printing options. This will allow you to make any necessary changes to ColorChoice 3.0 prior to ripping the job. When complete select Print to return to the Print dialog box. • WINDOWS 95/98 PRINT SCREENS Windows 95/98 users will see the slightly different Print Dialog box as it appears below. Once the settings have been applied from the previous section, select the Properties button at the upper right. Once the Properties dialog box appears select Custom Page from the row of options and then select the Custom button near the bottom center of the screen Once the Custom Defined Size dialog box appears enter the Width and Length (height) values that match the Quark document. To conserve print media match the paper size values to the document size values. This will remove any surrounding white area in the print data. Select OK when all settings are complete and then select the Device Options tab to continue. Once the Device Options dialog box appears select Hold for both the Spooling and Printing options. . This will allow you to make any necessary changes to ColorChoice 3.0 prior to ripping the job. When complete select OK to return to the Print dialog box. • WINDOWS NT PRINT SCREENS Windows NT users will see the slightly different Print Dialog box as it appears below. Once the settings have been applied from the previous section, select the Properties button at the upper right. Once the Properties dialog box appears select PostScript Custom Page from the row of options and then select the Custom button near the bottom center of the screen Once the PostScript Custom Page Size Definition dialog box appears enter the Width and Length (height) values that match the Quark document. To conserve print media match the paper size values to the document size values. This will remove any surrounding white area in the print data. Select OK and then select the Advanced tab to continue. Find the Printer Features at the bottom and select Hold for the Spooling and Printing options. This will allow you to make any necessary changes to ColorChoice 3.0 prior to ripping the job. When complete select OK to return to the Print dialog box. • COMMON PRINT SCREENS FOR MAC AND PC Once the Print dialog appears again select Print to release the document. During this process QuarkXPress 4.x builds a Hexachrome separated DCS formatted EPS file to the specifications of the Hi-Fi JET Hexachrome ICC profile (same for CAMMJET). The following dialog box will appear indicating that the Hexachrome separations are being built into a singular DCS formatted EPS file one color plate at a time When the process is complete make sure you have the QuarkXPress document saved so that it can be used in the future. Next launch ColorChoice 3.0 and verify that the document is listed in the queue. Then double click the document in the queue to open the Job Properties dialog box. Once the Job Properties dialog box is open, select Page Preview in the upper right hand corner to activate the preview function. This preview is the first of the six color plates within the DCS 3.0 file, which is the CYAN plate. Currently there is no way to preview all six colors together. The Layout Preview can be selected in the upper right corner of the screen to preview the job as it will appear on the media size specified in ColorChoice 3.0. **The Layout Preview of DCS files will always show each of the six color plates within the DCS 3.0 file instead of one composite plate. Even though six black and white plates representing the individual CMYKOG appear, O N L Y O N E F U L L C O L O R print will occur on the Hi-Fi JET where the first plate appears near the bottom right on the Layout Preview screen. All Job Properties settings are still active including and will be shown interactively on the Layout Preview screen. Finally select the Print tab to verify that the Color Mode is set to CMYKOG and the Driver Options are set to Super Unidirectional (720 dpi) printing. Check that the Hi-Fi JET is connected and ready to print and select Ok when complete. Finally select the printer icon to begin the RIP and print process. The completed print job should begin once the data has been ripped. Should you encounter any technical problems with this workflow, please email a complete description of the problem to the Roland DGA Corporation technical support staff at the following email address: [email protected] Alternatively, you can call the Roland DGA Corporation technical support department at the following toll free number: (800) 542-2307 Roland DGA Corporation thanks you for choosing our color solutions and we look forward to providing more innovative tools to market in the near future. All the best, Roland DGA Corporation. Appendix For more information on the Roland Hi-Fi JET visit the following site at: http://www.hifijet.com/ For more information on all available Roland certified Hi-Fi JET media visit the following site at: http://www.rolanddga.com/products/color/hifi-media.html For more information on all Roland products please visit the following site at: http://www.rolanddga.com/ To obtain a free upgrade to ColorChoice 3.0, and to read about all its exciting and powerful new features, visit the Roland DGA Hi-Fi JET web site at: http://www.hifijet.com/colorchoiceform.asp For more information on the DCS file format visit the following Adobe site at: http://www.adobe.com/supportservice/custsupport/SOLUTIONS/c2c2.htm For more information on the Adobe® Photoshop® software please visit the following web site: http://www.adobe.com/prodindex/photoshop/main.html To purchase the full or upgrade version of the Adobe® Photoshop® software please visit the following web site, which compares software/hardware prices of many Internet stores: http://www.zdnet.com/computershopper/ For more information on the PANTONE®® HexImage™ software please visit the following web site: http://www.pantone.com/catalog/heximage_ss.htm To purchase PANTONE®® HexImage™ software please visit the following web site: http://www.pantone.com/commerce/store_hexachrome.htm For more information about QuarkXPress 4.x visit their web site at: http://www.quark.com/quarkxpress/ For more information on adding the color management components to QuarkXPress please look at Quark's document located at the following web site: http://www.quark.com/tech/technotes/tn402.html For more information about the PrintRGB XTension please look at Quark's technical information located at the following web site: http://www.quark.com/files/printrgb_xt.html