1
."'
'
.'
•
•
•
•.
•
•
INSTALLATION AND OPERATION
•
•
LITHO IN USA.
UltraNav
988-0106-39A
INSTRUCTIONS
EALGIflIE,tJt1
TM
PDF compression, OCR, web-optimization with CVISION's PdfCompressor
NOTES:
PDF compression, OCR, web-optimization with CVISION's PdfCompressor
s
I.
*V6i',L.r.
:::• :4I.
:t: :t?:.'.2.c
p
.
.,.• •1•
.1
NOTES:
.
•
••...•t•Y••?. .
.
—
. ..
.
.
SONARTABLE OF CONTENTS
INTRODUCTION
MOUNTING
POWER CONNECTIONS
TRANSDUCER
KEYBOARD BASICS
DISPLAY
OPERATION
AUTOMATIC
SENSITIVITY
GRAYLINE
RANGE
ZOOM-AUTOMATIC
ZOOM-MANUAL
ALARMS
FISH ALARM
ZONEALARM
DEPTH ALARM
AUDIOALARM ON/OFF
MENUS
CHART SPEED
FISH I.D
CHART CURSOR
FASTRAK
DIGITAL DISPLAYS
DIGITALSIZE
UNITOFMEASURE
BACKUGHTS
SPEAKER VOLUME
DISPLAY CONTRAST
DIGITAL SONAR
NOISE REJECTION
ASP
SURFACE CLARITY CONTROL (SCC)
DISPLAY ZONE BAR
DISPLAYZOOM BAR
TRANSDUCERS AND CONE ANGLES
SIGNAL INTERPRETATION
FISH ARCHES
WATER TEMPERATURE ANDTHERMOCLINES
SURVEYINGALAKE
BAITFISH
SONAR TROUBLESHOOTING
HOW TO OBTAIN SERVICE
LORAN SECTION
1
2
4
4
6
7
7
7
9
10
11
12
12
13
14
15
16
17
17
18
19
20
20
21
22
23
23
24
24
25
26
27
28
28
29
30
31
32
34
34
35
38
39
Copyright © 1990, Eagle Electronics
All rights reserved.
All featuresand specifications subjectto Change without notice.
AU screens in this manual are simulated.
PDF compression, OCR, web-optimization with CVISION's PdfCompressor
NOTES:
PDF compression, OCR, web-optimization with CVISION's PdfCompressor
•
NOTES
.
.1
.".....—."""..
.1.
I
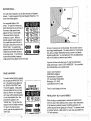
INTRODUCTION
The UltraNav represents one of the best values in sportfishingsonar
today. It rivals other sonar units costingmuch more in featuresand
performance. With its menus, the UltraNav offers easy-to-useoperation at the touch of a button. The screen showsthe underwaterworld
with high resolution and detail. The UltraNav also displaysdigital
depth, boat speed, surface water temperature, and distancetravelled
(distance log) ifthe optionalspeed/temperature sensor (model EST-T)
is attached.
Although the UltraNav has many features and functions,the "soft key"
menu systemmakes it easyto use. Above all, don't be afraid to try
differentfeatures and functions on the unit. You can't hurt it by
pressing buttons!
Read this manual and take it with youthe first few times you use your
unit. It makes a great referenceshouldyou need it. The more you
know whenyou getto thewater,the more your UltraNavcan do for
you!
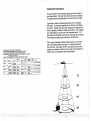
MOUNTING
Install The UltraNav in any convenient location, providedthere is clearance behind the unit when it is tilted for thebest viewingangle. Holes
in the bracket base allowwood screw orthrough-boltmounting. You
may need to placea piece of plywood on theback of thin fiberglass
panels to secure the mounting hardware. Make certain there is
enough roombehindthe unitto attach the powerand transducer
cables.
PDF compression, OCR, web-optimization with CVISION's PdfCompressor
1
The smallest holethat will pass one power or transducer plug is one
inch. After the holeis drilled, pass the transducer connector up
throughthe hole first, then pass the powercable down through it.
After thecables have been routed, till the holewith a good marine
sealingcompound. Offsetthe bracket to cover the hole. Routethe
power cable throughtheslot and break out one of the otherslots in the
bracketfor thetransducercable.
NOTCHES
POWER CONNECTIONS
The UltraNavworks from a twelve-volt battery system only. For the
best results, attach the powercable directlyto thebattery. You can
attachthe power cableto an accessoryor powerbuss, however you
may have problems with electrical interference. Therefore, it's safer to
go ahead and attachthe powercable directlyto thebattery. lithe
cable is not long enough, splice#18 gauge wire onto it.Attach the inline fuse holder to the red lead as closeto thepower source as possible. For example, if you haveto extend the powercableto the
battery or power buss, attach one end of the fuse holderdirectlyto the
battery or power buss. This will protect both the unit and thepower
cable in the event of a short.
1 7Q°
Thepower cable hasthree wires, red,white, and black. Red is the
positivelead, black is negative or ground. The white wire is usedfor
the NMEA interface. To usethisfeature, attach a shielded, twisted pair
cable fromtheautopilotor other marine equipment's NMEA interface
to the white wire on the UltraNav's power cable. Solder the twisted
pair'sground wire and shield wire tothe blackwire on the NavGuide's
powercable. Do not connecttheshieldwire to the autopilot. See your
autopilot'smanual for more instructions. If you're not goingto use this
feature, cut and tape the whitewire to preventa short.
Minimize electrical noise by routingthe power cable away from other
possible sources of electrical interference. One ofthe largest noise
generators is the engine's wiring harness. For best results, keepthe
power and transducercables awayfromthe engine wiring.
2
PDF compression, OCR, web-optimization with CVISION's PdfCompressor
103
•
•.
:
•.
.
-..
.. .
:fl.
..t?C".' •:
•. .
•.
.
.
.... .. .
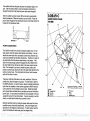
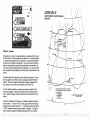
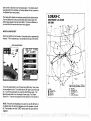
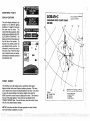
NORTH PACIFIC LORAN-C CHAIN GR1 9990
REONALMANAGER COMMANDER. PACIFIC AREA. ALAMEDA, CA
CHAIN MANAGER:COMMANDER. 17TH COAST GUARD DISTRICt JUNEAU, AK
COORDINATOR OF CHAIN OPERATIONS LOCATION: LORMONSTA KODIAK, AK
CONTROL SITE LORMONSTA KODIAK. AK
063I0.
MISTER
(RAY
61ATICI
ST.PAIL
Ac
ATm
Ac
YANKEE
PORT
CLARENCE
Ax
CBLL
ia)
C#.
5700122N
1701606,6W
524544.0/I
1737049.00
l0
3575.8
OS 1440311
20000'
1165312:6W 0066.05
NARROW
CAPE,AK
KW)
ThANS/MI
ANTENNA
10.4
600
ISPPN12
225
625Ft
0.0
57262020
11,3W
43000/
3650.45
. .
..
.
. . . . .. .
I
AWPPN4S
355
S2SFT
MGIOPCLE
0.0
AWPPN'42
1000
1360Fr
kflJCI'OLE
*0.6
NOTES
MC*4OPOLE
-
15222
. .; . .. .
.
OR
AUTOPILOT
OTHERMARINEEQUIPMENTS
HMEAINTERFACE
-
ZULU
. .
TO
XMTT
PVR
.
AN'FPN'44A
400
625FT
Ma4OPOLE
0.0
DUALRKIEW/ORI7900
The UltraNav has reverse polarity protection. No damagewill occur to
the unit if the powerwires are hooked up backwards. However, it
won't work until thewiringis connectedproperly.
Attachtheloran module's cableto the UltraNav's powercable. Tags
on the cables identifyboth the loran and the optional speed/temperature sensor's connector. See the loran section in this manual for loran
moduleinstallation.
NOISE
Bilge pumps and their wiringcan also radiate noise, so keep the cables
awayfrom them, if possible.
VHF radio antennasand cables radiate AF energy at high power
levels. It is important to keepthe powerand transducercables away
from them, also. See thesonartroubleshooting sectionfor tips on
preventing noise problems.
102 OCR, web-optimization with CVISION's PdfCompressor
PDF compression,
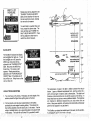
TRANSDUCERCONNECTIONS
See thetransducerowner's manual included with the unit for
transducerinstallation instructions.
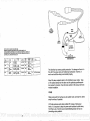
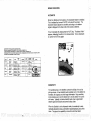
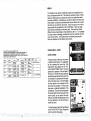
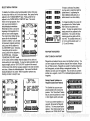
KEYBOARD
Thekeyboardhas keys arrangedin two verticalcolumns. Thekeys in
the left column are used to switchthe unit between sonar, loran, and
plotter modes, plus menu selections. The keys in theright column
pertain to thebasic sonar functions. The menu key in the bottom right
corner ofthe keyboardactivates thefirst menu page.
333FT
.1-c
4-c
ec
WAYPT
SAVE
WAYPT\
RECALL/
ON
OFF
SENS - Pressthis key to adjust the unit's sensitivity and Grayline.
RANGE - This key lets you adjustthe range whenthe unit is in the
manual mode.
ZOOM
- The Ultragivesyou 2Xand 4Xzoom capability withthis key
AUTO - Thisturns theautomatic featureoff and on.
ALARM- Activateand adjustthe alarms throughthis key.
4
PDF compression, OCR, web-optimization with CVISION's PdfCompressor
101
...:*•h...
(.
........'0 ........
...
.
.
.
.
0.
.0
....
.0
.....'
I
MENU - Press this key to showthe menus and gain accessto most
functions.
ON - The ON key turns theUltra on.
OFF - The Off key turns the Ultra off.
SONAR- This key switches the UltraNav fromthe loran mode to the
sonar mode.
LORAN- Press this key to switch to the loran mode.
PLOTTER - The plotter appears when this key is pressed.
WAYPT SAVE - Press thiskey to save a waypoint.
WAYPT RECALL - Thiskey activates the waypoint recall menus.
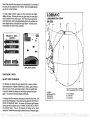
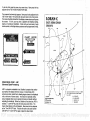
ICELANDIC LORAN-C CHAIN GR1 9980
REGIONAL MANAGER. COMMANDER COAST GUARD ACTIVITIES EUROPE. LONDON,UK
CHAIN MANAGER COMMANDER COAST GUARD ACTIVITIES EIJROPE. LONOON. UK
COORDINATOR OF CHAIN OPERATIONS LOCATION LORMONSTA KEFLAVLI(, ICELAND
CONTRDLSITE:LORMONSTA KEFLAVIK, ICELAND
CD0LL
P5W
IKV9
THANEMOT
xMrrrER
ANTB406
N0/4
ECU
ANIFPS445
1506
l200Fr
0.0
00010.
01M00/J
ODOR.
5645750
SANDUS
0E.AND
645426441
035021.5W
YWISKEY
4OlSSOO
GREENLAND
5000lION
11000'
4006.03
ANIFN445
760
M00IOPOLE
625FT
451527.5W
E.100.MOROE
8217 E0$N
270426.5W
30600/
5544.54
AWFPI'IAA 055
M0140P01.E
036 Fr
XRAV
IS..DEESSAPX
(uo)
NiftOs
M00IOPCLE
41.0
DUALMTEW/0AI7030
0.0
DLIAL0A1E 0507570
Note: The Sonar, Loran, Plotter, Waypoint Save and Waypoint Recall
keys are also usedas 'soft keys" or feature select keys. When a
menu selection arrow points to one of these keys, the key activates the
menu feature, not the feature printedon the key. For example, if you
press the PLOTTER key as shown below, the Fish ID featurewill be
turned off.
-
AT
0I
FISH-ID
WAYPT
SAVE
WAYPT"-.
RECALL"
'I
____
Hiji;:E-
CE
CE
CE
CE
CE
ON
OFFr
PDF compression,100OCR, web-optimization with CVISION's PdfCompressor
5
L15srr1
j
0
4-C
1ETRICI
•
LORANeC
NORTHWEST PACIFIC CHAIN
CR1 9970
C AD.]'. DISPLAY I
1 LIGHT I
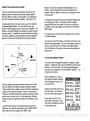
DISPLAY - General
The lights are turned on for approximately ten seconds whenthe Ultra
is first turned on. Menus appearat the sametime. To keep the lights.
on, pressthe key adjacentto the Light label. It controlsthe backlighting used on thedisplay and keyboard. If youdon't want the lights on,
wait ten secondsand the lights will automatically turn themselvesoff.
The menus will also disappearaftertenseconds, oryou canturn them
off by pressing thekeyadjacentto theCLEAR key at the bottom of the
S.
screen.
The Metric label at the top of thescreen works the same way. Press
the key adjacentto the Metriclabel to change thedepth from feet to
meters. This also changesthetemperature displayto degreesCelsitEs, âpeedto knots, and log to kilometers on the Ultra Plus.
Anr..j,tdl. LIrr .4 Co.or.— 1: 5PMM
% (M Fiz Aa,nny (*5% 2dMSL No.,.Ufl
The ADJ Display label lets you adjustthe display's contrastfor the
best viewingangle. Pressing this key gives you thecontrastadjust
menu. See the Display Contrast section for moreinformation on this
feature.
Whenthe UltraNavis firstturned on, thedisplaywill appearsimilarto
theone below. The word "AUTO" in the uppercenter of thedisplay
indicates the automatic feature is on. A small note symbolnext to the
"AUTO" indicator means the alarm speakeris enabled. •The digital
bottomdepth is displayedimmediately beneath theAUTO indicator.
—
fl
M
IWOJIMA
W
MARCUS IS.
NOKKAIDO
GESASHI
X
Y
1 3ARAGADA
;.
-.
6
PDF compression,
OCR, web-optimization with CVISION's PdfCompressor
h
•. •4•R.. •.. .j.,pq.t.Ij.1..t5j..
.
ji5'i7q''.•n,?...
'
;....c
.
.
I
SONAR OPERATION
AUTOMATIC
Whenthe UltraNav is first turnedon, the Automatic feature is enabled.
This is indicated by the word"AUTO" at the top ofthe screen. The
Automatic feature adjusts the sensitivity and rangeso the bottom
signal is displayedin the lower half of the screen at all times.
To turnAutomatic off, simply press theAUTO key. The lefters "Man"
appears, indicating the unit is in the manual mode. To turn Automatic
on, press the AUTOkey again.
.a
iiUTrP.. ----10
3$3FT
NORTHWEST PACIFIC LORAN.C CHAIN CR19070
REGIONAL MANAGERCOMMANDER. PACIFICAREA, ALAMEDA.CA.
CHAINMANAGER COMMANDER, 14THCOASTGUARD DISTRICT, HONDLULU, HI
COORDINATOR OF CHAIN OPERATIONS LDCATION. COMMANDER, FAREASTSECTION. YOKOTA, JAPAN
CONTROLSITE LORMONSTAVOKOTA, JAPAN
000LL
SWA
1KW)
ANIFPN'.45
lOIS
N0!
1350 Ft
M0!AOPOLO
'.0
STArI0!1
COOP.
WSThR
WOJIIM
JAPAN
244502.5W
1411030,3E
MARCUSISLAND
JAPAN
241707.914
l036053.2E
110001
4253.90
AN01R4-45
XMV
HOI0II0O
JAPAN
424427.IN
1434300.20
30005
0005.17
A1WPPN.45
500
YANKEE
0ESASMI
2E3025.014
1200550.45
50000?
AN'FP*45
600
4403,29
M4OLE
132700.114
144 4022,00
2535.04!
01000
750 Ft
los)
XMITIEP
TRANSMIt
ANTB'INA
05510.
•
WHISKEY
JAPAN
ZULU
BARRISADA
EGO
4_5
—
NOTES
1200ff
2100
MCO4OPOLE
0.0
025ff
0.0
DUALAATEw!oRI5070
625 Ft
0.0
DUALRATEWIOPISS7O
Ma4000LO
SENSITIVITY
Thesensitivitykey on the UltraNav controlsthe abilityof the unit to
pick up echoes. A low sensitivity level excludes much of the bottom information, fish signals, and othertarget information. High sensitivity
levels enablesyou to see this detail, but it can also clutterthe screen
with noise. Typically, the best sensitivity level shows a good solid
bottomsignal with Grayline and some surface clutter.
When the UltraNav is in the Automatic mode, the sensitivity is automaticallyadjusted to keepa solid bottom signaldisplayed, plus a little
more. This gives it thecapability to show fish and other detail.
PDF compression,98 OCR, web-optimization with CVISION's PdfCompressor
7
t}33FT
'---ED
113RAY1
However,situationsoccur where it becomes necessary to increase or
decreasethesensitivity. This typicallyhappens when you wishto see
more detail, so an increase in sensitivity is indicated. The procedureto
adjust it is the samewhetherthe unit is in the automatic or manual
mode.
To adjust the sensitivity, pressthe SENIS key. The sensitivity adjust
menu appearson the left side of the screen. The switchfor the
Graylineadjust menu is immediately beneath it.
The sensitivity menu has up and down,arrows, plus a vertical bar
graph. The graph gives a visual indication of the sensitivity level. The
numberabovetheup arrow' also shows the percentage of sensitivity in
use.
To increase the sensitivity level, press the key adjacent to the menu's
up arrow on the left side of the unit. As you pressthekey;the menu's
bar graph will growtaller and thepercentage will increase in value.
You can also seethe difference on thechart record as it scrolls. When
the sensitivity is at the desired level, release thekey.
To decreasethe sensitivity level, press the key adjacent to thedown
arrow. The bar graph and percentage will decrease. When the
sensitivity is at the desired level, release the key.
Whenyou reach eitherthe maximum or minimum limit, the speakerwill
sound an alert tone.
To turn the menus off, pressthe key adjacent to the CLEAR key at the
bottom left side of the unit.
'
8
'
97
PDF compression, OCR, web-optimization with CVISION's PdfCompressor
GRAYLINP
GRAYLINE® lets you distinguish between strong and weak echoes. It
"paints" gray on targets that are stronger than a preset value. This
allows you to tell the difference between a hard and soft bottom. For
example, a soft, muddy or weedy bottom returns a weaker signal
which is shown with a narrow or no gray line. A hard bottom returns a
strongsignal whichcausesa wide gray line.
If you havetwosignals of equal size, one with gray and the other
without,then thetarget with gray is the strongersignal. This helps
distinguish weedsfrom trees on the bottom, or fish fromstructure.
GRAYLINE® is adjustable. Since GRAYLINE® showsthe difference
between strong and weak signals, adjusting Sensitivitymay require a
differentGRAYLINE® level, also. The level chosen by the Ultra at
poweron is usually adequate for most conditions. Experimentwith
your unitto find the GRAYLINE®settingthat's best for you.
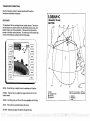
NORTHEAST U.S. LORAN-c CHAIN GRI9960
REGIONAL MANAGERCOMMANOER, ATLANTICAREA. NEWYORK,NY
CHAIN MANAGER COMMANDER, ATLANTIC AREA, NEWYORK, NY
COORDINATOR OF cHAINOPERATIONS LOCATION: LORSTA SENECA, NY
CONTROLSITE: LORSTA SENECA, NY
D®I0.
MASTER
ODELL
&TA'TI4
860400A,2W
OWE,.
OARBOU,OdE
075637.7W
XHAY
YANKEE
fltU
6W
q3jFT ---20
NW,I
((WI
AJ2FH4-94
(50(10001
000
700 Fr
MaIDPOLE
0.0
DUALHATE W/0R5070
1100W
270720
NdVFR.I.12
360
OLT
0.0
DUALHATE WIOREISO
ANdrFI1.12
325
620FT
0.0
DUALRATEWFSW003O
(601
4242SOON
40402724
'17W.040MIT
AI4TENKA
764023.9W
WHISKEY
PWR
9WUER
NOTES
4-c
NAI'IlJOKET
MA
411011204
606030.1W
200'
CARaWA
3403lOIN
050
TIP
0.0
DUALHATE W!0Rh7960
779446,7W
3000)!
3221.04
AWFPN-42
DEAtH.000
-395107.014
07201MW
6409W
3162.60
ANdFFN'44
400
625Fr
Ma4DPOLE
20
DLJALHATEW(0010970
DANAIN
a
'r
MWDPOLE
1900.51
Sc
-
GRAYLINE®—
r
To adjust GRAYLINE®,press theSENSkey. The sensitivity menu
appears in the upper left side of the display, while the GRAYLINE®
switch label appears immediately beneath it. First press thekey
adjacentto the "SENS GRAY" label. Thischanges the sensitivity
adjust menu to GRAYLINE® adjust. Now pressthe key adjacentto
theup arrow to increase the gray level. Press the key adjacentto the
down arrow to decrease it. The percentage of GRAYLINE® in use
changes as the arrow keys are pressed. The bar chart also gives a
graphical indicationof the GRAYLINE® level. You can seethe
change on the screen (both on the menu and on the chart record)as
PDF compression,96 OCR, web-optimization with CVISION's PdfCompressor
9
you pressthe keys. After you've made the adjustment, pressthe key
adjacentto theCLEARkeyto erase the menu.
RANGE- Automatic
Whenturned On for the firsttime, the UltraNav automatically places the
bottom signal in the tower half of thescreen. This is calledAuto
Rangingand is part of the automatic function. The rangecannotbe
changedmanuallywhile the unit is in automatic.
RANGE - Manual
40'
The UltraNav gives you control over the range when it's in the manual
mode. Both the lower and the upperlimit are adjustable.
To changethe range, first makecertain the UltraNav is in the manual
mode. If necessary, presstheAUTO key to switchto the manual
mode. Next, pressthe RANGEkey. Two arrows appearin the lower
left corper of the display. These arethe range adjust arrows: Press
the key correspondingto the upperor lower arrow to decreaseor
increase the range. The available ranges are 0-10, 20, 40, 60, 100,
150,200,300, 500, 900 feet. After thedesired range is displayed,
press the CLEARkey to erase therange arrows.
50'
NOTE: The depth capabilityof the UltraNav dej.ends on the
transducerinstallation, waterand bottom conditions, and other factors.
You can expect to read depths in excess of 350 feet in both fresh and
saltwater.
tilt:l1
0
18..3FT
t
ADJUE
RiiNG'
S
jcU
10
95
PDF compression,
OCR, web-optimization with CVISION's
PdfCompressor
ZOOM
Enlarging or "zooming"the picture isa commonmethod usedto show
small detail and fish signals. The UltraNav gives you two different
zoom sizes, plus a split screen zoom option. The zoom operationand
adjustmentis differentin theautomatic and manual modes.
ZOOM
- AUTOMATICMODE
To zoomthedisplay in theautomatic mode, first press the ZOOM key.
All targets on the displayare enlarged four times normal size automatically. The menus shown below also appear.
I}SE3FT
U.S.WESTCOAST LORAN-cCHAIN CR19940
----20
3?,&FT
0:
REGIONAL MANAGER COMMANDER. PACIFIC AREA,ALAMEDA, CA
CHAIN MANAGER COMMANDER. PACIFIC AREA, ALN'IEDA, CA
COORDINATOR OF CHAIN OPERATIONS LOCATION LORSTA MIODLETOWN, CA
CONTROLSITE: LORSTA MIODLETOWN,CA
1KW)
7NSM6T
.ANrslIa
601
XMVITSR
AWFPN-4M
400
625FT
+19
PWR
DEmo.
MASTER
STMIOI
FAlLOW,NV
ODOR.
In)
363306.6N
.
XItAY
VMIcEE
eEOAflWA
MIDDLETOWI
CASEARCHLIGHT
NV-
4703-WON
11944395W
11003/
204657.ON
27000/
-
AN'FFfI-IS
1600
OtT
+0.5 DUALPATEW/0flI6960
MI67PN44A
100
625F1
+0-6
540
OLT
0.0
3766.66
1r2944.5W 105430
3919162W
l4
4617-4W
NOTES
MOIOPOLE
11545 564W
WHISKCY
SOD
40003/
196730
MONOPOLE
AIEFFW44
SPUT SCREEN ZOOM
To switch targets between twice their normal size and fourtimes
normal, press the key adjacent to the "2X14X" label.
To switch between the spill screen zoom and full screenzoom, press
the key adjacentto the "SPLIT/FULL" label. The screen instantly
splits into two sections. All targets on the left are shown at fourtimes
the size of theones on the rigjit. If you switchto the 2X zoom mode,
echoes on the left sideof thescreen are shown at twice the size as the
ones on the right. The echoes that scroll acrossthe screen are the
exact same echoes on both sides of the screen. They're simply
enlarged on the left side. Thisfeaturetracks the bottom, keeping it on
thedisplay at all times, whenthe automatic feature is on. Once you've
set the zoom as desired,press the CLEAR key to erase the menus.
To turn theZoom feature off, press the RANGEkey.
PDF compression,94 OCR, web-optimization with CVISION's PdfCompressor
11
ZOOM - MANUAL MODE
When you press thezoomkeywhite theunit is in the manual mode,
thescreen shownbelowappears. The unit is automatically placed in
the4X zoom mode. For a 2Xzoom, simplypress the key adjacent to
the 2X/4X label. For a split screenzoom, pressthe key adjacent to
the SPLIT/FULLlabel. Remember, the UltraNav won't track the
bottom signal while it's in the manual mode.
'fB
----20
1g----D
cc
4OJUST I
<2XI
ec
ADJUST ZOOM
To adjustthe zoom, press the key adjacent tothe ADJUSTlabel. A
screen similarto the one on theright appears. A zoom bar and adjust
arrowsappear on the screen. The echoes on the left side of the
screen are the onesthat appearbetween thetop and thebottom of the
zoom bar. Pressthe keys adjacent to thearrows to move thezoom
bar up or down. As you adjustthezoom bar,the echoes move on .the
left side ofthe screen at the same time. The zoom adjust menus wilt
automatically clear a few seconds after you'vepressedthe last key.
ALARMS
The UltraNav hasthree different typesof alarms. The first is the Fish
Alarm. It sounds when the Fish l.D. feature determines a group of
echoes is a fish. Another alarm is theZoneAlarm which consistsof a
12
PDF compression,
OCR, web-optimization with CVISION's PdfCompressor
93
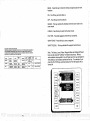
SELECT TYPE
OF ALARM
ALARM MENU
bar. Any echothat appearsinside this bar triggersthe alarm. The last
alarm is called the BottomAlarm. Only the bottom signal will trip" this
alarm. This is useful as an anchorwatch, a shallowwater alert, or for
GREATLAKESLORAN-C CHAIN CR1897D
REGIONALMANAGER COMMANDER, ATLANTICAREA, NEWYORK. NY
CHAIN MANAGER COMMANDERATLANTICAREA, NEWYORK, NY
COORDINATOR OF CHAIN OPERATIONS LOCATION:
LORSTASENECA. NY
CONTROLSITE:LORSTASENECAMY
D6210.
s1WTIi
009
WETER
DAkk,91
206!0791
P990
OD'OU
lYE)
XMUTEII
AIQFPN-44
0720121W
ft
WHISKEY
MA1.040.
XMY
EBIECA,
YANKEE
OAUOETTS
-
6KW)
4
-
TWANEEST
flhTB*
navigation.
N4
ECD
You can also turn the alarm speaker off throughtheALARM menu.
NOTES
626 Ft
MGIOPOIE
0.0
OOJALBATE000910900
700ff
0.0
DIJALRMEW!09I7060
DUALBATE W!G919060
300030.704
0510203W
110001
3390.11
ANIFPN-64
HOSE)
600
424200.0W
764932.0W
20000!
6162.06
AWFW4-64
000
700 Fl
M0!IOPLE
0.0
40204091
440004
ANIPFII-42
600
730 Fl
00
MGIOPOLE
HOGS)
FISH ALARM
Use the fish alarm for a distinctive audible alarm when fish or other
suspendedobjectsare detectedby the Fish LD. feature- To use the
fish alarm feature,first press theALARM key. Now press the key
adjacent tothe 'FISH" label- The menu shown below appears.
PDF compression, OCR, web-optimization with CVISION's PdfCompressor
92
13
To turn the fish alarm on, press the key adjacentto the "TURN ON"
label. Thescreenwill clearand returnto thechart display. Each time
a fish symboldisplayson thescreen, a tone will sound. The word
"FISH" shows in the lower left cornerof the screen. They will flash
when the alarm sounds.
To turn the fish alarm off, again presstheALARM key, then the key
adjacent to the "FISH" label. Now press thekey adjacent tb the
"TURN OFF" label. The alarm is now disabled.
ZONE ALARM
400
To activatethe Zone.Alarm, first press theALARMkey. Next, press
the key next to theZone Alarmlabel. The word s "ZONE ALARM"
show on the screen's right side,signifyingtheZone Alarmis active.
The adjustmentlabel appearson the loftside ofthe display, whereas
the zone bar showson thefar right side. Any echo that appears
between thetop and bottom ofthis barwill trigger thealarm. This
alarm will sound on fish, structure, bottom echoes, etc.
'}83FT
•IkflZ
- —ctJo
cNE
300
A
L
A
ISETI
_____ R
çSHAL F!J1I
5D
To adjust thetopof thezone alarm bar, first pressthekey nextto the
SET SHAL/DEEPlabel. The SHALletters appearin reverse. Now
press the key adajacent to the toparrow to movethetopof thebar
shallower. To adjustthetopof the bar deeper, press the key adjacent
to the down arrow. To adjustthe bottom of the zone alarm bar, again
press the key adjacent to theSET SHALJDEEP label. You can now
adjust the bottom of the zone alarm bar using thekeys adjacent to the
up and down arrows.
91
14
PDF compression,
OCR, web-optimization with CVISION's PdfCompressor
Onceyou've made theadjustments, press the CLEARkey to erase the
menus.
To turn theZone Alarm off, return to theZone Alarm menu,then press
the key adjacent to the "ALARM OFF' label.
DEPTH. ALARM
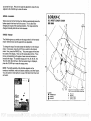
MEDITERRANEAN SEA LORAN-C CHAIN GRI7900
REGIONAL MANAGERCOMMANDER, COAST GUARD ACTIVITIES EUROPE. LONDON. UK
COASTGUARD ACTIVITIES EUROPE. LONDON. UK
CHAN Mk4AGERCOMMANDER.
COORDINATOR OF CHAIN OPERATIONS LOCATION: LORSTA SELLIA MARINA, ITALY
CONTROLSITE: LORSTA SELLIA.MARINA, ITALY
XIOT1SR
P000
8XWI
TRAN0WI
NITWM&
ANUFPN.39
¶80
825 Ft
M000POLE
CEBU.
DESIG.
STATES4
COQEL
NW4
000
MASIEP
SELLLk
0MRINA,ffALY
30 5220Th
I043302E
XMl
LMIPE000A
303120.00
320
010 FT
MaIGPOLO
03
1231 30.20
11086!
1750.00
AILS
F1A0X
YN1KEE
(AII0ABUALO4
TURKEY
400021W
27020130
29000!
3073.29
A9VFPN-39
186
025FT
M4C8'OLE
03
ZULU
ESTAPTIT
SPAS
420336.54
33 12 lOSE
47000!
3900.74
NUFFN-39
ISO
G2SFT
0.0
-
Ma!OPotE
NOTES
The Depth Alarmworks off the bottom signal only. No other echo will
triggerthis alarm. The Depth Alarm is actually twodifferentalarms. It
consistsof a shallow alarm and a deep alarm. The shallowalarm
sounds a warningtone whenthebottomsignalgoes shallowerthan the
alarm set point. The deep alarm sounds when the bottom signal goes
deeperthan the alarm set point. Use the shallow alarm to warn you of
shallowwater. Use thedeep alarm to alert you to deeperwater, such
as a drop-off.
0.0
To turnthe Depth Alarmon, pressthe ALARM key. Next, pressthe
key adjacentto the Depth Alarm label.
OEPTk
.s
cJ
33FT
ALARM
OFF
-'%ftJ
DEEP
ALARM
This brings youto the Shallow Alarm and Deep Alarm menu. The
bottom depth is shown at the top of the display. The shallow and deep
alarm adjustmentarrows are beneath the digital depth. Now simply
press the key adjacent to the up arrow to increasethe depth or the
90 OCR, web-optimization with CVISION's PdfCompressor
PDF compression,
15
down arrow to decreaseit on thedesired alarm. The shallowalarm
was adjusted in this example, so thekey adjacent to the up arrow on
the ShallowAlarm was pressed.
Thedeep alarm adjustsand activates exactlylike the shallowalarm.
The only difference is the sound thedeep alarm makes when the
bottom goes deeperthan thealarm depth. This tone is differentso
you can tell by the sound which alarm was triggered.
AUDIO ALARM ON/OFF
I
Whenthe UltraNav is firstturned on, theaudio alarm is automatically
enabled. This is indicated by a note symbolat thetop of the screen.
-z AUDIOALARMSYMBOL
----10
38,,3FT
-C
-C
C-c
ri
SELECT TYPE
OF ALARM
SSI
To turn the audio alarm on or off, press theALARMkey. Next, press
thekeyadjacent to the 'TurnAlarm Sound Off" label to turn the audio
off. To turn theaudio alarm on, pressthe ALARMkey again. The
label that was used to turn the sound off now reads "Turn Alarm
Sound On." Pressthe key adjacent to this label to turn the sound on.
NOTE: The words corresponding to the alarm in use will still flashon
thedisplay whenthe alarm is triggered even if thespeakeris turned
off. For example, theword 'ZONE" flasheswhen the zone alarm is
triggered.
89
16
PDF compression,
OCR, web-optimization with CVISION's
PdfCompressor
MENUS
The UltraNav uses menus extensively to guide you throughthefunctions and featuresof theunit. The menu key accessesmany of these
features, allowingyouto customize the unit to your particularneeds
and waterconditions. Although you mayhaveto leave one menu and
enter another to reach the desired function, all you haveto do is press
the menu key to select the next menu. If you ever get lost in a menu,
simplypress the key adjacentto the CLEAR label. There are eight
sonar menus accessible with the menu key. The menu key shows
differentmenus, depending on which mode the unit is in. For example,
if a sonar screen is showing, pressing the menu key will show the first
sonar menu screen. Ifthe plotterscreenis showing, pressingthe
menu key displaysthe first plotter menu screen.
.
.
—
ADJIJST
SONAR MENU - PAGE 1
SOUTHEAST U.S. LORAN-C CHA*I FRI 7900
REGIONALMANAQERCOMMANDER. ATLANTICAREA.NEVORICNV
CHAIN MANAGER COMMANDER.ATLANTICAREA. NEWVORK,NV
COORDINATOR OF CHAIN OPERATIONS LOCATION: LORSTA MALONE, FL
CONTROL SITE:LORSTA MALONE. FL
CDOBLL
00516.
STATION
COON.
MASTER
MJ'LOHE.
306939 TN
WHISKEY
0NGEVILLE
304339,04
004943.600
ft
LA
luol
XMTTER
PWR
IKWI
AWFF?4'64
OSlO *3W
166HO0'SI
TRAN6MFr
ANTB404
4
I
N4
ECD
700FT
M40FOLE
0.0
.0,6
110001
1609.64
ArFN-M
66HC03)
600
700FT
MONOPOLS
22009/
AWF090-64
400
700Fr
0.0
MeIOPOLE
XMY
OAflIONDVILJ,E,7X
263106,004
976060,1W
444326
YANKEE
JUPITER.Fl,
27010t4N
5006ESAW
420
NWFPO4-42
326
025FT
Ma4OPOLE
0.0
ZIIU
CAROLINA
340046,IN
600001
AMPFtI,42
660
'TiP
0.0
SOAOH,NO
770440,7W
0642,73
132H00S)
0901.09
TURN
CHARTSPEED
NOTES
DUALP.ATEW/0RIu970
I
The rateechoes scroll across the screen
is called thechart speed. It'sadjustable
by first pressing the menu key, then
pressing the key adjacent to the "ADJUST CHARTSPEED"label. Thechart
speed menu appears on the left side of
the screen. Increase thechart speed by
pressing the key adjacenttotheuparrow
or decreaseit by pressing the key adjacentto thedown arrow. The percentage
of chart speed in use changes as the
arrow keys are pressed. The bar chart
also gives a graphical indication of the
chartspeed. You canseethechange on
the screen(bothon the menu and on the
chart record) as you press the keys.
Afteryou've made the adjustment, press
the key adjacent to the CLEAR key to
FISH-ID
}33 FT
erase the menu.
To stopthechart, pressthekey adjacent
tothe "STARTSTOP"label. Repeat this
step to start the chart again.
88 OCR, web-optimization with CVISION's PdfCompressor
PDF compression,
17
SONAR MENU - PAGE 1
FISH l.D.
The Fish LD. feature identifies targetsthat meet certainconditionsas
fish. The micro-computer analyses all echoes and eliminatessurface
clutter, thermoclines,and other signals that are undesirable. In most
instances, remaining targets are fish. The Fish LU. feature displays
symbols on thescreen in placeofthe actual fish echoes. There are
fourfish symbolsizes:tiny, small, medium, and large. These are used
to designatetherelative size between targets. In otherwords, it
displaysa small fish symbolwhen it thinks a target is a small fish, a
medium fish symbolon a largertarget, etc.
The micro-computer is sophisticated, but it can be fooled. It cannot
distinguishbetween fish and other suspended objectssuch as trotlines, turtles, submerged floats, air bubbles, etc. Individual tree limbs
extendingoutwardsfrom a group of limbs is the hardestobject for the
Fish l.D. featureto distinguish from fish. You may see Fish ID.
symbolson the screen when actually, there are no fish. Practice with
the unit in both the Fish l.D. mode and withoutto becomemore
familiar with the Fish l.D. feature.
38.3 FT
500
CHiiRT
20*
40°
.1
OFF
A
When the UltraNav is turned on, the Fish 1.0. feature is automatically
turned on, also. To turnthe Fish l.D. featureoff, pressthemenu key,
then pressthe key adjacent to the "Turn Fish-ID Off" label. Or press
theAUTO key. This turns the Fish 1.0. feature and automatic off at
18
PDF compression,
OCR, web-optimization with CVISION's PdfCompressor
87
the same time. To turn the Fish l.D. feature on again, first press the
menu key. Next, pressthe key adjacent to the "Turn Fish-ID. On"
label. The menu immediately disappears and thesonar screen
returns. Echoeswill continue to scroll across the screen, however, the
surface clutterwill no longerbe displayed. Anytargets the microcomputerdetermines are fish will be displayedas fish symbols.
Remember, the Fish ID. featurecannotbe used when the UltraNav is
in the manual mode. If you turn the Fish l.D. feature on when the
UltraNav is in manual, the micro-computer will turn the automatic
feature on. If you turn automatic off when the Fish 1.0. feature is on,
theFish LD. feature will be turned off also.
SONARMENU - PAGE 2
NORWEGIAN SEA LORAN-cCHAIN GRI7970
REGIONAL MANAGER. COMMANDER, COAST GUARD ACTIVITIES EUROPE, LONDON, UK
CHAIN MANAGER COMMANDER. COAST GUARD ACTIVITIES EUROPE. LOND,UK
COORDINATOR OF CHAINOPERATIONS LOCATION: LORAN-C DETAILKEFLAVIK, ICElAND
CONTROL SITE; LORMONSTA DEFIAVIK, ICELAND
•
00510.
TRANSMJT
AN1B4NA
mffFl4-44
320
025FT
AOSTII1-30
166
142747,00
11020/
4048.10
544026.04
00172020
20000/
4305.62
AWFFI4.42
320
SANDUR
I0e,ANO
046420Th
40062/
ANPW4-45
620021.0W
l6
2044,64
JMJMAYEO4
7264523W
AWFFISS
166
NORWAY
004300.7W
60000/
620031
MASTER
0CM?
Ec.NOSWAY
WHISKEY
SYLT
SEAM/AMY
216.2
'WA
1KW)
0000.
EJDE,FAOROE 021750,0/8
I0,,00NMAAK
070420.5W
YAM/CEO
000LL
0CM/TIES
0TA71004
00200624
148)
M4DF0/E
______
Nfll
000
0.0
HOlES
DUALBATE W/0R17020
__________
—
—
______ — __________
easFr
M00IOPOLE
0,0
625 Fl
0,0
M8OPOL0
ISOOFI
MONOPOLE
0.0
625F1
MO4OPOLE
0.0
DUAL RATSW/0R07020
•
CHARTCURSOR
The UltraNav has a chart cursorthat allowsyouto pinpoint atarget'sdepth. The
cursor is simply a horizontal line that
extends across the display from left to
right. A depth box at the end ofthe line
ontherightsideshowsthelirie'sdepth.In
theexample below,the cursor (line) is at
30.2 feet.
To display the chart cursor, press the
menu key twice. Now press the key
adjacent to the "TURN CHART CUR
SOR ON" label. A screen similarto the
one below appears.
Usethe keys adjacent tothe up and down
arrow to movethe cursor up or down to
the desired depth.
To turn the chart cursor off, press the
menu key twice. Now press the key
adjacent to the "TURN CHART CURSOROFF"label. The UltraNavreturnsto
the sonar screenwithoutthechartcursor.
NOTE: The Chart Cursorwill not work
when FASTRAK is on, or when the
Zone Alarm, or Zoom Windowbars are
activated.
.1
-H-
4
it.
r.ptL
ON
__________
__________
________________
----20
q33FT 0
.
a0
e
PDF compression, OCR, web-optimization with CVISION's PdfCompressor
86
19
SONAR MENU - PAGE 2
FASTRAK
This feature converts all echoes to
short horizontal lines on thedisplay's
far right side. The graph continues to
operate normally. FASTRAKgives
you a rapid update of conditions directly under the boat. This makes it
useful for ice fishing, or when you're
fishing at anchor. Sincethe unit is not
moving, fish signals are long, drawn
out lines on a normal chart display.
FASTRAK converts the graph to a
vertical bar graph that, with practice,
makes a usefuladditionto fishing at a
stationary location.
To turn FASTRAKon, press the menu
key twice,then pressthekeyadjacentto
the "TURN FASTRAKON" label. To
turn it off, repeat the same steps. The
"TURNI FASTRAKOFF" label appears
instead of the '9URN FASTRAK ON"
label.
SONAR MENU - PAGE 3
cs
i
SELECT DIGITAL DISPLAYS
The UltraNav can display the depth,
speed, surface watertemperature, and
distancelogontheupperleftportionof
the screen, ifthe optionalEST-T speed'
temp sensor is attached. It can also
show your position in latitude/longitude or TDs. When the UltraNav is
first turned on, only the depth is displayed. Each digital display can be
turned on or off as desired.
20
II.
.4
DIGITALS
I
4
.
b
85
PDF compression, OCR, web-optimization with CVISION's
PdfCompressor
•. ...........
.1.5.
To selectthe digital displays menu, first
pressthemenu key three times. Next,
pressthekey adjacent to the"SELECT
DIGITAL DISPLAYS" menu at the top
of the screen. A screen similar to the
one at right appears.
Now press the key adjacent to the
desired display. For example, to turn
the temperature display on, press the
key adjacent to the "TEMP. IS OFF"
label.
Onceyou do this, thedisplay will show
thetemperature and read "TEMP. IS
j
ON". You can turn each displayon or
off individually.
Pressthe CLEAR key to exit from thismenu or wait approximatelyten
secondsand the menus will automatically clear.
NOTE:The "LORAN IS OFF" means the loran positiondisplay on the
sonar screen is off. This screen does notturn the loran on or off.
GULFOF ALASKA LORAN-C CHAIN SRI7950
REGIONAL MANAGER: CCMMANCER, PACIFICAREA ALAMEDA, CA
17TH
CCAST
GUARD
CHAIN MANAGER: CCMMANDER
DISTRICT, IUNEAU AK
COORDINATOR OF CHAIN OPERATIONS LOCATION: LCRMONSTA KODIAK. AK
CONTROL SITE:LORNDNSTA
KODIAK. AK
CESIG,
STATION
COOR-
CD/BLL
(Us)
0/MUTTER
(KW)
ANTENNA
ECC
AN/FPN-44A
540
SLT
.i.1.D
AN/FPN-44A
400
625FT
0.0
MASTER
TCK
AK
6310 42.0 N
1424831.0W
XRAY
NARROW
CAPE
572620.2N
152 2211.3W
11000!
2004.45
SHOALCOVE,
AK
55 26 20.0N
1311519.6W
-
26000
3051.14
AN!FPN—14A
540
SL.T
PORT
CLARENCE
ES 14 40,0 N
1665312.6W
44000
3932.52
AN/FPN-44A
400
N/A
YANKEE
ZULU
I
NCM
PWR TRANSMIT
NOTES
SONAR MENU - PAGE 3
SELECTDIGITALSIZES
MONOPOLE
.
.
DUAL
RATE WI
GM 0090
0.0
DUAL
J
I
N/A
RATEWI
SRI0990
The digital displays can be shown in three differentsizes- small,
medium, or large. To change the size of the digital display, first press
the menu key three times. Now press thekey adjacent to the
"SELECTDIGITAL SIZES" menu. The screenshownbelow appears.
SELECT DIG.
SELECT
DIGITAL
4
-'4
at
—4
'
-•
.4
itiS
N
I
SLC
SIZES
—II
i
wr1:t]
4!
b.
— .
PDF compression,84 OCR, web-optimization with CVISION's PdfCompressor
21
Now simply pressthe key adjacent to the desired label. For example, if
you press the key adjacent to the "SMALL"label,thedigitaldisplays
are shown in small numbers.
The large digital selection erases the chart and shows the digital
displaysin large. Pressing the menu key givesonly one menu page
which is differentfrom other menus. This menu lets you go back to
chart information, placingthe digitaldisplayback in the mediumsize,
select digital displays, and adjustthedepth alarm. Returning to the
chart restoresthe normal menu operation.
SELECT DIG.
SIZES
ri w
I
w
)
tIJ
w_
fl!1
SMALL DIGITAL DISPLAY
SONAR MENU - PAGE 4
SELECT UNITS OF MEASURE
The UltraNavcan displaythewater depth in feet or meters, surface
water temperature in degreesFahrenheit or Celsius, speedin statute
miles per houror knots, and distance(log) in miles or nautical miles.
This menu switchesall displaysto their metric equivalent and back
again. You cannot switcheach display individually.
To changetheunitsof measure, firstpressthemenu key fourtimes. The
screenaboveleftappears. Next, pressthekey adjacent tà the "SELECT
UNITS OF MEASURE"label. The screen at the above right appears.
Nowpress the key adjacent to the"CHANGETO METERS, °C, NAUTICAL MILES" label. The unit of measure will change to the metric
equivalent. Repeat thesamestepsto switchtheunitsof measure again.
83
22
PDF compression,
OCR, web-optimization with CVISION's
PdfCompressor
UNITS OF
MEASURE
ARE IN
.;..:
FEET
MILES
ol
:T,URN.1
BPiCKLIGHT
ON
4
LABRADOR SEALORAN-cCHAIN CR173O
REGIONAL MANAGER COMMANDERATLANTIC AREA NEWYORK, NY
CHAIN MANAGER COMMANOER, ATLANTIC AREA. NEWYORK, NY
COORDINATOR OF CHAIN OPERATIONS LOCATION: LORMONSTA ST. ANTHONY, NEWFOUNDLAND, CANADA
CONTROL SITE:LORMONSTA ST.ANTHONY, NEWFOUNDLAND
DEBIG.
STMIJ
CA.
CDW0L
(us)
362
P/ABlER
FCXHARBOUR 6222
NPLD,CANAN 664220,-lW
WHISKEY
CAPE PACE
NR.D. CAMAB
46463225
110001
531022.2W
2167.31
XMY
nIBIOSoC
GREE4LAHO
1725
451027.0W
20000!
-3505.09
BOOR
.
N
PWP
TRANOMP
OMITtEB
1KW)
AN1'ONNA
SOD
ANfI'PN-64
IOOHCBE)
003
700 PT
OA4OYOLE
EC
DUALRA'IBWIORSEJO
AWFPN-45
1500
1350 Fl
MONOPCLE
0.0
DUALRATEW/0P15500
ANIFPII.4S
705
GOSH
M01IOPOLB
0.0
DUALRATEW!5R19060
NOTES
:
4
,1
-
-
CHANGE TO
METERS .°C
ri:tLES-.
____
SONARMENU - PAGE4
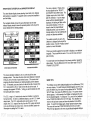
BACKLIGHTS
The UltraNav has internal lights for the display and keyboard. To turn
these on, pressthe menu key four times,then pressthekeyadjacentto
the"TURNBACKLIGHT ON" label. To turnthebacklights off, repeatthe
same steps.
SONARMENU-PAGE5
SPEAKERVOLUME
The speakervolume has two steps low and high. The speakervolume is
highwhen the unit is firstturned on.
To change it, first press the menu key
five times. Now press the key
adjacentto the "SET SPEAKER
VOLUMELOW" label. To switch
back to the high volume, repeat the
above steps.
rSETPEAKEP
-j
DISPLAY
CONTRAST
4!:
23
PDF compression,82 OCR, web-optimization with CVISION's
PdfCompressor
P' SET SFE(.iVEF
SONAR MENU - PAGE 5
DISPLAY CONTRAST
The unit's display contrast is adlustable to suit different lighting
conditions. To adjustit, first press
the menu key five times. The
menu shown aboveappears.Now
pressthekeyadjacentto the "AD-
r':
proximately ten seconds andthey'll
automaticallyclear.
CANADIAN WEST COAST CHAIN
GRI 5990
This diagram reflects
observed data.
50'
4
JUST DISPLAY CONTRAST", The
displaycontrastarrows appearon
the left side of the screen. To
increase the contrast, press the
key adjacentto the up arrow. To
decrease it, pressthe key nextto
the down arrow. Press the Clear
keytoerase the menu,orwait ap-
LORAN-C
4
----20
.4
4-C
S
40°
PRESET-MEMORY
The UltraNavsaves all settingssuch as sensitivity, chart speed,
display contrast,and more in battery backed-up memory. This memoryis retainedeven if poweris disconnected fromtheunit. If you need
to return thesonar settingsto thefactory defaults, firstpressthe
MENU keywhile a sonar screen is displayed five times. The screen at
thetop of this page appears. Now press thekey adjacent to the
"PRESETSONAR"label. The unit will reset, return to a sonar screen
with all of the originalfactorysettings.
NOTE: Preset does not affectthe loran operation, nor does it erase
any loran settings, waypoints, or routes.
24
PDF compression,
OCR, web-optimization with CVISION's PdfCompressor
81
SONAR MENU - PAGE 6
DIGITAL SONAR
CANADIN WESTCOAST LORANCCHAIN GRI509D
ID. feature.
REONALMANAGER COMMANDER. PACIFIC PBEA, ALAMEDA. CA
To turn the digital sonar off, press the Menu key six times. Now press
the key adjacent to the "TURN DIGITAL SONAROFF" label. To turn
it back on again, repeat the samesteps.
CHAIN MANAGER COMMANDER. PACIFIC AREA, ALAMEDA. CA
COORDINATOR OF CHAIN OPERATIONS LOCATION: LORSTA MIDDLETOWN. CA
CONTROLSITE: LCRSTAWILLIAMS LAKE. BC.CANADA
I
00310.
MASTER
TRMISWT
ANTOINA
7fl
ODD
A05FPN44A 400
525FT
+IT
OD3LL
01ATI0!4
WILLIAMS
LPJ{0,90.
ODOR.
(95)
51 6769.0K
.
122r02.2w
PElT
XhOTTER
1KW)
M40PC1E
NOTES
-
ONOADA
ORAY
SHOAl.COVE
AK
052620.9W
131 1510.7W
11200!
7343.00
AWFPN-4M
540
OLE
VAM(EE
000AGE.WA
470345.0W
1194439.5W
27020!
152730
ANIFFO4.46
1620
ELT
ZISU
FOOlHARDY
BC.CN4AOA
602029.7W
12721 20.0W
40000!
MilFFl404
I2SHCTS)
400
025FT
M0!409011
¶205.61
TURHIHO OFF
When the UltraNav is turned on for the
THE DIGITAL
first time, the digital depth display is
WILL DISABLE
ALL OF THE
located at the top left corner of the screen.
AUTOMATIC
Thisdisplaycomes froma separate digiFEATURES
tal sonar built intothe Ultra. It displays
If
it
loses
the
the
bottom
depth.
4
only
bottom,the lastknown depth willflashon
the display. When the digital finds the ____________ _____________
bottom, it will automatically display the
bottom depth again.
The digital sonar can be turned off, however this also turns all automaticfeatures off also, suchas auto sensitivity, auto ranging,andtheFish
0.0
.
DUALRATE09/GAl7000
SONAR MENU - PAGE 7
FISH l.D. ON
-tOO DUALAATEW/0R10940
0.0
ALEATBAY
r
:1-..
YET
NOISE
F EJECTIOLI
NOISE REJECTION
The UltraNav's noise rejection feature
is an effectivetool in combating
noise. In sonar terms, noise is any
undesired signal. It is caused by
electrical and mechanical sources
such as bilge pumps, engine ignition
systems and wiring, air bubbles passing over the face of the transducer,
even vibration from the engine. In all
cases, noise can produce unwanted
marks on the display.
_________
__________________________
The UltraNav has atwostep.noiserejection system. When the unit is
turned on, the noise rejection is on normal. If you have noise problems
(identified by random lines or dotson the display), try changingthe
noise rejection level to high.
25
PDF compression,80 OCR, web-optimization with CVISION's
PdfCompressor
To do this, first press the menu key seven times. Now press the key
adjacent to the "SET NOISE REJECTION"label.
Thescreenatthelowerright appears. Nowpress thekeyadjacenttothe
'SET HIGH" label. The screenwill clear and return to the chart screen.
Thenoiseshouldbe cleared fromthedisplayas newechoes scroll across
the screen. If it isn't, you may have a problem with electrical wiring,
engine, or transducerinstallation. Check with your local dealer, Eagle
servicecenter,ortheEaglefactorycustomerservicedepartment forhelp.
.:.:::iJ
NO]$E
CHART NOISE
LORANC
EAST ASIAN CHAIN
GRI 5970
50°
REJECTION
REJECTION
IS SET
'a
I
'4
I4
40°
I
SONAR MENU -PAGE 7-ASP
(Advanced SignalProcessing)
ASP is a programembedded in the UltraNav's computerthat continually monitorsthesignalsfrom the receiver, It determines which
echoes are noise, rejects them, allowingtarget echoes to be displayed
with a minimum of screen clutter. This feature is especially useful,
since it typically allowsyou to operatetheboat at all speedswithout
adjustingthe sensitivity. Whenthe UltraNav is first turned on, ASP is
enabled. To turn ASP off, pressthe menu key seven times. The
menu shown aboveon the left appears. Nowpressthe key adjacent
to the "Turn Off ASP' label. The unitwill return to the sonar screen
with ASP off. To turnASP on again, repeattheabovesteps.
26
PDF compression,
OCR, web-optimization with CVISION's PdfCompressor
79
SQNAR MENU - PAGE 7- FISH 1.0.
-J
________________
OFF
SURFACECLARITY CONTROL 5CC
The markings extendingdownwards from
thezerolinecanextend many feetbelow
thesurface. These markings are called
surface clutterand are caused by wave
action, boat wakes, temperature inver
sion, and more.
EASTASIAI'J LORAN-C GRI5970
REGIONAL MANAGER: PACIFIC AREA, ALAMEDA, CA
CHAIN MANAGER: COMMANDER 14TH COAST GUARD DISTRICT, HONOLULU, HI
COORDINATOR OF CHAIN OPERATIONS LOCATION: COMMANDER, FAREASTSEGTION, YOKATA, JArAN
CONTROL SITE: LORMONSTAVOKOTA, JAPAN
CDIELL
lusI
DEWS.
STATION
00CR,
MASTER
FOHAFJG
KOREA
2411 WaN
1292027,30
IIOKKAIDO
JAPMI
424427-iN
14a409.2E
XRAY
KWN4SJU
KOREA
25 2223.SN
T26322S.7E
YANKEE
EESASHI
JAPAN
262625.94 42F
¶2600 56,40 2565,56
WHISKEY
11I
XMI'RER
PWR
IK%R
TRANSMIT
ANTENNA
NOM
EDO
AWT1RN'28
25
FT
-1,5
AMIWH'45
4797.66
21000/
947.52
1
I1NIThN-29
76
AI4IFPN4S
1000
4
MCNDPCLE
NOTES
USAFMANNEO
________________
•.•:SETHCt4AF1T1
SUF FACE
CLARITY
___________________
gflJaJa1a
________ _______
SurfaceClarity Control, or SOC reduces or eliminatesundesiredsignals
fromthedisplay. 3CC variesthesensitivity ofthereceiver, decreasingit
nearthe surface and gradually increasing ft as the rangeincreases. TypiFor
cally, the maximum depth that 3CC affects is 75% of the range.
clutter
would
with
maximum
surface
on
a
0-60
foot
SCC.
range
example,
be reducedto approximately 45 feet.
I.,..
I..
•
,0.6
DUALRK6SWSRI997
400 FT
MDNOPaE
-1.75
USAFMANNED
626 FT
MONOPOLE
0.0
DUAL MATEP4/SRI"?
6ZSFT
HCIISE
:PtjEct104.:
MONOPOLE
Thereare three levels ofSOCavailable whenthe Fish 1.0. feature is off:
low, medium, and high. When the Fish 1.0. featureis on, the 5CC is not
adjustable and this menu doesn't shown on the display.
SCC
4
To adjust the SOC. make certain the
Fish ID. feature is off, then press the
MENUkeyseventimes.Now pressthe
key adjacent to the "SET CHART
SURFACE CLARITY" label. Finally,
press the key adjacent to the desired
3CC level. The unit will return to the
chart, usingthe level of 3CCyouchose.
IS
SELECT
—
7.
27
PDF compression,
78 OCR, web-optimization with CVISION's PdfCompressor
MENU -PAGE 8
DISPLAY ZONE BAR
The bar used in the zone alarm normallydisappearsafterthealarmisset.
It can be turned on continuously, if
desired. To turn the zone alarm bar
on, press the menu key eight times.
Now press the key adjacent to the
"DISPLAY ZONE BAR" label. The
menu screen disappearsandthezone
alarm bar displayson the right side of
thescreen. Thiswill alsoturnthe zone
alarm on if it wasn't already on. Repeatthesestepstoturnthezonealarm
bar off. Turning it off also turns the
zone alarm off.
MENU - PAGE 8
DISPLAY ZOOM BAR
Whenthe tiltraNav is in the manual
mode, theZoom Bar can be turned
on continuously. To do so, first
make certainthe Ultra is in the
manual mode,then pressthe MENU
key eight times. Now press thekey
adjacentto the "DisplayZoom Bar"
label. Note: The zoom bar only
shows in the Split Zoom mode.
ZOOFi BAR
.1
CLEAR
______I'
ii
28
PDF compression,
OCR, web-optimization with CVISION's PdfCompressor
77
•
TRANSDUCERCONE ANGLES
The sound waves from the transducer spread out intothe water in a
cone shaped beam. Thislooks much like the beam from a flashlight.
The angle betweentheoutsideedges of the cone is the cone angle.
Eagleoffers a choice of transducers with either an 8 or 20 degree
cone angle. The transducer supplied with the Ultra has a 20 degree
cone angle. Typically, wide cone angle transducers (20 degrees) are
ideal for operating in shallow to mediumwaterdepths. The 20 degree
cone angle allows you to see more of theunderwater world. In 15
feet of waterthe 20 degree conecovers an area about six feet across.
The 8 degreetransducer covers only about a two foot circle.
The20 degree transducer is almost always the best to use in fresh
water, the 8 degree mostly in salt water. In a deep water environment, (300 feet - fresh water, 100 feet salt water) the narrow cone
angle is more desirable. Since the sound energy concentrated in a
smallerarea, it can penetrate to much deeper depths.
i'
CANADIAN EASTCOAST LORAN-C CHAIN CR15930
REGIONALMANAGER COMMANDERATLANTIC
CHAIN MANAGER COMMANDERATLANTIC AREA
COORDINATOR OF CHAIN OPERATIONS LOCATION
NEWFOUNDLAND CANADA
CONTROLSITE: LORMONSTAST.ANThONY,
[!
bt'StER
(RAY
srA111
CARBOU hE
NN4TUCI(E1
4116llSI
695539.1W
CAPE RACE
NRDCAKAIIA
ZILIJ
I'OXHAJIBOUR
NR.DCMaDA
50'
100'
150'
200'
76 OCR, web-optimization with CVISION's
29
PDF compression,
PdfCompressor
•
Both 8 degree and 20 degree transducers give accurate bottom readings, even though the bottom signal is much wider on the 20 degree
model. This is becauseyou are seeing more of the bottom. Remember, the shallowedge of the signal showsyou thetrue depth. The
rest of the signal tells you whetheryou are over rocks, mud, etc.
SIGNAL INTERPRETATION
Your UtraNavgives an accuratepicture of the bottomthat your boat is
passing. A bottom of firm sand, gravel, shell, or hard clay returns a
fairly wide signal. If the automatic mode is off and thesignal narrows
down, then it meansthat you have moved over a mud bottom. Mud
absorbsthe soundwave and returns a weaksignal. Turn up the
sensitivityto see a betterbottom signal.
Big rocks or stumps on a smooth bottom send back signals abovethe
bottom level signal. The height of thesignal dependson thetarget's
height. As you pass over a post, it should be clearlyvisible as a short
line extending abovethe bottom signal.
A steep slope returns a wide signal, the steeperthe wider. Signals
returnedfrom a high underwater cliff are usually the widest of all.
DIGITAL
BOTFOM
DEPTH\
333FT
4-:
WAYPT
SAVE
WAYPTN
RECALL/
;.":.
:r.c
-
OIF
ON
75
30
PDF compression,
OCR, web-optimization with CVISION's
PdfCompressor
FISH ARCHES
Fish arches are created when the cone of sound passes over a fish.
The distance to a fish when the cone first strikes it is shown as "A"
below. When the center of the cone strikes the fish, the distance is
shorter as shown "B". As the cone leaves the fish, the distance
increasesagain as shown in "C".
BOATS DIRECTION OF TRAVEL
CENTRAL PACIFIC LORAN-C CHAIN CR14900
REGIONAL MANAGERCOMMANOER. PACIFIC AREA.ALAMEDA, CA
CHAIN MANAGER 14THCOAST GUARD DISTRICt HONOLULU, HI
COORDINATOR OF CHAIN OPERATIONS LOCATION: OMSTA KANEOHE, HI
CONTROLSITE:OMSTA KANEOHE, HI
DESIG.
MSTER
STATIOl
JOwsr'4
IGLANOHI
IXMV
VAM(EE
UPCLIJ
H'
OW
KUREISLAND
HI
1
.1
adln-
B
A
When the Fish I.D. mode is off, the depth ofthewaterwill affectthesize
and shape of the fish arch due to the cone angle diameter. For
example, if the cone passes over a fish in shallow water, the signal
displayedon the UltraNlavmay not arch at all. This is due to the narrow
cone diameterand the resolution limitations of the display.
74 OCR, web-optimization with CVISION's PdfCompressor
PDF compression,
31
Very small fish probablywill not arch at all. Mediumsizedfish will show
a partial arch, or a shape similar to an arch if they're in deep water.
Largefish will arch, but turn thesensitivity up in deeperwaterto see the
arch. Because of water conditions, such as heavy surface clutter,
thermoclines, etc., the sensitivity sometimes cannot be increased
enoughto getfish arches.
3. If you're using the loran on land, keep away from trees, buildings,
and (most important)power lines. The loran will not work inside a
building, or under a metal carport, shed, etc.
(NOTE: These units are designedfor marine(boating)
purposes and generally work best on the water.)
One of the best ways to get fish arches is to expand or "zoom" a
segmentof thewater. For example, from45 to 60 feet. The smaller the
segment, the betterthe screen resolution will be. The easiestway todo
this on the UltraNav is with the Bottom Track feature. Use the2x or 4x
Bottom Track mode to expand the echoes, making it easier to see
detail. For the best results, turn the sensitivity up as high as possible
withoutgettingtoo much noisepn the screen. In mediumto deep water,
this method should work to displayfish arches.
4. If you're having trouble with the unit locking on to the stations,you
may have a piece of gear such as a radio, bilge pump, or engine
that is causing interference. First turn everythingin the boat off,
then try initializing the unit. Entertheinitial position first. If that
doesn'twork, then try the GRI. If the unit still doesn't lock on, then
look for other sourcesof interference. (see below)
Ifyou see fish signals whentheunit is in the manual mode, but don't get
INTERFERENCE SOURCES
fish symbols when the Fish I.D. feature is on, try increasing thesensitiv-
or BAD RECEPTION
Land Sources:
1. Military installations. (High power transmitters in the loran band.)
2. Hydro-electric plants. (Dams)
3. High voltage power lines. These radiate noise at high levels.
WATER TEMPERATURE AND THERMOCLINES
Water temperature has an. important-if not cdntrolling-influerice upon
the activities of all fish. Fish are cold blooded and their bodies are
always the temperature of the suritunding water. During the winter,
colder water slows down their metabolism. At this time, they need
about a fourth as much food as they consume in the summer.
Most fish don't spawn unless the water temperature is within rather
narrow limits. The surface temperature meterbuilt into the Ultra Plus
helps identify the desired surface water spawning temperatures for
various species. Trout can't $urvive in streams that get too warm.
Bass and otherfish eventuallydie outwhen stocked in lakesthat remain
too cold during thesummer. While somefish have a widertemperature
tolerance than others, each has a certain range within which it tries to
stay. Schooling fish suspendedover deep water lie at the level that
provides this temperature. We assumethey are the most comfortable
here.
4. Storms. A storm between you and the loran station can interfere
with the signals, even if it's many miles away.
5. Mountains, trees, buildings. These reflect the signals.
Try to stay
in an open area.
Boat Sources:
1. Boat engine. Resistorsparkplugs help, alternatornoise filter may
also be required.
!
2. Power cable routed to fuse panel instead of directlyto battery.
Route
power cable directlyto thebattery.
3. Bad antenna placement. The antenna should be placed in an
open area on the boat, away from otherantennas or structure.
4. Fluorescent lights.
32
73
PDF compression,
OCR, web-optimization with CVISION's
PdfCompressor
UNITS OF
MEASURE
IN
..t1A1Jt;.: FiiL•ES
r
RNC F S
Simply press the key adjacent to the
"CHANGE TO MILES AND MPH"
label and the UltraNav will return to
the last used loran screen, showing
the new units of measure.
"I
830
CHAhi'3 TO
MILES AND
To switch back to nautical mites and
knots, repeatthe above steps. The
menu will now read 'CHANGE TO
NAUT. MILES AND KNOTS". Press
thekey adjacentto that menu to
switchthe units of measure.
78°
SURFACE LAYER
ABSORBS HEAT.
FROM THESUN
770
EPILIMNION
760
BACKLJGI-ITS
TheUltraNav's keyboard and display
are backlightedfor night use. To turn
the backlightson or off, press the
MENU key, then press the key
adjacentto the "CHANGE SETUP"
label. Now pressthe MENU key
threetimes. The screen at left
appears. Simply press the key
adjacent to the "TURN BACKLIGHT
ON/OFF" label. lithe lights are off,
they will turnon. If they wereon, this
will turn them off.
r
T
'1
SELECT
UNITS OF
F1EASURE,
c. -a?
THERMOCLINE
'MOSTpRoDucTivE
ZONEFOR FISHING
68°
56°
500
'I________ ________ b.
LEAP
LORAN TROUBLESHOOTING
1. You must have an 8' antenna. Preferably, the entire length of the
antennashould be higherthan anything else on the boat.
2. For best results, wire thepowercable directlyto the battery,
preferably the main engine's cranking battery. This assures the
boat will be grounded, since thelower unit is in the water. If you're
using an isolated battery, wire a grounding plateto the ground side
of the battery. The loran will work better if it's grounded to water.
470
The temperature pf water in the lake is seldom constant from top to
bottom. Layers of differenttemperatures form, and the junction of a
warm and cool layer of water is called a thermocline. The depth and
thicknessof thethermocline can varywith theseasonor time of day. In
deep lakes there may betwo or more at differentdepths. Thermoclines
are important to fishermen because they are areas where fish are
active. Many times bait fish wilt be above the thermoclinewhile larger
game fish will suspend in or just belowit.
The UttraNav can detect this invisible layerin thewater, but the sensitivity will probably have to be turned up to see it.
33
PDF compression,
PdfCompressor
72 OCR, web-optimization with CVISION's
SURVEYINGA LAKE
The most successful anglers on any body of water are thosewho fish it
day after day and year afteryear. Eventually, they learn thehotspots
that produce fish consistently. They discover through experience
where, and at what depth,they can expect to find thefish they want at
any season. And they realize that these productive areas change
throughout the year dependingon water level, temperature, food, and
other factors.
With the Ultra, anyonecan eliminate guesswork and concentrate on the
areas where fish are likely to be. Even if it's thefirst time on the lakef
The most efficientway to becomeacquainted with a body of water is to
survey it with your UltraNav. Start with a map of the lake, if possible,
and indicatethepromisingspots in relation to landmarkson shore.
As you go about your survey, your UltraNav will tell youthe depth and
type of bottom. It will also reveal suspended fish.
Keep a few markerbuoys in the boat, ready to toss overboard. When
the Ultra indicates a school of fish, throwthe buoy out. With theschool
thus marked, you can makeyour turn and come back to fish in exactly
the right spot. This is essential when you're far from shore on a big
lake. Unless you mark the school of fish when you're over it, you may
notbe ableto find it again.
BAIT FISH
The importanceof bait fish to successful fishing can't be over-emphasized. They are the principlefood of all game fish in mostwaters.
Bait fish are the plankton feeding forage fish, such as minnows and
shad. Bait fish can also be the young of game fish, such as crappies,
bluegill, and bass.
Most bait fish concentrate within five feet ofthe surfacewhere sunlight
promotesthe growth of the plankton on which they feed. One method
of fishingis to usethe UltraNav to findthe baitfish first. With the Fish ID
feature off, A school of bait fish will look like a "cloud" on the display.
Usually, game fish will be nearby, often directly beneaththe school of
bait fish.
Once thedesired values are entered, press the key adjacent to the
"ENTER" label. The UltraNav will return to the last used loran screen,
using thecorrectionsyou entered. Switch to thepositionscreen to
see if ASF's are in use. The letters "ASF" appearin the upper left
corner of thescreen, immediately below the automatic/manual mode
S
a
a
indicator.
ASF
INDICATOR
AbJUST TO
OFFSETS
AUTO
SRI :?98C
Posi TLOtI Pr
N 24°33.37
U131° 43.6W
'11SF
FIX IS GOOD(S
135°
23.8 KM
56.8
ENT.
SELECT UNIT OF MEASURE
The UltraNav can display distance in nautical or statute miles and
speed in knots or miles per hour. When the UltraNav is turned on for
the. very firsttime, distance is in
nautical miles and speed is inknots.
To changethe units of measure, press
the MENU key while a loran screen is
displayed, then press the key adjacent
4
I
__________________to the "CHANGE SETUP" label. Now
press the MENU key three times. The
screen shown at left appears.
.
.
Now press the key adjacentto the
ARF1OR
"SELECT UNITS OF MEASURE"
label. The screen at the top of the
nextpage appears.
34
PDF compression,
OCR, web-optimization with CVISION's PdfCompressor
71
Now enterthe exact latitude/longitude for your position. Remember to
enter a zero at the beginning of the longitude if it's less than 100
degrees. The screen below right appears after the last longitude
numberis entered.
ASF
LAT'LON
C
C
C
H———0
--.-w
ASF
LAT' LON
18.07
H32° 5th33
U82°
IMPORTANT
SERVICE INFORMATION!
If your unit is not working,or if you need technical help,please use the following
troubleshootingsection before contactinga service center or the factory customerservicedepartment.It maysaveyou thetroubleof returning yourunit. See
the How To Obtain Servicesection on page38 if you need service.
SONARTROUBLESHOOTING
Unit won't turn on:
-a
1. Checkthe powercable'sconnectionat the unit. Also check the wiring.
r
4
Lirricrr.
rLAR rC.II
2. Make certain the powercable is wiredproperly. The red wire connects
to the positivebatteryterminal, blackto negative or ground.
3. check the fuse.
If you're east of Greenwich, England (east longitude), press the key
adjacent to the EAST/WEST label. Otherwise, if everythingon the
screen is correct, press the key adjacent to the ENTER label. The UItraNav will return to the last used loran screen, usingthe position
offset you entered.
TU OFFSET
To change the ASF using the ID
offset method,press thekey adjacent
to the "ENTER TD CORRECTION"
label on the ASF menu. The menu
shown at right appears.
The offset or correctionin microsecondsis shown for each secondary
in the chain. Press the key adjacent
to the up or down arrows to change
the TD offset. Pressthe key adjacent
to the up arrrowto increase the value,
or the down arrow to decrease it.
ADJUST TO
OFFSETS
\bJ. 0.00.
_____________
______
4. Measurethebatteryvoltageatthe unit'spowerconnector.Itshould be atleast
11 volts. If it isn't, the wiringtothe unit is defective, the batteryterminalsorwiring
on the temiinals are corroded,or the batteryneeds charging.
Unit freezes, locks up, or operates erratIcally:
1. Electricalnoisefromthe boat's motor, trollingmotor,oran accessorymay be
interfering withthe sonarunit. Re-routing thepowerandtransducercablesaway
from otherelectricalwiring on the boat mayhelp. Route the sonar unit's power
cable directlyto the battery insteadof throughafuse block or ignition switch
2. Inspectthe transducercable forbreaks,cuts, or pinchedwires.
3. Check both the transducer and powerconnectors. Make certain both are
securelyplugged in to the unit.
_____
a_
ENTER:;
_________
Weak bottom echo, digItal readings erratIc, or no fish signals:
1. Make certain transducer is pointing straight down. Clean the face of the
transducer. Oil, dirt, andfuel can cause afilmtoform onthetransducer,reducing
Its effectiveness. If the transducer is mounted inside the hull, be sure it is
shooting throughonly one layeroffiberglass andthat it is securelybondedto the
hull. Do NOT use RTV siliconerubberadhesive or Marinetex".
35
PDF compression,
OCR, web-optimization with CVISION's
PdfCompressor
70
Weak bottom echo, digital readings erratic, or no fish,signals (cont.):
2. Electricalnoisefromtheboat'smotorcan interferewiththesonar. Thiscauses
the sonar to automaticallyincrease its Discrimination or noise rejection feature.
Thiscan cause the unit toeliminate weakersignalssuch asfish or even structure
fromthe display.
3. Thewater may be deeperthan the sonar's ability to findthe bottom. If the
sonarcan't find the bottomsignalwhileit's in the automaticmode, the digitalwill
flash continuously. It may changethe range to limits far greaterthan the water
you are in. Ifthis happens,placethe unitinthe manUal mode, then changethe
rangeto a realisticone, (forexample, 0-100feet)and increase thesensitivity. As
you move into shallowerwater, a bottomsignal should appear.
IMPORTANTI
ASF correctionsentered by theuser are good only for the stations
in use at thetime and location being corrected, If you travel away
from the area, theASF correction may not be valid. ASF corrections may notbe usable if you change stations, or if the unit automatically changes stations. This especially holdstrue if you enter a
latitude/longitude positionto change ASF. The UltraNav will only
apply the ASF correction to the stations in use - not all of them.
Remember, if you change stations, especially if you change GRI's,
theASF will haveto be re-entered.
4. Checkthe battery voltage. If the voltagedrops, the unit's transmitterpower
also drops, reducing its ability to find the bottom ortargets.
To change the ASF, first pressthe MENU key while a loran screen is
Bottomechodisappears at hIgh speeds or erraticdigital reading orweak
bottom echowhile boat Is moving
-
1, The transducer maybe in turbulentwater. It must be mounted in a smooth
flowof water in orderforthe sonar to work at all boat speeds. AirbubblesIn the
water disrupt the sonar signals, interfering with its ability to findthe bottom or
other targets. The technicalterm for this is Cavitation'.
2. Electricalnoisefromtheboat'smotorcaninterferewiththesonar. Thiscauses
the sonarto automaticallyIncrease its Discrimination or noiserejectionfeature.
This can causethe unitto eliminate weakersignalssuchas fish orevenstructure
fromthedisplay. Try usingresistorsparkplugsor routing the sonar unit'spower
and transducer cables awayfrom otherelectricalwiring on the boat.
No fish arches when the Fish ID feature Is off:
1. Make certaintransduceris pointingstraightdown. This isthe most common
problemif a partialarch is displayed. Seethe Fish Arch section in your owner's,
manualfor more information.
2. The sensitivitymay not be high enough. In orderforthe unitto displayafish
arch, it has to be ableto receive thefish's echo from the time it entersthe cone
until it leaves, If thesensitivityis not highenough,the unit displaysthefish only
when it is in the centerof the cone.
3. UsetheZoom feature. It is mucheasierto displayfish archeswhenzoomed
in on asmall range of waterthan a largeone. For example, you will have muth
better luckseeingfish archeswitha 30to 60 foot range than a0 to 60 foot range.
This enlargesthe targets, allowing the displayto show much more detail.
displayed. Now, press the key adjacent to the "CHANGESETUP"
label. Press the MENU key one moretime, then pressthe key
adlacent to the "ADJUSTASF" label. The screen shownbeloW
appears. This menu lets you change the ASF using TD offsets or
latitude/longitude correction. Entering the ASF correctionautomaticallyturns the ASF featureon.
Latitude/Longitude ASF Correction
__________________
Use the latIlong ASF correction if the
_____________________
latitude/longitude position shown on
the display is slightly different than
your known, preciseposition. (If the
displayed positionis off by a large
margin, the Alternate/Primary feature
may need to be switched.) For
example, suppose your actual tatitude/
longitude is 38-25-40/81-34-10, but
the UltraNavdisplays38-24-30/81-3520. Simplyenter your actualposition,
and the lJltraNav will handle the rest.
--TO
k
LAT /LQN
a
ri ',..n
MORE'
________
To changethe ASF using thelatitude/longitude correction, you first
mustbe in thelocationyou are changing. Next, press the key adjacent to the "ENTER LAT/LONG CORRECTION" label. The screen at
thetop of the next page appears.
36
69
PDF compression,
OCR, web-optimization with CVISION's
PdfCompressor
NMEA INTERFACE
OUTPUT
IS I
The UltraNav can send data out
according to NMEA 0180010183
formats. The NMEA output is turned
off when the UltraNav is turned on for
the very first time.
_____________________
To select the NMEA output, press the
S
____________________
MENU key while a loran screen is
displayed. Now press the key adja
cent to the 'CHANGE SETUP" label.
Next, pressthe MENU key two times.
Finally, press the key adjacent to the
SELECTNMEA OUTPUT"label.
The screen shown below appears.
OFF
Select
CIJT
4
_____________________
4
HMEn 0183
_______1
Simply press a key adjacentto the desired output. The NavGuide will
return to the last loran screen and outputdata on the white serial data
wire. (Seethe Power Connections sectionfor wiring instructiops.)
4. The boat must be moving ataslow trollingspeed to seefish arches. If the boat
is motionless, fish stay inthe cone,showing onthe displayas straighthorizontal
lines.
ELECTRICALNOISE
A majorcauseof sonarproblems is electrical noise. Thisusuallyappearsonthe
sonar's display as random patternsof dots or lines. In severe cases, it can
completelycover the screenwith blackdots, orcause the unit operateerraticly,
or not at all.
To eliminateor minimize the effects of electrical noise, first try to determinethe
cause. Withthe boat at rest in the water,the firstthing you should do is turnall
electrical equipmenton the boat off. Makecertain the engineis off, also. If your
unitdoes NOThave ASP (Advanced SignalProcessing), or if you canturnASP
off, turn on your sonar unit. There should be a steady bottom signal on the
display. Nowturn on each piece ofelectrical equipmenton the boat and viewthe
effect onthe sonar's display. Forexample,turn on the bilgepump and view the
sonardisplayfornoise. if no noise is present, turnthe pumpoff, then turn on the
VHFradioand transmit. Keep doingthis until all electricalequipmenthas been
turnedon,theireffect onthe sonardisplaynoted, then turnedoff. Ifyourunit has
ASP, and you can'tturnit off, firstturn on each piece of electrical equipment on
board,one at a time,then turn on the sonarunit Youwill haveto look quicklyfor
noise, since the ASP feature starts eliminating noise fromthe display a few
seconds afterthe unit is turned on.
ASF Correction
Loran signals are affected by the terrain they travel over. Plains,
lakes, mountains, and cities affect the signal and they each affect it in
differentways. This effect is called the additional secondaryphase
factor, or ASF. It's usually factoredin when a loran chart is made.
However, ASF's vary from placeto place, so there can be differences
between the chart and the real world.
b
Therecan also
a difference in your actual position and the one
the
due to ASF. In this case, the loran signals are
loran,
displayed by
distortedfrom their theoreticalposition. Since the measured TD's are
shifted, the loran shows a TD or latitude/longitude that is not the
actual position.
The UltraNav has an correction featurethat lets you change the ASF.
This forcesthe loran to use a new ASF instead of the one that resides
in its memory. You can shift the ASF by changing the TD offset or by
entering your actual latitude/longitude position.
If you find noiseinterferencefrom an electrical Instrument, trolling motor, pump,
or radio, try to isolate the problem. You can usually re-routethe sonar unit's
power cable and transducer cable away from the wiring that is causing the
interference. VHF radio antennacablesradiatenoise whentransmitting,so be
certain to keepthe sonar'swiresawayfrom It. You mayneedto routethe sonar
unit'spowercabledirectlytothebatterytoisolate itfrom otherwiringonthe boat.
It no noise displays on the sonar unit from electrical equipment,then make
certain everything except the sonar unit is turned oft then start the engine.
Increase the RPM withthe gearshift in neutral. If noise appearson the display,
the problemcouldbe one ofthreethings;spark plugs, alternator, ortachometer
unit's
wiring. Try using resistorsparkplugs,alternatorfliters, orroutingthe sonar
the
directlyto
cable
from
routing
powercable
away
engine
wiring.
Again,
power
the batteryhelps eliminatenoiseproblems. Makecertain to usethe in-linefuse
suppliedwiththe unit whenwiringthe powercableto the battery.
When no noise appears on the sonar unit afterall of the abovetests, then the
noise source is probably cavitation. Many novices or persons with limited
experiencemake hasty sonar installations which function perfectlyin shallow
water,orwhenthe boat is atrest. In nearlyall cases, thecause of the malfunction
will be the location and/or angle of thetransducer. The face of the transducer
must be placed in a location that has asmoothflowof water at all boat speeds.
Read your transducerowners manualforthe best mounting position.
37
68 OCR, web-optimization with CVISION's
PDF compression,
PdfCompressor
How to Obtain Service
ARRIVAL ALARM
We back your investment in quality products with quick, expert service and
genuine Eagle replacement parts. If you need service or repairs, contactthe
authorizedEagle ServiceCenter nearest you. TheenclosedServiceCenterList
will helpyou findthe closestrepairfacility.Ifdesired youcan contacttheFactory
CustomerService Center. Transportation expensesto us orto the Authorized
Service Center are your responsability. The productwill be returned to you by
surfacecarrier at no charge.
The arrival alarm sounds a tone when your positionis within the
alarm's radius of a waypoint. For example, the alarm will Sound if you
come with .1 nauticalmiles of a waypoint if the arrival alarm's setting
is .1 nauticalmile.
Factory Repair
Ifyour unit needs repair, andyou wish to write orsend aproductto the factory,
use the followingaddress:
EAGLE ELECTRONICS
Att: Service Department
12000 E Skelly Dr
Tulsa, OK 74128-2486
You can call or write to an authorized Eagle Service Center or the Factory
Customer Service Department before sending your unit in for rppair. A
technicianmaybe able to solvethe problemand save youthe inconvenience of
returning your unit.
Forthe Eagle factorycustomerservice department, call 1-918-234-1452.
When sendinga producttothe factory or aservice center, we recommendyou
do the following:
1.
Use the original box and filler material the product was packed in when
shipping your product.
2. Always insurethe parcelagainstdamageor lossdurlhg shipment.
For proper testing, repair, and service, send a brief note with the product
describing the problem. Be sure to include your name, return shipping
address, and a daytimetelephonenumber.
IMPORTANT: Be sure to include proof of purchase when sending the
product if it is still in warranty.
a ARadius
rr iv a.
S Arrival
Radius
1
a CLinit
D. I.
a C.D.L
Linit
<MUTE ALARM
I
CMUTE
ALARM
I
To adjust the arrival alarm, press the ALARM keywhile a loran or
plotter screen is displayed. The screen shown above left appears.
Pressthe key adjacent to the up arrow on the arrival alarm's menu to
increase the radius, thedown arrow to decrease it or turn it off. Press
the key adjacent to the EXIT labelto return to the loran screen.
C.D.I. ALARM
The C.D.I. alarm sounds when you are off course by the same
amount as the alarm setting. For example, if the alarm setting is .1
nauticalmiles, then the alarm will sound if you're off course by .1
nauticalmiles. The C.D.I. alarm adjust also changesthe O.D.l. range
on the SteeringScreen.
To adjust the C.D.I. alarm, press the ALARM.keywhile a loran screen
is displayed. The screen shown above left appears. Now press the
key adjacent to the up arrow on the C.D.l.'s alarm menu to increase it,
the down arrow to decreaseit or turn it off. If the alarm is turned off,
the C.D.I. indicator's limits are preset to .1 nauticalmile. Pressthe
key adjacentto the EXIT label to return to the loran screen.
38
67
PDF compression,
OCR, web-optimization with CVISION's
PdfCompressor
each waypoint, the UltraNavwill automatically switch to the next
waypoint on the list. This continues until you've travelled the entire
route.
ULTF?ANA V
Canceling a Route
To stop the UltraNav from navigating a route, pressthe MENU key,
then pressthe key adjacentto the ROUTES label. Now press the key
adjacent to the CANCEL ROUTE label. The UltraNav will stop
sequencing throughthe waypoints on the route. However, it will still
show navigation data to the last waypoint in use.
LORAN
OPERATION
Erasing a Route
To erase a route, press the MENU key, then press the Icey adjacent to
the "ROUTES" label. Now pressthe key adjacent to the "ERASE
ROUTE" label. The screen shown belowappears.
The asterisk shown to the left of
and Route 2 signifies that
these routes havewaypoints saved.
To erase Route 1, simply press the
key adjacent to the "SELECT" label.
To erase Route 2, or any other route
that has the asterisk displayed, use
the keys adjacent to the up or down
arrows. This moves the list of routes
up or down. When the desired route
is in the selection box at the top of the
screen, press the key adjacentto the
"SELECT" label. The routewill be
erased, and the UltraNav will return to
the last loran screen.
Route
_________________________
1
WARNING!
USE THIS LORAN RECEIVER ONLY AS AN AID TO
NAVIGATION. A CAREFULNAVIGATOR SHOULD
NEVER RELY ON ONLY ONE METHOD TO OBTAIN
POSITION INFORMATION.
IcEOUTE 1102
—
ROUTE 1103
ROUTE 1104
ROUTE 1105
_______
_____
I
NOTICEI
MAKE CERTAINTHE LORAN IS DISPLAYINGTHE CORRECT
POSITION IN LATITUDE/LONGITUDE
LORAN ALARMS
The UltraNav hastwo loran alarms. One is an arrival alarm that
sounds when you come within a presetdistanceto a waypoint. The
other is a CDI. alarm that sounds when you move off course more
than the alarm's set point.
COORDINATES BEFORE NAVIGATING WITH THIS UNIT.
THE POSITION MUST BE CORRECT FOR THE
NAVIGATION FEATURESTO WORK PROPERLY.
39
PDF compression, OCR, web-optimization with CVISION's
PdfCompressor
66
Followinga Route
LORANTABLE OF CONTENTS
LORAN-GENERAL
ACCURACY
HOWLORAN-C WORKS
INSTALLATION - ELC-1 LORAN MODULE
OPERATION
INITIALIZATION
SELECTGRI
SELECT INITIAL POSITION
STATION DATA SCREEN
AUTOMATIC ANDMANUAL MODES
MANUAL STATION SELECTION
PRIMARY ANDALTERNATE SOLUTIONS
SHOWTD'S
TRUEAND MAGNETIC POSITION
LORAN DISPLAYS
POSITION SCREEN
STEERINDICATOR ANDNAVIGATION SCREEN
NAVIGATION SUMMARY SCREEN
PLOTTER
USING THE PLOTTER WITH AWAYPOINT
PLOTTER MENUS
CLEAR PLOTTER
SELECT PLOTTER RADIUS SIZE
SELECT PLOTTER UPDATE RATE
WAYPOINTNAVIGATION
HOWTO SAVEAWAYPOINT
SAVING PRESENT POSITION AS AWAYPOINT (QUICKSAVE)
SAVING PRESENT POSITION - VIEWANDSAVE
ENTER NEWWAYPOINT/GO TO WAYPOINT
WAYPOINT RECALL
ERASEAWAYPOINT
ROUTES
CREATINGAROUTE
FOLLOWING A ROUTE
CANCELLING A ROUTE
ERASING A ROUTE
LORANALARMS
ARRIVALALARM
C.D.I. ALARM
NMEAINTERFACE
ASE CORRECTION
LATITUDE/LONGITUDE ASF CORRECTION
TD OFFSET ASF CORRECTION
SELECTUNITSOFMEASURE
BACKLIGHTS
LORAN TROUBLESHOOTING
41
41
42
43
44
44
45
46
47
48
49
50
To follow a saved route, pressthe MENU key, then the key adjacent
to the ROUTES label. Now pressthe keyadjacentto the "RTE
FORWARD"to follow a route fromthefirst waypoint to the last, or
"RTE BACKWARD" to follow a route from the last waypoint to the
first. The screens are virtually identical, and instructions for both are
the same. In this example, route forward is used. The screen below
appearsafter thekey adjacent to the "RTE FORWARD" label is
pressed.
_________________________
51
52
53
53
54
55
56
57
57
58
58
58
59
59
59
60
60
62
62
63
63
65
66
66
66
67
67
68
68
69
70
71
72
72
P.OUTE ftOiY
*ROuTE *02
An asteriskappearsto theleft of the
routes that have waypoints assigned.
Move the list up or down using the
keys adjacent to the up and down
labels Until the desired route is in the
selection box at the top of the screen.
Route number one is used in this
example. Pressthe key adjacent to
the 'SELECT" label. The screen
shown below appears.
ROUTE StUB
-ROUTE
ROUTE
____________
_____
I
____
-
_______________
21°53.D5
PICK A UPt
TO START
ROUTE #01
N
2 U 78° 24.51
FORWARD
a
SELECT
*04
*05
EXIT
_______
________
Now choosethe first waypoint to start
the route. Thedefault is waypoint
a numberone, as shown in this exa ample, howeveryou can start the
route from any waypoint in the route.
The UltraNav will show navigation
data to each consecutive waypoint in
the route after the first waypoint is selected. Again, press the keys
adjacent to the up and down labels
until the desired waypoint is in the
selection box at the top of the screen.
Press the key adjacept to the
"SELECT" labelto choose the waypoint and start the route.
S
The UltraNav Will show navigation and plotter information to each of
the waypoints in the route. As you come within .1 nautical mile of
40
65
PDF compression,
OCR, web-optimization with CVISION's
PdfCompressor
Loran - General
ROUTE
ROUTE
ROUTE
ROUTE
Once the desired route number is in
the box, pressthe key adjacent to the•
"SELECT"label. In this example,
route number one is used. The
screen shown belowappears next.
I
2
N
LI
31°53.D6'
78024.51
SELECT UJPTS
ROUTE #01
FOR
—
—
a
tiQU
1102
1103
1104
1105
a
This is the waypoint selection menu. It
lets you pick the waypoints for the
route. Press the keys adjacent to the
up or down arrows to scroll throughthe
listof waypoints. When thefirst waypointappearsin the selection box at
the top of the screen, press the key
adjacent to the "SELECT" label. A
small "01" appears above the waypoint's number.. This lets you know
that this is thefirst waypointin the
route.
Continue selecting waypoints in the
order youwish to travel in the route
until all of the desired waypoints have
been picked for the route.
Each routecan have up to ten waypoints. If you make a mistake and
add an undesired waypoint to a route,
press the key adjacent to the "CLEAR
ROUTE" label. This erases all of the
waypoints in the route. You can then
start the selection process over again.
After selecting all of the route'swaypoints, press the key adjacent to the
"EXIT" label. The UltraNav returns to
the last used loran display.
2
N
U
31°53.O6
78°24.51
SELECT UPTS
ROUTE #01
FOR
UtfltE.H
ui+1
<44S iiiuirnj
NOTE:
This section covers the installation and operationof the UltraNav's
Loran. The ELC-1 Loran-C module must be attachedto the
UltraNav for position information.
Loran is short for Long RAnge Navigation. It's a navigation system
that uses powerful low frequency (100 kHz) radio transmittersand
sensitivereceivers. Thus, you can determine your positionover long
distances.
Loran was developed and used during World War II. At that time it
was called Loran-Aand operated at a higherfrequency. Research
and development continued duringthefifties. Thecurrent Loran
version, Loran-C, was introduced in the sixties. It works over longer
distancesthan Loran-A and it's easierto use.
ACCURACY
The absolute accuracy of Loran is between 0.1 and 0.25 nautical
miles, depending on your location. Repeatable accuracy (your ability.
to returnto the samespot) is 100 feet or belier. The difference
between the twotypes of accuracy is important. Absoluteaccuracy
tells you where you are on the map. Repeatable accuracylets you
find your way back to the same site time aftertime.
However, the accuracy you experience may not be as good as the
numbers above suggest. The crossing angle of the lines of position
affects the accuracy. The sharper the crossing angle, the more
chancefor positionerror. A ninetydegree crossingangle is best, but
it can vary down to thirty degrees withouta large position error.
If you wish to double checkyour Loran, first pick a spot on the chart
that is clearly marked with latitude/longitude marks. Then go to it.
Onceyou arrive, let the Loran settle, then compare the position
information on the UltraNav to the chart. It should be very close.
PDF compression,
64 OCR, web-optimization with CVISION's PdfCompressor
41
MOW LORAN-C WORKS
ROUTES
The Loran systemconsistsof three to five transmitter stations. These
are called a "chain." The letter "M" designates the master station
inside the chain. The other stationsin thechain are the secondaries.
Their names are W, X, Y, and Z, although not all chains have four
secondarystations. The secondary transmitters are synchronized
with the masterwhich transmits at precisetime intervals. Thistime
interval is calledthe Group RepetitionInterval or GRI. Each chain has
a different GRI.
The UltraNav givesyou the abilityto go to several waypoints in a row.
This feature is called Routes. A route consists Of two or more waypoints. When you run a route, the UltraNav givesyou navigation
information to the first waypoint in the route. As you reach the first
waypoint,the arrival alarm sounds, then the nextwaypoint is automatically selected by the unit. Navigation information is displayed for
this waypoint until the arrival alarm sounds and theprocess repeats
for the next waypoint. This happens until you've travelled to all the
waypoints in the route.
Thesecondarystationstransmit at precisetime intervals afterthe
master stationtransmits. Since these transmitters are located hundreds of miles apart, it takes a differenttime for the signals from each
transmitterto reach you. The Loran receivermeasures this time
differencebetweenthe master and twoof the secondaries. The
UltraNavautomatically choosesthe best master-secondary pairs for
your location. The time differenceor (TO) is measured in microseconds. Plotting theTO on a chart with Loran-C lines results with
your positionsomewhereon a line of position(LOP). A line of position is an imaginary line on which thetime delay between the master
and one of the secondaries is the same. In this example the boat is
located somewhere on the 14605.2LOP.
There are two steps necessary to createa route. First, you must
selectthe route number. Then pick the aypoints to use in the route.
To follow a route, you simply determine the starting waypoint, then
decide whetherto followthe route forward or backward. After these
steps are completed, the UltraNav will start navigating on the route.
Creating a Route
To create a route, first pressthe MENU key while the unit is in the
loran mode. The menu on the left appears. Now press the key adjacentto the ROUTES label. The screen shown below left appears.
Next, pressthe key adjacent to the "CREATE ROUTE" label. The
screen shown below right appears.
A
I
am]j1i14NI
athN!Th1&I1
ROUTE 1102
ROUTE U03
ROUTE fl04
ROUTE 1105
—. —
The Loran receiverthen measures the time difference between the
master and another secondary. The example on the next page is
31882.8. If you plotthis LOP on a chart, you'll noticethat it crosses
thefirst line-of-position. Your positionis at the intersection of thetwo
lines.
The UltraNav has the capabilityto store twenty routes. Routes number one through five are displayed on thescreen. Press the key
adjacent to the up or down labelto movethe desired route number
into the selection box at the top of the screen.
42
63
PDF compression,
OCR, web-optimization with CVISION's
PdfCompressor
WAYPOINTRECALL
rn
You must recall a waypoint to usethe Steer Indicatoror Navigation
screens. To recall a waypoint, first press Waypoint Recall key. The
menu shown below appears.
Four waypoints display on this
screen. To recall one of these waypoints other than the one at thetop of
the screen, simply press the key
adjacentto the up or down labels.
This moves the list of waypoint
H 31°5O,.O3
'U
78°2211
t
a_
"IN
"U
aN
'U
numbersup or down. When the
desiredwaypoint number appears in
the reversevideo area at the top of
the screen, press the key nextto the
SELECTlabel. The waypoint displayed at the top of the screen will be
recalled and the UltraNav will return
to the loran screen. To exit from this
screenwithoutrecalling a waypoint,
simply pressthe key adjacent to the Exit label.
31°48.31''
78° 19.01
31°43.24
78°25.30'
k
All Loran-C receivers work on this principle. Mostmodern receivers
also display latitude/longitude. The receivertakes theTD information
and, using a complex mathematical formula,converts it to Iatitude/
longitudepositiondata. You can display both TO's and latitude/longitude on the UltraNav to determine your position.
If you wish to know more about Loran-C, orderthe United States
CoastGuard's book "Loran-C USER HANDBOOK." It's an excellent
bookthat describes Loran in greaterdetail.
Loran-CUser's Handbook
COMDTINSTM16562.3
ERASE A WAYPOINT
To erase a position from the waypoint
list, first press the WAYPOINTSAVE
key. Now press thekeyadjacent to
the "ERASEA WAYPOINT'label.
This screen appears. Simply press
the keys adjacent to the up or down
labels to move the list of waypoints
up or down until the desired waypoint
is in the black selection box.
Now
press thekey adjacent to the
"ERASE"label. This will erase the
waypoint fromthe UltraNav's memory.
To return to the last used loran
screen, press the key adjacent to the
"EXIT" label.
ERASE
LJAYPOINT
1. N3EtdL42i.!
4 72°33.51'
E
32° 14.16'
73°02.03'
a_
S
Superintendent of Documents
U.S. Government Printing Office
Washington,D.C. 20402
Code #050-012-00171-5, 1980
There is a small charge for the book.
INSTALLATION- ELC-1 Loran-C MODULE
When choosing a mounting location, rememberto install the ELC-1
where it's clear of other antennas, wires, masts, or other obstructions.
A high locationis preferred, however for lightningprotection, the
antennashouldn't be the highest pad of the boat. The antennashould
be mounted vertically. Make certain it is as far away as possiblefrom
VHF radio antennas.
42
62
PDF compression,
OCR, web-optimization with CVISION's
PdfCompressor
"
Improperperformance can also occur if the antennais mounted too
close to metal objectssuch as tuna towers. Again, a location that
places the Loran assemblyin the clear is preferable to one that is high
and obstructed.
You must purchasean eight foot stainless steel or fiberglass whip
antenna. The threads are standard3/8"-24 for the whip. A ratchet
mount base is most commonlyusedto mountthe Loran to the boat.
Thebase mountingthreads are conventional 1"-14machine thread
(NOT pipe thread). This allows theuse of standard antenna mounting
hardware. Tightenall hardware securely.
aLAT'LON
WPT
Now enter thewaypoint location. Rememberto add a zero to the longitude if it's less than 100 degrees.
The screen shown belowappears
after the last longitude numberis
entered.
0
':w
C
H
0
w
C
4
Thecable suppliedwith the ELC-1 is thirty feet long. Do not cut the
cable if it's too long. Instead, coil and store it out of theway. An
extension cable is available if the cable is too short. Ask your dealer
or call your local servicecenter or the Eagle Factory Customer
/
Servicedepartment for more information.
LAT LON
The ELC-1 can be attachedto a swivel bracket or hollow extension
mast, if desired.
OPERA11ON
LPJPT
320 18.07'
U82° 5(133'
P4
If you are east of Greenwich, England
(east longitude), pressthe key adjacent to the EAST/WEST label. Otherwise, if everything on this screen is
correct, press the key adjacent to the
ENTER label.
INITIALIZATION
The screen belowappears next.
The Loran mustbe initializedor "told where it is" the veryfirst time it's
used. Once it finds your presentposition, the UltraNav stores it each
time power is turned off. If you don't travel over approximately one
hundred miles from the last time you turnedthe loran off you
shouldn'thaveto repeat this step.
ENTER
1
—
THE COUPLER
Whenthe UltraNavis turned on for
the very first time, and you press the
LORANkey, the screen shown at
right appears. To initializethe loran
using the GRI search, press the key
adjacentto the "SELECT GRI" label.
If you know your presentposition,
and you want the loran to choose
the GRI, press thekey adjacentto
the "ENTER INITIALPOSITION"
MUST BE
INITIALIZED
4
label.
This menu gives you three choices.
You can save the waypoint underthe
next available number, using the
"SAVE AS #" label at thefop of the
tcreen. The VIEW/SAVEmenu
stores the waypqint under any number
you desird. (Seethe Saving Present
Position. -View and Save Method.)
Finally,you can travel directlyto the
waypoint and not save it by pressing
the key adjacent to the "GO TO
WPT" label.
tzEIMansS
.11
44
PDF compression,
OCR, web-optimization with CVISION's PdfCompressor
.
61
The waypoint number increments each time you save a waypoint,so
Once you've
you don't have to keeptrack of the waypoint numbers.
stored the waypoint,tile UltraNav returns to the loran display.
The Select CR1 and
(Note: You can re-initialize the loran at any time.
Initial Positionfeatures are menu items. The followingsection on
these featurestell how to access these features from the menus. The
initialization is identical.)
TIP
Save your home dock or launching ramp as waypoint number one.
It's easy to remember home is number one when you want to return.
Saving Present Position View and Save Method
The Quick Save" feature doesn't allow the selection of a waypoint
number. You haveto use the next available numberwhen usingthat
method. To saveyour presentposition underany waypoint number,
first press theWaypointSave key, then press the key adjacentto the
'VIEW/SAVE" label. The screen
shown below appears.
N
SAVE
31°26.09'
83°62.38'
Your presentpositiondisplays at the
Ui
topofthe screen. If you want to save
AS UJPT 1t1
thiswaypoint under a number other
than the one displayed, simply press
the key adjacentto the up or down
labels. This moves the list of waypoint numbers up or down. When the
desired waypoint number appears in
the reverse video area, press the key
next to the SAVE label. The waypoint
displayed at the top of the screen will
be saved under this number, then the
UltraNavwill return to the loran
screen. To exit from this screen withoutsaving a waypoint,simply
press the key adjacent to the EXIT label.
EnterNewWaypoint / Go To Waypoint
To save a waypointotherthan your presentposition, first press the
wish
WaypointSave key. The waypoint save menu appears. If you
the
key adjacent
to save the waypoint using latitude/longitude, press
to the "INPUT LL WPT" label. To save a waypointusing TD's, press
the key adjacentto the "INPUTTD WPT" label. The steps to save a
waypoint are identical. For this example, we'll usethe Iatitudef
longitude method. The screen at the top of the next page appears,
SELECTGRI
Use this function if you don't knowyour position. The UltraNavwill
calculate your present position using the chain you select. See the
charts in the back of this manual for the proper chain to use in your
area. Once you know the chain's number, pressthe menu key while
the loran screen is displayed. Now press the key adjacentto the
"CHANGESETUP" label. Finally, press the key adjacent to the
"SELECT CR1" label. A screen similar to the one shown below
appears. The GRI for the chain is shown at the top of the screen.
The chain's name is right below the
this example, CR1 7980 is
shown.
,_...
SOUTHEAST
To changethe CR1, press the key
UNITED• STATES
adjacentto the up or down labels.
This scrollsthe chains through the
display window. Whenthe desired
chain is displayedin thewindow,
pressthe key adjacentto the
SELECTlabel. The UltraNav will
-___________ ______
revert to the last used loran screen
_____________ ______
and place the following message in a
windowon the screen; "Searching for
___________
CR1". The UltraNav then looks for
the stationswithin the selected chain.
Once it finds the stations, it
It
processes the signals until it "locks on" to each station in the chain.
to
deterall
the
stations
in
a
chain
doesn't need to find and lock onto
minethe latitude/longitude. However, it does need to lock onto three
stationswith good signals to calculate a latitude/longitude. To view
the UltraNav's loran station acquisition and signal strengths, seethe
"STATION DATA" sectionin this manual. Until the loran finds all of
the necessarystations in the chain and locksonto them, it flashesthe
latitude/longitude. This means the latitude/longitude display is not
usable. Whenthe position numbers stopflashing, the loran is ready
for use.
WARNING: DO NOT NAVIGATEWHEN THE POSITION DISPLAY
(EITHERLAT/LONG OR TD'S)IS FLASHING!
45
60 OCR, web-optimization with CVISION's
PDF compression,
PdfCompressor
SELECT INITIAL POSITION
To keep a continuous line plotted,
you maywant to experimentwith the
To initializethe UltraNavusing the initial position method,first press
the menu key while the unit is in the loran mode. Next, press thekey
adjacent to the "CHANGESETUP" label. Finally, pressthe key
adjacent to the "ENTER INITIAL POSITION" label. The screen
shown on the right appears. Now
enter your presentposition in
latitude/longitude coordinates.
a INITIAL
JLATLOH
I
Rememberto enter a zero at the
beginningof the longitude if it is
less than one hundred degrees.
The screen shownbelow right appears after the last longitude
number is entered. If you are east
of Greenwich, England (east longitude), press thekey adjacent to
the EAST/WEST label. Otherwise,
.4 ________
if everythingon this screen is
correct, pressthe key adjacent to
EI4TE
the ENTER label. A message
"SEARCHINGFOR GRI" scrolls
on the screen until the UltraNav finds thestationsin the chain and
starts workingon cycle selection. To view the station acquisition and
signal strengths,see the "STATION DATA" section in this manual.
Until the loran finds all of the necessary stationsin the chain and locks
onto them, it flashesthe latitude/longitude. This meansthe latitude/
longitude display is not usable. When the positionnumbersstop
flashing,the loran is ready for use.
4
n INITIAL
%9LAT'LON
---s
INITIAL
S
P432° 18.07'
U82° 50fl3'
082°E.O..33'
C
IJEST:
________
1:
EfISH
.4
UPDATE
RATE IS
•1O SEC
To change the plotter time, pressthe
key adjacent to the "Select Update
Rate" label on the plotter menu
screen. To select an update interval,
simply pressthe key adjacentto the
desired time. The screen will clear,
returning you to the plotter with the
new time. The available times are: 2,
5, 10, 20, and 30 secondsand 1,2,
5, 10, and 20 minutes.
WAYPOINTNAVIGATION
HOWTO SAVE A WAYPOINT
Waypointsare locations that you save in the UltraNav's memory. You
canthen navigateto these positions usingthe Steer Indicator, Navigation, or Plotter screens. Waypoints are useful for markingshipwrecks,
hot fishing spots, and other fishing or navigational locations. The
UltraNavcan store up to 100 waypoints. You can store your present
positionas a waypoint,or enterTD's or latitude/longitude positions as
waypoints.
Saving Present Position as a
Waypoint (Quick Save Feature)
LAT' LON
32018.0?'
update interval. Lengthening the
interval between plots gives you a
betterchance to see more history.
I.
*:LEAR EttERi.
The UltraNavlets you save your
presentpositionwith only two key
presses. This "Quick Save" feature
lets you save the position of a wreck
or otherObjects quickly and easily.
To save your presentposition as a
waypoint, first presstheWaypoint
Save key. The menu shown below
appears. Now simply pressthe key
adjacent to the "SAVE AS #0" label.
a
.4,
4
______________________
________
46
59
PDF compression,
OCR, web-optimization with CVISION's
PdfCompressor
STATION DATA
PLO1TER MENUS (cont.)
1
4
Clear Plot
The Clear Plot" label clears the solid
track line. The plotter will continue to
draw your track after this key is
pressed,howeverthe location of your
presentpositionwill be centered on
the screen.
SELECT
RADIUS
SIZE
a
UPDATE
The UltraNav's Station Data Screendisplays all of thetechnical data
for the stations in the current GRI. To view this screen, press the
MENU key two times. The screen shown below left appears. Now
pressthe key adjacent to the "STATION DATA SCREEN". The
screen shown below right appears. The TD's for the master station
and all of the secondaries in the chaindisplay at the top of the screen.
Stations that are currentlyin use are shown in reverse video. In this
example, the master and stations Y and Z are in use.
4
w
SCREEN
a
Swe
SELECT RADIUS
___
ii:
SUt1I1AR?
IN _____
NAUT. MILES
____
RADIUS
IS
______ 1'4NM
SelectRadius Size
This menu allows the changing of the
circle's radius on the plotter sc(een.
The plot radius is 1/4 nautical mile
whenthe UltraNav is turned on for the
very first time. The available plot radii
are: 1/4, 1/2/, 1, 2, 5, 10, 20, 50, 100,
and 200 nautical miles. This lets you
zoom in or zoom outthe plotter's
display. To select a radius, simply
press the key adjacent to the desired
radius size. The screen will clear, returning youto the plotterwith the new
radius.
STATION
DATA
4
__
14958.69 C
X
31903.51
C
Z
60865.50
C
R
U
flX
V
2
R R
The letter on the far right side of the screen is an abbreviationfor the
station status. The status is as follows:
S - SEARCH Searchingfor the station's signal. Do not use
this TD for navigation.
C - CYCLEERROR The receiveris trying to "lock on" to
the propercycle. Do not use this TD for navigation.
Select Update Hate
The plotter shows your track by drawing a solid line behind your
presentposition. When the unit is turned on forthe very first time, the
position is updated once everyten seconds. You can vary thistime
from 2 seconds to 20 minutes.
only when the "L" indicator displays.
As each dot is placed on the track line, one is erased from the end
after a certain length has been achieved. This shortensthe plotted
line, but still showsthe history of your passage. If you plot a course
that's a long distanceaway and use a short updatetime, the line may
not reach from the starting location to thedestination.
B - BLINK The station transmits a signal called "Blink" when it's
signal is not usable. Do not use this TD for navigation.
L - LOCKED
The receiverhas locked on to the station. Use a TD
N - SNR The receiverhas a low signal to noise ratio for this station.
Do not usethisTD for navigation.
PDF compression, OCR, web-optimization with CVISION's PdfCompressor
58
47
U
14958,29 L
X: 31903.51 L
98799
'HI'
MW<VZ
R
RR
DEPTH
50.7 FT
Below the station'sTD's are the bar
graphs showing thesignal strength for
each station. The numberat thetop
of the bar graph shows the relative
signal strengthwith 9 the maximum, or
best and 0 theworst. Graphs that are
solid represent stationscurrently in
use by the loran. Again, in this
example, stationsMaster, 'I, and Z are
currentlyin use. The letter "R"
beneath the bar graphs signifies the
stationsthe UltraNav recommends
using. Finally, at the bottom of the
screen, the water depth is displayed.
On thisexample, all stations are locked, with good signalstrengths.
To exit this screen, pressthe MENU key and choose another one.
AUTOMATICand MANUAL MODES
The UltraNav's Loran has both automatic and manual modes. Do not
confuse this with the sonar automatic and manual modes. These are
two independentfeatures.
The UltraNav choosesthe stationswith the bestcrossing angles and
signal strengthswhen it's in the automatic mode. It doesthis by
continuallymonitoring the stations signals to determinethe bestones
to use. If the unit determines one or morestations arebetterto use
than the currentones, it will automatically switchto the new stations.
However, there are times whenyou don't want the unit to switch
stations. When you're navigating using waypoints is one. You must
use the samestationswhentravellingto a waypoint as the ones used
when the waypoint was saved. For example, if the loran was using•
M,X, and Y when thewaypoint was saved, you must use M,X, and Y
to navigate back to that waypoint. Otherwise, navigationerrorscan
occur. Placing the unit in themanual mode preventsthe UltraNav
from changing stations.
If your present position starts to move outsideof the circle, the
UltraNavwill first clear the display for an instant. Then it will redraw
your presentpositionalong with a portionof your tracknear thecenter
of the screen. Your present position will always be on the plotter at all
times. You do not have to recall a waypoint to use the plotter.
To clear the plotter, see the Plotter Menus section
Usingthe Plotterwith a Waypoint
Usingthe plotter with a recalled waypoint or route is an easy way to
see the effects of wind and current on your boat. To usethe plotter in
this manner, simply recall a waypoint (see the WaypointRecall section
for more information), then pressthe PLOTTER key. A screen similar
to the one below appears.
The "S' is your starting location. Thi
was your positionwhen you recalled
the waypoint. The flashingcross is
your present position, and the "D" is
the destination. The destination is the
recalled waypointposition. If you are
using a route, it's the first waypoint
locationin the route. The doffed line
is the direct path or course from the
starting location to the destination.
Follow this line to get to the waypoint.
The destinationwaypoint number is
displayedin the plotter's lower left
corner. In this example, waypoint
number 10 is the destination.
DistanceTo Go (DTG) and Bearing to waypoint (BRG) are displayed
at the bottom of the screen when a waypoint is recalled.
An arrival alarm is available that sounds a tone when you comewithin
a preset distanceto the destination. See the sectionon alarms for
more informationon the arrival alarm.
PLOTFERMENUS
Pressingthe MENU key while the plotteris displayedgives you a new
set of menus, relating only to the plotter. A description of the menu
functionsfollows on the nextpage.
48
PDF compression,
OCR, web-optimization with CVISION's PdfCompressor
57
BearingTo Waypoint (BRG) is the
third display, showing thedirection to
the recalled waypoint.
Heading (HDG) is the fifth item on the
screen. This display shows your
heading (direction of travel).
Velocity Made Good (VMG) is your
actual speed toward the waypoint.
5,07
XTE(MI1)L 0.01
BRO (MflG) 3270
HOG (MiG) 322°
16.4
tJMO (1(N)
16.6
SOG (KN)
OTO (MM)
00:
1 :32
TTG
Speed Over Ground (SOG) is the
OEPTH(FT)
averaged speed over ground that you
are making. For example, if your
boat speedometer says you are travellingat ten knots, but you're
is
going head-on into a two knot current, then your speed over ground
eight knots.
Time To Go to waypoint is thetime the UltraNav calculates it will take
you to reach the recalled waypoint.
Water Depth is the last itemon the Nay SummaryScreen.
PLOTTER
The plotterlets you easily see your course and direction of travelon
the screen. The plotterwill also showyour starting position and
destination if you are travelling to a
waypoint or on a route.
To use the plotter, simply press the
PLOTTER key. A screen similar to
this one appears.
Theflashing cross is your present
position. The solid line is your track,
or path you have travelled. The circle
is.acompass rose with north, south,
east, and west marked. The circle's
radius is displayed at the top of the
screen. Your present position is
displayedat the bottom of the screen.
To place the UltraNav in the manual
mode, first pressthe MENU key. Now
____________________
press the key adjacent to the
"CHANGESETUP" label. Now press
the MENU key two more times. The
"AUTO OFF" label appears at thetop
of this screen. Now press the key
adjacent to this label. The menus will
disappear, switching to the last used
SELECT
UF1Efl
OJJ TF'UT
________________________
TFLIE
E.EAF 1iJO
_______________
loran screen,
The word "AUTO" or "MAN" appear at
thetop of the positionscreen, showing
which mode is in use.
4
CLEAP
__________
See the "Position Screen"section for more information.
MANUAL STATION SELECTION
The UltraNav's manual station selection feature lets you decide which
stationsto use. This also locks the unit in the manual mode.
To manuallychange stations, first
press the MENU key, then press tile
:tJUOP4O,,O!J
key adjacent to the "CHANGE
adSETUP" label. Now pressthekey
jacentto the "SELECT LORAN STATIONS" label. The screen shown below appears. In this example, stations
M, Y, and Z are in use (shown by the
TD's in reverse video). The UltraNav
also recommends usingthesestaREC.
tions. To change stations, simply
,6U6E55O
press the keys adjacent to thedesired
.1
stations. After each key is pressed,
an asterisk displaysnext to the
EXIT _____
station'sletter, signifying the change.
Press the key for all stations that you intend to use. in this example,
the keys adjacent to stations M, W, and Z were pressed. After
selecting the desired stations, press the key adjacentto the "ENTER"
label. This activates your selection and returns the UltraNav to a
loran screen. If the stations you've chosen are locked with good
crossingangles, the unit should show a latitude/longitude position
after a short wait.
cii
.I1
1
14958.69
31903.51
4I5tCi
""
49
PDF compression,
PdfCompressor
56 OCR, web-optimization with CVISION's
PRIMARYand ALTERNATE SOLUTIONS
The loran normally determines its position by measuring thetime
differencebetween the master and two other secondary stations.
Each time difference results in a line of position. Your presentposition is the intersection of the lines of position. This is called a "fix'.
A mathematicalformulain the loran receiver uses TD's to determine
the latitude/longitude position. Due to the nature of loran, your
position in latitude/longitude can be on either side of a baseline. (The
baseline is an imaginary straight line connecting the masterand each
secondarystation.) It's possible for the loran to lock onto the stations,
give good fix qualities and signal strengths, but show the latitude/longitude on the other side of the baselinefrom your.present position.
Distance To Go (DTG) is displayed immediately below the C.D.I.
indicator. This is the distancefrom your presentposition to the
waypoint. When the UltraNavis firstturned on, the distanceis shown
in nauticalmiles.
The bearing to thewaypointfrom your presentposition displays at the
center left side of the screen. The bearingis shown in degrees
magnetic (MBRG) when the UltraNav is turned on for the first time.
To switch to a true bearingdisplay, seethe "SELECTTRUE BEARINGS" section.
The waypoint you're currentlyusing for navigation shows to the right
of the bearing display.
The cross track error (XTE) displaysat thebottom of the screen, right
abovethe waterdepth display. This is the samedistanceas shown at
the top of the screen by the C.D.I. display, only in digital numbers.
Whenthe UltraNav is first turned on, the cross track error displays in
nautical miles.
NAVIGATION SUMMARYSCREEN
This screen shows all navigation information to a waypoint in digital
numbers. To display this screen, press the MENU key twice while the
UltraNav is in the Loran mode. The screen shown belowappears.
Nowpress the key adjacent to the "NAy SUMMARY SCREEN". The
followingscreen appears.
These two positions (yourpresentposition and the one on the other
side of the baseline) are called the primary and alternatesolutions.
They're usually far apart, making it easy to tell if the loran is displaying
a positionfar from your actual location. However, if you'recloseto
the baseline, the differencebetweenthe alternate and primary solution
could be only a few miles, or less. For this reason alone, its always
importantto knowyour approximate position when initializing or using
a loran.
To switch from the primaryto the alternate solution, first press the
MENU key. Next, press the key adjacent to the "CHANGESETUP"
label. Now press thekey adjacent to the "MORE" label.
(Note: All featuresare in nautical
miles, degreesmagnetic, and knots
when the UltraNav is turned on for
the very first time.)
Distance To Go (DTG) shows at the
topof the screen. This is the distance to the last recalledwaypoint.
Cross Track Error (XTE) is the
second itemon this screen. Cross
track error is the distanceto the side
of your desired course.
OTO (NIl)
5.07
XTE(NM)L 1101
BRO(IIflG)
HOG (MflG)
0110 (1(N)
SOG (1(N)
327°
3220
16.4
16.6
TTG
00:18:32
OEPTH(FT) 87a9
50
55
PDF compression,
OCR, web-optimization with CVISION's
PdfCompressor
STEER INDICATOR DISPLAYand NAVIGATIONDISPLAY
The steer indicatordisplay shows steering,crosstrack error, distance
and bearingto a waypoint. A waypoint must be saved and recalled to
use this display.
The navigation display shows the same information as the steer
indicator display except it shows the present position at the top ot the
screen insteadof the steering indicator.
O
III.,,a0.0
3i.l.yI
0.1
i
S TEE R
—
DT0c (NM>
I
a*i
2
312°
0.02
65.8 FT
STEER INDICATOR SCREEN
_________
N
U
32° 14.06'
810 2426'
424
i1sZi1!
2
312°
.
65.8 FT
This menu appears. Finally, press
the key adjacentto the'SELECT
ALTERNATE SOLUTION"label. The
UltraNav returns to a loran screen
after this selection. If you're using a
screen with the latitude/longitude
displayed, the lat/long will flash until a
new positiondisplays. lithe unit
doesn't showthe proper latitude/
longitude position, you may have to
change stations,then try switching the
primary and alternate solutions.
The solutioncurrently in use by the
UltraNav is displayed at the top of the
position screen. See the "Position Screen"
sectionfor more information.
a
AEJUStASP,
F lJS ITI0Fl
DisPLAYED
III TO'S
_____________________
SELECT
ALTEF NATE
SOLIJTIOtI
tLEAi
Check.yourpositionagainst the loran after it displaysa new latitude/
longitude. They should be the same. If so, use the loran and navigate normally.
To switch back from the alternate to the primary solution, repeat the
above steps. The only difference is the menu label reads "SELECT
PRIMARYSOLUTION".
NAVIGATION SCREEN
The course deviationindicator (C.D.l.)is at the top of the steer
indicator screen. This shows the cross track error distancein nautical
miles you are to theside of your desired course. (The course is an
imaginaryline drawn between your starting locationand the destination.) For example, you are a tenth of a mile to the left of course lithe
C.D.I. arrow points to the 0.1 mark on the left side of the scale. A
message also appears STEER >", telling you which direction to steer
the boat to get back on course.
The C.D.I. range is 0.1 nautical mile when the UltraNav is turned on
for the first time. To set it to a differentdistance,use the CD]. alarm
adjust menu. The C.D.I. range and alarm are the same. For example, ii the C.D.I. range is one mile, then the C.D.I. alarm will sound
if you are off course one mile or more. See the ALARMS section for
informationon setting the C.D.I. alarm.
SHOW TD'S
The UltraNav shows either latitude/longitude or time differences(TD's)
on most screens. To switch between latitude/longitude and TD's, first
pressthe MENU key, then pressthe key adjacent to the "CHANGE
SETUP" label. Now press the MENU key once. The screen shown
above appears. In this example, the UltraNav is displaying the position in latitude/longitude. To change to TD's, pressthe key adjacent
to the "POSITION DISPLAYED IN TD'S" label. The UltraNav will
revertto the last loran screen and show the position in time differences. To switch the display again, simply repeatthe above steps.
The menu will now read "POSITION DISPLAYED IN LAT/LON".
Press the key adjacent to this menu to get latitude/longitude displays.
54 OCR, web-optimization with CVISION's PdfCompressor
PDF compression,
51
TRUE and MAGNETICPOSITION
POSITION DISPLAY
Most navigatorsrealize there is a difference between true and magnetic north. True north is thetop of the world. It's whereall lines of
longitude converge. Magnetic north is the location our compasses
point. It lies several hundred miles to the southof true north, at a
locationin Canada.
The positiondisplay shows your
present position,heading, speed over
ground, depth, and status displays.
135°
23a8
JJ UItJ
32° 14.06'
LI 81° 24.36'
2:D:....:(i.iF!i
4.24
Remember, do not use the loran fornavigation when the position
displayflashes. Find and correct the problem before navigating with
the unit.
H:TSF!G. .Tl,JPt#.
a
TPUE
BESRItTG
T
56.8
last used loran screen, showing all navigation information in degrees
true. Repeatthese steps to switch backto magnetic. The menu that
originally said "SELECTTRUE BEARING" now reads "SELECT
MAGNETICBEARING".
C..
24°33.37
IJi3i°4363
rix
The UltraNavcan display navigation information in magnetic ortrue.
When it's turned on for the very firsttime, magnetic is used. To
switch to true, press the MENU key, then pressthe key adjacent to
the "CHANGESETUP" label. Now pressthe key adjacentto the
"MORE" label twotimes. The menu shown below appears. In this
example, magnetic is in effect. Pressthe key adjacent to the "SELECT TRUE BEARING"label. The screen will clear and return to the
LNME
H
The GRI in use and the mode (autoIS 6000(8)
matic or manual)display at thetopof
the screen. Immediately beneath
these is the presentpositiondisplay.
It shows your presentpositionin either
latitude/longitude or TD's. To the left
of theword "POSITION" is the ASF
KN
indicator. It only shows when ASF's
E1EFTH
are in use. On the far right is the
primary/alternate solutiondisplay. If
the unit is in the primarymode, the letters "PAl" appear. "ALT"
appear if the unit is in the alternate mode. In this same areais the fix
quality indicator. Fix quality is a measure of the lines of position's
crossing angles. If the fix. quality is poor, usethe displayed information with caution. Thedisplayedposition can and will vary with poor
crossing angles. The position displayflashesthe last known position
when the fix quality is not usable. A number to the right of the fix
quality message showsthe fix quality's value, It's range is from zero
(0) to nine (9), with zero theworst and ninethe best.
Charts are usually laid out according to a Mercator projection which
uses truenorth. If you plot a course on a chart using the Mercator
projection,you'll either have to convert magnetic readings to true or
use true readings.
H
AUTO GRI :7980
RSF FtELrT I 'iN Pr
1
312°
.4*TFi.' <iqji
0.03
i
)..
65.8 FT
)•
TRUEBEARING
(TBRG)
I
Beneath the fix quality message is your heading, or direction the boat
is travelling. Speedover ground (SOG) shows your actual speed,
regardless of the speedometer reading. For example, if you're travelling at ten knots directlyagainst a two knot current, then your speed
over ground is eight knots. You will typicallyneed to travel some
distance in a straight line before the SOG feature "settles down" and
gives an accuratereading.
The last. display on this screen is the digital depth display.
52
PDF compression,
OCR, web-optimization with CVISION's PdfCompressor
53