1
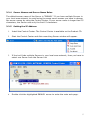
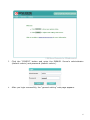
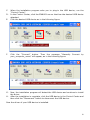
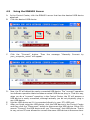
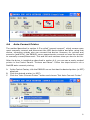
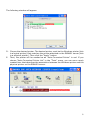
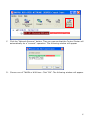
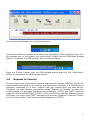
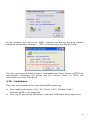
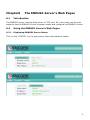
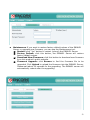
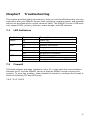
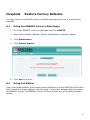
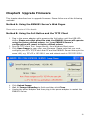
ENNUS1 USB-OVER-NETWORK SERVER User Manual 0 Table of Contents CHAPTER1 INTRODUCTION ..........................................................................................................2 CHAPTER2 PRODUCT OVERVIEW ...............................................................................................3 2.1 Package Contents ........................................................................................... 3 2.2 Product CD ..................................................................................................... 3 2.2.1 Start-up Procedures ........................................................................................ 3 2.3 Physical Description....................................................................................... 3 2.4 Supported USB Devices.................................................................................. 3 CHAPTER3 BASIC INSTALLATION ...............................................................................................4 3.1 Connecting the Hardware............................................................................... 4 3.2 Assigning an IP Address to the ENNUS1 Server ............................................ 4 3.2.1 Preliminary ..................................................................................................... 4 3.2.2 IP Address ....................................................................................................... 4 3.2.3 Methods for Setting the IP Address................................................................. 4 3.2.4 Server Names and Server Name Rules ........................................................... 5 3.2.5 Setting the IP Address ..................................................................................... 5 CHAPTER4 USING THE ENNUS1 SERVER...................................................................................8 4.1 Introduction .................................................................................................... 8 4.2 Connect & Disconnect.................................................................................... 8 4.3 Subnet Issue .................................................................................................... 8 4.4 Installation of USB Device Driver.................................................................. 9 4.5 Using the ENNUS1 Server............................................................................ 11 4.6 Auto-Connect Printer.................................................................................... 12 4.7 Network Scanner........................................................................................... 14 4.8 USB Storage.................................................................................................. 16 4.9 Request to Connect ....................................................................................... 17 4.10 Limitations .................................................................................................... 18 CHAPTER5 THE CONTROL CENTER .........................................................................................19 5.1 Installing Control Center.............................................................................. 19 5.2 Using the Control Center.............................................................................. 20 5.3 Quitting the Control Center.......................................................................... 20 CHAPTER6 THE ENNUS1 SERVER’S WEB PAGES ..................................................................21 6.1 Introduction .................................................................................................. 21 6.2 Using the ENNUS1 Server’s Web Pages....................................................... 21 6.2.1 Displaying ENNUS1 Server Status ............................................................... 21 6.2.2 Setting up ENNUS1 Server Configuration ................................................... 22 CHAPTER7 TROUBLESHOOTING ...............................................................................................25 7.1 LED Indicators ............................................................................................. 25 7.2 Firewall......................................................................................................... 25 CHAPTER8 RESTORE FACTORY DEFAULTS............................................................................26 8.1 Using the ENNUS1 Server’s Web Pages....................................................... 26 8.2 Using Init Button........................................................................................... 26 8.3 Default Parameters List................................................................................ 27 CHAPTER9 UPGRADE FIRMWARE .............................................................................................28 CHAPTER10 THE INIT BUTTON.....................................................................................................29 1 Chapter1 Introduction Thank you for purchasing Encore ENNUS1 USB-OVER-NETWORK SERVER (in the following referred to as “ENNUS1 Server”). ENNUS1 Server is designed to connect your AIO/MFPs (All-In-One/Multifunction Printer), printers, USB mass storages (hard drives, flash drives, and memory card readers), scanners, USB speakers, and USB 1.1 cameras to your network, allowing all network users to access these shared USB devices. This manual provides introductory information as well as detailed instructions on how to set up and manage ENNUS1 server in various network environments. To fully benefit from this document, you should be familiar with basic networking principles. Should you require any technical assistance, please contact your product reseller. Or you can visit our website at http://www.encore-usa.com for latest product information. This document is subject to changes without prior notice. 2 Chapter2 2.1 Product Overview Package Contents Verify that nothing is missing from the package by using the checking list below. Please contact your retailer if any item is missing or damaged. All packing materials are recyclable. Please confirm the items in the package below: The ENNUS1 USB-OVER-NETWORK SERVER Quick Installation Guide CD Power Adaptor 2.2 Product CD This CD provides easy-to-use Control Center software, User’s Manual and Quick Installation Guide. 2.2.1 Start-up Procedures If your computer is configured to auto start CDs, this CD will start automatically when inserted. You can also navigate to the CD and start the autorun.exe file from within the Windows file manager. 2.3 Physical Description 1. 2. 3. 4. 5. 2.4 Power Adaptor Connector: for DC 12V/1A power adaptor Init Button: for restoring the parameters to the default values Ethernet Connector: for twisted pair category 5 cable USB Host Port: USB 1.1/2.0 low, full, and Hi-Speed compliant Indicators Power Indicator is lit when powered on. If it is not lit, or if it blinks, there is a problem with the ENNUS1 Server or power adapter. Link Status is lit when network cable is plugged in. If it is not lit, it indicates that the ENNUS1 server is not connected to the network. Status Indicator blinks to indicate network activity. USB Indicator is lit while a USB device connects to the USB Port of ENNUS1 Server. If it is not lit, or if it blinks, there is a problem with the USB device or the ENNUS1 Server. Supported USB Devices The ENNUS1 server supports the following types of USB devices. z z z z z z USB Printer USB multifunction printer (MFP/AIO) USB scanner USB storage (such as USB external HD, and flash drive) USB speaker USB camera 3 Chapter3 3.1 Basic Installation Connecting the Hardware 1. Make sure that your USB devices are switched off and that the ENNUS1 Server’s power adapter is disconnected. 2. Connect the USB devices to the USB ports. 3. Connect the ENNUS1 Server to the network with a twisted-pair category 5 cable, 10baseT or 100baseTX. 4. Turn on the USB devices and make sure they are ready for use. 5. Connect the power adapter to the ENNUS1 Server. The power indicator will light up and the USB indicator will flash. When the Link indicator lights up, the ENNUS1 Server is correctly connected to the network. The USB indicator stops flashing when the ENNUS1 Server begins its normal operation. Please note that if you only connect USB devices to the ENNUS1 server and do not plug in any LAN cable, the USB LED will not turn on until the LAN cable is plugged in. 3.2 Assigning an IP Address to the ENNUS1 Server 3.2.1 Preliminary 3.2.2 If you have a DHCP server on your network, your ENNUS1 Server will receive an IP address automatically. The IP address will then appear in the Control Center or on the web page of configuration. If your DHCP server does not give an IP address to the ENNUS1 Server, the ENNUS1 Server will use the Factory IP address: 192.168.1.100. If you are not working in a DHCP network, you need to manually set the ENNUS1 Server’s IP address. IP Address Unless you are assigning an IP address using DHCP, you must obtain an unused IP address from your network administrator. 3.2.3 Methods for Setting the IP Address You can set the IP address of your ENNUS1 Server using one of the following methods, depending on your network operating environment: Automatic IP Address Assignment Manual IP Address Assignment 4 3.2.4 Server Names and Server Name Rules The default server name of the Server is “ENNUS1”. If you have multiple Servers in your local area network, to avoid using the same server names you have to change the server names by using the Control Center. If your server name is longer than 15 characters, the Server uses only the first 15 characters. 3.2.5 Setting the IP Address 1. Install the Control Center. The Control Center is available on the Product CD. 2. Start the Control Center and Auto-searching Server window will appear. 3. If the tool finds multiple Servers in your local area network, then you have to select one Server from the Server List. 4. Double click the highlighted ENNUS1 server to enter the main web page. 5 5. Click the “CONFIG” button and enter the ENNUS1 Server’s administrator (default: admin) and password (default: admin). 6. After you login successfully, the “general setting” web page appears. 6 7. Click the button corresponding to your choice of IP setting method (static or dynamic using DHCP). When assigning a static IP address you also have to define Subnet Mask and Default Gateway. If you choose Automatically get IP by DHCP, you can use desired DNS by clicking the Manual DNS button and manually assigning a DNS. 8. Click Submit to save your settings. And the ENNUS1 Server will reboot. 9. You have now finished configuring the IP address. 7 Chapter4 4.1 Using the ENNUS1 Server Introduction The goal of this product is to provide connectivity to USB devices from a single server. A new technology, “NetUSB”, has been developed to achieve this goal. “NetUSB” is a “USB over IP” technology that transparently redirects all USB packets to a TCP/IP network channel. “NetUSB” allows you to use remote USB devices as if they are connected directly to your PC. 4.2 Connect & Disconnect “NetUSB” allows you to use remote USB devices as if they are connected directly to your PC. The “connect” operation is a software operation that simulates an actual USB device plug-in. That is to say, when you do a “connect” operation in the Control Center, PC can then detect a USB device’s plug-in, although actually you do not plug in any USB device. Similarly, the “disconnect” operation is a software operation that simulates the disconnection of the USB device. Once the connect operation is successful, the operations to use that USB device are just the same as if the USB device is directly connected to the PC. If a USB device is “connected” by a PC, we say that PC has the ownership of the USB device. Only one PC can get the ownership of a USB device at the same time. Therefore, if a USB device is connected by one PC, no other PC can connect this USB device until this USB device is disconnected. 4.3 Subnet Issue Before using the NetUSB technology, you must first make sure that your PC can access ENNUS1 server via TCP/IP. The simplest way to do this is using “Control Center” to search for ENNUS1 server on the network and change its IP address to be the same subnet as your PC. If the ENNUS1 server and your PC are not in the same TCP/IP subnet, Control Center will show the ENNUS1 server in green, as in the following figure. 1. 8 You must change the IP address (or using DHCP) of the ENNUS1 server so that the ENNUS1 server and your PC are in the same subnet. To do this, please double-click on the ENNUS1 server, and the following window will appear. Change the IP setting to make ENNUS1 server and your PC within the same subnet. After automatic reboot, Control Center will show the ENNUS1 server in blue, meaning you can access these servers by the NetUSB technology. 192.168.1.100 1 4.4 Installation of USB Device Driver Some USB devices, like printers or MFPs (multifunction printers), require installing vendor-supplied driver (usually on vendor’s CDROM). For those USB devices that do not require drivers, please skip this section. A. B. Insert vendor’s CDROM into the CD drive and run the “autorun” program. Follow the instructions of the installation program to install driver. 9 C. D. E. When the installation program asks you to plug-in the USB device, run the “Control Center”. In the Control Center, click the ENNUS1 server that has the desired USB device attached. Click the desired USB device as in the following figure. F. Click the “Connect” button. Then the message “Manually Connect by your_computer_name” will appear, as in the following figure. G. Now, the installation program will detect the USB device and continue to install the driver. After the installation is complete, click the USB device in the Control Center and then click the “Disconnect” button to disconnect the USB device. H. Now the driver of your USB device is installed. 10 4.5 Using the ENNUS1 Server A. In the Control Center, click the ENNUS1 server that has the desired USB device attached. B. Click the desired USB device. C. Click the “Connect” button. Then the message “Manually Connect by your_computer_name” will appear. D. Now, the PC will detect the newly connected USB device. The “connect” operation is a software operation that simulates an actual USB device plug-in. That is to say, when you do a “connect” operation in the Control Center, the PC will assume a USB device is newly connected, although actually you do not physically plug in any USB device. Use the USB device as if it is connected directly to your PC’s USB port. After you finish using the USB device, click the USB device in the Control Center and then click the “Disconnect” button to disconnect the USB device. Other PCs cannot “Connect” the USB device until you “Disconnect” that USB device. That is to say, no two PCs are allowed to connect the same USB device at the same time. E. F. 11 4.6 Auto-Connect Printer The method described in section 4.5 is called “manual connect”, which means users must manually connect and disconnect the USB device before and after using that device, otherwise nobody else can connect that device. However, for printers and scanners (and MFPs), the ENNUS1 server supports auto-connect so users do not need to manually connect/disconnect. This and the next sections show you how to do this. After the driver is installed as described in section 4.4, you can see a newly created printer in the Control Panel’s “Printers and Faxes”. Follow the steps below to do a NetUSB auto-connect printing. A. In the Control Center, click the ENNUS1 server that has the desired printer (or MFP) attached. B. Click the desired printer (or MFP). C. Click the “Auto Connect Printer” button and choose “Set Auto-Connect Printer”. 12 The following window will appear. D. Choose the desired printer. The desired printer must be the Windows printer (this is a logical printer) that matches the printer attached on the ENNUS1 server (this is a physical printer). Then click the “Apply” button. E. Then, the printer will be marked as an “Auto-Connected Printer” in red. If you choose “Auto-Connected Printer List” in the “Tools” menu, you can see a newly created item that describes the association between the Windows printer and the physical printer on the ENNUS1 server. 13 F. Try to issue a print job to the desired printer. The Control Center will automatically do a connect operation. The print job will be issued to that printer. G. Even if you have properly setup an auto-connected printer, the Control Center must be running (in the background) while a print job is issued. This means you have to open the Control Center every time you start Windows. In order to skip this manual operation, you can make the Control Center open automatically after you login to Windows. Choose the “Configuration” item in the “Tools” menu. The following window will appear. Click on the check box and then on the “OK” button. This feature is enabled by default. If you would like to break the association between the Windows printer and the physical printer, just click on the association and click the “Delete” button in the “Auto-Connected Printer List”. 4.7 Network Scanner For NetUSB scanning, we recommend you use Network Scanner as the following steps. A. In the Control Center, click the ENNUS1 server that has the desired MFP (or scanner) attached. B. Click the desired MFP (or scanner). 14 C. Click the “Network Scanner” button. Then you can see that the Control Center will automatically do a “connect” operation. The following window will appear. D. Choose one of TWAIN or WIA item. Click “OK”. The following window will appear. 15 E. F. Follow the usual steps to do scanning. After the scanning, close the “Auto-Connect Scanner” window. At this moment, Control Center will automatically do a disconnect. 4.8 USB Storage When you connect a USB storage, as in the following picture, a new disk will appear on your PC. If the USB storage is a flash drive, the new disk will be called a “removable disk”. 16 You can see the storage icon in the system tray. Use the new disk as a regular disk. When you are ready to disconnect the disk, click the storage icon in the system tray and choose “Safely remove USB Mass Storage Device” to remove the USB storage, as the following figure. Open the Control Center, click the USB storage device and click the “Disconnect” button to disconnect the USB storage device. 4.9 Request to Connect If users always use auto-connect printer and network scanner, ENNUS1 server will automatically and properly do connect and disconnect. However, if a USB device is manually connected by a user, nobody else can connect and use that device. Therefore, we offer another mechanism called “Request to Connect” to solve this inconvenience. For example, there are two computers – TEST1 and TEST2. Now the owner of “HP Photosmart 2600” is TEST1. Then, the TEST2 computer wants to use this HP printer. The user on the TEST2 computer can click the “Request to Connect” button in the Control Center. The following window appears on TEST2. 17 At this moment, the user on the TEST1 computer will see the following window, indicating that another computer – TEST2 is requesting to use the HP printer. The user can choose to accept or reject. If accepted, the Control Center on TEST1 will automatically disconnect the device and the Control Center on TEST2 will automatically connect that device. 4.10 Limitations There are some limitations for using the NetUSB technology. A. Only supports Windows® 2000 / XP / Server 2003 / Windows Vista™. Windows 98/ME is not supported. B. Only one PC can get the ownership of the same USB device at the same time. 18 Chapter5 The Control Center This chapter describes how to use the Control Center. 5.1 Installing Control Center 1. Insert the included CD into the personal computer. The Autorun screen as in the following should appear. 2. Click Install Application button. 3. Click Next to continue through each installation step. 4. Click Finish. 19 5.2 Using the Control Center You can use the following tools to help you use the ENNUS1 server: Configure Server: go to the server’s web pages to configure the highlighted ENNUS1 server. Auto-Connect Printer: set auto-connect printer. Please refer to section 4.6 for details. Connect: connect a highlighted USB device. Disconnect: disconnect a highlighted USB device. Request to Connect: used to notify the owner of a USB device that you need the USB device. Please refer to section 4.9 for details. Network Scanner: actually this is auto-connect scanner. Please refer to section 4.7 for details. Note: You can also double-click on the highlighted ENNUS1 server to get the “Configure Server” function. 5.3 Quitting the Control Center The Control Center does not actually quit if you click the “X” box (close box) at the top right corner of the window. Instead, it just minimizes itself to the system tray. There are two ways to quit the Control Center. The first way is choosing “Exit” item in the “File” menu in the Control Center. The second way is right-clicking the icon of the Control Center in the system tray and choosing the “Exit” item. 20 Chapter6 6.1 The ENNUS1 Server’s Web Pages Introduction The ENNUS1 server runs the http server on TCP port: 80. Users may use the web pages to see the ENNUS1 Server’s system status and configure the ENNUS1 Server. 6.2 Using the ENNUS1 Server’s Web Pages 6.2.1 Displaying ENNUS1 Server Status Click on the “STATUS” icon to see system status and network status. 21 6.2.2 Setting up ENNUS1 Server Configuration To set up the ENNUS1 Server configuration, click on the “CONFIG” icon and then the system will request user to enter administrator (default: admin) and password (default: admin) to login. General Configuration Server Information: You have to set the Server Name, which is the name to represent the ENNUS1 Server. TCP/IP: You have to set the ENNUS1 Server’s TCP/IP configuration to connect TCP/IP network. Please see Chapter 3 Basic Installation for more details. Administrator: You can change administrator name and password. If you forget administrator name and password, you must perform Restore Factory Default action by plugging in the power adaptor while pressing the Init button. Please refer to the chapter “Restore Factory Defaults”. 5 5 5 Administrator: enter your desired administrator name. New Password: enter your desired password. Re-type Password: re-confirm the password. 22 Maintenance If you want to restore factory default values of the ENNUS1 Server or upgrade new firmware, you can use the Maintenance tool. 5 Restart: click “Yes” button to restart (reboot) the ENNUS1 Server. 5 Factory Default: click this button, the ENNUS1 Server will restore factory default values. 5 Download New Firmware: click this button to download new firmware from this product’s public website. 5 Firmware Upgrade: click Browse to find the firmware file to be upgraded. Click Upload to upload the firmware into the ENNUS1 Server. Please wait about 30 seconds for the upgrading. The ENNUS1 server will automatically reboot after the upgrading. 23 24 Chapter7 Troubleshooting This chapter provides useful information to help you resolve difficulties that you may experience with your ENNUS1 Server. Fault symptoms, possible causes, and remedial actions are provided within a quick reference table. This ENNUS1 Server’s USB ports only support MFPs, printers, scanners, mass storage, and USB cameras. 7.1 LED Indicators Indicators Power Behavior On Off Description Power On Power off/System error Link On Off Network connected No physical connection to network Status Blinking Activity on network Off On Blinking Off No activity on network USB device connected Connected USB device error No physical connection to USB device USB 7.2 Firewall If firewall software has been installed on your PC, it may block the communication between the PC and the ENNUS1 server so that the ENNUS1 server cannot work properly. To solve this problem, either disable the firewall or configure the firewall to allow the following TCP and UDP ports: 7305, 7413, 20005 25 Chapter8 Restore Factory Defaults You may restore the ENNUS1 Server’s default parameters by one of the following methods. 8.1 8.2 Using the ENNUS1 Server’s Web Pages 1. Go to the ENNUS1 Server’s web page and click CONFIG 2. Enter administrator (default: admin) and password (default: admin). 3. Click Maintenance. 4. Click Factory Default. 5. Click Yes to confirm Using Init Button Plug in the power adaptor while pressing the Init button until the USB LED blinks. After that, unplug the power adaptor and then plug in the power adapter again to restart the ENNUS1 server. The ENNUS1 server will now operate using the factory default values. 26 8.3 Default Parameters List Server Information z Server Name: ENNUS1 TCP/IP z Automatically get IP by DHCP: Enabled - Manual DNS: None (Disabled). z Static IP: Disabled - IP Address: 192.168.1.100 - Subnet Mask: 255.255.255.0 - Default Gateway: none - DNS Server: none User Accounts z Administrator: admin z Password: admin 27 Chapter9 Upgrade Firmware This chapter describes how to upgrade firmware. Please follow one of the following methods: Method A: Using the ENNUS1 Server’s Web Pages Please refer to section 6.2.2 for details. Method B: Using the Init Button and the TFTP Client 1. Plug in the power adaptor while pressing the Init button until the USB LED blinks. Please note that after this step, the ENNUS1 Server will operate using the factory default values, i.e., your ENNUS1 Server’s configuration will revert to factory default values. 2. Run the TFTP client Tool: Image Burner, from Windows Start menu. 3. Click Open Image to open your new firmware. Please note that you must configure your PC’s TCP/IP such that PC and the ENNUS1 Server belong to the same LAN, e.g. PC’s IP is 192.168.1.xxx and subnet mask is 255.255.255.0. 4. Click Upload Image. 5. Wait for Image Uploading to finish and then click Close. 6. Unplug the power adapter and then plug in the power adapter to restart the ENNUS1 Server. 28 Chapter10 The Init Button The Init button is used for maintenance: Simultaneously press Init button and turn on (by plugging in the power adaptor) the ENNUS1 Server until the USB LED blinks. The ENNUS1 Server will now do the following tasks: A. Perform a factory reset of the ENNUS1 server, which restores most of the parameters and settings to factory default values. B. Perform a TFTP server. You can upgrade new firmware using any TFTP client tool. Note: After performing the tasks mentioned above, you have to unplug the power adaptor and then plug in the power adaptor to restart the ENNUS1 Server. Version 1.0 Copyright © 2008 Encore Electronics, Inc. 29